Signs & Causes of a Clogged Bathtub Drain
A clogged bathtub drain is typically caused by a buildup of hair, soap scum, and mineral deposits trapped within the P-trap or main pipe. When water begins to pool around your ankles during a shower or drains at a sluggish pace, your plumbing system is signaling an active blockage that requires immediate attention.
Signs Your Bathtub Drain Is Clogged
Recognizing the early warning signs of a clogged tub drain prevents minor flow restrictions from turning into complete plumbing backups. Paying attention to how your fixtures behave can save you from costly emergency repairs.
- Slow Draining Water: If your bath tub is clogged, water pools around your feet while showering and takes several minutes to empty after you turn off the faucet.
- Gurgling Sounds: Air trapped in the pipes by a partial blockage creates bubbling noises as water attempts to force its way past the obstruction.
- Unpleasant Odors: Decaying hair, trapped soap scum, and mildew decomposing inside the pipe emit foul, musty smells near the drain opening.
- Standing Water Backflow: In severe cases, dirty water from the main line pushes back up through the drain or nearby fixtures when other appliances are used.
Common Causes of Bathtub Blockages
Understanding what causes a clogged bathtub helps you target the root of the issue rather than just treating surface-level symptoms. Most blockages accumulate gradually over months of daily use.
- Hair Accumulation: Shed hair combines with body oils to form dense, fibrous webs that cling to cross-bars and pipe walls inside the drain.
- Soap Scum Residue: Traditional bar soaps contain fats and minerals that react with hard water, leaving behind a sticky film that narrows pipe interiors.
- Mineral Buildup: Hard water deposits scale along the interior of older metal pipes, creating rough surfaces where debris easily snags.
- Foreign Objects: Small bath toys, shampoo bottle caps, and discarded razors accidentally slip past the stopper and wedge tightly into the P-trap.
Before You Start Identify Your Drain Stopper Type
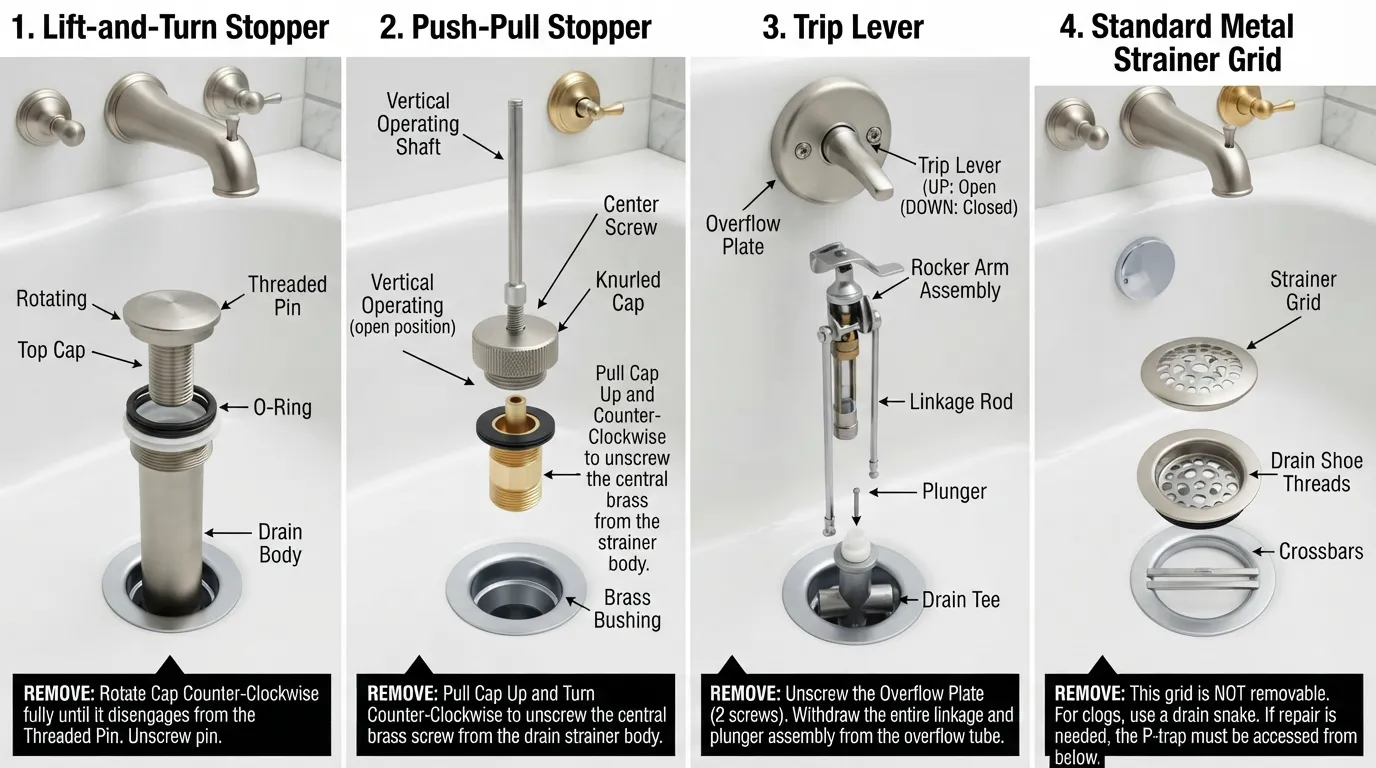
Identifying your specific bathtub drain stopper type is essential before attempting any unblocking method. Removing or disengaging the wrong mechanism can damage the fixture or prevent you from accessing the pipe interior for proper cleaning.
Lift-and-Turn Stopper
Lift-and-turn stoppers operate by rotating the knob counter-clockwise to open the drain and clockwise to close it. These mechanisms often feature a small set screw underneath the top cap that secures the assembly to the central post.
- Identification: The cap spins freely in circles and lifts upward manually to let water pass.
- Mechanism: Relies on a threaded post or pin holding the cap tightly to the crossbar.
Push-Pull Stopper
Push-pull stoppers are controlled by pressing down on the knob to seal the drain and pulling up to open it. They look very similar to lift-and-turn models but do not require any twisting motion to operate.
- Identification: The stopper moves strictly on a vertical axis when pushed or pulled.
- Mechanism: A small brass or steel screw inside the shaft fastens the top piece to the inner crossbar.
Trip Lever Toe Touch Stopper
Toe-touch stoppers lock into place with a gentle tap of the foot and pop back up when pressed a second time. Alternatively, trip lever systems use a faceplate mechanism located on the vertical wall of the tub rather than inside the drain itself.
- Identification: A spring-loaded plunger sits directly inside the drain or is controlled via an overflow plate lever.
- Mechanism: Internal springs maintain tension to keep the drain open or closed dynamically.
Screen Strainer Stopper
Strainer stoppers are static mesh or slotted covers designed to catch debris before it enters the plumbing lines. They are typically found in modern walk-in showers or custom bathtubs with integrated filtration grates.
- Identification: A fixed grid or perforated metal plate covers the entire opening of the drain.
- Mechanism: Screws directly into the tub shoe or snaps firmly into a rubber gasket seal.
How to Remove Each Type
Safely dislodging your drain stopper ensures you can clear trapped hair and buildup without causing structural damage to your fixture.
- Lift-and-Turn: Hold the knob in the open position, locate the tiny set screw on the side of the cylinder, loosen it with a hex wrench, and pull straight up.
- Push-Pull: Unscrew the top knob counter-clockwise while holding the body steady, then remove the exposed inner screw with a screwdriver.
- Toe-Touch: Twist the entire outer cap counter-clockwise by hand until it unscrews completely from the threaded mounting post.
- Trip Lever & Strainer: Unscrew the faceplate screws on the overflow drain and pull out the rocker arm assembly, or unfasten the center retaining screw on strainer grates.
Dealing With Standing Water? Do This First
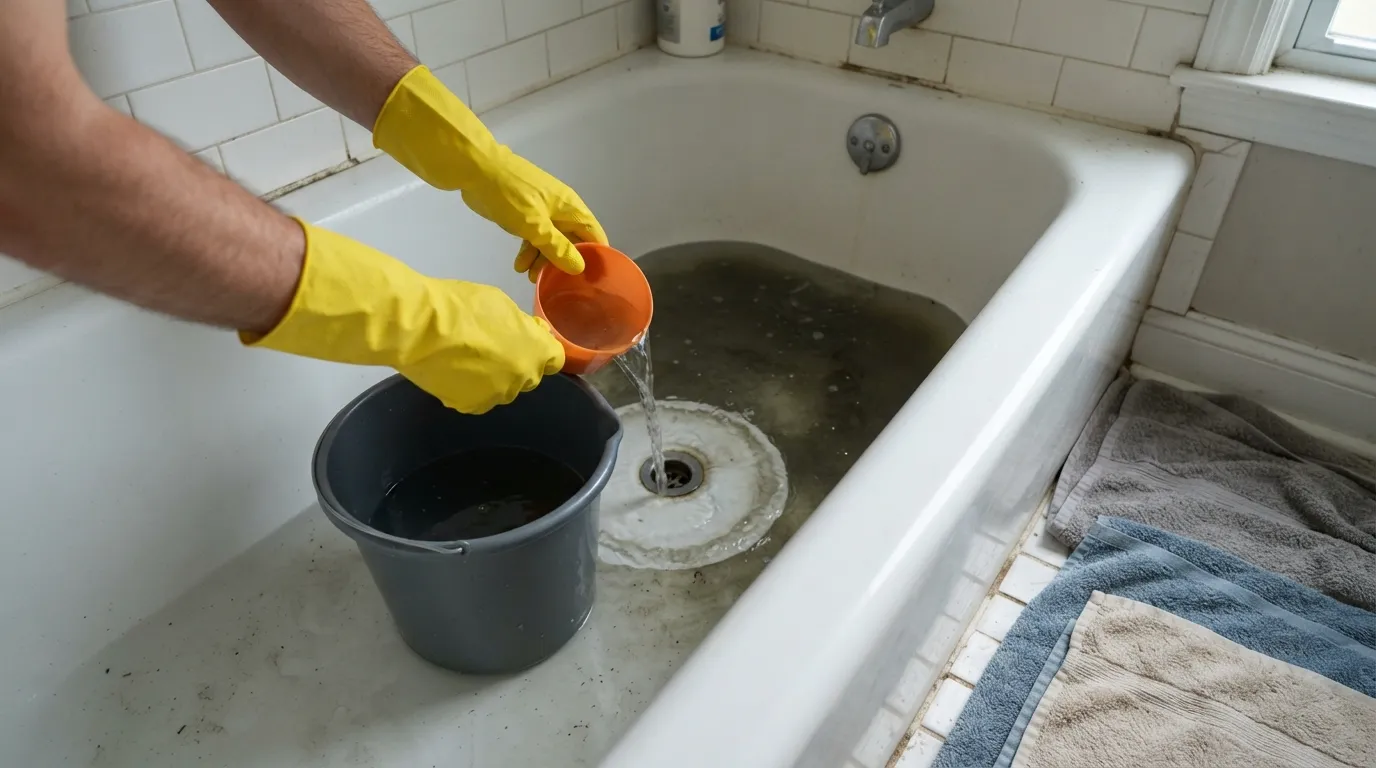
Bailing out accumulated standing water before applying physical clearing methods or chemical treatments ensures maximum product efficiency and prevents messy overflows. If your tub water won’t go down entirely, addressing the surface pool is the mandatory first step.
How to Safely Remove Standing Water Before Unclogging
Removing stagnant water restores visibility around the drain opening and keeps cleaning agents from getting overly diluted. Taking a few moments to scoop out the excess liquid makes the subsequent unclogging process much cleaner and more effective.
- Scoop and Pour: Use a handheld cup or small container to scoop the water out of the basin and dump it directly into a nearby bucket or toilet bowl.
- Soak Up the Remnants: Use old towels or a wet-dry vacuum to absorb the final shallow layer of water left at the bottom of the sloped tub surface.
- Keep the Area Dry: Wipe down the immediate perimeter of the drain flange so your tools maintain a solid grip without slipping on wet porcelain.
Tools You’ll Need
Gathering basic household items before you start prevents interruptions while dealing with a water-filled tub. Having these supplies nearby keeps the workflow fast and sanitary.
- Plastic Cup or Scoop: A disposable plastic cup or small kitchen container works best for fast, high-volume bailing.
- Small Bucket: A lightweight bucket collects the dirty wastewater for easy disposal outside the bathroom or into a sink.
- Old Towels: Placed around the base of the tub, old towels catch accidental splashes and keep your bathroom floor dry.
- Rubber Gloves: Protects your hands from stagnant wastewater, bacteria, and harsh residues trapped inside the drain opening.
Method 1 Fish Out the Hair Manual Removal
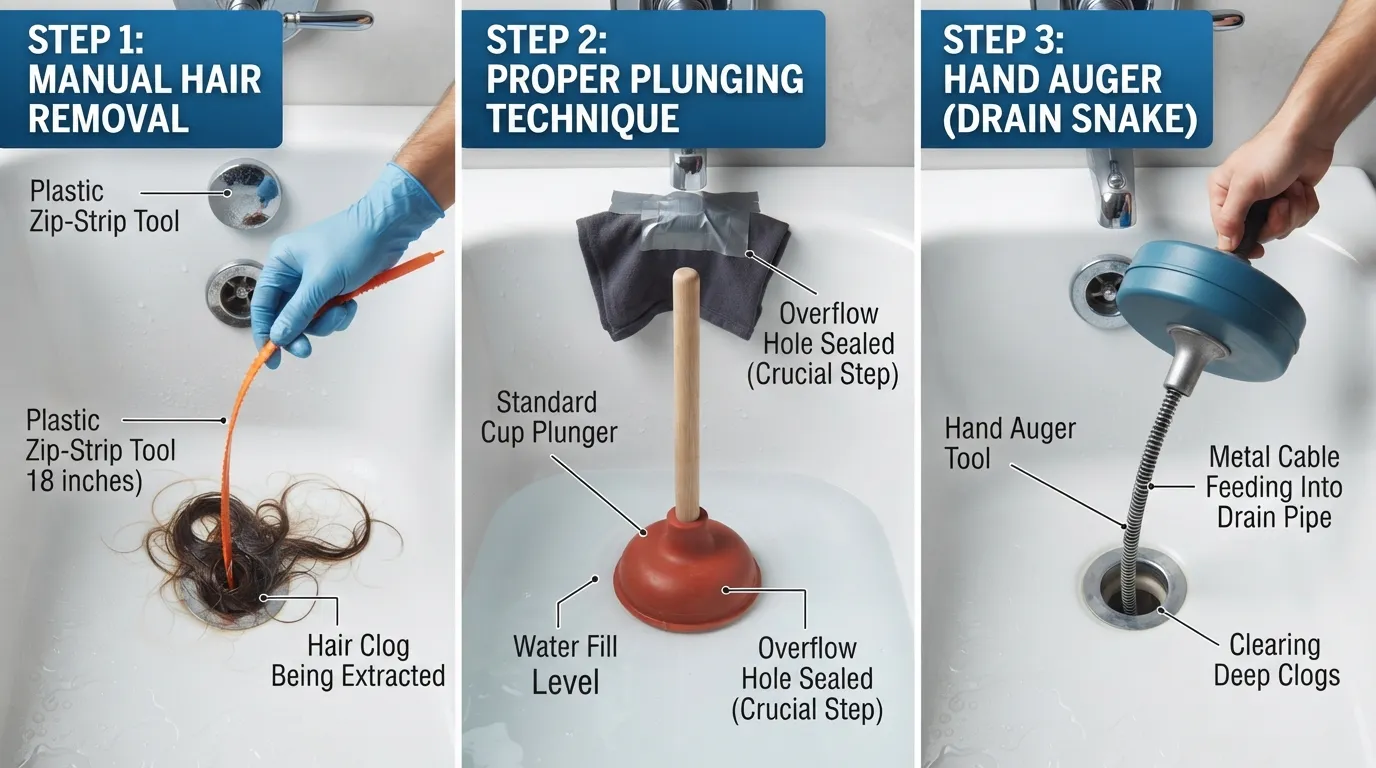
Manual hair removal is the most effective first-line remedy for a clogged bathtub drain because hair makes up over 90 percent of bathroom blockages. Fishing out the mass directly eliminates the core obstruction without exposing your pipes to harsh chemical wear.
Tools to Use
Having the correct physical extraction tools allows you to reach past the crossbars and hook deep-seated clumps of hair effortlessly.
- Zip-Strip Hair Tool: A flexible plastic wand featuring tiny backward-facing barbs that latch onto hair and drag it out cleanly.
- Bent Wire Hanger: An improvised metal hook fashioned from an old coat hanger works wonders for snagging stubborn residue deep down.
- Needle-Nose Pliers: Helpful for gripping dense clumps near the surface and pulling them free once they are loosened.
- flashlight to peer directly down the throat of the drain opening and locate the mass.
How to Pull Hair Out of the Drain
Following a systematic manual extraction approach ensures you clear the entire obstruction without pushing the tangled mass further down into the pipe trap.
- Step 1: Remove or open your drain stopper completely to gain unobstructed access to the main waste pipe opening.
- Step 2: Insert your zip-strip or bent wire tool gently into the drain hole, pushing it downward until you feel resistance or hit the P-trap bend.
- Step 3: Twist and wiggle the tool slightly to catch the surrounding hair, then pull upward slowly and steadily to draw the slimy mass out.
- Step 4: Dispose of the extracted hair into a trash bag immediately, wipe down your tool, and repeat the insertion process until no more debris comes up.
- Step 5: Run warm water down the drain for a couple of minutes to flush out any remaining loose particles and verify proper flow restoration.
Method 2 How to Plunge a Bathtub Drain Step by Step
Plunging a bathtub drain creates powerful air and water pressure pulses that break up stubborn clogs stuck deep within the waste line. Using a standard cup plunger correctly clears blockages that manual pulling tools cannot reach.
Step 1 — Cover the Overflow Hole
Sealing the bathtub overflow hole is the most crucial step in the entire process because open vents allow air pressure to escape. Without this seal, the plunging force dissipates harmlessly instead of targeting the clog.
- Seal the Opening: Press a wet washcloth or a heavy plastic sheet firmly over the overflow plate opening located near the top of the tub wall.
- Maintain Air Pressure: Hold or tape the cloth tightly in place so that air and water are forced exclusively through the bottom drain pipe.
Step 2 — Position the Plunger Correctly
Placing your flat-bottomed cup plunger directly over the drain opening ensures a tight suction seal required for effective pressure transfer. Avoid using flange toilet plungers, as their narrow inner flaps hinder proper sealing on flat tub surfaces.
- Add Water Seal: Pour a small amount of water into the tub basin until the rubber cup of the plunger is completely submerged.
- Center the Rubber Cup: Align the rim of the cup evenly over the drain hole to prevent air leaks during your push-and-pull strokes.
Step 3 — Pump Technique
Executing a rhythmic, forceful pumping motion generates the hydraulic shock needed to dislodge greasy or hair-packed blockages. Consistency matters far more than raw muscle strength.
- Perform Firm Strokes: Push downward smoothly and pull up sharply 10 to 15 times in succession without breaking the water seal.
- Maintain Suction: Keep the rubber lip pressed closely against the porcelain floor throughout the entire cycle to maximize pressure buildup.
How Do You Know It Worked?
Recognizing the immediate indicators of a cleared line lets you know when to stop plunging and clean up your workspace.
- Rapid Drainage: Standing water drops instantly down the pipe with a noticeable sucking sound once the air block breaks free.
- Clear Flow Test: Running hot water through the faucet reveals a steady, fast-spinning vortex with no pooling around the drain.
No Plunger? Try These Alternatives
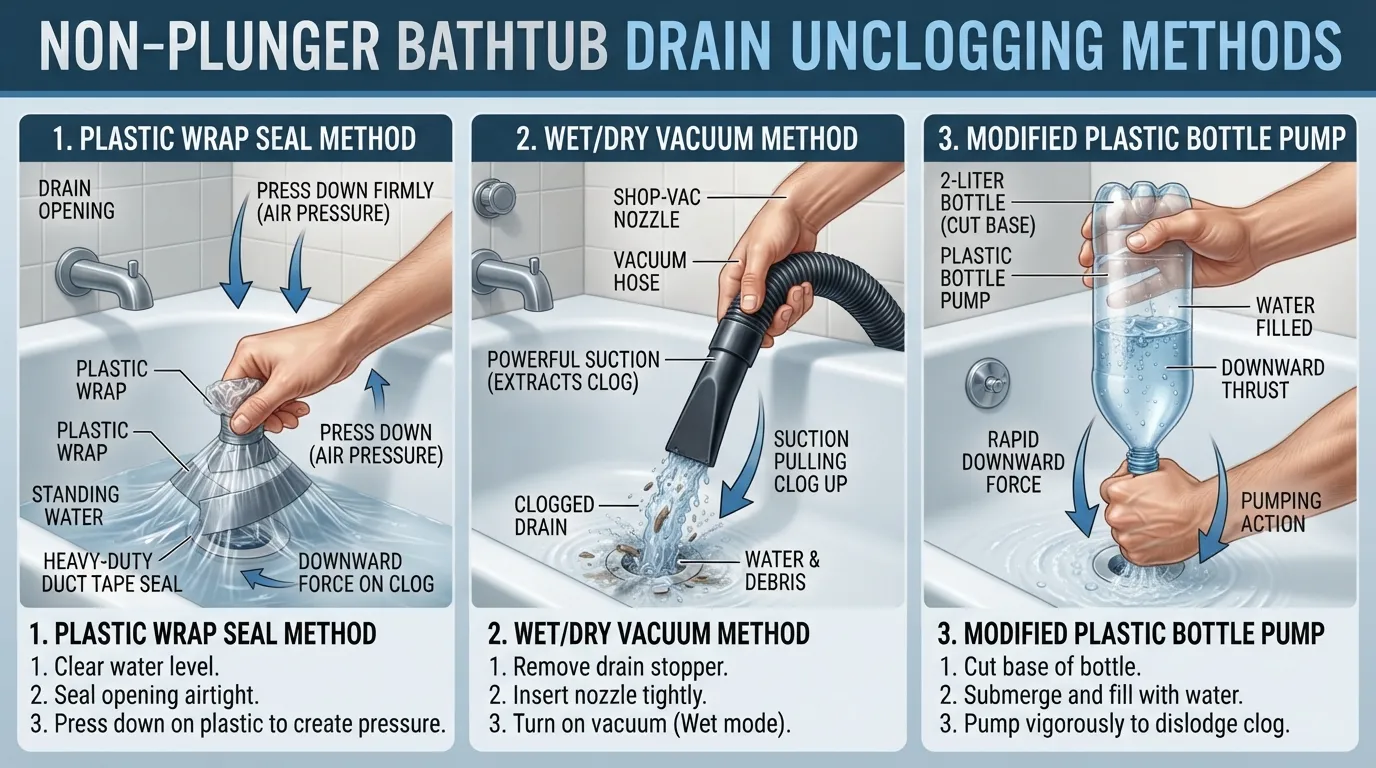
Unclogging a bathtub drain without a standard plunger is entirely possible using everyday household items that create alternative air compression seals. These clever DIY hacks generate pneumatic pressure to force stubborn blockages through the waste line.
Plastic Wrap + Push Method
Sealing the top of the tub opening with heavy-duty plastic wrap traps air inside the drain system, turning your hands into an improvised pneumatic pump. Pushing down on the flexible plastic creates an air pressure wave that blasts away minor blockages.
- Seal the Perimeter: Wipe the rim of the drain dry and wrap layers of tight plastic wrap or heavy trash bags across the entire opening, securing the edges with strong duct tape.
- Press and Release: Place your hands flat on top of the plastic sheet and push downward firmly in a rapid pumping motion to force air down the pipe.
Wet Dry Vacuum Method
A shop vacuum provides immense suction power capable of pulling stubborn clogs up and out of the drain trap instantly. This method works exceptionally well for thick hairballs and sludge.
- Prep the Vacuum: Switch your shop vac to the wet extraction setting and remove any paper filters to protect the motor from liquid damage.
- Create a Tight Seal: Place the flexible vacuum hose directly over the drain opening, using a wet rag around the nozzle to block any escaping air gaps.
- Power On: Turn the vacuum to high suction for 10 to 15 seconds to pull the obstructive debris straight up into the collection canister.
Improvised Suction Trick
Large plastic bottles or specialized rubber funnels can be modified to act as miniature pneumatic plungers for smaller sink and tub outlets. The flexible walls of the container rebound quickly to generate consistent pressure pulses.
- Select a Container: Use a clean 2-liter plastic soda bottle with the bottom cut off or a large rubber funnel that fits snugly over the drain opening.
- Pump the Vessel: Fill the container partially with water, place the opening over the drain, and squeeze the walls rapidly to force liquid jets downward into the clog.
Method 3 How to Snake a Bathtub Drain
Snaking a bathtub drain physically hooks and breaks apart tough blockages located far past the P-trap where plungers cannot reach. Using a hand auger is the ultimate mechanical solution for stubborn, recurring clogs.
What Is a Drain Snake Hand Auger?
A drain snake, or hand auger, consists of a flexible coiled metal cable housed inside a drum with a hand crank. The pointed tip navigates complex pipe bends to bore directly through dense mineral and hair obstructions.
- Flexible Steel Cable: Provides enough rigidity to push through pipe elbows while remaining pliable enough to bend with the plumbing layout.
- Thumb Screw Lock: Secures the cable length in place so you can crank and twist the auger without the line slipping back into the drum.
Entry Point Option 1 — Through the Drain Opening
Feeding the snake directly through the floor drain opening is ideal for clogs sitting right at the P-trap bend. However, crossbars inside older drains can sometimes make this entry point tricky to navigate.
- Remove the Stopper: Take out all internal stopper mechanisms to expose the straight vertical drop into the waste line.
- Feed Carefully: Push the cable tip into the hole gently until you encounter the first bend or resistance point.
Entry Point Option 2 — Through the Overflow Pipe
Entering through the overflow plate opening is often the most effective route because it bypasses the restrictive drain crossbars entirely. This path drops the cable straight down toward the sanitary tee and main trap.
- Unscrew the Faceplate: Remove the overflow cover and pull out any attached linkage or trip lever arms.
- Guide the Cable Down: Insert the snake tip downward into the open pipe, allowing gravity and gentle rotation to lead it past the tee junction.
Step-by-Step Snaking Technique
Executing a controlled rotational technique prevents the steel cable from kinking or scratching the interior walls of your bathtub piping.
- Step 1: Pull out 1 to 2 feet of cable from the auger drum and tighten the thumbscrew lock to secure it.
- Step 2: Feed the tip into your chosen entry point until you feel the cable catch against the obstruction.
- Step 3: Loosen the thumbscrew, feed another foot of cable, re-tighten, and turn the crank handle clockwise while pushing forward gently.
- Step 4: Once you feel the cable bite into the clog, continue turning and slowly pull the line backward to extract the tangled mass.
- Step 5: Clean the debris off the cable, repeat until the wire passes smoothly through the line, and flush with hot water.
Bathtub Not Draining After Snaking? What to Check Next
If your bathtub is still not draining after a thorough snaking session, the underlying issue likely extends beyond a basic local clog. Identifying advanced plumbing failures prevents wasted effort.
- Main Vent Stack Blockage: Leaves, nests, or debris trapped in your roof vent stack can slow down drainage across multiple home fixtures simultaneously.
- Deep Main Sewer Line Clogs: Tree roots invading underground sewer lines or heavy grease buildup in the main lateral require professional hydro-jetting.
Plunger vs Drain Snake Which One Should You Use?
Choosing between a plunger and a drain snake depends entirely on the depth, composition, and stubbornness of the blockage inside your plumbing lines. Matching the right tool to your specific clog saves time and prevents unnecessary damage to your fixtures.
When Plunging Is Enough
Plunging is the ideal first-response solution for surface-level clogs caused by loose hair and soft organic soap scum. This hydraulic approach clears blockages sitting right below the drain opening without requiring disassembly.
- Shallow Blockages: Effective when the obstruction is trapped within the immediate P-trap or just beneath the drain flange.
- Soft Debris: Easily breaks apart fluffy hairballs and loose soap buildup that have not yet hardened against pipe walls.
When You Need a Snake Instead
A drain snake becomes necessary when standard plunging fails or when water refuses to budge despite repeated pressure attempts. This mechanical tool tackles severe issues that physical water pressure cannot displace.
- Deep Pipeline Obstructions: Reaches clogs embedded far down the waste line past the reach of air compression.
- Hardened Mineral Scale: Bored through thick mineral deposits and foreign objects wedged tightly in pipe bends.
Comparison Table
Home Remedies for a Clogged Tub Natural Methods & Safety Warnings
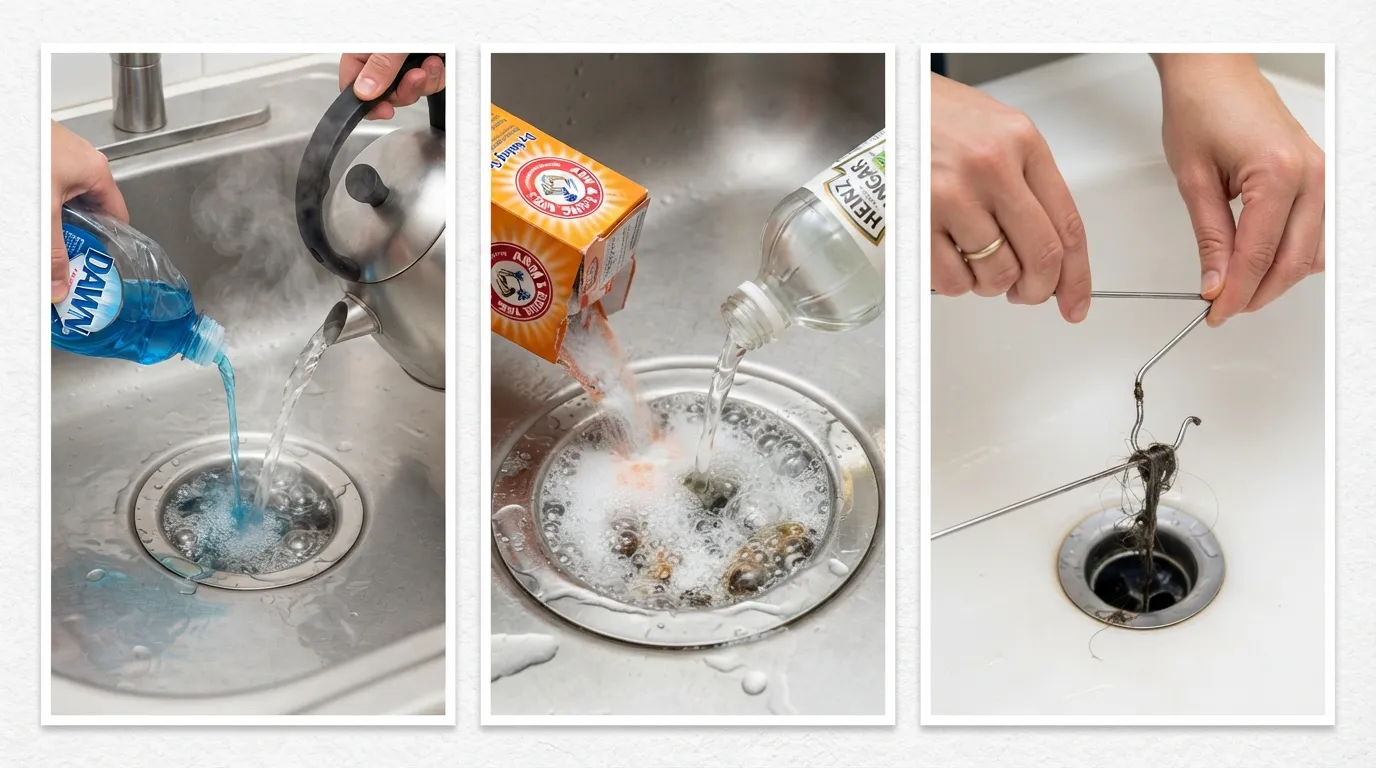
Natural home remedies offer a safe, eco-friendly way to dissolve organic sludge and grease buildup without subjecting your plumbing lines to aggressive commercial acids. Utilizing common household ingredients effectively breaks down minor restrictions while protecting your pipes.
Baking Soda + Vinegar Method
Combining baking soda and vinegar creates a fizzing chemical reaction that loosens organic waste and neutralizes foul drain odors naturally.
- Step 1: Pour one cup of dry baking soda directly down the dry drain opening, followed immediately by one cup of warm white vinegar.
- Step 2: Cover the drain with a stopper or cloth to trap the effervescent reaction inside the pipes and let it sit undisturbed for 15 to 30 minutes.
- Step 3: Flush the line thoroughly with a kettle of hot tap water to wash away the loosened debris.
Boiling Hot Water Method
Hot water melts greasy soap scum and washes away dissolved residue, but you must verify your plumbing material before applying extreme heat.
- Check Pipe Material: Use boiling water exclusively if your home features older cast iron or copper plumbing lines.
- Protect PVC Pipes: Limit water temperature to hot tap levels (around 140°F) for modern PVC or plastic pipes to prevent joint seal failure and warping.
Dawn Dish Soap + Hot Water Trick
Dawn dish soap acts as a powerful grease cutter that breaks down oily body fats binding hair clogs together inside the trap.
- Apply Soap: Squeeze half a cup of liquid dish soap directly into the standing water or down the drain opening.
- Let It Penetrate: Allow the soap to coat the blockage for 10 minutes, then pour a bucket of hot water down the drain to flush the liquefied grease away.
Hydrogen Peroxide Method
Hydrogen peroxide provides a mild oxidizing reaction that attacks organic buildup and sanitizes bacteria-ridden slime inside bathroom drains.
- Pour and Fizz: Mix one cup of hydrogen peroxide with a tablespoon of baking soda and pour the solution down the drain.
- Rinse: Allow it to fizz for 20 minutes before flushing the pipe with warm water.
Home Remedies for a Clogged Tub Natural Methods & Safety Warnings
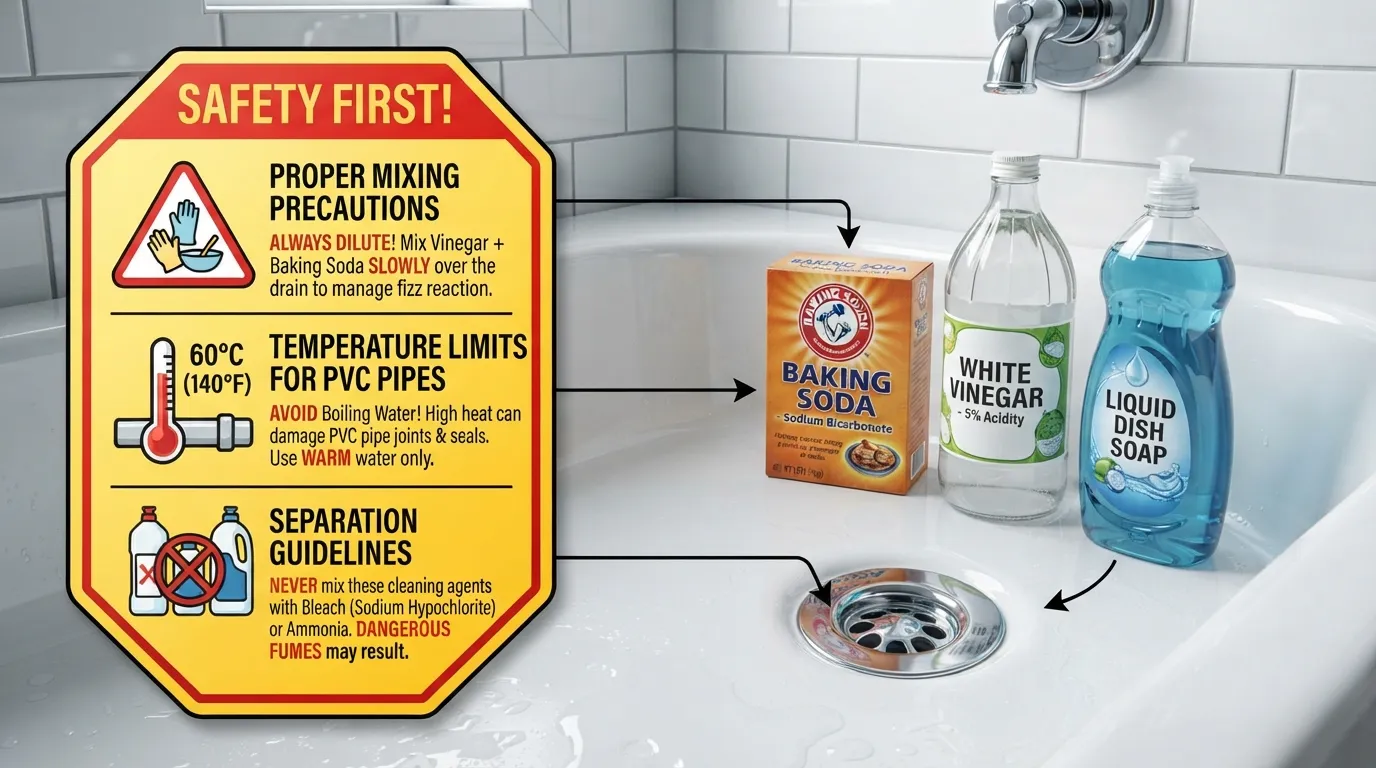
Natural home remedies offer a safe, eco-friendly way to dissolve organic sludge and grease buildup without subjecting your plumbing lines to aggressive commercial acids. Utilizing common household ingredients effectively breaks down minor restrictions while protecting your pipes.
Baking Soda + Vinegar Method
Combining baking soda and vinegar creates a fizzing chemical reaction that loosens organic waste and neutralizes foul drain odors naturally.
- Step 1: Pour one cup of dry baking soda directly down the dry drain opening, followed immediately by one cup of warm white vinegar.
- Step 2: Cover the drain with a stopper or cloth to trap the effervescent reaction inside the pipes and let it sit undisturbed for 15 to 30 minutes.
- Step 3: Flush the line thoroughly with a kettle of hot tap water to wash away the loosened debris.
Boiling Hot Water Method
Hot water melts greasy soap scum and washes away dissolved residue, but you must verify your plumbing material before applying extreme heat.
- Check Pipe Material: Use boiling water exclusively if your home features older cast iron or copper plumbing lines.
- Protect PVC Pipes: Limit water temperature to hot tap levels (around 140°F) for modern PVC or plastic pipes to prevent joint seal failure and warping.
Dawn Dish Soap + Hot Water Trick
Dawn dish soap acts as a powerful grease cutter that breaks down oily body fats binding hair clogs together inside the trap.
- Apply Soap: Squeeze half a cup of liquid dish soap directly into the standing water or down the drain opening.
- Let It Penetrate: Allow the soap to coat the blockage for 10 minutes, then pour a bucket of hot water down the drain to flush the liquefied grease away.
Hydrogen Peroxide Method
Hydrogen peroxide provides a mild oxidizing reaction that attacks organic buildup and sanitizes bacteria-ridden slime inside bathroom drains.
- Pour and Fizz: Mix one cup of hydrogen peroxide with a tablespoon of baking soda and pour the solution down the drain.
- Rinse: Allow it to fizz for 20 minutes before flushing the pipe with warm water.
Safety Warning Never Mix These Chemicals Together
Combining certain household cleaners or mixing DIY remedies with commercial products creates toxic fumes and dangerous chemical reactions that threaten your health.
- Never Mix Bleach and Ammonia: Creates lethal chloramine gas vapors that cause severe respiratory damage.
- Avoid Bleach and Acid: Mixing bleach with vinegar or commercial drain openers produces toxic chlorine gas.
- Flush Completely: Always rinse your pipes thoroughly with plain water before trying a different cleaning method to prevent accidental chemical interactions.
Chemical Drain Cleaners Drano vs Natural Methods What
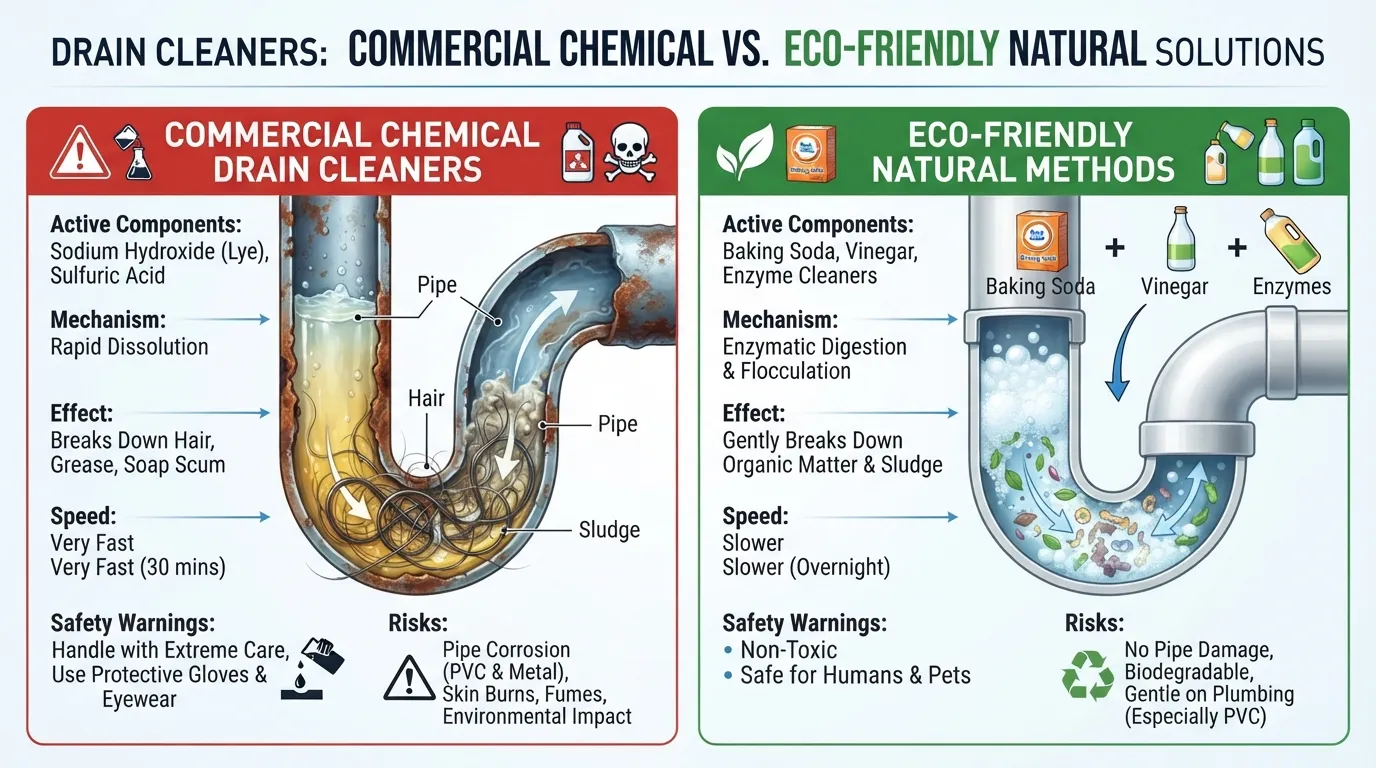
Professional plumbers generally advise caution when using harsh chemical drain cleaners because caustic formulas can damage older pipe infrastructure and injure skin on contact. Understanding how products like Drano compare to natural remedies helps you choose a safer, more effective approach.
Do Chemical Drain Cleaners Actually Work?
Commercial lye- or acid-based chemical cleaners generate a thermal reaction designed to dissolve hair and organic sludge blockages quickly. While they can open severely restricted pipes, their effectiveness drops significantly if standing water dilutes the formula before it reaches the clog.
- Fast Dissolution: Breaks down hair and grease rapidly without requiring mechanical tools or physical effort.
- Surface Limitations: Often fails to clear dense mineral scale or foreign objects wedged tightly inside the P-trap.
Why Plumbers Often Avoid Drano
Plumbers frequently discourage regular use of harsh commercial formulas due to the long-term chemical wear they inflict on household plumbing systems. For official safety guidelines and manufacturer recommendations on chemical products, you can consult Liquid Plumr’s unclogging guide.
- Pipe Corrosion: Caustic chemicals generate intense heat that can warp PVC fittings and eat away at older metal pipe walls.
- Health and Safety Hazards: Splashes cause severe chemical burns, and accidental mixing with other cleaners releases toxic fumes.
Enzyme-Based Cleaners as a Safer Alternative
Enzyme and bacteria-based drain cleaners use biological cultures to safely digest organic waste, hair, and grease over a few hours without harming pipes.
- Eco-Friendly Action: Completely safe for PVC, copper, and cast iron pipes as well as septic tank bacterial balances.
- Preventative Maintenance: Excellent for regular monthly treatments to keep bathroom lines free of slow-forming buildup.
Verdict — Which Method Wins?
Mechanical removal techniques and natural solutions win out over harsh chemical cleaners for everyday bathroom maintenance and safe clog resolution.
- Best Overall Choice: Manual hair extraction, plunging, and snaking provide immediate results without risking pipe corrosion.
- When to Use Chemicals: Reserve commercial or enzyme cleaners strictly as a last resort when mechanical methods fail to clear lingering residue.
Visual Guide Clogged Bathtub Drain Diagram
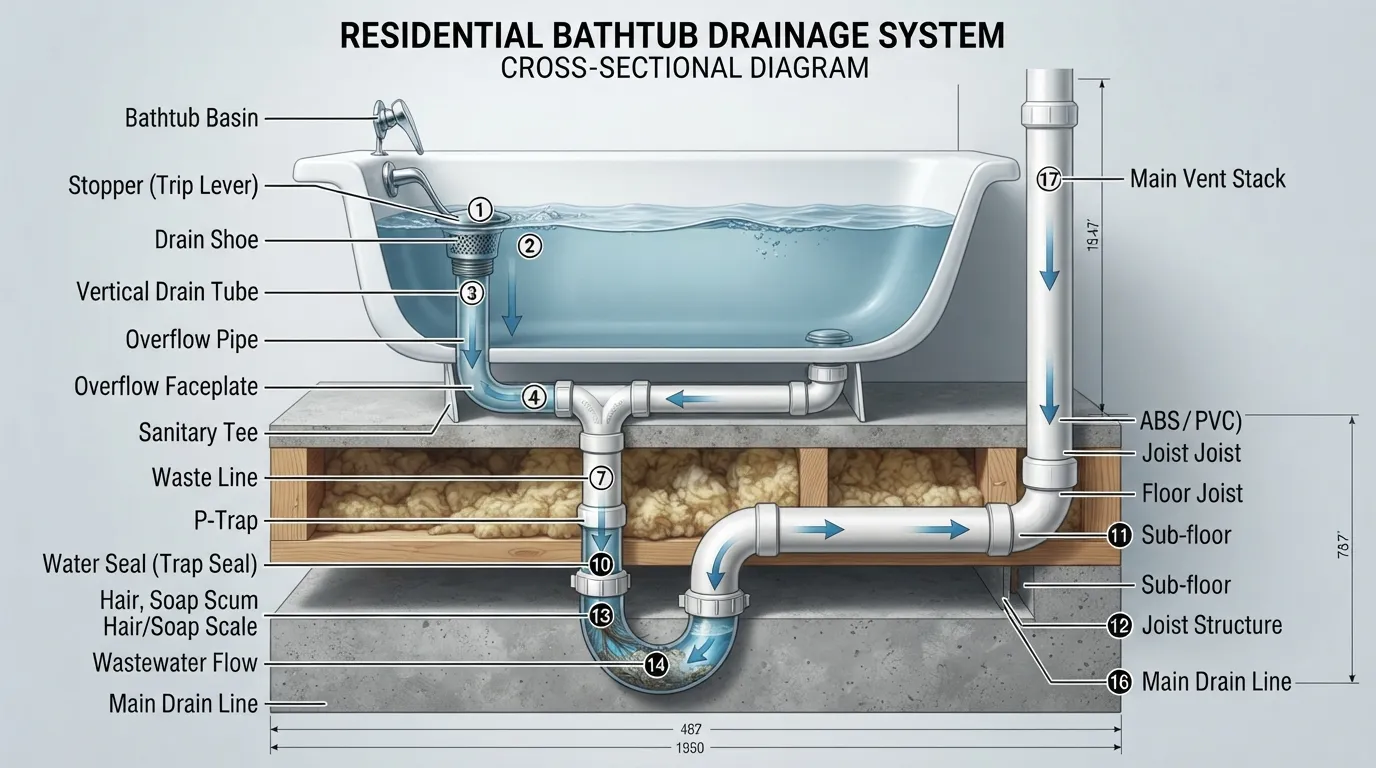
Understanding the anatomical layout of your plumbing system helps you visualize exactly where hair and debris accumulate. Reviewing a clogged bathtub drain diagram reveals how the drain opening, overflow pipe, and P-trap connect behind the walls and underneath the floor.
Anatomy of a Bathtub Drain
A standard bathtub plumbing system consists of interconnected pipes designed to manage wastewater while trapping sewer gases and heavy debris.
- Drain Opening and Stopper: The primary intake point at the bottom of the tub where water and hair first enter the waste shoe.
- Overflow Pipe and Plate: The secondary safety drain located higher up the tub wall that prevents accidental flooding while venting excess air pressure.
- Sanitary Tee Junction: The connecting fitting where the downward vertical drain tube meets the horizontal overflow conduit.
- P-Trap: A U-shaped bend located directly beneath the tub floor that holds a standing pool of water to block foul sewer gases from entering the bathroom.
- Main Waste Line: The primary discharge pipe that carries wastewater away from the bathroom fixtures toward your home’s main sewer line.
How to Clean & Maintain Your Bathtub Drain Prevent Future Clogs
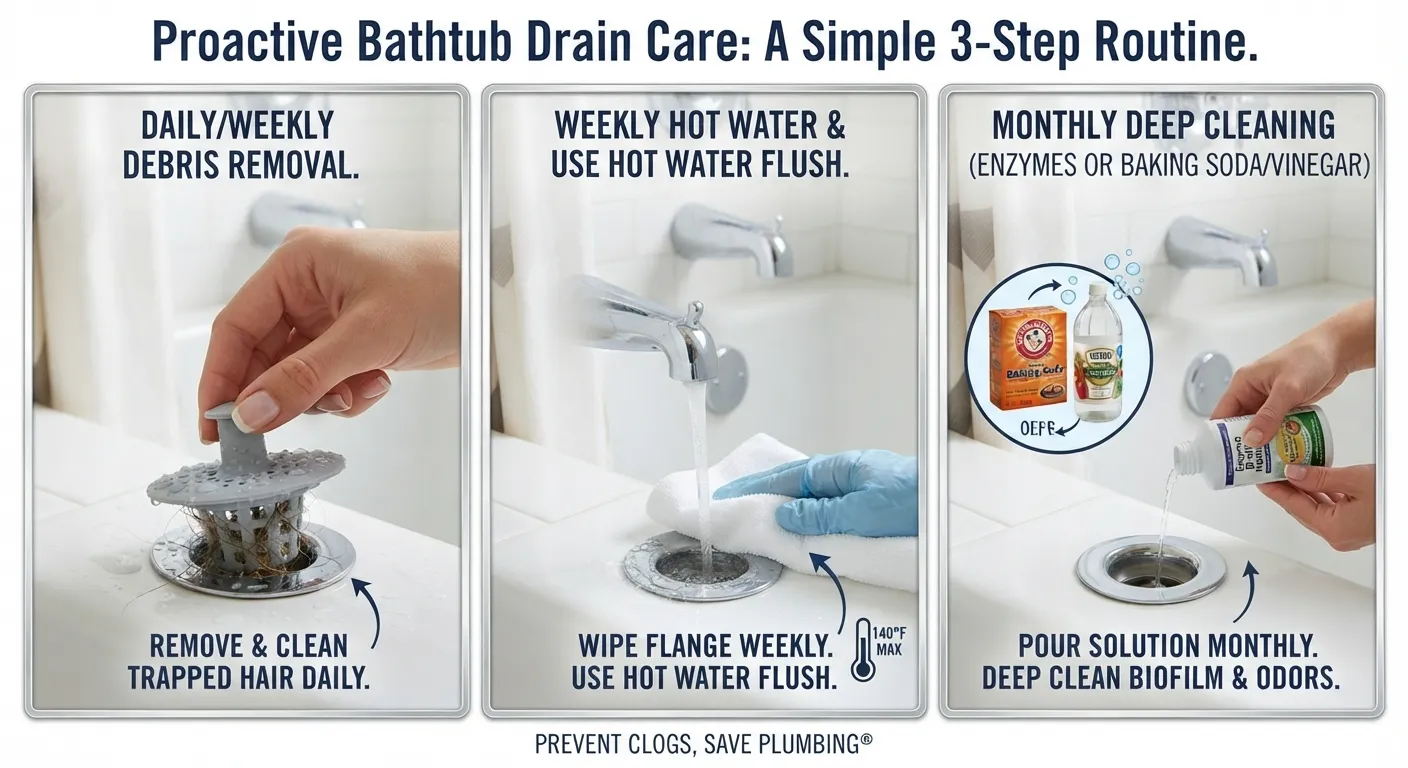
Implementing a proactive maintenance routine prevents hair, soap scum, and mineral scale from building up into stubborn blockages. Keeping your bathtub drain clean requires just a few minutes of weekly attention.
Weekly Maintenance Routine
Performing simple weekly habits stops organic debris from binding together inside the P-trap before a major clog can form.
- Hot Water Flush: Run a full tub of hot tap water down the drain once a week to melt away fresh soap residue.
- Wipe Down the Flange: Clean around the drain rim and stopper after every bath to remove trapped hair and body oils.
Drain Covers and Hair Catchers
Installing a silicone or stainless steel hair catcher over your drain opening is the single most effective way to stop clogs before they start.
- Trap Debris Early: These inexpensive mesh screens catch 99 percent of loose hair on the surface while allowing water to flow freely.
- Easy Disposal: Simply lift the catcher out after your shower, dump the trapped hair into the trash, and rinse it clean.
Monthly Deep Clean Tip
Running a monthly preventative cleaning cycle keeps pipe interiors polished and free of slimy bacterial buildup.
- Natural Enzyme Wash: Pour half a cup of an enzyme-based cleaner or a baking soda and vinegar solution down the drain once a month.
- Overnight Rest: Let the cleaning agent sit undisturbed overnight to dissolve invisible organic films lining the pipe walls.
Still Clogged? Chronic Clogs & When to Call a Plumber
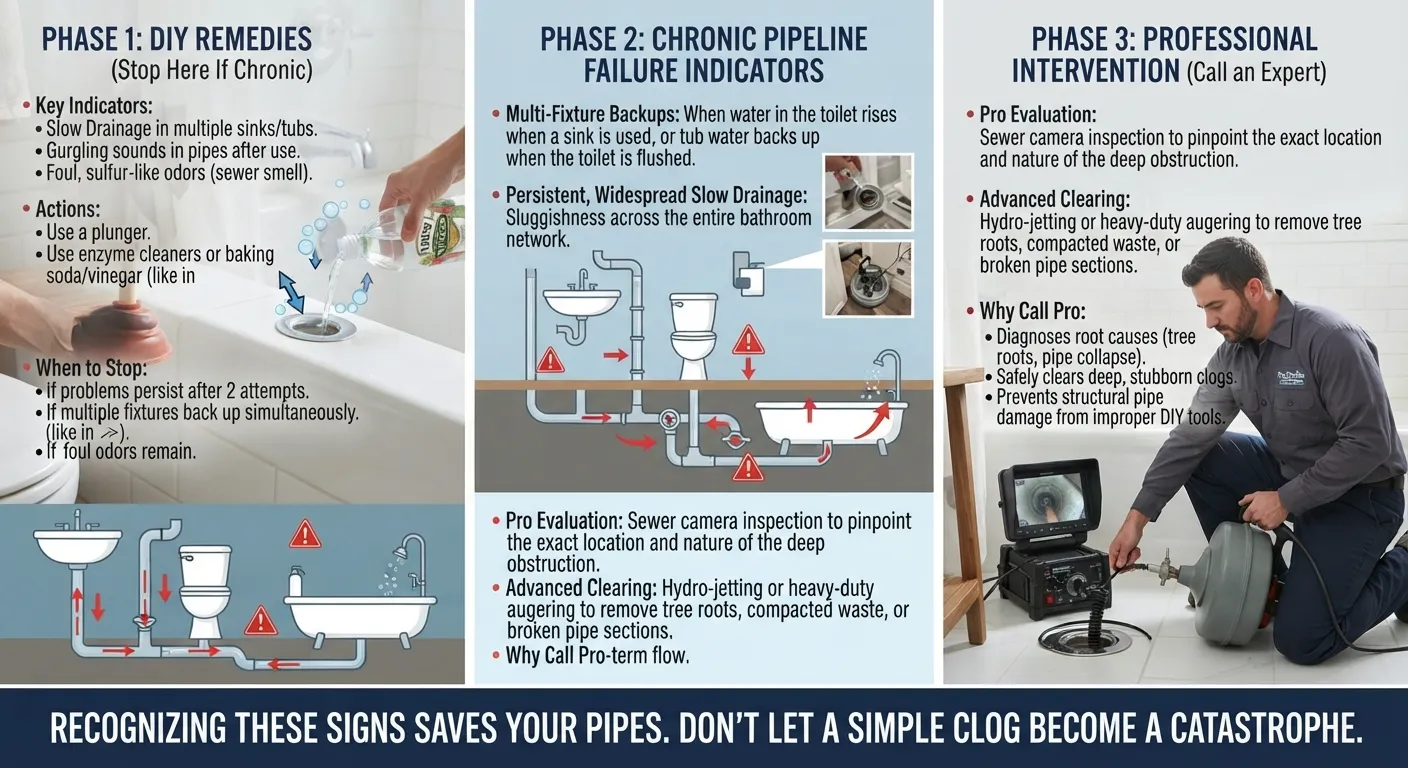
Persistent or recurring blockages that return immediately after plunging or snaking usually indicate a deeper structural plumbing issue. Recognizing the difference between a simple hair clog and a severe main line failure prevents endless frustration.
Signs of a Deep Chronic Pipe Clog
If your bathtub refuses to stay clear despite multiple cleaning attempts, the obstruction is likely sitting deep within your main drainage stack or sewer line.
- Multiple Fixture Backups: Water bubbling up in your toilet or bathroom sink whenever you run the bathtub indicates a blocked main waste branch.
- Foul Sewage Smells: Persistent, sulfur-like odors escaping from the drain point to a compromised P-trap seal or blocked roof vent.
- Slow Drainage Everywhere: Sluggish flow across all bathroom fixtures means the blockage is located far downstream from your individual tub trap.
Hydro-Jetting Explained
Hydro-jetting is an advanced plumbing technique that uses high-pressure water streams to scour the interior walls of your pipes completely clean.
- Complete Restoration: Blasts away stubborn grease, mineral scale, and invading tree roots down to the bare pipe walls.
- Long-Lasting Results: Far more thorough than standard snaking, leaving your drainage system running like new.
When DIY Stops Working Time to Call a Professional
Knowing when to put down your tools and hire a licensed plumber saves your piping infrastructure from accidental breakage.
- Cracked or Damaged Pipes: Older cast iron or clay pipes can fracture under aggressive snaking or chemical use.
- Unresolved Main Line Failures: If mechanical augers hit an unmovable obstruction or fail to restore flow, professional camera inspection is required.
Frequently Asked Questions FAQ
Find direct, expert answers to the most common questions regarding bathtub drain blockages, natural remedies, and safe plumbing maintenance.
What will dissolve hair in a drain?
Hair is primarily composed of protein (keratin), which is best dissolved using enzymatic cleaners containing specialized protease bacteria or commercial lye-based chemical drain openers that break down protein bonds. For manual removal, a zip-strip hair tool or bent wire hanger pulls out hair masses instantly without chemical corrosion.
Can I pour boiling water down my tub drain?
Boiling water is safe to pour down cast iron or copper plumbing lines to melt soap scum and grease, but you should avoid it if your home has modern PVC plastic pipes. Extreme heat can warp PVC joints and weaken the rubber seals connecting your drain assembly.
Why shouldn’t you use baking soda and vinegar to unclog a drain?
While baking soda and vinegar create a satisfying fizzing reaction that helps loosen light surface debris, the resulting chemical mixture neutralizes into mostly water and salty residue. It lacks the heavy lifting power needed to dissolve dense hair clogs or mineral scale located deep inside the P-trap.
Does Dawn really unclog drains?
Dawn dish soap acts as an effective surfactant and grease cutter that breaks down oily body fats binding hair clogs together. Pouring half a cup down the drain followed by hot water helps lubricate and slide soft organic blockages through the pipes.
Is it safe to put hydrogen peroxide down the drain?
Hydrogen peroxide is completely safe for all types of plumbing lines, including PVC and septic systems. It provides a mild oxidizing action that neutralizes organic slime and eliminates foul drain odors.
What happens when you mix Dawn dish soap and hydrogen peroxide?
Mixing liquid dish soap and hydrogen peroxide creates a safe, bubbling cleaning solution that targets organic buildup and grease. Unlike bleach mixtures, this combination does not produce toxic fumes, making it safe for general household drain maintenance.
Can you use a plunger in a bathtub to unclog the drain?
Yes, a standard cup plunger works exceptionally well in bathtubs as long as you completely seal the overflow hole with a wet cloth. Without sealing the overflow vent, air pressure escapes and prevents the plunger from creating the hydraulic force needed to dislodge the clog.
How do you unclog a bathtub drain in 10 minutes or less?
The fastest way to clear a tub drain is manual hair extraction using a zip-strip tool or wire hanger to pull out the main blockage immediately. If the clog is slightly deeper, covering the overflow hole and applying 10 to 15 rapid strokes with a cup plunger clears the line in minutes.
What acid do plumbers use to unclog drains?
Professional plumbers occasionally use concentrated sulfuric acid-based commercial cleaners for severe commercial or industrial scale blockages. However, due to extreme chemical safety hazards and the risk of melting residential pipes, licensed plumbers generally prefer mechanical augers, hydro-jetting, or safe enzyme solutions.

Oscar Vance | Master Plumber & Drainage Expert
Meet Oscar Vance, a licensed master plumber sharing practical solutions on residential repairs, preventive maintenance, and thoughtful home upkeep.

