Why Your Water Meter Is the Fastest Leak Detector in Your Home
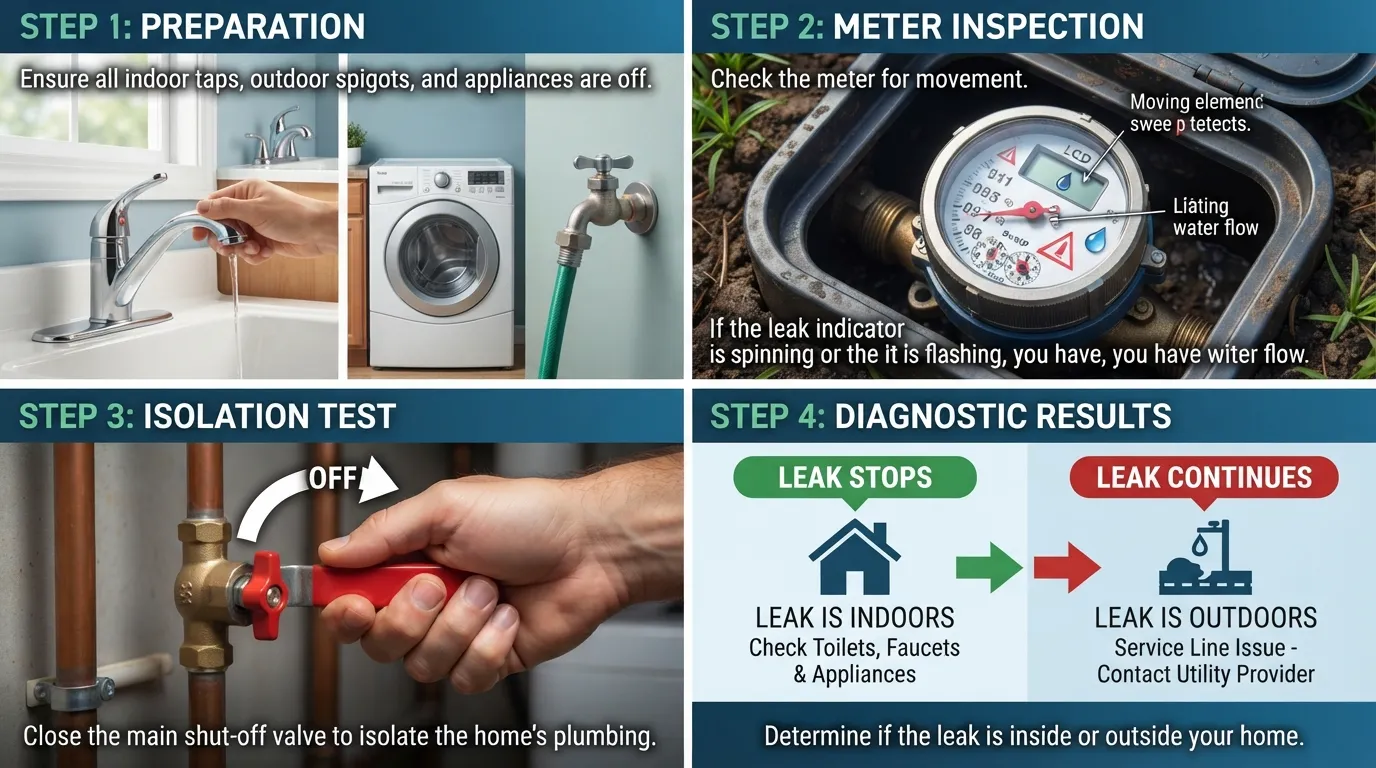
Your property’s water meter serves as the ultimate diagnostic tool for uncovering hidden household leaks before they cause structural damage or inflate utility expenses. Unlike visual inspections that only catch surface-level plumbing issues, the main water meter monitors every drop flowing into your system, making it the most precise instrument for early leak detection.
Why Checking Your Water Meter Matters
Monitoring your water meter routinely safeguards your home against catastrophic water damage and prevents unexpected financial strain. Even a minor pinhole leak can waste thousands of gallons over a billing cycle, turning a small plumbing glitch into an expensive repair project.
- Unexplained High Bills: A sudden spike in your monthly utility statement is often the primary indicator of a continuous hidden leak.
- Preventing Structural Damage: Catching leaks early stops moisture from rotting subfloors, warping drywall, and breeding toxic mold behind walls.
- Water Conservation: Detecting and repairing silent leaks preserves precious municipal resources and lowers your environmental footprint.
- Protecting Plumbing Infrastructure: Constant water flow wears down supply lines, increasing the likelihood of sudden pipe bursts.
What You’ll Need Before You Start
Gathering a few basic tools before opening your meter box ensures a smooth, efficient diagnostic process without frustrating interruptions. Most residential meters are located near the street curb or property boundary inside a heavy utility box.
- Meter Key or Screwdriver: A specialized utility meter key or a flathead screwdriver helps safely pry open stubborn or locked meter box lids.
- Flashlight or Smartphone Light: Meter boxes are often dark, damp, and home to debris, making illumination essential for reading the dial.
- Notepad and Pen or Phone: Recording exact numbers and timestamps allows you to track meter movement accurately during testing.
- Stiff Brush or Rag: A quick wipe clears away dirt, mud, and condensation obscuring the digital or analog register face.
Understanding Your Water Meter Types & Leak Indicators
Locating and interpreting a leak indicator requires identifying your specific model of water meter, as residential systems feature distinct dials and digital displays. Recognizing these core components allows you to confirm active water movement instantly without specialized plumbing equipment.
Mechanical Meters
Traditional mechanical meters rely on physical gear movement driven by water flow passing through the intake valve. These units feature a large main register dial alongside a smaller, highly sensitive secondary component designed specifically to catch micro-flows.
- Low-Flow Indicator: Often styled as a small silver sweep hand, red triangle, or blue star wheel that spins even when a single faucet drips slowly.
- Main Register: Tracks total cumulative consumption in gallons or cubic feet, functioning similarly to an automobile odometer.
- Mechanical Limitations: While reliable and durable, these older dials require sharp eyesight and adequate lighting to spot minimal gear rotation.
Digital Meters
Modern electronic utility meters replace moving gears with solid-state sensors and LCD digital screens to display real-time usage data. These advanced units eliminate mechanical wear and tear while offering precise data tracking.
- LCD Flow Icon: Displays a dedicated flashing droplet or plus-sign icon when water passes through the sensor continuously.
- Smart Meter Integration: Many digital units transmit hourly consumption telemetry wirelessly to municipal water authorities or homeowner apps.
- Screen Activation: Some digital faces require a flashlight beam or a tap on the glass sensor panel to wake up the LCD display.
Neptune, Badger & Sensus Meters Common Brand Differences
Different utility providers install distinct meter manufacturers, each with unique display configurations and leak alert mechanisms. Knowing your specific manufacturer prevents misreading standard utility hardware.
- Neptune Water Meter Leak Indicator: Typically utilizes a distinct triangular low-flow indicator that spins effortlessly under minimal pressure changes.
- Badger Meter Setup: Often incorporates an absolute encoder register where digital readouts pair with auxiliary mechanical sweep hands.
- Sensus Smart Units: Emphasize batch digital readouts that display flow rates directly in gallons per minute alongside alarm flags for continuous leaks.
How to Check for Water Leaks Using Your Water Meter
Conducting a water meter leak test provides a definitive diagnosis of your home’s plumbing integrity without requiring professional diagnostic tools. Following a methodical, step-by-step procedure isolates active system leaks from normal household consumption.
Step 1: Stop All Water Use
Eliminate all active water consumption inside and outside your home to ensure the water meter remains completely stationary during testing. Even minimal liquid movement will skew your diagnostic results.
- Indoor Fixtures: Ensure all bathroom sinks, showers, bathtubs, and kitchen faucets are tightly closed.
- Appliances: Confirm that your washing machine and dishwasher are not running cycles, and check that automatic ice makers are temporarily disabled.
- Outdoor Systems: Turn off hose spigots, automatic lawn irrigation sprinklers, and evaporative cooling systems.
Step 2: Locate and Open the Meter Box
Locate your residential meter box, which is typically buried near the front property line, curbside, or sidewalk area embedded in the ground. Use your meter key or a heavy screwdriver to safely remove the protective lid.
- Box Inspection: Shine your flashlight inside to check for standing water, dirt, or insects before reaching into the enclosure.
- Clearing the Dial: Brush away any mud, spider webs, or condensation blocking the mechanical register face or digital screen.
- Safety Precaution: Watch out for sharp metal edges and local wildlife resting inside underground utility boxes.
Step 3: Check the Leak Indicator
Examine the meter face closely to determine if water is currently flowing through your supply lines while all fixtures are off. A moving indicator confirms an active leak somewhere in the system.
- Mechanical Dials: Look for a small red or blue low-flow triangle, star, or gear wheel spinning continuously.
- Digital Screens: Verify whether the digital LCD flow icon or plus sign is actively blinking or flashing.
- Immediate Diagnosis: If the indicator moves or spins, water is escaping through a pipe, joint, or plumbing fixture.
Step 4: The One-Hour Test Alternative Method for Slow Leaks
If the low-flow indicator appears completely stationary but you still suspect a hidden issue like a slow-running toilet flapper, perform the one-hour consumption test. This catches minor, intermittent seepage.
- Record the Numbers: Write down every digit on the main mechanical register, including the final rolling fractional numbers.
- Wait Patiently: Leave the home completely undisturbed without using any water for exactly 60 minutes.
- Compare Readings: Return to the box and check the mechanical register again; if the numbers have advanced, a slow leak is present.
How to Check a Digital Water Meter for a Leak
Modern digital and smart water meters replace traditional mechanical gears with advanced electronic sensors, requiring a different approach for leak detection. Understanding these digital interfaces allows homeowners to leverage high-tech telemetry for precise leak identification.
Reading the Digital Flow Icon
Electronic meter faces feature high-resolution LCD screens designed to display volume metrics alongside real-time diagnostic icons. These screens often remain in a low-power sleep mode to conserve battery life until activated.
- Activating the Display: Press the integrated optical sensor pad or shine a bright flashlight directly onto the meter face to illuminate the LCD screen.
- Locating the Flow Indicator: Look for a flashing droplet symbol, a directional flow arrow, or a plus-sign indicator on the digital readout.
- Interpreting Active Leaks: If the flow icon remains lit or blinks while all household taps are closed, water is moving through the internal sensor.
Using Utility Company Apps to Detect Leaks Remotely
Many municipal utility providers now deploy smart meters equipped with radio transmitters that sync directly with consumer-facing mobile applications. These platforms allow homeowners to monitor continuous consumption without opening outdoor utility boxes.
- Continuous Usage Alerts: Set up custom push notifications that trigger when water flows continuously for more than a specified hourly window.
- Historical Trend Analysis: Review hourly and daily usage graphs in the app to spot abnormal consumption spikes during overnight hours.
- Automated Leak Warnings: Modern software algorithms often analyze usage patterns automatically and flag potential continuous-flow anomalies.
Difference Between Digital & Mechanical Meter Testing
While the fundamental logic of turning off all water sources remains identical, reading a digital register involves interpreting electronic data rather than watching moving mechanical parts. Knowing these distinctions prevents diagnostic errors.
- Resolution Precision: Digital sensors can detect micro-flows and fractional drops that might fail to move heavier mechanical gear wheels.
- Power Dependency: Digital units rely on internal lithium battery packs, meaning dead displays require utility intervention to replace the register face.
- Data Verification: Smart meters often display rate-of-flow values directly in gallons per minute alongside cumulative usage numbers.
Water Meter Moving When Water Is Off What It Actually Means
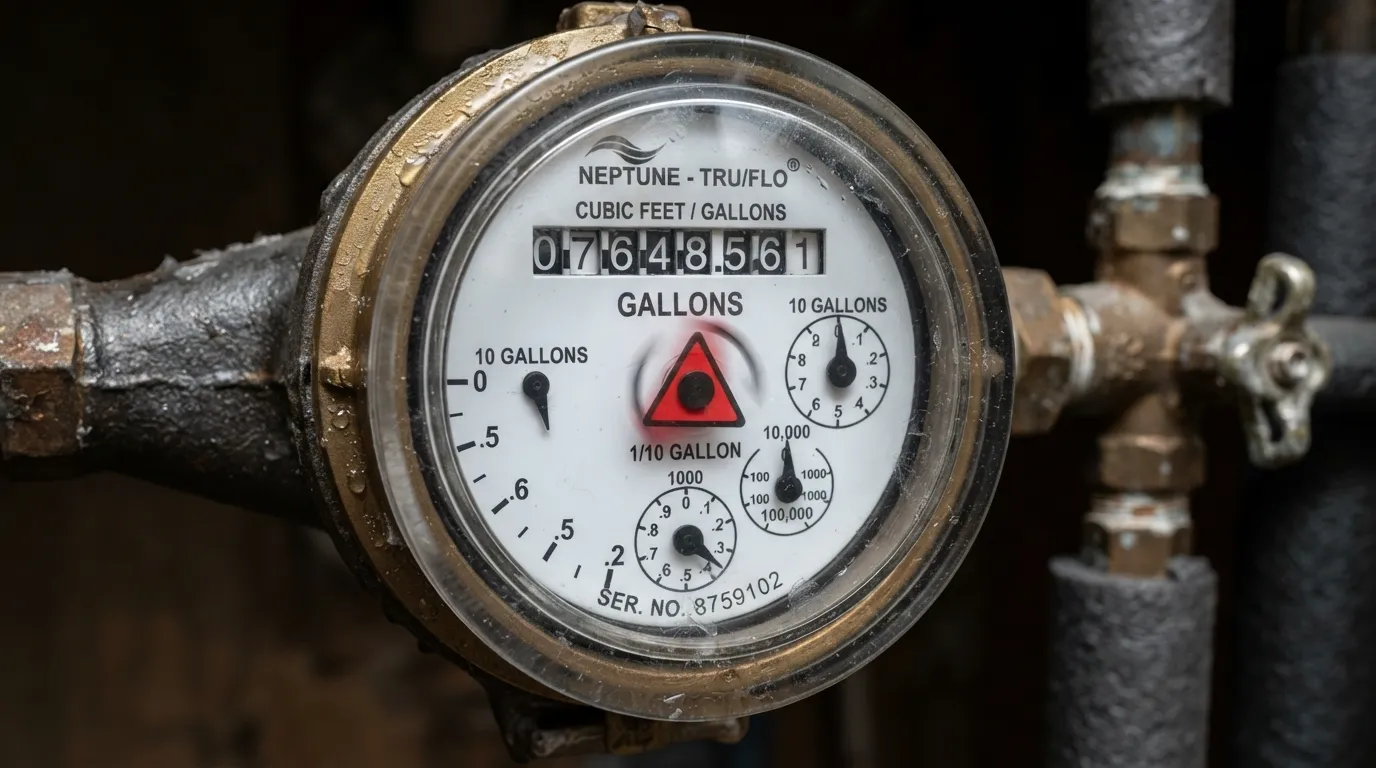
Discovering that your water meter is moving while every indoor and outdoor fixture is completely shut off confirms an active leak somewhere in your plumbing network. This diagnostic result eliminates guesswork, directing your immediate attention toward isolating the source of the escape.
Slow-Moving vs Fast-Moving Indicator What’s the Difference
The speed at which your low-flow indicator spins or your digital flow icon blinks provides an immediate clue regarding the severity and scale of the plumbing failure. Assessing this movement rate helps determine whether you are dealing with a minor fixture nuisance or a major pipe rupture.
- Slow, Creeping Movement: A sluggishly turning triangle or intermittent LCD flash typically points to a minor slow leak, such as a worn toilet flapper, a dripping faucet, or a pinhole supply line leak.
- Rapid, Continuous Spinning: A fast-spinning indicator signals a heavy volume of water loss, commonly caused by a major main line break between the meter and the house foundation.
- Erratic or Pulsing Movement: Intermittent movement often suggests an automatic appliance cycling on and off or thermal expansion within a closed plumbing loop.
Common Reasons Your Meter Keeps Spinning
When the meter indicates active flow despite your best efforts to shut down the home, specific household culprits are usually to blame. Systematic isolation testing helps narrow down these common problem areas.
- Running Toilets: A deteriorating flapper valve inside the tank silently bleeds water straight into the sewer line around the clock.
- Underground Supply Leaks: Cracks in the buried service line running from the street meter into your home waste immense amounts of water underground.
- Faulty Irrigation Valves: Stuck solenoid valves on lawn sprinkler systems often fail to close completely, creating hidden outdoor leaks.
- Leaking Water Heaters: Internal tank corrosion or faulty pressure relief valves can discharge water continuously into floor drains.
When It’s a False Alarm Water Softener Ice Maker Cycles
Not every instance of a moving meter points to a damaging plumbing leak, as certain household mechanical systems consume water automatically without direct human intervention. Checking these automated devices prevents unnecessary panic.
- Water Softener Regeneration: Many filtration systems run automatic nightly backwash or regeneration cycles that draw water through the meter without manual activation.
- Automatic Ice Maker Refills: Refrigerator ice makers cycle periodically to fill molds, pulling brief bursts of water that trigger sensitive low-flow dials.
- Thermal Expansion Tanks: Water heaters expanding during heating cycles can occasionally trigger minor backflow or pressure adjustments on un-checked check valves.
- HVAC Condensate Systems: High-efficiency HVAC units tied directly to domestic water supply lines for humidification can initiate unexpected flow cycles.
Locating the Source Indoor Outdoor or Main Supply Line Leak
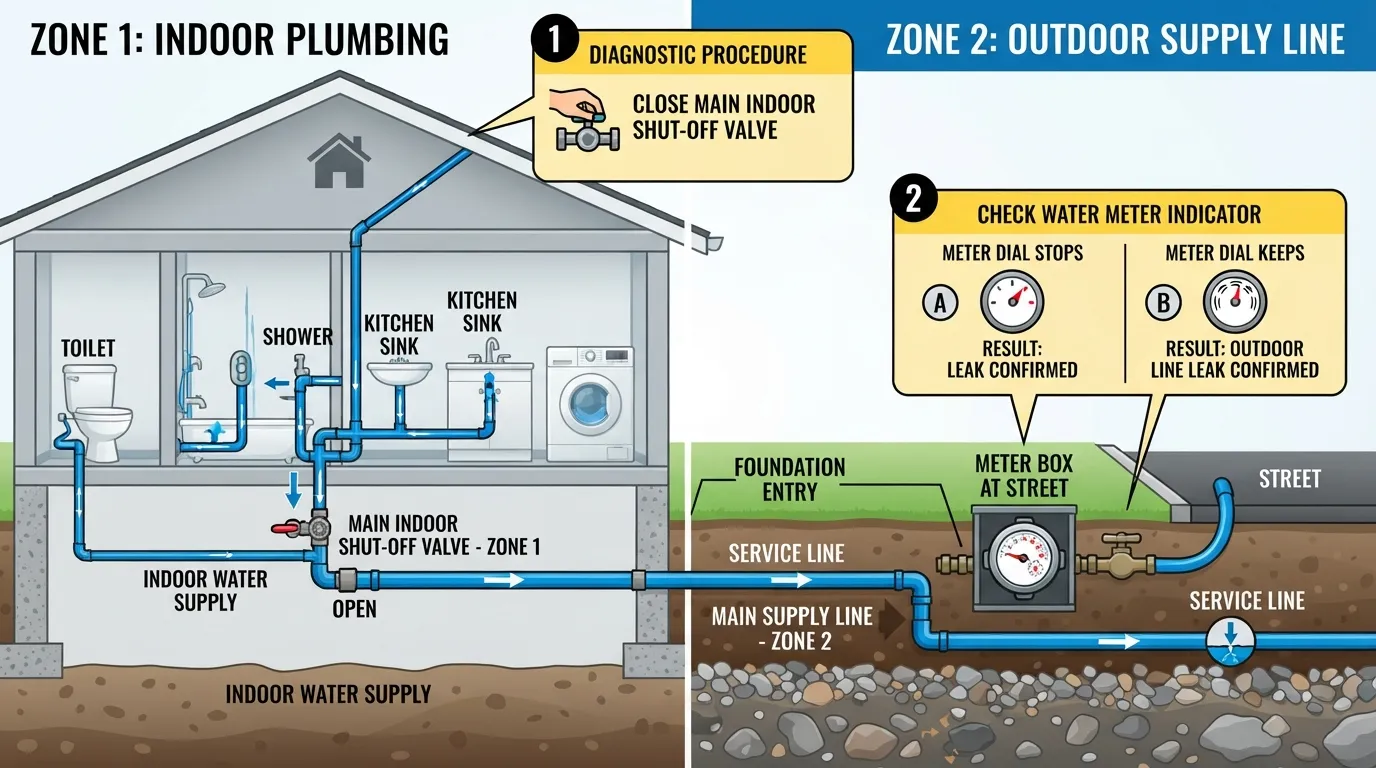
Once your water meter confirms an active leak, the next critical step involves isolating whether the problem exists inside your living space or along the underground service line. Performing a simple main shut-off valve test pinpoints the exact zone of failure without requiring professional diagnostic equipment.
The Main Valve Test
The main house shut-off valve serves as the master control gate dividing your indoor plumbing network from the underground municipal supply line. Testing this valve narrows down the leak’s location within minutes.
- Locate the Master Valve: Find the main indoor water shut-off valve, typically positioned where the supply pipe enters your home through the basement wall, crawlspace, or utility room.
- Turn the Valve Off: Close the main valve completely by turning it clockwise or pulling the lever perpendicular to the pipe.
- Return to the Meter: Walk back out to your street meter box and check the leak indicator dial or digital screen once more.
If It Stops: The Leak Is Inside Your Home
If the meter indicator stops moving immediately after you close the main house valve, your underground supply line is completely sound. The leak is isolated entirely within your indoor fixtures, appliances, or branch pipes.
- Check Toilets First: Perform a dye test on all household toilets, as silent flapper leaks are the leading cause of indoor water loss.
- Inspect Visible Fixtures: Examine sinks, showers, washing machine hoses, and water heater connections for drips or pooling water.
- Isolate Branch Lines: If your home features secondary shut-off valves for specific bathrooms or wings, turn them off one by one while watching the meter to find the exact branch.
If It Keeps Moving The Leak Is in the Main Supply Line
If the meter indicator continues to spin even though the main house valve is completely shut off, the problem lies outside your home. This confirms a breach in the underground service pipe running from the meter box to your foundation.
- Subsurface Seepage: Look for unusually lush, green patches of grass, soggy soil, or unexplained puddling along the direct path between the meter and your house.
- Sound Detection: In some cases, you can hear a faint hissing sound by pressing your ear against the main indoor pipe upstream of the closed valve.
- Professional Intervention: Underground service line leaks require professional leak detection specialists equipped with acoustic listening devices and heavy trenching gear.
How to Find Hidden Underground & In Wall Leaks
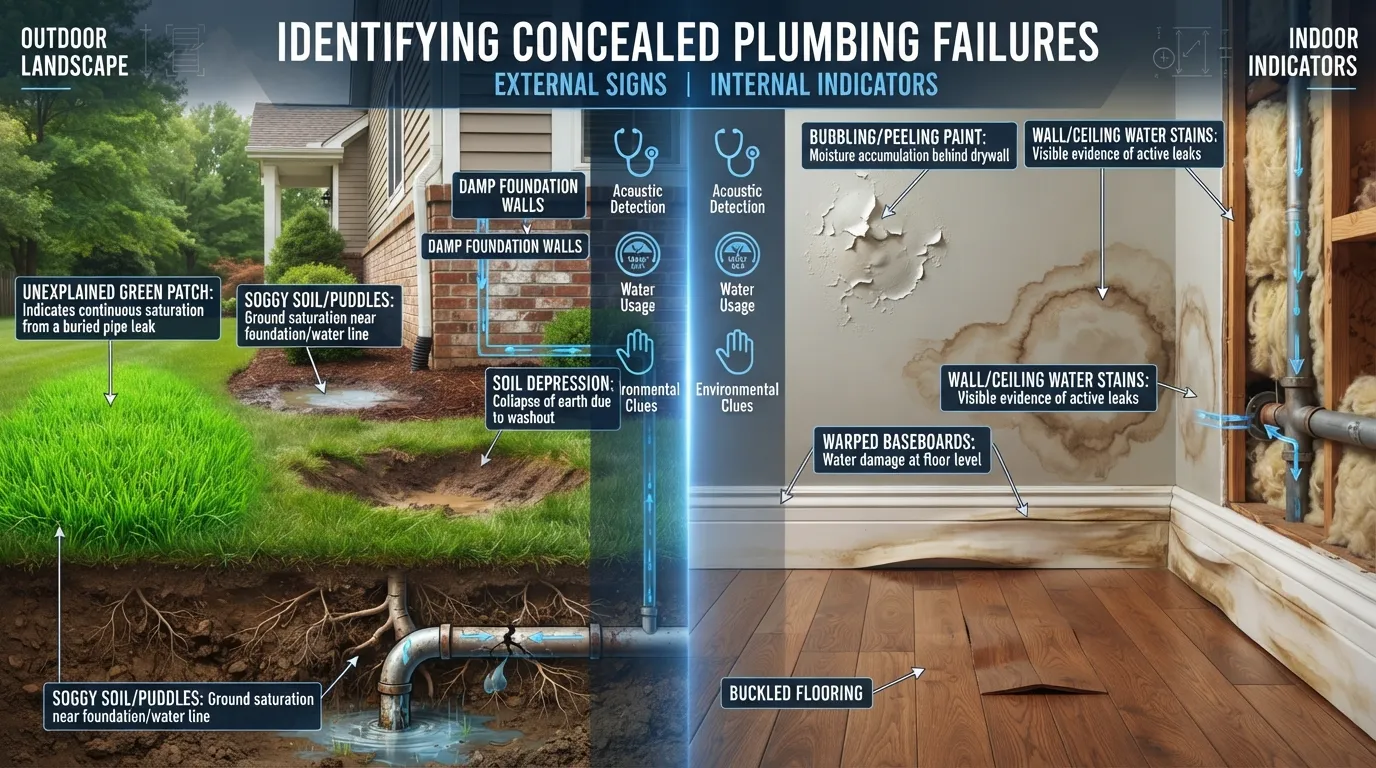
Pinpointing a leak that remains concealed beneath concrete slabs, behind drywall, or deep underground requires recognizing subtle environmental and physical warning signs. Because these hidden breaches cannot be spotted with a simple visual check, homeowners must rely on systematic diagnostic clues.
Signs of an Underground Leak
Underground supply lines experience immense soil pressure, shifting foundations, and root intrusion, making them prone to silent breaches. Identifying surface anomalies helps catch these subterranean failures before they wash away landscaping or compromise your foundation.
- Unexplained Boggy Spots: Puddles, constantly damp earth, or unnaturally lush, bright green patches of grass appearing in your yard during dry weather.
- Sudden Water Pressure Drops: A noticeable drop in shower and faucet pressure indicates that water is escaping through a cracked service pipe before entering the home.
- Foundation Shifts or Sinkholes: Soil erosion caused by escaping pressurized water can create minor depressions, dips, or settling concrete around your driveway and walkways.
How to Detect a Leak Inside a Wall
Leaks concealed behind wall cavities or under subfloors often reveal themselves slowly through structural wear and moisture damage before becoming a visible emergency. Catching these indicators early prevents toxic mold growth and extensive timber rot.
- Musty Odors and High Humidity: Persistent musty smells or warped, buckling baseboards often point to trapped moisture within wall cavities.
- Discolored or Peeling Paint: Yellowish water rings, bubbling wallpaper, or blistering paint indicate active water seepage from overhead or internal supply lines.
- Acoustic Listening: Pressing a mechanic’s stethoscope or a glass tumbler against drywall near plumbing runs can sometimes help you hear a faint hissing or rushing sound.
When to Call a Professional Leak Detection Service
While DIY water meter tests effectively diagnose the presence of a leak, tracking down exact sub-slab or underground breaches requires sophisticated equipment beyond standard household tools. Knowing when to hire an expert prevents destructive exploratory demolition.
- Acoustic Leak Detectors: Professionals use high-gain electronic listening devices to amplify the sound of water escaping through underground or in-wall pipes.
- Thermal Imaging Cameras: Infrared technology allows technicians to spot temperature variations behind walls caused by hidden hot or cold water leaks.
- Electronic Pipe Locators: Specialized line tracers map out the exact underground path of your service pipes to minimize unnecessary yard excavation.
Common Indoor Leak Sources You Should Check First
Once you confirm that an active leak exists inside your home using your water meter and main shut-off valve, you must systematically inspect the most frequent residential trouble spots. Focusing on common hardware failures saves time and prevents unnecessary plumbing expenses.
Toilets Silent Flapper Leaks Dye Test Tip
Toilets represent the number one source of hidden indoor water waste, often leaking silently around the clock without any surface overflow. A deteriorating rubber flapper valve allows water to escape directly from the tank into the bowl and down the sewer drain.
- The Food Coloring Dye Test: Remove the toilet tank lid and place a few drops of dark food coloring or a specialized dye tablet into the standing water.
- Observation Period: Wait 10 to 15 minutes without flushing the toilet to check if colored water seeps into the ceramic bowl.
- Flapper Replacement: If color appears in the bowl, replace the worn rubber flapper valve immediately to stop the continuous leak.
Faucets & Fixtures
Bathroom sinks, kitchen taps, and showerheads frequently develop slow, steady drips caused by degraded internal rubber O-rings, worn ceramic cartridges, or mineral scale buildup. While a single drop every few seconds seems harmless, it adds up to thousands of gallons wasted annually.
- Cartridge Inspection: Inspect single-lever handles and screw-down stems for moisture weeping past the packing nuts or handles.
- Aerator Maintenance: Clean mineral deposits out of faucet aerators to restore proper water flow and prevent back-pressure leaks.
- Shower Valve Check: Feel behind shower handles and tile surrounds for continuous moisture or warm spots indicating internal stem leaks.
Water Heater Leaks
Water heaters endure constant thermal stress and high operating pressure, making them prime candidates for hidden tank corrosion, valve failures, and fitting leaks. Catching these issues early prevents catastrophic tank ruptures and basement flooding.
- Pressure Relief Valve: Check the temperature and pressure (T&P) relief valve discharge pipe for steady trickling or mineral crust accumulation.
- Tank Base Pooling: Inspect the floor directly beneath the storage tank for moisture pooling from internal seam cracks or rusted tank bodies.
- Supply Connection Seams: Examine incoming cold and outgoing hot water pipe unions for slow weeping around threaded fittings.
Irrigation & Sprinkler Systems
Outdoor landscape irrigation systems feature complex networks of valves, underground PVC lines, and sprinkler heads that are vulnerable to weather damage, root intrusion, and mechanical wear.
- Solenoid Valve Diaphragms: Inspect outdoor valve control boxes for stuck or debris-jammed diaphragms that prevent valves from closing fully.
- Broken Sprinkler Heads: Walk your lawn during an active test cycle to spot sheared, cracked, or sunken sprinkler heads spraying uncontrollably.
- Backflow Preventer Leaks: Check above-ground backflow prevention assemblies for leaking test cocks or cracked brass bodies caused by winter freezing.
Water Meter Leaking Who Is Responsible?
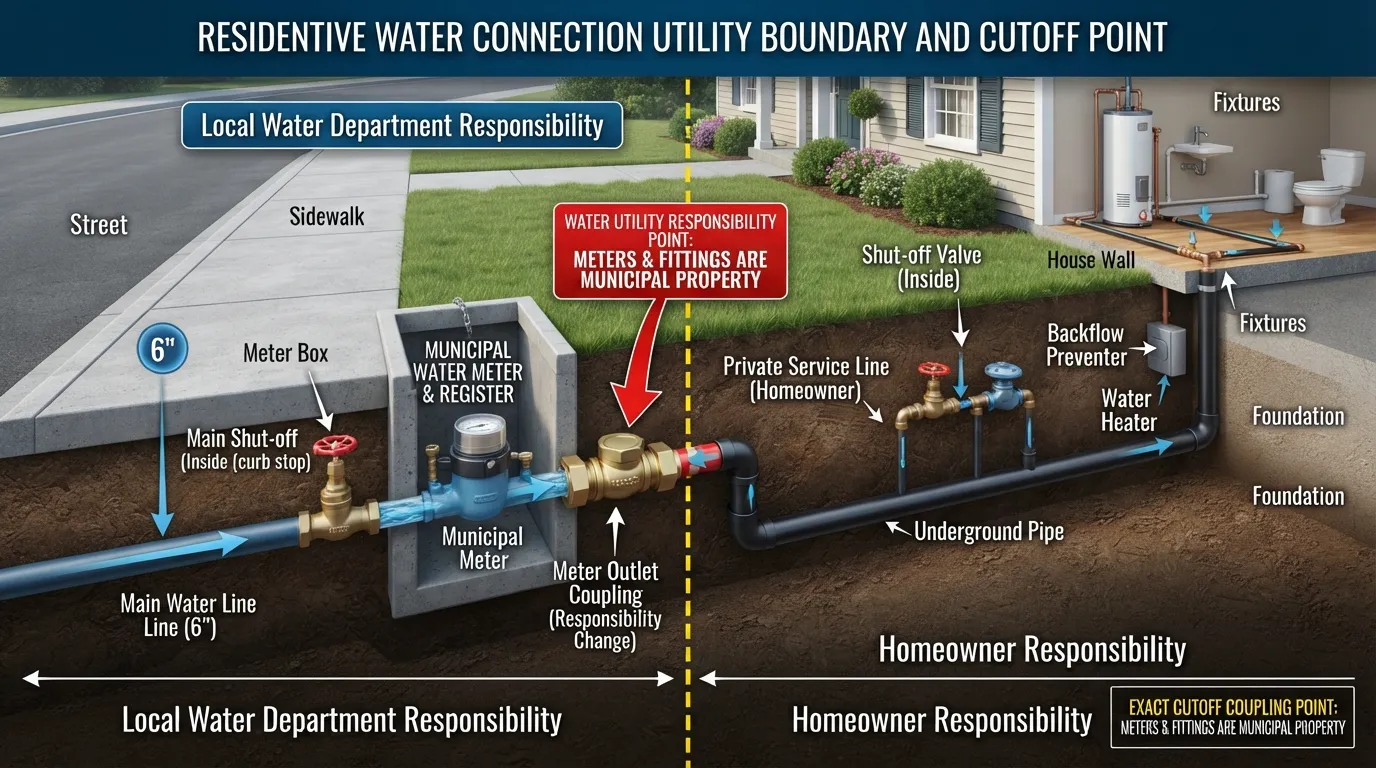
Determining liability for a water leak around your utility box depends entirely on the location of the breach relative to the property’s main meter valve. Establishing ownership boundaries prevents homeowners from paying for municipal infrastructure repairs or facing unexpected utility penalties.
Homeowner’s Responsibility
Property owners bear full financial and maintenance responsibility for all plumbing fixtures, distribution lines, and underground service pipes located downstream from the water meter toward the house. If a leak occurs on the house side of the meter assembly, hiring a plumber or repairing the line falls entirely on the resident.
- Private Service Lines: The underground pipe running from the outlet side of the meter box directly to your indoor foundation is the homeowner’s liability.
- Indoor Plumbing Network: Every supply line, branch pipe, valve, and fixture inside your living space is maintained at the owner’s expense.
- Meter Valve Damaged by User: Stripping the consumer-side shut-off valve inside the meter box requires professional replacement paid for by the resident.
Utility Company’s Responsibility
Municipal water departments and local utility providers maintain absolute jurisdiction over the city main lines, municipal supply connections, and the water meter itself up to the intake coupling. Any failure occurring upstream of the meter register is repaired by the city at no cost to the homeowner.
- The Meter Body and Register: Mechanical wear, fogged glass, or internal meter failure remain the legal property of the utility district.
- Street-Side Supply Mains: Large water mains running beneath public roadways and sidewalks are entirely managed by municipal work crews.
- Inlet Connection Seams: Leaks occurring on the street-side municipal coupling before the meter intake valve must be reported for city servicing. For official guidelines on municipal utility boundaries, consult resources like the EPA WaterSense Infrastructure Guide.
How to Report a Meter Leak to Your Utility
If you discover that the water leak originates from the utility-owned side of the meter box, you must contact your local water provider immediately to avoid billing disputes and prevent municipal water loss.
- Locate Account Information: Pull your most recent utility bill to find your dedicated account number and the emergency dispatch phone number.
- Document the Issue: Take a clear photo or short video showing water pooling inside the meter box or bubbling up around the municipal fittings.
- Request High-Bill Adjustments: If a utility-side leak inflated your monthly bill, ask customer service about submitting a leak adjustment form or credit request once the municipal repair is complete.
How Much Does It Cost to Fix a Water Leak?
Budgeting for a plumbing repair requires understanding whether you can tackle the issue yourself or whether you need to hire a licensed professional. Leak repair expenses vary drastically depending on the location, severity, and complexity of the damaged pipe.
DIY Fix Cost Simple Faucet Toilet Leaks
Minor indoor fixture leaks are usually inexpensive DIY projects that require basic hand tools and inexpensive replacement parts available at any local hardware store.
- Toilet Flapper Replacement: Costs between $5 and $15 for a universal rubber flapper, taking less than ten minutes to install without professional help.
- Faucet Cartridge or Washer Repair: Replacement cartridges or O-ring kits typically range from $10 to $35, saving hundreds in service fees.
- Supply Hose Swaps: Braided stainless steel toilet and sink supply lines cost between $15 and $25 each, preventing catastrophic burst failures.
Professional Plumber Cost Average Price Range
When leaks involve concealed wall cavities, slab foundations, or main underground service lines, professional intervention becomes necessary. Labor rates and specialized diagnostic fees reflect the complexity of the job.
- Standard Diagnostic & Service Call: Plumbers typically charge an initial dispatch or diagnostic fee ranging from $100 to $250.
- In-Wall or Ceiling Leak Repairs: Fixing accessible pipe leaks behind drywall generally costs between $150 and $450, excluding cosmetic drywall patching.
- Underground Main Line Replacement: Trenching and replacing a damaged outdoor service line can range from $1,500 to $4,500 depending on total length and landscaping disruption.
Factors That Affect Repair Cost
Several distinct variables influence final plumbing invoices, making it essential to evaluate your specific situation before calling a contractor.
- Accessibility: Exposed basement pipes cost far less to repair than lines buried beneath concrete slabs or finished ceilings.
- Pipe Material: Older galvanized steel or polybutylene pipes often require extensive repiping compared to modern PEX or copper repairs.
- Emergency Dispatch Fees: Calling a plumber late at night or during holidays for a major leak substantially increases labor billing rates.
How Long Can a Water Leak Go Unnoticed And Why It Matters

Concealed household leaks frequently remain undetected for weeks or even months, quietly causing extensive structural degradation and financial strain long before visible symptoms appear. Understanding the timeline of silent water loss emphasizes the critical importance of routine meter checks.
Average Time Leaks Go Undetected
Many hidden plumbing issues persist indefinitely because homeowners rarely inspect areas like crawlspaces, subfloors, and underground service lines until a catastrophic failure occurs.
- Silent Toilet Seepage: A worn flapper valve can leak thousands of gallons a month for up to a year before a spike in utility billing draws attention.
- Sub-Slab & Wall Pinhole Leaks: Slow weeping behind drywall or under concrete foundations often goes unnoticed for 3 to 6 months until musty odors or buckling flooring emerge.
- Underground Service Line Breaks: Subterranean yard leaks can remain concealed for months if soil drains the escaping water away from the surface unnoticed.
Water Damage & Mold Risks
Allowing moisture to linger unchecked inside building cavities creates an ideal environment for rapid structural rot and hazardous biological growth that threatens indoor air quality.
- Toxic Mold Colonization: Mold spores germinate within 24 to 48 hours in damp, unventilated wall cavities, spreading allergens throughout your HVAC system.
- Timber and Drywall Decay: Persistent moisture weakens load-bearing wooden framing, rots subfloors, and causes drywall partitions to crumble.
- Foundation Compromise: Constant water saturation beneath concrete slabs causes soil settlement, resulting in severe structural cracks and uneven floors.
Financial Impact of Ignoring a Leak (Gallons Month
Ignoring a seemingly minor leak compounds financial losses rapidly, turning a cheap $10 gasket replacement into thousands of dollars in wasted water and property restoration costs.
- Massive Gallon Accumulation: A mere 1/8-inch crack in a supply line can waste over 30 gallons of water an hour, totaling more than 20,000 gallons a month.
- Escalating Utility Bills: Municipal tiered pricing structures penalize excessive consumption, causing monthly water statements to double or triple unexpectedly.
- Costly Restoration Fees: Mitigating extensive water damage, replacing ruined drywall, and treating mold remediation often cost between $2,000 and $10,000.
Frequently Asked Questions
Addressing common homeowner questions regarding water meters and leak detection clarifies diagnostic procedures and helps resolve typical plumbing uncertainties quickly.
How to tell if you have a water leak by the meter?
Turn off all indoor and outdoor water sources, then walk to your outdoor meter box. Observe the low-flow dial, triangular sweep hand, or digital LCD flow icon; if it continues to move or flash, an active leak is present.
How do I find a water leak that is not visible?
Perform the main shut-off valve test by closing your master indoor valve and checking if the meter stops. If the meter stops, the leak is indoors (such as a running toilet or faulty water heater); if it keeps moving, the underground supply line is compromised.
What is the most common water leak in a house?
Silent toilet flapper leaks represent the most frequent indoor plumbing issue, often wasting hundreds of gallons daily without making any audible sound.
Can I detect a water leak between my house and the meter without a plumber?
Yes, by turning off the main house shut-of valve and checking the meter. If the meter still moves while the indoor valve is closed, you have isolated the leak to the underground service line running between the meter and your home.
How can you check if your house has more than one water meter?
Properties with auxiliary guest houses, multi-family units, or extensive in-ground irrigation systems may feature separate sub-meters. Inspect your property boundary or consult your municipal utility account records to verify if secondary meters are registered to your service address.
Can you hack a water meter?
Tampering with, altering, or attempting to manipulate a municipal water meter is illegal and constitutes utility theft. Modern digital smart meters also feature magnetic sensors and anti-tamper alarms that instantly alert utility providers to unauthorized interference.
How do you use a water leak detector?
Smart water leak detectors, such as smart whole-home shut-off valves or remote acoustic sensors, attach to your main water line or sit near flood-prone appliances like washing machines to monitor flow anomalies and automatically shut off water when abnormal usage is detected.
Conclusion Next Steps If You Found a Leak
Detecting a household water leak early transforms a potential structural disaster into a manageable repair project. Acting promptly on your meter readings protects your plumbing infrastructure, prevents property damage, and stops utility expenses from spiraling out of control.
Quick Recap Checklist
Following a systematic diagnostic approach ensures you accurately identify, isolate, and resolve plumbing failures before they worsen. Use this quick checklist to guide your next actions:
- Verify the Meter Movement: Shut off all household water sources and check your mechanical dial or digital flow icon for continuous movement.
- Isolate the Zone: Perform the main shut-off valve test to determine whether the leak is located inside your living space or along the underground service line.
- Inspect Common Culprits: Check toilets with a simple food coloring dye test and inspect faucets, water heaters, and irrigation valves.
- Monitor Digital Dashboards: Review your utility provider’s mobile application for automated continuous-flow alerts and historical usage anomalies.
When to Call a Local Plumber or Utility Company
While minor fixture repairs and flapper replacements are great DIY projects, complex plumbing failures require immediate professional intervention to prevent permanent damage.
- Call a Licensed Plumber: Contact a professional contractor immediately if you detect underground service line leaks, burst pipes behind walls, or complex sub-slab failures requiring specialized acoustic or thermal imaging tools.
- Contact Your Utility Provider: Report any suspected leaks occurring upstream of your meter’s intake coupling or request municipal assistance for damaged utility-owned meter registers and valves.
- Act Without Delay: Addressing water leaks quickly safeguards your home’s structural integrity, prevents toxic mold growth, and lowers costly utility bills.

Oscar Vance | Master Plumber & Drainage Expert
Meet Oscar Vance, a licensed master plumber sharing practical solutions on residential repairs, preventive maintenance, and thoughtful home upkeep.


Pingback: Water Valve Turned Off but Water Still Running Well? Fix It