Why Is Water Still Running When the Valve Is Off?
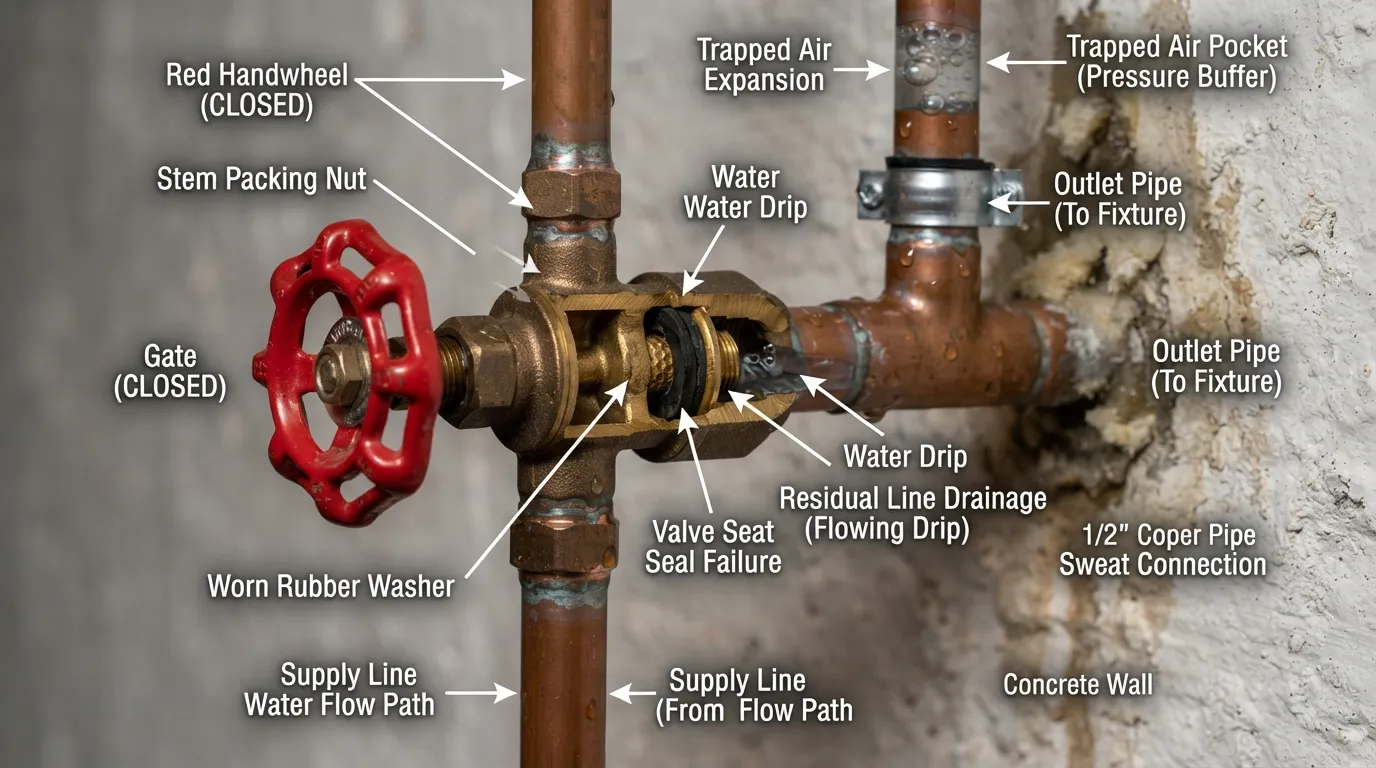
Discovering water is still flowing from a fixture even after you have closed the supply valve can trigger immediate panic. In most cases, this phenomenon is completely normal and simply represents residual water draining from the pipes. However, it can occasionally signal a failing shut-off valve that requires professional attention.
Understanding the difference between trapped gravity-fed drainage and an active leak helps you determine whether you can relax or if you need to shut off your property’s main water supply. Our diagnostic framework below walks you through every potential cause, helping you assess the severity of the situation within minutes.
Is This Normal or a Problem?
If water trickles or runs for just a few seconds after closing a valve, it is normal residual drainage. Gravity pulls the remaining water trapped between the closed valve and your faucet out of the line. If a steady, pressurized stream continues indefinitely, your shut-off valve is failing to seal completely and needs repair or replacement.
- Residual Drainage: Lasts less than 10 to 30 seconds, slows down rapidly, and stops entirely.
- Valve Failure: Maintains steady pressure, keeps flowing without interruption, or worsens when other fixtures are used.
- Main Supply Bypass: Occurs when the local valve is faulty, or when backpressure from a different plumbing line feeds the outlet.
What This Article Will Help You Diagnose
This comprehensive guide equips you with the exact troubleshooting steps needed to isolate plumbing anomalies and protect your home from water damage. We break down the complex mechanics of residential water systems into clear, actionable inspection stages.
- How to differentiate between harmless trapped pressure and a leaking gate or ball valve.
- Step-by-step methods to test your home’s main water shut-off valve for complete sealing integrity.
- Clear identification of faulty washers, mineral buildup, and worn valve seats that prevent proper closure.
- Actionable safety measures to take before attempting any DIY plumbing repairs or valve replacements.
Which Valve Did You Turn Off? Interactive Decision Guide
Diagnosing why water keeps running requires identifying the exact valve you manipulated and observing the flow behavior. Different valves control distinct zones of your plumbing infrastructure, meaning a leak at a sink valve carries a completely different meaning than a failure at your main line.
Use the diagnostic pathways below to match your specific symptoms with the correct root cause. Pinpointing whether the water is trapped residual moisture or a pressurized leak allows you to apply the proper fix or know when to call a professional plumber.
Main House Valve vs. Individual Fixture Valve vs. Street Curb Valve
The location of the valve you closed dictates how much water remains in the system and where a potential failure might lie. Understanding your home’s valve hierarchy is the first step toward accurate troubleshooting.
- Individual Fixture Valve (Angle Stop): Located directly beneath sinks or behind toilets. Closing this should stop water only to that specific fixture; if it runs, the local valve seat or washer is worn.
- Main House Valve: Typically found where the water line enters your home (basement, crawlspace, or utility room). Closing this shuts off the entire building; water trickling past it indicates a failing gate or ball valve.
- Street Curb Valve: Located near your property line in a underground utility box. This controls the municipal supply and requires a specialized key; turning this off should completely isolate your home from city pressure.
Is Water Trickling or Running at Full Pressure? Diagnostic Table
The velocity and volume of the post-shut-off water stream tell you instantly whether you are dealing with harmless gravity drainage or an active valve bypass.
Symptom-to-Cause Quick Reference Table
Mapping specific physical symptoms to mechanical failures helps you bypass guesswork and target the exact component causing your plumbing headache.
Top Reasons Why Water Keeps Running The 5 Real Causes
Finding that water persists after closing a supply valve is a common household frustration rooted in mechanical wear or basic fluid dynamics. Identifying the exact mechanism behind the flow prevents unnecessary panic and directs you straight to the required fix.
Examine the five most frequent culprits detailed below to understand why your plumbing system is defying the closed valve. Each scenario highlights specific structural or operational anomalies that govern water behavior inside residential pipes.
1. Residual Water Trapped in Pipes How Long It Actually Lasts
Gravity and air pressure frequently hold a final column of water suspended within elevated pipe sections after a supply valve is closed. This harmless residual drainage trickles out as air bleeds into the system and empties the line.
- Duration and Volume: Genuine residual water typically stops completely within 10 to 30 seconds, accompanied by sputtering or hissing sounds.
- Vertical Elevation: Fixtures located on lower floors experience shorter drainage times because water easily pulls downward, whereas overhead showerheads drain longer.
- System Venting: If air cannot enter the pipes efficiently, water can trickle out sluggishly for several minutes, mimicking a slow leak.
2. Worn-Out or Faulty Shut-Off Valve Mineral Deposits & Seal Failure
Older gate-style valves and neglected quarter-turn ball valves frequently suffer from internal degradation that prevents complete closure. Hard water mineral deposits and sediment erode rubber seals or block metal gates from seating flush.
- Gate-Style Deterioration: The internal threaded stem can strip or snap off, leaving the metal wedge stuck open even when the external handle turns freely.
- Mineral Scale Buildup: Limescale deposits accumulate around ball valves and valve seats, creating microscopic gaps where pressurized water continues to seep through.
- Perished Washers: Rubber compression washers on older globe valves flatten, harden, or crack over time, losing the flexibility needed to create a watertight seal.
3. Wrong Valve Was Closed Multiple Water Sources Explained
Complex plumbing layouts, additions, or multi-unit configurations often feature multiple shut-off valves that confuse homeowners. Closing an isolation valve for a secondary branch line leaves the primary supply to the fixture completely open.
- Branch vs. Main Lines: You may have closed an appliance-specific angle stop instead of the room isolation valve, or vice versa.
- Cross-Connections: Backfeed loops from thermal expansion tanks or integrated bidets can route water backward into supposedly isolated segments.
- Unlabeled System Layouts: In older homes without updated plumbing schematics, homeowners frequently mistake pressure-reducing valves or check valves for functional shut-off controls.
4. Water Heater Tank Still Draining
Hot water lines can maintain a steady flow long after the main house valve is shut due to the immense volume and pressure stored inside the water heater tank. The thermal expansion and head pressure of a 40-to-50-gallon tank will force water through open hot-side taps for an extended period.
- Stored Volume Discharge: The entire thermal reservoir must empty or depressurize before hot water faucets stop running completely.
- Siphoning Effect: Opening a hot water tap while the main line is closed can trigger a siphon effect, pulling water out of the heater and surrounding lines.
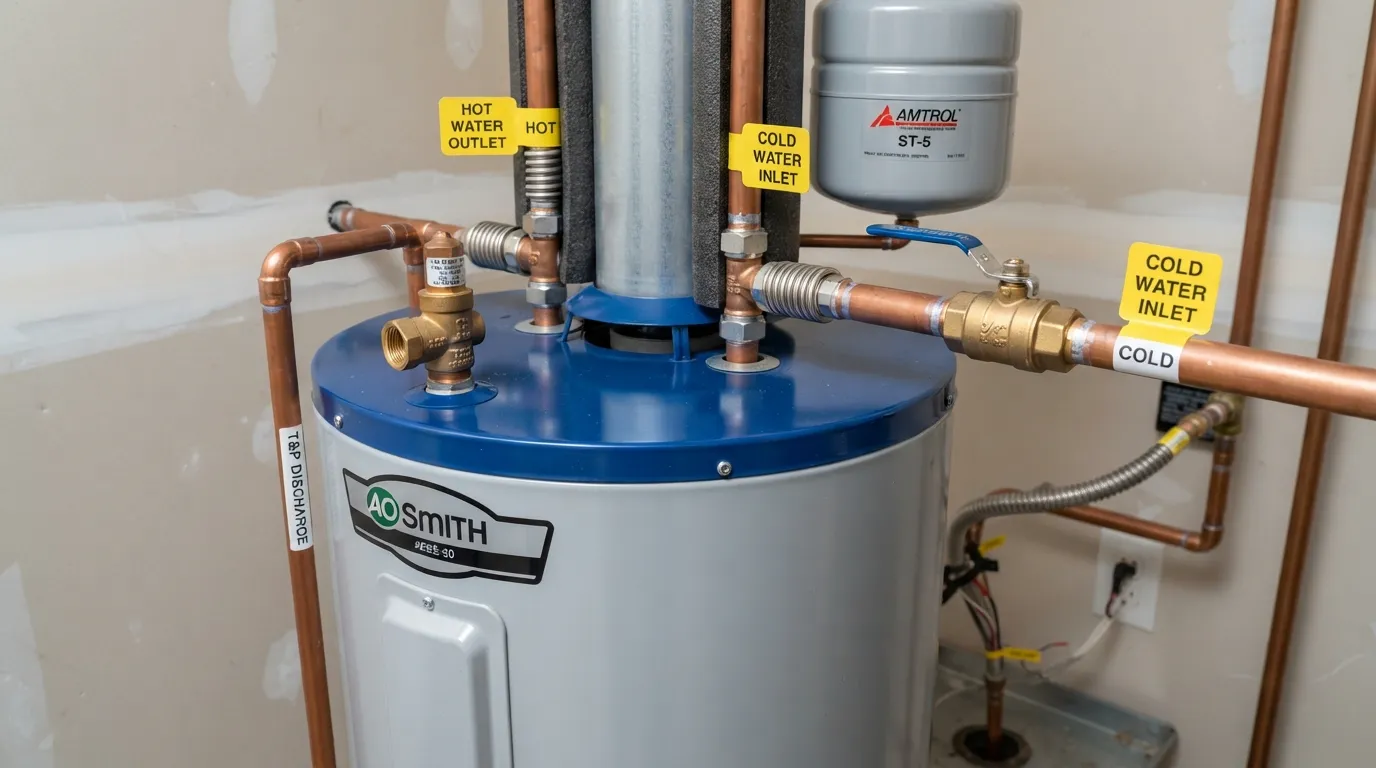
- Isolation Requirement: True isolation of hot water fixtures requires closing the cold water inlet valve directly on top of the water heater tank itself.
5. Spinning Water Meter What It Really Means
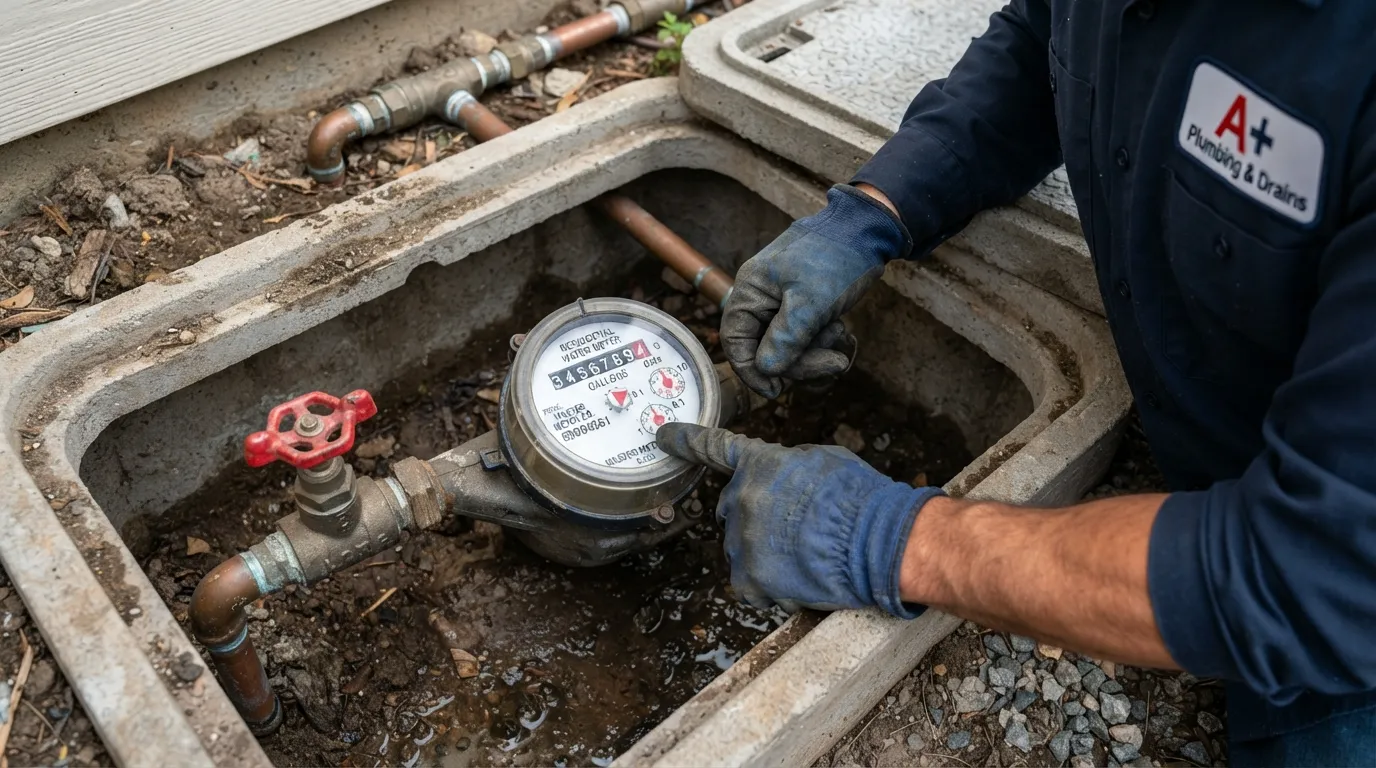
Observing your utility meter dial spin after you have closed your home’s main valve provides definitive proof of an active downstream leak or an incomplete valve closure. A stationary dial confirms the valve is holding, while movement indicates water is escaping somewhere in the system.
- Low-Flow Indicator Triangle: Modern utility meters feature a small triangular dial or gear that rotates with even the tiniest trickle or seepage.
- Main Valve Bypass Check: If the main house valve is fully closed and the meter dial keeps turning, water is bypassing the valve or leaking between the street and the house.
- Actionable Diagnosis: A spinning meter combined with running faucets means your main shut-off valve is failing to seat and must be replaced immediately.
How to Test If Your Valve Is Fully Closed
Confirming whether a shut-off valve is completely functional requires a systematic, multi-point isolation test rather than simply trusting the handle position. Even if a valve turns all the way to the closed position, internal wear or mineral binding can leave a hidden gap that allows water to bypass.
Executing this diagnostic procedure isolates your plumbing network and provides definitive proof of valve integrity within minutes. Follow the sequential steps below to verify whether your shut-off valve is successfully halting water flow.
Step 1 — Check the Water Meter Dial
Locate your property’s water meter, typically found in an outdoor utility box near the street or sidewalk, and observe the main indicator dial. A stationary needle or gear confirms that your main valve is holding a complete seal, whereas a spinning low-flow indicator reveals active leakage downstream.
- Locate the Leak Indicator: Look for a small red or blue triangle, star wheel, or low-flow gear on the meter faceplate.
- Observe for 60 Seconds: Keep all household taps closed and watch the indicator wheel closely to see if it moves even slightly.
- Verify Valve Failure: If the dial continues to rotate after you close the main house valve, the valve core is failing to seat completely.
Step 2 — Open the Lowest Faucet or Outdoor Spigot
Purge all remaining pressurized water from your plumbing lines by turning on the lowest fixture in your home, such as a basement sink or an outdoor ground-level garden hose spigot. Opening a low-level tap allows trapped water to drain out rapidly via gravity, venting residual pressure.
- Target Elevation: Choose the lowest elevation point in your building to ensure all overhead lines drain effectively.
- Bleed the Air: Open both the hot and cold handles simultaneously to release trapped air pockets and accelerate complete pipe drainage.
- Monitor Flow Cessation: Watch the spigot output closely to see if the stream tapers off into a sputter and stops entirely within 30 seconds.
Step 3 — Listen and Watch for Continued Flow
Return to the problem fixture or faucet where you originally noticed water running and evaluate its behavior now that the downstream lines have been vented. A healthy closed valve will reduce the flow to zero within seconds, while a faulty valve maintains a continuous trickle.
- Acoustic Check: Listen closely at the pipe joints near the shut-off valve for any ongoing hissing or rushing sounds of moving water.
- Catch Basin Test: Place a small container under the faucet to measure if water continues to accumulate past the one-minute mark.
- Pressure Rebuild Test: Leave the faucet open for two minutes; if water begins flowing strongly again, the shut-off valve is leaking past its seat.
Test Example First Hand Insight
During a recent diagnostic inspection on an older residential property, a homeowner insisted their main water valve was closed because the red handle would turn no further. However, opening the basement laundry sink resulted in an unabated, steady stream of water that refused to stop.
- The Diagnosis: A physical inspection revealed that the internal brass gate had detached from the threaded stem due to corrosion, meaning the handle turned freely while the gate stayed stuck in the open position.
- The Resolution: Testing the exterior street curb valve successfully halted the flow, proving that the indoor main valve required immediate replacement by a licensed plumber.
- Key Takeaway: Never trust a valve handle alone; always verify closure by checking the water meter dial and observing downstream fixture drainage.
How to Stop the Water for Good
Resolving persistent water flow requires moving past temporary measures and addressing the root mechanical failure. Whether trapped pressure, lodged mineral debris, or a completely stripped internal valve gate is causing the issue, systematic intervention will restore complete control over your home’s water supply.
Review the comprehensive repair progression below to safely clear lines, attempt quick diagnostic resets, or execute a permanent valve replacement. Following these ordered steps ensures you minimize property damage and avoid unnecessary plumbing bills.
Step 1 — Drain the Remaining Lines Flush Toilets Open Spigots
Clearing residual water and depressurizing your plumbing network is a mandatory prerequisite before performing any troubleshooting or valve maintenance. This step prevents unexpected flooding when fittings are opened or loosened.
- Open Lowest Fixtures: Turn on basement or ground-floor sink faucets, shower handles, and outdoor hose spigots completely.
- Flush Toilets: Flush all toilets in the house to drain the storage tanks and empty remaining water from the supply lines.
- Verify Complete Drainage: Wait until all faucets sputter and stop running entirely, confirming that internal line pressure has dropped to zero.
Step 2 — Reset the Valve Open Close Method to Dislodge Debris
Stuck valves can often be coaxed back into a functional seal by cycling them forcefully to dislodge trapped mineral scale or sand particles. This quick reset technique saves time and frequently corrects minor sealing failures instantly.
- Cycle the Handle: Turn the shut-off valve handle completely open, then firmly close it again through its full range of motion.
- Repeat Three Times: Rapidly opening and closing the valve a few times creates turbulence that shears away minor calcium or debris buildup on the seal.
- Check Success: Return to your lowest faucet to verify if the flushing action successfully forced the valve to seat completely.
Step 3 — When to Replace the Valve Completely
If cycling the valve fails to stop the water flow and the meter continues to spin, the internal components are permanently worn or damaged. Replacing the faulty valve is the only permanent solution to eliminate ongoing leaks and prevent potential property damage.
- Isolate Upstream Supply: Shut off the water at the street curb valve or secondary upstream master control before cutting any pipes.
- Remove the Old Unit: Unscrew threaded connections or use a tubing cutter to remove the failed compression or soldered valve body.
- Install the New Assembly: Clean the pipe ends thoroughly with abrasive cloth and secure a fresh replacement valve following manufacturer instructions.
Upgrading from Gate Valve to Ball Valve Why It’s Better
Traditional multi-turn gate valves are notorious for failing over time due to stripped internal stems and fragile brass wedges. Upgrading to a modern quarter-turn ball valve dramatically improves long-term reliability and ease of use.
- Quarter-Turn Operation: A simple 90-degree turn completely opens or closes the flow, eliminating the ambiguity of multi-rotation handles.
- Resistant to Mineral Buildup: The smooth chrome-plated brass ball design prevents mineral scale from catching on internal sealing surfaces.
- Visual Status Confirmation: When the handle aligns parallel with the pipe, the valve is open; when perpendicular, it is completely shut.
Contacting Your Utility Provider for the Street Curb Valve
If your home’s main indoor shut-off valve is broken and you cannot isolate the property safely, you must rely on the municipal curb valve. Most local water utilities prohibit homeowners from tampering with street-level utility boxes directly.
- Call Emergency Line: Contact your local water utility or municipal public works department immediately to report a failed main shut-off valve.
- Request Emergency Shut-Off: Ask a utility technician to come out and temporarily close the street curb stop so you can perform indoor repairs.
- Schedule Permanent Fix: Arrange for a licensed plumber to replace your indoor main valve while the street service line is safely isolated.
Fixture Specific Issues Shower & Toilet Valves
Plumbing anomalies frequently manifest differently depending on the specific fixture involved, as showers and toilets utilize specialized internal mechanics rather than standard faucets. Understanding these distinct components ensures you do not waste time troubleshooting the wrong part of your plumbing network.
Examine the fixture-specific failure points below to accurately diagnose why water persists at your shower head or toilet tank even after closing local supply controls. Each scenario highlights unique structural characteristics that govern water retention in high-use bathroom spaces.
Why Your Shower Valve Keeps Running After Shut-Off
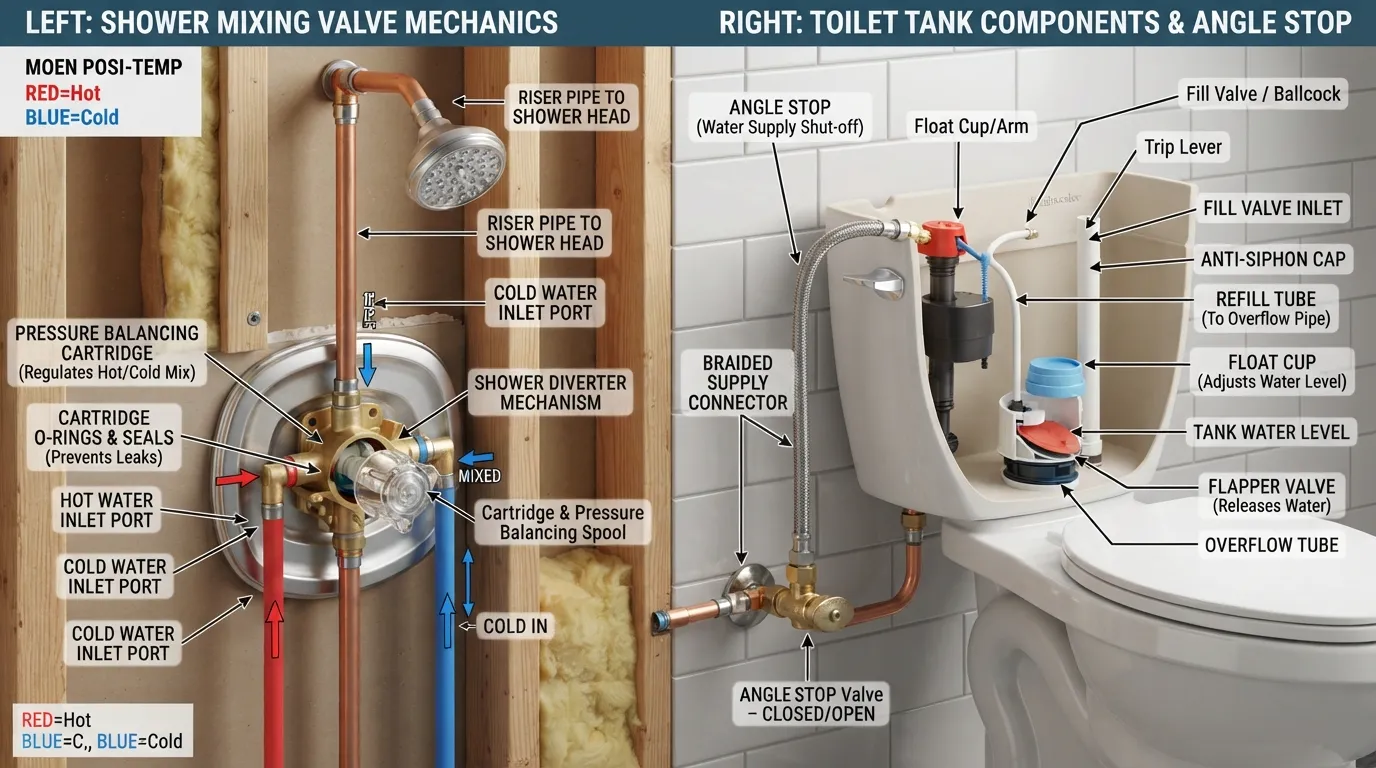
Unlike standard sinks with direct angle stops under the basin, most showers and bathtubs lack individual shut-off valves behind the trim plate. Consequently, closing the main water supply to work on a shower cartridge often results in water continuing to trickle or drain for an extended period.
- Overhead Pipe Drainage: Water trapped in the vertical riser pipes running from the shower valve up to the showerhead takes several minutes to empty completely via gravity.
- Cartridge Seepage: If water continues running indefinitely after the main supply is off, a worn pressure-balancing cartridge or cartridge o-ring is allowing residual line backflow to seep through.
- Diverter Valve Retention: Tub spout diverters can trap water within the spout neck, causing a delayed release long after the handle has been returned to the closed position.
Toilet Shut-Off Valve Closed But Water Still Running What’s Different
When you close the small angle stop valve underneath a toilet and water still enters the tank or bowl, you are typically dealing with a failing local valve seat or a siphon-fed bowl cross-connection. A toilet’s gravity-flush mechanism creates unique pressure dynamics compared to pressurized supply lines.
- Faulty Angle Stop Seal: The multi-turn or compression valve under the toilet often fails to seal completely due to internal rubber washer deterioration, allowing a steady trickle into the fill tube.
- Residual Tank Volume: Any water already inside the elevated toilet tank will continue to feed downward into the bowl until the tank reservoir is entirely empty.
- Supply Line Retention: The flexible braided hose connecting the wall valve to the toilet tank holds a small volume of water that slowly drains out once fittings are loosened.
Why There’s No Dedicated Shutoff for Bathtubs/Showers in Some Homes
Many residential building codes do not require individual shut-off valves for tub and shower installations to minimize hidden leak risks behind finished bathroom walls. Builders intentionally omit these local access valves to prevent concealed failures that could rot subfloors.
- Access Panel Limitations: Showers built on concrete slabs or interior walls often lack back-access panels, making the installation of localized shut-off valves structurally impractical.
- Reliance on Main Master Controls: Plumbers rely on the home’s primary shut-off valve or dedicated bathroom branch shut-offs to isolate shower mixing valves during repairs or cartridge replacements.
- Minimizing Failure Points: Eliminating extra threaded joints and compression fittings inside concealed wall cavities drastically reduces the long-term probability of catastrophic hidden water damage.
Water Heater Considerations Does Hot Water Still Run If Main Is Off?
Shutting off your home’s main water supply instantly stops incoming cold water, yet hot water faucets often continue to run or trickle for several minutes. This confusing behavior occurs because your water heater acts as an isolated pressurized reservoir completely separate from the incoming utility line.
Understanding how thermal storage and pressure dynamics interact within your plumbing network prevents confusion during emergency repairs. Review the mechanical relationship between your water heater and household taps below to see why hot water refuses to stop immediately.
How Water Heaters Are Connected to the Main Line
A residential water heater sits directly in line with your plumbing system, receiving cold water through an inlet pipe at the bottom and distributing heated water out through an outlet pipe at the top. The entire tank remains under constant house pressure as long as the main supply valve stays open.
- Cold Water Inlet Valve: A dedicated shut-off valve sits directly on top of the cold water feed pipe entering the tank, allowing you to isolate the heater independently.
- Continuous Pressure Vessel: The tank is a sealed steel container designed to withstand standard municipal water pressure without collapsing or rupturing.
- System Isolation: Closing the home’s main master valve stops fresh water from entering the building, but it does not automatically drain the 40 to 50 gallons already trapped inside the heated tank.
Why Hot Water Might Still Flow Temporarily
When you close the main supply valve and open a hot water tap, gravity, head pressure, and thermal expansion push the remaining water out of the tank reservoir. This stored volume must completely discharge before your hot water lines run completely dry.
- Stored Tank Volume: A standard residential tank holds dozens of gallons of water that will continue to feed hot-side faucets until the reservoir empties.
- Thermal Expansion Push: Heated water expands inside the tank, generating internal pressure that forces the remaining liquid outward through open hot-water fixtures.
- Siphon Effect: Opening a high-level faucet while the main line is closed creates a mild siphoning action, pulling residual water backward out of the heater and surrounding branch pipes.
Safety Concerns Can Pipes Still Burst If Water Is Off?
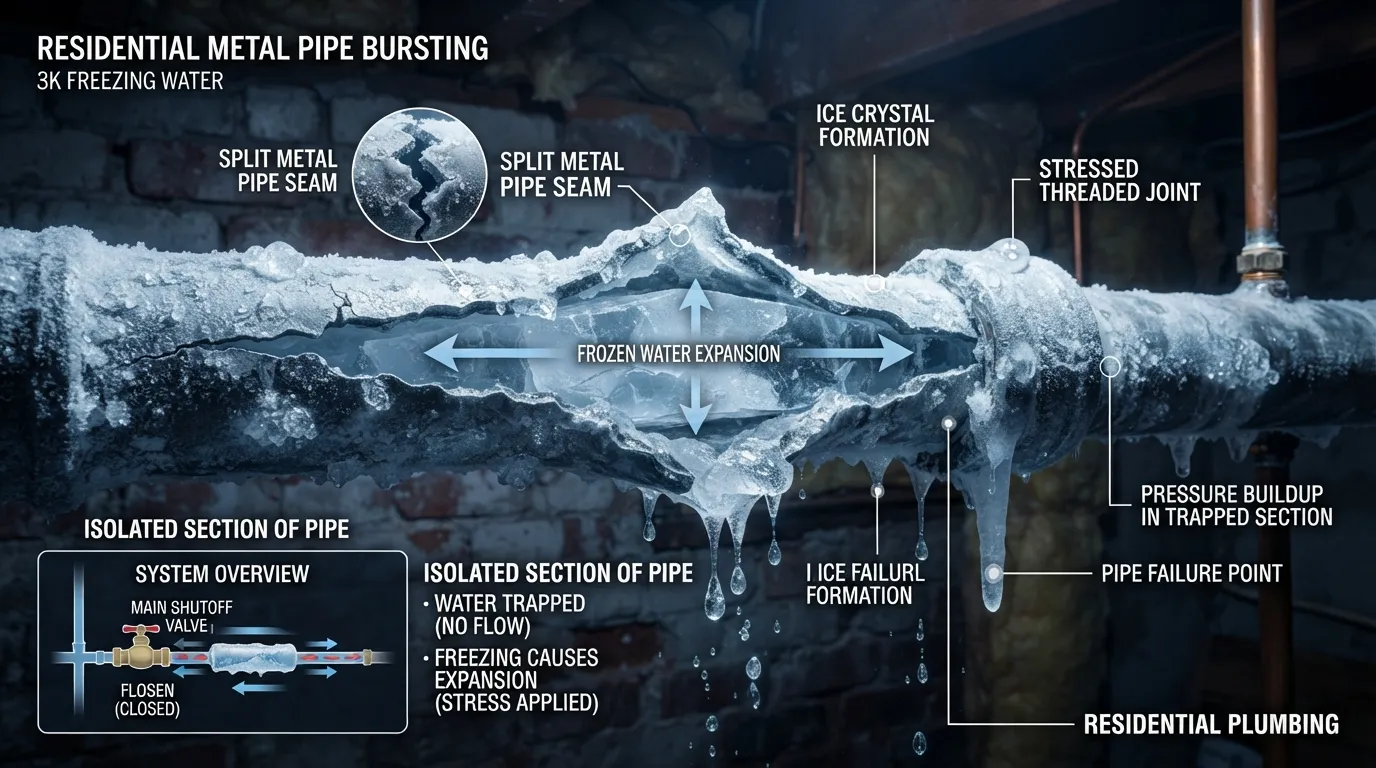
Many homeowners assume that closing a water supply valve completely eliminates the risk of pipe bursts or catastrophic leaks. Unfortunately, residual pressure, trapped moisture, and sub-freezing temperatures can still cause severe plumbing damage even when the main control is turned off.
Understanding the actual physical risks that remain after shutting off your water protects your property from unexpected winter emergencies and structural damage. Review the critical safety guidelines below to ensure your plumbing system remains secure during extended absences or repairs.
Can Pipes Burst Even With the Valve Closed?
Yes, pipes can still burst even when the water supply valve is fully closed if water remains trapped inside the line and freezes. When trapped water turns to ice, it expands outward with immense force, easily cracking copper, PVC, and PEX piping regardless of whether the valve is open or shut.
- Trapped Volume Expansion: Closed valves isolate water inside specific pipe segments, and without room to expand, freezing water generates pressure exceeding 2,000 psi.
- Exterior Wall Vulnerability: Uninsulated pipes running through exterior walls or crawlspaces remain highly susceptible to freezing even when main pressure is cut.
- Residual Moisture Risk: Even partially drained pipes retain enough liquid film to form ice plugs that split pipe seams during severe cold snaps.
Is It Safe to Leave the Main Valve Off for Extended Periods Vacation?
Leaving your main water valve turned off while you are away on vacation is one of the best preventative measures you can take to avoid catastrophic indoor flooding. However, simply closing the valve without properly preparing your home’s thermal environment can introduce new risks.
- Flood Prevention: Shutting the main line ensures that if an appliance hose or fitting fails while you are away, only the small amount of residual water in the pipes can escape.
- Appliance Safety Hazards: Ensure that electrically heated appliances like washing machines and ice makers are powered down or disconnected so they do not run dry and burn out.
- Winter Heating Requirements: If you travel during winter, never turn your heating system completely off; maintain a minimum indoor temperature of 55°F to prevent freezing in isolated lines, as detailed by the Insurance Information Institute.
Should You Leave Faucets Open While the Water Is Off?
Leaving low-level faucets slightly open after shutting off your main water supply is a recommended best practice during plumbing repairs or extended winterizations. Opening fixtures relieves trapped internal pressure and gives expanding ice a place to push safely if temperatures drop.
- Pressure Relief: Leaving taps cracked open prevents thermal expansion and hydraulic shock from stressing weak pipe joints and older solder connections.
- Complete System Drainage: Open faucets allow gravity to pull remaining water out of overhead lines, minimizing the risk of localized freezing and pipe bursts.
- Post-Repair Air Bleeding: Keeping faucets accessible ensures that when you eventually turn the water back on, trapped air escapes smoothly without causing violent water hammer surges.
Turning the Water Back On Safely Reverse Process
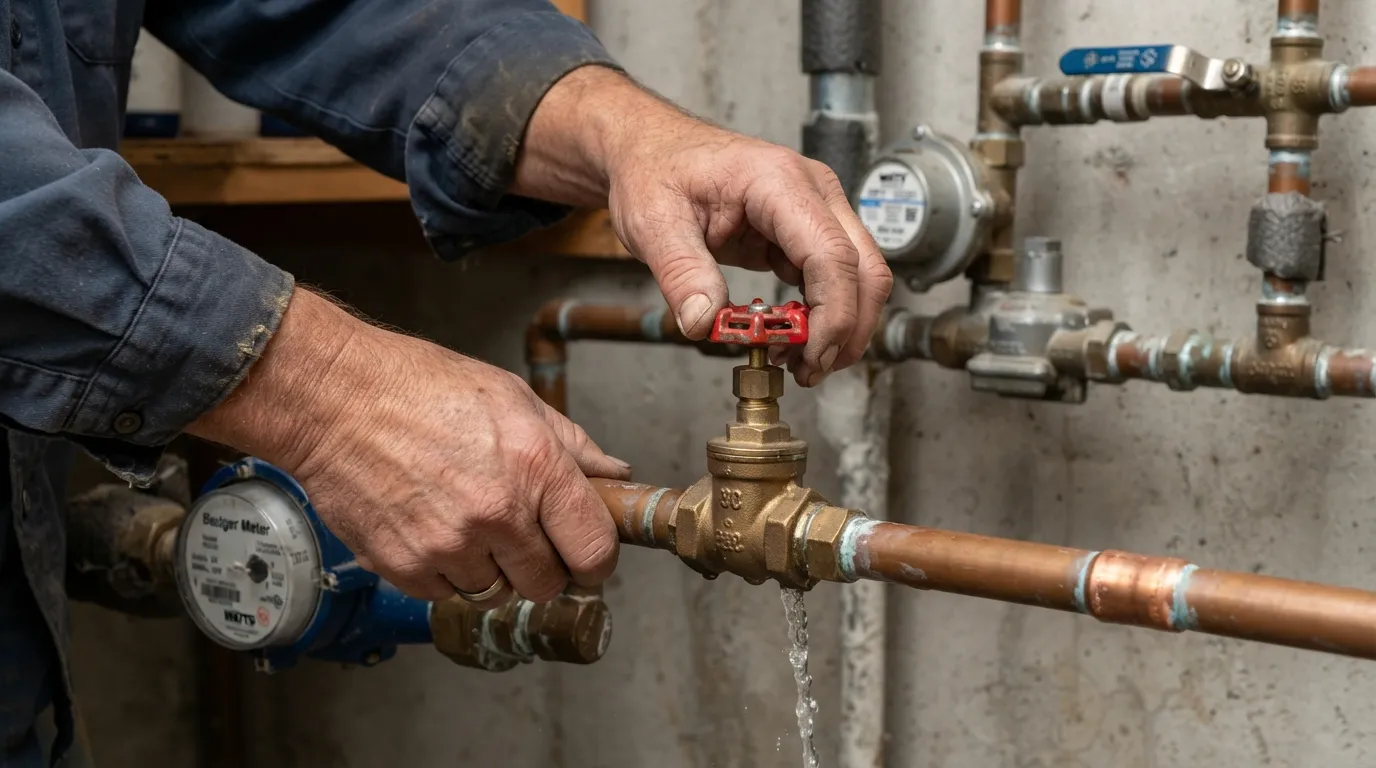
Restoring your plumbing system’s flow requires a deliberate, sequential approach rather than simply yanking the main handle open. Rushing the reopening process can trigger catastrophic surges that rupture weak joints, blow out rubber gaskets, or damage internal appliance seals.
Following a controlled repressurization protocol allows you to safely reinstate your home’s water supply while purging trapped air. Review the critical safety steps below to ensure a smooth transition back to standard operating pressure without risking mechanical failure.
Step by Step How to Turn Your Main Valve Back On
Slowly repressurizing your plumbing network is the single most important rule when restoring water service. You must turn the handle in microscopic increments to allow the pipes to fill gradually and equalize the massive incoming municipal water pressure.
- Initial Crack: Turn the valve handle just slightly—barely a quarter-turn for a ball valve, or one full rotation for a gate valve—until you hear a faint hiss of water entering the system.
- Wait and Equalize: Pause for 30 to 60 seconds to let the initial rush of water partially fill the empty downstream lines and stabilize the internal pressure.
- Full Reopening: Once the rushing sound quiets down, slowly turn the reopening valve to the completely open position to restore maximum flow to the property.
Why You Should Open Faucets Before Turning Water Back On
Opening multiple faucets before reopening the main valve creates an essential escape route for trapped air. Without open taps, the incoming water compresses the air inside the pipes, generating severe pressure buildup that can blast apart soldered fittings.
- Air Evacuation: Open fixtures provide a safe exit point for trapped air pockets, preventing them from acting as pneumatic rams against closed valves.
- Sediment Flushing: Reopening a main line often stirs up mineral debris and rust; open taps allow this dirty water to flush out immediately instead of clogging appliance screens.
- Visual Confirmation: Watching the lowest open spigot sputter and eventually flow clear provides instant visual proof that the system is successfully repressurizing.
Avoiding Water Hammer and Air-in-Pipes Issues
Water hammer occurs when high-velocity water suddenly collides with a closed valve or air pocket, sending violent, banging shockwaves through your pipes. Bleeding the air completely from every fixture prevents these destructive vibrations and protects your plumbing infrastructure.
- Bleed Air Systematically: Leave all open faucets running until the violent sputtering, spitting, and hissing transitions into a smooth, solid stream of water.
- Close Fixtures Bottom-to-Top: Once the air in pipes is fully cleared, begin turning off the open faucets starting at the basement level and working your way up to the top floor.
- Protect Appliances: Never run the washing machine or dishwasher immediately after restoring water until you have fully bled the lines using standard sink faucets first.
DIY vs. Professional Help When to Call a Plumber
Knowing when to stop DIY troubleshooting and call a professional plumber can save you from catastrophic property damage and expensive emergency repairs. While minor valve resets and residual drainage are easy to handle yourself, structural valve failures require expert tools and certified expertise.
Evaluating the complexity, legal boundaries, and financial costs associated with plumbing repairs ensures you make the right choice for your home. Review the decision guide below to determine whether your valve issue is a safe weekend project or an urgent job for a licensed contractor.
Signs You Need a Licensed Plumber
Certain plumbing scenarios involve high-pressure main lines or concealed pipe configurations that make professional intervention mandatory. Attempting to force or cut main water lines without proper shut-off capability can flood your home within minutes.
- Broken Main Valve: If your home’s main indoor shut-off valve is completely stripped, rusted solid, or snapping off in your hand, stop immediately and call a professional.
- Uncontrollable Flow: If closing your valves fails to reduce the water flow and you lack access to a working street curb valve, a plumber must intervene.
- Concealed Wall Leaks: If water is running behind drywall, beneath concrete slabs, or near electrical panels, expert acoustic leak detection is required.
Estimated Cost of Valve Replacement DIY vs. Professional
Understanding the financial implications of a valve replacement helps you budget appropriately for parts, tools, or labor fees. Comparing DIY expenses against hiring a professional highlights the value of prompt preventative maintenance.
Who Is Responsible Homeowner or Utility Provider? Curb Valve Cases
Property lines and municipal codes dictate strict boundaries regarding who holds legal responsibility and maintenance rights for water valves. Misunderstanding these lines can result in municipal fines or unexpected repair bills.
- Homeowner Responsibility: You are entirely responsible for all plumbing lines, branch valves, fixtures, and the main indoor shut-off valve located on your private property side.
- Utility Provider Responsibility: The municipal water department owns and maintains the water meter, the street main line, and the curb stop valve located at or near your property boundary.
- Tampering Restrictions: Most local water authorities strictly prohibit homeowners from operating or repairing the street curb valve without official authorization; unauthorized tampering can result in heavy penalties.
Preventive Maintenance Stop This From Happening Again
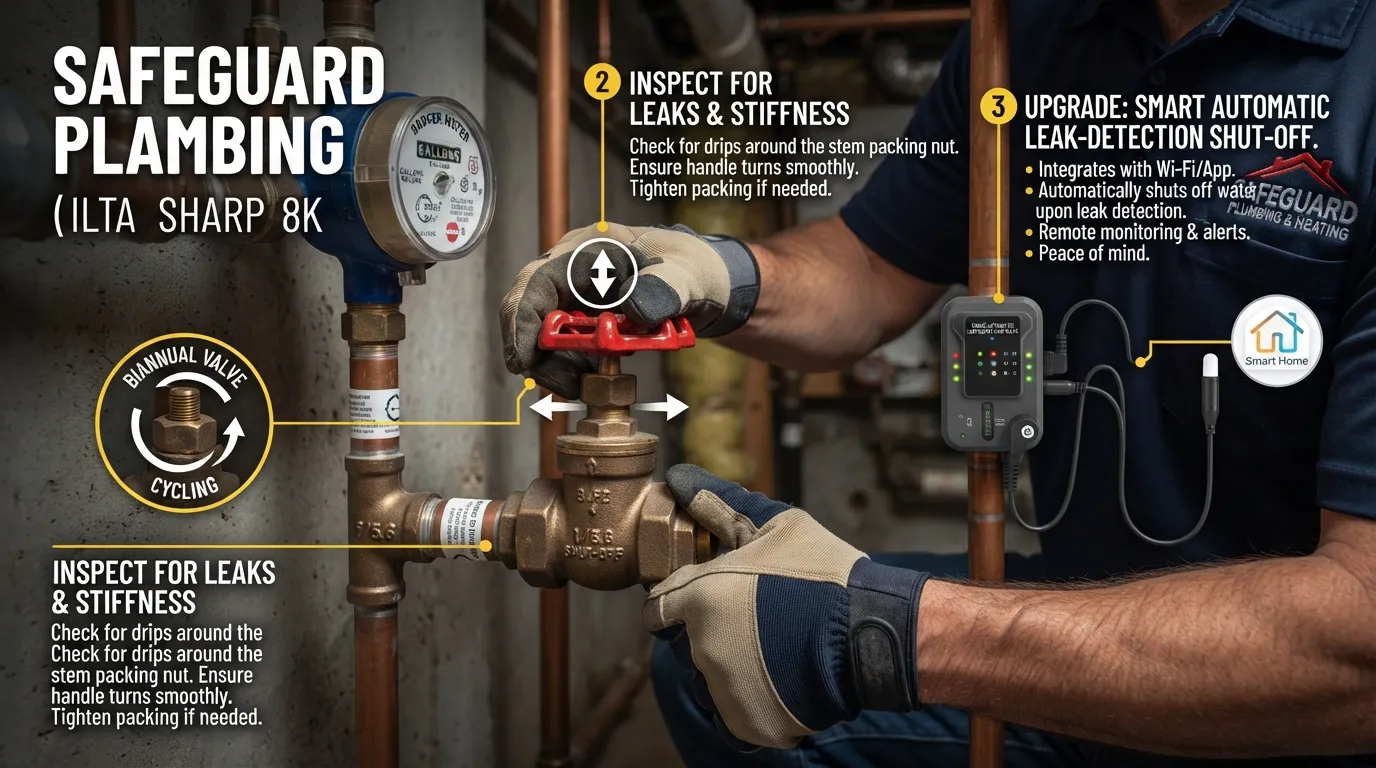
Preventing future plumbing emergencies requires establishing a proactive maintenance routine to ensure your shut-off valves remain responsive and dependable. Neglected valves frequently seize up or corrode solid over time, leaving you helpless when a sudden leak occurs.
Implementing simple, regular checks and investing in modern preventive hardware protects your home from unexpected water damage. Review the expert maintenance strategies below to keep your entire plumbing network in peak operational condition.
How Often Should You Exercise Your Main Valve?
Plumbing experts recommend opening and closing your main water shut-off valve at least once every six months to keep the internal mechanisms lubricated and prevent mineral binding. Regularly exercising the valve prevents hard water scale from locking the gate or ball into a single stationary position.
- Biannual Routine: Schedule your valve check twice a year—such as when changing smoke detector batteries or during spring and fall cleaning.
- Full Range Cycling: Turn the handle all the way to the closed position and back to open to clear away minor mineral crystals before they harden.
- Emergency Readiness: A regularly exercised valve turns smoothly and seals instantly when a sudden household leak demands immediate action.
Signs Your Valve Is About to Fail
Recognizing early warning signs of mechanical wear lets you to replace a compromised valve on your schedule rather than during an emergency. Watch closely for physical indicators that your current setup is reaching the end of its lifespan.
- Stiff or Binding Handles: If a valve handle requires excessive force, pliers, or wrenches to turn, mineral deposits or warped stems are compromising the unit.
- Slow Seepage Around the Stem: A small puddle or damp crust forming around the valve packing nut indicates that internal seals are perishing.
- Multi-Turn Slop: If a gate valve handle spins loosely without engaging the internal mechanism, the threaded stem has stripped and the valve can no longer close.
Upgrading to a Smart Automatic Shutoff Valve
Installing an automated smart water shut-off valve provides ultimate peace of mind by detecting leaks instantly and cutting off your home’s main supply automatically. These advanced devices combine smart-home technology with continuous flow monitoring to protect your property 24/7.
- Automatic Leak Shut-Off: Smart sensors placed near water heaters, washing machines, and toilets communicate with the main valve to shut water off the moment a leak is detected.
- Smartphone App Integration: Modern systems alert your phone instantly and allow you to monitor water pressure, consumption, and valve status remotely while away.
- Comprehensive Insurance Savings: Many major homeowner insurance providers offer annual policy discounts when you install a professionally monitored smart water protection system.
Frequently Asked Questions About Water Shut-Off Valves
Homeowners frequently encounter confusing plumbing behaviors when trying to isolate their water supply during repairs or emergencies. Addressing these common questions provides quick clarity and helps you navigate unexpected plumbing issues with confidence.
Explore the expert answers below to master your home’s water distribution network and understand exactly what to do when a valve fails to perform as expected. Each response targets key technical queries asked by homeowners nationwide.
Why is my water still running even though I turned off the valve?
Water typically continues running briefly after closing a valve due to residual drainage, gravity pulling trapped fluid out of elevated pipes, or head pressure discharging from your water heater tank. If the flow does not stop within 30 seconds, your shut-off valve is likely failing to create an airtight internal seal.
Why is my shut-off valve not stopping water?
Shut-off valves usually fail to stop water because hard water mineral deposits, calcium scale, or physical debris prevent the internal gate or ball from seating completely flush. In older gate-style valves, the internal threaded brass stem can also strip or snap off, allowing the exterior handle to turn while the internal gate remains stuck open.
How long should water run after turning off the main valve?
Genuine residual water drainage should slow down rapidly and stop completely within 10 to 30 seconds after closing the supply valve. If hot water lines are involved, the flow can persist for several minutes while the pressurized 40-to-50-gallon water heater tank completely drains or depressurizes.
Why is my water meter running even after I shut off the water?
A spinning low-flow indicator or dial on your water meter after closing the main house valve provides definitive proof that water is actively escaping downstream. This movement indicates either an incomplete valve closure, a bypass leak, or a broken service line located between the meter and your home foundation.
Is it okay to leave the main water valve off?
Yes, leaving your main water supply valve turned off is completely safe and serves as an excellent precautionary measure to protect your home from sudden plumbing leaks while you are away. However, you should ensure that electrically heated appliances like water heaters and ice makers are powered down so they do not run dry.
Is it a good idea to turn off the main water valve when on vacation?
Turning off your main water valve before leaving for an extended vacation is one of the most effective ways to prevent catastrophic indoor flooding from failed appliance hoses or burst pipes. This simple habit guarantees that if a fitting gives way while you are out of town, only the minimal residual water trapped in the lines can escape.
Can pipes still burst if water is turned off?
Pipes can still freeze and burst even when the main supply valve is completely closed if sufficient moisture or trapped water remains inside the line. When trapped water turns to ice, it expands with tremendous force, splitting copper, PVC, and PEX piping regardless of valve status.
Should I leave faucets open after shutting off the water?
Leaving low-level faucets cracked open after shutting off your main supply is highly recommended during plumbing repairs or freezing weather. Open taps relieve trapped internal pressure, allow residual lines to drain fully via gravity, and give expanding ice a safe escape path if temperatures drop.
Can I still use my toilet if the water is shut off?
You can flush a toilet exactly once after the water is shut off, as long as the toilet tank is currently filled with water from previous use. Once that remaining reservoir empties into the bowl, you will need to manually pour a bucket of water directly into the bowl to trigger a manual flush.
Should faucets be open when turning water back on?
Opening multiple faucets before turning your main water valve back on is an essential safety step that provides a safe escape route for trapped air and debris. Bleeding the lines prevents violent water hammer shockwaves and keeps high-pressure air pockets from blasting apart fragile pipe fittings.
Why aren’t there water shutoff valves for each room?
Building codes intentionally omit individual room shut-off valves to minimize hidden failure points and reduce the risk of concealed leaks behind finished drywall. Plumbers rely on strategic main branches or individual fixture angle stops to isolate specific areas without burying extra compression joints inside walls.
Why do water shutoff valves fail?
Water shut-off valves fail primarily due to mineral scale accumulation, aggressive corrosion, and the natural degradation of internal rubber washers or packing seals over time. Failing to exercise the valve handle at least twice a year accelerates this binding process, causing the internal mechanisms to lock up or strip entirely.

Oscar Vance | Master Plumber & Drainage Expert
Meet Oscar Vance, a licensed master plumber sharing practical solutions on residential repairs, preventive maintenance, and thoughtful home upkeep.


Pingback: How to Replace a Bathroom Faucet: Step-by-Step DIY Guide
Pingback: How to Clean Sediment From Water Lines Safely