What You Need to Know Before Replacing a Bathroom Faucet
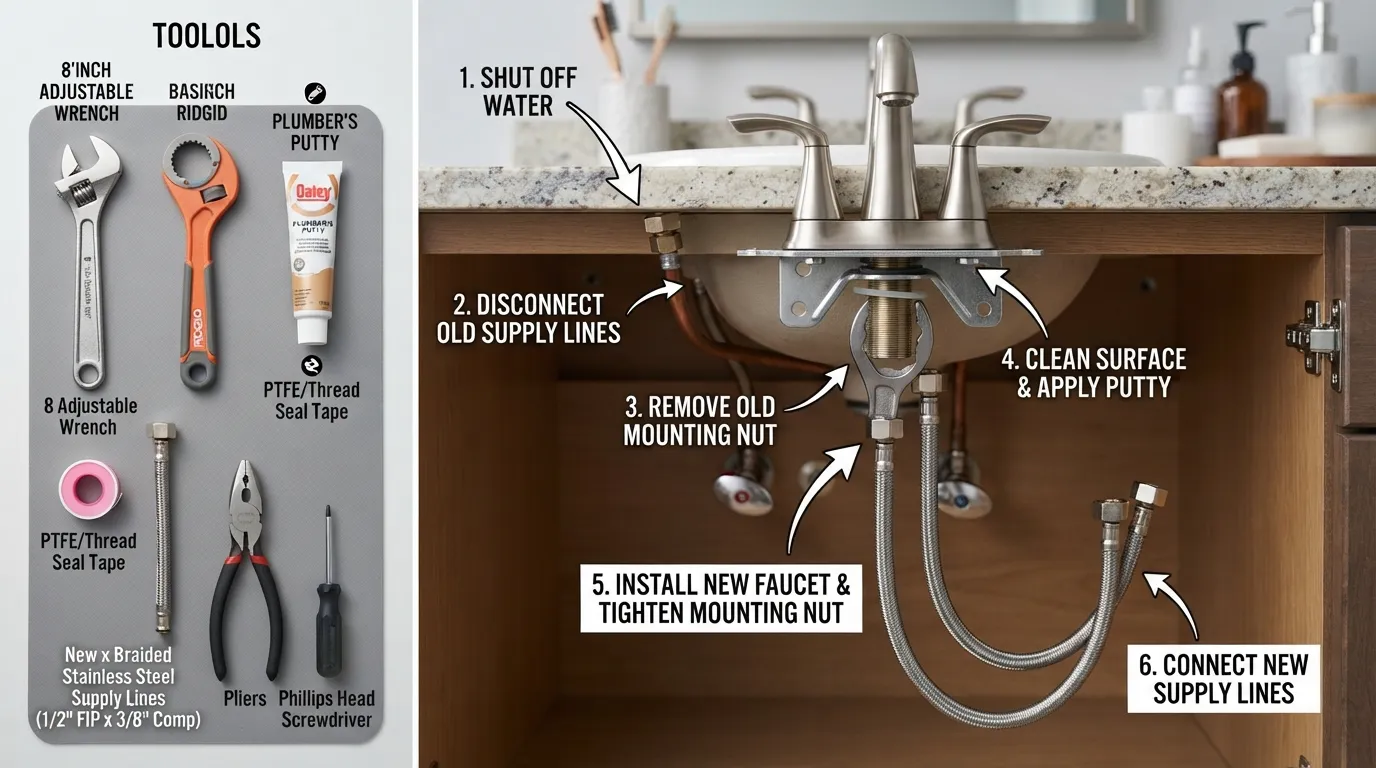
Replacing a bathroom faucet is one of the most rewarding and manageable DIY plumbing projects you can tackle. With basic household tools and less than two hours of your time, you can completely refresh your vanity’s look while saving significantly on professional plumber fees.
Is Replacing a Bathroom Faucet a DIY Job?
Yes, bathroom faucet replacement is completely beginner-friendly and achievable for most homeowners. The entire process typically takes under two hours and requires only standard tools like an adjustable wrench, flashlight, and plumber’s putty.
- Skill Level: Beginner-friendly with no prior plumbing experience required.
- Time Commitment: Usually takes between 60 to 120 minutes from start to finish.
- Cost Efficiency: Eliminates labor costs, making it an affordable weekend upgrade.
What You’ll Learn in This Guide
This comprehensive walkthrough equips you with the exact steps, safety checks, and pro tips needed to complete your bathroom faucet replacement successfully. You will master every phase of the installation process without guesswork.
- How to properly prepare your workspace and shut off the water supply lines safely.
- Step-by-step instructions for uninstalling your old, corroded, or outdated fixture.
- Techniques for mounting your new faucet and connecting supply lines leak-free.
- Post-installation testing methods to guarantee optimal water pressure and performance.
Signs You Need to Replace Your Bathroom Faucet
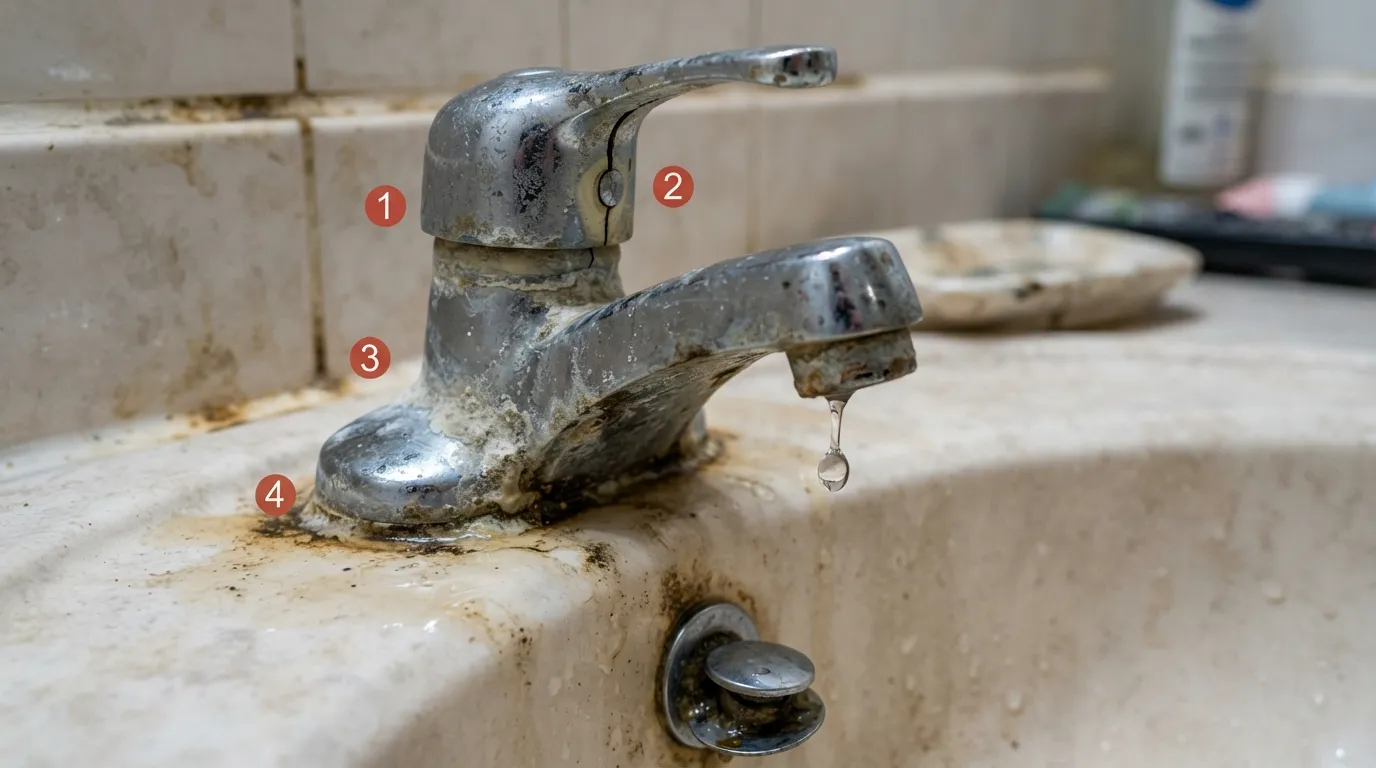
Deciding whether to repair or replace your bathroom fixture depends on the severity of the damage and its overall age. While minor drips can often be fixed with a simple washer or cartridge swap, persistent issues usually signal that a complete faucet replacement is the smartest, most cost-effective long-term solution.
Common Signs of a Failing Faucet
Recognizing the early warning signs of fixture failure helps prevent sudden water damage and frustrating vanity leaks. If you notice any of these structural or functional problems, upgrading your hardware is likely overdue.
- Persistent Dripping: A constantly dripping faucet that persists even after replacing washers or valves indicates worn-out internal casting.
- Severe Corrosion and Rust: Flaking chrome, green mineral buildup, or pitting around the base creates permanent aesthetic damage and weakens the metal.
- Low Water Pressure: Clogged or damaged internal waterways and a degraded faucet aerator can drastically restrict water flow.
- Outdated Style: Upgrading your bathroom’s interior design often makes swapping out legacy fixtures an essential remodeling step.
How Long Do Bathroom Faucets Typically Last?
High-quality bathroom faucets generally have a lifespan of 15 to 20 years, though budget models may begin failing much sooner. Hard water mineral buildup and aggressive chemical cleaners can accelerate wear and tear on internal components.
- Average Lifespan: 15 to 20 years for standard residential brass or stainless-steel fixtures.
- Hard Water Impact: Mineral scale buildup can clog cartridges and restrict movement in as little as 5 years if not regularly cleaned.
- Repair vs. Replace Threshold: If repair parts cost more than 50% of a brand-new fixture, replacement is always the better investment.
How to Identify Your Bathroom Faucet Type
Determining your exact sink configuration before purchasing a replacement ensures a seamless installation without compatibility issues. Measuring your existing hole spacing and counting the pre-drilled mounting holes prevents frustrating returns.
Single Hole Faucet
A single hole faucet combines both the water spout and the mixing handle into one cohesive, streamlined unit. Many models include an optional escutcheon plate to cover unused side holes if you are transitioning from an older configuration.
- Design: Integrates handle and spout into a single vertical body.
- Hole Requirement: Requires just one mounting hole on the sink deck.
- Versatility: Can fit three-hole sinks when paired with a matching deck plate.
Centerset Faucet (3-Hole, 4-Inch Spacing)
Centerset faucets are designed specifically for standard three-hole bathroom sinks where the outer handle holes are spaced exactly four inches apart from center to center. The handles and spout are typically connected to a single base plate.
- Design: Two handles mounted directly onto a shared base deck alongside the spout.
- Hole Requirement: Requires three distinct holes on the sink rim.
- Measurement Rule: The distance between the outer handle centers must equal four inches.
Widespread Split-Set Faucet 6-Inch+ Spacing
Widespread or split-set faucets feature independent hot and cold handles separated entirely from the central spout body. This premium style offers maximum flexibility for custom vanity layouts and larger sink basins.
- Design: Three separate, standalone components consisting of two handles and one spout.
- Hole Requirement: Requires three holes, with adjustable spacing ranging from 6 to 16 inches.
- Measurement Rule: Measure the span from the center of the left handle hole to the center of the right handle hole.
Tools and Materials You’ll Need
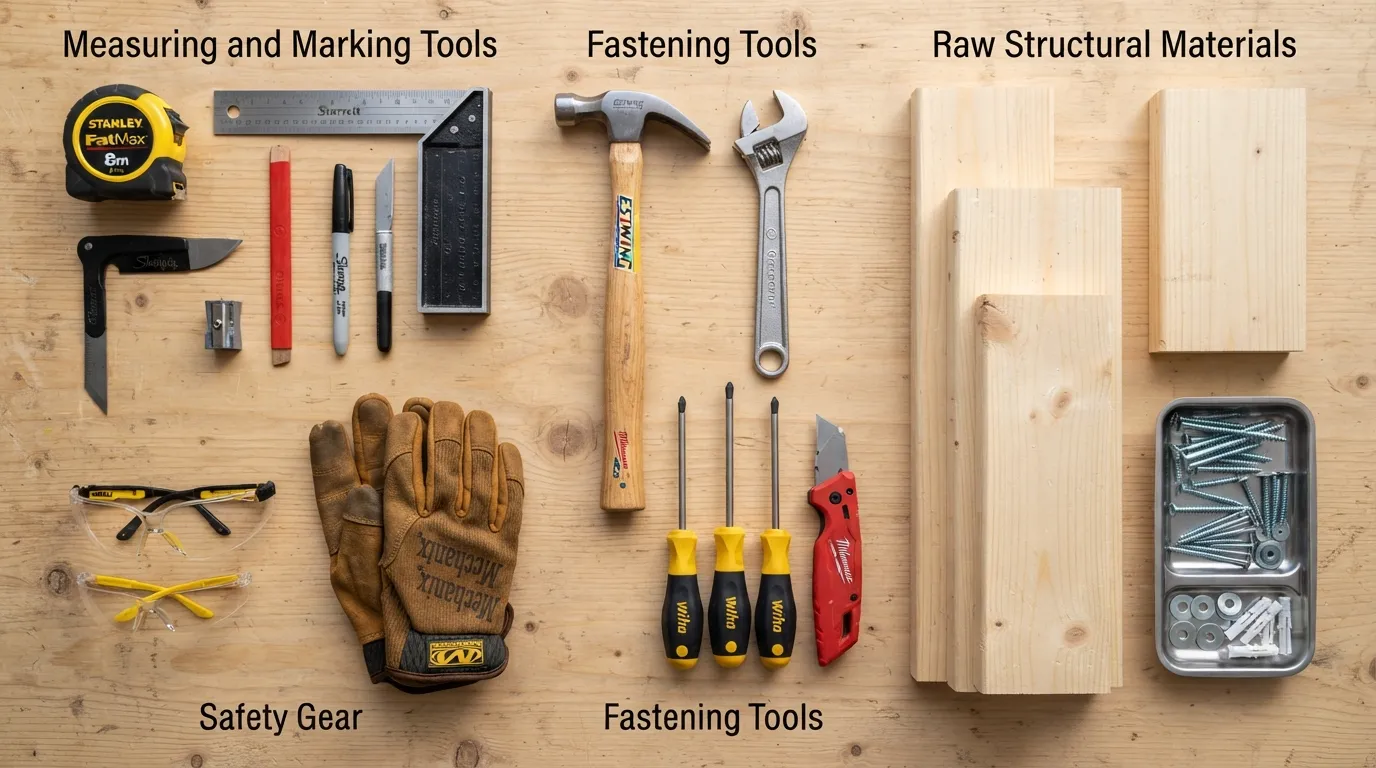
Gathering all necessary tools and replacement components before diving under the sink prevents frustrating interruptions mid-project. Having the right hardware on hand ensures a smooth, leak-free installation from start to finish.
Essential Tools Checklist
Most bathroom faucet replacements require only standard hand tools that are easy to maneuver in tight vanity spaces. A specialized plumbing wrench makes loosening rusted nuts significantly faster.
- Basin Wrench: A long-handled pivoting wrench specifically designed to reach tight mounting nuts behind the sink bowl.
- Adjustable Wrench: Used for tightening water supply lines and slip nuts without stripping hex fittings.
- Flashlight or Headlamp: Essential for illuminating dark, cramped working spaces underneath the vanity.
- Small Bucket and Towels: Catches residual water trapped inside old supply lines and P-trap assemblies when disconnected.
Materials & Replacement Parts Checklist
Using fresh sealing materials and high-quality replacement parts prevents premature leaks and water damage. Never reuse old, brittle gaskets or worn-out supply lines.
- New Bathroom Faucet Kit: Matches your existing sink hole configuration (single hole, centerset, or widespread).
- Plumber’s Tape (PTFE Tape): Wrapped around threaded pipe connections to create a tight, watertight seal.
- Clear Silicone Sealant: Used around the base plate of the faucet to anchor the fixture and block moisture seepage.
- Flexible Braided Supply Lines: Replaces old, degraded lines to ensure reliable water flow and secure connections.
DIY vs Hiring a Plumber Cost Comparison
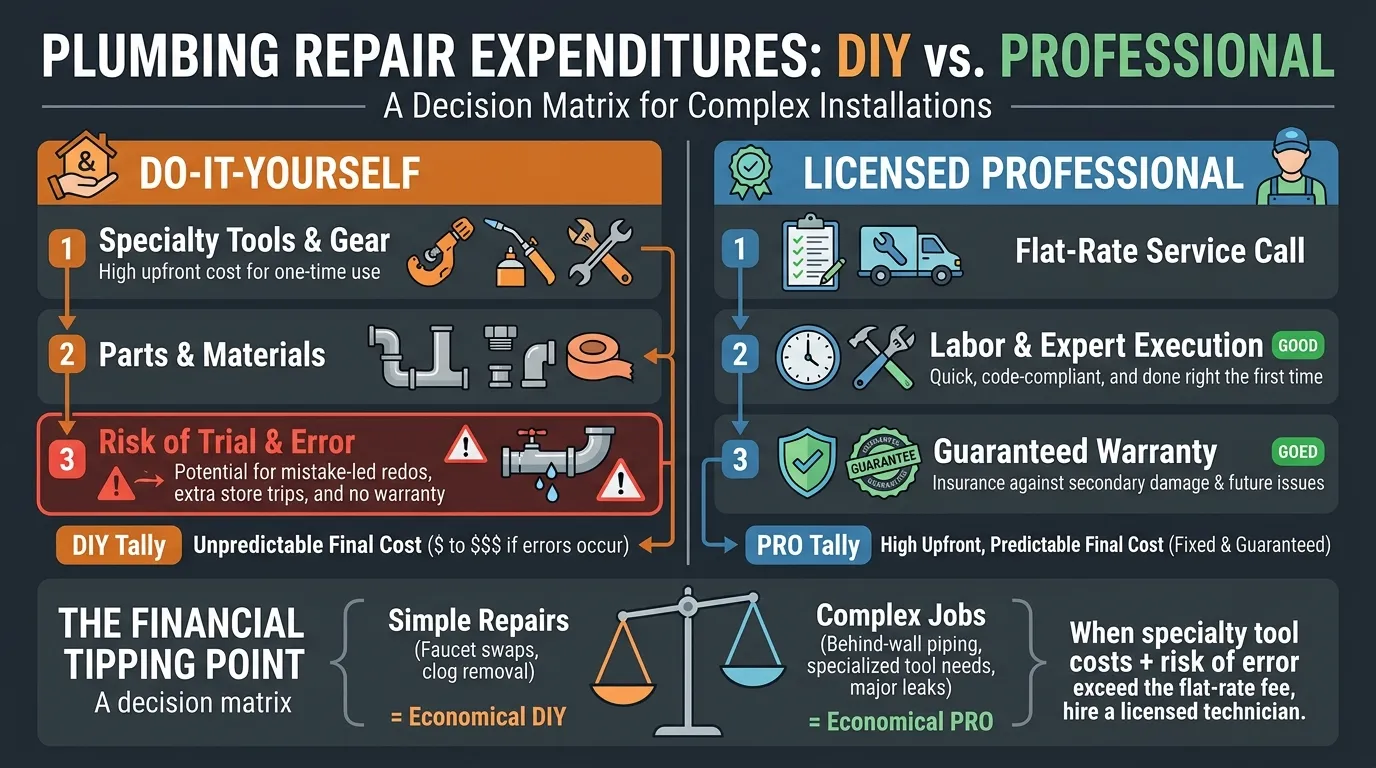
Deciding between a DIY faucet replacement and hiring a professional comes down to weighing upfront hardware costs against professional labor rates. According to data tracked by industry resources like Angi, total professional replacement costs typically range from $170 to $360, making a do-it-yourself approach a major money-saver.
Average Cost to Replace a Bathroom Faucet Yourself
When you tackle a bathroom faucet installation as a DIY project, your only expenses are the hardware and basic consumable materials. This route keeps total project spending tightly controlled.
- Hardware Cost: $45 to $150 for a reliable mid-range single-hole or centerset faucet kit.
- Materials Cost: $10 to $20 for plumber’s tape, silicone sealant, and optional flexible supply lines.
- Total DIY Investment: Usually under $170, with zero labor expenses incurred.
Average Plumber Installation Cost
Hiring a licensed professional provides peace of mind and warranty coverage, but labor fees significantly increase the project total. Plumbers generally charge an hourly rate plus a service call fee.
- Labor Rates: Plumbers typically charge $45 to $200 per hour, with standard installation taking 1 to 2 hours.
- Total Professional Cost: Expect to pay between $170 and $360 total for standard fixture swaps.
- Retailer Services: Big-box home improvement stores like Home Depot quote flat-rate local installation services starting around $150 to $250 depending on regional rates.
When Should You Hire a Professional Instead?
While standard swaps are straightforward, certain legacy plumbing setups introduce complications that require specialized tools and expert intervention. Knowing your limits prevents minor upgrades from turning into major household disasters.
- Severely Corroded Supply Lines: Rusted shut-off valves or frozen supply nuts that risk breaking off inside the wall require professional pipe extraction.
- Complex Custom Layouts: Wall-mounted faucets or custom luxury split-set designs requiring modified in-wall plumbing lines.
- Persistent Structural Leaks: Chronic leaks originating deeper within the vanity substructure or compromised P-trap assemblies.
Step by Step Guide How to Replace a Bathroom Faucet
Replacing your bathroom faucet is a straightforward process when approached methodically. Following this step-by-step installation guide ensures a secure, watertight setup without damaging your sink or plumbing infrastructure.
Step 1: Shut Off the Water Supply
Locate the hot and cold water shut-off valves directly underneath your sink basin and turn them clockwise until fully closed. Open your faucet handles to drain any residual water trapped in the lines and relieve pressure.
- Safety First: Always verify water flow has completely stopped before loosening any threaded fittings.
- Drain Residual Water: Place a small bucket and folded towels beneath the P-trap to catch leftover droplets.
Step 2: Remove the Old Faucet
Disconnect the flexible supply lines from the shut-off valves using an adjustable wrench. Next, use a basin wrench to loosen and remove the mounting nuts securing the faucet body to the underside of the sink deck.
- Disconnect Fittings: Unscrew supply line connectors and detach the pop-up lift rod linkage.
- Lift Out Fixture: Lift the old faucet straight up from the top of the sink, then thoroughly clean away any old putty, mineral scale, or grime from the deck surface.
Step 3: Replace the Sink Drain (Optional but Recommended)
If your new faucet kit comes with a matching pop-up drain assembly, now is the ideal time to swap out the old components. Unscrew the drain nut underneath, remove the old tailpiece, and seal the new flange with plumber’s putty.
- Apply Putty: Roll a thin rope of plumber’s putty around the underside of the new drain flange and press it firmly into the sink drain hole.
- Secure Assembly: Tighten the rubber gasket and locknut underneath the basin, wiping away any excess squeezed-out putty cleanly.
Step 4: Install the New Faucet
Position the new faucet gasket or run a thin bead of clear silicone sealant along the bottom edge of the faucet base plate. Insert the mounting shanks and water lines through the designated holes on your sink deck.
- Align Faucet: Ensure the faucet body is centered and sits straight and square against the back of the sink rim.
- Tighten Mounting Nuts: Hand-tighten the mounting nuts from underneath, then gently snug them with your basin wrench without overtightening.
Step 5: Reconnect Water Lines and Test for Leaks
Connect your flexible hot and cold supply lines to the corresponding shut-off valves and tighten them securely with a wrench. Slowly reopen both water supply valves and inspect all connections closely for any signs of weeping or leaks.
- Flush Aerator: Remove the faucet aerator tip and run both hot and cold water for one full minute to clear out any trapped debris or pipe scale.
- Check for Leaks: Wipe joints dry with a paper towel and run your fingers along the threaded connections and P-trap to confirm a completely watertight installation.
How to Replace Different Faucet Types Variation Specific Mini Guides
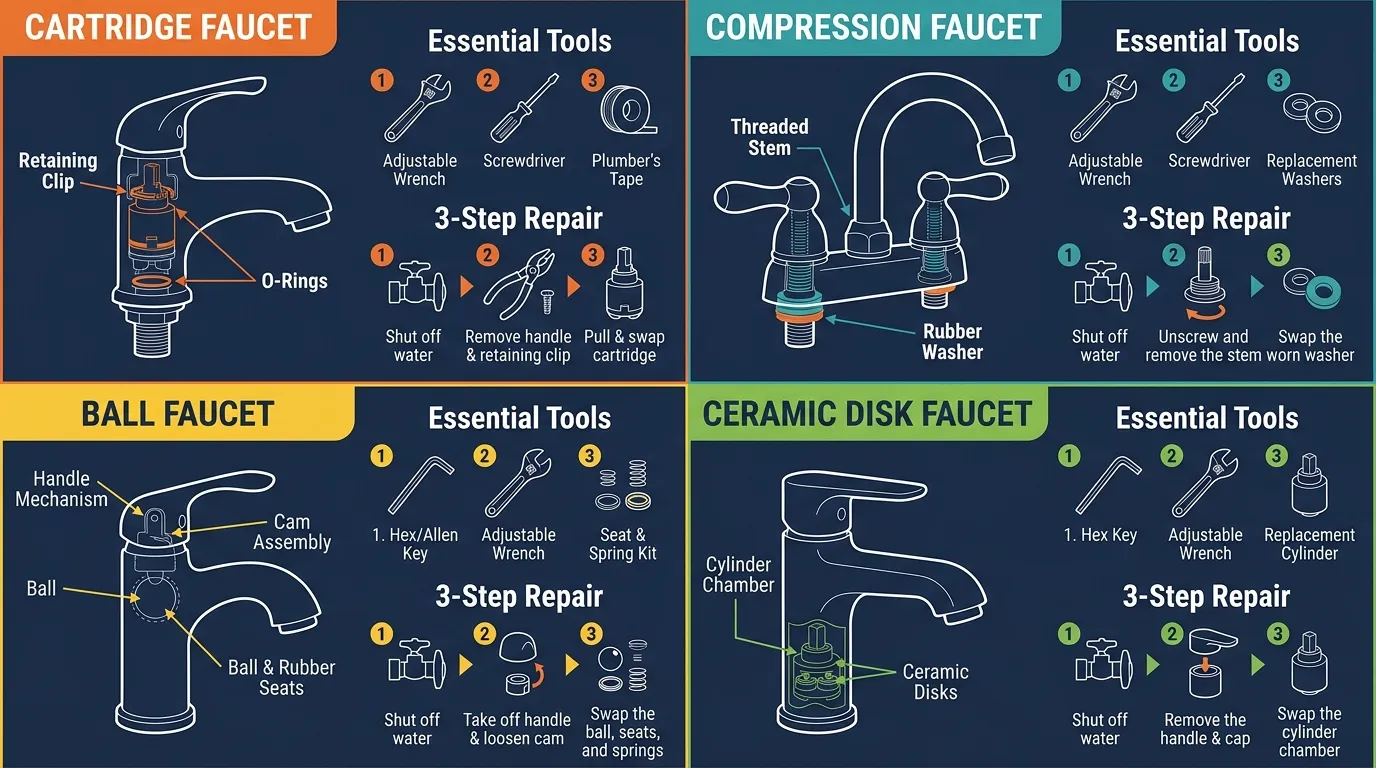
While the core replacement workflow remains largely consistent, specific faucet configurations have unique mounting requirements. Tailoring your installation approach to match your exact hardware style guarantees a secure, professional-grade finish.
How to Replace a Single Handle Bathroom Faucet
Single handle faucets integrate the mixing valve directly into the main spout housing, making them the easiest model to install. They require minimal coordination underneath the sink deck.
- Deck Prep: Place the included rubber gasket or optional deck plate over the single pre-drilled mounting hole.
- Secure Body: Feed the attached hot and cold supply lines through the hole and tighten the mounting bracket nut securely from underneath.
How to Replace a Bathroom Faucet with Two Handles
Two-handle configurations require separate hot and cold valves that must align perfectly with the central spout. Proper alignment prevents awkward handle angles and ensures smooth, symmetrical operation.
- Handle Placement: Insert the separate hot and cold valve assemblies through the outer mounting holes, securing them loosely with underside locknuts.
- Spout Alignment: Position the central spout between the handles, connect the internal quick-connect hoses or T-valve, and tighten all mounting nuts evenly.
How to Replace a 3-Hole Bathroom Faucet
Three-hole faucets can either be centerset models with a shared baseplate or widespread independent setups. Measuring the precise spacing between holes beforehand ensures your new fixture fits the existing vanity deck.
- Spacing Check: Confirm your sink hole spread matches either the standard four-inch centerset layout or a wider split-set design.
- Deck Sealing: Apply a continuous bead of silicone sealant around the perimeter of all base plates to prevent water from seeping into the vanity cabinet.
How to Replace a Bathroom Sink Faucet with a Pop Up Drain
Replacing the mechanical pop-up drain assembly alongside your faucet ensures smooth stopper operation and eliminates old, corroded drain leaks. This step integrates the sink stopper lift rod with the tailpiece linkage.
- Rod Connection: Insert the horizontal pivot rod through the drain tailpiece and attach the lift rod strap using the spring clip connector.
- Adjustment: Test the stopper pull height to ensure it opens and closes completely when the faucet handle or lift knob is operated.
Common Mistakes and Troubleshooting Tips

Even seasoned DIYers occasionally run into minor snags during a plumbing upgrade. Knowing how to diagnose and resolve these frequent installation hiccups saves you time, frustration, and unnecessary service calls.
Faucet Still Leaking After Installation? Here’s Why
Finding a small puddle under the vanity right after a fresh install is frustrating, but it usually points to one of a few simple fixes. Re-evaluating your connections quickly stops water loss.
- Loose Supply Connections: Flexible supply line nuts may need an extra quarter-turn with an adjustable wrench to compress internal rubber washers.
- Missing Thread Tape: Forgetting to wrap plumber’s tape clockwise around threaded nipples allows water to slip past pipe threads.
- Damaged O-Rings: Pinched or twisted internal seals inside the quick-connect fittings can leak under full water pressure.
Dealing with Stuck or Corroded Mounting Nuts
Years of accumulated moisture underneath bathroom sinks cause metal mounting nuts to rust solid to the underside of the basin. Forcing them can crack porcelain or fiberglass sinks.
- Penetrating Oil: Spray a generous amount of liquid penetrating oil onto the stuck threads and let it sit for 15 to 30 minutes.
- Basin Wrench Leverage: Use a specialized long-handled basin wrench to gain sufficient torque in cramped vanity spaces.
- Alternative Cutting: If corrosion is completely fused, carefully cut through stubborn brass or plastic nuts using a mini hacksaw or nut splitter.
What to Do If You Can’t Identify the Faucet Manufacturer
When trying to source replacement repair parts for an unbranded or legacy faucet, finding exact matches can feel impossible. Replacing the entire fixture is often the most practical solution.
- Universal Compatibility: Standard single-hole and centerset replacement kits fit virtually all universal sink deck footprints.
- Measure Before Buying: Always measure your existing mounting hole spacing and deck thickness before purchasing a generic replacement model.
Avoiding Cracked Packing Nuts Real Scenario Insight
Overtightening the packing nut beneath the faucet handle or supply connection is a common beginner mistake that cracks brass or plastic fittings instantly. Always use a gentle touch when working with delicate internal threads.
- Snug, Not Crushed: Tighten nuts securely by hand, then use a wrench to turn them just a quarter-turn further until resistance is felt.
- Check Alignment: Ensure fittings are perfectly straight before applying torque to prevent cross-threading and structural cracks.
Which Faucet Brand Should You Choose? Delta vs Moen
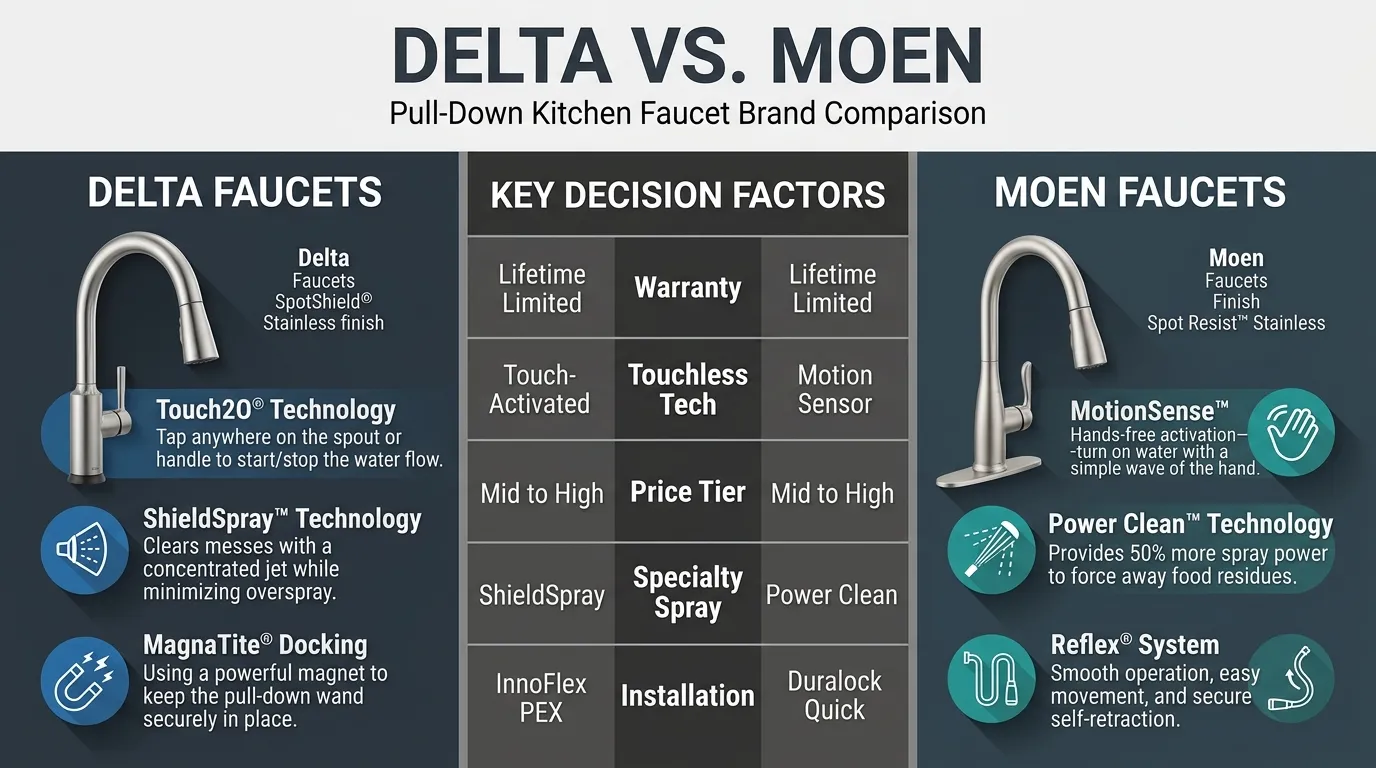
Choosing the right brand for your bathroom faucet upgrade heavily impacts long-term durability, water efficiency, and ease of maintenance. Professional plumbers consistently recommend brands that back their products with robust lifetime warranties and easily accessible replacement cartridges.
Delta Faucets: Pros and Cons
Delta is renowned for innovative engineering, featuring proprietary technologies like Diamond Seal Technology that reduce leak points and simplify cartridge replacements.
- Pros: Excellent availability of replacement parts at local hardware stores; intuitive DIY-friendly designs; robust lifetime limited warranties.
- Cons: Some lower-end model lines incorporate high-impact plastic components in non-critical body areas.
Moen Faucets: Pros and Cons
Moen is an industry leader celebrated for exceptionally smooth handle operation and the revolutionary M-PACT common valve system, which lets you update your faucet trim style without changing behind-the-wall plumbing.
- Pros: Premium build quality with heavy-duty metal construction; smooth, reliable cartridge operation; hassle-free customer warranty support.
- Cons: Generally commands a slightly higher price point compared to entry-level competitors.
Recommendation Based on Budget and Durability
Selecting between these two top-tier brands depends on your immediate design preferences and long-term upgrade plans.
- Choose Delta If: You want reliable, budget-friendly performance with maximum ease of finding replacement internal parts quickly.
- Choose Moen If: You prefer heavy-duty metal construction and want the flexibility of updating your sink style later without tearing out old plumbing valves.
Frequently Asked Questions FAQ
Get quick, definitive answers to the most common questions homeowners ask before, during, and after replacing a bathroom faucet.
Do all bathroom faucets fit all sinks?
No, bathroom faucets do not universally fit all sinks. You must match your faucet type (single hole, centerset, or widespread) to the pre-drilled mounting hole count and spacing on your sink deck.
- Hole Count Verification: Check whether your sink has one, two, or three pre-drilled holes.
- Spread Measurement: Measure the distance between outer holes for centerset (4-inch) or widespread setups.
Can you install a bathroom faucet without a plumber?
Yes, replacing a bathroom faucet is a very manageable DIY project for most homeowners. With standard household tools and basic plumbing tape, you can complete the job safely in under two hours.
- Beginner Friendly: No specialized welding or pipe cutting is typically required for standard sink replacements.
- Cost Savings: Tackling this project yourself saves between $150 and $350 in professional labor fees.
How long does it take to replace a bathroom faucet?
For most DIYers, replacing an existing bathroom faucet takes between 60 to 120 minutes. Stubborn, corroded mounting nuts or rusty supply lines can occasionally add extra time to the removal phase.
- Removal Phase: 30 to 45 minutes to shut off water, detach old supply lines, and extract the legacy fixture.
- Installation Phase: 30 to 60 minutes to clean the deck, mount the new faucet, and reconnect water lines.
How do I fix a dripping faucet without replacing parts?
If your faucet is dripping, mineral scale buildup around the internal aerator or cartridge is often the culprit rather than complete component failure. Soaking the aerator in white vinegar can frequently restore proper water flow.
- Aerator Cleaning: Unscrew the tip of the faucet spout and soak the screen in vinegar to dissolve hard water deposits.
- Flush Debris: Run the water briefly with the aerator removed to clear out trapped mineral flakes.
Does Home Depot install bathroom faucets?
Yes, major home improvement retailers like Home Depot offer local professional installation services through vetted independent contractors. Standard installation pricing typically ranges from $150 to $250 depending on your region and complexity.
- Service Booking: You can purchase installation services directly online or at your local store’s service desk.
- Warranty: Retailer-backed installations usually include a short-term workmanship warranty on top of the manufacturer’s hardware warranty.
Conclusion Final Tips Before You Start
Replacing your bathroom faucet is an empowering and straightforward home improvement project that delivers an instant aesthetic upgrade. By carefully preparing your tools, matching your sink hole configuration, and taking your time with each connection, you can achieve a professional-grade installation entirely on your own.
Key Takeaways
Keeping a few essential principles in mind ensures your DIY plumbing upgrade stays smooth, leak-free, and stress-free from start to finish.
- Verify Compatibility: Always measure your sink hole count and spacing before purchasing a new single-hole, centerset, or widespread fixture.
- Protect Connections: Use fresh plumber’s tape on threaded pipe fittings and avoid overtightening nuts to prevent cracks.
- Test Thoroughly: Flush out debris and check all joints with paper towels immediately after restoring water pressure.
Final Pro Tip
Never rush the preparation and cleanup phase beneath the sink. Taking an extra five minutes to thoroughly clean away old mineral scale and dried putty from the vanity deck guarantees a tight, watertight seal that will protect your cabinet and last for years.

Oscar Vance | Master Plumber & Drainage Expert
Meet Oscar Vance, a licensed master plumber sharing practical solutions on residential repairs, preventive maintenance, and thoughtful home upkeep.

