How to Get Air Out of Plumbing Lines
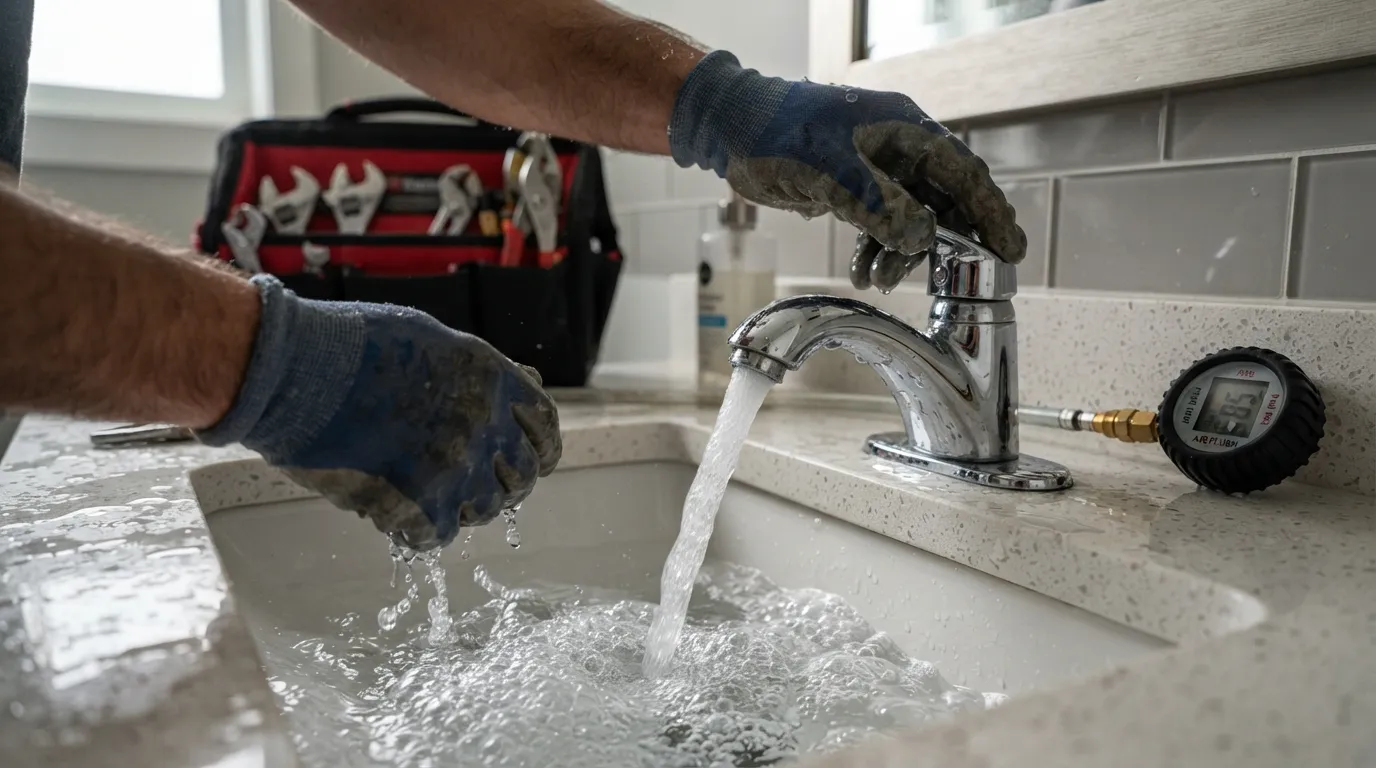
To get air out of plumbing lines, turn off your main water supply, open the highest faucet in your home, and then turn the main valve back on to let water flush through the system. Allow all fixtures to run until a steady water flow expels trapped air, sputtering, and gurgling noises.
- Locate the main valve: Find and close your main water shut-off valve to begin the system reset process.
- Open highest fixtures: Open the highest faucets and showers in your house to give trapped air an escape route upward.
- Reopen main supply: Slowly turn the main water supply back on, allowing pressure to push the air pockets out.
- Flush all faucets: Let every faucet, toilet, and appliance run until the water flows smoothly without sputtering.
Why Does Air Get Trapped in Plumbing Lines?
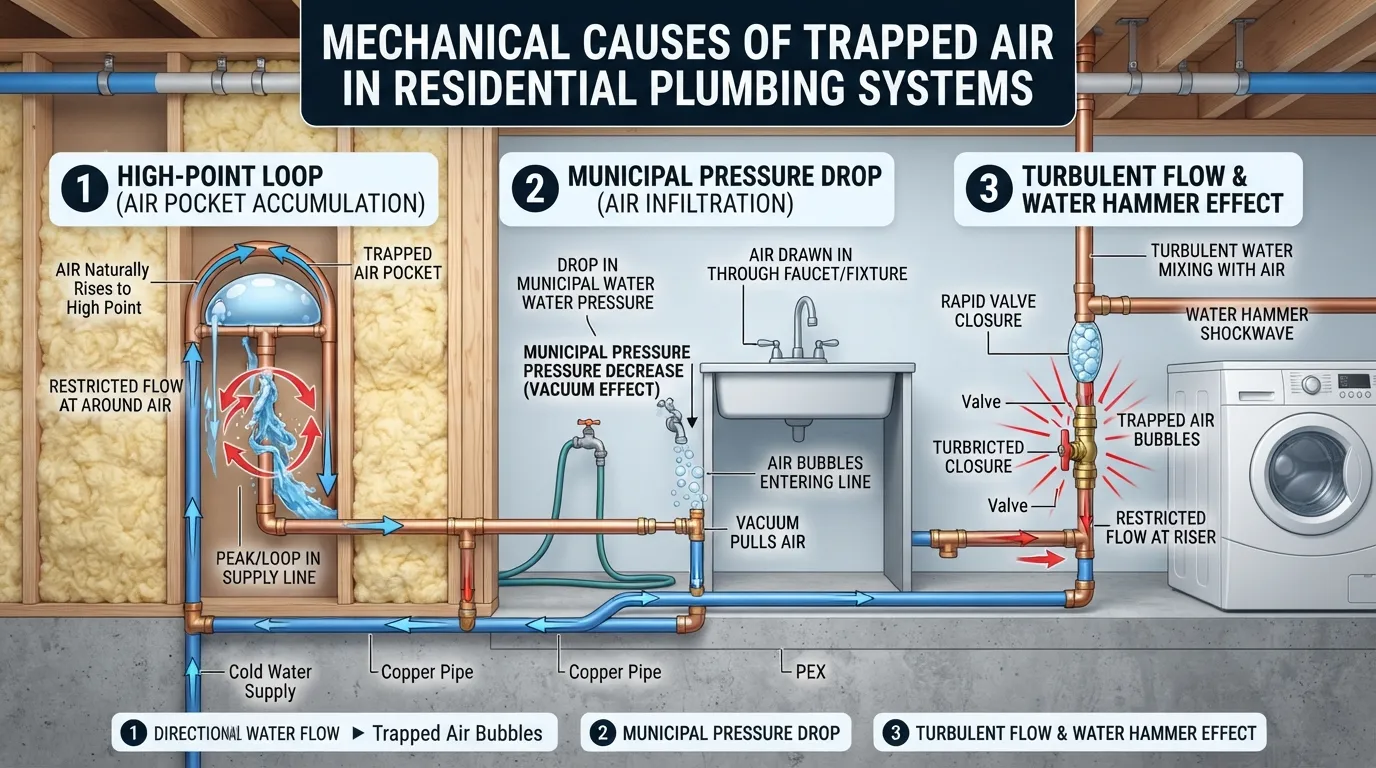
Air enters your plumbing system whenever a break in the water pressure allows gas pockets to form or enter the piping network. Understanding these root causes helps prevent recurring sputtering, hammering, and erratic water flow across your fixtures.
New Plumbing Installation or Repair Work
Whenever a new plumbing system is installed or existing pipes are opened for repairs, ambient air naturally fills the empty cavities. When the main water supply is turned back on, this trapped air gets pushed toward your fixtures, resulting in sudden bursts of sputtering or gurgling when faucets are first opened.
- Uncharged pipes: Newly fitted pipes start completely dry and filled with atmospheric air.
- Initial pressurization: Restoring the water supply compresses the remaining air into pockets.
- Fixture purging: Air escapes sequentially the moment individual valves or aerators are opened.
Water Main Repairs by Your Utility Company
Municipal utility work or local pipe breaks force municipal water districts to shut down supply mains temporarily. When the main line is drained and later refilled, large volumes of air are swept directly into residential service lines.
- Main line drainage: Repairing a street main forces water out, leaving massive air voids.
- Rapid re-entry: Restored pressure drives pressurized air columns straight into home meters.
- Neighborhood-wide impact: Multiple nearby households usually experience identical sputtering simultaneously.
Water Heater Issues Sediment Anode Rod Refill After Draining
Water heaters frequently trap and generate air pockets due to thermal expansion, tank draining, or chemical reactions inside the reservoir. Sediment buildup and a degrading sacrificial anode rod can accelerate gas generation inside the tank.
- Tank maintenance: Refilling a water heater after annual flushing leaves an upper pocket of air.
- Chemical reactions: A deteriorating anode rod can react with minerals, producing localized gas bubbles.
- Thermal expansion: Overheating water causes dissolved gases to separate and accumulate at the top.
Well Pump or Pressure Tank Problems Well Water Users
Private well systems are uniquely vulnerable to air entrapment due to mechanical failures within the well pump or a waterlogged pressure tank. If the water table drops or the pump draws down too low, it pulls air straight into the delivery lines.
- Drawdown limits: A well pump running too close to the water table sucks in air bubbles.
- Bladder failure: A ruptured pressure tank bladder eliminates the air-water separation barrier.
- Faulty check valves: A leaking foot valve allows water to drain back down, introducing air pockets.
- Pressure drops: Erratic pressure switch settings cause surging and air entrapment.
A Hidden Leak Drawing Air Into the System
A suction-side leak on a supply pipe or an underground supply line breach can pull air into the plumbing system whenever negative pressure occurs. Instead of spraying water outward, these micro-leaks act like a straw, sucking in ambient air during high-demand cycles.
- Negative pressure zones: Rapid water usage creates localized suction forces near compromised joints.
- Invisible entry: Small cracks underground admit air without showing immediate surface puddles.
- Persistent sputtering: Faucets repeatedly introduce air even long after a main system purge.
Seasonal Water Shutoffs Vacation Homes Winterizing
Vacation properties, seasonal cabins, or homes undergoing winterization are routinely drained of water to prevent freezing damage. Recommissioning these properties requires a strict systematic flush to clear out extensive air volumes.
- Complete drainage: Drained winterized lines leave miles of empty pipe capacity filled with air.
- Dry fixture valves: Unused valves trap dry air pockets that compress against closed seals.
- Systematic restart: Neglecting a whole-home purge leads to severe pipe hammering and air locks.
Signs & Symptoms How Do You Know There’s Air in Your Pipes?
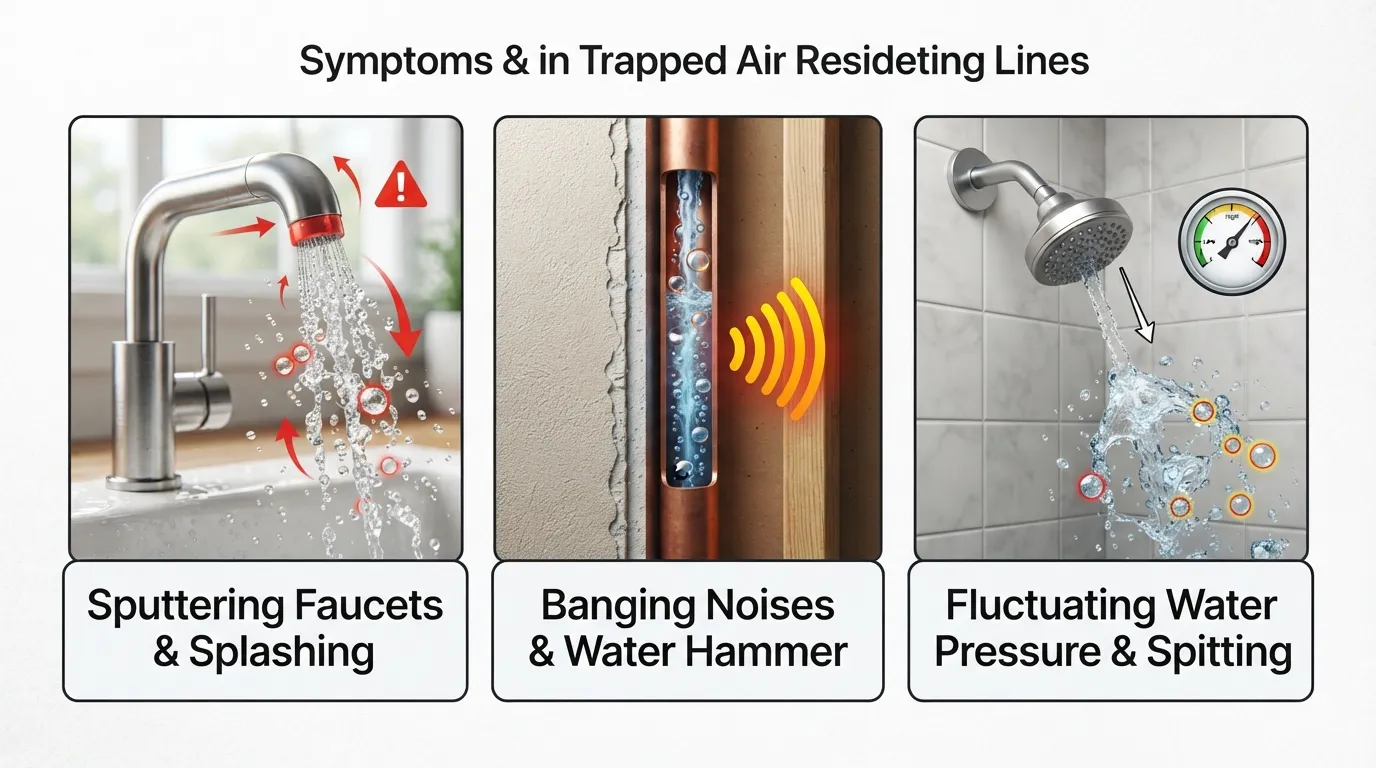
Identifying trapped air early prevents unnecessary stress on your plumbing infrastructure and fixtures. Look for specific behavioral indicators when operating water outlets throughout your home.
Gurgling or Sputtering Sounds from Faucets
A distinctive spitting, sputtering, or barking sound when opening a faucet is the most common sign of trapped air. As compressed gas bubbles rush toward the exit orifice, they force intermittent spurts of water instead of a smooth stream.
- Intermittent flow: Water breaks apart into droplets or sprays sideways as pockets pass.
- Noise emission: Hollow gurgling sounds echo through the supply lines near the valve.
- Aerator disruption: Sputtering debris can quickly clog fine mesh faucet aerators.
Inconsistent or Fluctuating Water Pressure
Trapped air acts like a spring inside your plumbing network, compressing and expanding unpredictably. This causes water pressure to surge or drop drastically without any manual adjustment to the valve.
- Surging streams: Water suddenly blasts out harder than normal when air escapes.
- Pressure drops: Flow slows to a weak trickle while air blocks the narrowest pipe restrictions.
- Unstable showers: Showerheads transition erratically between hot blasts and weak trickles.
Air Spitting or Spraying Before Water Flows
When a fixture has been turned off for a few hours, air accumulates at the highest point of the line. Turning on the handle immediately releases a pressurized blast of compressed air before steady liquid water catches up.
- Dry initial bursts: The first second of activation releases dry air pressure hiss.
- Splashing hazards: Sudden bursts can spray water across countertops or bathroom sinks.
- Repetitive behavior: The symptom recurs every time the fixture sits unused for a brief period.
Banging Vibrating Pipes Water Hammer vs Air
While true water hammer stems from hydraulic shock, trapped air cushions can also cause pipes to shudder, vibrate, or bang against wall studs. The compressible nature of air creates a bouncing effect inside the rigid framing.
- Vibration resonance: Running water causes long pipe runs to rattle audibly inside walls.
- Abrupt stops: Closing a valve quickly causes trapped air pockets to compress violently.
- Distinguishing noise: Air-related sounds usually accompany sputtering, whereas water hammer is a single sharp bang.
How to Remove Air from Plumbing Lines
Removing air from your plumbing lines requires a structured, systematic flushing sequence. Following this precise protocol purges trapped pockets, balances system pressure, and restores smooth water flow across your entire property.
Step 1 – Turn Off the Main Water Valve
Locate your home’s main water shut-off valve and turn it completely clockwise to shut off incoming supply. This stops new water from entering while you prep the piping network for a total pressure reset.
- Valve location: Look near the water meter, basement wall, or crawlspace entry point.
- Complete closure: Ensure the handle is fully turned off to isolate your household plumbing.
Step 2 – Open All Faucets and Fixtures Highest Floor to Lowest
Walk through your home opening every single faucet, shower valve, and outdoor spigot, starting from the top floor down to the basement. Opening these fixtures gives trapped air a clear, unobstructed path to escape.
- Top-down approach: Start on the upper level and work your way systematically downward.
- Include appliances: Flush toilets and open appliance supply lines like washing machine valves.
- Remove aerators: Unscrew delicate faucet aerators to prevent loosened debris from clogging screens.
Step 3 – Turn the Main Water Supply Back On Slowly
Return to your main water shut-off valve and open it very slowly. Restoring pressure gradually prevents sudden hydraulic shock while allowing incoming water to sweep trapped air upward toward the open fixtures.
- Gradual turn: Open the valve halfway first, letting water trickle through slowly.
- Pressure stabilization: Listen closely as lines fill up before opening the valve all the way.
Step 4 – Let the Water Run Until Sputtering Stops 10 15 Minutes
Allow every open faucet and fixture to run continuously for roughly 10 to 15 minutes. Watch the streams closely until all sputtering, gasping, and gurgling completely disappear and a steady, smooth flow is achieved.
- Continuous flow: Do not close any valves prematurely while air is still purging.
- Monitor output: Verify that water runs crystal clear and completely bubble-free.
Step 5 – Close Faucets in Reverse Order Lowest to Highest
Once the water runs steady everywhere, close your fixtures in reverse order—starting from the lowest level and working your way back up to the top floor. This final step prevents new air pockets from forming as line pressure stabilizes.
- Bottom-up closure: Shut basement taps first, moving upward level by level.
- Final check: Finish by turning off upper-floor sinks and showers last.
Well Water vs City Water Does It Change the Process?
The source of your home water supply directly dictates how air enters your pipes and how you should handle the purging process. Understanding whether you rely on municipal infrastructure or a private well system prevents repeated air locks.
If You’re on City Water Supply
Homes connected to municipal city water rarely generate air internally. Trapped air in city water systems almost always results from exterior utility line repairs, meter replacements, or temporary municipal water shutoffs that inject air volumes directly into your service connection.
- External origin: Air enters from street-level main breaks or utility maintenance work.
- Simple resolution: A single whole-home flushing sequence permanently clears the issue.
- Consistent pressure: Municipal pumps maintain stable baseline pressure once lines are purged.
If You’re on a Well System Pressure Tank Check
Private well owners must look beyond standard fixtures when clearing air. If air persists despite multiple flushes, you likely need to inspect your pressure tank and well pump settings to eliminate continuous air intake at the source.
- Tank inspection: Check if your pressure tank has become waterlogged and lost its air cushion.
- Bladder testing: Press the Schrader valve on the tank to see if water sprays out (indicating a ruptured internal bladder).
- Pump drawdown: Ensure your submersible or jet pump is not drawing air from dropping water table levels.
Why Well Systems Trap Air More Often
Well systems are inherently prone to air accumulation due to the mechanical nature of extracting groundwater. Dissolved gases come out of solution under pressure changes, and faulty check valves allow water to drain backward, pulling air into the lines.
- Dissolved gases: Groundwater naturally carries dissolved methane, carbon dioxide, or air that escapes inside pressure tanks.
- Foot valve leaks: A failing check valve allows water to siphon back into the well, replacing it with an air pocket.
- Switch calibration: Improperly adjusted pressure switches cause rapid cycling, churning air bubbles into the water stream.
Air Only in One Fixture or Shower? Targeted Fix
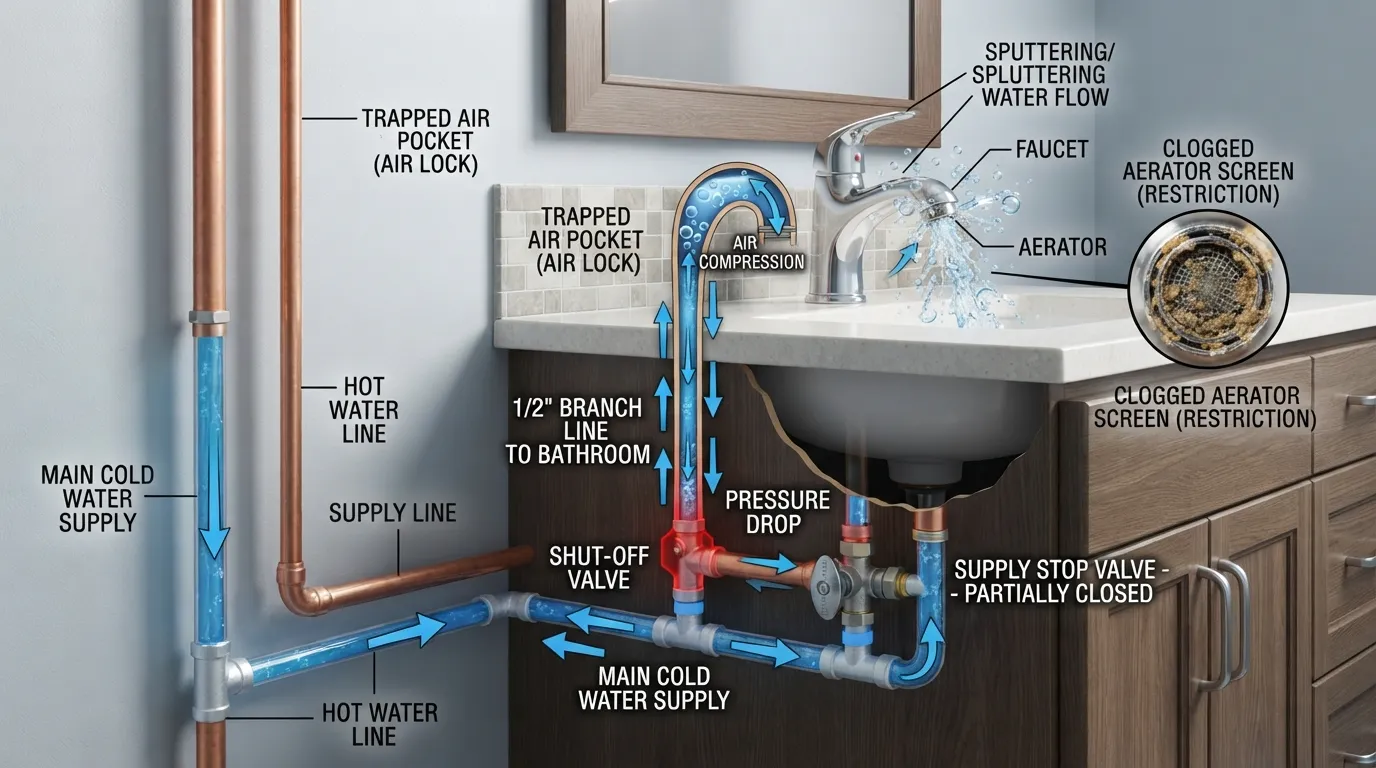
If sputtering and air sputtering are isolated to a single sink, showerhead, or appliance rather than your entire home, a whole-house flush is unnecessary. Targeted troubleshooting resolves localized air traps and blocked mechanisms within specific fixtures.
Air Trapped Only in the Shower or One Sink
A single fixture experiencing persistent sputtering usually indicates an localized air bubble trapped behind a mixer valve or a partial restriction in that specific supply line. Shower valves often act as high points where air naturally gathers over time.
- Isolated symptom: All other household taps run perfectly smooth while one fixture sputters.
- Valve high points: Multi-port mixing cartridges can trap small pockets of air that refuse to move downstream.
- Targeted relief: Cycling the affected handle repeatedly helps dislodge the trapped gas pocket.
Checking the Fixture’s Own Shut-Off Valve
Many sinks, toilets, and individual appliances feature local isolation valves beneath the basin or behind access panels. A partially closed or vibrating local stop valve can create turbulence that mimics trapped air.
- Angle stop inspection: Ensure the under-sink supply valves are opened completely counterclockwise.
- Loose stem washers: A damaged or loose internal washer inside the local valve can flutter and introduce air-like sputtering.
- Supply line kinks: Check flexible braided lines for sharp bends that restrict smooth water entry.
Aerator & Showerhead Cleaning
What feels and sounds like an air pocket is frequently mineral scale or debris trapped inside a faucet aerator or showerhead faceplate. Sediment restricts water flow unevenly, causing a spitting, sputtering stream.
- Unscrew aerators: Remove the tip of the affected faucet and inspect the fine mesh screen for buildup.
- Soak in vinegar: Clear mineral deposits by soaking clogged showerheads or aerators in white vinegar.
- Debris clearance: Flush the bare line briefly without the screen attached to clear out loosened sediment.
What Is an Airlock And Why Basic Steps Sometimes Don’t Work
While normal trapped air easily escapes when you open a faucet, an airlock creates a stubborn blockage that standard flushing cannot move. Understanding the physics of an airlock explains why certain plumbing lines refuse to flow despite your best efforts.
Airlock vs Normal Trapped Air What’s the Difference?
A normal air pocket sits at the high point of a pipe and gradually compresses or releases when pressure changes. An airlock, however, occurs when a trapped bubble forms a complete, continuous seal inside a downward pipe bend or U-shaped dip, balancing water pressure from both sides and entirely halting flow.
- Complete obstruction: The bubble blocks the entire internal diameter of the pipe.
- Equalized pressure: Water pressure pushing from behind equals the resistance of the trapped air bubble.
- Stubborn persistence: Standard faucet opening fails because the vacuum forces hold the bubble firmly in place.
Does an Airlock Clear Itself Naturally?
An airlock will almost never clear itself naturally if the pipe layout traps the bubble securely in a high point or loop. Because water always seeks the path of least resistance, it will bypass the air-locked zone entirely if an alternative route exists, leaving the line dead.
- Zero self-correction: Static pressure alone is rarely enough to compress and push out a locked vapor seal.
- Complete flow stoppage: Affected fixtures remain bone dry or completely blocked indefinitely.
- Thermal aggravation: Heating systems and hot water loops can worsen airlocks due to constant steam expansion.
How to Manually Break an Airlock Advanced Method
Clearing a stubborn airlock requires forcing water or pressure directly through the blocked zone to dislodge the vacuum seal. The most effective technique involves connecting a garden hose between a functioning high-pressure tap and the air-locked fixture.
- Hose bleeding method: Attach a double-ended garden hose to a working hot or cold tap and the locked fixture tap.
- Cross-pressure application: Open both valves simultaneously so the higher pressure pushes the air bubble backward out of the trap.
- Alternative drainage: Open drain plugs or bleed valves near circulating pumps to release the trapped vapor manually.
Air Keeps Coming Back Every Morning? Here’s Why
If your plumbing lines require daily purging every morning, you are dealing with a recurring structural issue rather than a random air bubble. Identifying the root mechanical failure stops air from continuously regenerating overnight.
Waterlogged Pressure Tank Well Systems
For homes on private wells, waking up to sputtering faucets every morning is the classic symptom of a waterlogged pressure tank. When the tank loses its internal air charge, it can no longer cushion pressure changes, causing the pump to cycle erratically and pump air into the lines.
- Lost air cushion: Water completely fills the tank chamber, eliminating the necessary compressible air space.
- Short cycling: The well pump turns on and off rapidly every time a toilet flushes or a tap drips.
- Overnight accumulation: As the system sits idle overnight, dissolved gases separate and pool into large pockets.
Faulty Water Heater Expansion Tank
In municipal water systems, a failing thermal expansion tank can cause consistent morning sputtering. If the tank’s internal bladder ruptures or becomes waterlogged, thermal expansion inside your water heater has nowhere to go, forcing compressed air and vapor back into your hot water supply lines.
- Thermal pressure spikes: Heated water expands safely into the tank; without it, excess pressure forces air up.
- Water-filled reservoirs: Tapping the expansion tank produces a heavy, solid sound instead of a hollow ring.
- Hot-water isolation: Sputtering occurs exclusively on hot-water taps throughout the morning hours.
Overnight Pressure Drop from Utility Company Work
Municipal water suppliers often conduct overnight maintenance, flushing, or pressure adjustments during low-demand hours. These scheduled utility fluctuations can drain local service lines and draw air into your home’s top-floor fixtures by morning.
- Off-peak grid flushing: Nighttime municipal line work forces air columns into residential service connections.
- Morning discovery: The trapped air sits quietly until family members wake up and open fixtures for the day.
- Temporary pattern: This specific cause usually resolves within a day or two after utility work concludes.
When Recurring Air Means a Deeper Leak
If your system is not on a well and your expansion tank is fully functional, daily morning air points to a hidden suction-side pipe leak. When water usage drops to zero overnight, micro-leaks in underground lines act as a siphon, drawing ambient air into the plumbing.
- Underground breaches: Supply lines buried beneath your yard or slab develop small cracks that admit air under vacuum.
- Compromised joints: Loose fittings on suction lines pull air whenever neighborhood water demand fluctuates.
- Professional intervention: Persistent daily air that defies standard purging requires professional pressure testing and leak detection.
Natural DIY Method vs Using a Device

When clearing persistent air from your plumbing, you can choose between traditional manual purging and specialized mechanical devices. Selecting the right approach depends on whether you are dealing with a simple one-time air bubble or a chronic plumbing design issue.
The Natural No-Tool Method Recap
The standard manual approach requires zero tools, relying strictly on gravity, water pressure, and a systematic open-and-flush sequence. By shutting off the main supply, opening all fixtures from top to bottom, and gradually restoring pressure, you let physics push trapped gas out naturally.
- Zero equipment cost: Requires nothing more than your hands and basic access to home fixtures.
- Ideal for minor issues: Perfectly clears air introduced by recent repairs or municipal water main work.
- Simple execution: Takes less than twenty minutes to complete for an entire residential property.
Using a Wet Dry Vacuum to Pull Air Out Faster
If a stubborn airlock or dry line refuses to accept pressure from the main valve, a wet/dry shop vacuum provides a powerful mechanical shortcut. By creating a strong suction seal directly over a faucet or shower outlet, you can physically yank the trapped air pocket out of the line.
- Vacuum suction: Attach the shop vac hose tightly to the problematic spout using a wet rag seal.
- Negative pressure pull: Turn the vacuum on while opening the valve to forcefully draw out the air lock.
- Water engagement: Once suction pulls the air bubble free, liquid water immediately rushes forward into the hose.
Air Release Valves & Water Hammer Arrestors Long-Term Devices
For homes that suffer from chronic, recurring air pockets, installing mechanical inline devices offers a permanent solution. Air release valves automatically vent trapped gases before they reach your fixtures, while water hammer arrestors absorb the hydraulic shock that compresses air.
- Automated venting: Air release valves use internal float mechanisms to expel gas bubbles continuously without manual intervention.
- Shock absorption: Piston-styled water hammer arrestors cushion rapid valve closures to prevent pressure spikes.
- Professional installation: These devices require a plumber to splice them directly into high-risk supply lines or manifold areas.
Is This the Same as Air in a Sewer Line? Clarification
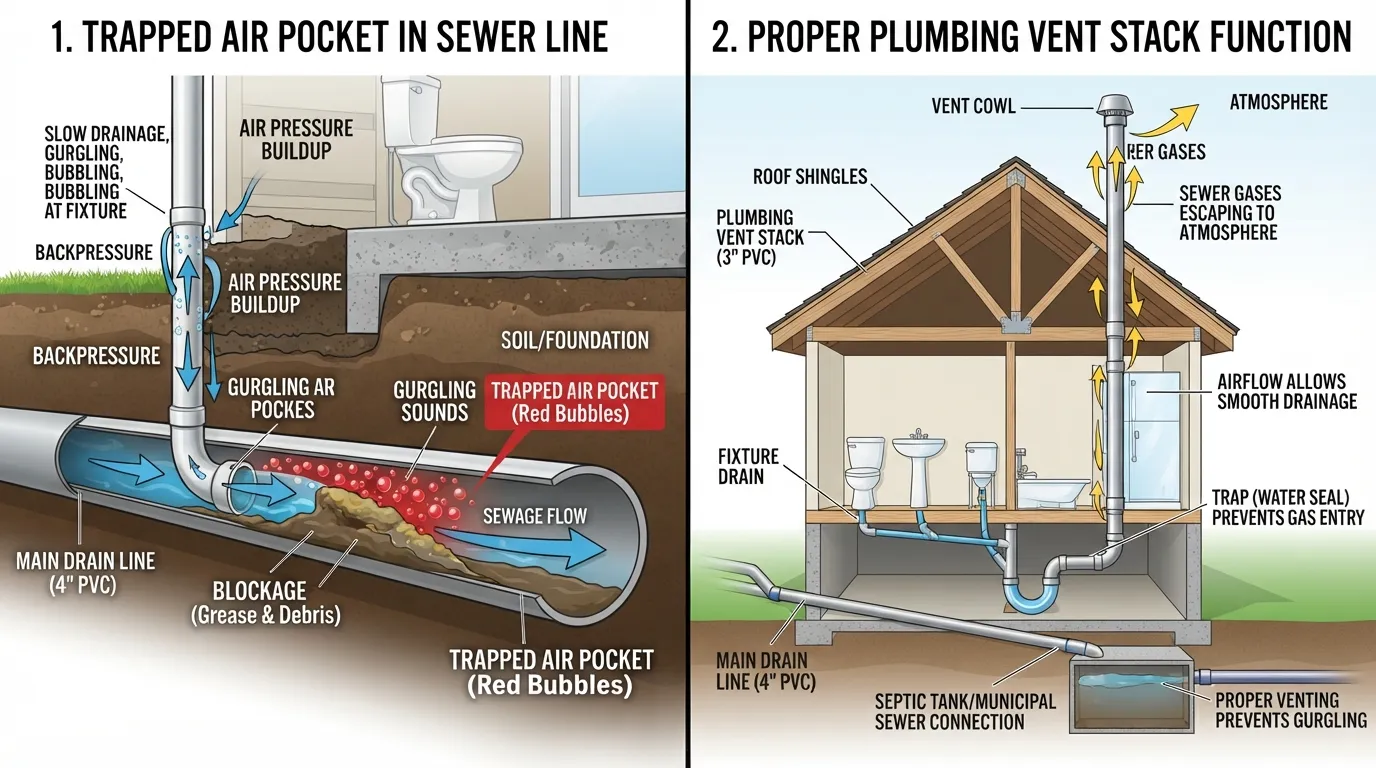
Homeowners frequently confuse pressurized air sputtering from fresh water faucets with gas issues coming from their home’s drain or sewer lines. These are completely separate plumbing networks requiring entirely different troubleshooting methods.
Supply Line Air vs Drain Sewer Vent Air Key Difference
Fresh water supply pipes operate under high pressure to deliver clean, drinkable water to your fixtures. Conversely, your drain-waste-vent (DWV) system operates under gravity and atmospheric pressure to carry wastewater away and vent sewer gases safely out through your roof.
- Water supply pipes: Trapped air here causes sputtering, sputtering aerators, and fluctuating pressure when you open a tap.
- Sewer vent lines: Problems here cause slow drainage, foul sewer odors, and bubbling gurgles in toilet bowls—never sputtering faucets.
- Isolated systems: Clean drinking water never mixes with wastewater or sewer gases under normal conditions.
Signs Your Issue Is Actually a Blocked Sewer Vent
If your plumbing fixtures are not sputtering when turned on, but your drains are making strange sounds or emitting foul odors, your problem is a blocked roof vent stack rather than trapped water-line air.
- Toilet gurgling: Flushing a toilet causes nearby bathtubs or sinks to gurgle as air struggles to escape the drain lines.
- Slow draining: Sinks and tubs drain sluggishly because a blocked roof vent creates a vacuum effect in the pipes.
- Sewer gas smells: Unpleasant sulfur or sewage odors waft around bathroom drains due to siphoned P-traps.
for a Blocked Roof Vent Stack
Clearing a blocked sewer vent requires removing debris from the roof vent stack protruding above your house. Leaves, animal nests, or ice buildup frequently plug these openings, restricting proper atmospheric venting.
- Roof inspection: Safely climb onto your roof and locate the vertical PVC or cast-iron vent pipe corresponding to the slow drains.
- Debris removal: Reach into the opening or use a plumber’s snake to clear out leaves, twigs, or bird nests.
- Water flush: Spray a garden hose down the vent stack to wash away remaining blockages and verify clear drainage.
How Long Does It Take for Air to Fully Clear?
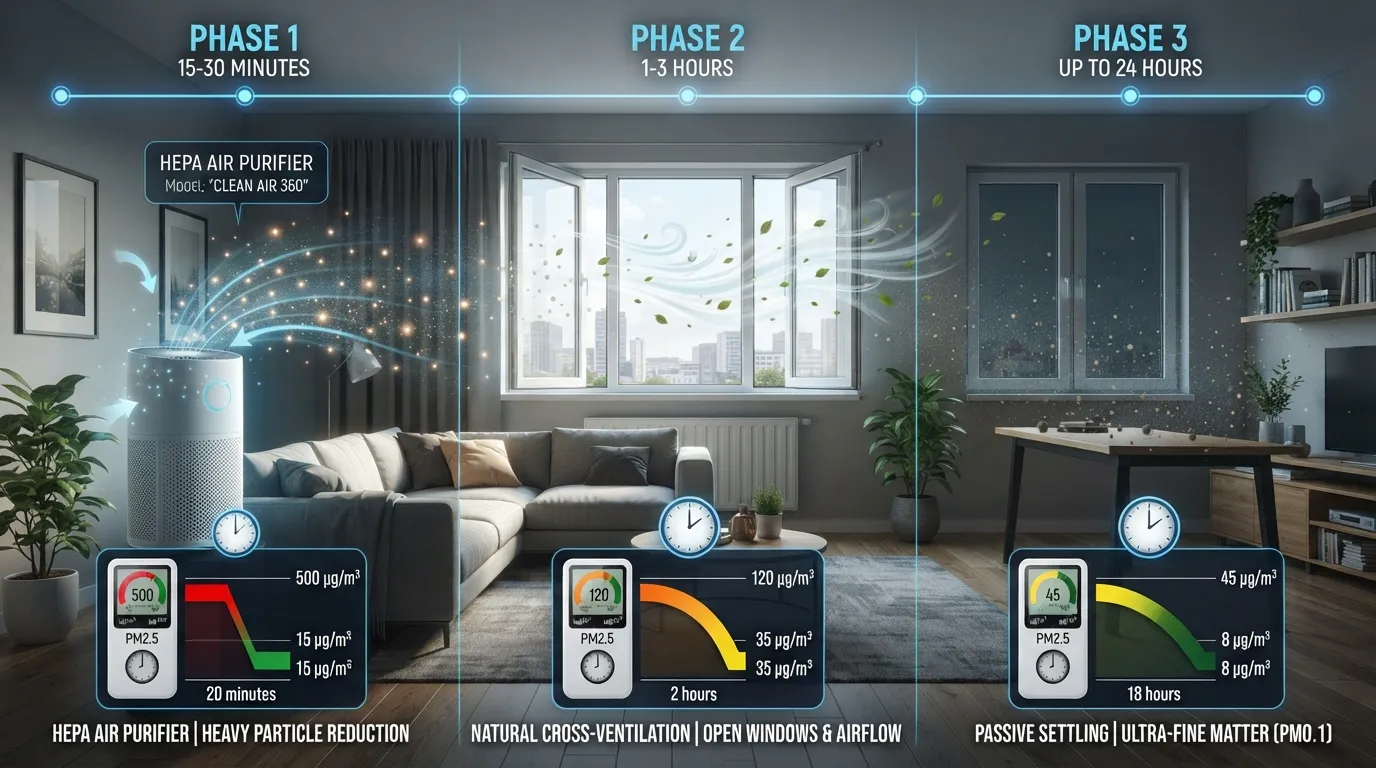
The time required to completely purge air from your plumbing lines depends on the scale of your system and the volume of trapped gas. While a minor pocket clears in minutes, complex networks demand extended flushing.
Typical Timeframe for Minor Air Pockets
For standard single-story homes or localized repairs, clearing trapped air takes roughly 10 to 15 minutes of continuous running. Once the main valve is reopened and all fixtures run steadily, pressurized water quickly sweeps out minor gas bubbles.
- Standard duration: 10 to 15 minutes of active flushing for average-sized homes.
- Immediate improvement: Sputtering typically stops within the first few seconds at high-flow fixtures.
- Quick stabilization: Pressure normalizes rapidly once aerators and valves catch up to the flow.
When It Takes Longer Multi-Story Homes Long Pipe Runs
Large multi-story properties, sprawling ranch-style houses, or homes with extensive exterior plumbing lines can take significantly longer—sometimes up to 30 to 45 minutes of systematic flushing. Long vertical pipe runs require sustained pressure to push trapped air all the way upward to upper-floor outlets.
- Extended volume: Larger pipe diameters store much higher volumes of compressed air.
- Vertical travel time: Pushing air up multi-story risers requires continuous, uninterrupted water pressure.
- Appliance involvement: Ice makers, dishwashers, and washing machine supply loops add extra cycle time to a complete purge.
Prevention Tips Stop Air From Getting Trapped Again
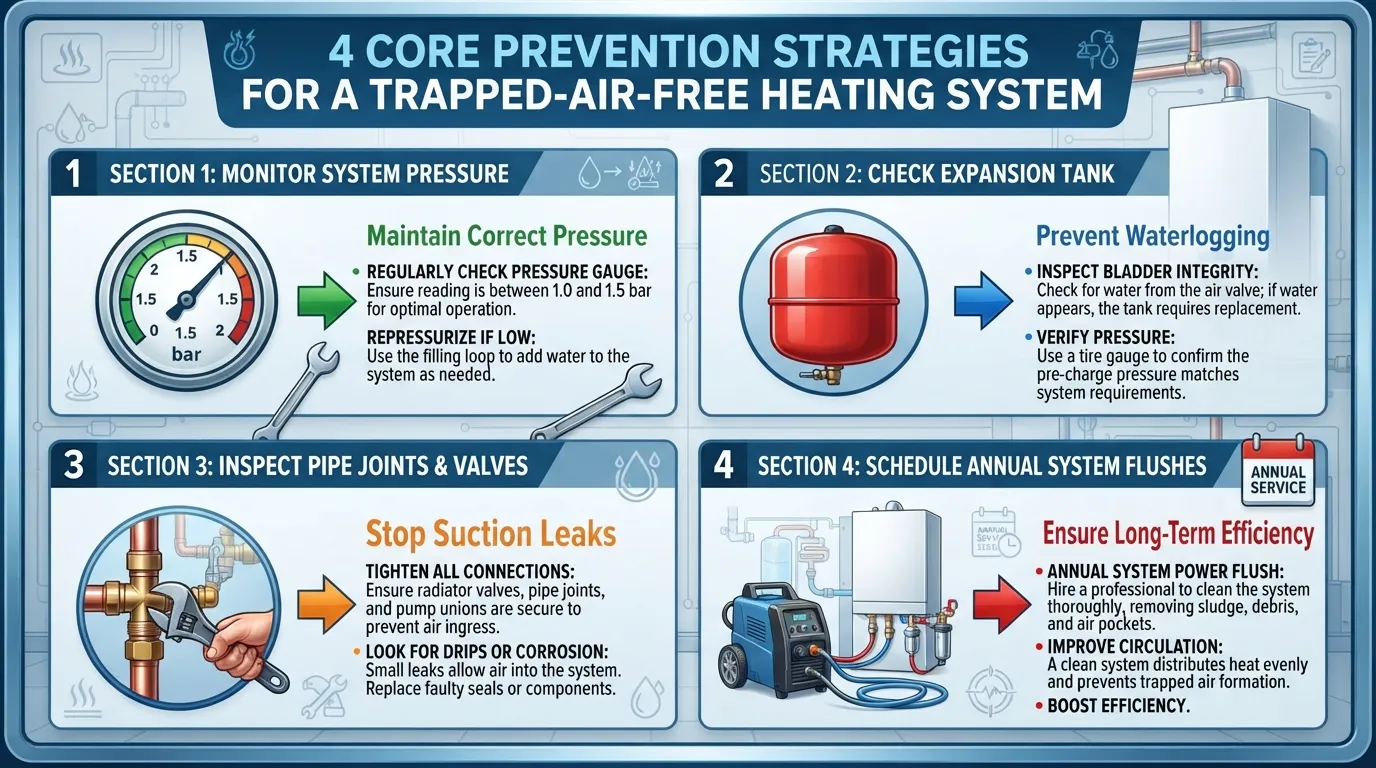
Preventing air from re-entering your plumbing system saves you from recurring sputtering and protects your fixtures from unnecessary water hammer stress. Implementing these simple maintenance habits keeps your pipes fully charged and running smoothly.
Close Valves Slowly After Any Repair Work
Whenever you complete plumbing repairs, switch out fixtures, or turn your main water supply back on after a shutdown, always open and close valves gradually. Rapidly slamming valves shut traps high-speed air columns and causes violent pressure spikes.
- Controlled handling: Turn handles slowly over several seconds to let pressure equalize.
- Gradual refilling: Allow pipes to fill smoothly without creating turbulent air compression zones.
- Valve integrity: Check that ball valves and gate valves operate smoothly without sticking or slipping.
Regular Water Heater Maintenance
Your water heater acts as a natural collection point for thermal gases and sediment. Flushing your water heater tank annually and checking its anode rod prevents mineral buildup and excessive gas generation.
- Annual flushing: Drain sediment buildup once a year to maintain clear internal tank pathways.
- Anode rod inspection: Replace degrading sacrificial anode rods before they react chemically to produce gas.
- Expansion monitoring: Keep an eye on your thermal expansion tank to ensure it handles pressure swings properly.
Installing an Air Release Valve During New Installations
If you live in an area prone to recurring air locks or are undertaking a major plumbing renovation, ask your plumber to install an automatic air release valve at the system’s highest point.
- Automated discharge: Internal float valves vent trapped gas bubbles automatically before they reach your faucets.
- High-point placement: Positioned strategically where air naturally accumulates in residential loops.
- Maintenance reduction: Eliminates the need for manual whole-house flushing after minor utility interruptions.
When to Call a Professional Plumber
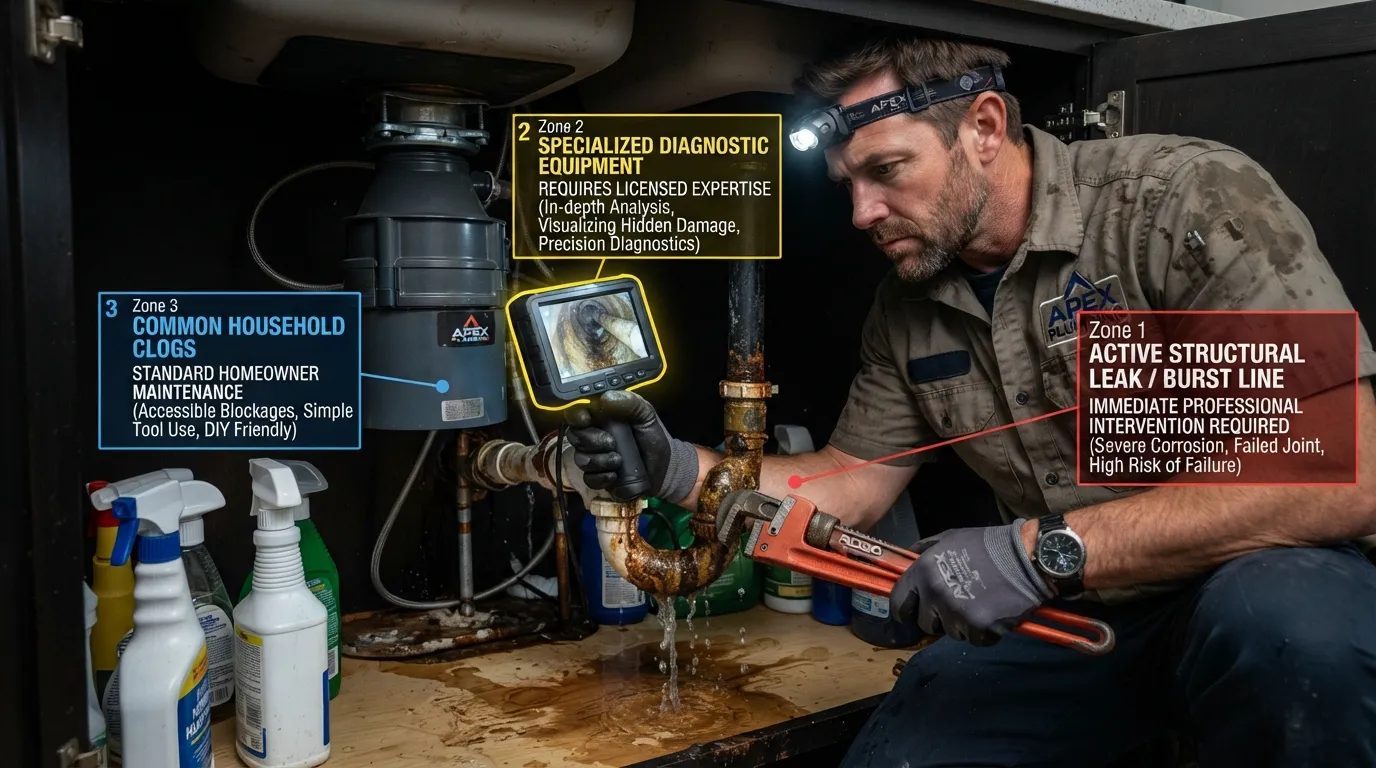
While most trapped air issues can be resolved with standard DIY flushing, certain symptoms indicate a deeper mechanical failure requiring licensed expertise. Knowing when to call a professional prevents costly property damage and recurring system failures.
Signs the Problem Isn’t Just Trapped Air
If purging your lines fails to stop the sputtering, or if new symptoms appear alongside the air bubbles, the root cause is likely a failing component or hidden infrastructure damage rather than simple trapped gas.
- Unresolved sputtering: Faucets continue spitting and gurgling even after multiple systematic whole-home flushes.
- Sudden pressure drops: Overall household water pressure collapses unpredictably without a clear municipal cause.
- Mysterious moisture: Damp drywall, unexplained puddles, or unusually high water bills suggest a hidden pipe leak drawing air.
What a Plumber Will Check That You Can’t
Licensed plumbers utilize specialized diagnostic tools and industry expertise to test elements of your plumbing system that are inaccessible to homeowners. They can pinpoint the exact mechanical source of chronic air infiltration.
- Pressure regulator testing: Plumbers use specialized gauges to test if a failing Pressure Reducing Valve (PRV) is causing system surges.
- Electronic leak detection: Advanced acoustic equipment and thermal cameras locate underground or behind-the-wall suction leaks without destructive demolition.
- Well system diagnosis: Professionals can inspect deep-well pump electronics, pressure switches, and bladder tanks to restore proper air-water balance.
Frequently Asked Questions FAQ
Quickly resolve common concerns about trapped air, system damage, and stubborn blockages with these direct, expert-verified answers to the most common plumbing queries.
Will an airlock eventually clear itself?
An airlock will almost never clear itself naturally because the trapped air bubble creates a complete vapor seal that permanently equalizes against incoming water pressure. Since fluid physics dictates that water takes the path of least resistance, it will completely bypass the air-locked section indefinitely.
- Static resistance: Normal residential water pressure is rarely strong enough to compress and push out a locked vapor seal.
- Persistent blockage: Faucets and showers connected to the air-locked line will remain completely dry until manually fixed.
- Required action: You must actively break the vacuum using a cross-pressure hose method or mechanical suction.
How do I get rid of air in my plumbing pipes fast?
To get rid of air in your plumbing pipes fast, shut off your main water valve, open all household faucets starting from the highest floor downward, and slowly turn the main water supply back on. Let the water run uninterrupted for 10 to 15 minutes to push the gas out.
- Isolate the supply: Stopping incoming flow resets the system baseline before purging.
- Create clear escape routes: Opening upper-level fixtures first gives rising air a direct exit path.
- Flush completely: Leave all taps running until every fixture produces a steady, sputter-free stream.
What device can be used to remove air from water lines?
An automatic air release valve is the most effective permanent device used to continuously vent trapped air from residential water lines. For immediate DIY intervention on a stubborn blockage, a standard wet/dry shop vacuum can provide the mechanical suction needed to pull out localized air.
- Air release valves: Plumbers install these float-operated vents at high points to expel gases automatically.
- Water hammer arrestors: These piston devices absorb hydraulic shock, stopping rapid air compression.
- Wet/dry vacuums: Applying a vacuum hose over a sputtering faucet forcibly yanks trapped air out of the line.
Why do my hot water pipes vibrate and make noise?
Hot water pipes vibrate and make noise because trapped air expands aggressively under thermal heat, or due to sudden hydraulic shock known as water hammer. When fast-moving hot water hits an air pocket or a closed valve, the resulting shockwave causes unsecured pipes to rattle violently against wall studs.
- Thermal expansion: Heating water forces dissolved gases out of solution, creating bouncy, pressurized air pockets.
- Hydraulic shock: Closing a tap abruptly sends a kinetic wave that crashes into trapped air barriers.
- Loose brackets: Unsecured copper or PEX piping shakes audibly when turbulent air and water mix inside the walls.
Can trapped air damage my plumbing system?
Yes, persistently trapped air can severely damage your plumbing system by amplifying water hammer shockwaves, which gradually vibrate pipe fittings loose and compromise watertight seals. Left unchecked, the continuous shaking from compressed air pockets often leads to micro-fractures and expensive internal wall leaks.
- Joint degradation: Constant rattling breaks down soldered copper connections and weakens PVC pipe glue over time.
- Fixture wear: Violent, high-pressure sputtering can blow out delicate O-rings and damage internal faucet mixing cartridges.
- Appliance strain: Unpredictable air pockets disrupt the internal solenoid valves on dishwashers and washing machines.

Oscar Vance | Master Plumber & Drainage Expert
Meet Oscar Vance, a licensed master plumber sharing practical solutions on residential repairs, preventive maintenance, and thoughtful home upkeep.

