Introduction What Plumbing a Pressure Tank Means
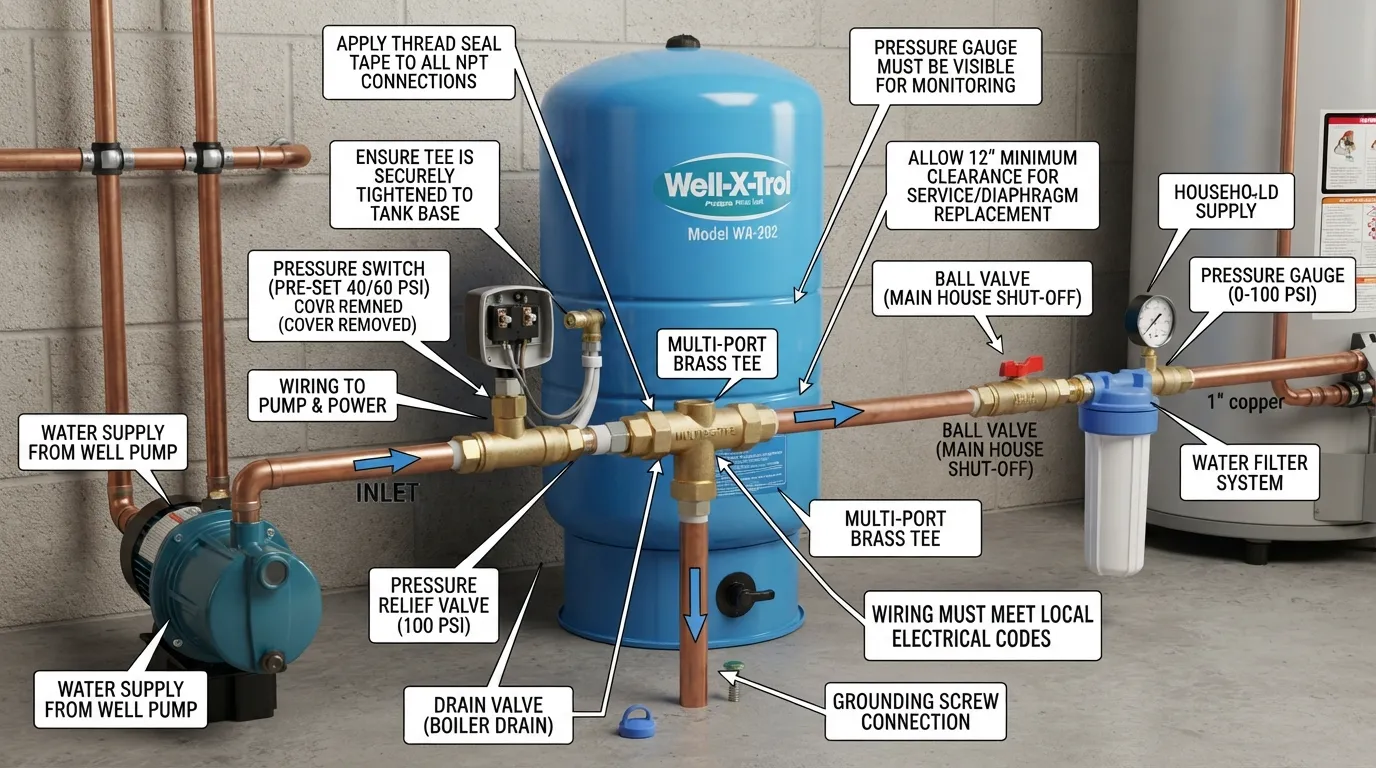
Plumbing a pressure tank involves connecting a specialized water storage vessel to your well pump and home distribution network to maintain steady water pressure, prevent pump motor burnout, and ensure a reliable water supply. Without a properly plumbed tank, your well pump would cycle on and off every time you open a faucet, drastically shortening its operational lifespan.
What Does “Plumbing a Pressure Tank Actually Mean?
Plumbing a pressure tank means integrating a pressurized bladder or diaphragm tank into your existing well water system using correct pipe fittings, check valves, and pressure switches. This setup regulates water flow and stores pressurized water so your pump does not need to run continuously.
- Pressure Regulation: Balances water pressure throughout your household plumbing system to avoid sudden surges or drops.
- Pump Protection: Reduces the frequency of pump cycles, preventing premature motor wear and overheating.
- Constant Supply: Provides an immediate reserve of pressurized water even when the well pump is temporarily resting.
Who Needs This Guide Well Owners DIYers New Homeowners
This comprehensive guide is designed for individuals managing private residential water systems who want to understand, install, or maintain their well infrastructure safely. Whether you are replacing an aging unit or setting up a system for a new property, clarity on plumbing fundamentals is essential.
- Private Well Owners: Homeowners looking to troubleshoot pressure fluctuations or replace a waterlogged pressure tank independently.
- DIY Enthusiasts: Handy individuals seeking step-by-step technical insight into well water system layouts and plumbing codes.
- New Rural Homeowners: Anyone transitioning to a well water system who needs foundational knowledge of how pressure tanks protect household plumbing.
How a Water Pressure Tank Works
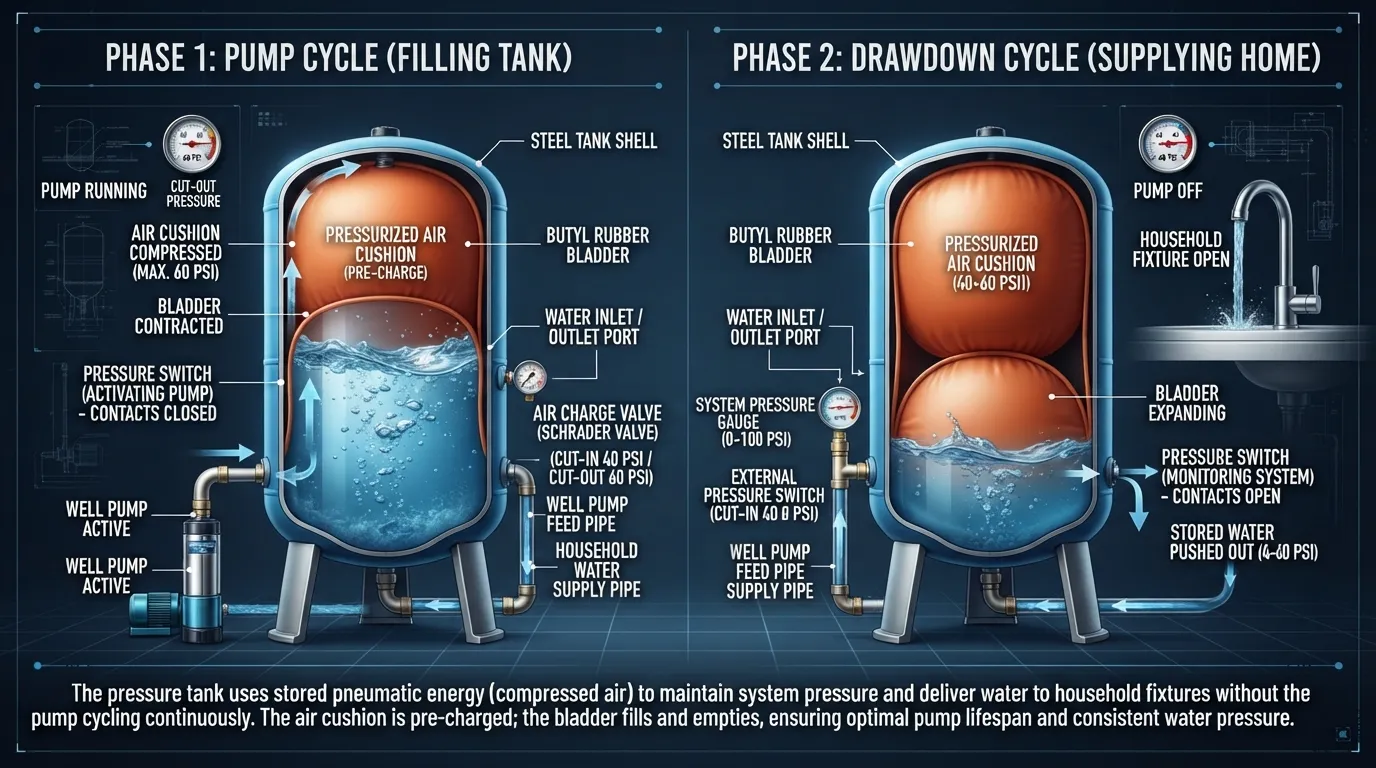
A water pressure tank uses a compressed air cushion to push stored water through your home plumbing system without requiring the well pump to run constantly. Understanding this underlying mechanical process is essential before attempting any installation or replacement work on your well water system.
The Role of the Bladder Diaphragm
Modern pressure tanks use a heavy-duty internal rubber bladder or diaphragm to physically separate the compressed air chamber from the water storage chamber. This barrier prevents the water from absorbing the air charge over time.
- Air-Water Separation: Keeps the air cushion intact so the tank maintains its pressurization capacity across thousands of cycles.
- Corrosion Prevention: Shields the metal tank interior from constant water contact, significantly extending the lifespan of the unit.
- Efficient Displacement: Flexes dynamically as water enters and exits, ensuring smooth and consistent delivery pressure at your faucets.
Pressure Switch, Cut-In & Cut-Out Explained
The pressure switch acts as the electronic brain of your well system, monitoring tank pressure and signaling the well pump when to turn on or off. It relies entirely on two distinct operational thresholds.
- Cut-In Pressure: The low-pressure threshold (typically 30 or 40 PSI) where the switch triggers the pump to turn on as water is consumed.
- Cut-Out Pressure: The high-pressure threshold (typically 50 or 60 PSI) where the switch shuts off the pump once the tank is fully replenished.
- System Synchronization: Must be calibrated correctly relative to the tank’s air pre-charge to prevent rapid pump cycling and motor burnout.
Why Pre-Charge Air Pressure Matters
The air pre-charge is the foundational cushion of compressed air sealed inside the tank behind the bladder, typically measured via a standard Schrader valve. Correct pre-charge ensures the bladder expands and contracts smoothly.
- Preventing Waterlogging: An incorrect air charge causes the tank to fill completely with water, eliminating the pressure buffer and causing the pump to short-cycle.
- Calibration Standard: The air pre-charge must always be set exactly 2 PSI below your system’s cut-in pressure switch setting when the tank is completely drained of water.
- Optimal Performance: Proper pre-charging maximizes the usable drawdown water volume stored between pump cycles.
Tools & Materials Needed

Gathering all necessary tools and piping materials before starting your pressure tank installation prevents mid-project delays and ensures leak-free connections. Having the correct hardware on hand is critical for safely handling pressurized water lines and electrical components.
Basic Tools Checklist Wrench Voltage Tester Teflon Tape Pipe Dope
A successful plumbing setup requires specific mechanical and safety tools to handle threaded fittings, electrical current shutoffs, and thread-sealing compounds. Always double-check your toolkit prior to breaking into existing water lines.
- Pipe Wrench & Adjustable Wrench: Essential for gripping and tightening heavy brass tank tees, nipples, and threaded unions securely.
- Non-Contact Voltage Tester: A critical safety tool to verify that power to the well pump pressure switch is completely shut off before wiring.
- Teflon Tape & Pipe Dope: Combined thread sealants used on male pipe threads to prevent high-pressure water leaks across threaded joints.
- Bucket and Utility Rags: Necessary for catching residual water trapped inside the old tank or supply lines during disassembly.
Material-Specific Requirements PEX vs PVC vs Copper
Your connection strategy will depend entirely on the existing plumbing material feeding your home distribution network. Each pipe type requires distinct joining techniques and specialized transition fittings.
- PEX Piping: Requires a dedicated crimp or clamp tool, PEX rings, and barbed brass insert adapters; offers flexibility and freeze resistance.
- PVC Piping: Requires purple primer and heavy-duty solvent cement (glue); must be fully cured before reintroducing water pressure.
- Copper Piping: Requires a propane torch, lead-free solder, flux, and proper tubing cutters; offers maximum durability for permanent rigid installations.
Choosing the Right Tank Tee & Fittings
The tank tee is the multi-port brass manifold that mounts directly to the water inlet of your pressure tank, housing your pressure switch, pressure gauge, relief valve, and drain valve.
- Pre-Assembled Manifolds: Selecting a pre-loaded brass tank tee kit saves time and ensures correct port sizing for standard switches and gauges.
- Lead-Free Compliance: Ensure all brass fittings and nipples are certified lead-free for potable drinking water safety compliance.
- Union Connections: Incorporating union fittings makes future tank replacement significantly easier by avoiding the need to cut rigid supply lines.
Safety & Pre Installation Prep

Prioritizing safety before touching any plumbing or electrical components prevents severe injury from high-voltage pump circuits and pressurized water bursts. Following a rigorous pre-installation checklist ensures a controlled, hazard-free working environment.
Step 1 — Cut Power to the Well Pump
Well pumps operate on 230V or 115V electrical circuits capable of delivering a fatal shock, making absolute power isolation your very first priority. Never rely on the pressure switch contacts alone to disconnect power.
- Locate Circuit Breaker: Find the dedicated double-pole breaker controlling the well pump in your main electrical service panel and switch it to the OFF position.
- Verify Zero Voltage: Use a calibrated non-contact voltage tester directly on the pressure switch terminals to confirm the circuit is completely dead.
- Lockout/Tagout: Secure the breaker box with a safety tape or warning note to prevent anyone from accidentally restoring power while you work.
Step 2 — Shut Off the Main Water Supply
Isolating the work area from the rest of your home water network stops backflow and keeps your workspace dry during tank removal. Stopping the flow protects your home from unnecessary flooding.
- Close Isolation Valve: Turn off the main supply ball valve located immediately after the pressure tank leading into your household distribution lines.
- Drain Downstream Pressure: Open the nearest indoor faucet to bleed off any trapped residual water pressure lingering in the household pipes.
- Check for Flow Stoppage: Verify that water has completely stopped running from the open faucet before proceeding to dismantle any fittings.
Step 3 — Drain the Old Tank Completely
A water-logged pressure tank can weigh well over 100 pounds, making it dangerous to disconnect and lift until every drop of water is evacuated. Proper draining minimizes physical strain and indoor mess.
- Open Drain Valve: Attach a garden hose to the drain valve on your tank tee or open the built-in drain port and route it outside or into a large bucket.
- Depress Schrader Valve: Remove the protective cap on the tank’s air valve and press the core pin to release trapped air and speed up water drainage.
- Confirm Empty Status: Allow the tank to drain fully until water stops flowing entirely and the tank feels lightweight and hollow.
Step by Step Guide How to Plumb a Water Pressure Tank
Plumbing a pressure tank requires precision, correct thread sealing, and careful alignment to ensure a leak-free system that operates efficiently for years. Follow this sequential guide to install your tank correctly and restore your home water pressure.
Step 1 — Check and Adjust Pre-Charge PSI
Before installing the tank into your plumbing line, you must verify and calibrate its air pre-charge pressure while it is completely empty of water. Correct pre-charge setting ensures maximum drawdown efficiency and prevents premature bladder failure.
- Check Baseline PSI: Remove the Schrader valve cap and use a standard tire pressure gauge to measure the air pressure inside the empty tank.
- Adjust to Match Switch: Inflate or bleed air until the pre-charge reading is exactly 2 PSI below your system’s cut-in pressure switch setting.
- Replace Cap: Reinstall and hand-tighten the Schrader valve cap securely to prevent slow air leaks over time.
Step 2 — Wrap Threads with Teflon Tape & Pipe Dope
Proper thread preparation is the single most important factor in preventing persistent high-pressure water leaks across threaded brass fittings and nipples. Combining tape and dope creates an impenetrable seal.
- Apply Teflon Tape: Wrap polytetrafluoroethylene (PTFE) tape 4 to 6 times clockwise around male pipe threads, pulling tightly into the thread grooves.
- Layer Pipe Dope: Brush a thin, even coat of approved thread-sealing compound directly over the taped threads to lubricate and seal micro-gaps.
- Avoid Over-Wrapping: Keep tape clear of the very first thread to prevent loose fragments from entering and clogging your water lines.
Step 3 — Mount the Pressure Switch, Gauge & Relief Valve
Attach all primary control accessories directly to the ports of your brass tank tee before connecting the manifold to the main tank inlet. This ensures proper alignment and easy access for future monitoring.
- Install Pressure Gauge: Screw the pressure gauge into the designated 1/4-inch port facing outward for clear visibility.
- Mount Pressure Switch: Thread the pressure switch onto the vertical 1/4-inch nipple on top of the tee using proper thread sealant.
- Add Relief Valve: Install an ASME-rated pressure relief valve into the remaining side port as a critical safety backup against system over-pressurization.
Step 4 — Connect Incoming (Well) and Outgoing (House) Lines
Align your incoming well supply line and outgoing household distribution line with the designated ports on the pre-assembled brass tank tee manifold. Secure all unions to facilitate future maintenance or replacement.
- Attach Incoming Line: Connect the water supply line coming from your well pump directly into the designated inlet port of the tank tee.
- Attach Outgoing Line: Connect the household distribution line to the opposing outlet port leading into your home water filtration and plumbing network.
- Incorporate Unions: Use dielectric or standard plumbing unions on both lines so the tank can be unbolted and removed without cutting rigid pipes.
Step 5 — Secure and Tighten Without Cracking Fittings
Tighten all threaded joints firmly using appropriate wrenches, exercising caution to avoid over-torquing and cracking fragile brass fittings or tank connections. Balance firmness with material safety.
- Use Backup Wrenches: Hold opposing fittings with a secondary wrench to prevent twisting or straining the tank’s welded inlet nipple.
- Check Alignment: Ensure pipes enter fittings straight without lateral tension or binding that could cause joint failure under pressure.
- Wipe Excess Dope: Clean away any squeezed-out pipe compound around joint seams for a clean, professional finish.
Testing the System After Installation

Thoroughly testing your newly plumbed pressure tank before regular use ensures all connections are watertight, electrical switches function properly, and trapped air is completely purged from your plumbing network. Executing a systematic startup checklist protects your home from unexpected water damage and mechanical failures.
Restoring Water Supply Safely
Slowly reintroducing water pressure prevents water hammer shock and allows you to catch minor leaks before they escalate into major plumbing issues.
- Keep Main Isolation Closed: Ensure the outgoing main supply valve leading to your house remains closed initially while the tank fills from the well.
- Open Main Supply Slowly: Crack open the well supply valve just enough to let water trickle into the tank, listening carefully for steady flow.
- Monitor Tank Filling: Watch the pressure gauge rise steadily as water enters the bladder until it approaches the system cut-in pressure threshold.
Checking Connections for Leaks
Performing a meticulous leak inspection across all newly installed fittings, threaded joints, and the tank tee manifold ensures complete system integrity under high operating pressure.
- Visual Flashlight Inspection: Shine a bright flashlight around every threaded connection, union nut, and port to catch the glimmer of any escaping droplets.
- Tissue Paper Test: Touch a dry piece of tissue paper or toilet paper along the bottom of joints; any dampness will instantly reveal micro-leaks.
- Immediate Corrective Action: If a joint weeps, relieve system pressure entirely before gently tightening the fitting or reapplying thread sealant.
Bleeding Trapped Air from the Line
Air pockets naturally become trapped inside household pipes during plumbing work, causing sputtering faucets and erratic water delivery until completely purged.
- Open Highest Household Faucet: Navigate to the highest bathroom or kitchen sink in your home and open both hot and cold handles fully.
- Purge Air and Debris: Let the water run unchecked for several minutes until sputtering stops and a smooth, continuous stream flows.
- Flush Additional Fixtures: Sequentially open lower faucets and flush toilets throughout the home to clear out any remaining pipe sediment or trapped air.
Restoring Power & Monitoring the Pressure Switch
With water flowing and air cleared from the lines, you can safely re-energize the well pump and confirm that your pressure switch cycles within correct PSI parameters.
- Turn On Breaker: Switch the dedicated well pump circuit breaker back to the ON position at your main electrical panel.
- Observe Cut-Out Cycle: Watch the pressure gauge climb as the pump runs, verifying that the switch cuts off automatically at your maximum preset pressure (e.g., 50 or 60 PSI).
- Verify Cut-In Threshold: Run water continuously and confirm the pump kicks back on automatically when pressure drops down to your minimum cut-in level.
Common Problems & Troubleshooting
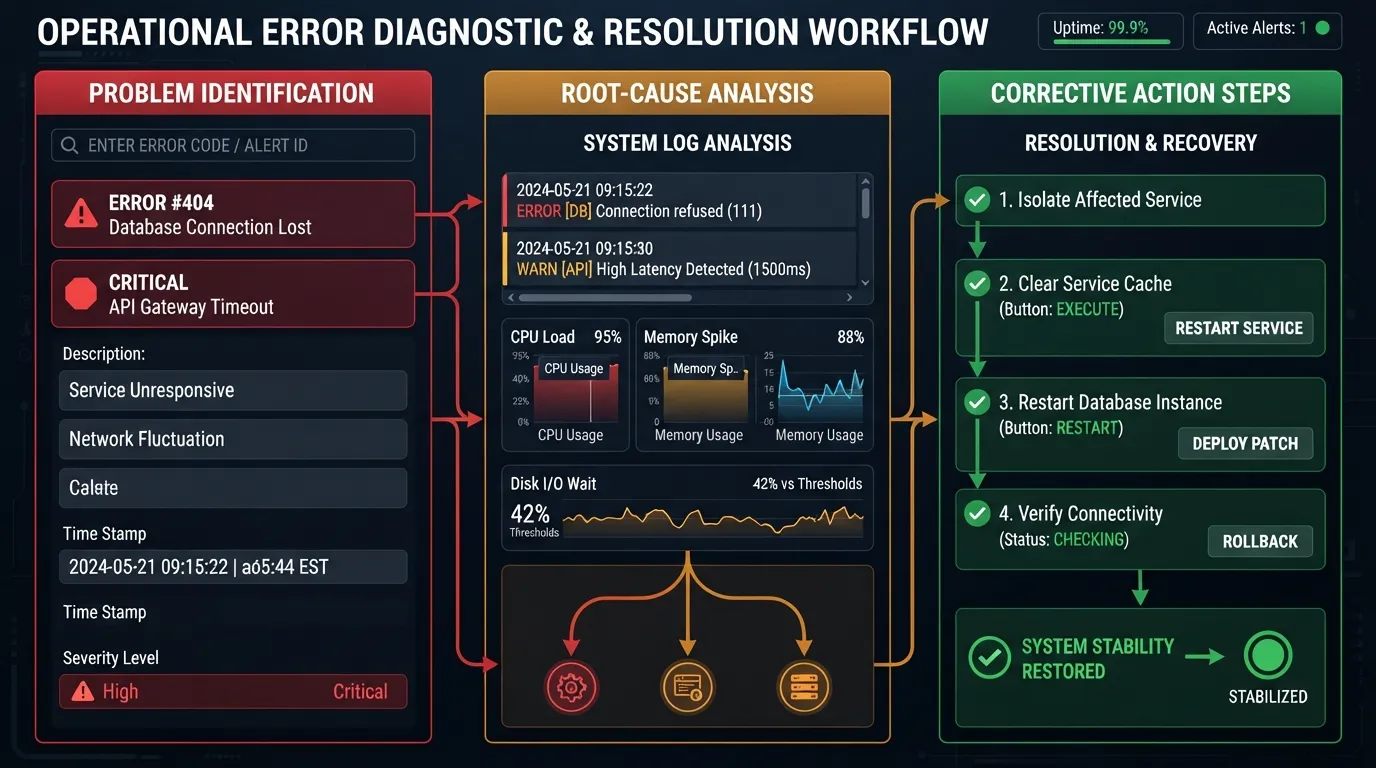
Recognizing the early warning signs of pressure tank failure helps you diagnose and resolve plumbing issues before they cause total well pump burnout or catastrophic water damage. Understanding these common malfunctions empowers you to service your system efficiently.
Signs Your Bladder Is Wearing Out
An aging bladder gradually loses its flexibility and structural integrity, leading to performance inefficiencies that impact your entire household water system.
- Fluctuating Water Pressure: Experiencing erratic surges and sudden drops in water pressure while running household faucets or showers.
- Frequent Pump Clicking: Hearing your well pump switch on and off rapidly every few seconds whenever a tap is partially open.
- An aging tank that no longer holds its air pre-charge consistently between seasonal maintenance checks.
How to Tell If the Bladder Is Broken
A completely ruptured internal bladder causes the air chamber to flood with water, transforming the pressure tank into a waterlogged, heavy dead-weight.
- Water from Schrader Valve: Pressing the core pin on the top air valve releases water instead of compressed air, confirming a torn bladder.
- Heavy Top-Heavy Feel: Tapping the upper half of the tank reveals a dull thud instead of a hollow ring, indicating the entire vessel is full of water.
- Immediate Short-Cycling: The well pump kicks on instantly the moment a single cup of water is drawn because there is no air cushion left.
Pump Cycling Too Fast Causes & Fixes
Rapid pump cycling, known as short-cycling, places extreme strain on electrical motor windings and can destroy a well pump in a matter of weeks.
- Waterlogged Tank: Fix by draining the system entirely and resetting the proper air pre-charge pressure via the Schrader valve.
- Stuck Pressure Switch Contacts: Inspect the switch for burned or pitted electrical contacts and replace the unit if points are fused together.
- Hidden Plumbing Leaks: Check toilets, outdoor hose bibs, and underground lines for silent leaks that trigger continuous pump engagement.
Water Leaking from Tank Connections
Seepage or pooling water around the tank tee manifold or base indicates degraded thread seals, loose unions, or hairline cracks in fittings.
- Loose Threaded Joints: Depressurize the system and carefully tighten loose brass nipples or adapters using a backup wrench.
- Degraded Thread Sealant: Disassemble leaking fittings, clean off old tape and pipe dope completely, and re-wrap fresh layers of Teflon tape.
- Cracked Fittings: Replace any over-torqued brass adapters or cracked plastic components immediately with certified lead-free brass hardware.
Maintenance & Lifespan
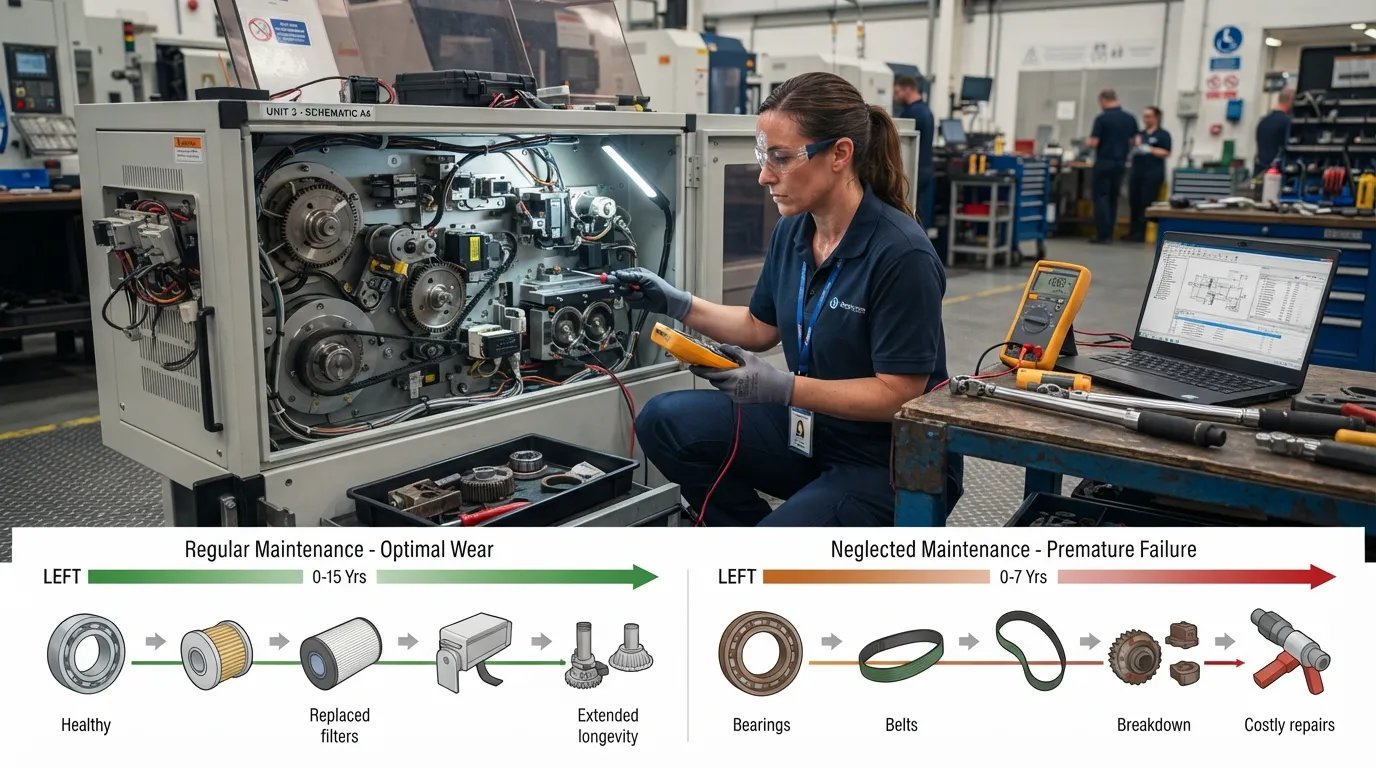
Routine preventive maintenance and regular inspections significantly extend the operational lifespan of your well water pressure tank while protecting your pump motor from premature failure. Establishing a consistent upkeep schedule ensures reliable water delivery year-round.
How Often Should You Drain a Pressure Tank?
Draining and checking your pressure tank should be performed on a scheduled basis to verify air pre-charge levels and clear out any minor sediment buildup.
- Annual Inspection Routine: Perform a complete pre-charge check and system drain at least once every year to maintain optimal drawdown volume.
- Seasonal Well Checkups: Schedule your maintenance check during spring or autumn before heavy water usage seasons or freezing temperatures begin.
- Post-Repair Maintenance: Always inspect and reset the pre-charge level whenever plumbing modifications or pump repairs are completed.
Average Lifespan of a Water Pressure Tank
Most standard residential well pressure tanks last between 5 to 15 years, depending heavily on water quality, tank construction materials, and proper initial installation.
- Diaphragm vs. Bladder Models: High-end replaceable-bladder tanks generally outlast smaller diaphragm tanks because the water never touches the metal walls.
- Water Quality Impact: High mineral content, iron, or acidic water can corrode internal components and shorten the overall lifespan of the tank.
- Cycling Frequency: Systems experiencing heavy daily water demand or short-cycling wear out faster due to constant mechanical fatigue.
Warning Signs It’s Time for Replacement
Certain structural failures cannot be resolved with basic troubleshooting, making a full tank replacement the only safe and permanent solution.
- Exterior Rust and Corrosion: Visible rust bubbling through the steel outer shell indicates structural thinning and imminent rupture risk.
- Repeated Bladder Failures: If a replacement bladder or waterlogged tank fails repeatedly shortly after being serviced, the entire unit must be swapped out.
- Permanent Pressure Loss: An inability to hold air pre-charge pressure despite clearing the valve core signals an unrepairable internal leak.
Can You Replace Plumb It Yourself? DIY vs Professional Cost
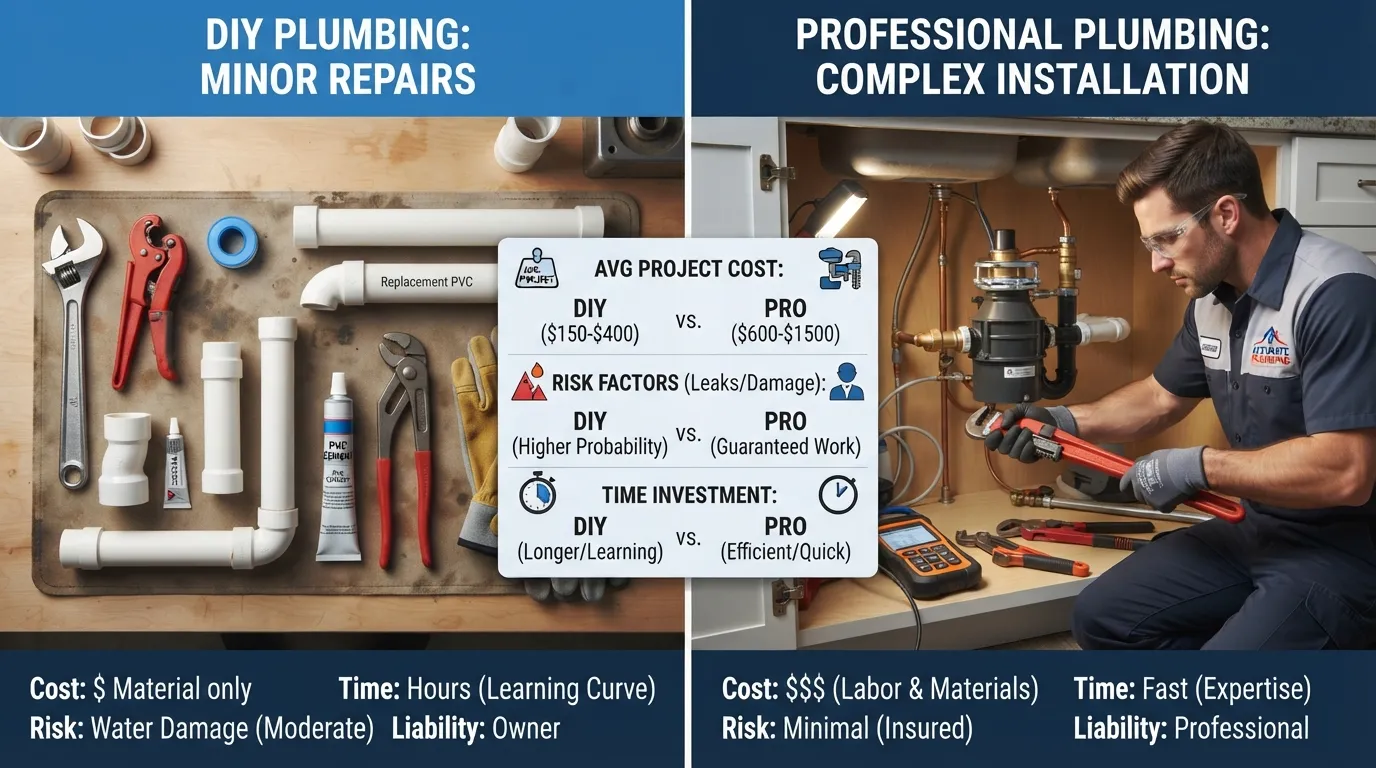
Deciding whether to tackle your pressure tank installation as a weekend DIY project or hire a licensed plumber depends on your plumbing experience, comfort with electrical wiring, and budget constraints. Evaluating the financial and labor requirements upfront ensures a realistic project plan.
DIY Cost Breakdown Tank + Fittings + Tools
Taking on a pressure tank replacement yourself significantly reduces labor expenses, leaving you responsible only for material hardware costs and basic tools.
- Pressure Tank Unit: Quality residential tanks typically range from $200 to $600 depending on storage capacity (e.g., 20-gallon to 86-gallon models).
- Fittings and Accessories: Brass tank tees, pressure switches, gauges, relief valves, and pipe sealants cost approximately $50 to $120 total.
- Specialty Tools: If you lack basic wrenches, PEX crimpers, or a voltage tester, expect an initial tooling investment of $40 to $100.
Average Professional Plumber Installation Cost
Hiring a licensed professional ensures code-compliant installation and saves time, though labor rates and service call fees add substantially to the total project price.
- Total Professional Cost: Standard plumber installations typically range from $450 to $1,200 including both parts and labor.
- Labor Component: Plumbers generally charge between $150 to $300 per hour, with tank replacements taking roughly 2 to 4 hours of total work time.
- Cost Validation Data: You can review detailed regional pricing benchmarks and labor estimates on HomeGuide to compare typical well service rates in your area.
When Should You Hire a Professional Instead?
While DIY plumbing is rewarding, certain complex system layouts or physical limitations make calling a licensed well professional the safest choice.
- Complex Electrical Wiring: If your pump system involves heavy-duty control boxes, magnetic starters, or 230V circuits you feel uncomfortable handling.
- Rigid Main Line Modifications: When heavy cast iron or corroded galvanized steel pipes require specialized cutting, threading, or welding equipment.
- Physical Strain and Access: Large high-capacity tanks weigh over 100 pounds when empty and can be extremely difficult to maneuver in tight crawlspaces or basements.
Advanced Related Scenarios

Exploring advanced plumbing configurations and specialized use cases helps well owners optimize their water systems for unique household demands or industrial applications. Understanding these alternative setups ensures maximum flexibility and system performance.
How to Connect Two Pressure Tanks Together
Connecting two pressure tanks in parallel doubles your total water storage reserve and drawdown capacity without increasing the maximum operating pressure of the system.
- Parallel Plumbing Layout: Connect both tanks to a shared main manifold line so that water flows into and out of both vessels simultaneously.
- Matching Pre-Charge PSI: Ensure both tanks are inflated to the exact same air pre-charge pressure to prevent uneven water distribution and bladder wear.
- Benefits for Heavy Demand: Ideal for large households or properties with high-flow irrigation systems that experience frequent pump short-cycling.
Is a 20-Gallon Tank Big Enough for a House?
A 20-gallon pressure tank is typically the minimum standard size recommended for a small home or cabin with low simultaneous water usage.
- Small Household Suitability: Sufficient for a 1-to-2 person home with minimal simultaneous fixtures running (e.g., one shower or faucet at a time).
- Short-Cycling Risk: Larger families or homes with modern multi-head showers will cause a 20-gallon tank to cycle rapidly, risking premature pump wear.
- Upgrading for Demand: Medium-to-large homes generally require 62-gallon or 86-gallon tanks to provide adequate water reserve between pump cycles.
What Can You Use Instead of a Pressure Tank?
While traditional pressure tanks are standard, alternative flow-control systems eliminate the need for a bulky physical storage vessel.
- Constant Pressure Systems: Uses a variable-speed (VFD) well pump that adjusts its motor speed dynamically to match household water demand in real-time.
- Flow Switch Controllers: Electronic pump controllers that turn the pump on instantly when flow is detected, maintaining steady pressure without a large bladder tank.
- Space-Saving Benefits: Ideal for tiny homes, tight utility closets, or off-grid setups where physical space is severely limited.
Connecting a Pressure Tank to a Pressure Washer
Plumbing a small accumulator or pressure tank into a heavy-duty pressure washer supply line helps smooth out fluctuating well flow and prevents pump starvation.
- Maintaining Constant Inlet Flow: Pressure washers require a steady, uninterrupted volume of water to prevent cavitation and internal pump damage.
- Buffer for Well Systems: A small inline accumulator tank absorbs pressure drops caused by long garden hose runs or fluctuating household demand.
- Setup Precautions: Ensure flow rates and pressure ratings match the specific specifications required by your commercial or residential pressure washer unit.
Frequently Asked Questions
Reviewing expert answers to common technical questions helps clarify nuanced installation procedures, pressure calibrations, and system placement guidelines for your well water setup.
What Is the Proper PSI for a Pressure Tank?
The proper air pre-charge PSI for a pressure tank must always be set exactly 2 PSI below your system’s pressure switch cut-in setting when the tank is completely drained of water.
- Standard Calibration: For a standard 30/50 PSI switch, the tank pre-charge should measure exactly 28 PSI.
- Measurement Condition: Always check or adjust the pre-charge using a tire pressure gauge when the tank has zero water pressure inside.
How Do You Increase Water Pressure in an Overhead Tank?
Increasing water pressure from an elevated gravity-fed storage tank requires raising the physical elevation of the tank or installing an external booster pump.
- Elevation Rule: Water pressure increases by approximately 0.433 PSI for every 1 vertical foot of elevation drop between the tank and the faucet.
- Booster Pump Solution: If raising the tank height is impossible, install an automated electric booster pump on the outlet line to boost household pressure.
Can a Bladder Tank Be Used for Compressed Air Too?
No, a residential water pressure tank bladder is specifically engineered and rated to handle water storage and cannot be used safely as an air receiver tank.
- Material Degradation: Compressed air tanks are built with heavy structural steel designed to hold dry air, whereas water pressure tanks feature internal rubber bladders that degrade under unlubricated air pressure.
- Safety Hazard: Using a water tank for pure air compression risks structural failure and explosive rupture under high pneumatic pressures.
Where Is the Best Place to Install a Water Pressure Tank?
The best place to install a water pressure tank is indoors in a dry, frost-free, and easily accessible location near where the main water line enters the house.
- Freeze Protection: Never install a pressure tank in an uninsulated outdoor location where freezing winter temperatures can crack the steel shell or fittings.
- Maintenance Access: Ensure there is adequate physical clearance around the tank to check the Schrader valve, read the pressure gauge, and service the tank tee.
How Do You Calculate Water Pressure in an Overhead Tank?
You can calculate static water pressure from an overhead gravity tank by multiplying the height of the water column above the delivery point by 0.433.
- Formula: Pressure (PSI) = Height in feet × 0.433.
- Example: A tank sitting 30 feet above your kitchen sink will produce roughly 13 PSI of natural gravity-fed water pressure at that fixture.
Conclusion Key Takeaways
Mastering the installation and maintenance of a water pressure tank ensures reliable household water delivery, protects your well pump from premature burnout, and prevents costly emergency plumbing repairs. Following systematic installation steps guarantees a secure, long-lasting system setup.
Recap — Key Steps to Remember
Successful plumbing execution relies on precise planning, correct pre-charge calibration, and meticulous thread sealing across every connection point.
- Pre-Charge Calibration: Always set your tank’s air pre-charge exactly 2 PSI below your system’s cut-in pressure while the tank is completely drained.
- Thread Preparation: Combine Teflon tape and approved pipe dope to create a reliable, leak-free seal on all threaded brass fittings and tank tee ports.
- System Testing: Slowly reintroduce water pressure, check every joint with a flashlight, and purge trapped air from household fixtures before restoring full electrical power.
Final Safety Reminder
Working with pressurized water lines and high-voltage electrical circuits demands constant vigilance and strict adherence to safety protocols.
- Electrical Isolation: Always verify zero voltage at the pressure switch using a non-contact tester before touching any wiring or components.
- Pressure Release: Ensure the system is completely depressurized and drained before attempting to unbolt fittings or remove an old tank.
- Professional Assistance: Do not hesitate to call a licensed well professional if you encounter complex electrical setups, heavy corroded piping, or physical lifting constraints.

Oscar Vance | Master Plumber & Drainage Expert
Meet Oscar Vance, a licensed master plumber sharing practical solutions on residential repairs, preventive maintenance, and thoughtful home upkeep.

