Understanding Water Heater Sediment and Why Flushing Matters
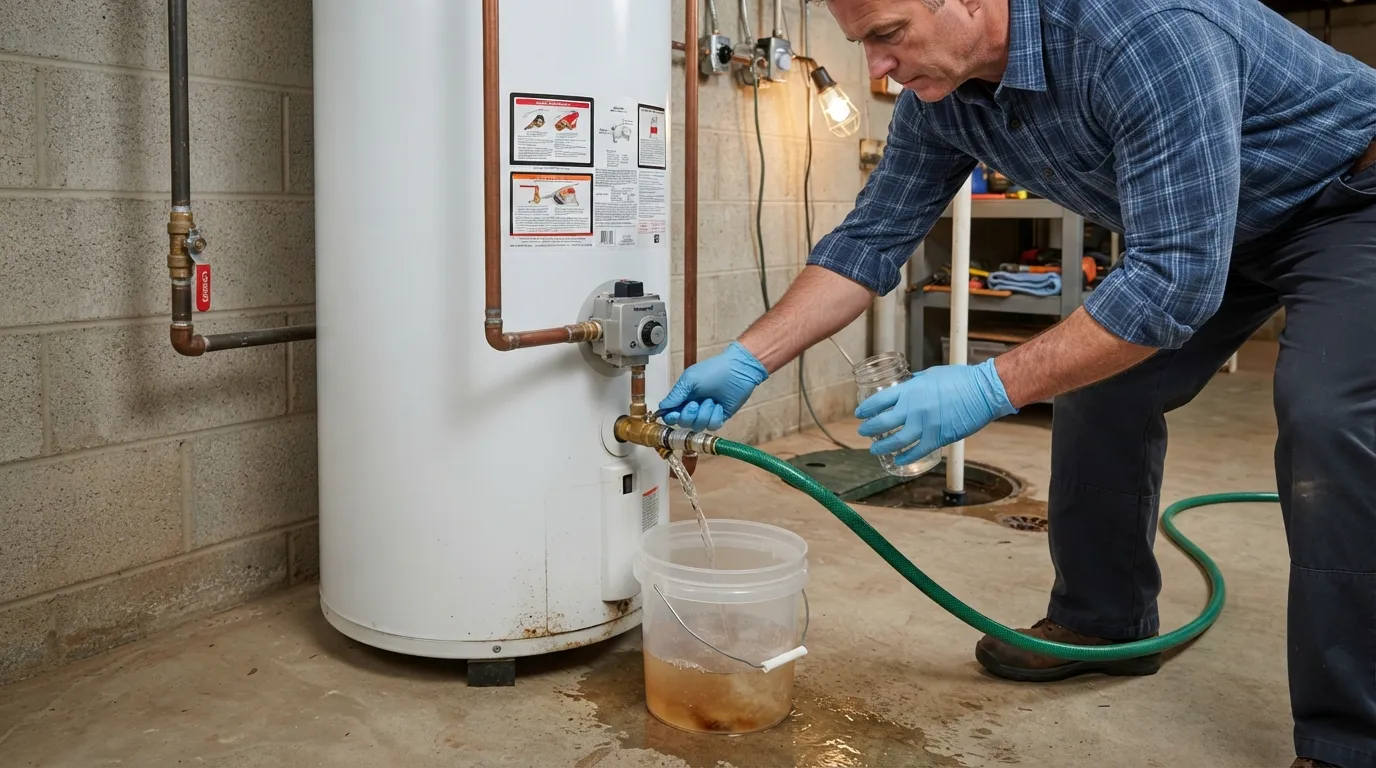
If your water heater is making strange rumbling noises or taking longer to deliver hot water, heavy sediment buildup is likely the culprit. Over time, minerals naturally present in your water supply settle at the bottom of the tank, forming a hard layer that drastically reduces overall efficiency and drives up your monthly utility bills.
This comprehensive, beginner-friendly guide will walk you through everything you need to know about tank maintenance. By learning how to properly flush your system, you can eliminate damaging buildup, restore peak performance, and significantly extend the lifespan of your water heater without needing professional help.
What Is Water Heater Sediment & Why Flushing Matters
Sediment buildup is one of the most common yet overlooked maintenance issues for residential water systems. Understanding how these deposits form and affect your tank is the first step toward preventing costly premature replacements and maintaining optimal home energy efficiency.
What Causes Sediment Buildup in a Water Heater?
Hard water contains dissolved minerals like calcium and magnesium that enter your plumbing system daily. As water is heated inside the tank, these minerals separate from the liquid and solidify, eventually settling at the bottom of the water heater.
- Mineral Precipitation: High temperatures accelerate the chemical process of minerals solidifying out of hard water.
- Municipal Supply Factors: Homes supplied by well water or regions with severe hard water experience accelerated sediment accumulation rates.
- Gravity Settling: Over months of daily use, heavier particles naturally sink and form a dense layer over the burner or lower heating element.
How Sediment Affects Heating Efficiency & Tank Life
When a thick layer of mineral deposits accumulates at the bottom of the tank, it creates a thermal barrier between the heat source and the water. This barrier forces the system to work harder, leading to several critical performance and safety issues.
- Popping and Rumbling Noises: Trapped water boiling beneath the sediment layer creates deep bubbling sounds as steam forces its way up.
- Reduced Energy Efficiency: The heating element must stay on longer to penetrate the sediment layer, directly spiking your monthly energy bills.
- Tank Corrosion and Leaks: Trapped heat causes metal fatigue and overheating at the tank base, severely shortening the overall lifespan of the appliance.
- Department of Energy Guidelines note that routine maintenance prevents permanent system degradation.
Signs You Need to Flush Your Water Heater
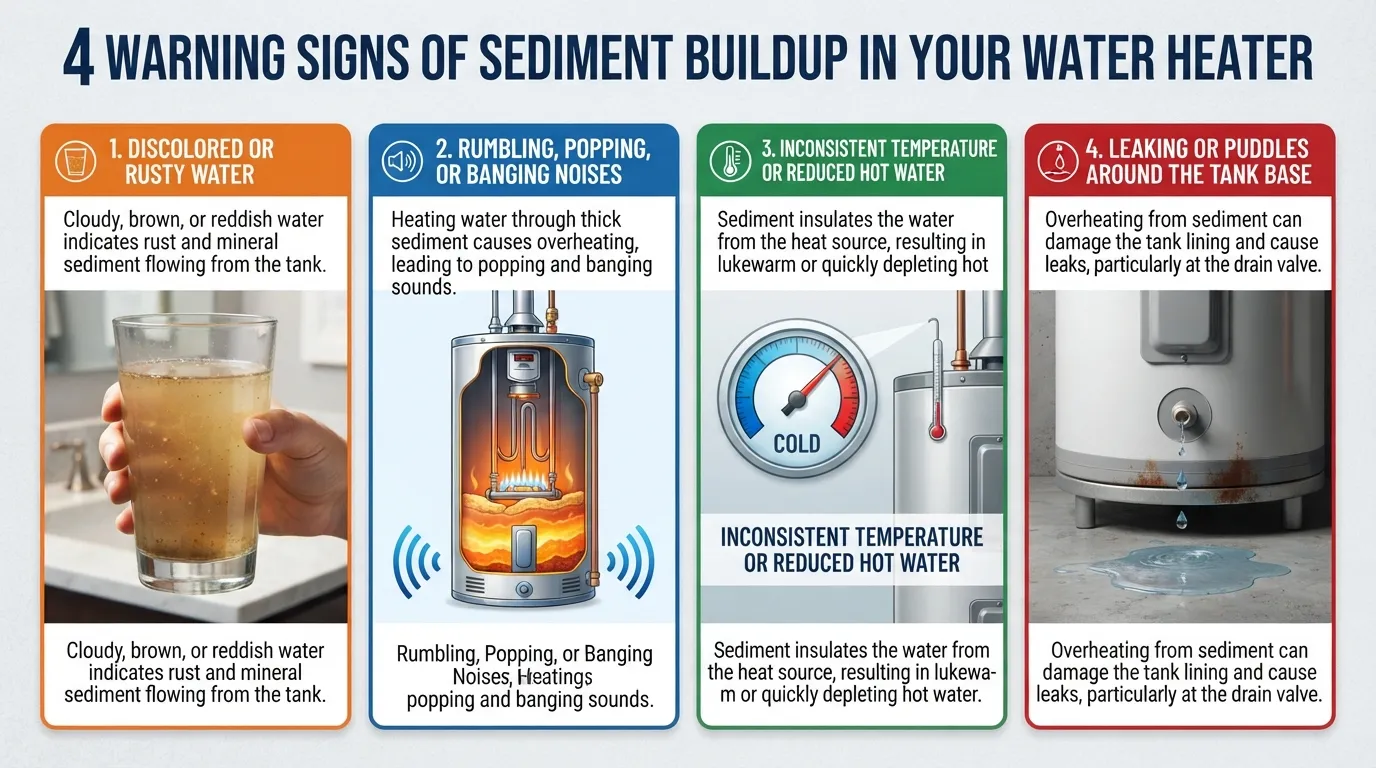
Recognizing the early warning signs of mineral accumulation can save you from sudden appliance failure and costly emergency repairs. Paying attention to how your system sounds, performs, and delivers water helps you catch maintenance issues before they escalate.
Strange Noises (Rumbling, Popping, Banging)
Unusual sounds are often the very first indicator that your water heater is overdue for a complete flush and sediment removal.
- Trapped Moisture Boiling: A thick layer of mineral deposits traps water underneath it against the direct heat source.
- Steam Bubbles: As the trapped water boils, steam tries to push upward through the heavy sediment, creating loud popping or rumbling noises.
- Metal Stress: Continuous localized overheating from these trapped pockets puts excessive stress on the bottom of the tank walls.
Discolored or Rusty Water
When you turn on the hot water tap and notice changes in clarity or color, your tank environment requires immediate inspection.
- Corrosion Indicators: Brown, reddish, or yellowish tinting usually points to interior tank rust accelerated by trapped heat.
- Sediment Stirring: Heavy mineral piles can occasionally get stirred up and pushed through your plumbing lines to your faucets.
- Anode Rod Failure: Discolored water can also signal that your sacrificial anode rod has fully depleted, exposing the steel tank to active corrosion.
Reduced Hot Water Supply or Slow Heating
A compromised thermal transfer rate directly impacts your daily household routine and appliance recovery speeds.
- Shorter Hot Water Duration: The physical volume of the tank is partially displaced by solid mineral sludge rather than usable water.
- Extended Recovery Times: It takes significantly longer for the system to cycle and heat water when a thick sediment blanket blocks thermal output.
- Heating Element Strain: Lower heating element efficiency forces electrical or gas components to run continuously, risking burnout.
What You’ll Need Before You Start
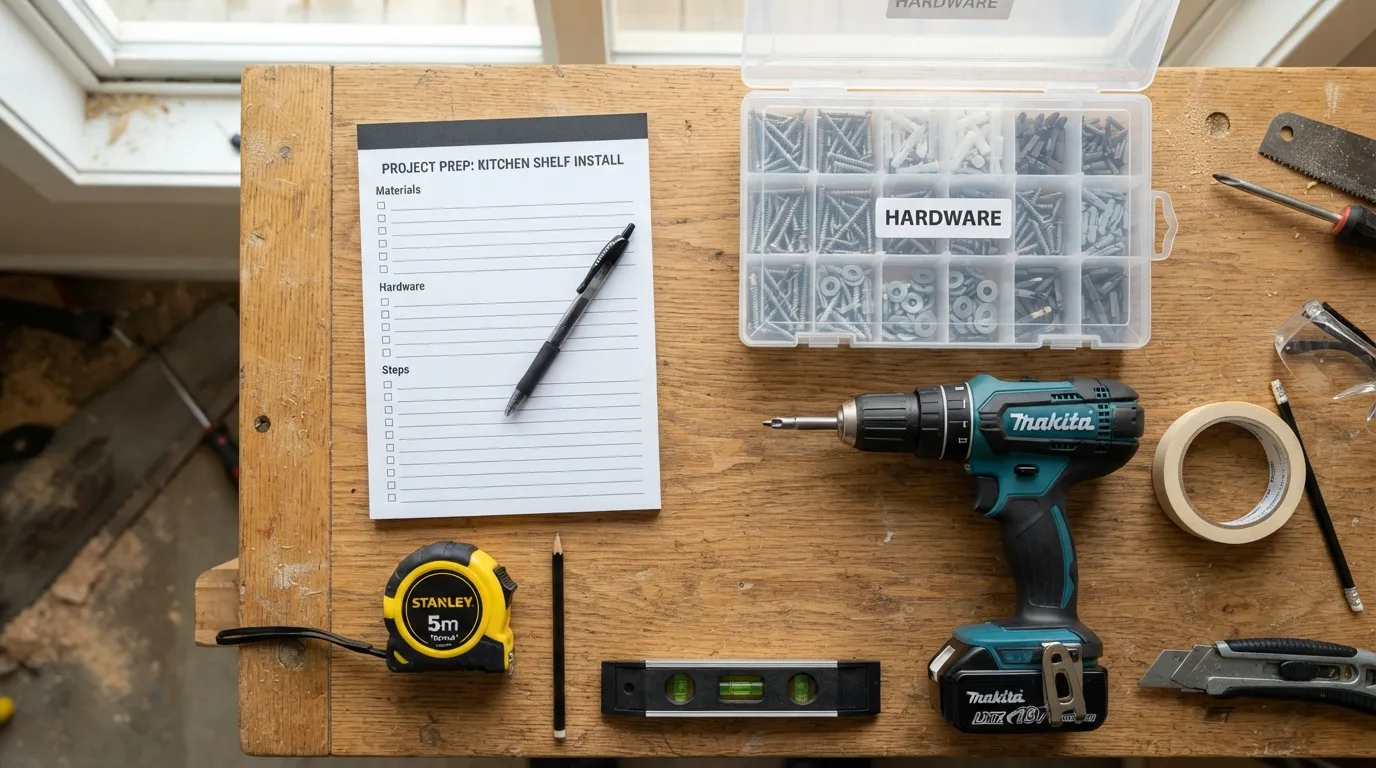
Gathering the proper tools and safety equipment beforehand ensures the water heater flushing process goes smoothly and safely. Having everything staged nearby prevents unnecessary interruptions once you begin draining the tank.
- Standard Garden Hose: Used to safely direct drained water from the tank drain valve to a suitable disposal area or floor drain.
- Bucket or Pail: Useful for catching initial dirty discharge, testing valve clearance, and checking water clarity during the process.
- Floor Drain or Sump Pump: Provides an accessible drainage outlet; if a floor drain isn’t nearby, a utility pump and extra hose may be required.
- Flathead Screwdriver: Needed for turning off electrical service panel breakers, gas control valves, or tightening specific components if necessary.
- Adjustable Pliers or Wrench: Helpful for securing loose hose connections or operating stubborn drain valves without damaging them.
- Old Towels and Rags: Essential for wiping up minor spills, residual drips, and keeping your workspace dry.
- Protective Gloves and Eye Protection: Safeguards your hands and eyes from hot water splashes, rusty sediment, and cleaning residue.
Safety Precautions Before You Begin
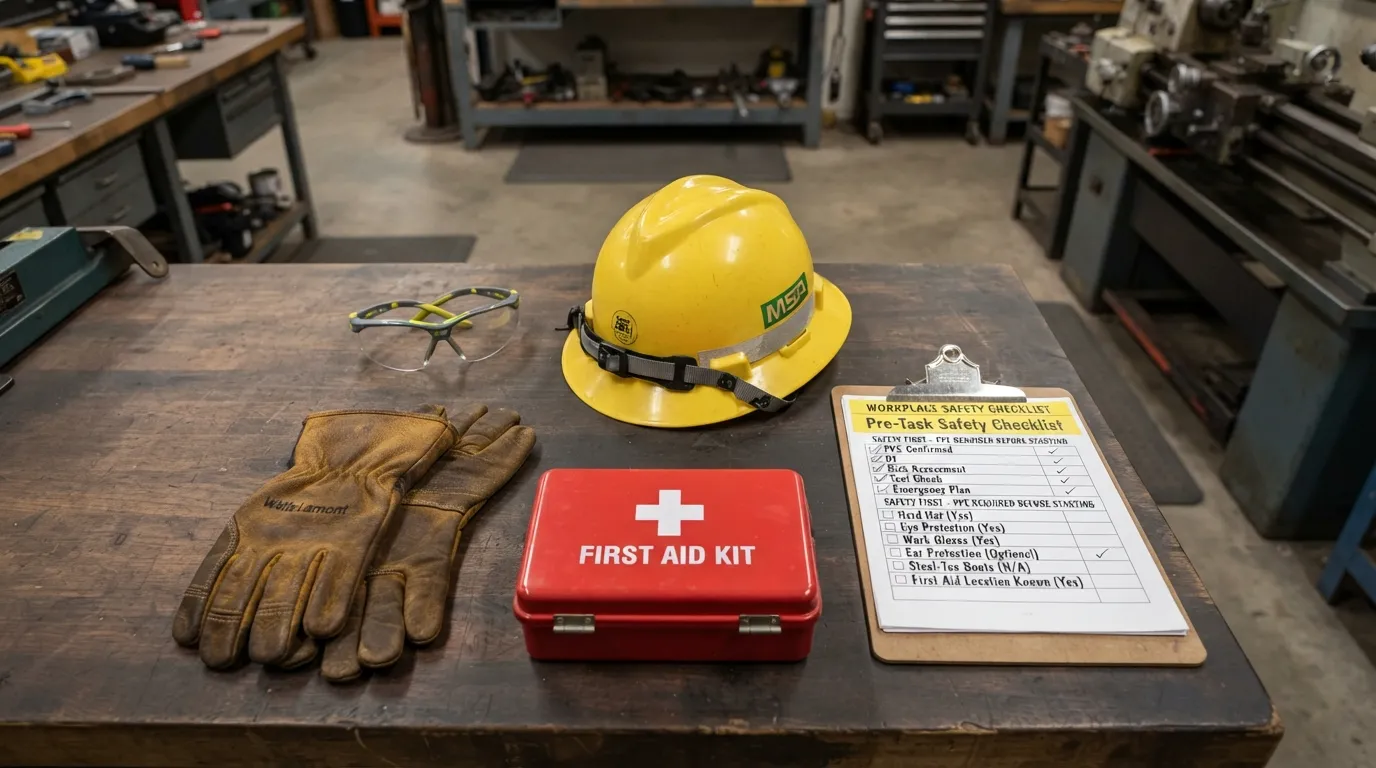
Working with residential water heaters involves handling high-temperature water, electricity, or pressurized gas lines. Prioritizing safety precautions before starting your maintenance routine prevents severe burns, electrical shocks, or gas leaks.
Scalding & Hot Water Risks
Water heaters store large volumes of liquid at dangerously high temperatures that can cause instant, severe skin burns upon contact.
- Turn Off Power Early: Always power down the heating system at least one to two hours before starting to let the internal water cool down safely.
- Wear Protective Gear: Put on heavy-duty rubber gloves and safety glasses to shield yourself from unexpected hot water splashes or pressurized steam.
- Test Water Temperature: Catch a small test sample in a bucket first to verify the water is safe before letting it flow freely across your floors.
Gas Leak / Pilot Light Safety Check
Gas water heaters require careful management of fuel lines to avoid hazardous accumulation of flammable vapors during maintenance.
- Switch to Pilot Mode: Turn the gas control valve from the “On” position to the “Pilot” or “Off” setting before draining any water from the tank.
- Prevent Element Burnout: Draining a gas water heater while the burner is active can instantly melt or ruin the inner lining of the tank.
- Ventilation and Leaks: Ensure your workspace is well-ventilated, and if you smell gas after finishing, immediately shut off the main supply and call a professional.
Electrical Safety for Electric Heaters
Electric water heaters run on high-voltage circuits that pose extreme shock hazards if serviced while live.
- Locate the Circuit Breaker: Go to your home’s main electrical panel and completely switch off the dedicated breaker feeding the water heater.
- Verify Power Off: Use a non-contact voltage tester on the unit’s junction box to confirm zero electrical current before handling any internal components.
- Never Run Dry: Turning power back on before the tank is completely refilled with water will permanently destroy the upper and lower heating elements.
How to Flush a Water Heater
Flushing your residential tank is a straightforward maintenance chore that prevents mineral buildup, eliminates rumbling noises, and protects your utility investment. Follow this detailed, sequential walkthrough to safely purge debris and restore peak operating performance.
Step 1 – Turn Off the Power or Gas
Cutting off the thermal energy source ensures the appliance does not run dry or overheat while the water level drops.
- Electric Units: Switch off the designated circuit breaker inside your main electrical service panel.
- Gas Units: Turn the gas control valve dial from the “On” position to the “Pilot” setting so the burner stays off.
Step 2 – Shut Off the Cold Water Supply
Locate the cold water inlet valve situated directly on top of your water heater and twist it clockwise to stop incoming pressure.
- Valve Closure: Ensure the handle is turned completely perpendicular to the pipe to shut off the supply tightly.
- Pressure Isolation: This isolates the tank contents so you can safely drain the internal reservoir without continuously adding fresh liquid.
Step 3 – Connect the Hose & Open a Faucet
Hook up your equipment and relieve internal air pressure to allow a smooth, steady gravity drain.
- Garden Hose Setup: Attach a standard garden hose securely to the lower drain spigot and route the open end toward a floor drain or exterior exit point.
- Air Venting: Open a nearby hot water faucet inside your home to break the vacuum lock and help the tank drain efficiently.
Step 4 – Drain and Flush the Tank (Practical Tip: Agitating Sediment)
Open the drain valve completely to let the water discharge, keeping an eye out for stubborn, heavy mineral clogs.
- Initial Discharge: Let the discolored water and loose debris run out into a bucket or drain until the stream slows down.
- Practical Tip (Agitating Heavy Sediment): If hardened mineral deposits clog the spigot and block the flow, briefly open and close the cold water inlet valve for a few seconds. This quick pressure surge stirs up and breaks apart compacted sediment at the bottom so it can flush out smoothly through the open drain valve.
Step 5 – Refill the Tank and Restore Power
Ensure the tank is fully saturated with water before reactivating any heating components to avoid permanent internal damage.
- Purge Air Pockets: Close the drain valve, disconnect your hose, and reopen the cold water inlet valve while keeping home hot water faucets running until all trapped air clears out.
- Re-energize the System: Once water flows steadily from your taps without sputtering, turn your electrical breaker back on or switch the gas control valve back to the “On” position.
How to Flush an Electric vs Gas Water Heater Key Differences
While the fundamental plumbing mechanics of draining a storage tank remain similar across models, electric and gas water heaters require vastly different safety protocols and shutdown procedures. Knowing how to properly isolate your specific heating system prevents severe equipment damage and personal injury.
Flushing an Electric Water Heater (Breaker-Specific Steps)
Electric units rely on high-voltage immersion elements that present catastrophic burn risks if exposed to air while energized.
- Main Panel Isolation: Locate your home electrical service panel and completely trip the double-pole circuit breaker dedicated to the water heater.
- Verify Zero Voltage: Never skip shutting off the breaker; draining an electric unit with power running will instantly fry the upper heating element.
- Extended Cooling Period: Allow the tank to sit disconnected for at least two hours so the internal water temperature drops to a safe handling level.
Flushing a Gas Water Heater (Pilot/Vacation Mode Steps)
Gas water heaters use an open combustion burner and a gas control valve that must be carefully managed to prevent hazardous fuel issues.
- Switch Control Dial: Turn the primary gas control knob from the “On” position to the “Pilot” or “Vacation” setting before draining any water.
- Protect the Burner Assembly: Keeping the gas valve on during a drain drops the water level below the combustion chamber, warping or melting the inner tank liner.
- Relighting the Pilot: Once the tank is completely refilled and purged of air, follow the manufacturer guidelines printed on the unit to safely reignite the pilot light.
How to Flush a Water Heater Without a Garden Hose
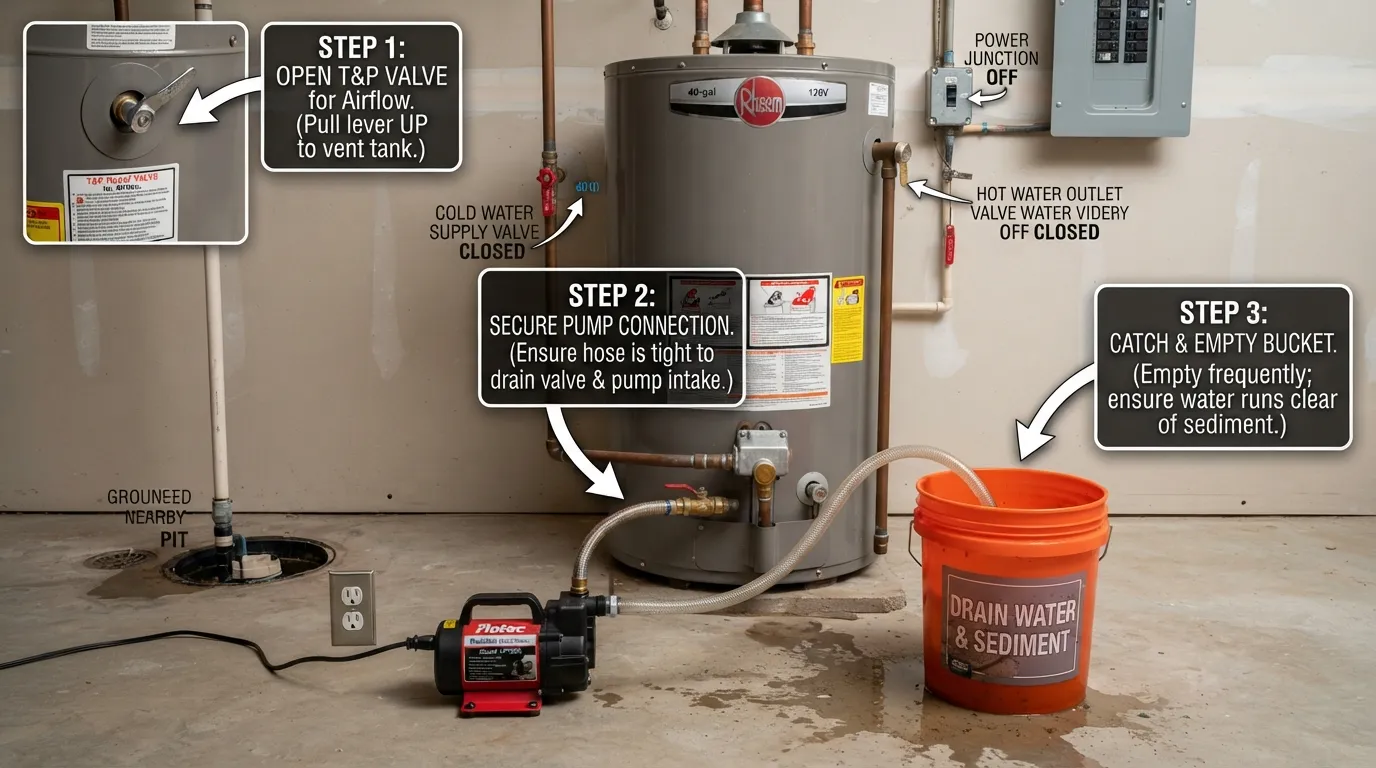
If you don’t have a standard garden hose available or your setup is located in a tight utility closet where a hose cannot reach, you can still complete the maintenance process using alternative techniques. While it requires a bit more physical effort, using localized containers gets the job done effectively.
Alternative Draining Methods (Bucket Method)
When direct outdoor routing isn’t an option, catching the discharge in smaller containers allows you to empty the tank safely indoors.
- Direct Bucket Placement: Place a sturdy 5-gallon bucket directly underneath the lower drain spigot, positioning a low-profile towel underneath to catch stray drips.
- Controlled Valve Operation: Open the drain valve slowly to fill the bucket halfway, then close it momentarily to carry and dump the heavy water into a nearby utility sink or bathtub.
- Repeating the Cycle: Repeat this fill-and-dump cycle multiple times until the water runs completely clear of debris and sediment flakes.
When This Method Is Practical
The bucket method works best in specific scenarios where standard drainage routes are entirely blocked or unavailable.
- Apartment or Tight Closets: Ideal for compact indoor utility spaces where running a long garden hose through living areas is messy and impractical.
- Minor Sediment Flushes: Highly effective if you are only performing a quick, partial maintenance flush rather than draining a completely neglected, heavy-sludge tank.
- Emergency Maintenance: Serves as a reliable temporary workaround when standard hoses are damaged or missing during an unexpected plumbing upkeep session.
How to Flush a Tankless Water Heater
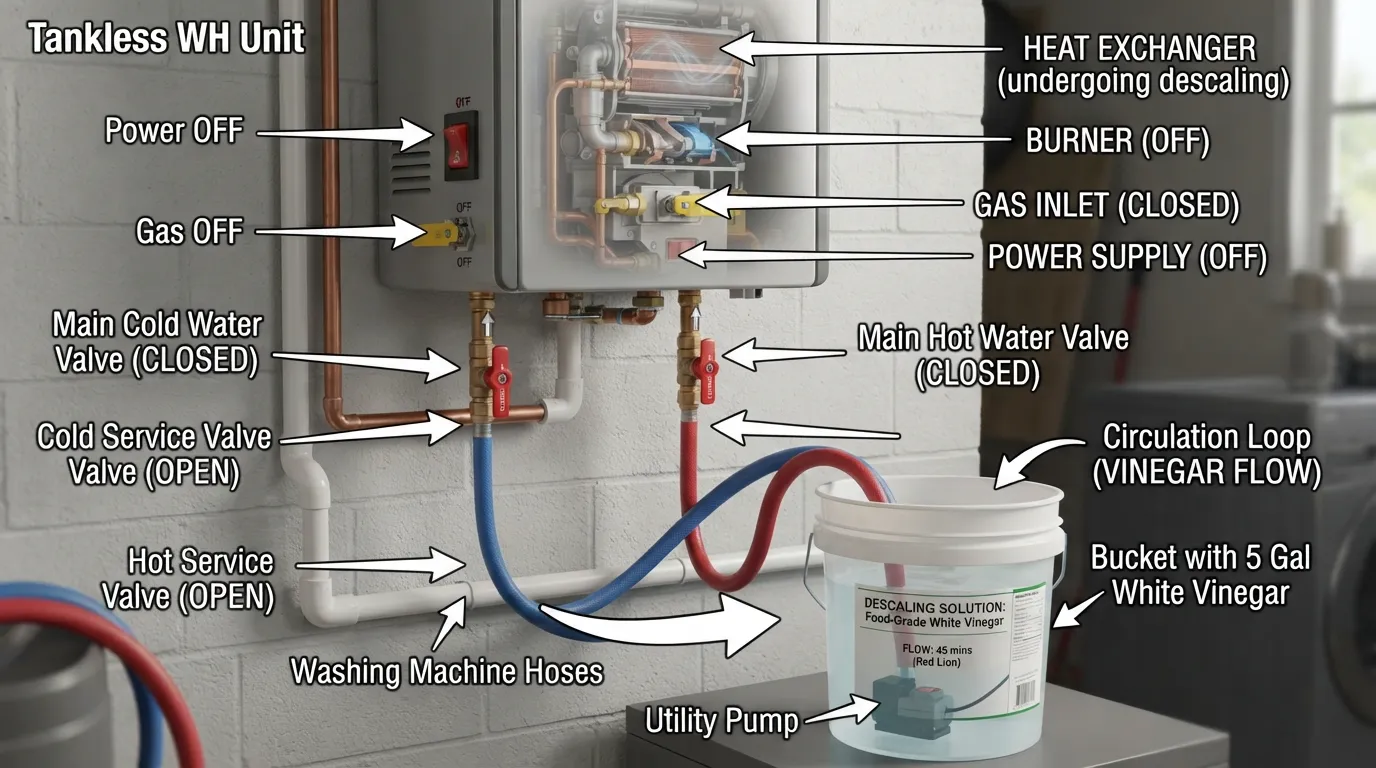
Unlike traditional storage tank models that hold standing water, tankless water heaters heat liquid on demand through high-powered burners. Because they lack a large reservoir, they require a completely different descaling process using a specialized circulation kit rather than a standard drain valve.
Why Tankless Heaters Need a Different Process
Tankless heat exchangers feature narrow internal coils that are highly vulnerable to rapid mineral scale accumulation, which restricts water flow and triggers error codes.
- No Storage Reservoir: Tankless units do not store water, meaning you cannot simply open a bottom drain spigot to empty out accumulated debris.
- Scale Buildup on Coils: Hard water minerals quickly bake onto the internal heat exchanger fins, reducing heating efficiency and causing system lockouts.
- Isolation Valve Design: Tankless systems use built-in hot and cold isolation valves specifically engineered to connect to an external cleaning pump.
Vinegar Circulation Method for Tankless Units
Descaling a tankless water heater requires flushing a mild acid solution through the internal heat exchanger to dissolve stubborn mineral deposits.
- Power Down the Unit: Unplug the tankless water heater or turn off its dedicated circuit breaker to ensure the system does not fire dry during service.
- Connect the Circulation Kit: Attach a small utility pump filled with food-grade white vinegar to the cold water service port using a short hose.
- Run the Solution: Let the pump circulate the vinegar solution through the system for 45 to 60 minutes to completely dissolve internal scale.
- Rinse and Reconnect: Flush the system thoroughly with clean water by opening the service valves before restoring electrical power and normal operation.
How to Flush a Water Heater in an Apartment
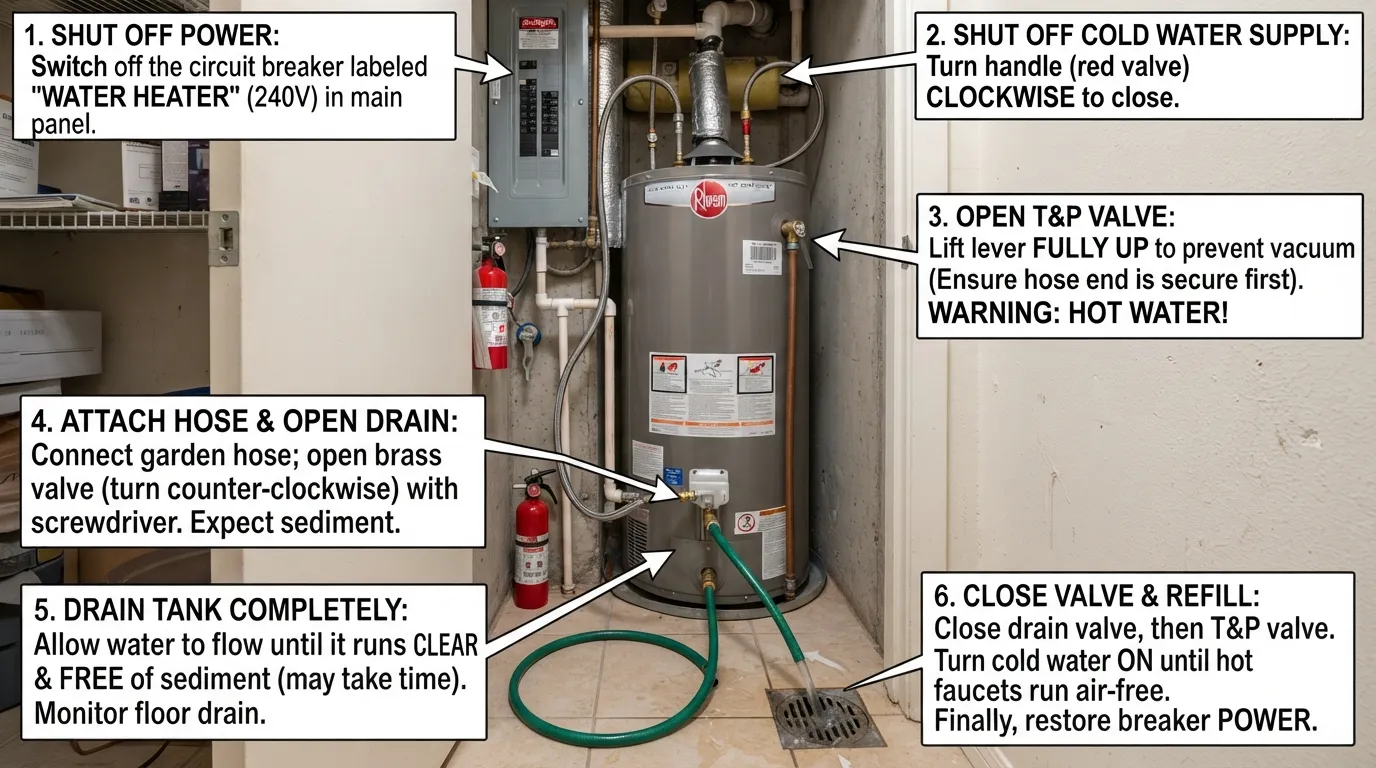
Living in a rental property or apartment complex presents unique challenges when dealing with water heater maintenance. Due to shared plumbing infrastructure, lease restrictions, and limited access to floor drains, apartment residents must approach appliance upkeep differently than homeowners.
Challenges Renters Face
Apartment water heaters are typically tucked away in tight utility closets or balconies, making standard draining procedures difficult.
- Lack of Floor Drains: Most apartment utility closets do not feature floor drains, requiring residents to use the bucket method or long hose runs.
- Lease Restrictions: Standard lease agreements often prohibit tenants from performing unauthorized plumbing modifications or heavy maintenance.
- Shared Building Systems: Accidentally shutting off incorrect valves can disrupt hot water access for neighboring units in the same complex.
When to Contact Your Landlord or Building Maintenance
Because major plumbing fixtures are the legal responsibility of property management, knowing when to call for professional help protects your lease terms.
- Severe Sediment Clogs: If the water heater is making loud rumbling noises or producing discolored water, submit a formal maintenance request immediately.
- Leaking Valves or Tanks: Never attempt to repair or flush a leaking tank in an apartment, as water damage can impact multiple floors and units.
- Routine Upkeep Policies: Check your tenant handbook or ask your landlord if routine tank flushing is covered by building maintenance staff annually.
Dissolving Heavy Sediment Vinegar & Descaling Method
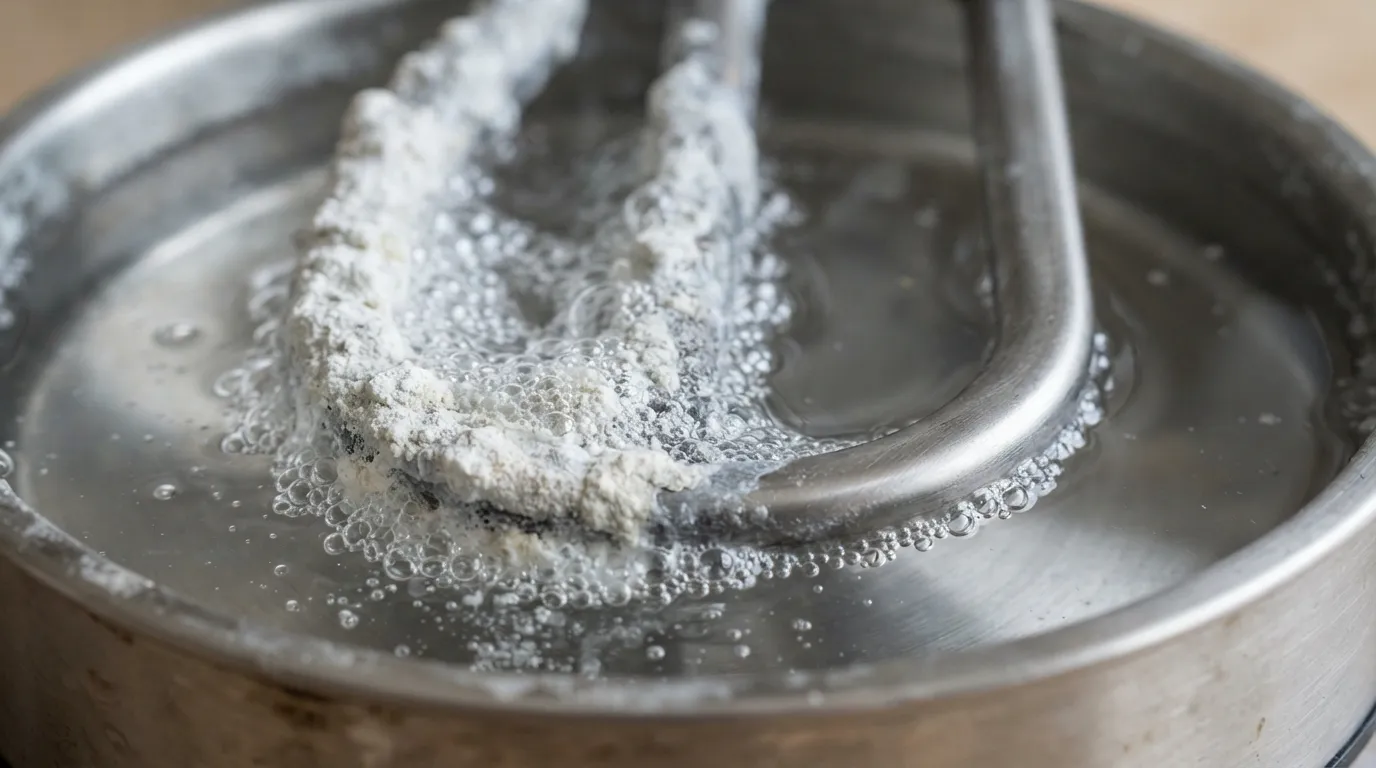
When a water heater has been neglected for several years, standard draining often fails to remove hardened, rock-like mineral deposits cemented to the tank bottom. In these stubborn cases, using a mild acidic solution is necessary to break down and dissolve heavy sediment layers.
When Flushing Alone Isn’t Enough
If you have already completed a standard tank flush and still hear loud rumbling noises or notice poor hot water recovery, stubborn mineral scaling remains trapped inside.
- Compacted Mineral Slabs: Years of unchecked hard water buildup solidify into thick crusts that cannot pass through a standard drain valve opening.
- Blocked Drain Spigot: Heavy sludge can completely plug the internal opening of the drain valve, stopping water flow entirely even when opened.
- Persistent Heating Inefficiency: Residual scale continues to insulate the bottom of the tank, forcing burners or electric elements to overheat and burn out prematurely.
Step-by-Step Vinegar Descaling Process
Introduce food-grade white vinegar directly into the tank reservoir to chemically dissolve compacted mineral deposits without damaging interior glass linings.
- Drain and Isolate: Completely drain the water heater tank using standard safety precautions, then close the lower drain valve tightly.
- Introduce the Vinegar Solution: Pour several gallons of food-grade white vinegar into the top cold water inlet pipe using a funnel, or pump it directly through the drain valve.
- Allow Adequate Soak Time: Let the vinegar solution sit undisturbed inside the tank for at least three to four hours to fully soften and dissolve the hardened mineral crust.
- Final Flush and Rinse: Open the drain valve a second time to purge the loosened sludge, then run fresh water through the tank until all vinegar residue clears out completely.
How Often Should You Flush Your Water Heater
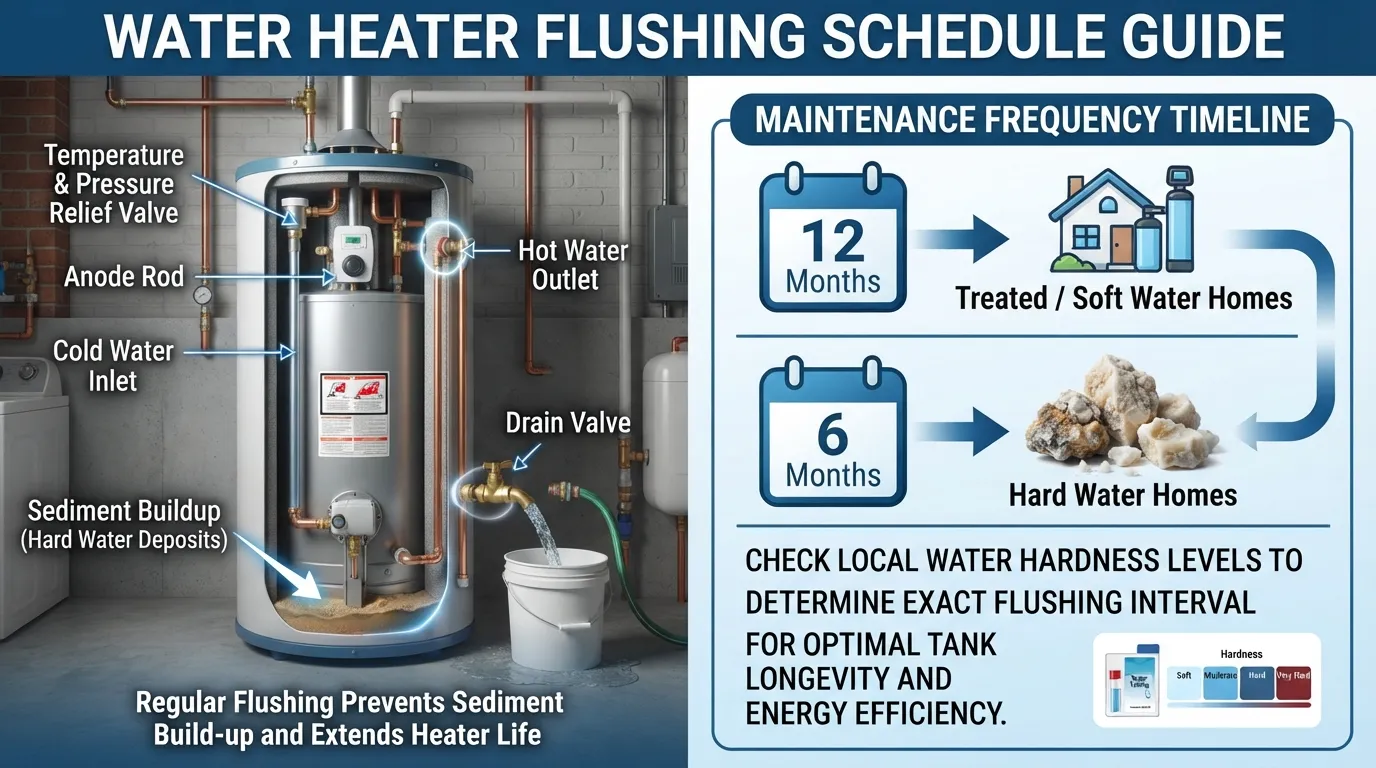
Establishing a consistent preventive maintenance schedule is essential for maximizing the operational lifespan of your water heater and preventing unexpected component failures. Knowing how frequently your specific system needs attention depends heavily on your local water quality and daily household usage.
Recommended Flushing Schedule (6–12 Months)
For most standard residential tank water heaters, performing a complete flush at least once a year keeps mineral accumulation under control.
- Annual Standard Maintenance: Flushing your tank every 12 months is the baseline recommendation for homes with balanced water conditions.
- New Installation Break-In: If you install a brand-new water heater, perform an initial flush after the first year to clear out any early manufacturing residue.
- Manufacturer Recommendations: Rheem’s official maintenance guidelines recommend regular annual purging to protect internal tank linings.
How Water Hardness Affects Flushing Frequency
Homes supplied by hard water sources contain significantly higher concentrations of dissolved minerals, requiring a much more aggressive upkeep schedule.
- Severe Hard Water Zones: If your local water supply is heavily mineralized, you should flush your water heater every 6 months to prevent thick sludge layers.
- Well Water Systems: Private well systems often carry high levels of iron, calcium, and sediment, demanding biannual maintenance checks.
- Water Softener Use: Households equipped with an efficient whole-home water softening system can safely stick to a standard 12-month flushing interval.
What Happens If You Never Flush Your Water Heater
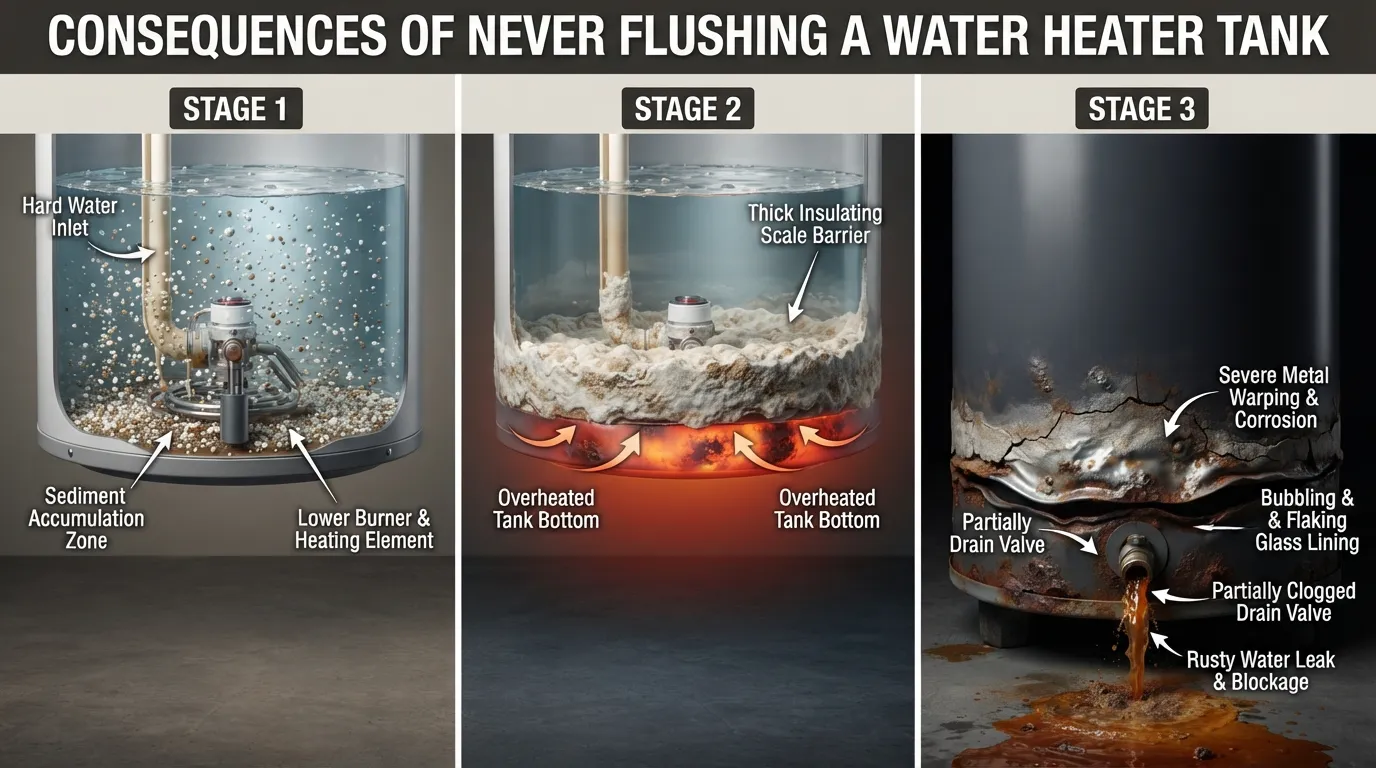
Ignoring routine water heater maintenance can lead to a cascade of mechanical failures, skyrocketing utility costs, and catastrophic property damage. Understanding the long-term consequences of neglected sediment buildup highlights why regular flushing is a vital homeownership chore.
Reduced Efficiency & Higher Energy Bills
When heavy mineral deposits accumulate at the base of your tank, they form an insulating layer between the heat source and your water supply.
- Thermal Barrier Effects: The heating elements or gas burners must burn significantly longer and hotter to penetrate the sediment sludge.
- Spiked Monthly Utility Bills: Extended heating cycles consume much more electricity or natural gas, directly driving up your ongoing household expenses.
- Component Burnout: Overworked heating elements suffer from severe thermal stress, leading to frequent electrical failures and costly replacement parts.
Premature Tank Failure & Leaks
Trapped heat pockets underneath dense sediment layers wreak havoc on the structural integrity of your steel storage tank.
- Metal Fatigue and Fractures: Localized overheating causes the bottom metal walls of the tank to warp, weaken, and eventually develop micro-fractures.
- Catastrophic Tank Ruptures: A severely corroded, neglected tank can rupture unexpectedly, releasing dozens of gallons of scalding water onto your floors.
- Shortened Appliance Lifespan: While a well-maintained water heater lasts 10 to 15 years, an unmaintained tank often fails prematurely within 5 to 7 years.
Cost to Flush a Water Heater DIY vs Hiring a Plumber
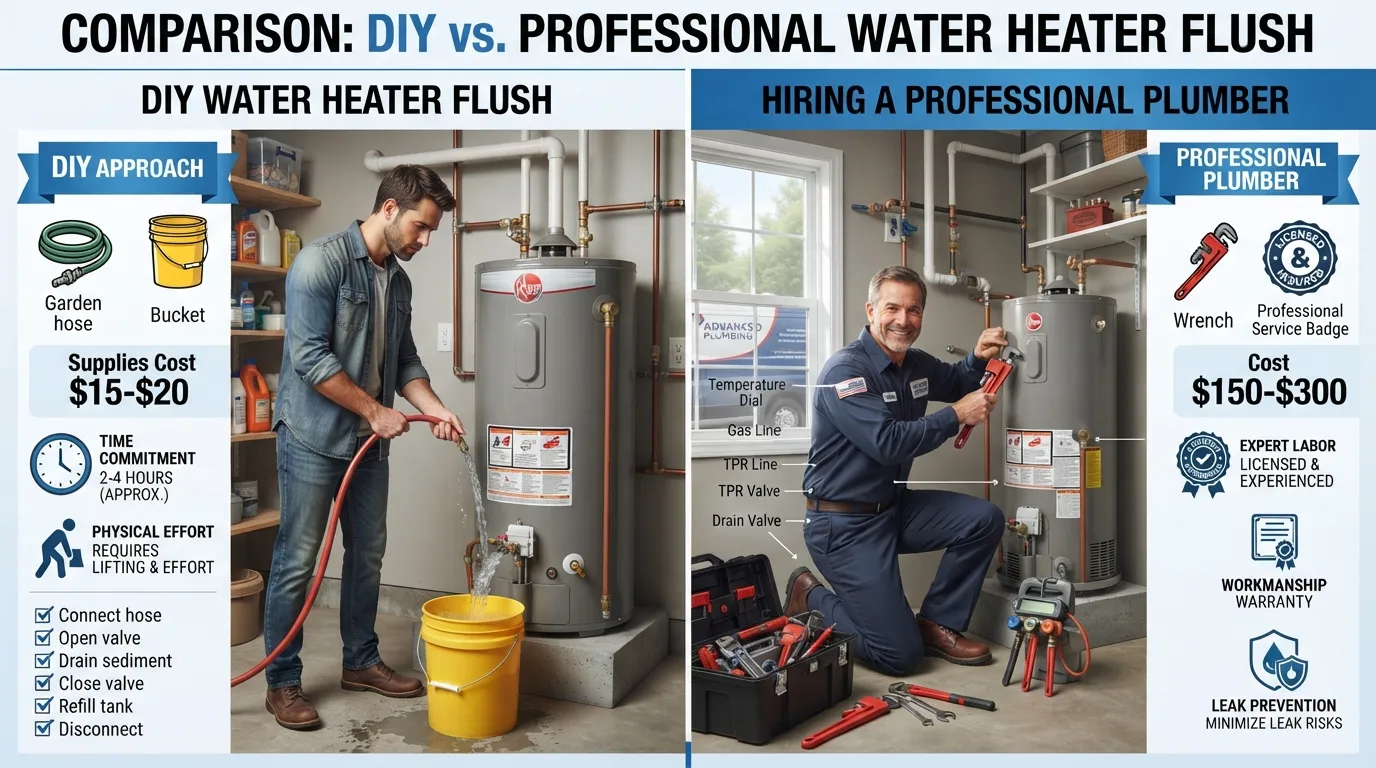
Deciding whether to tackle water heater maintenance yourself or hire a licensed professional involves weighing out-of-pocket costs against time, safety, and system complexity. Understanding the financial breakdown helps you make an informed choice for your home.
DIY Flushing Cost Breakdown
Performing a standard water heater flush on your own is extremely cost-effective since it relies on basic household tools you likely already own.
- Equipment Expenses: If you already own a standard garden hose, 5-gallon bucket, and basic hand tools, your out-of-pocket cost is zero.
- Optional Supply Costs: Purchasing a replacement hose, Teflon tape, or food-grade vinegar for descaling typically costs between $15 and $30 total.
- Time Investment: Expect to spend about one to two hours of hands-on labor completing the shutdown, drainage, and refill cycle.
Professional Plumber Cost Estimate
Hiring a licensed plumbing contractor ensures the job is done correctly, but you will pay for specialized labor and service dispatch fees.
- Standard Service Call Rates: Most plumbers charge a flat service fee or hourly rate ranging from $150 to $300 just to visit your home and flush the tank.
- Bundled Maintenance Packages: Routine flushing is sometimes offered at a discount if combined with other annual plumbing inspections or water treatment servicing.
- Hidden Repair Upcharges: If the technician discovers a broken drain valve or a depleted anode rod during service, expect additional parts and labor fees.
When It’s Worth Hiring a Professional
While DIY maintenance works well for routine upkeep, certain warning signs or system complications require immediate professional intervention.
- Severely Damaged Valves: If the lower drain spigot is completely rusted shut, stripped, or leaking, a plumber must safely extract and replace it.
- Age and Neglect: If a water heater has never been flushed in over five years, professional descaling prevents accidental damage to fragile internal seals.
- Gas and Electrical Complications: Homeowners uncomfortable working around gas control lines or high-voltage electrical breakers should always defer to licensed experts.
Should You Flush an Old 7+ Year Water Heater?
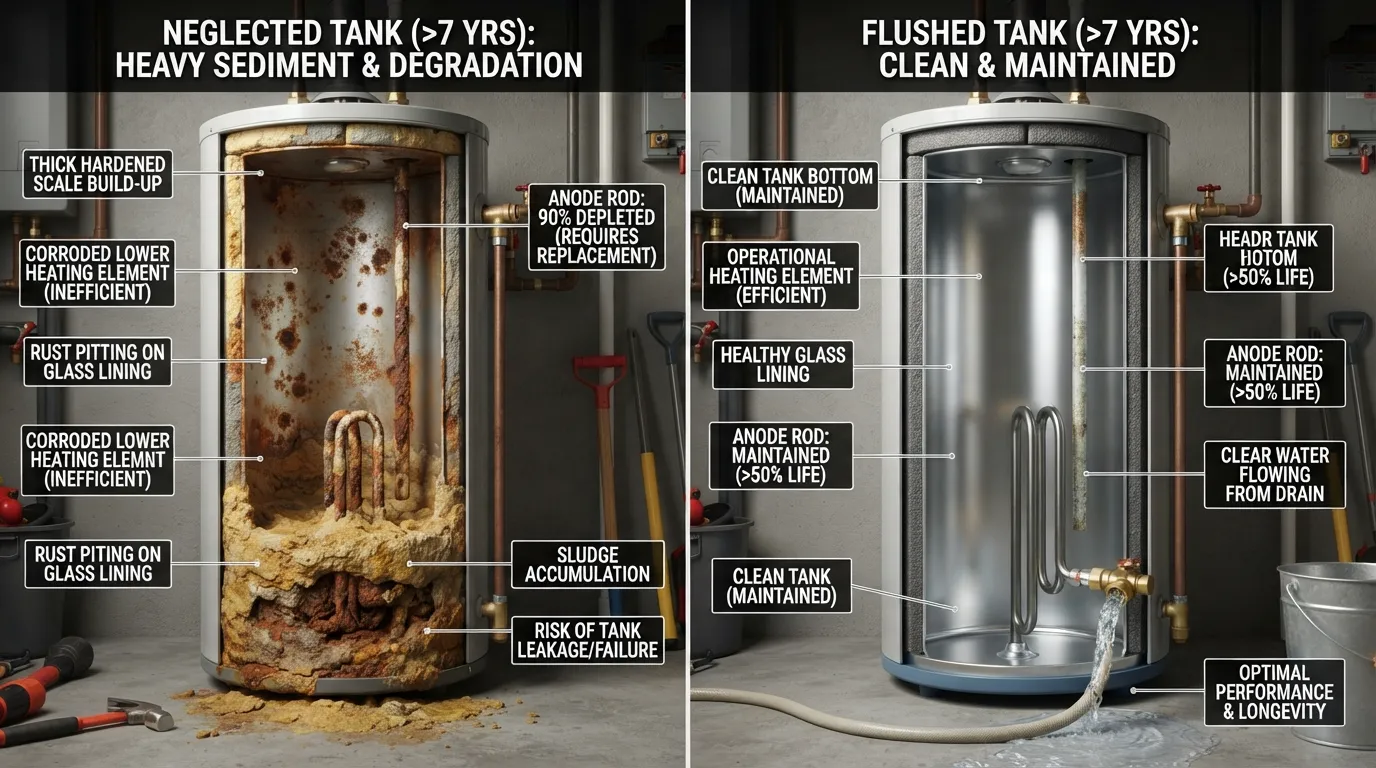
As water heaters age past the seven-year mark, their internal components become fragile, and thick layers of mineral scale solidify permanently at the bottom of the tank. Deciding whether to perform a late flush requires careful evaluation of whether the system can handle the maintenance or if it is closer to total failure.
Risks of Flushing a Long-Neglected Tank
Attempting a high-pressure or sudden flush on a severely aged appliance can sometimes trigger unexpected mechanical failures rather than fixing them.
- Fragile Valve Failure: Older brass or plastic drain valves become brittle over time; forcing them open can snap the stem or cause a permanent leak that refuses to close.
- Dislodging Scale Plugs: Thick mineral crusts often act as a secondary seal over tiny rust holes; removing the sediment can suddenly expose hidden leaks in the tank floor.
- Thermal Shock Stresses: Pumping cold water into a scorching, aged metal tank can warp internal welds and fracture aging glass linings.
Repair vs Replace Making the Right Call
Understanding when routine maintenance is no longer effective saves you from pouring money into a failing appliance that is due for replacement.
- Inspect Anode Rod Condition: If your 7+ year old heater has never had its sacrificial anode rod replaced, the tank walls are likely vulnerable to active corrosion.
- Weigh Replacement Costs: Given that standard residential water heaters typically last between 10 and 12 years, investing in a professional repair for a severely deteriorated unit is rarely cost-effective.
- Proactive Upgrade: If your aging water heater shows signs of bottom leaks, persistent rusty discoloration, or continuous heating failures, planning a proactive replacement prevents a catastrophic flood.
Troubleshooting Common Issues After Flushing
Even when you follow every step of the maintenance process carefully, minor hiccups can occasionally happen once you start the system back up. Knowing how to diagnose and resolve post-flushing issues quickly ensures your household hot water supply returns to normal without unnecessary panic.
Stuck or Corroded Drain Valve
Over years of exposure to mineral-rich water, the lower drain spigot can become tightly jammed, stripped, or completely rusted shut.
- Use Proper Leverage: Gently grip the plastic or brass valve stem with an adjustable wrench or pliers, taking care not to crack the threaded housing.
- Clear Mineral Blockages: If the valve turns but no water drains, hardened sediment is likely plugging the internal opening; carefully clear it using a stiff wire or screwdriver while wearing safety gloves.
- Install a Replacement Valve: If the spigot is stripped beyond use, turn off your main water supply, drain the tank from a pressure relief valve, and replace the old valve with a durable brass ball valve.
Discolored Water After Flushing
Seeing a slight yellowish, brownish, or cloudy tint right after completing a flush is a common occurrence that usually clears up quickly.
- Stirred Residual Sediment: The high-pressure rush of refilling the tank often stirs up microscopic mineral flakes that were left clinging to the interior walls.
- Run the Taps: Let your bathtub or utility sink hot water tap run continuously for three to five minutes to flush out any remaining suspended debris.
- Check Anode Rod Status: If discolored water persists for more than 24 hours, your sacrificial anode rod may be completely depleted, causing interior tank corrosion.
No Hot Water After Flush
If your taps run cold shortly after finishing maintenance, it typically points to a shutdown safety feature or a simple activation oversight.
- Check Electrical Breakers: Ensure you successfully flipped the dedicated circuit breaker back to the “On” position inside your main electrical panel.
- Relight the Gas Pilot: For gas units, verify that the control knob was switched back from “Pilot” to the “On” position and that the burner flame is actively burning.
- Allow Recovery Time: Remember that a newly refilled tank of cold water takes anywhere from 30 to 60 minutes to cycle back up to your preferred household temperature.
Frequently Asked Questions
Find quick, authoritative answers to the most common questions homeowners ask about water heater maintenance, draining times, and DIY safety guidelines.
Can I Flush My Hot Water Heater Myself?
Yes, flushing a water heater is a completely manageable DIY project for most homeowners who feel comfortable working around basic plumbing connections and safety switches.
- Required Skills: As long as you follow sequential safety steps—such as cutting power or gas and relieving pressure—no professional licensing is needed.
- Time Commitment: The entire process typically takes less than two hours from start to finish.
Is It Worth It to Flush a Water Heater?
Flushing your water heater is exceptionally worthwhile because it directly prevents premature component failure and lowers your monthly energy bills.
- Energy Savings: Removing insulating mineral layers restores peak thermal efficiency, reducing daily electricity or gas usage.
- Lifespan Extension: Routine annual maintenance can easily double the operating lifespan of your storage tank.
How Long Does It Take to Drain a Hot Water Heater?
The total draining time depends heavily on the physical capacity of your tank and the amount of sediment buildup inside.
- Standard Timeframe: Most 40- to 50-gallon residential storage tanks take between 15 and 30 minutes to empty completely through a standard garden hose.
- Sludge Delays: If heavy sediment clogs the drain spigot, draining may take longer until the blockage is safely cleared.
How Do I Shut Off a Gas Water Heater?
Safely shutting down a gas water heater requires managing the fuel control dial before any water is removed from the tank.
- Locate the Control Valve: Find the gas control thermostat located near the bottom front of the exterior tank housing.
- Switch Settings: Turn the primary operating knob from the “On” position to the “Pilot” or “Off” setting to completely deactivate the burner.
Mastering Water Heater Maintenance for Long-Term Reliability
Routine water heater maintenance is one of the most effective ways to protect your home from unexpected plumbing emergencies, expensive utility bills, and premature equipment replacement. By taking the time to understand how sediment accumulates and following a structured annual flushing routine, you can keep your system running at peak performance for years to come.
Whether you choose to handle the project yourself using a standard garden hose and basic hand tools or decide to call in a professional for an older, neglected unit, staying proactive pays off. Implement these steps today to enjoy endless hot water, lower energy costs, and ultimate peace of mind.

Oscar Vance | Master Plumber & Drainage Expert
Meet Oscar Vance, a licensed master plumber sharing practical solutions on residential repairs, preventive maintenance, and thoughtful home upkeep.

