Why Knowing How to Turn Off Your Shower Valve Matters
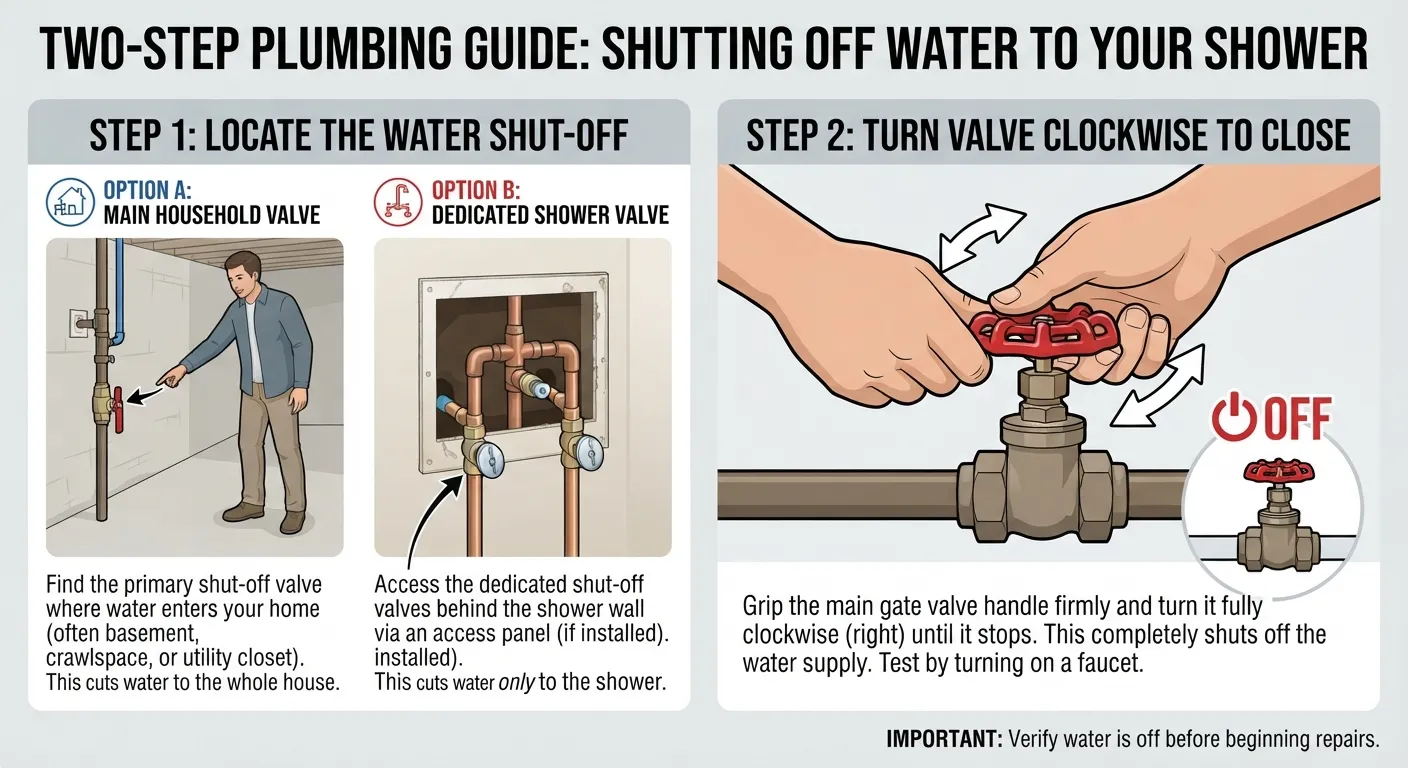
Mastering the location and operation of your shower valve is an essential skill for handling any sudden plumbing emergency or executing routine bathroom renovations. When a catastrophic water leak strikes, knowing how to immediately isolate your water shut-off minimizes costly structural damage to your home.
Equipping yourself with this basic DIY repair knowledge saves both time and expensive emergency plumber fees. Understanding your plumbing system ensures you can act decisively before minor drips escalate into major disasters.
Do You Have a Dedicated Shower Shut Off Valve?
Finding out whether your shower has an independent shut-off valve depends entirely on your specific plumbing installation type. While most standard residential showers lack dedicated local shut-offs, high-end builds or recent renovations frequently incorporate specialized components that allow you to isolate the water supply instantly.
How to Check for Individual Shower Valves
To determine if your shower features localized shut-offs, inspect the wall directly behind your shower fixture for an access panel or carefully remove the decorative trim plate. Look closely at the central brass valve body to see if it features built-in isolation mechanisms.
- Access Panel Inspection: Check closets, hallways, or adjacent rooms sharing the exact wall with your shower for a small removable utility panel.
- Trim Plate Removal: Unscrew the handle and escutcheon plate to expose the inner mixing valve assembly.
- Screwdriver Stops: Look for small, flat-head screw slots on the sides of the brass valve body that can be turned ninety degrees to block water flow locally.
What It Means If You Don’t Have One
If your inspection reveals no integrated screwdriver stops or access panels, your bathroom relies entirely on the main residential supply line. This standard configuration means any major repair or leak fix requires shutting off water to the entire house rather than just the shower stall.
- Main Supply Dependency: You must locate your home’s primary water meter or main shut-off valve near the foundation or water heater to perform maintenance.
- Shared Pressurized Lines: The shower shares un-isolated supply lines with other nearby bathroom fixtures like sinks, bathtubs, and toilets.
- Pre-Repair Preparation: Always verify the location of your main valve and alert household members before attempting any DIY plumbing interventions.
Method 1 Shutting Off Water at the Shower Valve If Available
Locating integrated shut-off valves directly at your shower unit allows you to bypass turning off the main house supply. This targeted method keeps the rest of your home fully functional while you perform necessary maintenance on the mixing valve or cartridge.
Tools You’ll Need
Gathering the correct tools before you start prevents unnecessary delays and keeps your workspace organized during the repair process.
- Flathead Screwdriver: Essential for turning the built-in screwdriver stops on the valve body.
- Hex Wrench / Allen Key Set: Required for loosening and removing the shower handle set screw.
- Pliers or Channel Locks: Helpful for gripping stubborn decorative trim or internal components gently.
- Flashlight or Headlamp: Crucial for illuminating dark access panels or recessed valve cavities.
Step by Step Removing the Handle and Trim Plate
Exposing the internal plumbing components requires safely dismantling the outer hardware without scratching your shower wall or damaging the fixtures.
- Locate and Remove Set Screw: Search the underside or face of the shower handle for a small hex screw, loosen it using an appropriate Allen key, and slide the handle off.
- Detach the Escutcheon Plate: Unscrew or pull back the decorative metal trim plate (escutcheon) to fully expose the brass valve body and mixing chamber behind the wall.
- Inspect the Inner Cavity: Carefully examine the hot and cold water supply lines to verify if integrated isolation valves are present on the sides of the brass body.
Locating and Turning the Screwdriver Stops
Once the inner valve body is visible, you can execute the mechanical shut-off procedure safely and effectively.
- Identify the Isolation Slots: Locate the integrated hot and cold screwdriver stops positioned on the left and right flanks of the main brass valve body.
- Turn Clockwise to Close: Insert your flathead screwdriver into the slot and rotate it 90 degrees clockwise until it stops, completely blocking the water flow.
- Repeat for Both Lines: Ensure you shut off both the hot and the cold supply stops securely to prevent any residual pressure or leaking during repairs.
How to Confirm the Water Is Fully Off
Verifying that the isolation valves have completely sealed off the water supply prevents messy surprises once you disassemble the inner cartridge.
- Test the Handle: Return to the shower handle position temporarily or open the cartridge stem to check if water continues to drip or flow.
- Drain Residual Pressure: Allow any trapped water remaining inside the pipes to bleed out completely into the tub or shower pan.
- Check for Dryness: Confirm that the flow drops entirely to zero before pulling out the internal valve cartridge for replacement or cleaning.
How to Shut Off Water to Shower With No Valve
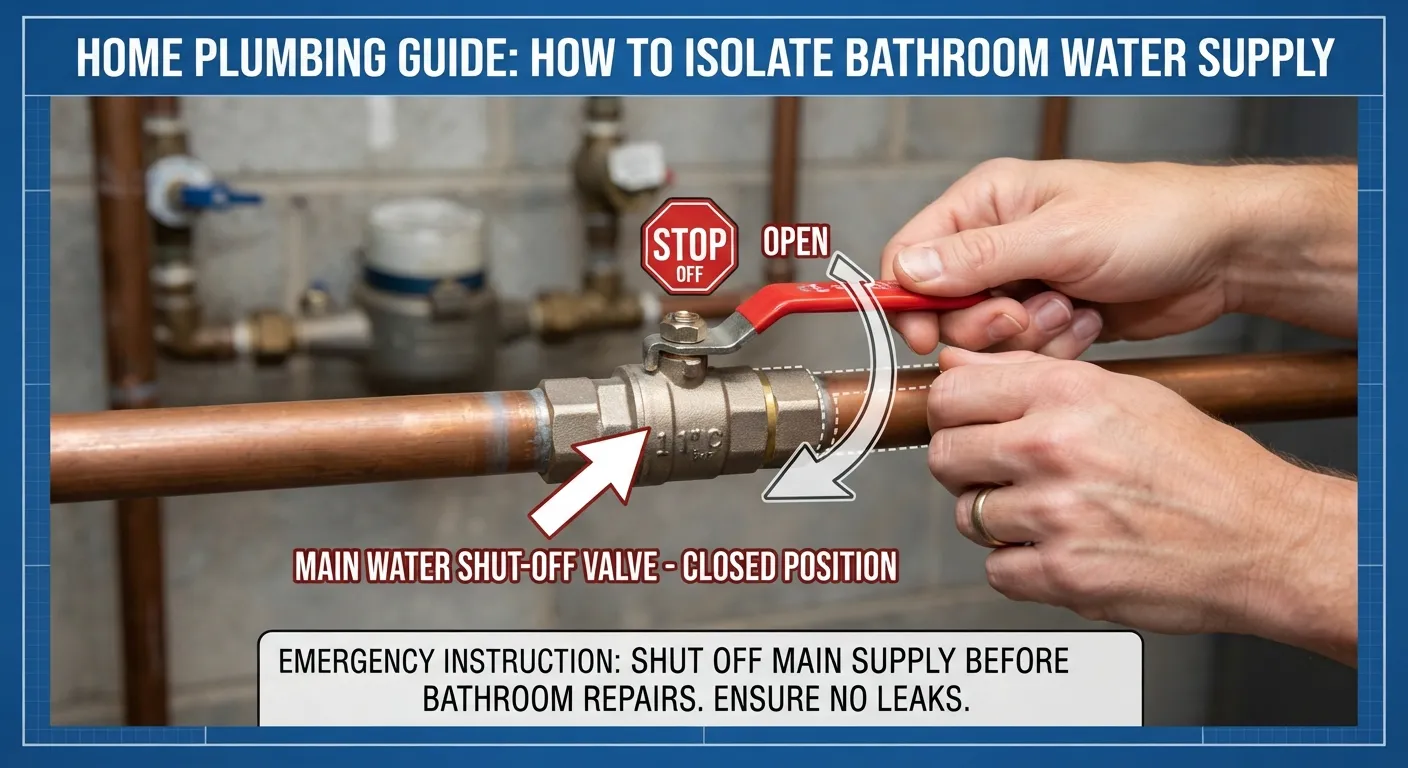
Dealing with a leaking shower when no dedicated local shut-off valve exists requires alternative isolation strategies. Because standard residential builds route plumbing directly from main lines without secondary bathroom manifolds, you must rely on strategic workarounds to stop the flow.
Why Most Showers Don’t Have a Dedicated Valve
Standard residential construction practices rarely include localized shut-offs for individual fixtures to minimize potential points of failure behind finished walls. Eliminating hidden valves significantly reduces the long-term risk of catastrophic behind-the-wall leaks that could go unnoticed for months.
- Cost and Complexity: Plumbers streamline initial construction and lower material expenses by running continuous un-isolated pipe loops directly to major fixtures.
- Maintenance Accessibility: Building codes prioritize keeping mechanical connection points centralized or easily reachable rather than packing tight wall cavities with extra brass fittings.
- Industry Standards: The common reliance on main home shut-offs or water heater valves remains the default protocol for standard residential plumbing layouts.
Removing the Cartridge as a Temporary Fix
If you cannot isolate the water locally and turning off the entire house is inconvenient, you can sometimes use specialized tools to manage severe leaks directly at the mixing chamber. However, this approach requires extreme caution and quick execution.
- Specialized Extraction: Use a durable cartridge puller tool designed for your specific brand of shower valve to safely extract stubborn inner assemblies.
- Using Temporary Plugs: Some professional plumbers insert specialized rubber test plugs or pressure caps directly into the open valve body to block incoming water streams.
- Emergency Contingency: Treat this method strictly as a temporary emergency measure while you prepare to shut down the main supply line permanently.
Shutting Off Water at the Water Heater
If your leak involves only the hot water line or you need to isolate hot water supply pressure during maintenance, you can bypass turning off the entire house.
- Locate the Inlet/Outlet Valves: Find the cold water inlet supply line and the hot water outlet pipe directly on top or near your residential water heater unit.
- Close the Hot Outlet Valve: Turn the valve handle on the hot water outlet pipe clockwise to completely cut off thermal water delivery to the household plumbing network.
- Verify Cold Isolation: Keep in mind that this leaves cold water lines fully pressurized, so check which side of your shower valve is actually leaking before relying on this method.
When You Must Use the Main Shut-Off Instead
When localized tricks fail or your shower valve leaks uncontrollably from both hot and cold ports, reverting to the primary household supply is the only safe option.
- Locate the Main Valve: Find your primary water meter box near the street or the main indoor shut-off valve where the municipal line enters your home’s foundation.
- Execute Full Shutdown: Turn the lever or wheel valve fully clockwise to shut down all incoming water pressure across every fixture in the building.
- Drain Low-Point Faucets: Open the lowest taps in your house (like basement utility sinks or ground-floor bathtubs) to bleed remaining pressure from the lines before starting work.
Method 3 Turning Off the Main Water Supply Universal Fix
Shutting off the main water supply provides a foolproof, universal solution when your shower lacks a dedicated local valve and bypassing individual lines is impossible. This definitive method completely stops all water flow into your home, allowing you to tackle major plumbing repairs safely.
Common Locations Basement,Utility Closet Water Meter Outside
Locating your primary water shut-off valve quickly depends on your home’s geographic region, foundation style, and overall architectural age.
- Indoor Utility Areas: Check basement walls facing the street, laundry rooms, utility closets, or near the water heater where municipal supply lines enter the house.
- Outdoor In-Ground Boxes: Search your perimeter for a concrete or plastic utility box labeled “Water Meter” buried near the front property line or sidewalk.
- Exterior Wall Mounts: Look along outer foundation walls for protective insulated enclosures or outdoor spigot shut-off combinations common in warmer climates.
Lever-Style vs Wheel-Style Valves How to Turn Each
Residential plumbing systems typically feature one of two primary valve mechanisms, each requiring a distinct operating motion to seal off the water.
- Quarter-Turn Lever Valves: Modern ball valves feature a flat handle aligned with the pipe; rotate the lever 90 degrees crosswise to the pipe to close it completely.
- accumulatorRound Wheel Gate Valves: Older homes feature traditional multi-turn spoked handles; turn the wheel clockwise several full rotations until it firmly seats shut.
- Safety Precaution: Never force a stuck wheel valve aggressively with heavy metal wrenches, as old brass stems can snap easily and cause major leaks.
Draining Remaining Water From Pipes Safely
Once your main water supply is successfully closed, trapped residual pressure and water volume will remain suspended inside your upper-level plumbing lines.
- Open Lowest House Faucets: Turn on basement or ground-floor bathtubs and utility sinks to allow trapped water to drain out completely.
- Open Highest Fixtures: Open upstairs bathroom faucets simultaneously to let air enter the system and push out any lingering water columns.
- Begin Your Repair: Once the flow stops entirely and lines are fully depressurized, you can safely dismantle your shower valve components without unexpected spray.
Special Case Shutting Off Shower Water in a Mobile Home
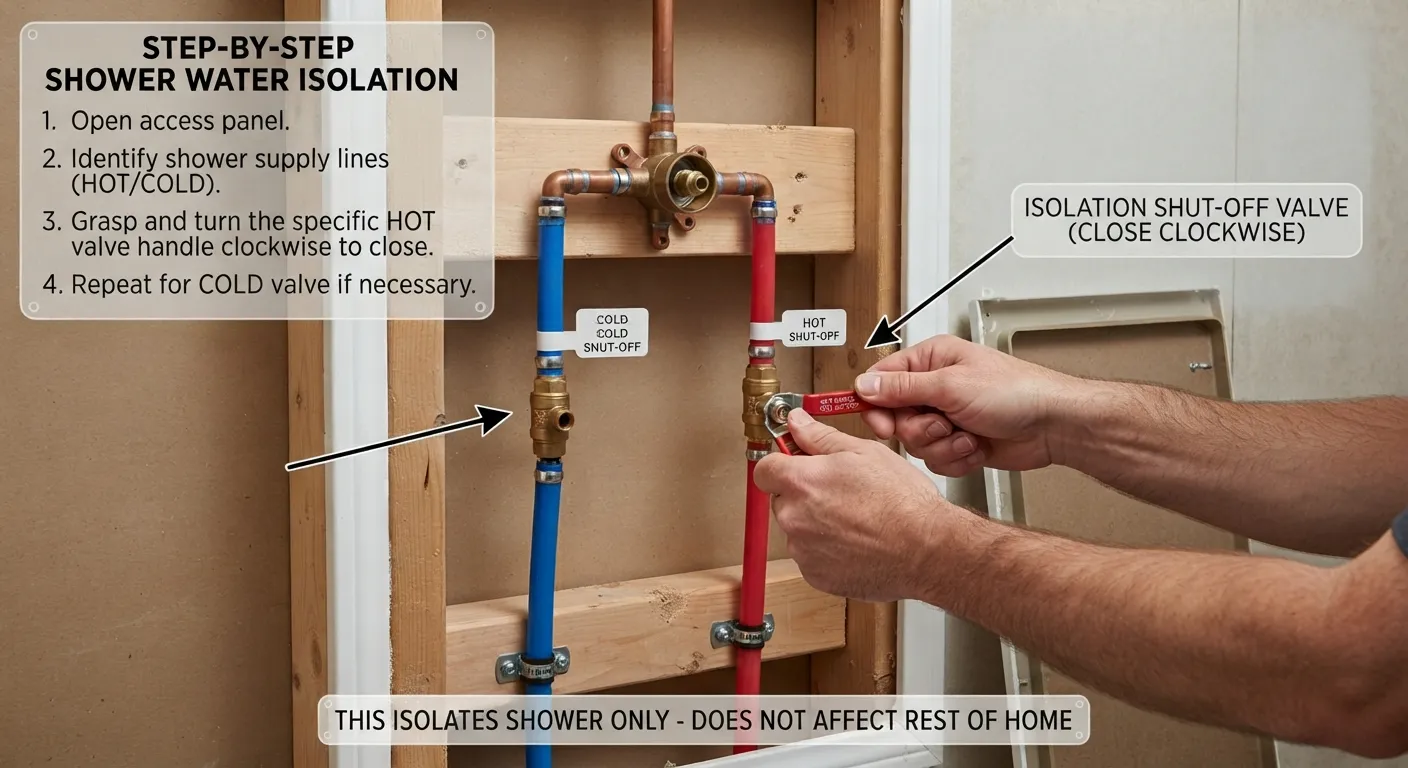
Shutting off water to a shower in a manufactured or mobile home requires understanding unique plumbing configurations that differ significantly from standard site-built houses. Because these structures utilize flexible lines routed through enclosed crawlspaces, locating the proper isolation point is vital for successful repairs.
Where Mobile Home Shut Off Valves Are Usually Located
Mobile home plumbing systems typically feature localized or centralized shut-offs designed for easy accessibility by homeowners during maintenance emergencies.
- Under-Sink Manifolds: Check the cabinets beneath your bathroom vanity or kitchen sink, where secondary inline shut-off valves often control specific branch lines feeding the shower and tub.
- Main Exterior Riser: Look directly underneath the floor framing where the main municipal water supply pipe rises through the protective belly wrap into the home.
- Utility Closet Access: Inspect built-in laundry enclosures, hot water heater compartments, or dedicated utility hatches where central manifold clusters are frequently installed.
Differences From Standard Residential Plumbing
Manufactured housing relies on specialized materials and structural routing methods that impact how you manage water isolation and repairs.
- Flexible PEX Piping: Most mobile homes utilize flexible cross-linked polyethylene lines rather than rigid copper or PVC, requiring specialized crimp fittings if repairs are needed.
- Belly Board Protection: Supply lines are typically suspended inside the enclosed underbelly insulation wrap, meaning you must access inline valves through designated panels rather than exposed crawlspaces.
- Low-Pressure Constraints: Manufactured home fixtures often feature integrated flow restrictors and sensitive valve bodies that demand careful pressure management when turning lines back on.
Special Case Turning Off Shower Water From Outside
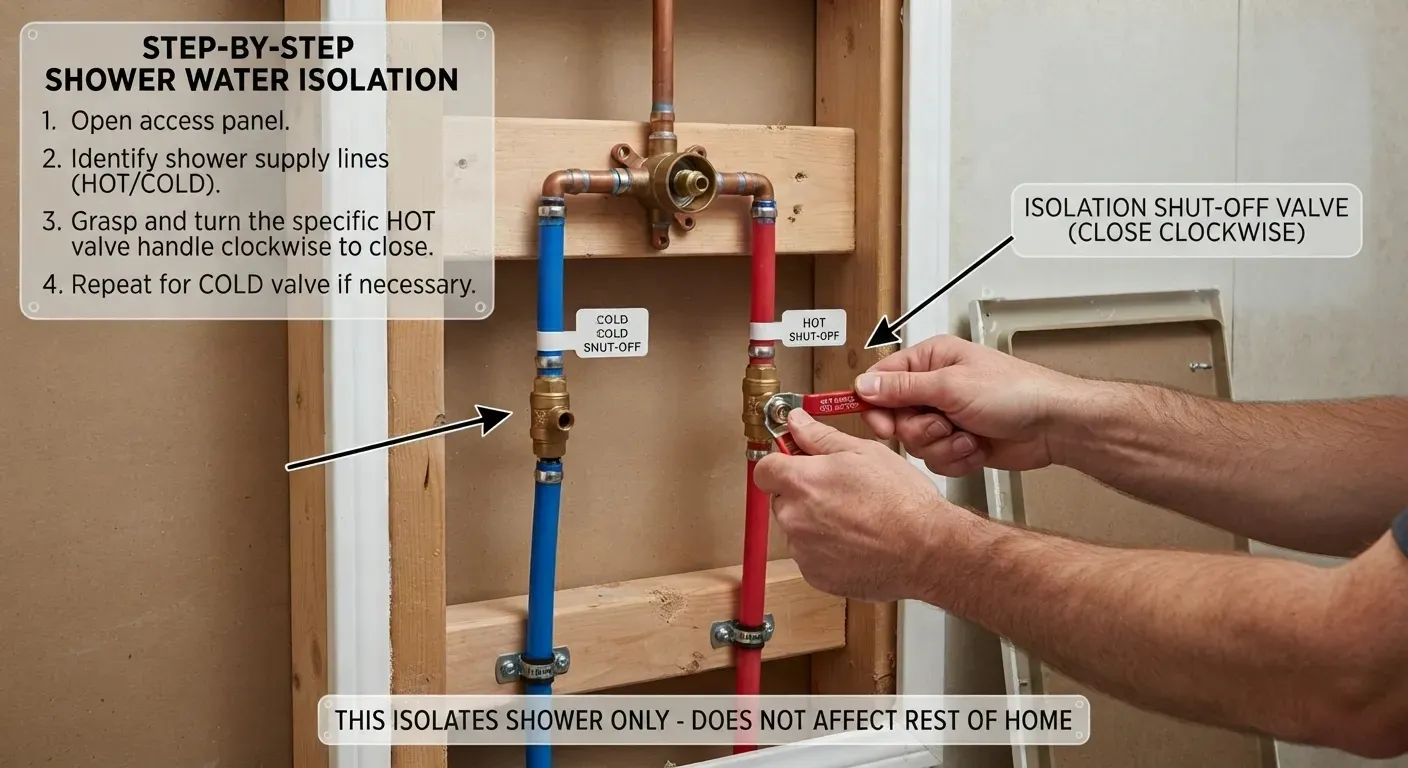
Isolating your shower water from an exterior access point provides a reliable alternative when indoor plumbing lines are inaccessible or corroded. Knowing how to operate outdoor utility controls ensures you can stop water flow during catastrophic indoor leaks without entering confined spaces.
Locating the Exterior Curb Shut Off Valve
Exterior water controls are typically positioned near your property boundary or directly outside the main foundation wall within a protective utility enclosure.
- Street-Side Meter Box: Locate the heavy plastic or concrete utility box near your front property line or sidewalk labeled “Water Meter” or “Water.”
- Curb Stop Mechanism: Inside the meter box, look for the curb stop valve positioned on the municipal side of the meter cylinder.
- Exterior Foundation Riser: In warmer climates, check the outer wall where the primary supply line enters the house for an insulated exterior ball valve.
When to Use This Instead of the Indoor Main
Relying on outdoor exterior shut-offs becomes necessary when specific household conditions prevent the safe operation of interior plumbing controls.
- Stuck or Leaking Indoor Valves: If your indoor main gate valve is stripped, severely corroded, or leaks heavily when touched, the exterior curb stop is your safest fallback.
- Flooded Utility Areas: When a major indoor pipe rupture floods your basement or utility closet, shutting off water from the outside prevents entering a hazardous area.
- Emergency Municipal Isolation: Using a specialized T-handle meter key on outdoor curb stops allows you to cut water access instantly before professional help arrives.
Troubleshooting Shower Faucet Won’t Fully Turn Off
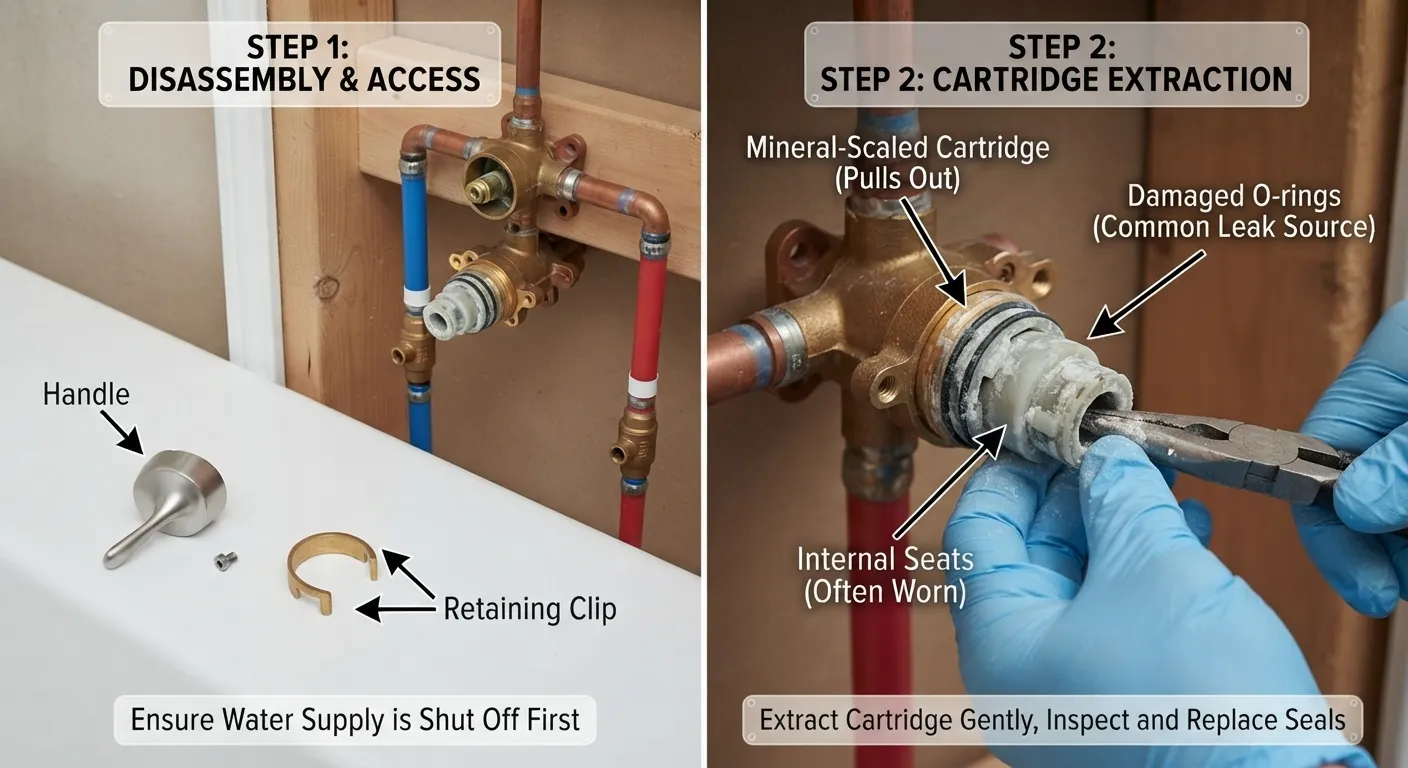
Discovering that your shower faucet continues to drip or run constantly even after turning the handle off indicates an internal component failure rather than a supply valve issue. Diagnosing the exact mechanical cause ensures you purchase the correct replacement parts before beginning repairs.
Worn Cartridge or Washer
Over years of daily usage, the internal rubber seals, O-rings, and ceramic discs inside modern mixing valves degrade from friction and mineral exposure.
- Degraded Rubber Seals: Flat washers and O-rings harden, crack, or flatten out over time, losing the tight seal required to block pressurized water streams.
- Cracked Ceramic Discs: Single-handle cartridge assemblies rely on precision-ground ceramic plates that can chip or scratch due to hard water sediment.
- Sediment Accumulation: Calcium and lime deposits build up around internal sealing surfaces, preventing the valve mechanism from closing completely flush.
Stuck or Corroded Valve Stem
Older two-handle or three-handle compression faucets often suffer from mechanical binding caused by mineral corrosion inside the valve housing.
- Mineral Binding: Hard water minerals fuse the brass stem to the surrounding packing nut, restricting full rotational travel of the handle.
- Stripped Threading: Forcing a stiff handle can strip the internal brass or plastic threads, making it impossible to tighten the washer down onto the valve seat.
- Stem Replacement: If deep corrosion pits the metal stem surface, cleaning alone won’t suffice, and you will need to replace the entire stem assembly.
When to Call a Plumber vs. DIY Fix
While replacing a worn cartridge is a manageable weekend DIY project, certain plumbing complications demand professional intervention to avoid expensive structural damage.
- DIY Friendly Scenarios: Modern single-handle cartridges that slide out easily with standard household tools represent straightforward weekend repair jobs.
- Corroded Main Infrastructure: If old galvanized pipes or soldered copper joints begin twisting or cracking while you attempt repairs, stop immediately and call a professional plumber.
- Behind-the-Wall Leaks: Discovering active water seepage or mold inside the wall cavity during valve extraction requires expert plumbing and restoration services.
How to Turn the Water Back On Safely
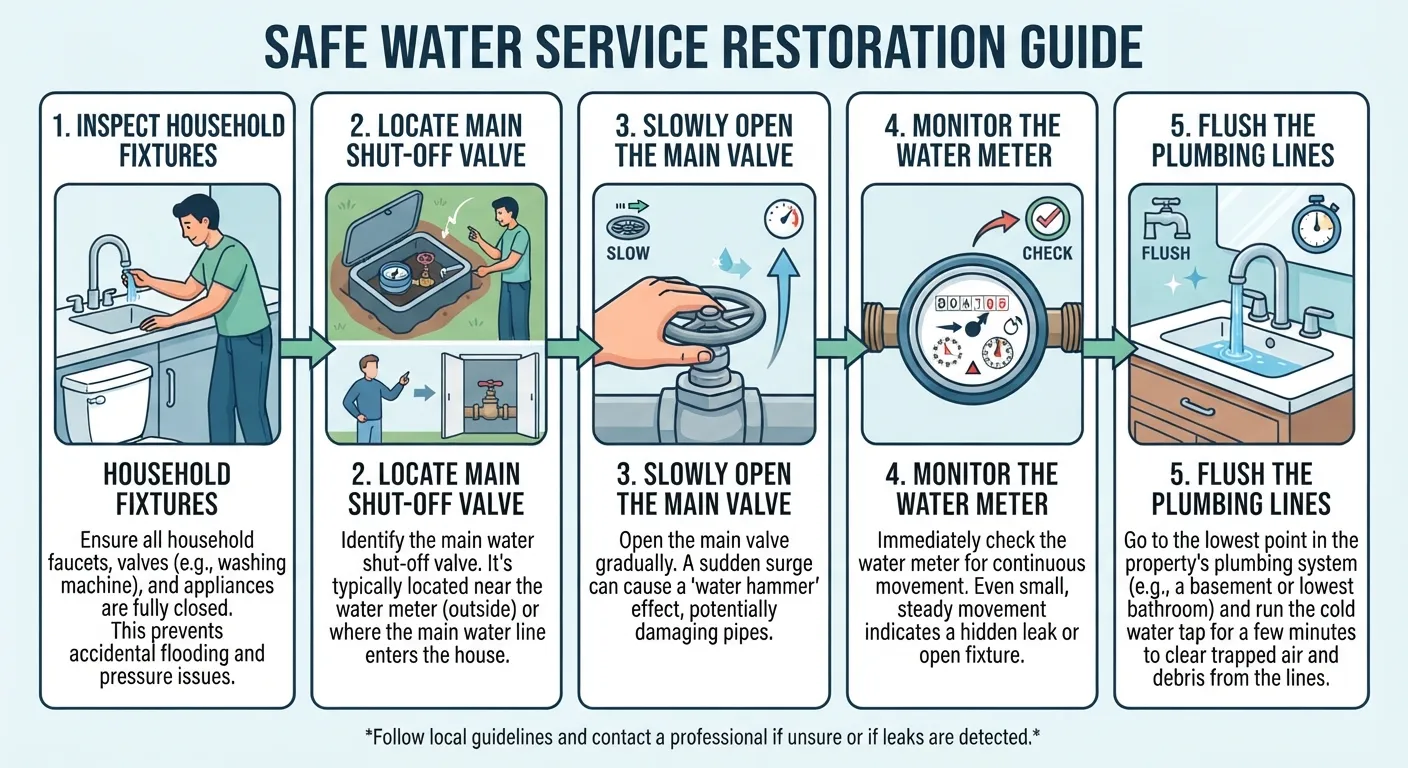
Restoring your household water supply after completing a shower repair requires a controlled, step-by-step approach to protect your plumbing infrastructure. Rushing this final stage can cause violent pressure surges and unmasked leaks that threaten your home.
Reopening the Valve Slowly to Avoid Water Hammer
Opening your main shut-off or local isolation valves too quickly forces a massive column of high-velocity water into empty, air-filled pipes, creating a dangerous hydraulic shock known as water hammer.
- Controlled Incremental Turns: Open your main valve or screwdriver stops very gradually, taking a full thirty seconds to move the handle from completely closed to fully open.
- Bleeding Trapped Air: Keep a downstairs or nearby bathtub faucet partially open while reopening the supply to let trapped air escape smoothly without rattling pipes.
- Preventing Pipe Damage: Slow reopening safeguards fragile solder joints, flexible connectors, and threaded fittings from destructive shock waves.
Checking for Leaks After Restoring Water
Verifying system integrity immediately after re-pressurization ensures your repair was successful and catches any hidden drips before they cause structural damage.
- Inspect the Shower Assembly: Keep the shower handle in the off position and use a flashlight to check the newly installed cartridge, mixing valve, and trim plate for any signs of seepage.
- Check Downstream Fixtures: Walk through your home and briefly test other sinks and toilets to confirm that water pressure has normalized across all lines.
- Monitor for 24 Hours: Keep your bathroom access panel or wall cavity open for a full day, periodically touching surrounding drywall or framing to ensure absolute dryness.
Does Your Shower Type Affect the Shut Off Method?
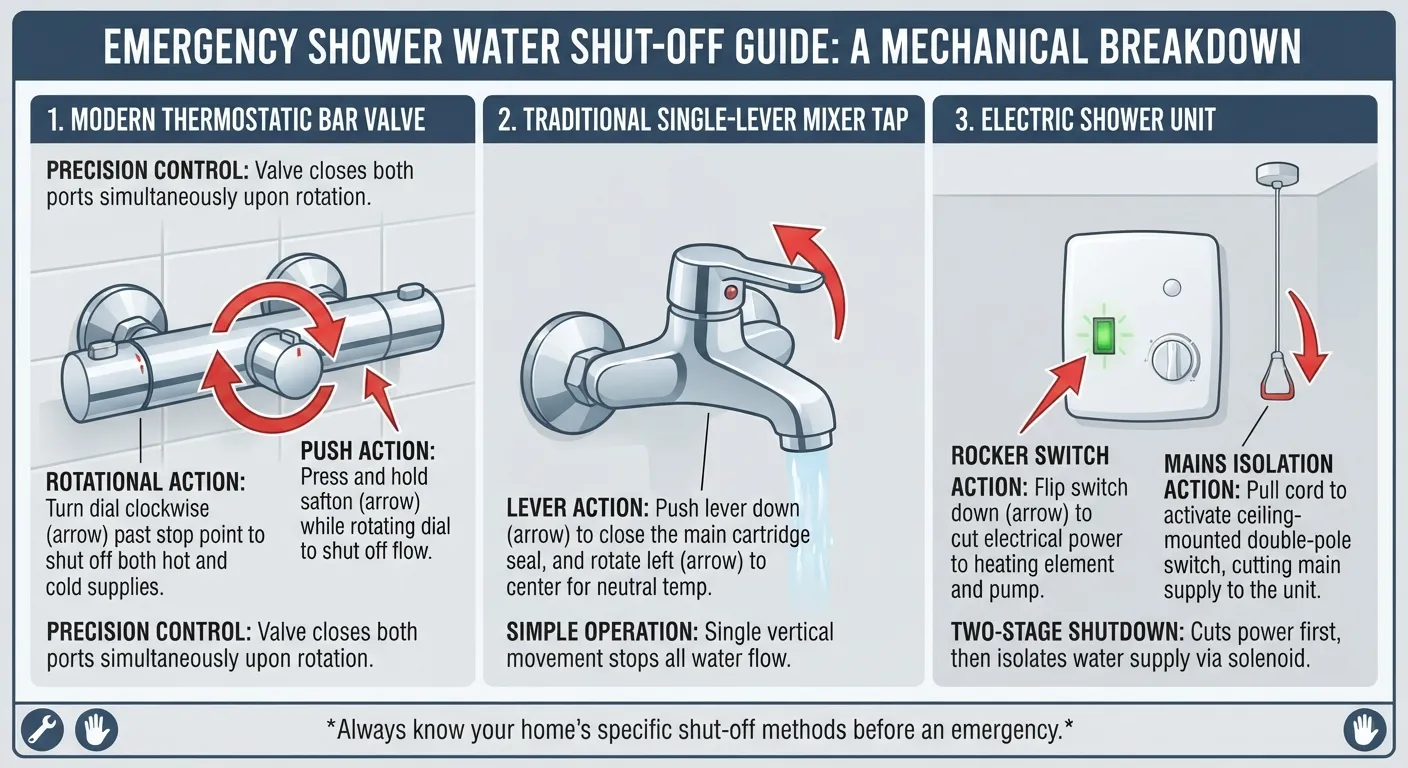
The architectural configuration of your bathroom directly determines how easily you can access your shower valves and isolate the water supply. Different enclosure styles present unique structural challenges that dictate your approach during a plumbing emergency.
Tub Shower Combo Where the Access Panel Usually Sits
Tub and shower combinations represent the most common residential layout, typically featuring a straightforward plumbing access route if built correctly.
- Adjacent Closet Location: Check the drywall in the bedroom, hallway, or walk-in closet directly opposite the showerhead wall for a square access hatch.
- Standard Height Alignment: Access panels are generally positioned at the exact height of the mixing valve to allow easy reach for plumbing repairs or cartridge swaps.
- Retrofit Panels: If your tub combo lacks an existing hatch, you can easily install an inexpensive plastic access panel after cutting a clean square into the drywall.
Walk In Showers Why Valve Access Can Be Harder to Find
Custom walk-in showers often feature high-end tile, stone, or glass finishes that conceal plumbing lines completely behind waterproofed walls without utility panels.
- Solid Tile Backings: Tiled or stone-clad bathroom walls make cutting a temporary access panel exceptionally difficult without destroying expensive masonry finishes.
- Shared Wet Walls: Plumbers usually route walk-in shower valves against a shared utility wall where access must be gained from an adjacent service room rather than the shower interior.
- Main Line Reliance: Because integrated local stops are rarely installed in custom tiled enclosures, you will likely need to rely on the main household water shut-off.
Prefab Shower Stalls Common Lack of Any Access Panel
Prefabricated acrylic or fiberglass one-piece shower units present unique maintenance hurdles due to their enclosed, monolithic manufacturing design.
- Enclosed Shell Structures: Prefab stalls feature molded plastic walls that encase the plumbing fixtures completely, leaving zero room for behind-the-wall inspection panels.
- Front-Facing Maintenance: All repairs and valve shut-offs must be executed strictly from the front by removing the handle, escutcheon, and internal cartridge.
- Basement/Crawlspace Access: For modular units located on raised foundations, inspect the crawlspace or basement ceiling directly beneath the stall to locate supply risers.
Renting? What to Do If You’re in an Apartment or Condo

Navigating a plumbing leak or valve issue in a rented apartment or condominium requires an entirely different protocol than owning a single-family home. Because multi-family buildings share interconnected plumbing networks and restricted utility spaces, tenants must handle emergencies carefully to avoid liability.
Why Renters Often Can’t Access the Main Shut-Off
Apartment buildings and high-rise condominiums centralize their mechanical systems to protect the entire community from accidental water damage caused by individual residents.
- Master Building Shut-Offs: Main control valves are typically housed in locked utility rooms, mechanical basements, or outdoor riser closets accessible only to licensed building engineers.
- Interconnected Risers: A single vertical supply stack often feeds multiple units stacked above and below each other, meaning closing a local valve could inadvertently shut off water to your neighbors.
- Liability and Lease Restrictions: Rental agreements and property management bylaws strictly prohibit tenants from tampering with main building plumbing infrastructure to prevent catastrophic multi-unit floods.
What to Do in a Leak Emergency as a Tenant
When a sudden shower pipe rupture or uncontrollable leak occurs in a rental unit, immediate and decisive action prevents property damage and protects you from lease violations.
- Locate Emergency Fixture Stops: Check underneath nearby bathroom vanities or behind accessible toilet supply lines for local shut-off valves that might temporarily isolate bathroom branches.
- Contact Building Maintenance Immediately: Call your property management’s emergency maintenance hotline right away to dispatch a professional who can access the building’s master shut-off.
- Document the Damage: Take clear photographs or video footage of the active leak and any resulting water damage to your personal belongings for your renter’s insurance and landlord records.
Requesting a Dedicated Shut Off Valve Installation From Your Landlord
If your rental shower frequently suffers from minor leaks or requires recurring cartridge replacements, advocating for infrastructure improvements benefits both you and the property owner.
- Propose Professional Upgrades: Politely request that management have a licensed plumber install localized screwdriver stops or an accessible maintenance hatch during routine servicing.
- Highlight Long-Term Savings: Point out to your landlord that adding dedicated isolation valves prevents minor drips from escalating into costly structural mold remediation and sub-floor rot.
- Review Lease Terms: Check your lease agreement regarding maintenance reporting timelines to ensure you comply with all written protocols for requesting professional plumbing repairs.
Frequently Asked Questions
Get clear, authoritative answers to the most common questions regarding shower water shut-off valves, emergency protocols, and DIY plumbing troubleshooting.
Is there a way to shut off water to just a shower?
Yes, if your shower features dedicated screwdriver stops located on the sides of the mixing valve behind the trim plate. If those are absent, you can isolate hot water at the water heater or perform temporary cartridge isolation, though most homes require shutting off the main supply line.
Where is the water shut-off valve for a shower?
Most standard residential showers do not feature a local valve. When present, individual stops are hidden behind the wall inside a service access panel or in an adjacent closet; otherwise, you must use your home’s main water shut-off valve.
Is there a water shut-off valve for a shower?
The vast majority of standard residential showers lack a dedicated local shut-off valve. Plumbers typically run continuous lines directly from the main household supply to minimize potential behind-the-wall leak points.
Do I need to open faucets when I turn water off and on?
Yes, opening faucets helps bleed out trapped pressure and clear air pockets from your plumbing lines. This is especially critical when turning your main supply back on to prevent destructive water hammer surges.
Can you use the bathroom when the water is shut off?
It depends entirely on the isolation method used. If you closed localized screwdriver stops for just the shower, your toilet and sink remain fully functional; closing the main house valve disables every plumbing fixture.
Why is the water still running even though I turned off the faucet?
Water continues to run or drip due to an internal component failure rather than a supply issue. Worn rubber washers, degraded O-rings, cracked ceramic discs, or heavy mineral buildup prevent the valve from sealing completely.
Why won’t the water turn off completely in my shower?
A shower that fails to shut off completely is usually caused by corrosion, a bound valve stem, or a worn-out cartridge assembly. If tightening the handle fails, the inner seals require immediate replacement.
Will pipes burst if water is turned off?
No, simply turning off the water will not cause pipes to burst. However, reopening your valves too quickly after a repair can create violent pressure shocks known as water hammer that damage fragile pipe joints.
What to do when the water faucet won’t turn off?
If a shower faucet refuses to turn off and creates an active leak, immediately locate and close your home’s main water shut-off valve. Once water flow stops, inspect the internal cartridge or call a professional plumber.
Why does my shower faucet keep running even after I turn it off?
A constantly running shower faucet points to a damaged or worn mixing cartridge. Continuous friction and hard water sediment erode the internal sealing components over time, preventing a tight shut-off.
How do I shut off water to a shower with no valve?
When a shower lacks a dedicated local valve, your options include shutting off the hot water line directly at the water heater, using a cartridge puller to manage emergency drips, or turning off the primary house water supply.
How do I turn off shower water in a mobile home?
Manufactured homes usually feature inline shut-off valves located beneath the bathroom vanity, inside utility closets, or near the main floor riser pipe where plumbing enters through the belly wrap.
Can I turn off shower water from outside my house?
Yes, you can shut off water externally using the curb stop valve located inside your street-side utility meter box or via an exterior main shut-off ball valve mounted along your foundation wall.
Do all showers have a shut-off valve behind the wall?
No, most standard showers do not have any valves hidden behind the wall. Localized isolation stops are typically only found in custom builds, high-end renovations, or specific commercial properties.

Oscar Vance | Master Plumber & Drainage Expert
Meet Oscar Vance, a licensed master plumber sharing practical solutions on residential repairs, preventive maintenance, and thoughtful home upkeep.

