How Do You Install Plumbing for a Toilet?
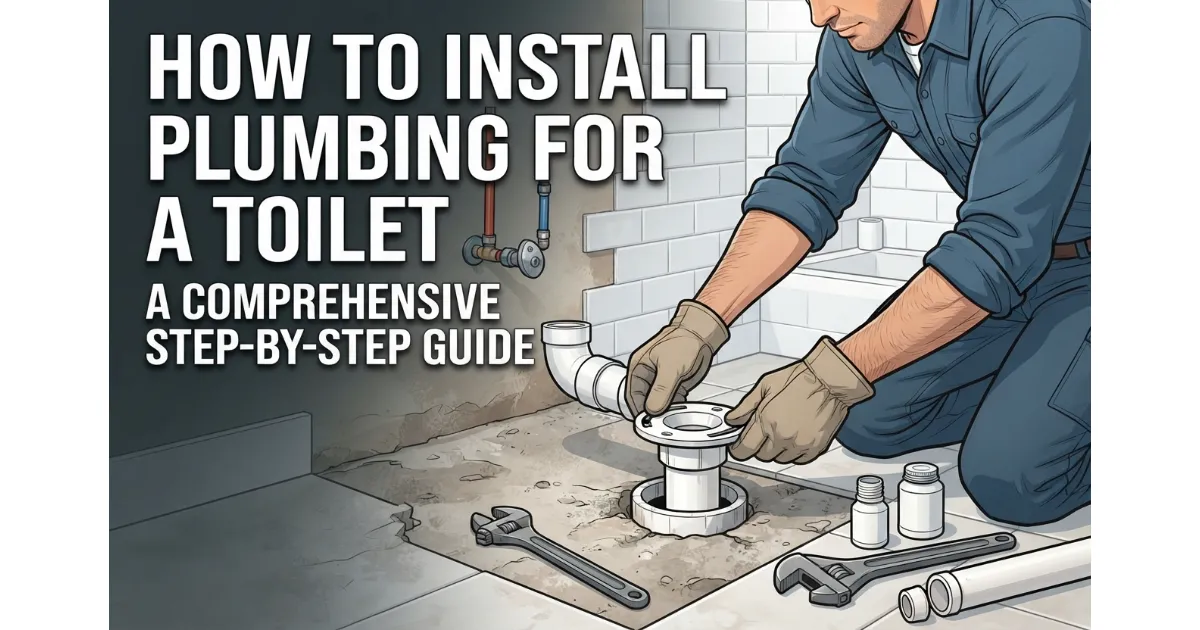 Installing plumbing for a toilet requires connecting three fundamental systems: a 3-inch or 4-inch DWV (Drain, Waste, and Vent) pipe, a dedicated cold-water supply line with an angle stop, and a secure closet flange anchored to the subfloor. Properly coordinating these components ensures waste removes efficiently, sewer gases stay blocked, and the toilet fixture seats securely without leaks.
What plumbing is needed to install a toilet?
- Drain Pipe: A standard 3-inch or 4-inch vertical waste line that carries solid and liquid waste directly to the main sewer or septic line.
- Vent Pipe: A vertical extension of the DWV system that regulates air pressure and prevents trap siphonage, allowing waste to flow smoothly.
- Cold-Water Supply Line: A pressurized 1/2-inch supply line equipped with an angle stop valve to control water flow into the toilet tank.
- Closet Flange: A heavy-duty anchoring ring secured to the finished floor that connects the toilet base directly to the drain pipe via a wax ring seal.
What this guide covers
This comprehensive installation manual breaks the plumbing and setup process down into two manageable, sequential stages to ensure professional-grade results. Follow the roadmap below to navigate both phases successfully:
- Part 1: Toilet Rough-In: Focuses on framing layout, running the DWV drain and vent pipes, establishing correct rough-in dimensions from finished walls, and setting the closet flange.
- Part 2: Setting the Toilet: Covers installing the wax ring, bolting the porcelain bowl, attaching the tank and water supply line, and testing for leaks.
Can You Plumb a Toilet Yourself or Do You Need a Plumber?
Deciding whether to tackle a toilet installation yourself depends entirely on the scope of the project, ranging from a simple fixture swap to running brand-new DWV lines. While setting a replacement toilet onto an existing, undamaged rough-in is a straightforward beginner task, structural pipe modifications require professional certification.
When DIY is realistic
- Direct Replacement: Swapping an old toilet for a new one using an existing, intact closet flange and water supply stub.
- Favorable Alignment: The rough-in distance from the finished wall matches the new toilet’s offset (typically 12 inches) with no floor reinforcement needed.
- Minor Component Fixes: Changing out an angle stop valve, supply line hose, or replacing a deteriorated wax ring seal.
When to call a licensed plumber
- New Rough-In Installations: Constructing a brand-new bathroom or relocating a toilet requires laying fresh drain, waste, and vent pipes.
- Structural Obstacles: Cutting through concrete slabs, load-bearing floor joists, or rearranging complex stack venting systems.
- Building Code & Permits: Local municipalities require licensed professionals to pull permits and pass strict municipal plumbing inspections for structural DWV work.
How much does a plumber charge to install a toilet?
DIY vs plumber checklist
- Evaluate whether your project involves a simple replacement vs new installation.
- Inspect the current condition of the subfloor and closet flange for rot or cracks.
- Determine if local building regulations require a certified licensed plumber and official permit.
- Calculate your total budget, factoring in labor costs versus DIY tool investments.
- Assess your comfort level with handling heavy porcelain fixtures and potential wastewater leaks.
Toilet Rough-In Dimensions: Distances Pipe Sizes & Diagram
Mastering toilet rough-in dimensions is critical for ensuring your fixture fits flush against the wall without awkward gaps or alignment issues. A proper layout accounts for exact measurements from finished surfaces, standard drain pipe diameters, and local code mandates.
What is a toilet rough-in?
A toilet rough-in refers to the precise placement of the water supply line and the drain opening relative to the surrounding structural walls before the toilet is installed. Getting these measurements right during the framing and rough plumbing stage is essential, as incorrect spacing will prevent the toilet tank from sitting flush or cause the base to miss the closet flange entirely.
Standard rough-in measurements
10, 12 aur 14 rough-in: kaunsa chunein?
- 12-Inch Rough-In: The universal modern standard. Most residential toilets are manufactured specifically for a 12-inch distance from the finished wall to the closet flange center.
- 10-Inch Rough-In: Used primarily in older historic homes or tight bathroom layouts where space constraints prevent a standard 12-inch offset.
- 14-Inch Rough-In: Less common, often found in spacious custom builds or large master bathrooms, requiring a specialized deep-offset toilet model.
Top-view aur side-view rough-in diagram
Refer to the architectural blueprint layout below for precise top-view and side-view positioning constraints. Ensure all measurements account for tile thickness and baseboard trim before cementing any PVC fittings.
- Top-View Layout: Highlights the 15-inch center-to-side-wall clearance and the 12-inch back-wall to flange-center offset.
- Side-View Layout: Demonstrates the vertical height of the 1/2-inch supply line stub-out and the flush mounting of the closet flange on the finished subfloor.
Finished wall vs stud se measure karna
- The Core Rule: Always measure your rough-in dimensions from the finished wall surface (including drywall, tile, or wainscoting), never from the bare framing stud.
- Common Mistake: Measuring 12 inches from a bare 2×4 stud will leave you short by roughly 1/2 inch to 3/4 inch once drywall and tile are installed, causing the tank to collide with the wall.
Tools and Materials You Need for Toilet Plumbing
Gathering the correct tools and high-grade materials before starting your toilet plumbing project ensures a seamless installation and prevents costly callbacks. Having everything staged and ready prevents mid-project leaks and code violations.
Pipes aur fittings
- ABS vs PVC: Choose either rigid PVC (white) or ABS (black) plastic pipes based on your local building code requirements and existing home infrastructure.
- Closet Bend: A specialized 3-inch or 4-inch 90-degree elbow fitting that connects the vertical toilet drop directly into the horizontal main drain line.
- Long-Sweep 90: Essential for changing direction in horizontal drain lines without restricting solid waste flow or causing blockages.
- Sanitary Tee: Used strictly in vertical vent and drainage applications to direct wastewater downward while letting air rise.
-
Vent Pipe: Standard DWV pipe extending upward through the roof to equalize air pressure across the drainage system.
Flange, wax ring aur bolts
- Closet Flange: The primary structural anchor ring (available in PVC, ABS, cast iron, or brass) that secures the toilet base to the floor.
- Offset Flange: A specialized problem-solving flange that shifts the drain opening up to 2 inches in any direction if your rough-in distance is slightly off.
- Flange Repair Ring: A heavy-duty stainless steel ring used to reinforce or repair broken slots on an existing plastic or cast iron flange.
- T-Bolts & Wax Ring: Solid brass floor bolts paired with a heavy-duty wax ring (with or without a plastic horn) to create a watertight, gas-tight seal.
Glue primer aur sealing supplies
- Plastic Primer: Purple or clear chemical cleaner that softens ABS or PVC plastic surfaces to ensure a permanent, chemical weld.
- Solvent Cement: Heavy-bodied cement formulated specifically for high-capacity DWV plastic pipes and fittings.
- Thread Seal Tape (PTFE): Applied to threaded connections on angle stop valves and supply lines to prevent micro-leaks under pressure.
Tools list
Safety gear
- Protective Eyewear: Essential safety glasses to shield eyes from flying plastic shards, primer splashes, and debris.
- Chemical-Resistant Gloves: Protects skin from harsh solvent cements, purple primers, and raw sewage exposure during old pipe removal.
- Dust Mask / Respirator: Recommended when cutting plastic pipe or working in confined, unventilated bathroom subfloor spaces.
How To Rough In Toilet Plumbing: Drain Vent and Water Supply
Executing a precise toilet rough-in establishes the structural foundation for your entire bathroom drainage and supply network. Getting the drain slope, vent positioning, and water supply alignment right prevents chronic clogs, sewer gas leaks, and costly flooring repairs down the road.
Step 1: Layout mark karna aur toilet location confirm karna
- Layout Execution: Measure precisely 12 inches out from the finished drywall or tile back wall, and snap a chalk line across the subfloor to mark the exact center point of the closet flange.
- Space Verification: Double-check that you have a minimum of 15 inches of clear lateral space on both sides of the centerline and at least 24 inches of clearance in front.
- Pro Tip / Warning: What can go wrong: Measuring from raw studs instead of the finished wall will shift your drain forward or backward, causing the toilet tank to hit the wall or leave a massive gap.
Step 2: Drain pipe aur closet bend lagana
- Drain Sizing & Slope: Run a 3-inch or 4-inch DWV drain pipe from the main soil stack, ensuring a mandatory downward slope of at least 1/4 inch per foot toward the sewer line.
- Closet Bend Connection: Secure the 90-degree closet bend fitting directly beneath the floor drop using purple primer and heavy-duty solvent cement.
- Pro Tip / Warning: What can go wrong: Forgetting to check your horizontal pipe slope with a torpedo level will lead to sluggish drainage and recurrent backups.
Step 3: Toilet vent kaise lagayein?
- Vent Necessity: Every toilet requires a vent pipe to regulate atmospheric air pressure, prevent trap siphonage, and safely vent toxic sewer gases outside through the roof.
- Routing & Wet Venting: Tie your vertical vent stack into the drainage line using a sanitary tee at least 6 inches above the flood level rim, or utilize a compliant wet-venting arrangement.
- Addressing Venting Queries: Can a toilet be vented outside? Yes, all toilet vent stacks must route upward through the roof or connect to a main stack that terminates outdoors to prevent indoor gas buildup.
Step 4: Closet flange lagana
- Flange Placement: Fasten the closet flange securely so that it rests squarely on top of the finished flooring material and anchors firmly into the subfloor using corrosion-resistant screws.
- Alignment Check: Ensure the mounting slots for the T-bolts are properly aligned parallel to the back wall before driving down structural fasteners.
- Pro Tip / Warning: What can go wrong: If the flange is installed too low beneath the finished floor level, the wax ring will fail to seal properly, resulting in subfloor rot from leaks.
Step 5: Cold-water supply line aur shut-off valve lagana
- Supply Stub-Out: Position the 1/2-inch cold-water supply pipe roughly 6 inches to the left of the toilet center line and about 8 inches up from the finished floor.
- Valve Installation: Wrap PTFE thread seal tape around the pipe threads and twist on a 3/8-inch angle stop shut-off valve, tightening it securely with a wrench.
- Pro Tip / Warning: What can go wrong: Placing the supply valve directly behind the toilet tank footprint makes it impossible to shut off water during an emergency.
Concrete slab vs wooden subfloor: farq kya hai?
- Wooden Subfloor: Requires cutting floor joist bays, feeding PVC or ABS pipes through framing, and anchoring flanges directly into plywood subflooring.
- Concrete Slab: Requires breaking through concrete with a jackhammer, trenching for drain lines, setting accurate slopes, and repouring concrete around the rough-in.
New construction vs replacement: kya alag hai?
- New Construction: Offers full freedom to run fresh DWV lines, adjust framing, and set perfect code-compliant rough-in dimensions from scratch.
- Replacement: Constrained by existing framing, fixed drain locations, and older pipe materials that may require transition couplings.
Stud wall ke andar piping route karna
- Framing Protection: When routing vent stacks and supply lines against a stud wall or through walls, drill centered holes through studs and install metal nail plates to prevent puncture from drywall screws.
- Structural Integrity: Never notch load-bearing studs beyond local building code limits to accommodate oversized DWV pipes.
How to Test Toilet Plumbing Before Closing the Walls
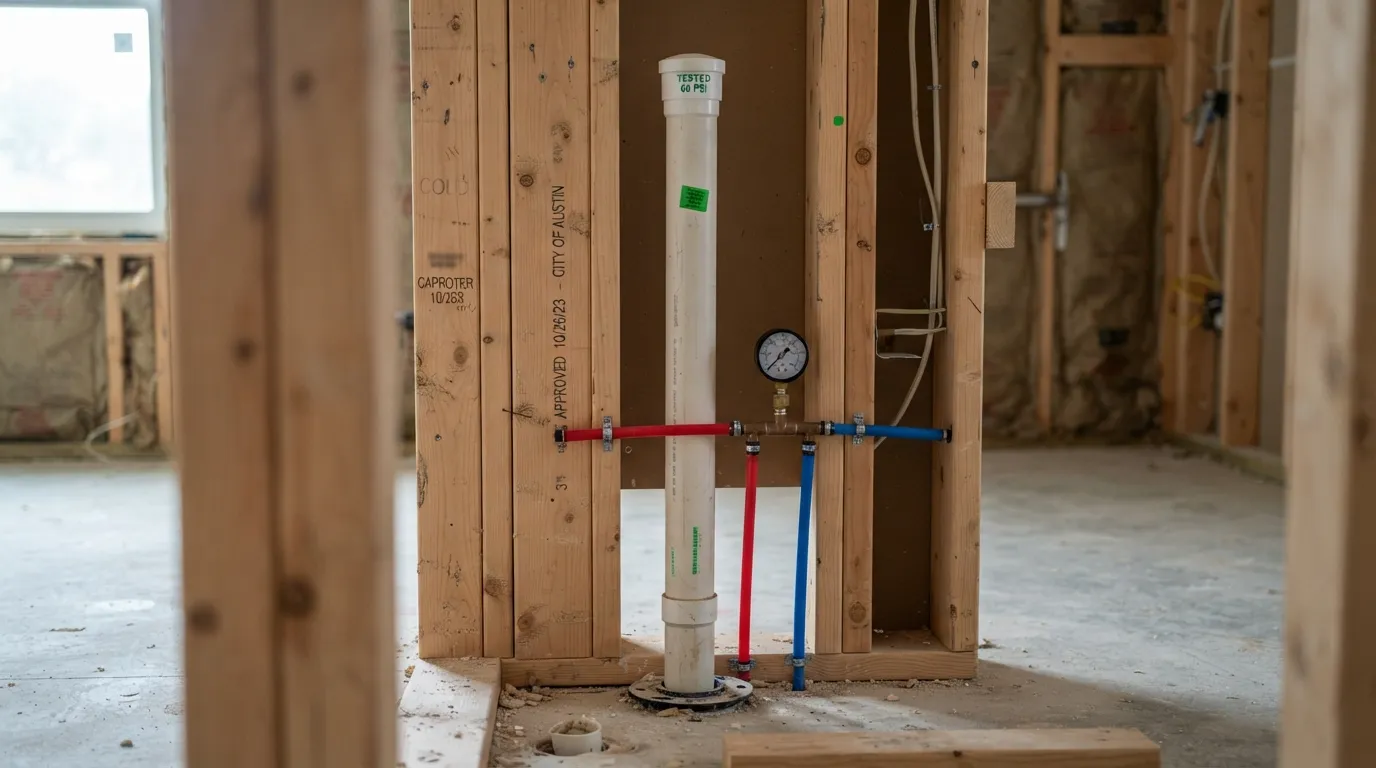 Testing your newly installed toilet rough-in plumbing before sealing up drywall or closing subfloors is a critical step that prevents catastrophic, hidden leaks. Performing rigorous pressure and water tests ensures your DWV lines and supply systems are completely watertight and fully compliant with building codes.
Drain aur vent leak test
- Water Test Procedure: Cap off the lower drain cleanout or main stack drop, fill the upper vent stack with water, and monitor the water level for at least 15 minutes to verify there is zero drop.
- Glue Cure Time: Always wait for the solvent cement and purple primer to fully cure according to manufacturer specifications (typically 2 to 4 hours depending on temperature) before applying hydrostatic pressure.
- Visual Inspection: Inspect every solvent-welded joint, closet bend, and sanitary tee connection with a flashlight to catch slow weeping leaks early.
Water supply pressure test
- Static Pressure Check: Temporarily pressurize the 1/2-inch cold-water supply line and angle stop valve to check for micro-seeps at threaded and crimped joints.
- Thread Seal Integrity: Ensure PTFE thread seal tape was applied correctly clockwise onto pipe threads to prevent pressure drops under normal household water load.
Inspection se pehle checklist
- Verify that the drain pipe maintains a consistent downward slope of at least 1/4 inch per foot toward the main sewer line.
- Confirm that all structural wood studs or concrete slab trenches are protected against future screw punctures.
- Double-check that rough-in measurements match your specific toilet model requirements (typically 12 inches from the finished back wall).
- Ensure local municipal inspectors have signed off on the rough-in layout and pressure test before closing any walls.
How to Set and Connect the Toilet Wax Ring Bolts Tank & Supply Line
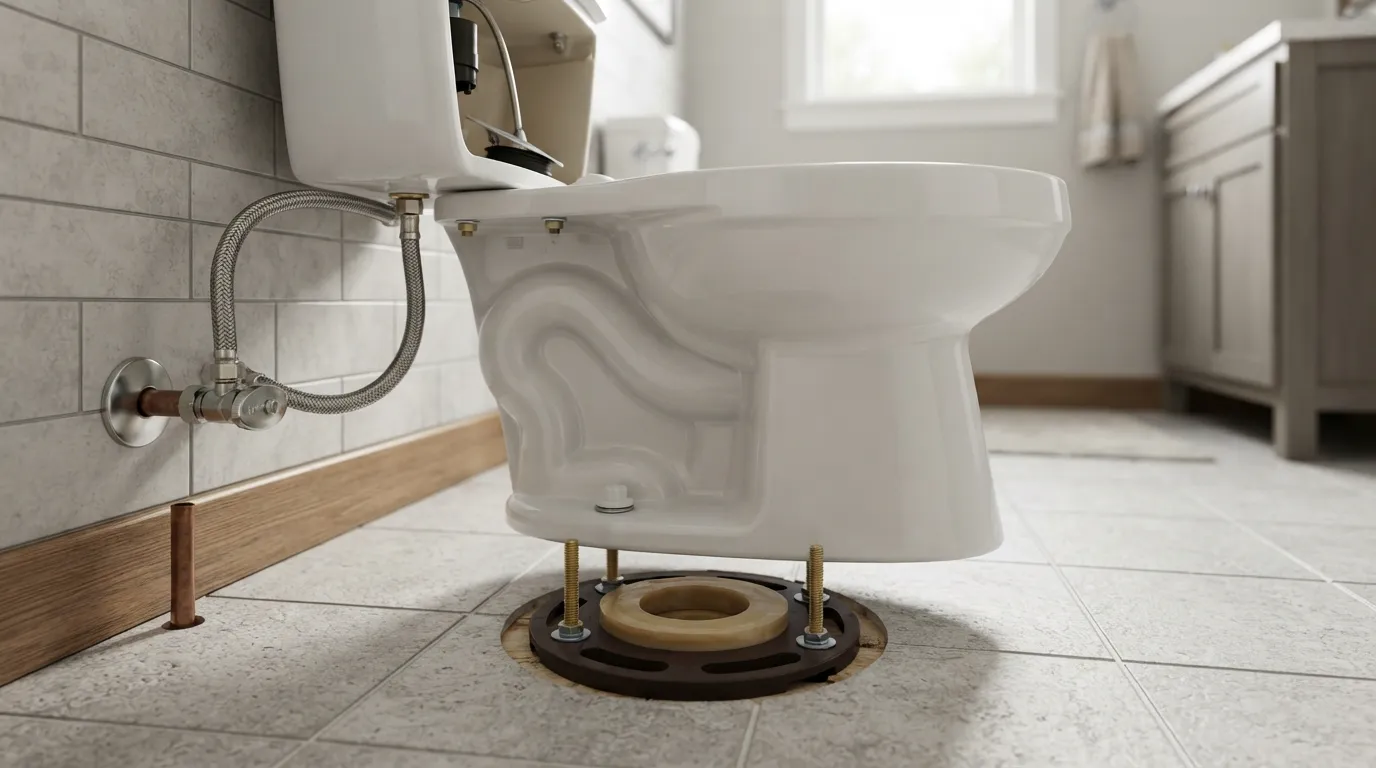 Setting the toilet fixture onto your finished rough-in requires careful alignment, delicate handling of porcelain, and precise torque control. Completing this final installation phase correctly guarantees a secure, leak-free, and stable connection that withstands daily use.
Step 1: Flange check karna aur closet bolts lagana
- Flange Assessment: Clean away any debris, mortar, or old wax from the closet flange and ensure it sits solidly on the finished floor.
- T-Bolt Insertion: Slide the solid brass T-bolts into the opposing slots of the closet flange, locking them upright using plastic retainer washers so they will not slip out of place.
Step 2: Wax ring lagana
- Ring Placement: Gently invert the toilet bowl onto a soft piece of cardboard or blanket, and press the wax ring firmly around the porcelain horn on the bottom outlet.
- Ring Variations: Choose between a standard wax ring with a polyethylene plastic horn for extra directional guidance or a wax-free foam seal depending on your installation preference.
Should you put the wax ring on the toilet or the flange?
Professional plumbers generally recommend pressing the wax ring directly onto the bottom horn of the inverted toilet bowl rather than the floor flange. This ensures the wax centers itself perfectly over the porcelain outlet. When you flip and lower the bowl, gravity and pressure compress the wax uniformly against the flange, forming an airtight and watertight seal.
Step 3: Bowl ko seedha set karna aur dabana
- Precision Lowering: Lift the toilet bowl carefully, align the floor T-bolts with the mounting holes on the ceramic base, and lower it straight down in one smooth motion.
- Compression Push: Firmly press your body weight down onto the rim of the bowl, rocking it slightly left and right so the wax ring crushes completely against the flange.
Step 4: Nuts tight karna over-tightening se china crack
- Hardware Assembly: Place plastic washers and metal caps over the T-bolts, then thread on the brass nuts by hand.
- Torque Caution: Tighten the nuts alternately with a wrench just until snug. Warning: Over-tightening porcelain anchor bolts will instantly crack the china base, ruining the toilet.
Step 5: Tank lagana aur gasket
- Rubber Gasket Setup: Place the large rubber O-ring gasket over the flush valve nut on the bottom of the toilet tank.
- Tank Fastening: Lower the tank onto the back of the bowl, inserting tank bolts through rubber washers inside the tank and securing them underneath with wing nuts until level.
Step 6: Supply line connect karna
- Hose Attachment: Connect a flexible braided stainless steel supply line from the angle stop shut-off valve to the threaded inlet on the bottom of the toilet tank.
- Hand-Tightening Rule: Tighten the connection by hand, then give it an extra quarter-turn with a wrench. Do not over-torque plastic tank fill valve threads.
Step 7: Leak test, flush test aur caulk
- Water Activation: Turn on the angle stop valve, let the tank fill completely, and perform multiple test flushes while inspecting the base and floor.
- Base Caulking: Apply a bead of antimicrobial silicone caulk around the perimeter of the toilet base where it meets the floor, leaving a small 2-inch gap at the back to spot any future leaks.
Do plumbers still use wax rings? Wax-free option kya hai?
- Traditional Reliability: Yes, professional plumbers still rely heavily on traditional wax rings because they mold perfectly to uneven floor contours and create a permanent seal.
- Wax-Free Alternatives: Modern rubber and foam seals (like rubber gaskets with plastic horns) are increasingly popular because they allow repositioning the toilet without destroying the seal. Can I install a toilet without a wax ring? You can use a certified wax-free foam seal, but you must never install a toilet with zero sealing material between the bowl and the flange.
Bathroom Plumbing Layout: Toilet Shower and Sink Together
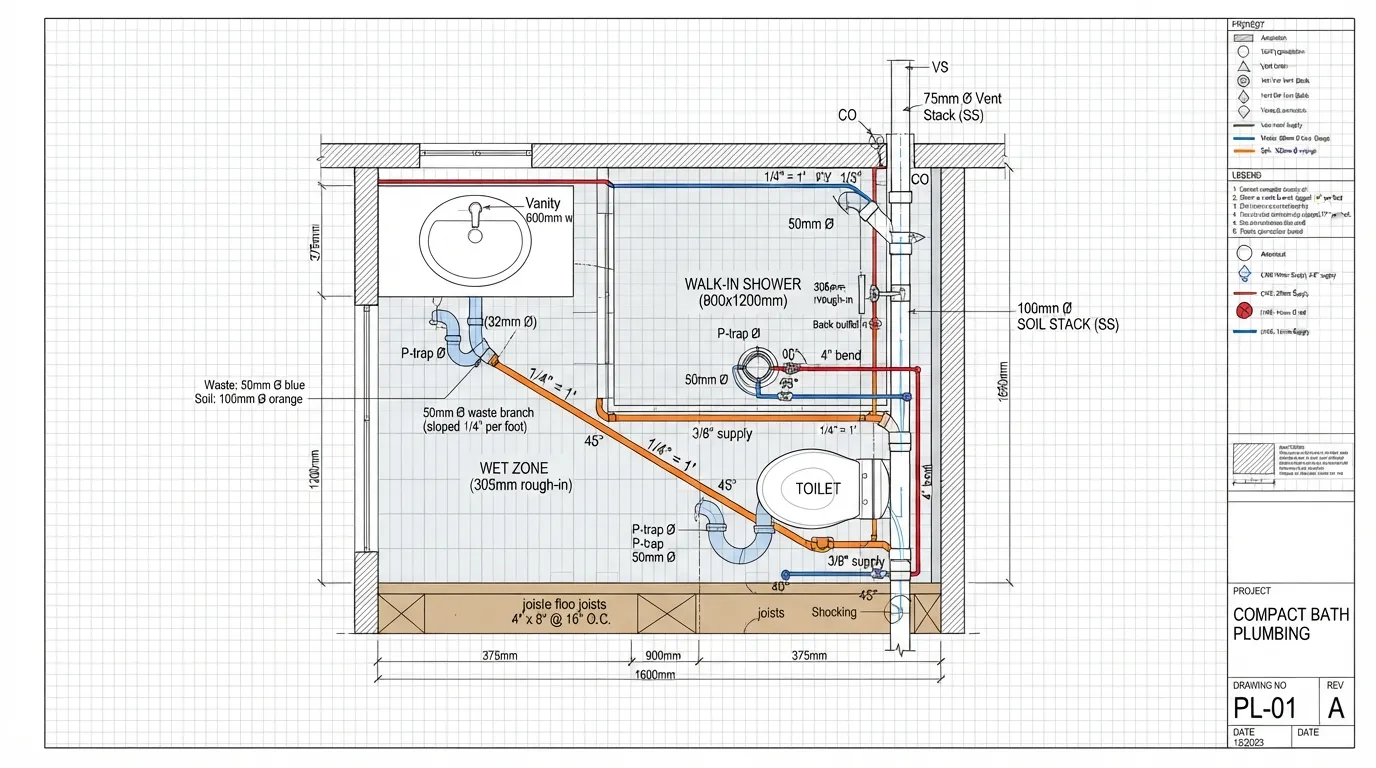 Designing a fully functional bathroom requires coordinating multiple plumbing fixtures so they share drainage lines and vent stacks efficiently. A well-planned bathroom group layout prevents slow draining, siphonage, and code violations by managing waste routing seamlessly.
Bathroom group layout ka basic idea
In standard residential construction, a bathroom group consists of a toilet, a sink (lavatory), and a shower or bathtub arranged closely together. Plumbing codes allow these fixtures to tie into a single shared horizontal branch drain, provided the drainage sizing and vent stack placement follow strict distance and grade rules.
Toilet sink aur shower ke drains aur vents ka relation
- Shared Vent Stacks: A single wet vent—often utilized by the sink drain line—can legally vent both the shower and the toilet if sized correctly and positioned downstream.
- Drain Hierarchy: The toilet requires a 3-inch or 4-inch drain line, while sinks typically use 1-1/2 inch pipes and showers use 2-inch drain lines before merging into the main soil stack.
- Trap Integration: Every fixture requires an individual P-trap (except the toilet, which has a built-in internal trap) to block sewer gases from entering the living space.
Spacing aur planning tips
- Fixture Sequencing: Position fixtures strategically so that the toilet is closest to the main soil stack, followed by the shower and sink further down the branch line.
- Maintain Proper Slopes: Ensure all horizontal branch lines maintain a steady downward fall of 1/4 inch per foot toward the main stack to encourage smooth waste flow.
- Code Clearance Checks: Verify local building codes for minimum spacing requirements between the center of the toilet, the vanity edge, and the shower glass or tub rim.
Toilet Plumbing Code Clearances and Permit Requirements
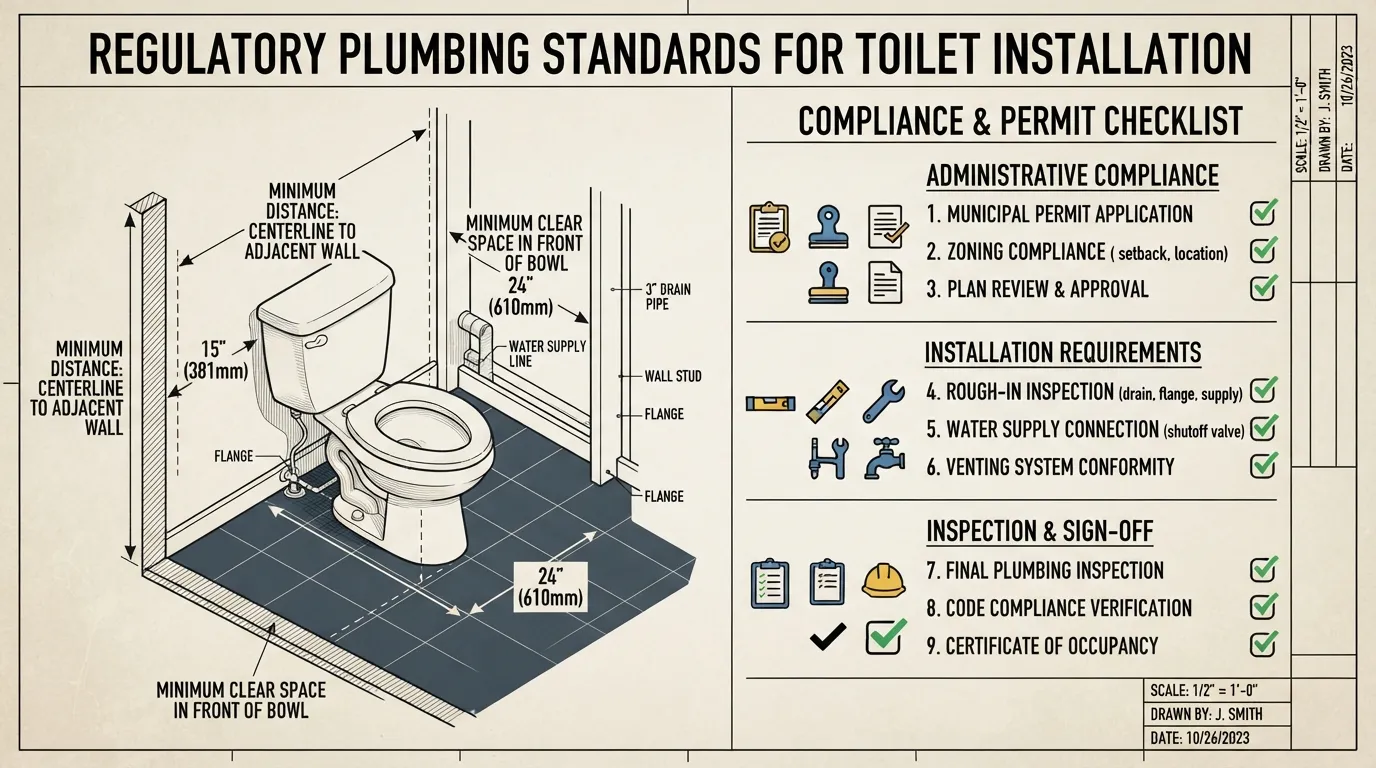 Adhering to recognized plumbing codes and local municipal rules is essential for passing inspections and ensuring long-term structural safety. Neglecting required spatial clearances or failing to acquire proper authorization can lead to costly fines or forced teardowns.
IPC vs UPC: kya farq hai?
- International Plumbing Code (IPC): Developed by the ICC, the IPC focuses heavily on performance-based provisions and is widely adopted across many eastern and midwestern U.S. states.
- Uniform Plumbing Code (UPC): Published by IAPMO, the UPC tends to be more prescriptive and rule-driven, focusing intensely on rigorous drainage sizing and venting safety. Both model codes govern safe waste removal and fixture standards.
Minimum clearances
- Side Clearance: A toilet must be positioned at least 15 inches from its exact vertical centerline to any side wall, partition, or vanity (requiring 30 inches total clear width).
- Front Clearance: Both IPC and UPC standards mandate a minimum of 24 inches of clear, unobstructed space extending outward from the front rim of the toilet bowl.
- Access Reference: Review the official plumbing code guidelines for comprehensive structural definitions.
Kab permit aur inspection chahiye?
- New Installations: Whenever you are running brand-new drain, waste, vent lines, or cutting into concrete slabs for a bathroom addition, an official building permit is legally mandatory.
- Simple Replacements: Swapping an old toilet onto an existing, unmodified flange generally does not require a permit in most jurisdictions.
Apne area ka local code kaise check karein?
- Visit your city or county’s online municipal building department portal to verify which model code edition (IPC or UPC) your region enforces.
- Consult with a local licensed contractor or municipal inspector before opening walls or pouring concrete to avoid failed inspections.
Common Toilet Plumbing Mistakes and How to Fix Them
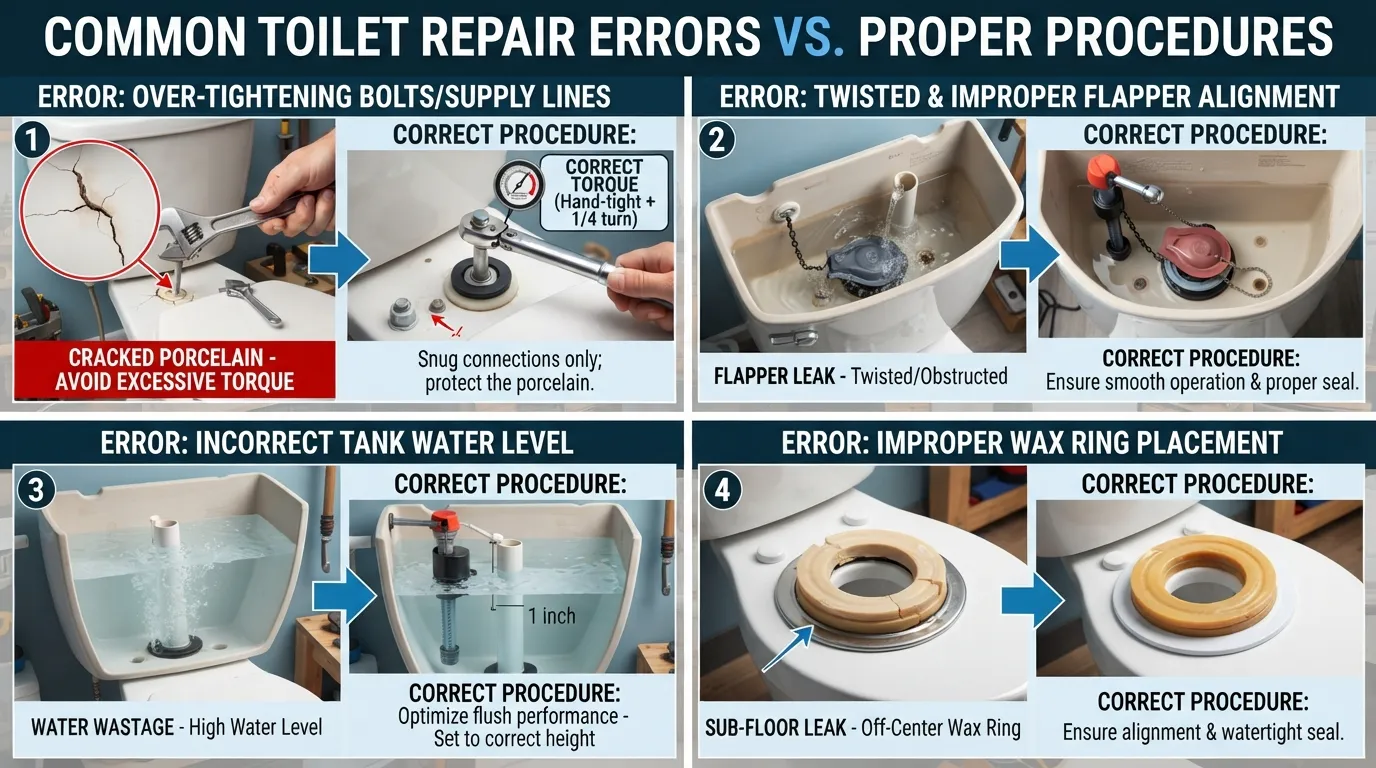 Avoiding common installation pitfalls ensures your bathroom setup remains trouble-free for years. Recognizing early warning signs like slow drainage, wobbling bowls, or sewer odors allows you to correct minor mistakes before they cause costly water damage.
Galat rough-in distance
- The Problem: Measuring from raw studs instead of the finished wall leaves the drain too close or too far, preventing the tank from sitting flush.
- The Fix: If the rough-in is off by an inch or two, you can use an offset closet flange to correct the alignment without tearing up the subfloor.
Flange bohat neeche ya bohat oopar
- The Problem: A flange installed below the finished flooring level crushes the wax ring insufficiently, while a flange set too high makes the toilet rock.
-
The Fix: Use PVC spacer rings to elevate a low flange level with the finished floor, or use heavy-duty shims to stabilize a raised flange.
Vent miss karna slow drain, gurgling
- The Problem: Neglecting a dedicated vent pipe causes trap siphonage, creating a gurgling sound and sluggish waste evacuation.
- The Fix: Install an approved air admittance valve (AAV) or tie the fixture into a compliant wet vent stack to restore proper atmospheric balance.
Over-tightening aur wobble
- The Problem: Forcing floor bolts too tightly cracks porcelain bases, while loose bolts allow the toilet to rock and rupture the wax seal.
- The Fix: Snug bolts down gently by hand with a wrench, and slide plastic shims underneath the ceramic base to eliminate any wobbling.
Toilet leak ya smell after installation
- The Problem: A degraded wax seal or uncaulked base allows water seepage and foul sewer gas odors to escape into the bathroom.
- The Fix: Pull the toilet, clean away the old wax, install a fresh wax ring, and re-anchor the bowl squarely over the flange.
Flush weak ya water rising short fix troubleshooting scope tak
- The Problem: Mineral scale buildup in rim jets or an improperly adjusted flapper chain restricts water flow during a flush.
- The Fix: Clear mineral blockages using white vinegar and adjust the tank flapper chain length to ensure optimal water release per flush cycle.
Frequently Asked Questions About Toilet Plumbing
Get direct, expert answers to the most common questions homeowners and DIYers ask regarding toilet installation codes, materials, and troubleshooting procedures.
What is the 135 rule in plumbing?
The 135 rule dictates that a horizontal drainage line cannot change direction by more than 135 degrees total (such as one 90-degree turn combined with one 45-degree turn) before it must reach a cleanout access point or a vent stack. This code restriction prevents sharp accumulation points, reduces flow friction, and prevents chronic clogging.
What toilet do most plumbers recommend?
Professional plumbers typically recommend reputable, high-efficiency models from established manufacturers like Kohler, Toto, and American Standard. Their recommendations focus heavily on strong siphon-jet flushing performance, fully glazed trapways that resist clogging, standard 12-inch rough-in compatibility, and readily available replacement parts.
Is there a better option than a wax ring?
Yes, modern rubber and foam wax-free seals have grown increasingly popular among plumbing professionals. While traditional wax rings remain highly reliable, wax-free alternatives allow you to lift and reposition the toilet multiple times during remodeling or floor tiling without destroying the seal integrity.
Can I install a toilet without a plumber?
You can easily install a replacement toilet yourself if your existing rough-in plumbing, closet flange, and water supply lines are in good condition. However, if your project requires cutting concrete slabs, running new DWV lines, or altering structural framing, hiring a licensed plumber is strongly advised to maintain building code compliance.
What size pipe is used for a toilet drain?
A residential toilet drain requires a minimum 3-inch diameter DWV (Drain, Waste, and Vent) pipe. Many modern building codes and larger multi-story homes also permit or specify a 4-inch drain pipe to maximize solid waste carrying capacity and prevent clogs.
How far should a toilet be from the wall?
The standard rough-in distance from the finished back wall to the center of the closet flange is 12 inches, though 10-inch and 14-inch offset models are available for special layouts. Additionally, building codes require at least 15 inches of clear side space from the centerline to any wall or vanity.
Final Checklist Before You Start
Completing your toilet plumbing project successfully requires careful preparation, strict adherence to building codes, and methodical testing. Review this final checklist to ensure every detail of your rough-in and installation phase is fully covered before you begin.
8 se 10 point final checklist
- Verify that your rough-in measurement is exactly 12 inches (or matches your specific model) from the finished wall, not bare studs.
- Confirm that your DWV drain line maintains a consistent downward slope of at least 1/4 inch per foot toward the main stack.
- Check that a dedicated vent pipe or wet vent is correctly positioned to prevent trap siphonage and gas leaks.
- Ensure the closet flange is securely anchored directly on top of the finished flooring material.
- Test your drain and vent lines under pressure to confirm they pass a proper leak test before closing any walls.
- Wrap all threaded pipe connections with PTFE thread seal tape and install an accessible angle stop shut-off valve.
- Press your wax ring firmly onto the bottom horn of the inverted toilet bowl to ensure a centered, airtight seal.
- Tighten floor T-bolts gently by hand with a wrench, avoiding over-torquing to prevent cracking the porcelain base.
- Verify code compliance for minimum side clearances (15 inches from center) and front clearances (24 inches).
- Perform a final multi-flush test and inspect the base perimeter for any signs of water seepage before applying silicone caulk.

Oscar Vance | Master Plumber & Drainage Expert
Meet Oscar Vance, a licensed master plumber sharing practical solutions on residential repairs, preventive maintenance, and thoughtful home upkeep.

