What Is a Drum Trap?
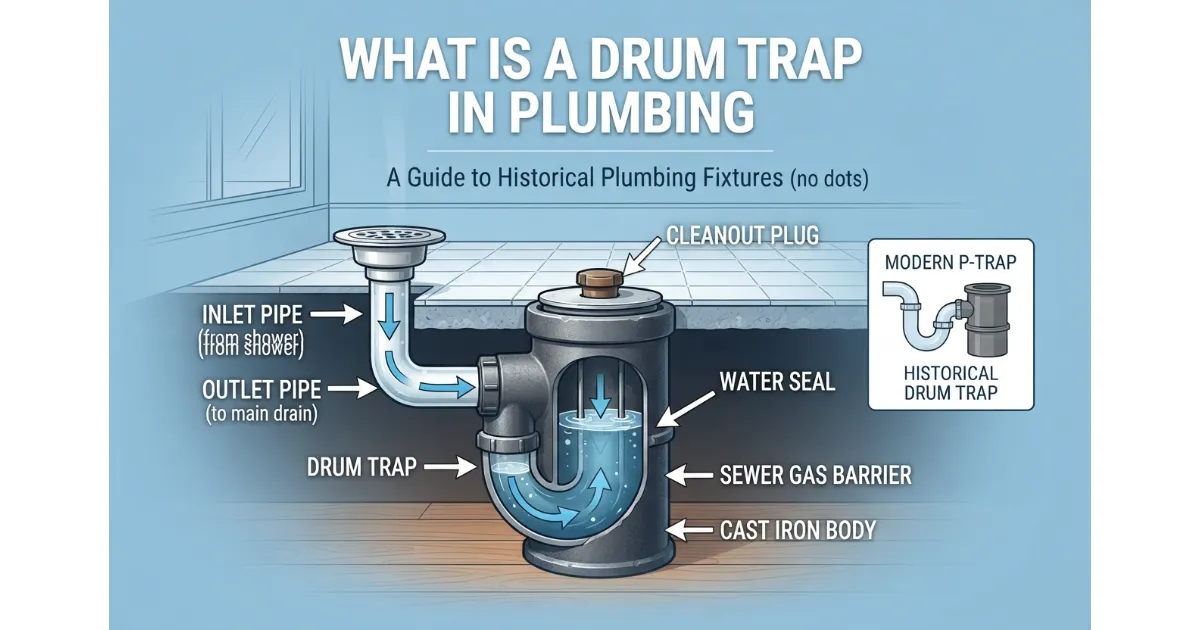 A drum trap is an older style of plumbing trap shaped like a cylindrical canister designed to maintain a vital water seal. It is integrated into the drain pipe system of older homes to prevent noxious sewer gas from escaping into living areas.
Drum Trap at a Glance
- Shape: Features a bulky, cylindrical canister design with a removable flat lid on top.
- Core Function: Maintains a standing pool of water to block sewer gases from entering through fixtures.
- Common Locations: Frequently discovered underneath bathtubs and showers in properties constructed before the 1970s.
- Current Status: Considered outdated by modern plumbing standards and typically non-compliant with current building codes.
- Biggest Issue: High vulnerability to trapping hair, soap scum, and sediment, which frequently causes stubborn clogs.
Is a Drum Trap the Same as a P-Trap?
No, a drum trap is not the same as a P-trap, though both plumbing fixtures share the goal of blocking sewer gas. While modern P-traps utilize a self-cleansing U-shaped bend, older drum traps use a wide cylindrical chamber that easily accumulates debris and requires tedious manual cleaning.
What Does a Drum Trap Look Like?
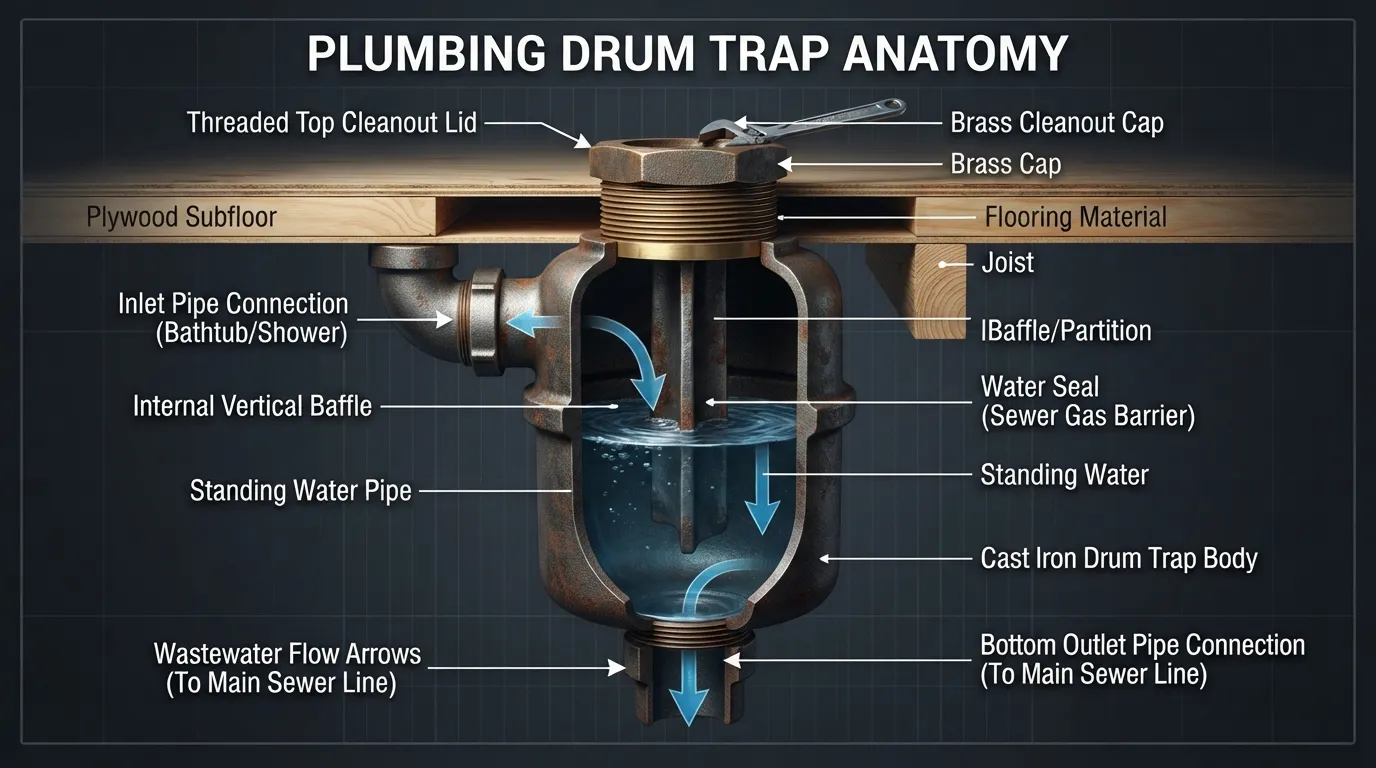 Identifying a drum trap in an older plumbing system helps homeowners recognize outdated infrastructure that may require professional replacement or specialized maintenance. Spotting its distinct canister shape and access cap makes visual inspection straightforward.
Typical Shape and Size
- Form Factor: Features a distinct coffee-can or small bucket-like cylindrical shape that is significantly wider than standard drain pipes.
- Dimensions: Typically measures about 3 to 6 inches in diameter and roughly 4 to 8 inches in height.
- Configuration: Sits inline with the waste pipe, acting as an oversized reservoir underneath the floor or fixture.
Where Drum Traps Are Usually Found
- Bathtubs and Showers: Most frequently installed beneath older tub and shower drain lines to capture hair and soap scum.
- Bathroom Floors: Often positioned directly under the bathroom subfloor, sometimes accessible via a small cutout hatch.
- Basements and Crawlspaces: Visible hanging below upper-floor bathroom ceilings or embedded near basement waste stack runs in historical homes.
The Access Cap: The Easiest Clue
- Cleanout Plug: Features a prominent threaded screw-on cap or flat plate right in the center of the top lid.
- Floor Level Exposure: In some older installations, this metal or brass cap sits flush with the bathroom tile or subfloor surface.
- Leak Indicator: The cap area is often prone to corrosion, mineral crust buildup, or slight water seepage over time.
Materials: Lead Cast Iron Brass Copper PVC
- Lead and Cast Iron: Common in homes built before the mid-20th century, highly susceptible to internal rust and structural degradation.
- Brass and Copper: Frequently utilized in mid-century upgrades, offering better durability but still prone to thread seizure at the cap.
- PVC: Occasionally found in later retrofits or amateur repairs, though modern plumbing codes generally prohibit drum traps entirely regardless of material.
Identification Checklist
- Home Era: The house was constructed before 1970 or features original plumbing infrastructure.
- Canister Profile: A bulky, wide cylinder structure is visible inline beneath a tub or floor drain.
- Access Lid: A circular threaded plug or flat cover plate is present on top of the canister.
- Material Composition: Constructed from heavy metals like cast iron, lead, or brass rather than flexible modern plastics.
- Drainage Issue: Frequent hair clogs or slow-moving water occur right before the main stack.
How Does a Drum Trap Work?
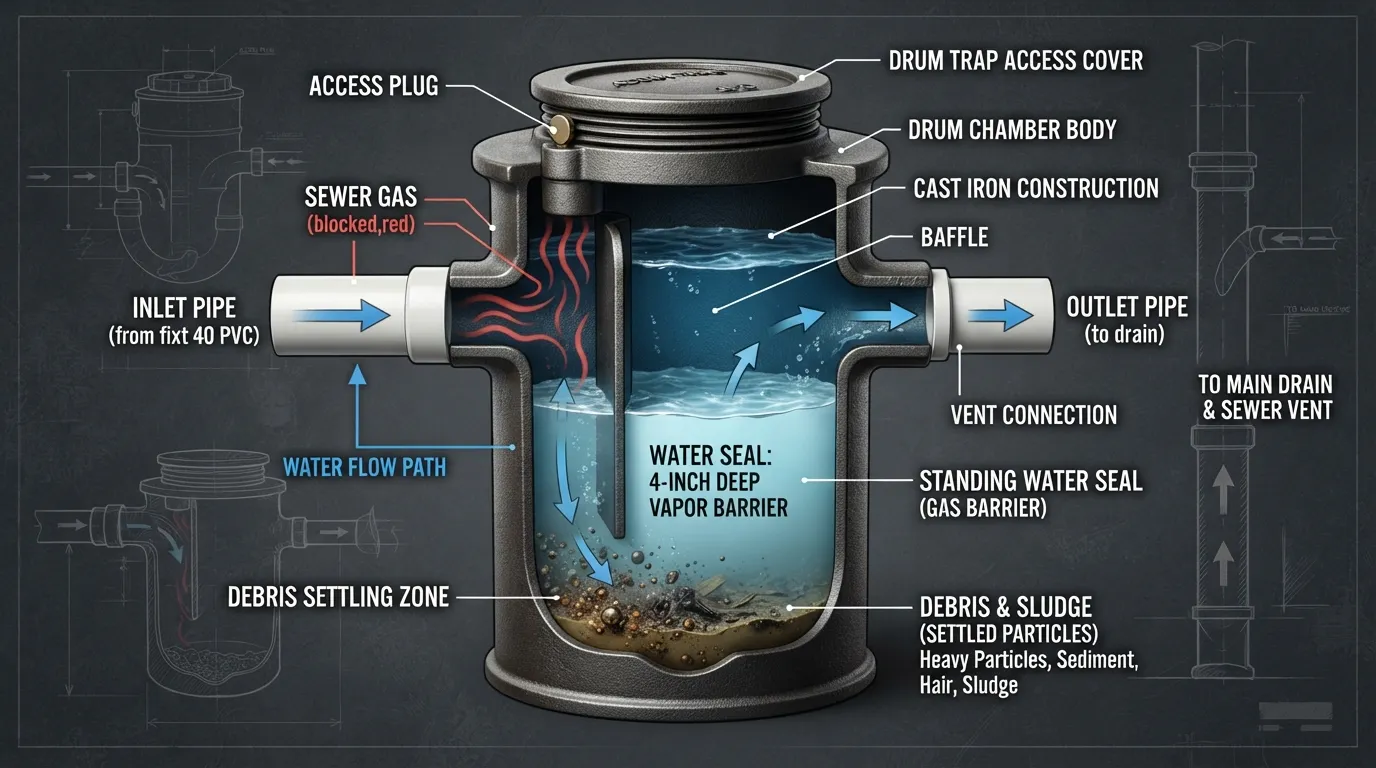 A drum trap operates by maintaining a standing volume of water inside a wide cylindrical canister, creating an impenetrable liquid barrier against toxic sewer gases while allowing household wastewater to flow smoothly down the drain.
The Water Seal Explained
The water seal within a drum trap functions as a physical liquid plug that blocks dangerous sewer gases from venting backward into indoor living spaces. Whenever a fixture drains, fresh water replenishes this internal pool, ensuring continuous odor protection for the home.
- Gas Prevention: Acts as an airtight barrier against methane and hydrogen sulfide.
- Continuous Replenishment: Everyday water usage automatically refills the internal reservoir.
Inside a Drum Trap: Inlet Outlet and Water Level
Inside a drum trap, wastewater enters through a specialized inlet, accumulates inside the wide canister reservoir, and exits through an outlet pipe positioned to maintain the standing water level.
- Inflow: Wastewater from a bathtub or shower enters via the upper or side inlet tube.
- Reservoir Collection: The liquid pools at the bottom of the wide cylindrical canister, slowing down velocity.
- Outlet Spillover: Clean water spills over the outlet baffle edge, leading out toward the main sewer line while leaving a permanent pool behind.
Why the Deep Water Pool Resists Seal Loss
The massive reservoir capacity of a drum trap makes it uniquely resistant to complete seal loss compared to modern compact alternatives. Even when poor roof venting creates severe negative pressure, the sheer volume ensures a safety margin remains intact.
- High Volume Buffer: Holds significantly more liquid than a standard P-trap or S-trap.
- Venting Tolerance: Withstands minor siphoning forces from adjacent plumbing lines without breaking the seal.
When a Water Seal Can Still Fail
Despite its large capacity, a drum trap water seal can still fail through prolonged evaporation during extended periods of disuse. When a guest bathroom or seasonal property sits empty for months, the standing water completely vaporizes.
- Evaporation Risk: Unused fixtures lose their water barrier over several weeks of dry conditions.
- Sewer Gas Entry: Once evaporated, foul odors and hazardous gases flow straight into the room unchecked.
Pros and Cons of a Drum Trap Honest View
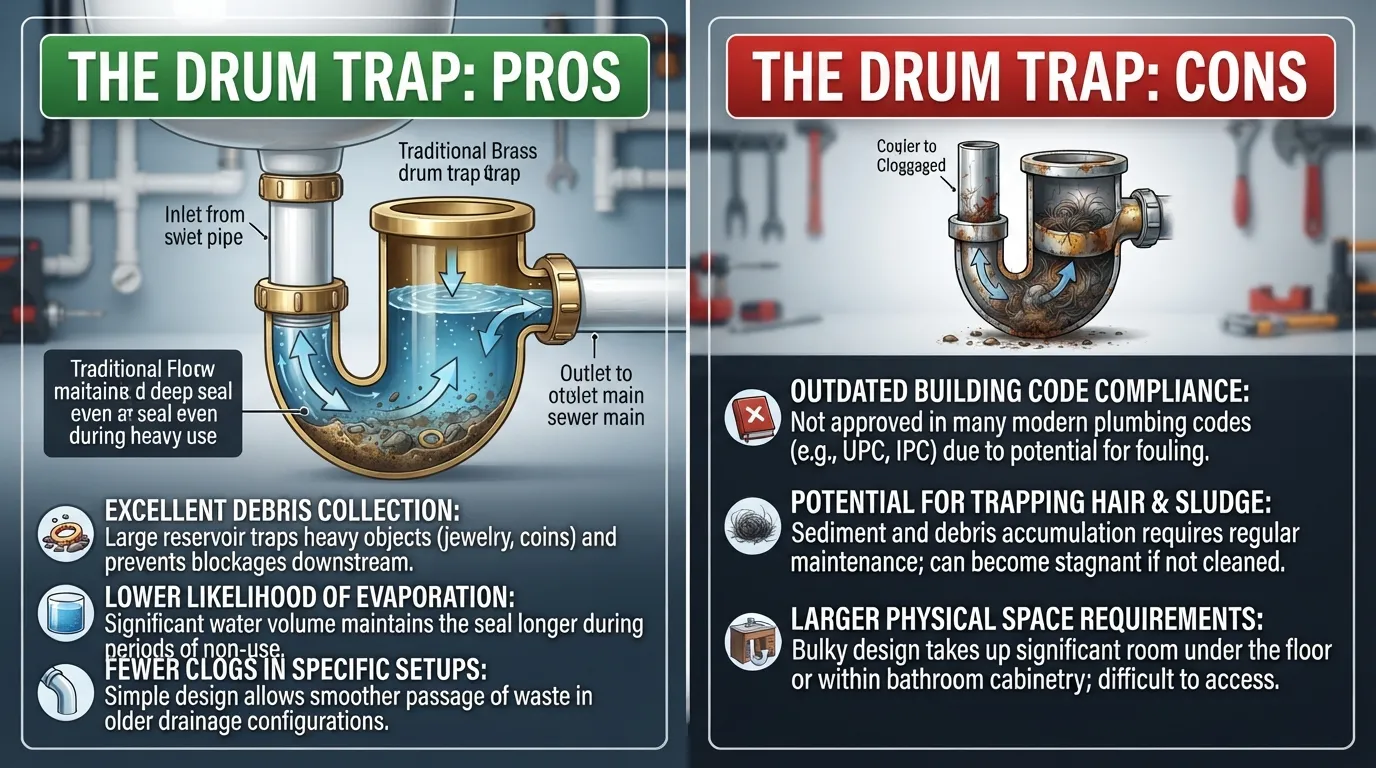 Evaluating drum traps requires balancing their robust historical engineering against significant modern maintenance drawbacks. While early plumbers prized their massive capacity, contemporary standards reveal why they have been largely phased out of modern building codes.
Advantages of a Drum Trap
Drum traps offer specific functional benefits that explain why millions were installed in mid-century homes across North America. Their unique geometry provides distinct defensive qualities against common plumbing failures.
- Deep Water Seal: Holds an exceptionally large volume of water, making it extremely resistant to siphonage or dry evaporation.
- Heavy Debris Catch: Acts as an oversized basin that stops heavy items like dropped jewelry or large objects from sliding deep into main lines.
- Proven Durability: Crafted from heavy-duty cast iron or brass, many original units have lasted for over half a century.
Disadvantages of a Drum Trap
Despite their rugged build, drum traps suffer from severe hydraulic flaws that create chronic headaches for modern homeowners. Their oversized internal shape prevents natural cleaning action.
- Not Self-Scouring: Unlike modern P-traps, the wide body slows water flow too much to flush away hair, grease, and soap scum naturally.
- Sludge Accumulation: Heavy sediment and organic sludge continuously settle at the bottom of the canister, forming thick blockages over time.
- Difficult Maintenance: Access caps frequently corrode, weld shut from mineral buildup, or leak after being opened for cleaning.
Drum Trap vs Modern Trap:
While a drum trap offers superior water seal resilience, a modern P-trap is vastly superior due to its self-scouring design and ease of unblocking. Replacing old drum traps with modern equivalents is almost always the best long-term investment for household plumbing health.
Signs of a Failing or Clogged Drum Trap
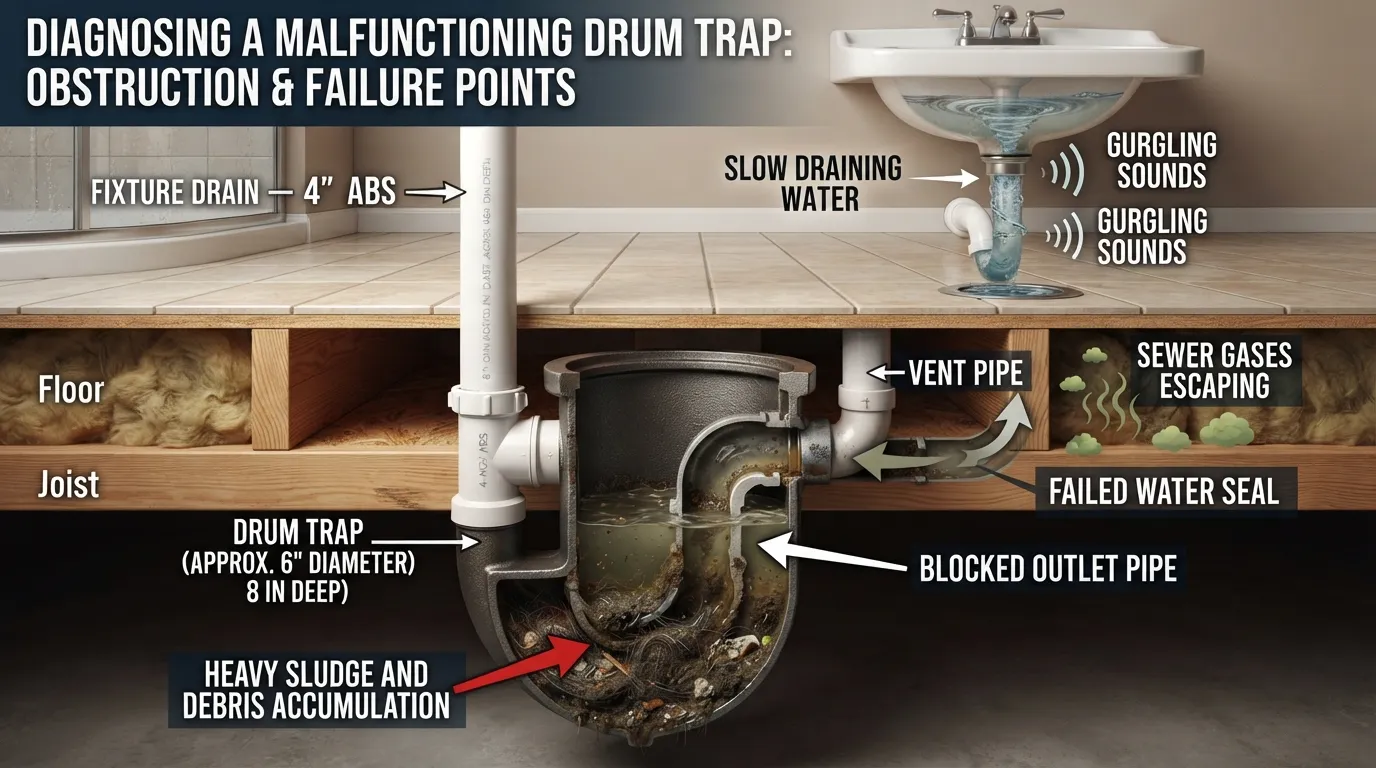 Recognizing the early warning signs of a failing or clogged drum trap helps homeowners prevent major wastewater backups and structural water damage. Because these traps hide under floors or behind tubs, tracking subtle symptoms is critical.
Slow Draining Tub or Shower
- Gradual Flow Reduction: Water begins pooling around your ankles during standard showers as the oversized canister slowly chokes with trapped hair and soap sludge.
- Persistent Sluggishness: Standard chemical drain cleaners provide only temporary relief because they flow past the thick debris accumulated at the bottom of the wide chamber.
Sewer Smell From the Floor or Drain
- Foul Odors: A distinct sulfur or rotting-egg smell wafts from the bathroom floor or tub drain when the internal water seal evaporates or breaks.
- Intermittent Stench: Odors often worsen during dry summer months or in infrequently used guest bathrooms as moisture rapidly vaporizes from the massive canister.
Gurgling Sounds
- Disturbed Air Flow: Gurgling or bubbling noises echo from the drain when a toilet flushes or an adjacent sink runs, indicating air is struggling to pass through a partially blocked trap.
- Pressure Imbalance: Trapped sludge combined with poor venting creates negative pressure vacuums inside the waste line.
Water or Dampness Around the Cap or Floor
- Corrosion and Rust: The metal cleanout cap or the surrounding subfloor shows persistent dampness, mineral crusting, or active water seepage.
- Seal Failure: Old rubber gaskets or degraded threads around the access plug fail under normal hydrostatic pressure.
Why These Signs Happen
- Sludge Buildup: Low water velocity inside the wide canister causes heavy organic waste, hair, and soap residue to settle permanently.
- Seal Loss: Debris buildup disrupts the delicate balance between the inlet and outlet, or evaporation drains the liquid barrier entirely.
- Aging Infrastructure: Decades of rust and mineral scaling narrow the internal diameter of the pipes.
When It’s Not the Drum Trap
- Main Line Clogs: If multiple plumbing fixtures throughout the house back up simultaneously, the issue usually stems from the main sewer line rather than a single drum trap.
- Vent Stack Blockages: Roof vent pipes clogged by leaves or debris can cause widespread gurgling and siphonage independent of the trap’s condition.
Are Drum Traps Illegal?
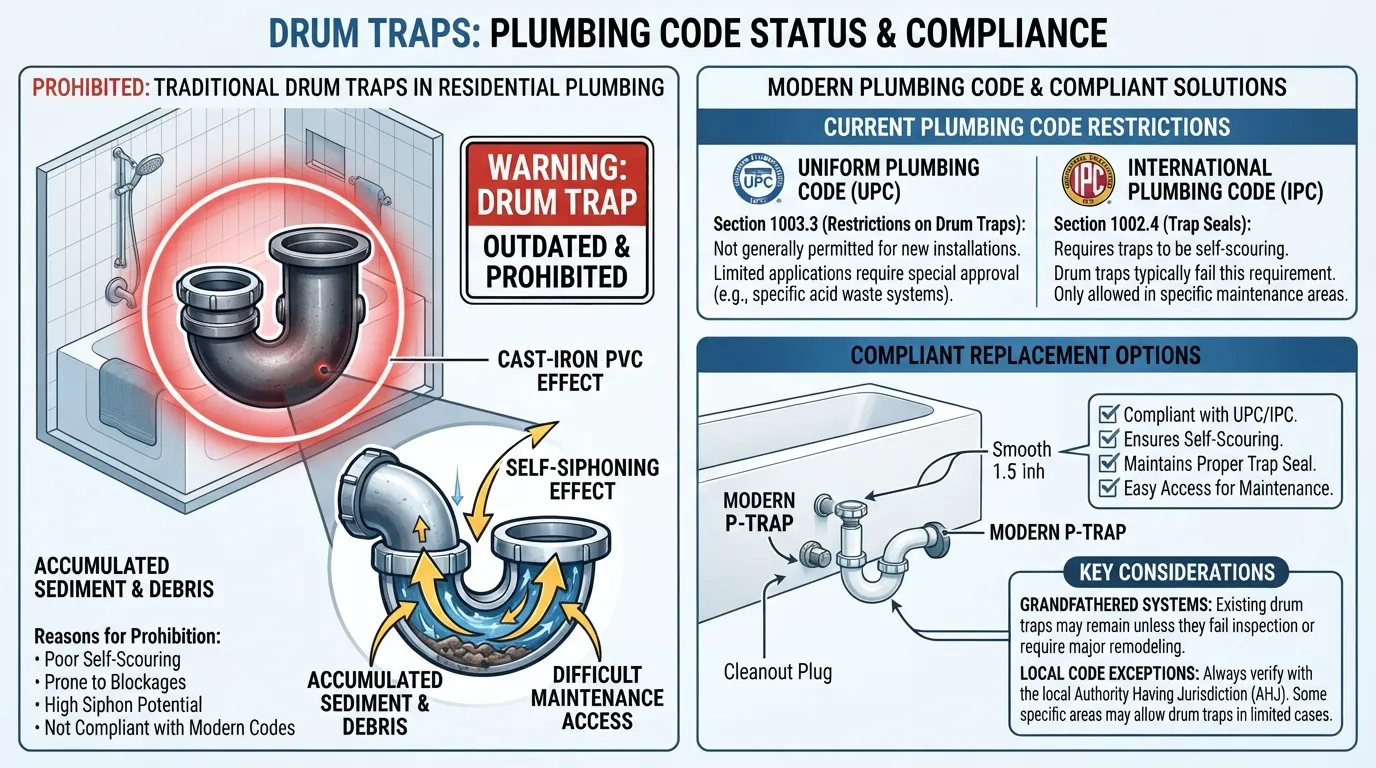 Navigating the legal status of drum traps requires distinguishing between new building standards and legacy infrastructure. While they are restricted in modern construction, encountering one in an older home does not automatically mean an immediate code violation.
Not Always Illegal
Drum traps are generally prohibited for new plumbing installations under major model codes like the International Plumbing Code (IPC). However, they are typically not “illegal” to possess in an existing home, provided they were legally installed when the house was originally built and do not pose an active safety hazard.
Why Modern Codes Prefer P-Traps
- Self-Scouring Design: Modern P-traps use water velocity to flush debris naturally, whereas drum traps accumulate sludge.
- Accessibility Standards: P-traps are designed for straightforward disassembly and clearing, reducing maintenance hurdles.
- Hydraulic Consistency: Contemporary codes prioritize uniform flow dynamics that prevent the severe clogging risks associated with wide canisters.
What About an Existing Drum Trap?
- Grandfathering Protections: Most municipal jurisdictions “grandfather” existing plumbing systems, meaning you are not legally required to tear open floors to replace a functioning drum trap.
- Renovation Triggers: Local building inspectors often require replacement with a modern P-trap if you perform major bathroom renovations or alter the underlying waste lines.
How to Check Your Local Code
- Local Authority Having Jurisdiction (AHJ): Plumbing regulations vary by city, county, and state. Always consult your local building department or official code portal before undertaking extensive plumbing updates.
- Permit Requirements: Licensed local plumbers can confirm whether your specific municipality mandates retrofitting legacy drum traps during property sales or major overhauls.
Drum Trap vs P-Trap vs S-Trap vs Bell Trap
Comparing various plumbing trap designs clarifies why the industry transitioned away from archaic canisters like drum traps toward efficient, self-cleaning alternatives. Each trap style manages wastewater dynamics and sewer gas protection differently.
Comparison Table
Drum Trap vs P-Trap
The primary difference lies in water dynamics: a drum trap holds a large stagnant body of water inside a wide chamber that readily accumulates debris, whereas a P-trap utilizes a streamlined U-bend engineered to scour itself clean with every regular flush. Furthermore, P-traps offer easy slip-joint disassembly, making maintenance remarkably straightforward compared to unbolting a rusted drum trap cap.
Drum Trap vs S-Trap and Bell Trap
- S-Trap: Shaped like the letter “S” dropping straight down through the floor, an S-trap tends to pull its own water seal dry via siphoning action, leading codes to outlaw it.
- Bell Trap: Commonly found in vintage basement floor drains, a bell trap uses an inverted cup (“bell”) over a water barrier that easily cracks, loses water, and leaks sewer gas.
How a Modern P-Trap Setup Works
- Trap Arm Connection: Wastewater flows horizontally out of the P-trap through a short pipe segment called the trap arm.
- Vent Integration: The trap arm connects directly to a vertical vent stack, which introduces controlled airflow to prevent vacuum siphoning and keep the water seal secure.
What Is the 135 Rule in Plumbing?
The 135-degree rule is a practical layout guideline used to track cumulative horizontal direction changes in drainage piping. When total bends—such as combining a 90-degree turn with a 45-degree turn—exceed 135 degrees without proper intervention, it can impair venting performance, slow wastewater velocity, and mandate an additional cleanout access point.
How to Unclog or Clean a Drum Trap
Cleaning a clogged drum trap requires patience, specialized safety precautions, and a methodical approach to avoid damaging old, brittle metal fittings. Because these traps accumulate heavy hair and sludge over decades, proper maintenance restores standard drainage flow safely.
Before You Start: Safety and Tools
- Personal Protective Gear: Wear heavy-duty rubber gloves and eye protection to guard against toxic sewer bacteria and corrosive residue.
- Essential Equipment: Gather a bucket, an adjustable pipe wrench, rags, a small drain snake or auger, and replacement thread sealant or tape.
- Lead Pipe Caution: Inspect the surrounding material carefully; older lead drum traps dent, tear, or crack easily under aggressive wrench pressure.
Step-by-Step: Cleaning a Drum Trap
- Locate and Prepare: Clear away any access panels or floor mats, and place a wide, low-profile bucket directly underneath the drum trap canister to catch trapped wastewater.
- Loosen the Access Cap: Carefully apply steady pressure with an adjustable wrench to loosen the central cleanout plug, turning it counter-clockwise in small increments.
- Drain Residual Water: Let the standing water and foul liquid drain slowly into your bucket before fully removing the threaded lid.
- Remove Sludge and Debris: Use a gloved finger, small brush, or a flexible drain auger to scoop out accumulated hair, soap scum, and dense organic sludge from inside the cylindrical chamber.
- Clean and Inspect Threads: Wipe the threads clean of mineral buildup, inspect the rubber gasket or seating surface, and apply fresh pipe thread tape if necessary.
- Reassemble and Test: Screw the cap back on securely without over-tightening, run warm water through the fixture, and check for leaks around the plug.
Common Mistakes to Avoid
- Over-Tightening: Forcing a corroded metal cap with extreme torque can snap the housing flange, instantly creating a catastrophic leak.
- Relying on Chemical Cleaners: Pouring harsh liquid drain openers into a clogged drum trap often fails to dissolve dense sludge and risks splashing caustic chemicals back onto your skin.
- Ignoring Damaged Threads: Reinstalling a plug with stripped or rusted threads without sealing it properly invites slow under-floor leaks.
When Not to DIY
- Frozen or Rusted Cap: If the cleanout plug refuses to budge after moderate pressure, forcing it risks fracturing legacy metal pipes.
- Active Seepage: If you notice damp subflooring, rotting wood, or active leaks around the housing, call a licensed professional immediately.
- Inaccessible Locations: If the drum trap is deeply embedded beneath tile or concrete without a proper access hatch, professional intervention is required.
How Often Should You Clean It?
Unlike modern P-traps that self-clean during everyday use, vintage drum traps in heavy-use family bathrooms benefit from a preventive inspection and debris clearance every 12 to 18 months to prevent sudden blockages.
Can a Drum Trap Be Replaced With a P-Trap?
Upgrading from an outdated drum trap to a modern P-trap is a common plumbing improvement that resolves chronic clogging issues and brings older systems closer to contemporary building code standards. However, the feasibility depends heavily on existing pipe alignment and structural access.
Short Answer: Yes Usually
Yes, a drum trap can typically be replaced with a modern P-trap, provided there is sufficient clearance and proper venting configuration available behind the walls or beneath the subfloor.
When Replacement Makes Sense
- Chronic Clogging: The fixture backs up repeatedly due to hair and sludge settling in the old canister chamber.
- Corrosion and Leaks: The access cap or housing exhibits persistent leaks, rusted threads, or structural weakness.
- Bathroom Renovations: Upgrading flooring, tiles, or fixtures provides open access to reconfigure legacy plumbing lines.
- Home Inspections: Real estate purchase agreements or home inspectors flag obsolete traps as a recommendation for modernization.
DIY vs Hiring a Plumber
- DIY Skill Level: Recommended only for experienced homeowners comfortable with cutting, fitting, and solvent-welding PVC or soldering copper/brass pipes.
- Professional Hiring: Best left to licensed plumbers when the trap is embedded beneath concrete slabs, tied into lead stacks, or requires complex re-venting.
How the Replacement Process Works
- Access Clearance: Open the floor hatch or wall cavity to fully expose the existing drum trap and surrounding waste lines.
- Removal of Old Trap: Cut away or unbolt the legacy drum trap assembly, draining any residual wastewater into a bucket.
- Pipe Adjustment: Modify the tailpiece and drain lines to bridge the dimensional gap left by the bulky canister.
- Installing the P-Trap: Fit a modern P-trap and trap adapter, ensuring proper alignment with the horizontal trap arm.
- Vent Verification: Confirm that the local vent stack maintains proper airflow to prevent siphoning of the new water seal.
- Leak Testing: Run water through the connected fixture and inspect all joints thoroughly for dripping or seepage.
Is video mein purani drum trap ko hata kar naya setup lagane ka tareeqa dekhein.
Do You Need to Turn the Water Off?
You typically do not need to shut off the main home water supply unless you are simultaneously replacing supply lines, shower valves, or faucets. However, you must ensure that no one uses the specific bathroom fixtures connected to the drain while you are actively cutting and modifying the waste pipes.
How Long Does the Job Take?
The time required varies based on accessibility and material type. If the trap is easily reached beneath an access panel in a crawlspace, a professional plumber can complete the conversion relatively quickly. Conversely, if tiles must be cut or corroded metal pipes need specialized cutting tools, the project can take several hours.
Does It Need a Permit or Inspection?
Minor interior plumbing retrofits sometimes bypass strict permit requirements, but altering structural waste and vent configurations usually mandates a permit under local municipal building codes. Always check with your local authority to ensure compliance.
Drum Trap Replacement Cost
Replacing an obsolete drum trap requires specialized labor, and understanding the associated financial investment helps homeowners budget effectively for plumbing upgrades. Because drum traps are often buried beneath subfloors or behind finished walls, labor costs can vary significantly depending on job complexity.
Typical Cost Range
Professional drum trap replacement typically ranges between $250 and $800 in standard residential settings, assuming straightforward access. If the trap is embedded beneath concrete slabs, tile flooring, or requires extensive pipe re-routing, total project costs can range from $800 to $1,500+.
What Affects the Price
- Floor and Wall Access: Breaking through tile, concrete, or drywall to reach a hidden canister dramatically increases labor hours.
- Pipe Material: Corroded cast iron or fragile lead pipes require specialized cutting tools and extra fittings compared to standard PVC.
- Labor Rates: Regional differences in contractor pricing and emergency versus scheduled service call fees impact the final bill.
- Plumbing Complexity: Re-configuring surrounding vent stacks and waste arms to accommodate a modern P-trap adds time and material costs.
Cost Table
How to Get an Accurate Quote
- Request In-Person Estimates: Ask plumbers to inspect the property directly so they can assess hidden variables like pipe material and subfloor depth.
- Clarify Restoration Costs: Confirm whether the quote includes repairing and finishing cut drywall, tile, or subflooring after the plumbing work is complete.
- Check Permit Inclusion: Inquire if local building permit fees and post-installation inspections are factored into the total proposal.
How Much Does a P-Trap Replacement Cost?
Replacing a standard, exposed modern P-trap is a much simpler task that typically costs between $150 and $350 when hired out to a professional plumber, or under $20 in materials if completed as a DIY project.
Real Invoice Example: A service invoice from a residential plumbing upgrade showed a total charge of $520 to cut out an aging brass drum trap beneath a second-floor bathroom tile floor, install a modern PVC trap adapter, and secure a new P-trap assembly.
Drum Traps for Home Buyers and Inspections
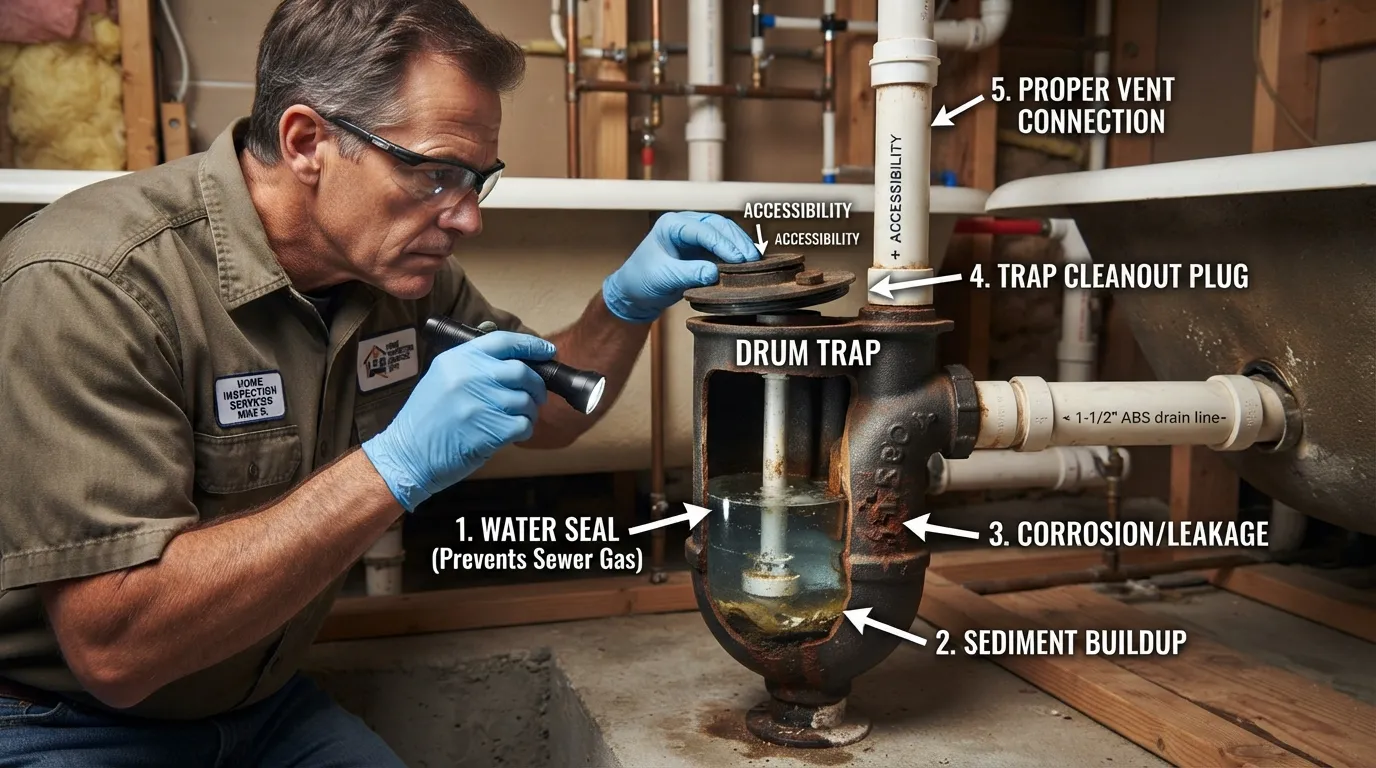 Discovering an antique drum trap during a pre-purchase property inspection is common when buying historic or mid-century homes. Understanding how to evaluate this finding prevents unnecessary panic while ensuring informed negotiations.
What If the Inspection Report Mentions a Drum Trap?
- Standard Disclosure: Home inspectors routinely flag drum traps as obsolete plumbing components that fall outside modern building code recommendations.
- Functional Verification: The inspector will check whether the trap is actively leaking, severely corroded, or draining slowly during the walkthrough.
Is It a Deal-Breaker?
An existing drum trap is rarely a deal-breaker for a real estate transaction. If the trap is structurally sound, clean, and functioning without active leaks or chronic blockages, it can continue to operate safely while you budget for future upgrades.
Should You Replace It Before or After Buying?
It is generally wiser to negotiate plumbing credits or complete the replacement after closing as part of a broader bathroom renovation. Tackling a buried drum trap mid-purchase can unnecessarily delay closing timelines, whereas handling it during your own scheduled remodeling allows you to select high-quality modern P-trap components and professional finishes.
Drum Trap FAQs
Addressing remaining frequently asked questions provides quick, authoritative answers to common homeowner curiosities regarding drum traps, alternative plumbing fixtures, and troubleshooting techniques.
Is a drum trap bad?
Drum traps are not inherently dangerous if they are clean and leak-free, but they are considered obsolete by modern standards. Their wide cylindrical design prevents self-cleansing action, making them exceptionally prone to accumulating thick hair and sludge clogs that modern P-traps easily avoid.
Why do drum traps smell?
Drum traps emit foul sewer odors when their massive internal water seal evaporates during periods of disuse, or if the cleanout cap gasket degrades and allows gas to seep out. Chronic clogs trapping organic debris can also produce unpleasant sulfur smells.
Is a drum trap the same as a bell trap?
No, they differ significantly in construction. A drum trap is a closed inline cylindrical canister used under bathtubs, whereas a bell trap is an open floor drain featuring an inverted metal bell resting over a shallow water reservoir.
Can I use a plunger or chemical cleaner on a drum trap?
Plungers offer limited temporary relief against dense sludge packed inside a drum trap’s wide chamber. Pouring harsh chemical drain cleaners should be strictly avoided because corrosive liquids can pool inside the canister, risking severe splashes and damaging older metal threads.
Do all old houses have drum traps?
No, not all historical homes feature them. While extremely common under bathtubs and showers in houses built from the 1920s through the 1960s, many vintage properties used early versions of standard P-traps depending on local building practices.
What is the difference between a drum trap and a grease trap?
A drum trap blocks sewer gas and serves individual bathroom fixtures like tubs, whereas a commercial grease trap is a large specialized interceptor designed to capture fats, oils, and greases from kitchen sinks before entering the sewer.
How can I tell if a P-trap is bad?
A modern P-trap is failing if it exhibits visible rust, hairline cracks, slipping slip-joints, or persistent water leaks beneath the sink basin. Missing water seals that allow continuous sewer gas odors also indicate failure.
Can an S-trap be converted to a P-trap?
Yes, converting an S-trap to a P-trap is standard practice to prevent siphonage and code violations. The conversion requires cutting into the wall to install a proper sanitary tee and extending a horizontal trap arm to an approved vent stack.

Oscar Vance | Master Plumber & Drainage Expert
Meet Oscar Vance, a licensed master plumber sharing practical solutions on residential repairs, preventive maintenance, and thoughtful home upkeep.

