What Is a Wet Vent in Plumbing?
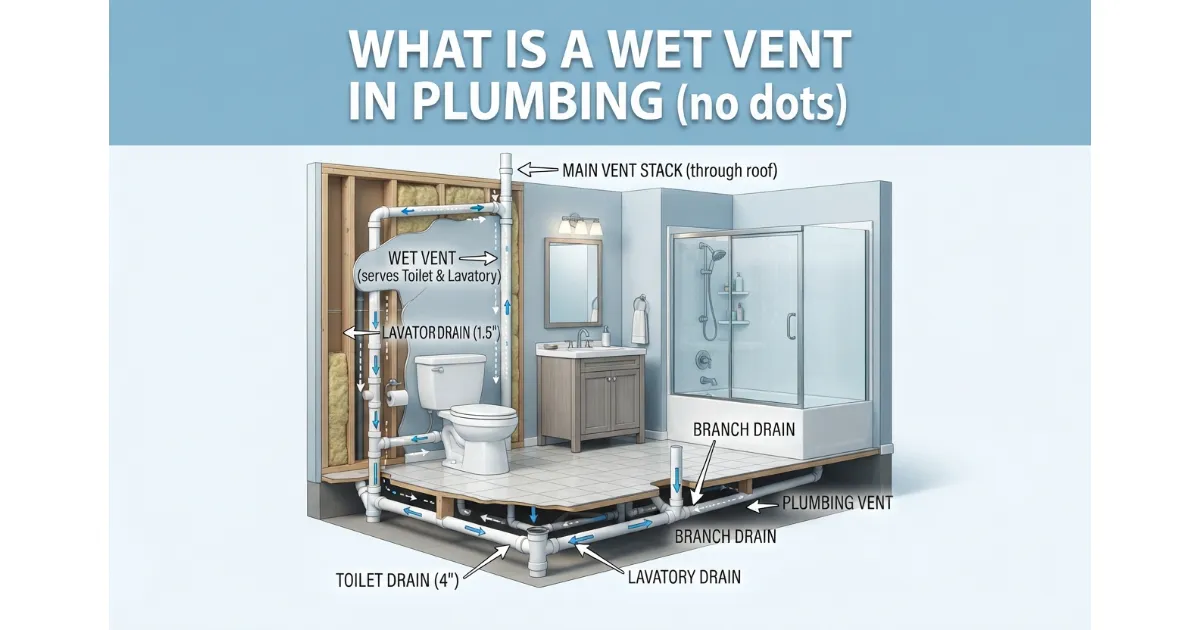 A wet vent is a specialized drain pipe that carries wastewater away from one plumbing fixture while simultaneously providing vital air circulation and ventilation for another fixture in the same DWV (Drain-Waste-Vent) system. By combining drainage and venting into a single vertical or near-vertical pipe, plumbers maximize spatial efficiency and reduce material complexity without compromising system safety.
Wet Vent Definition in Simple Words
At its core, a wet vent is a multi-purpose plumbing pipe acting as both a drain and an air vent. Instead of installing separate dedicated vent pipes for every individual fixture, code-compliant wet venting utilizes the wastewater discharge from an upper-level fixture—such as a bathroom lavatory—to maintain proper air pressure balance for a lower-level fixture like a toilet.
Why Plumbing Systems Need Venting
Proper plumbing ventilation is crucial for maintaining atmospheric pressure balance within the drainage network. Without an adequate supply of fresh air, rushing wastewater can create a negative pressure vacuum that siphons water right out of P-traps, allowing toxic and foul sewer gases to enter living spaces.
Vents ensure smooth drainage flow by introducing air behind moving wastewater, preventing gurgling, slow drains, and potential blockages. They act as pressure-relief valves for the entire household plumbing ecosystem.
How Does a Wet Vent Work?
A wet vent operates on a delicate balance of gravity, fluid dynamics, and atmospheric pressure. Because a single pipe handles both liquid waste and air circulation, it must be engineered so that water never completely fills the pipe diameter, preserving an open upper channel for continuous air venting.
The Dual Function: Drainage Below Air Flow Above
Inside a properly sized wet vent, wastewater and graywater cling to the lower portion of the pipe and flow downward under gravity. Meanwhile, the upper section of the exact same pipe remains open and empty, acting as an unrestricted air channel that connects upstream fixtures directly to the main roof vent stack.
This simultaneous two-way action allows the pipe to dispose of fixture discharge while venting another fixture without needing a separate standalone vent line running all the way up through the roof.
How a Wet Vent Protects Your P-Trap Seal
Every plumbing fixture relies on a P-trap to hold a small plug of standing water that blocks sewer gases from entering the home. When a large volume of water rushes down a drain, it creates a severe negative pressure vacuum that can suck the water right out of nearby traps—a destructive process known as siphonage.
A wet vent introduces immediate pressure equalization by drawing air from the roof stack down through the upper air space of the pipe. This neutralizes suction forces, protects the vital trap seal, and prevents foul odors or gurgling sounds.
Why Wet Vent Pipes Are Usually Upsized
Because a wet vent must simultaneously accommodate running water and open air space, building codes almost always require these pipes to be one or two sizes larger than standard dry drains. Upsizing the pipe prevents wastewater from completely choking the interior diameter, ensuring the system never loses its critical venting capacity.
Cross-Section of a Wet Vent Pipe Showing Water Flow and Air Space
| Zone | Primary Content | Functional Role |
|---|---|---|
| Upper Half | Air space & atmospheric air | Provides continuous ventilation and pressure equalization. |
| Lower Half | Graywater & blackwater | Carries wastewater downward via gravity to the main building drain. |
| Perimeter Walls | Pipe interior boundary | Maintains structural separation so flow never chokes air passage. |
Wet Vent vs Dry Vent: What’s the Difference?
Understanding the difference between wet and dry venting is essential for designing an efficient, code-compliant drainage system. While both systems protect your home from sewer gases and trap siphonage, they handle water and air paths quite differently.
What Is a Dry Vent?
A dry vent is a traditional dedicated pipe that connects to a plumbing drainage system and rises upward exclusively to carry air, never wastewater. These lines connect to the roof stack to equalize pressure without experiencing any liquid flow.
Wet Vent vs Dry Vent Comparison Table
When Plumbers Choose a Wet Vent Over a Dry Vent
- Space Optimization: Perfect for tight wall cavities where running multiple parallel pipes is structurally impossible.
- Framing Obstruction: Minimizes the number of holes that must be drilled through studs and floor joists, preserving structural integrity.
- Cost Reduction: Reduces overall labor time and material volume by combining two piping requirements into a single efficient run.
Types of Wet Vents: Vertical vs Horizontal
Plumbing systems incorporate different wet venting configurations depending on architectural layouts and building codes. Knowing whether a wet vent runs vertically or horizontally dictates how wastewater and air interact within the pipe network.
Vertical Wet Vent Explained
A vertical wet vent is the most common and widely permitted configuration in residential construction. In this setup, wastewater flows downward through vertical pipes while the upper section maintains an open air channel connected directly to the roof vent stack. Because gravity pulls water smoothly down vertical walls without choking the pipe diameter, modern plumbing codes heavily favor this method for multi-fixture bathroom groups.
| Component | Vertical Configuration Characteristic |
|---|---|
| Flow Dynamics | Water clings to pipe walls; air rises freely through the center core. |
| Code Acceptance | Universally accepted by IPC and UPC for standard bathroom group layouts. |
| Typical Application | Bathroom sink draining down to vent a lower toilet or tub combination. |
Horizontal Wet Vent Explained
A horizontal wet vent involves running the wet-vented portion horizontally or at a slight slope before it connects to a vertical stack. While highly efficient for complex joist layouts, horizontal wet venting is strictly regulated by modern plumbing codes due to the higher risk of wastewater blocking the upper air space. Most jurisdictions limit horizontal wet vents to specific fixture combinations and mandate larger pipe diameters.
| Component | Horizontal Configuration Characteristic |
|---|---|
| Flow Dynamics | Water pools along the bottom invert, requiring extra pipe volume to maintain an air gap. |
| Code Restrictions | Subject to stringent limitations on fixture units and maximum run lengths. |
| Typical Application | Connecting multiple bathroom fixtures across a concrete slab or floor joist bay. |
That Often Get Confused With Wet Venting
- Common Vent: A single vertical vent pipe serving two fixture traps placed at the same level on opposite sides of a wall.
- Circuit Vent: A loop or branch vent that serves a battery of up to eight floor-mounted fixtures like commercial toilets.
- Island Fixture Vent: A specialized loop configuration used when an island sink lacks a nearby wall for vertical venting.
- Air Admittance Valve (AAV): A mechanical, one-way spring valve that opens to let air in during drainage and seals shut to block sewer gas.
- Combination Drain and Vent: A specially designed horizontal wet system that accommodates both drainage and venting for special equipment.
Wet Vent Examples: Where Are They Used?
Wet vents are most commonly deployed in residential bathrooms where multiple fixtures cluster together in a compact layout. By utilizing shared piping networks, plumbers can streamline drainage while maintaining code-compliant air circulation across sinks, toilets, and showers.
Common Bathroom Group Example
The classic residential application is a standard full bathroom group featuring a bathroom lavatory sink, a toilet (water closet), and a shower or bathtub. In this configuration, the sink drain drops vertically and acts as a wet vent for the toilet, while downstreaming both fixture wastes into the main building drain.
| Fixture Position | Fixture Type | Venting & Drainage Role |
|---|---|---|
| Upstream | Lavatory Sink | Discharges water while supplying dry air down the upper pipe. |
| Midstream | Toilet (Water Closet) | Connected downstream, utilizing the sink’s drain pipe as its wet vent. |
| Downstream | Shower / Bathtub | Ties into the wet-vented stack before exiting to the main drain. |
Can a Toilet Be Part of a Wet Vent?
Yes, a toilet can be part of a wet vent system, provided it connects downstream of the wet-venting fixture (such as a bathroom sink). Modern plumbing codes explicitly allow toilets to be wet-vented by a lavatory, given that the pipe sizing is adequately upsized to handle high-volume solid waste flushes.
Can a Shower and a Toilet Share the Same Vent?
Yes, a shower and a toilet can share a wet venting network, but only under strict geometric and sizing rules. The shower drain must tie into the system properly, and the shared wet vent pipe must meet minimum diameter requirements (typically 2 inches for smaller groups or 3 inches if multiple toilets are involved) to prevent cross-siphonage.
How Far Can a Wet Vent Be From a Toilet?
The maximum distance allowed between a toilet trap and its wet vent depends heavily on your local jurisdiction and whether you follow the International Plumbing Code (IPC) or Uniform Plumbing Code (UPC). Generally, code specifications limit a 3-inch toilet trap arm to a maximum distance of 6 feet from the vent connection, though older or localized municipal amendments may vary.
Real-World Layout Scenario
During a recent master bathroom remodel, a licensed plumber encountered a tight 2×4 wall framing layout where running three separate dry vents to the roof was physically impossible. By implementing a 2-inch vertical wet vent tied from the dual vanity sinks down to the main toilet and shower branch, the team successfully satisfied local code requirements while preserving wall structural integrity and cutting down material waste.
Wet Vent Rules and Code Requirements IPC vs UPC
Designing a compliant wet venting system requires strict adherence to model plumbing codes. Because wet vents handle both wastewater and air, regulatory bodies enforce specific pipe sizes, fixture unit caps, and vertical limits to prevent back-ups, trap siphonage, and dangerous sewer gas leaks.
Wet Vent Pipe Sizing Rules
Fixture Unit Limits DFU Explanation
- Drainage Fixture Unit (DFU): A standardized measure assigned to every plumbing fixture based on its average wastewater discharge volume and flow rate.
- System Load Cap: Codes mandate that the total DFU load on a wet vent cannot exceed the maximum capacity specified for that pipe diameter. Exceeding this limit chokes the upper air space.
Same Floor Same Story Requirement
Model plumbing codes strictly stipulate that all fixtures connected to a wet venting network must be located on the same floor level. Mixing fixtures across different building stories on a single wet vent compromises pneumatic pressure balance and risks severe trap seal failure.
Layout Order: Where the Toilet and Heavy-Discharge Fixtures Go
In a compliant wet-vented bathroom group, lower-discharge fixtures (such as lavatory sinks) must enter the system upstream to provide the required dry air wash, while high-discharge fixtures (like toilets or bathtubs) connect downstream or at the base of the wet vent stack.
IPC vs UPC: Key Differences in Wet Venting
Can a Toilet Be Vented With a 2-Inch Pipe?
Yes, a toilet can be wet-vented using a 2-inch pipe under the International Plumbing Code (IPC), provided that the total drainage fixture unit load on that pipe does not exceed 4 DFUs (typically satisfying one toilet rated at 3 DFUs and one bathroom sink rated at 1 DFU). However, check your local jurisdiction, as some regional amendments or UPC codes mandate a 3-inch minimum for specific toilet configurations.
What If You’re Outside the US?
Plumbing regulations vary significantly across international regions, provincial guidelines, and municipal amendments. Always consult your local Authority Having Jurisdiction (AHJ) or hire a licensed local plumber to verify sizing tables before beginning any installation.
When Is Wet Venting Not Allowed?
While wet venting is a brilliant engineering shortcut for compact spaces, model plumbing codes strictly prohibit its use in certain configurations. Exceeding system limits or mixing incompatible fixtures risks severe trap seal failure, chronic slow drains, and failed municipal inspections.
Situations Where Wet Venting Is Restricted
- Multiple Building Stories: Connecting fixtures across different floors to a single wet vent violates code mandates that require all wet-vented fixtures to reside on the same level.
- Excessive Fixture Units: Surpassing the maximum Drainage Fixture Unit (DFU) rating allowed for your pipe diameter chokes the upper air space.
- Incorrect Fixture Order: Placing high-discharge fixtures (like toilets) upstream of venting fixtures (like sinks) blocks incoming airflow.
- Undersized Piping: Using standard 1.5-inch lines instead of code-required 2-inch or 3-inch pipes for shared wet sections.
- Prohibited Fixtures: Certain high-debris fixtures, such as commercial kitchen sinks or commercial garbage disposals, are generally barred from standard residential wet venting due to clogging risks.
Common Wet Venting Mistakes
What Happens If a Wet Vent Fail Inspection?
Failing a plumbing inspection due to improper wet venting means the local Authority Having Jurisdiction (AHJ) will issue a formal correction notice. Property owners or contractors must tear open drywall, re-pipe the affected lines to meet local IPC or UPC sizing standards, and schedule a costly re-inspection before obtaining an occupancy or completion permit.
Do All Plumbing Fixtures Need a Vent? Venting Without Going Through the Roof
Every single plumbing fixture requires proper air ventilation to maintain atmospheric pressure balance and prevent dangerous sewer gases from entering living spaces. However, fixtures do not always need their own individual pipe running straight up through the roof if clever engineering strategies like wet venting or approved mechanical alternatives are utilized.
Does Each Toilet Need Its Own Vent?
No, a toilet does not need its own isolated, dedicated vent pipe. Through compliant wet venting systems or shared branch configurations, a toilet can be perfectly vented by an upstream fixture like a bathroom sink, provided that all sizing and distance rules are strictly followed.
Do Plumbing Vents Have to Go Through the Roof?
Traditionally, model plumbing codes require at least one main vent stack to extend fully through the roof to open outdoor air. This primary roof terminal allows displaced sewer gases to vent safely into the atmosphere while supplying fresh air to the entire drainage network below.
Can You Vent Plumbing Out the Side of a House or Through a Wall?
In most standard municipal jurisdictions under IPC or UPC rules, venting plumbing lines directly out the side wall of a house is strictly prohibited because escaping sewer gases can drift back into windows, doors, or HVAC intake vents. However, certain local amendments or specialized engineered systems permit wall terminations under highly restricted conditions.
What Are Air Admittance Valves AAVs and Are They Allowed?
- Air Admittance Valve (AAV): A mechanical, one-way spring valve installed under sinks or inside walls that opens to draw air inward when negative pressure occurs during drainage, and seals shut automatically to block sewer gases.
- Code Acceptance: AAVs are widely permitted by modern building codes where tying into a traditional roof vent is structurally impossible, though local jurisdictions may restrict their use on primary building stacks or specific fixtures like island sinks.
What Happens If a Fixture Is Not Vented?
How to Properly Wet Vent a Toilet
Planning and installing a wet-vented toilet system requires precise layout execution and strict compliance with building codes. Whether you are remodeling a bathroom or planning new construction, reviewing the sequential planning steps, required materials, and professional standards ensures a safe and leak-free installation.
Before You Start: Check Code Permits and Fixture Limits
Prior to cutting any pipes or opening walls, verify your local municipal guidelines to determine whether your jurisdiction follows the International Plumbing Code (IPC) or the Uniform Plumbing Code (UPC). Always pull the required plumbing permits and verify that your total Drainage Fixture Unit (DFU) load stays within allowable limits for your pipe size.
Step-by-Step Wet Vent Layout Planning
- List All Connected Fixtures: Identify every fixture tying into the shared wet line, such as a bathroom sink, shower, and toilet.
- Verify Floor Level Constraints: Confirm that all wet-vented fixtures reside strictly on the same story or floor level.
- Determine Pipe Diameters: Select code-compliant pipe sizing—typically 2-inch minimum for the upper wet vent section scaling to 3 inches at the toilet branch.
- Map the Connection Points: Position the upstream venting fixture (like a lavatory sink) so that its drain drops directly down to act as the wet vent for the downstream toilet.
- Establish Proper Slope: Ensure all horizontal drain runs maintain a consistent downward slope of at least 1/4 inch per foot toward the main sewer line.
Tools and Materials Typically Needed
When to Call a Licensed Plumber
Plumbing modifications involving main stack connections, load-bearing framing cuts, or strict municipal code inspections carry high financial and structural risks if done incorrectly. If you are uncertain about fixture unit calculations, venting geometry, or local AHJ requirements, always hire a licensed professional plumber to guarantee code compliance and protect your home.
Can You Use a Wet Vent?
Before moving forward with a bathroom remodel or new installation, use this fast diagnostic checklist to determine whether a wet venting configuration is legally and functionally viable for your specific plumbing layout.
How to Read Your Results
- All “Yes” Answers: Your proposed layout aligns with standard code criteria, and a wet venting configuration is likely suitable for your project.
- Any “No” Answers: If you checked “No” to any question—such as mixing multi-story floors or exceeding DFU limits—wet venting is prohibited. You must switch to a traditional dry venting layout or consult a licensed professional plumber to redesign your system.
Wet Vent Problems: Signs of Failure and Troubleshooting
When a wet venting system encounters blockages, sizing miscalculations, or improper layouts, it immediately manifests noticeable operational failures. Recognizing the warning signs early helps homeowners prevent minor venting restrictions from escalating into severe sewage backups or costly structural repairs.
Signs a Wet Vent Isn’t Working
- Gurgling Drains: Bubbling or gurgling sounds coming from a sink or tub when the toilet flushes, signaling vacuum pressure sucking air through traps.
- Slow Draining Fixtures: Water lingering or draining sluggishly due to air-lock restrictions choking the interior pipe volume.
- Foul Sewer Odors: Unpleasant gas smells wafting around bathrooms, indicating that dry P-trap seals have been siphoned empty.
- Intermittent Trap Loss: Standing water disappearing from fixture traps due to unmitigated negative pressure surges.
Common Causes
How to Check a Plumbing Vent
Homeowners can perform basic visual inspections by checking the roof terminal for physical obstructions like bird nests, leaves, or frost buildup during freezing weather. If interior fixtures gurgle consistently while running water, inspect under sinks for functioning air admittance valves or call a professional to run diagnostic smoke or camera tests.
Plumber’s Tip Field Insight
Experienced field technicians frequently discover that recurring toilet gurgling isn’t caused by a localized clog, but rather by an obstructed roof vent stack choking the wet vent’s upper air space. Clearing the roof terminal instantly restores normal pressure equilibrium and resolves multi-fixture drainage sluggishness without needing to open up walls.
Pros and Cons of Wet Venting
Like any plumbing design strategy, wet venting offers distinct engineering advantages alongside notable limitations. Weighing these pros and cons helps homeowners and contractors determine whether a shared wet venting configuration is the right fit for their specific construction or remodeling project.
Advantages
- Reduced Material Costs: Combines drainage and venting into a single shared pipe, significantly lowering the total amount of PVC or ABS pipe required.
- Lower Labor Expenses: Fewer pipe runs and simplified connections mean faster installation times for plumbing professionals.
- Space Optimization: Perfect for compact wall cavities where running multiple parallel dry vent lines is physically impossible.
- Preserved Framing Integrity: Requires fewer holes to be drilled through wall studs and floor joists, keeping structural framing stronger.
Disadvantages and Limitations
Is Wet Venting Worth It?
For new construction or standard single-story bathroom layouts, wet venting is overwhelmingly worth it due to significant labor and material savings. However, for complex multi-story retrofits or older homes with rigid framing constraints, traditional dry venting or alternative mechanical solutions may ultimately prove safer and easier to install.
Wet Vent FAQs
What is the difference between a wet vent and a dry vent?
A wet vent serves a dual purpose by carrying fixture wastewater while simultaneously providing air ventilation for another fixture. In contrast, a dry vent is a dedicated pipe that exclusively carries air and never handles wastewater.
Can a toilet be part of a wet vent?
Yes, a toilet can be part of a wet vent system provided it connects downstream of an upper-level fixture like a bathroom sink. The pipe sizing must be properly upsized to handle solid waste flushes.
How far can a wet vent be from a toilet?
The maximum allowable distance depends on your local plumbing code and pipe diameter. Under standard IPC guidelines, a 3-inch toilet trap arm is generally limited to a maximum distance of 6 feet from the vent connection.
Can a shower and a toilet share the same vent?
Yes, a shower and a toilet can share a wet venting layout, but only when strict geometric rules, correct pipe slopes, and minimum 2-inch or 3-inch sizing requirements are strictly met.
What are the rules for a wet vent?
Wet vent rules mandate that all connected fixtures must reside on the same floor, total Drainage Fixture Units (DFUs) cannot exceed pipe capacity, and pipes must be upsized to maintain an open upper air channel.
Can a toilet be vented with a 2-inch pipe?
Yes, a toilet can be wet-vented with a 2-inch pipe under IPC rules if the total fixture unit load does not exceed 4 DFUs (typically one toilet and one sink). Always check local amendments for regional restrictions.
Can you vent a toilet without going through the roof?
While a primary stack must extend through the roof, individual fixtures can avoid direct roof runs by using approved wet venting networks or mechanical Air Admittance Valves (AAVs) where permitted by code.
Does each toilet need its own vent?
No, a toilet does not need an isolated standalone vent pipe. It can safely share a compliant wet vent or branch network connected to upstream bathroom fixtures.
How do you properly wet vent a toilet?
Properly wet venting a toilet requires checking local permits, planning a single-story layout with correct fixture order, using upsized 2-inch or 3-inch pipes, maintaining proper slope, and passing a pressure test.
When is wet venting not allowed?
Wet venting is prohibited across multiple building stories, when DFU fixture unit limits are exceeded, when high-discharge fixtures are placed upstream, or when local municipal codes ban the practice.
Is wet venting legal everywhere?
Wet venting is widely recognized under model codes like the IPC and UPC, but legality depends on your specific state, province, or local municipal amendments enforced by your Authority Having Jurisdiction (AHJ).
Conclusion and
Mastering the fundamentals of wet venting allows homeowners, apprentices, and DIY remodelers to optimize space, reduce material costs, and build highly efficient drainage systems. By following proper sizing rules, maintaining single-floor boundaries, and respecting local building codes, you ensure a safe and long-lasting plumbing network.
Final Takeaways
Wet vents successfully combine wastewater drainage and air ventilation into a single pipe by preserving an open upper air channel. When engineered correctly under IPC or UPC guidelines, they provide a reliable, space-saving alternative to traditional dry venting while protecting your home from sewer gases and trap siphonage.
Safety and Code Disclaimer
Plumbing systems directly impact structural safety, indoor air quality, and public health. Always consult your local Authority Having Jurisdiction (AHJ), verify regional plumbing codes, and work alongside a licensed professional plumber before altering main stacks, cutting framing, or undertaking complex drainage installations.

Oscar Vance | Master Plumber & Drainage Expert
Meet Oscar Vance, a licensed master plumber sharing practical solutions on residential repairs, preventive maintenance, and thoughtful home upkeep.

