How to Replace a Shower Head
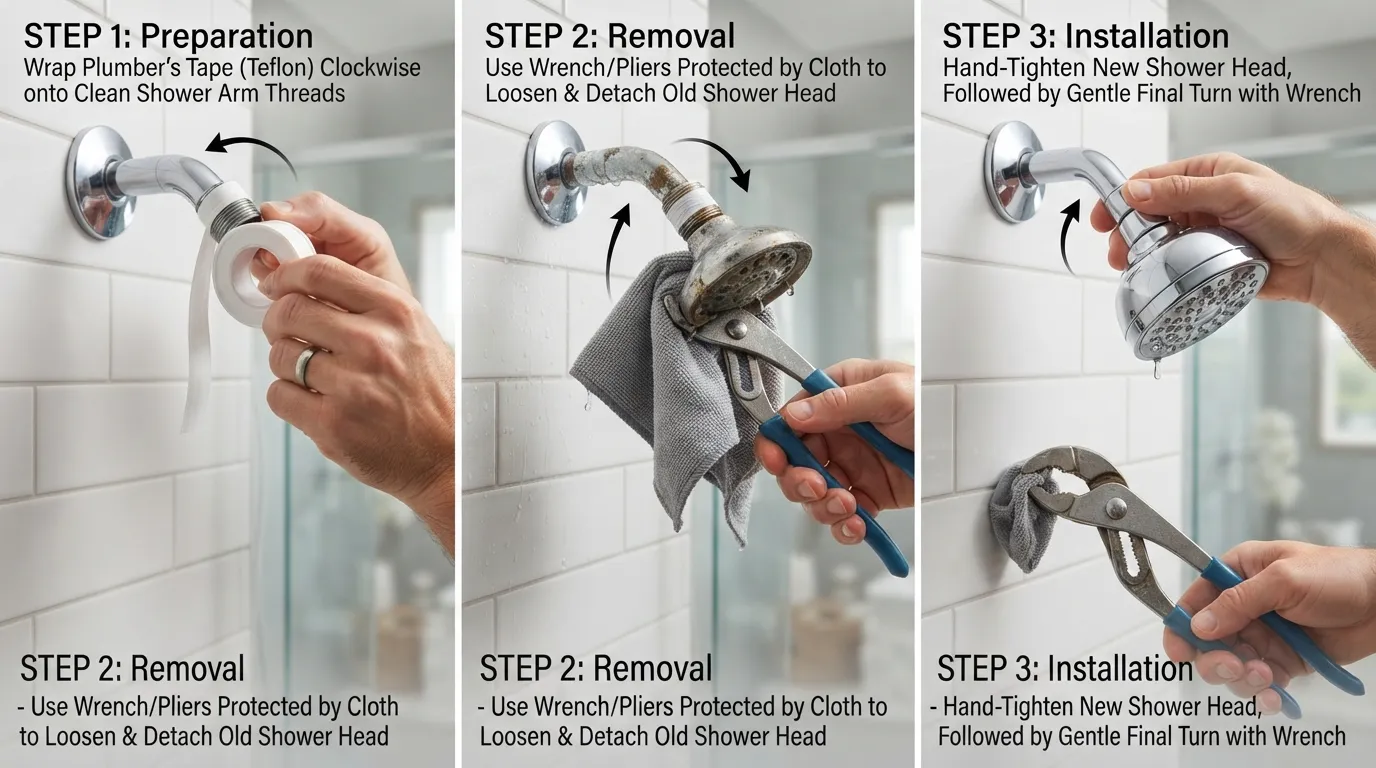
Replacing a shower head is a simple DIY project that typically takes less than 15 minutes and requires only basic tools. By unscrewing the old fixture counterclockwise, cleaning the threads, applying fresh plumber’s tape, and tightening the new shower head clockwise, you can instantly improve your bathroom’s water pressure and performance.
Process at a Glance
Upgrading your bathroom fixture requires careful execution of a few straightforward mechanical steps. Follow this rapid checklist to complete the swap cleanly and securely without leaks.
- Step 1: Unscrew the existing shower head by turning it counterclockwise by hand or gently using an adjustable wrench.
- Step 2: Clean the exposed shower arm threads thoroughly to remove any old debris, mineral buildup, or residual tape.
- Step 3: Wrap new Teflon tape clockwise around the threads 2 to 3 times to ensure a tight, water-resistant seal.
- Step 4: Thread the new shower head onto the arm by turning it clockwise until it is hand-tight and properly aligned.
- Step 5: Turn on the water supply to test for any leaks at the connection point, tightening slightly if necessary.
Tools & Materials You’ll Need
Gathering the correct equipment before you begin ensures a smooth replacement process without unexpected interruptions. Most standard installations rely on standard household hardware items.
- Adjustable Wrench: Used to grip stubborn or overtightened fixtures securely.
- Plumber’s Tape (Teflon Tape): Essential for sealing threaded joints and preventing water leaks.
- Channel Locks: Optional gripping tool helpful for stubborn older metal pipes.
- Clean Rag or Cloth: Used to protect the finish of your shower arm from wrench scratches and to wipe away debris.
- New Shower Head: Your replacement unit, selected to match your preferred spray patterns and bathroom decor.
Know Your Shower Head Type Before You Start
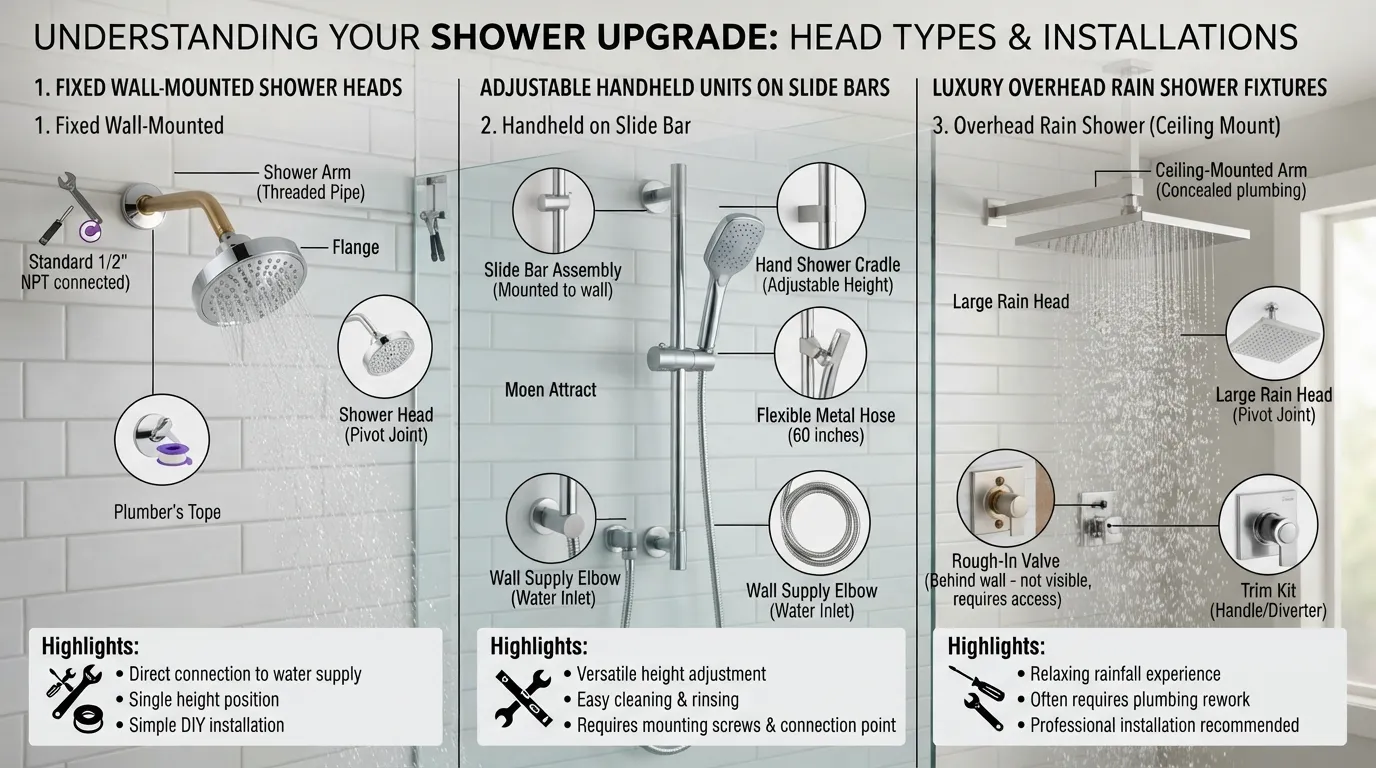
Identifying your existing shower fixture style ensures a seamless mechanical replacement and helps you select compatible hardware. Each variety connects slightly differently to the water supply pipe, requiring distinct considerations for alignment and support.
Fixed Wall-Mounted Shower Heads
Fixed shower heads attach directly to a rigid pipe extending from the wall, known as the shower arm. They stay permanently in one position, though many models offer adjustable spray angles via an internal ball joint.
- Connects straight to the threaded tip of the shower arm without extra tubing.
- Ideal for straightforward replacements and traditional bathroom setups.
- Requires minimal maintenance beyond occasional cleaning to prevent mineral clogs.
Handheld Shower Heads
Handheld models feature a flexible hose connected to a wall mount, allowing you to lift the fixture for targeted rinsing or cleaning. They combine the utility of a fixed unit with maximum versatility.
- Includes a mounting bracket that threads onto the primary shower arm.
- Comes with a flexible metal or reinforced plastic hose to transfer water.
- Perfect for bathing children, washing pets, and rinsing down shower walls.
Combo Shower Heads
Combo systems integrate both a fixed overhead rainfall shower and a secondary handheld unit into a single water source. They utilize a specialized diverter valve to switch between or combine water flows.
- Features a dual-outlet diverter valve that attaches to the main shower arm.
- Delivers customized showering experiences with multiple spray configurations.
- Requires careful tightening to support the extra weight of dual fixtures.
How to Identify Which Type You Currently Have
Determining your current hardware configuration takes only a few seconds of visual inspection. Check where the fixture connects to the wall pipe and whether an auxiliary hose is present.
- Examine the connection: Look to see if the main body screws directly onto the wall pipe or into a separate mounting bracket.
- Check for flexible tubing: Notice if a hose runs from a base mount to the shower handle, indicating a handheld system.
- Inspect for a diverter: Look for a small lever or toggle switch that splits water between two separate shower outputs.
Will Any Shower Head Fit Your Shower?
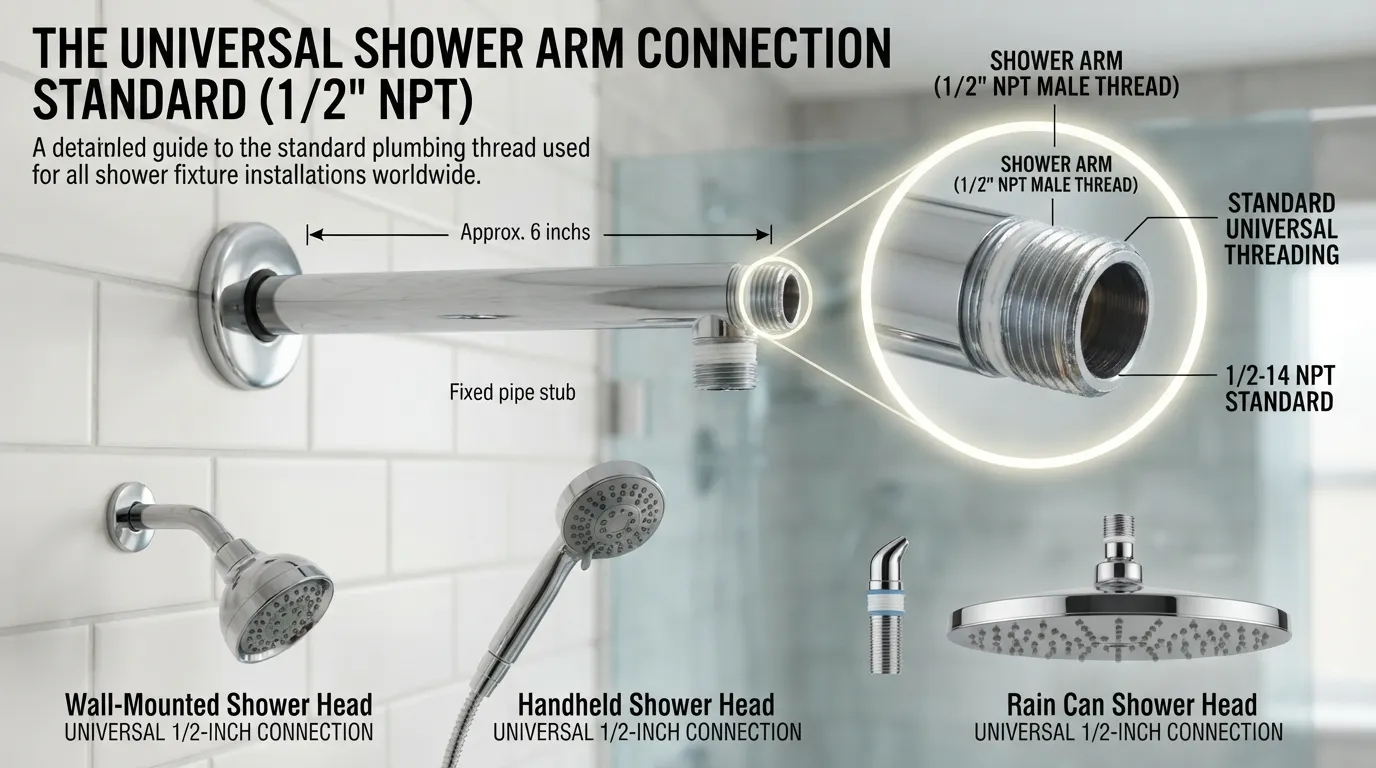
Most residential shower heads are designed with universal threading, meaning almost any standard replacement will fit your existing shower arm. However, confirming your pipe dimensions and connection style beforehand prevents unexpected installation delays.
Standard Thread Size Explained ½ Inch NPT
Virtually all modern American and international residential shower arms use a standardized half-inch National Pipe Thread (NPT) standard. This universal compatibility ensures that you can mix and match brands when purchasing a new fixture.
- The standard male threaded end on the shower arm measures roughly half an inch in diameter.
- New shower heads come with matching female internal threads designed to screw directly onto this pipe.
- Always check the manufacturer specifications on specialty luxury or imported models to verify thread sizing.
When You Might Need an Adapter
While standard sizing is the norm, older homes, custom luxury builds, or international plumbing systems can sometimes feature non-standard connections. Using an adapter bridge allows you to resolve these sizing discrepancies safely.
- Older properties or proprietary designer fixtures may utilize metric or three-quarter-inch threading.
- You can find brass conversion adapters at local hardware stores to bridge size differences.
- Ensure you use matching thread sealant or tape on both sides of the adapter to prevent leaks.
Handheld vs Fixed Compatibility Notes
Transitioning from a fixed shower head to a handheld model or a complex combo system is generally straightforward because the primary wall connection remains identical. The mounting bracket still screws directly onto the existing shower arm.
- The connection point at the shower arm is universally compatible across fixed and handheld designs.
- Heavier combo units may place extra strain on older, loose shower arms, requiring secure tightening.
- Verify that the included mounting bracket fits your wall space without blocking other trim elements.
How to Replace Your Shower Head
Replacing your old shower head takes under 15 minutes and requires no specialized plumbing experience [00:00:12]. Following this sequential guide ensures a clean, leak-free installation without damaging your wall pipe [00:01:30].
Step 1: Turn Off the Water Yes or No? Clarify the Confusion
You generally do not need to shut off your main home water supply to change a standard shower head. The shower valve handle in the off position blocks water flow past the pipe, keeping the workspace dry.
- Leave your main water valve alone unless your shower handle leaks or fails to shut off completely.
- Keep the bathroom shower handle firmly in the “off” position while working.
- Test that no water drips from the pipe before beginning your disassembly.
Step 2: Prep the Area Towel Drain Cover
Protecting your workspace prevents accidental loss of small components down the drain [00:00:28]. Minimal preparation keeps the installation process smooth and organized [00:00:24].
- Lay a thick towel across the bottom of the tub or shower floor to cushion falling tools.
- Cover the open drain securely with a rag or tape to prevent small screws or washers from falling down [00:00:28].
- Keep your tools and new hardware laid out within arm’s reach.
Step 3: Remove the Old Shower Head
Detaching the existing fixture requires turning it counterclockwise relative to the wall arm. Use a wrench if the connection is tight due to accumulated mineral deposits.
- Grip the base of the old shower head firmly with an adjustable wrench or channel locks.
- Turn the fixture counterclockwise to loosen the threaded seal.
- Unscrew the remaining threads by hand and pull the old unit completely away from the shower arm.
Step 4: Clean the Threads Rust & Mineral Deposits
Preparing the exposed metal pipe ensures a smooth, even surface for your new seal. Removing debris prevents future water leaks [00:00:54].
- Peel off any old, frayed plumber’s tape left behind on the pipe threads [00:00:54].
- Scrub the male threads with a wire brush or coarse cloth to eliminate mineral deposits [00:00:54].
- Wipe the shower arm completely dry with a clean towel.
Step 5: Apply Plumber’s Tape Correctly
Wrapping Teflon tape around the pipe threads creates a watertight barrier. Proper directionality ensures the tape stays tight as you screw on the new head.
- Hold the end of the plumber’s tape against the threads with your thumb.
- Wrap the tape clockwise 2 to 3 times around the shower arm threads [00:00:59].
- Tear the tape cleanly and press the loose end firmly into the grooves.
Step 6: Install the New Shower Head
Mounting your new fixture requires careful hand-tightening to avoid stripping the metal threads. Align the inner female threads straight onto the prepared pipe.
- Screw the new shower head clockwise onto the taped shower arm by hand.
- Ensure the threads catch smoothly without cross-threading or wobbling.
- Tighten securely by hand, giving a final gentle nudge with a wrench if required.
Step 7: Check for Leaks & Final Tightening
Testing your new installation verifies that the seal holds under water pressure [00:01:30]. Quick adjustments can resolve any minor drips immediately [00:01:34].
- Turn on the shower handle to check for leaks around the connection point [00:01:30].
- If water seeps through the threads, turn off the water, apply extra plumber’s tape, and tighten slightly more with a wrench [00:01:34].
- Wipe down your new fixture and enjoy your upgraded shower experience.
How to Change a Shower Head Without a Wrench
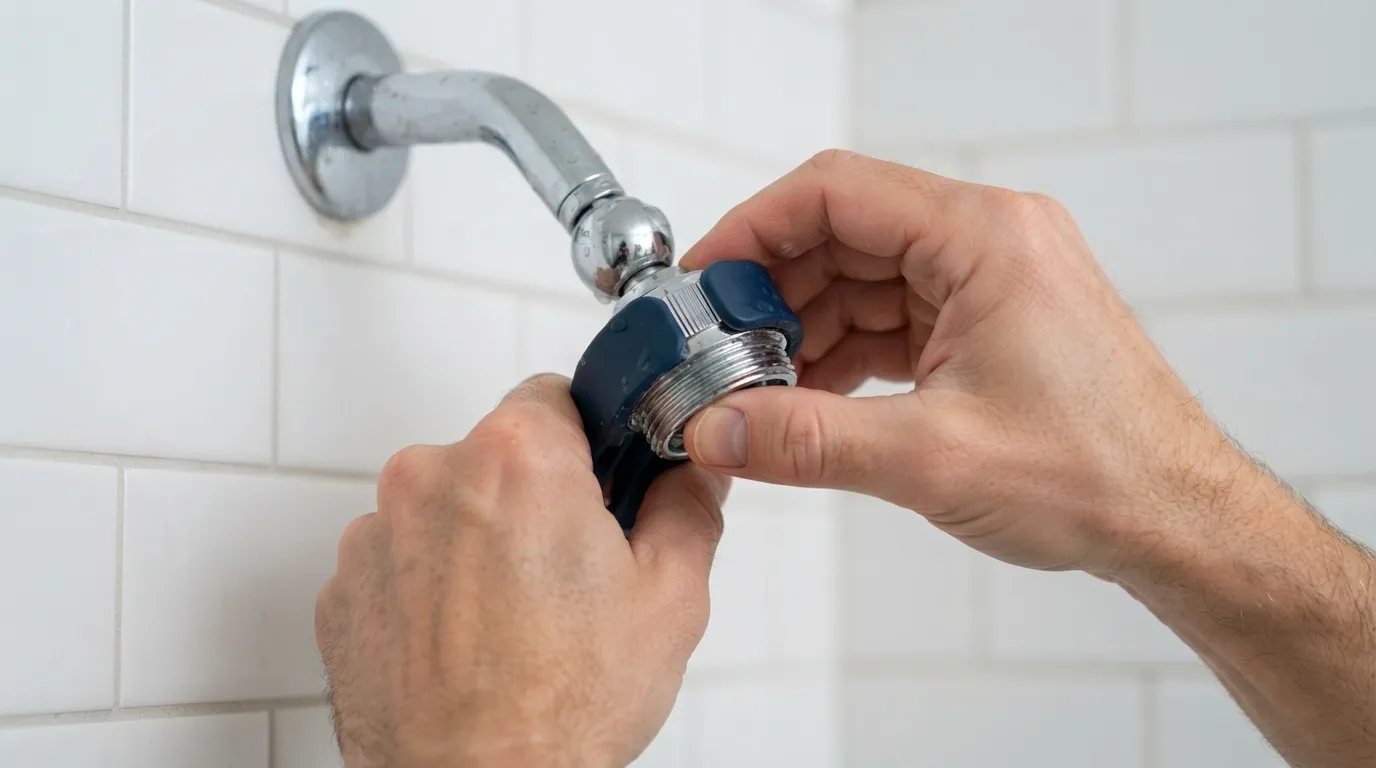
You can easily replace many modern shower heads completely by hand without using any tools at all. Manufacturers design contemporary residential fixtures with textured collars or easy-grip handles specifically to allow tool-free installation.
Hand-Tightening Method
Many tool-free shower heads feature large plastic or rubberized collars that provide sufficient leverage for a watertight seal. Hand-tightening also protects decorative metal finishes from accidental tool scratches.
- Ensure the shower arm threads are wrapped properly with fresh Teflon tape before starting.
- Screw the new fixture clockwise onto the pipe until you meet firm resistance.
- Twist firmly with your bare hands to secure the connection tightly against the rubber washer inside.
Using a Rubber Grip or Cloth for Extra Torque
If your hands slip on a smooth metal finish or you need a little extra leverage, household items can provide a secure grip without scratching the surface.
- Wrap a thick rubber jar-opener pad around the shower head collar to instantly maximize your grip friction.
- Alternatively, fold a clean cloth or washcloth tightly around the fixture before twisting by hand.
- Apply steady rotational force clockwise until the connection feels snug and secure.
When You Absolutely Need a Tool
While hand-tightening works for most installations, certain situations demand mechanical assistance to break stubborn seals or overcome tight factory torque.
- Old, heavily corroded fixtures fused together by mineral deposits usually require an adjustable wrench.
- Heavy metallic luxury rain cans or combo units often need extra wrench torque to support their weight safely.
- Always wrap the metal fixture jaws in thick tape or cloth to prevent scratching when tools become necessary.
How to Remove a Stuck Rusted or Fused Shower Head
Stubborn shower heads fused together by years of calcium deposits or rust require specific techniques to loosen safely without twisting or breaking the wall pipe. Applying proper leverage and chemical dissolvents resolves even the most frozen fittings.
Why Shower Heads Get Stuck Rust Mineral Buildup Overtightening
Over time, hard water minerals crystallize inside the threaded joints, cementing the shower head to the arm. Combined with excessive initial tightening, this creates a near-solid bond between the metals.
- Hard water mineral deposits accumulate inside the threads and harden like concrete.
- Corrosion and rust can fuse brass or aluminum components tightly together.
- Overtightening during previous installations compresses metal threads beyond normal tolerances.
Using Heat or Penetrating Oil for Fused Fixtures
When brute force fails to budge a stuck fixture, chemical lubricants or thermal expansion can break the mineral bond. Applying these methods protects your plumbing from structural damage.
- Spray a commercial penetrating oil like WD-40 Specialist directly onto the threaded joint and let it sit for 15 minutes.
- Tap the collar gently with a wrench handle to help micro-vibrations shake the loosened minerals free.
- Wrap a warm, wet towel around the connection briefly if thermal expansion is needed to expand the outer collar.
When to Cut Your Losses and Replace the Arm
If a shower arm begins twisting, bending, or cracking inside the wall during removal attempts, continuing to force it risks catastrophic plumbing leaks [00:00:20]. Replacing the entire arm is often faster and safer than fighting a completely ruined joint.
- Stop immediately if the wall pipe rotates or feels loose inside the tiled wall.
- Unscrew the entire shower arm counterclockwise from the internal drop-ear elbow if it remains hopelessly fused to the old head.
- Install a fresh, inexpensive replacement shower arm along with your new shower head for a completely renewed setup.
How to Remove a Stuck Rusted or Fused Shower Head
Stubborn shower heads fused together by years of calcium deposits or rust require specific techniques to loosen safely without twisting or breaking the wall pipe. Applying proper leverage and chemical dissolvents resolves even the most frozen fittings.
Why Shower Heads Get Stuck Rust Mineral Buildup Overtightening
Over time, hard water minerals crystallize inside the threaded joints, cementing the shower head to the arm. Combined with excessive initial tightening, this creates a near-solid bond between the metals.
- Hard water mineral deposits accumulate inside the threads and harden like concrete.
- Corrosion and rust can fuse brass or aluminum components tightly together.
- Overtightening during previous installations compresses metal threads beyond normal tolerances.
Using Heat or Penetrating Oil for Fused Fixtures
When brute force fails to budge a stuck fixture, chemical lubricants or thermal expansion can break the mineral bond. Applying these methods protects your plumbing from structural damage.
- Spray a commercial penetrating oil like WD-40 Specialist directly onto the threaded joint and let it sit for 15 minutes.
- Tap the collar gently with a wrench handle to help micro-vibrations shake the loosened minerals free.
- Wrap a warm, wet towel around the connection briefly if thermal expansion is needed to expand the outer collar.
When to Cut Your Losses and Replace the Arm
If a shower arm begins twisting, bending, or cracking inside the wall during removal attempts, continuing to force it risks catastrophic plumbing leaks [00:00:20]. Replacing the entire arm is often faster and safer than fighting a completely ruined joint.
- Stop immediately if the wall pipe rotates or feels loose inside the tiled wall.
- Unscrew the entire shower arm counterclockwise from the internal drop-ear elbow if it remains hopelessly fused to the old head.
- Install a fresh, inexpensive replacement shower arm along with your new shower head for a completely renewed setup.
How to Replace a Shower Head Arm
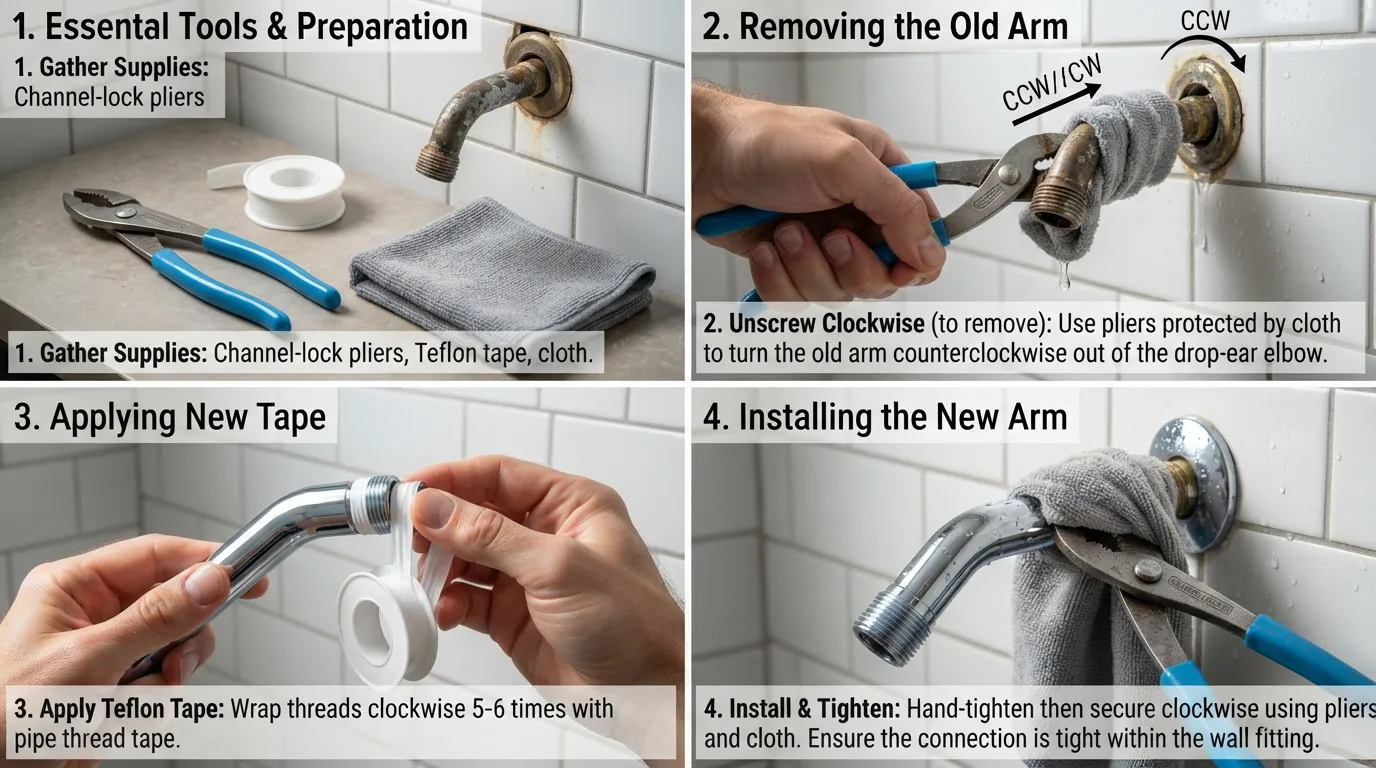
Replacing the shower arm along with your shower head is necessary if the existing pipe is rusted, bent, or leaking from the wall connection. Swapping the entire assembly takes only a few extra minutes and provides a completely fresh plumbing connection.
Signs Your Shower Arm Needs Replacing
Recognizing structural wear helps you decide when a simple head swap is not enough to fix your bathroom plumbing issues. Damaged pipes require full replacement to prevent hidden water leaks behind the wall.
- Persistent water leaks originating from where the pipe meets the wall flange.
- Visible rust, corrosion, or pitting along the length of the exposed metal arm.
- A wobbly or loose connection that spins freely inside the wall fitting.
Tools Needed for Arm Replacement
Gathering the right specialty tools ensures you can grip and unscrew the rigid pipe securely without damaging your bathroom tiles. Proper equipment makes removing threaded wall connections safe and efficient.
- Pipe Wrench or Channel Locks: Provides the heavy-duty grip required to turn smooth metal pipes.
- Plumber’s Tape (Teflon Tape): Essential for sealing both ends of the new shower arm.
- Wall Flange (Escutcheon): The decorative metal plate that covers the hole where the pipe enters the wall.
- Replacement Shower Arm: A standard half-inch threaded pipe matching your bathroom’s finish and length requirements.
Step-by-Step Arm Removal & Installation
Exchanging the old arm for a new one follows a straightforward sequence of unthreading, sealing, and re-securing. Taking your time prevents cross-threading into the internal wall fitting.
- Step 1: Unscrew the old shower arm by gripping it firmly with a pipe wrench and turning counterclockwise.
- Step 2: Slide the decorative wall flange off the old pipe and inspect the internal wall elbow threads for debris.
- Step 3: Wrap fresh Teflon tape clockwise 3 to 4 times around the male threads on both ends of the new shower arm.
- Step 4: Slide the new wall flange onto the pipe before screwing the arm clockwise into the wall fitting until tight and properly oriented downward.
- Step 5: Attach your new shower head to the exposed end, then run the water to verify there are no leaks at either connection point.
Replacing Shower Head and Handle Together
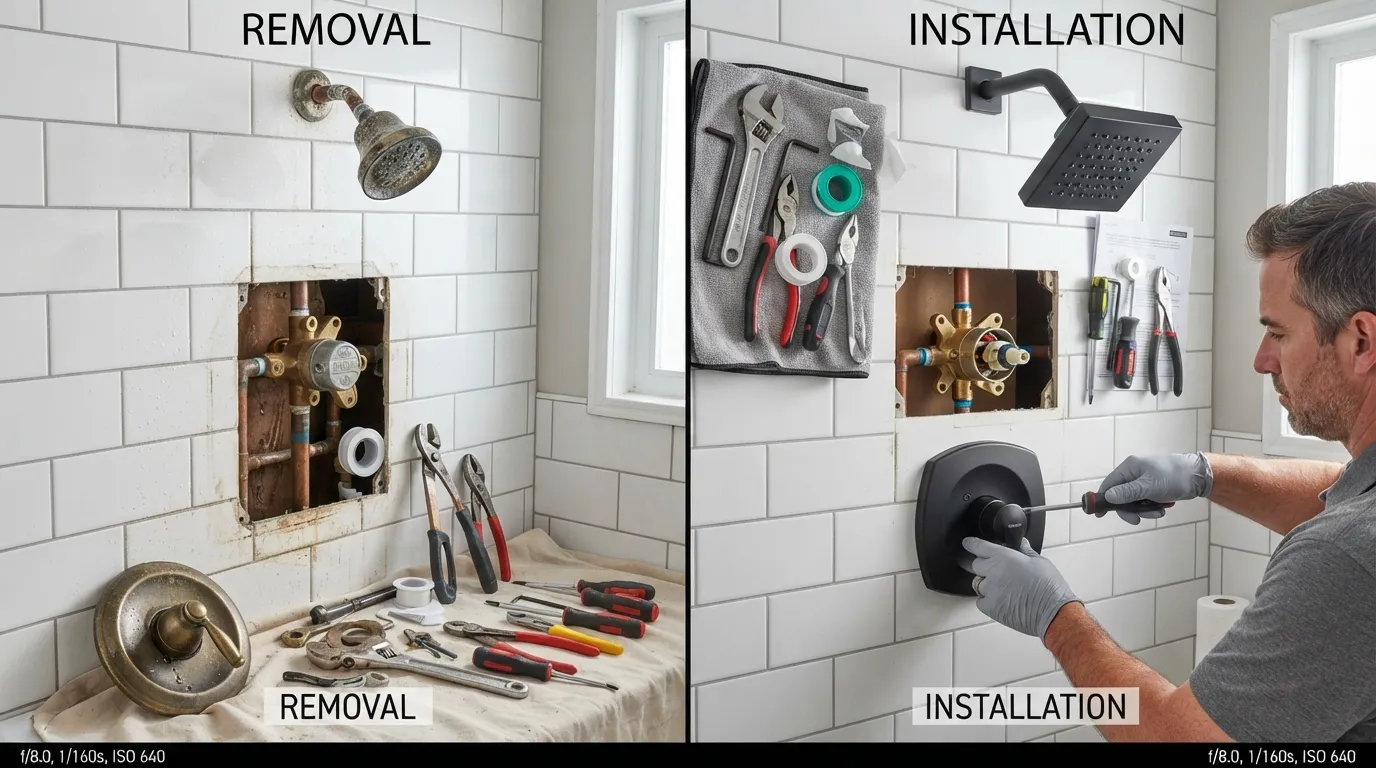
Upgrading your shower head and handle simultaneously ensures a matching aesthetic and replaces worn internal valve components. This comprehensive project modernizes your entire shower control system and prevents future leaks.
When You Need to Replace Both
While changing a shower head is a simple external fix, upgrading the handle usually involves working with the underlying mixing valve. Doing both at the same time is ideal during bathroom renovations or when addressing mechanical failures.
- Your existing shower handle leaks, feels loose, or fails to regulate water temperature accurately.
- You are remodeling the bathroom and want all visible hardware finishes to match perfectly.
- The new shower head manufacturer requires a specific matching pressure-balancing valve trim kit.
Combo Kit Installation Overview
Replacing a valve trim kit and handle alongside your shower head requires turning off the main home water supply before removing the faceplate. Careful adherence to the manufacturer instructions ensures proper cartridge alignment.
- Shut off your main water supply line and drain any residual water from the system.
- Remove the existing handle escutcheon plate and unscrew the old trim components.
- Install the new valve sleeve, handle adapter, and decorative faceplate according to the kit instructions.
- Finish by attaching your new shower head to the shower arm, turn the water back on, and test the entire assembly for leaks.
How Often Should You Replace Your Shower Head?
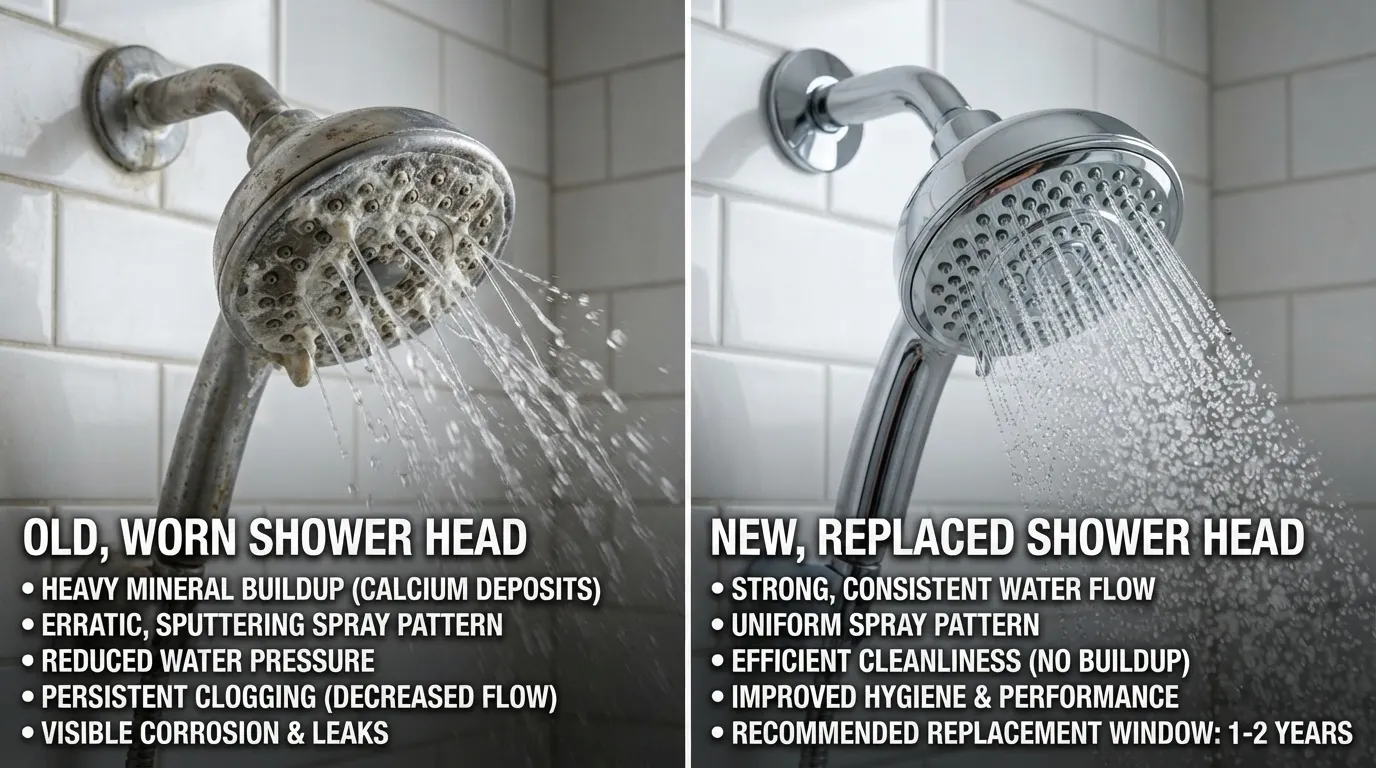
While shower heads can technically last for many years if maintained properly, routine replacement is often recommended for optimal hygiene and water performance. Regular upgrades prevent hidden bacterial accumulation and mineral restrictions.
Average Lifespan of a Shower Head 6 Months to 1-2 Years
Most standard residential shower heads perform at their best for one to two years before internal mineral buildup or rubber seal degradation begins to impact functionality. High-hardness water areas may require more frequent maintenance or replacements.
- Standard plastic and budget metal models typically degrade or clog significantly within 12 to 24 months.
- High-end brass or stainless steel fixtures can last indefinitely if they are regularly descaled and cleaned.
- Internal rubber washers and gaskets naturally dry out and crack over time, leading to minor slow leaks.
Signs It’s Time for a Replacement Low Pressure Mold Mineral Clogs
Monitoring your fixture’s performance helps you identify when cleaning is no longer sufficient and a full swap is necessary. Persistent performance issues signal internal wear.
- Uneven spray patterns or blocked nozzles caused by stubborn calcium carbonate crusting.
- Unexplained drops in water pressure even after clearing external nozzle openings.
- Visible black mold or pink slime accumulation inside the fixture chambers that cannot be reached with a brush. Research from the Centers for Disease Control and Prevention highlights how stagnant moisture in bathroom fixtures can harbor opportunistic pathogens if left unmaintained.
How to Extend Your Shower Head’s Life Cleaning Tips
Regular maintenance routines can significantly prolong the operational life of your shower head and keep water flowing smoothly. Simple cleaning steps prevent premature hardware failure.
- Soak the entire detachable shower head in a bag filled with white vinegar overnight to dissolve hard water scale.
- Scrub the rubber spray nozzles gently with an old toothbrush to dislodge remaining mineral flakes.
- Flush the clean fixture with running water before reattaching it to the shower arm.
DIY vs Hiring a Plumber Cost & Time Comparison

Deciding whether to tackle a shower upgrade yourself or hire a professional depends on the complexity of the project and your plumbing’s current condition. Most standard replacements are simple weekend DIY tasks, but specialized in-wall work requires expert help.
Average Time to DIY 15-30 Minutes
Replacing a standard shower head or shower arm independently takes very little time and requires zero prior plumbing experience. Having your basic tools gathered beforehand ensures the entire job wraps up quickly.
- Swapping out a standard shower head typically takes between 10 to 15 minutes.
- Replacing a stuck or rusted shower arm might extend your project time to roughly 30 minutes.
- Doing it yourself saves you the standard minimum service call fee charged by professional local contractors.
Average Plumber Cost Estimate
Hiring a licensed professional plumber for a straightforward fixture swap is rarely cost-effective due to service dispatch minimums. However, hiring out becomes necessary when dealing with complex behind-the-wall plumbing.
- Standard professional service call fees and hourly rates for basic fixture replacements typically range from $150 to $300.
- Complex valve replacements or custom plumbing rerouting can easily push total labor and material costs past $500.
- DIY replacements cost only the retail price of the new shower head and a roll of plumber’s tape.
When DIY Is NOT Recommended Fused Pipes In-Wall Installation
While surface-level upgrades are beginner-friendly, certain advanced plumbing situations carry high risks of costly water damage if mishandled. Knowing your limits prevents accidental structural damage.
- Call a professional if your shower arm is completely fused inside the wall fitting and twists or bends when you apply wrench pressure.
- Hiring an expert is essential when installing new mixing valves, custom body sprayers, or altering in-wall water supply lines.
- Persistent hidden leaks behind tiles require professional detection and repair to prevent mold and wood rot.
Common Mistakes to Avoid

Avoiding common installation errors ensures your shower head setup remains leak-free and undamaged. Knowing these typical pitfalls protects both your new hardware and your bathroom plumbing.
Overtightening and Cracking the Fixture
Applying excessive force with a wrench is one of the most frequent mistakes DIYers make during installation. Too much torque can easily snap metal threads or crack plastic internal components.
- Always stop turning as soon as the fixture meets firm, solid resistance against the washer.
- Avoid using maximum leverage on wrenches when tightening plastic shower head connectors.
- Rely on your plumber’s tape to create the water seal rather than extreme mechanical pressure.
Not Using Enough Plumber’s Tape
Skimping on Teflon tape or wrapping it in the wrong direction often leads to frustrating leaks right after installation. Proper application is essential for a secure, watertight joint.
- Wrap the tape firmly around the shower arm threads 2 to 3 times for standard installations.
- Always wrap in a clockwise direction so the tape does not unspool as you screw on the new head.
- Ensure you remove all old, frayed tape fragments before applying a fresh layer.
Ignoring Small Leaks After Installation
Leaving a minor drip unattended can lead to water waste, mineral crust buildup, and long-term corrosion. Even a slow leak requires immediate correction to protect your fixtures.
- Test your newly installed shower head thoroughly by running water at full pressure.
- Check the base connection and any hose fittings with your fingertips to detect hidden moisture.
- If water seeps through, unthread the fixture, add a little extra tape, and tighten slightly.
Using Wrong Wrench Size Scratching Finish
Using ill-fitting tools or failing to protect decorative surfaces often results in unsightly cosmetic damage. Standard metal wrenches can easily gouge polished chrome or brushed nickel finishes.
- Always wrap the jaws of your wrench in a thick cloth or painter’s tape before gripping metal collars.
- Select an adjustable wrench that matches the exact dimensions of your fixture’s flat edges.
- Hand-tighten whenever possible to eliminate the risk of accidental tool slips and scratches.
Frequently Asked Questions
Find direct answers to the most common questions about replacing, repairing, and maintaining your shower head and plumbing fixtures.
Can I replace a showerhead myself?
Yes, replacing a shower head is an exceptionally beginner-friendly DIY project that requires no special plumbing experience. Most installations take less than 15 minutes using only an adjustable wrench and plumber’s tape.
- No professional licensing or specialized tools are required for standard wall-mounted fixtures.
- Clear, step-by-step instructions make it easy for anyone to complete successfully.
Do you need to shut the water off when changing a shower head?
You generally do not need to shut off your main home water supply. As long as your shower handle is firmly in the closed position, the internal valve stops water flow to the shower arm.
- Keep the shower handle turned completely off while you work.
- Only shut off your main supply if the shower valve leaks or fails to seal properly.
Can I just unscrew my shower head?
Yes, standard shower heads simply unscrew by turning them counterclockwise relative to the wall pipe. If mineral buildup makes it stubborn, a gentle grip with an adjustable wrench will help break the seal.
- Turn counterclockwise to loosen and remove the old fixture.
- Protect polished finishes with a cloth or tape if using metal tools.
Can I replace my shower head with any shower head?
Almost all residential replacement shower heads are universally compatible with standard plumbing. As long as your home uses standard connections, any retail model will screw right on.
- Verify that the replacement features standard threading dimensions.
- Check specialty luxury imports for proprietary connection requirements.
Do all shower heads fit each other?
Virtually all standard American and international shower heads fit standard shower arms because they use a universal half-inch NPT thread size. This standardization lets you upgrade brands easily.
- Standard half-inch male threads match standard female inlets.
- Adapters are available for rare non-standard or older custom pipes.
How do I know what shower head will fit my shower?
You can confirm your shower head compatibility by checking your existing shower arm, which typically features a standard half-inch threaded male connection. Most residential systems follow this exact universal standard.
- Inspect the exposed pipe threads where the current head attaches.
- Measure non-standard or older antique pipes if you suspect unique sizing.
How do you fix a shower head that keeps coming off?
A shower head that repeatedly loosens usually lacks sufficient Teflon tape or a secure internal rubber washer. Reapplying fresh plumber’s tape clockwise and tightening snugly resolves the issue.
- Wrap the pipe threads with 2 to 3 layers of fresh plumber’s tape.
- Ensure the internal rubber O-ring or washer is seated correctly inside the inlet.
How do you fix a shower head that has fallen off its holder?
If a handheld shower head has detached from its wall mount or bracket, inspect the cradle for broken clips or loose mounting screws. Tightening the bracket mounting hardware or replacing a snapped cradle fixes the problem.
- Check the wall anchor screws on the mounting bracket.
- Replace broken plastic cradles with compatible universal replacement brackets.
Is it difficult to change a shower head?
Changing a shower head is not difficult and ranks as one of the easiest home improvement tasks. The entire process requires minimal physical effort and basic household tools.
- Most homeowners complete the swap in under 15 minutes.
- No heavy lifting or complicated pipe cutting is involved.
How do you replace a shower head and supply lines?
Replacing a shower head along with its water supply arm involves unscrewing the old fixture, unthreading the rigid pipe from the wall fitting, wrapping both ends with Teflon tape, and screwing in new components.
- Remove the old shower head and counter-rotate the wall arm out of its drop-ear elbow.
- Wrap both male ends of the new shower arm with fresh plumber’s tape before installation.
Conclusion Final Recap
Replacing your shower head is one of the quickest, most rewarding DIY plumbing projects you can tackle. By following the correct steps—from removing the old fixture and cleaning the threads to applying fresh plumber’s tape and hand-tightening your new upgrade—you can instantly enhance your bathroom’s performance without paying costly contractor fees.
- Most shower upgrades take less than 15 minutes and require only basic household tools like an adjustable wrench and Teflon tape.
- Universal half-inch threading ensures that almost any new shower head will fit seamlessly onto your existing wall arm.
- Routine maintenance, such as occasional vinegar descaling, keeps your fixture running efficiently for years to come.

Oscar Vance | Master Plumber & Drainage Expert
Meet Oscar Vance, a licensed master plumber sharing practical solutions on residential repairs, preventive maintenance, and thoughtful home upkeep.

