Introduction & Project Overview
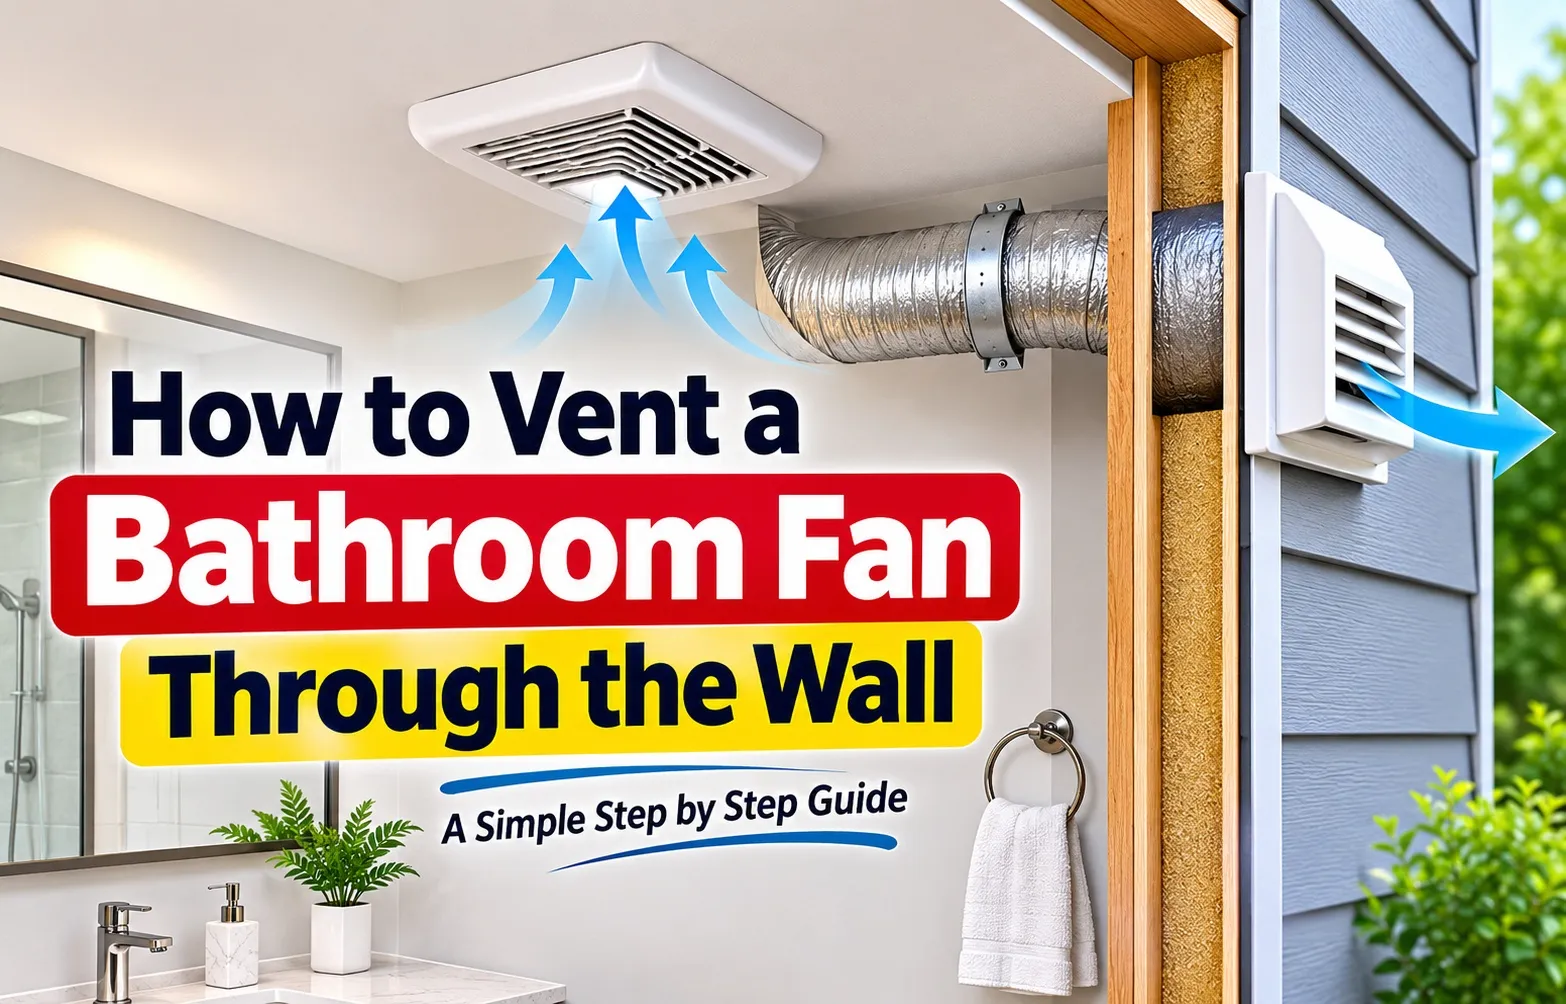 Venting a bathroom exhaust fan directly through an exterior wall is the most efficient and straightforward method to eliminate excess indoor humidity without cutting into your roof. By running short, straight ductwork straight out of the nearest side wall, you protect your framing from moisture damage while bypassing the complexities of attic crawling and roof shingle penetration.
Why Choose Sidewall Venting Over Roof Venting?
Sidewall venting offers superior airflow efficiency and significantly reduces installation risks compared to traditional roof routing. Roof vents are notoriously prone to ice dams, heavy wind-driven rain leaks, and long, winding duct runs that force the fan motor to work harder and wear out prematurely.
- Shorter duct runs maintain higher cubic feet per minute (CFM) airflow performance.
- Exterior wall penetrations are much safer and easier to seal against water leaks than sloped roofs.
- Maintenance, cleaning, and damper inspections from ground level or a short ladder take minutes instead of hours.
- Eliminates the danger of condensation pooling inside long vertical attic ducts during freezing winter months.
Can You Do This Yourself? (Skill Level & Time Estimate)
This project is perfectly suited for intermediate DIYers and homeowners comfortable with basic power tools like drills and hole saws. With the right preparation, layout, and safety checks, you can complete the entire installation in a single afternoon.
- Skill Level: Moderate DIY (requires drilling exterior walls and basic ladder safety).
- Estimated Time: 2 to 4 hours from initial layout to final weather-resistant sealing.
- Required Core Tools: Stud finder, drill, exterior hole saw, caulking gun, and measuring tape.
- Key Milestone: Successfully establishing a clean exterior exit point aligned with your interior fan housing.
Essential Tools, Materials, and Safety Checklist
Gathering the correct tools, materials, and safety gear before starting your bathroom fan wall installation prevents frustrating mid-project delays. Having everything staged and ready ensures a smooth workflow from your interior wall out to the exterior siding.
Complete Tool & Equipment Checklist
Having specialized cutting and sealing equipment on hand ensures clean penetrations and a weather-tight finish. Invest in quality cutting accessories so you don’t crack exterior stucco, vinyl, or wood siding during the core-cutting process.
- Stud Finder: Essential for locating wall studs and verifying clear interior pathways.
- Power Drill & Long Pilot Bit: Used to drill a pilot hole straight through to the exterior wall.
- Hole Saw (4-inch to 4.5-inch): Matches your duct diameter to cut through exterior sheathing and siding.
- Caulking Gun & Exterior-Grade Silicone Caulk: Provides a durable, waterproof seal around the exterior flange.
- Safety Glasses & Dust Mask: Protects your eyes and lungs from falling insulation, drywall dust, and wood debris.
Choosing the Right Vent Kit & Duct Material (Rigid vs. Flex Warning)
Selecting durable duct components directly impacts your fan’s efficiency and lifespan. Avoid cheap flexible foil ducting, which sags, catches lint, and creates massive airflow resistance that causes premature motor burnout.
- Louvered Vent Cap with Backdraft Damper: Prevents cold outdoor air, insects, and rain from blowing back into your bathroom when the fan is off.
- Rigid or Semi-Rigid Aluminum Ducting: Smooth interior walls allow maximum CFM airflow and prevent moisture buildup.
- UL-Approved Foil HVAC Tape: Seals duct joints airtight (never use standard duct tape, which degrades over time).
- Metal Hose Clamps: Securely locks the ducting to both the fan housing collar and the exterior vent tailpiece.
Safety First: Checking for Hidden Wires and Pipes
Cutting blindly into an interior wall risks striking live electrical cables, water supply pipes, or hidden drain lines. Always perform a thorough diagnostic check of the wall cavity before bringing out the high-speed hole saw.
- Turn Off Circuit Breakers: Power down the bathroom lighting and receptacle circuits at your main electrical panel before working near wall cavities.
- Scan with an Electronic Stud Finder: Use a multi-mode scanner capable of detecting AC voltage, live wires, and wooden framing.
- Inspect the Attic or Crawlspace: If your bathroom has an accessible ceiling space above the wall, verify what runs vertically inside that specific stud bay.
- Probe with a Pilot Bit First: Drilling a small 0.25-inch pilot hole lets you safely confirm that the exterior exit path is clear of external utilities or gas lines.
Planning the Route and Locating the Exit Point
Planning your exact duct route and marking the exit point on your exterior wall ensures a clean, professional installation without hitting hidden structural barriers. Careful upfront layout prevents costly patching and guarantees maximum fan efficiency.
Finding the Shortest, Straightest Path to the Outside
Locate your bathroom exhaust fan housing and identify the nearest exterior wall that leads directly outdoors. Keeping your duct route as short and straight as possible maximizes airflow and prevents moisture from accumulating in bends.
- Measure the distance from the fan’s exhaust port to the intended exterior wall penetration.
- Avoid unnecessary 90-degree elbows or sharp twists that severely restrict airflow performance.
- Ensure the exterior exit point terminates well away from windows, doors, or soffit vents to prevent exhaust air from re-entering the home.
Using a Stud Finder to Avoid Obstacles
Never cut into an exterior wall without checking for hidden interior framing members, electrical wiring, or plumbing lines. A reliable stud finder helps you map a clear corridor between studs.
- Scan the interior wall surface around your planned exit point to locate vertical wall studs.
- Switch your stud finder to AC detection mode to scan for hidden electrical cables running through the cavity.
- Verify that no water supply lines, drain pipes, or vent stacks occupy the target stud bay.
Drilling the Pilot Hole (From Inside to Outside)
Drilling a small pilot hole bridges your interior layout to the exterior siding, giving you a precise centering mark for your larger hole saw.
- Hold your long pilot drill bit level and centered on the desired exit spot inside the bathroom wall.
- Drill slowly straight through the drywall, wall cavity insulation, exterior sheathing, and siding.
- Go outside and inspect the pilot bit’s exit point on the exterior wall to ensure it clears any siding trim, electrical meters, or foundation lines.
Step 2 – Cutting the Exterior and Interior Holes
Cutting precise, clean openings through your exterior siding and interior drywall ensures your vent hood and ducting fit snugly without gaps. Using the correct hole saw size prevents structural damage and makes weatherproofing much easier.
Cutting the Exterior Siding and Sheathing with a Hole Saw
Your exterior penetration must match the exact outer diameter of your vent kit’s tailpiece or pipe to maintain a secure, airtight fit. Using a power hole saw centered on your pilot hole provides a clean, professional circle.
- Attach a 4-inch or 4.5-inch hole saw (matching your specific duct and vent kit size) to your power drill.
- Place the pilot drill bit of the hole saw directly into the pilot hole you drilled from the inside.
- Keep the drill perfectly level and cut slowly through the exterior siding and wooden sheathing to prevent splintering or cracking.
Matching the Interior Drywall Opening
Once your exterior hole is complete, move back inside the bathroom to mirror the opening through your interior drywall. A clean interior cut ensures your duct adapter slips smoothly through the wall cavity.
- Insert your pilot bit or a pencil through the hole from the outside, or line up your hole saw from the inside using your pilot hole.
- Carefully cut through the interior drywall layer, keeping dust to a minimum by holding a vacuum nozzle nearby.
- Clean away any loose insulation or debris inside the wall cavity between the interior and exterior openings.
Pro-Tips for Cutting Through Brick, Vinyl, or Stucco Sidings
Different exterior siding materials require specialized cutting techniques to prevent cracking, shattering, or expensive exterior wall damage.
- Vinyl Siding: Cut slightly larger than normal or use a specialized siding cutter because vinyl expands and contracts with temperature changes, and it cracks easily if a standard hole saw binds up.
- Brick Veneer: Use a carbide-tipped masonry hole saw or drill a circle of small hammer-drill holes around your pilot mark, then carefully chisel out the center brick core.
- Stucco: Score the outer stucco layer with an angle grinder diamond blade before using your hole saw to prevent the rough surface from chipping and flaking away.
Step 3 – Installing and Sealing the Exterior Wall Vent Cap
Properly installing and sealing your exterior wall vent cap prevents moisture leaks, pest infiltration, and cold drafts from entering your home. Taking your time with weatherproofing ensures your bathroom exhaust system withstands heavy rain and extreme seasonal temperatures.
Assembling the Vent Kit Tailpiece
Before mounting the vent cap to your exterior wall, assemble the short metal or plastic tailpiece pipe included with your kit. Ensure any built-in backdraft dampers swing freely without catching or binding on the inner walls of the pipe.
- Attach the short duct pipe or collar securely to the back of the louvered vent hood if it comes as separate pieces.
- Verify that the internal gravity louvers or backdraft damper open outward and close tightly by gravity or spring tension.
- Check that the tailpiece length matches your wall thickness so it extends slightly past the interior drywall for easy duct connection.
Applying Silicone Caulk for a Watertight Seal
Creating a complete waterproof barrier around the flange prevents wind-driven rain from seeping behind your exterior siding and rotting the wall sheathing. Refer to official guidelines such as the HUD Rehab Guide on Ventilation for proper weatherproofing and building compliance standards.
- Apply a generous, continuous bead of exterior-grade silicone caulk around the entire back perimeter of the vent hood flange.
- Leave a small gap at the very bottom edge of the flange to allow any trapped condensation to weep outward safely.
- Press the vent pipe firmly through the wall hole from the outside until the caulked flange sits completely flush against your siding.
Securing the Vent Cap and Testing the Louvers
Locking the vent hood securely into position with weather-resistant fasteners ensures it won’t vibrate loose during high winds or heavy fan operation.
- Fasten the vent cap to your exterior siding using stainless steel or galvanized, weather-resistant screws through the pre-drilled flange holes.
- Smooth out any excess silicone caulk squeezed out around the edges using a gloved finger to seal potential gaps.
- Test the exterior louvers by blowing air or gently pushing them to guarantee they open fully under pressure and snap completely shut when released.
Step 4 – Connecting and Securing the Ductwork
Connecting your bathroom fan housing to the exterior wall vent requires careful alignment and airtight sealing to maintain maximum exhaust efficiency. Proper installation of your ducting prevents humid air and condensation from leaking into your attic or wall cavities.
Routing Ductwork from the Fan to the Sidewall
Run your chosen ducting directly from the exhaust port on your fan housing to the tailpiece of the exterior wall vent. Keeping the run as short and straight as possible prevents air resistance and moisture buildup.
- Measure and cut your rigid metal ducting or semi-rigid pipe to the exact length needed without excessive slack.
- Avoid sharp bends, kinks, or sagging sections that restrict airflow and catch moisture.
- Ensure the interior connection aligns smoothly with the wall opening without pinching the pipe.
The Crucial Downward Pitch Rule (Preventing Condensation Pooling)
Humid air cooling inside exhaust ducts turns into liquid water, which must be drained safely outdoors rather than flowing back into your fan motor. A proper slope prevents water damage and electrical hazards.
- Pitch the ducting downward at a slight angle of about 1/4 inch per foot toward the exterior wall vent.
- This gentle downward slope guarantees that any condensation runoff drains straight outside instead of pooling in the line.
- Check that no low spots exist in the middle of the duct run where water could accumulate.
Securing Connections with Clamps and Foil Tape
Airtight connections are essential for stopping conditioned indoor air from escaping into the wall cavity. Never rely on standard duct tape, which dries out and fails over time.
- Attach the ducting securely to the bathroom fan exhaust collar and the exterior vent tailpiece.
- Use heavy-duty metal hose clamps tightened firmly around both connection points.
- Wrap all seams and joints thoroughly with UL-approved foil tape to seal the system completely airtight.
Troubleshooting, Common Mistakes & FAQs
Anticipating common installation errors and understanding how to troubleshoot airflow or moisture issues ensures your wall-vented bathroom exhaust system operates flawlessly for years. Addressing potential pitfalls early saves you from costly drywall repairs and premature fan motor failure.
Common Bathroom Fan Venting Mistakes to Avoid
Avoiding critical DIY shortcuts protects your home from hidden mold, structural wood rot, and inefficient airflow. Taking the time to execute each connection correctly guarantees optimal moisture control.
- Using Flex Foil Ducting: Cheap flexible foil sags easily, collects condensation pockets, and creates high airflow resistance that ruins fan efficiency. Always use rigid or semi-rigid aluminum pipe.
- Skipping the Exterior Seal: Failing to apply exterior-grade silicone caulk around the vent flange allows wind-driven rain to seep into your wall sheathing.
- Level or Upward Sloping Ducts: Running ducts flat or sloped toward the bathroom causes condensation water to drain back into the fan housing.
- Venting into Soffits or Attics: Never terminate ductwork inside an unconditioned attic space or near roof soffits, as the humid air will immediately re-enter your attic and cause mold.
Frequently Asked Questions (PAA Target Section)
Clear, direct answers to common homeowner queries help resolve operational concerns and optimize your setup for maximum airflow efficiency and weather protection.
Can you vent a bathroom fan through a sidewall?
Yes, venting through an exterior sidewall is an excellent, highly efficient alternative to roof venting. It provides a shorter, straighter duct run that maintains powerful airflow and eliminates roof leakage risks.
- Sidewall termination is ideal when bathrooms are located on outer stories or below unconditioned attic spaces.
- Shorter runs prevent moisture from pooling inside long vertical duct spans during freezing weather.
What should I do if my duct runs through a cold wall?
Running exhaust ductwork through an unconditioned exterior wall or cold framing cavity causes warm indoor moisture to condense rapidly against cold metal walls, resulting in water leaks.
- Wrap your metal ducting with R-value thermal duct insulation to prevent extreme temperature swings.
- Ensure the entire duct span maintains a continuous downward pitch toward the exterior exit vent.
How do I stop cold air drafts from coming through the vent?
Cold drafts entering through your bathroom exhaust fan indicate that your exterior termination cap or backdraft damper is failing to seal tightly against outside wind pressure.
- Inspect the exterior louvered vent cap to ensure spring-loaded or gravity louvers swing freely and close completely.
- Install an inline backdraft damper inside the duct run close to the exterior wall for an extra layer of protection.

Oscar Vance | Master Plumber & Drainage Expert
Meet Oscar Vance, a licensed master plumber sharing practical solutions on residential repairs, preventive maintenance, and thoughtful home upkeep.