How Shower Plumbing Works
 Shower plumbing is an integrated system of hot and cold supply lines, a pressure-balancing mixing valve, a riser pipe, and a sanitary drainage network designed to deliver and remove water safely. Understanding the core rough-in phase ensures optimal water pressure, leak prevention, and code compliance before closing up walls.
Shower Plumbing in 5 Steps
Mastering the rough-in installation requires following a precise sequence to connect water delivery and waste removal components correctly. Each stage builds directly upon the previous one to ensure a secure, pressure-tested infrastructure.
- Rough-In Layout & Blocking: Secure structural wood blocking between wall studs to anchor the mixing valve and drop-ear elbow securely at correct heights.
- Valve Installation: Mount the pressure-balancing mixing valve level and at the specified depth, ensuring hot and cold supply lines match the manufacturer’s directional arrows.
- Supply Lines Connection: Run hot and cold water supply lines up to the mixing valve using soldered copper, PEX, or CPVC piping according to local codes.
- Riser & Drop-Ear Setup: Extend a riser pipe upward from the valve to a secured drop-ear elbow positioned to support the future showerhead arm.
- Drain & System Test: Install the shower drain, P-trap, and vent line, then perform a rigorous water or air pressure test to confirm zero leaks.
How Long Does It Take and How Hard Is It?
Installing a brand-new shower plumbing system from scratch typically takes between 4 to 8 hours of active labor spread across multiple days due to curing and testing times. For experienced DIYers comfortable with pipe cutting, soldering, or PEX crimping, it is a manageable intermediate-to-advanced project.
- Skill Level: Advanced DIY or professional plumber recommended due to waterproofing and code requirements.
- Time Commitment: 4 to 8 hours of labor, excluding wall repair and tiling.
- DIY vs. Plumber Verdict: Best handled by a licensed plumber if you are altering structural framing or main vent stacks, though confident DIYers can handle straight retrofits.
What This Guide Covers That Others Skip
Most basic tutorials focus only on connecting the mixing valve, leaving out crucial technical details that prevent long-term water damage, foul odors, and costly structural repairs. A successful installation requires meticulous attention to hidden structural components.
- P-Trap and Vent Integration: Maintaining proper trap seals and venting to prevent sewer gas intrusion and slow-draining water pools.
- Thermal Expansion and Pipe Securing: Preventing noisy water hammer and pipe fatigue through proper strapping and insulation.
- Rigorous Leak Testing Protocols: Step-by-step guidance on pressure testing supply lines and standing water tests for drain pans before tile goes up.
What Plumbing Is Required for a Shower?
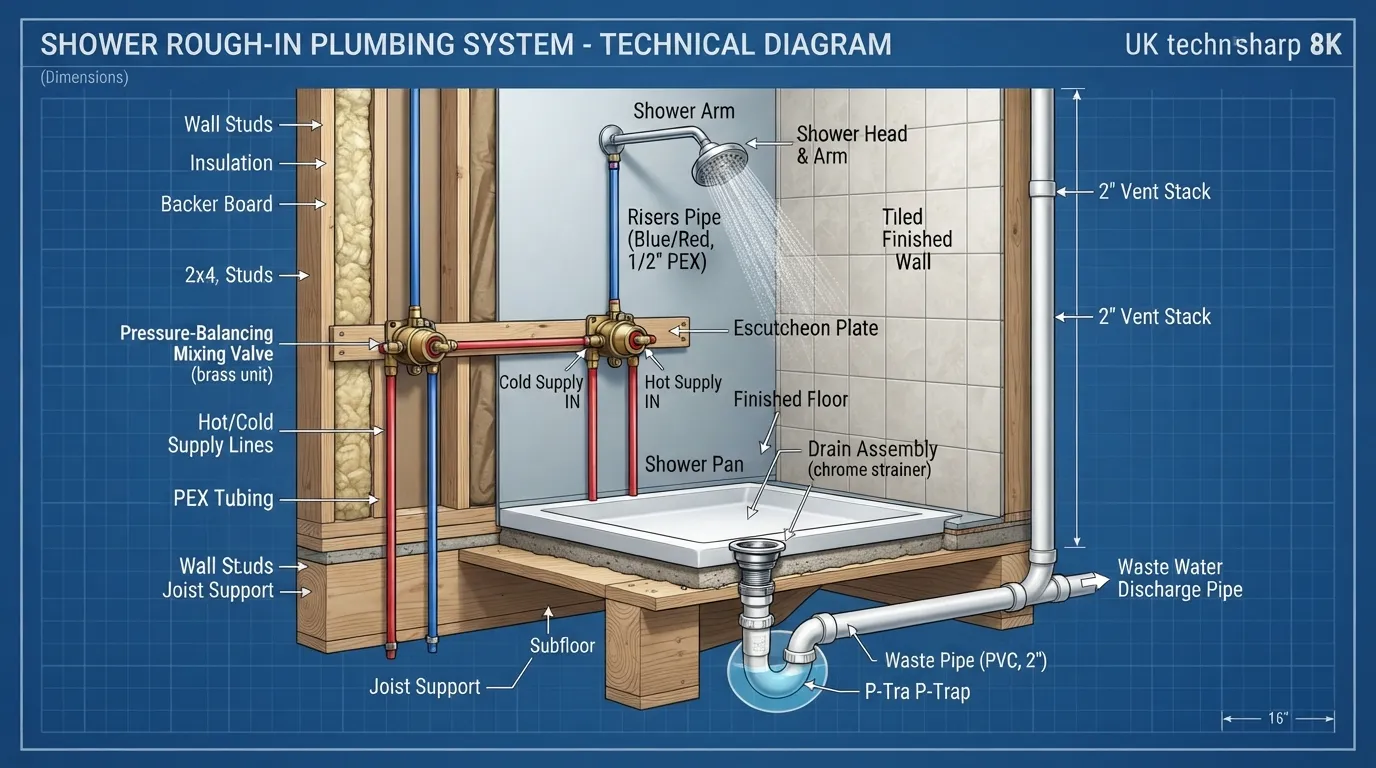 A functional shower requires a complete dual-path infrastructure consisting of a supply side to deliver temperature-controlled water under pressure and a drain side to safely remove wastewater via gravity. Both systems must work in tandem while adhering strictly to local plumbing codes to prevent leaks, pressure drops, and hazardous sewer gas leaks.
Supply Side: What Brings Water In
The water supply network delivers pressurized hot and cold water to the user, blending them accurately through a centralized control point before directing the stream upward. Proper sizing and secure anchoring are vital to maintain consistent flow and eliminate disruptive water hammer noises.
- Hot and Cold Supply Lines: Feeds lines running from the main home water heater and supply manifold to the mixing valve, typically using 1/2-inch copper or PEX tubing.
- Pressure-Balancing Mixing Valve: The mechanical heart of the shower that blends hot and cold water while preventing sudden temperature spikes when other household fixtures are used.
- Riser Pipe: The vertical pipe that carries mixed water upward from the mixing valve outlet toward the upper wall framing.
- Drop-Ear Elbow & Shower Arm: A securely anchored secure mounting fitting (drop-ear) that connects the riser to the curved shower arm and final showerhead.
Drain Side: What Takes Water Out
The drainage network relies on gravity to clear wastewater swiftly away from the shower pan without backing up or allowing sewer gases to enter the living space. Every component must maintain a continuous downward slope and proper atmospheric balancing.
- Shower Drain Assembly: A specialized flange and strainer mechanism clamped or solvent-welded directly to the shower base or custom liner.
- P-Trap: A curved section of pipe located beneath the floor that holds a standing pool of water to block foul sewer gases from rising up through the drain.
- Drain Line & Main Stack: Sloped horizontal and vertical piping (typically 2 inches in diameter) that transports wastewater away from the fixture toward the home main sewer line.
- Vent Pipe: A vertical atmospheric vent connected to the drainage system that equalizes air pressure to ensure smooth, rapid drainage and prevent trap siphonage.
Shower Plumbing Diagram
Visualizing the complete rough-in layout helps clarify how supply lines, the mixing valve, the drain, and the vent integrate behind finished walls. Use a comprehensive reference diagram to trace every component from the subfloor up to the showerhead.
- Hot/Cold Inlets: Enter the mixing valve from below or the sides at a standard height of 45 to 48 inches above the finished floor.
- Mixed Output: Travels vertically up a single riser pipe to a drop-ear elbow positioned roughly 80 inches high for the showerhead.
- Waste Outlet: Drops straight down from the shower strainer into a 2-inch P-trap that immediately ties into the wet vent or main stack.
Tub and Shower Combo vs. Shower-Only: What Changes
Converting a shower-only setup into a tub-and-shower combination—or vice versa—requires specific alterations to your valve selection and vertical drop layout. The fundamental principles remain identical, but valve routing and fixture counts differ.
- Diverter Valve Requirement: A tub-and-shower combo requires a three-port or universal diverter valve with a lower outlet port for the tub spout, whereas a shower-only valve can cap or omit this extra port.
- Height Adjustments: The mixing valve is installed slightly lower (around 28 to 32 inches from the floor) in a tub combo to accommodate the lower tub spout, compared to 45 inches for standalone showers.
- Drain Sizing Differences: Tub installations rely on a combined overflow and 1.5-inch or 2-inch waste shoe assembly, whereas custom tile showers mandate a 2-inch dedicated drain opening.
Plan Before You Start: Valve Pipe Type and DIY-or-Hire
Thorough upfront planning prevents costly rework, code violations, and mid-project delays. Choosing the correct valve mechanisms, piping materials, and joining techniques before tearing into walls establishes a solid foundation for a durable, leak-free installation.
Choose Your Shower Valve Type
Selecting the appropriate mixing valve determines your long-term water temperature safety and fixture expansion capabilities. While detailed valve mechanics are covered later, your primary choice at this planning stage is between a standard pressure-balancing valve and an advanced thermostatic mixing valve.
- Pressure-Balancing Valves: The industry standard for preventing scalding by automatically equalizing hot and cold water pressures if another household fixture opens.
- Thermostatic Valves: Premium options featuring separate volume and temperature controls, allowing you to lock in an exact preferred water temperature across every shower use.
PEX vs. Copper vs. CPVC: Which Pipe Should You Use?
Different plumbing materials offer unique balances of installation ease, cost, and longevity. Reviewing the characteristics of each piping type helps you choose the best option for your skill level and structural layout.
Push-Fit vs. Crimp vs. Soldered Connections
The method you use to join pipes dictates both your tool investment and long-term joint reliability. Each connection style requires specific preparation and adherence to manufacturer guidelines.
- Push-Fit Fittings (e.g., SharkBite): Fast, tool-free installation ideal for temporary fixes or tight spaces, though generally discouraged for permanent, inaccessible behind-the-wall joints.
- Crimp / Expansion Rings: Secure, permanent mechanical connections used exclusively with PEX piping that require specialized crimping or expansion tools.
- Soldered Joints: The traditional, time-tested method for copper piping that creates a molecular bond capable of withstanding extreme pressure and high heat.
Can You DIY This or Should You Hire a Plumber?
Determining whether to tackle the project yourself depends on your local building regulations, structural complexity, and comfort with specialized tools. Recognizing your limits early prevents dangerous water damage and code failures.
- DIY-Friendly Scenarios: Replacing an existing mixing valve in the exact same location using PEX or pre-fabricated copper stub-outs with accessible crawlspace or basement access.
- When to Hire a Plumber: Projects involving cutting into concrete slabs, altering main stack venting, relocating fixtures across structural floor joists, or pulling mandatory municipal permits.
- Essential Pre-Checklist: Confirm local building codes, shut off the main house water supply, and verify whether a licensed plumbing permit is legally required in your municipality.
Tools and Materials Checklist
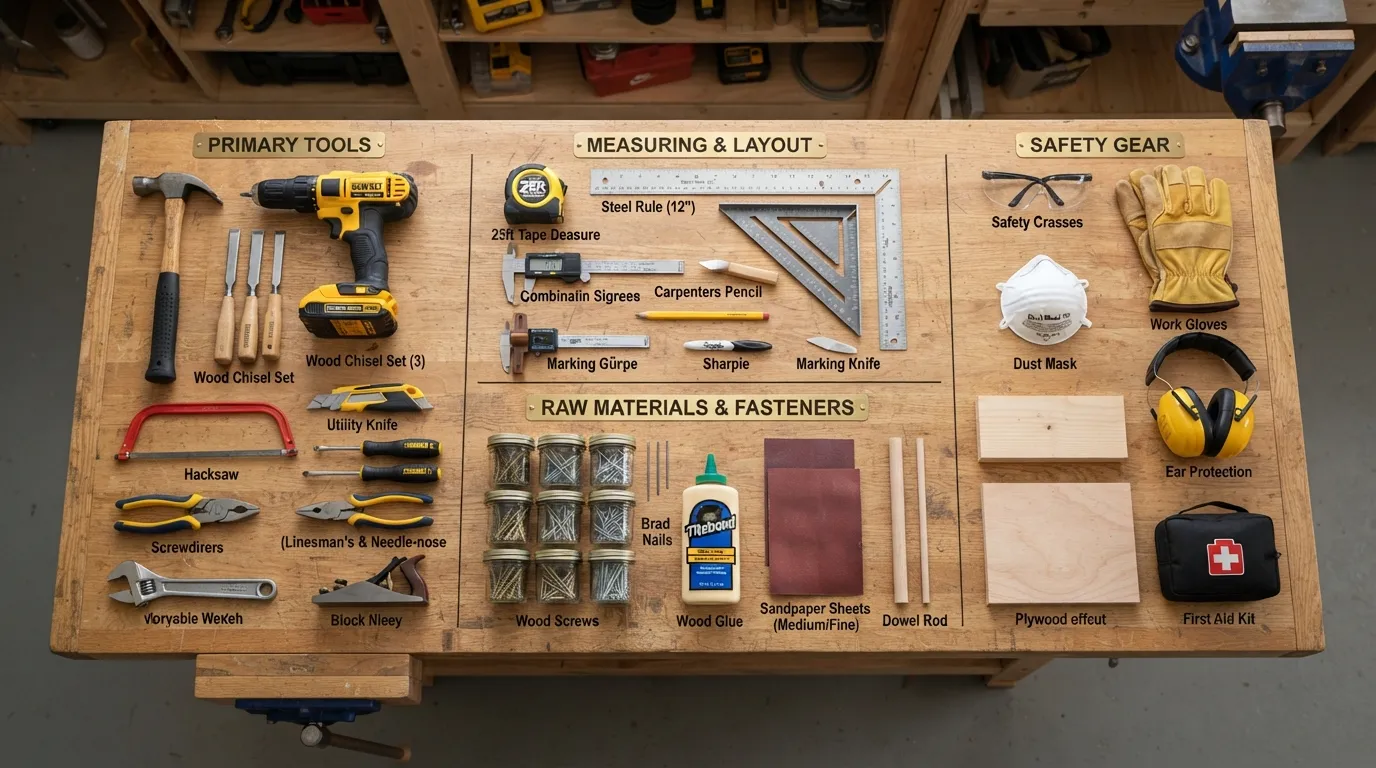 Gathering all required tools and materials before opening your walls prevents frustrating mid-project delays and emergency trips to the hardware store. Having a fully prepared workspace allows you to execute rough-in plumbing efficiently and maintain strict quality standards.
Tools You’ll Need
Equipping yourself with the correct specialized tools ensures clean cuts, secure mechanical joints, and precise alignment. Selecting high-grade professional equipment makes working inside confined wall cavities significantly safer and easier.
- Tubing Cutter: Essential for making clean, burr-free cuts on copper or plastic pipes without distorting the pipe roundness.
- Level and Tape Measure: Critical for verifying that your mixing valve, drop-ear elbows, and riser pipes are plumb and level.
- PEX Crimper & Ring Removal Tool: Required if you are installing a PEX piping system to secure crimp rings correctly.
- Propane Torch & Flux Brush: Necessary only if you are working with traditional copper piping and soldering joints.
- Adjustable Wrenches & Pipe Wrench: Used for tightening threaded fittings, adapters, and securing test plugs.
- Cordless Drill & Bits: Used for screwing structural wood blocking into wall studs to anchor valves and pipe supports.
Materials You’ll Need
Purchasing quality-rated plumbing supplies ensures your behind-the-wall infrastructure resists corrosion and withstands high water pressure for decades. Always check that your fittings match your chosen pipe material.
- Pressure-Balancing Mixing Valve: Complete with its protective plaster guard and manufacturer installation instructions.
- Piping Material: 1/2-inch copper, PEX, or CPVC pipe cut to estimated room dimensions plus waste margins.
- Drop-Ear Elbow: A sturdy 90-degree fitting with screw mounting tabs to anchor your shower arm securely to wood blocking.
- Shower Arm & Flange: The curved overhead pipe stub and decorative escutcheon plate that connects to your future showerhead.
- Thread Sealant & Tape: High-grade Teflon tape and approved pipe dope for sealing threaded tapered pipe joints.
- Structural Lumber & Test Plugs: 2×4 or 2×10 blocking pieces for valve mounting and threaded test plugs to cap lines during pressure testing.
Materials Quantity Tips
Ordering exact measurements often leads to shortages due to miscuts, angle adjustments, or unexpected routing changes behind old walls. Following smart buffer guidelines ensures you always have enough stock on hand.
- Pipe Length Buffer: Purchase 15% to 20% more pipe than your calculated layout requires to account for scrap cuts and test pieces.
- Extra Fittings Rule: Keep a few extra 90-degree elbows, straight couplings, and male/female adapters in your toolkit, as layout tweaks are common.
- Sealant Storage: Ensure your thread sealants and solvent cements are fresh and stored at room temperature for optimal bonding strength.
Rough-In: Heights Blocking and Valve Depth
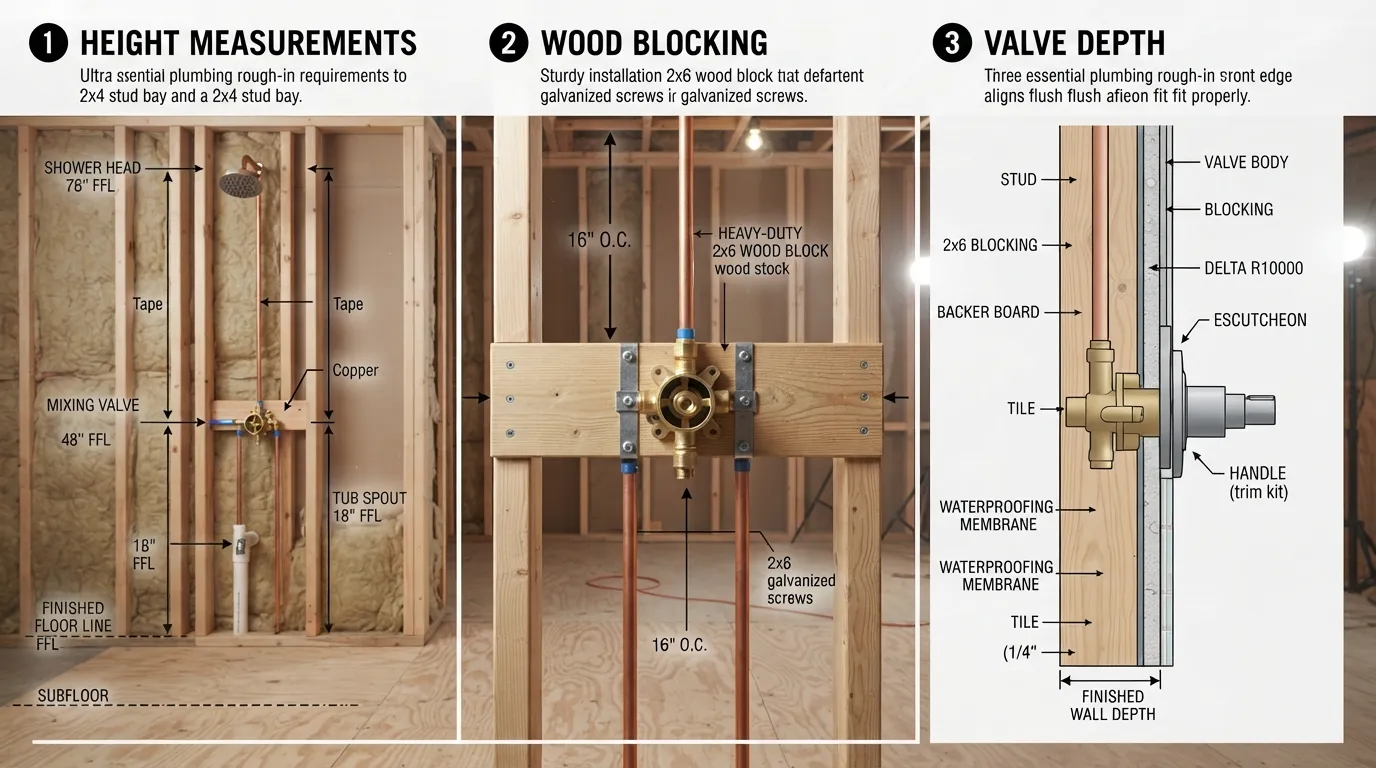 Executing the rough-in stage requires strict adherence to standard measurements, secure framing support, and precise valve alignment. Getting these foundational elements right ensures your finished fixtures line up perfectly and remain completely leak-free behind the wall.
Standard Shower Valve and Showerhead Heights
Positioning your fixtures at ergonomic standard heights ensures maximum comfort for users while complying with building codes. Adjusting heights based on household needs prevents awkward reaches and splashing issues.
- Mixing Valve Height: Mount the center of the valve between 38 and 48 inches (typically 45 inches) above the finished floor, depending on whether you have a standalone shower or a tub combo.
- Showerhead Height: Position the drop-ear elbow and shower arm between 80 and 84 inches from the floor to accommodate taller family members comfortably.
- Ergonomic Rationale: Standardizing these heights ensures the control handle is easily reachable from a standing position while keeping the spray angle optimal.
How to Install Blocking Between the Studs
Wall studs alone cannot support the weight and torque of mixing valves and shower arms over time. Installing solid wood blocking provides the rigid anchor points needed to eliminate pipe movement.
- Material Selection: Use solid 2×4 or 2×10 lumber wedged horizontally between adjacent wall studs.
- Valve Anchoring: Screw the mixing valve’s mounting tabs securely into the lower blocking block using corrosion-resistant screws.
- Overhead Support: Secure a separate upper block to anchor the drop-ear elbow firmly at your target showerhead height.
- Getting Valve Depth Right
Setting the mixing valve too deep or too shallow behind the wall creates massive headaches when installing the final trim kit. You must calculate the combined thickness of your structural backer board and finished tile before securing the valve body.
- Plaster Guard Guide: Most mixing valves include a plastic plaster guard that acts as a depth gauge; its outer edge typically aligns with the finished wall surface [00:00:51].
- Wall Buildup Calculation: Factor in 1/2-inch backer board plus 1/4-inch tile and thinset mortar (approx. 3/4 to 1 inch total) to avoid sinking the valve too far back [00:01:06].
- Forward Adjustment: Use thin wood shims or strapping behind the valve mounting plate if your framing studs sit too deep in the wall cavity [00:05:53].
Rough-In Mistakes That Cause Trouble Later
Overlooking small details during the rough-in phase can result in catastrophic water damage or expensive demolition down the road. Avoiding common missteps protects your investment and ensures code compliance.
- Reversing Hot and Cold Lines: Failing to align supply lines with the valve’s hot and cold indicator arrows causes permanently reversed temperature controls.
- Skipping Pressure Tests: Closing up walls without leaving lines pressurized under test plugs risks missing slow joint leaks that lead to hidden mold.
- Rigid Pipe Stress: Allowing pipes to pull or twist tightly against framing without expansion room causes joint fatigue and premature failure.
Install the Shower Valve and Connect Supply Lines
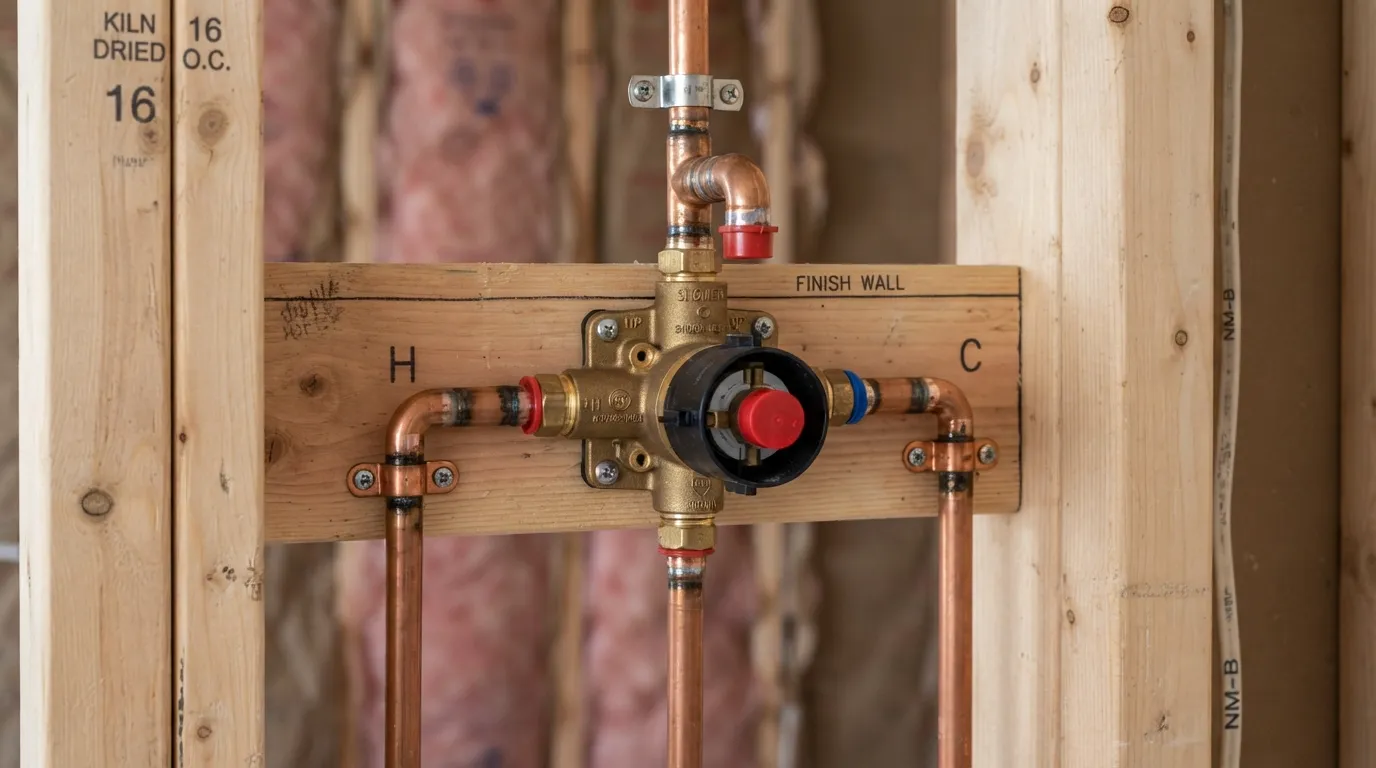 Connecting the shower mixing valve and supply lines demands precision, proper thread sealing, and careful adherence to manufacturer specifications. Executing these steps meticulously prevents hidden behind-the-wall leaks and guarantees optimal water flow.
Step 1: Mount the Valve Securely
Anchor your pressure-balancing mixing valve solidly to the horizontal wood blocking installed between your wall studs. Ensure the valve body does not wobble and aligns correctly with your planned finished wall depth.
- Rigid Mounting: Use corrosion-resistant wood screws through the valve’s mounting tabs to lock it tightly against the 2×4 or 2×10 brace.
- Plumb Alignment: Use a spirit level on the valve body to verify it is completely vertical and level before attaching any water lines.
Step 2: Seal the Threads Correctly
Properly sealing threaded male adapters prevents high-pressure leaks at the valve body connections. Always consult your valve manufacturer’s instructions before applying sealants.
- Teflon Tape Application: Wrap high-density Teflon tape clockwise 3 to 5 times around male pipe threads, pulling tightly so the tape molds into the grooves.
- Pipe Dope Compatibility: Apply a thin layer of approved pipe thread sealant over the tape only if specified by the manufacturer.
- Exclusion Rule: Never apply Teflon tape or pipe dope to soldered copper joints, rubber gasket unions, or push-fit sealing rings.
Step 3: Attach the Adapters
Transitioning from the valve body’s national pipe thread (NPT) outlets to your chosen piping material requires correct transition fittings. Secure these fittings firmly without over-torquing.
- Fitting Selection: Install 1/2-inch female NPT adapters onto the hot inlet, cold inlet, and upper shower outlet ports.
- Wrench Technique: Use a backup wrench on the solid brass valve body while tightening adapters with a second wrench to avoid twisting internal seals.
Step 4: Connect Hot and Cold Lines
Route your hot and cold supply lines to their respective valve ports, paying close attention to directional indicator markings. Never assume left and right orientations are universal across different valve brands.
- Valve Marking Inspection: Locate the cast-in “Hot” and “Cold” labels or directional arrows on the back or front of the brass valve body.
- Supply Routing: Connect the hot water supply line exclusively to the hot port and the cold supply to the cold port to ensure predictable temperature control.
Working With PEX vs. Copper at the Valve
The material you choose for your supply lines changes how you approach the final connections at the mixing valve. Tailoring your installation technique to your pipe type ensures long-term joint stability.
- PEX Flexibility: PEX tubing allows smooth, sweeping bends that reduce the need for extra 90-degree elbows, minimizing potential leak points.
- Copper Rigidity: Rigid copper requires precise cutting and torch soldering or specialized press fittings, offering unmatched structural stability right up to the valve.
Run the Riser and Install the Drop-Ear Elbow and Showerhead Arm
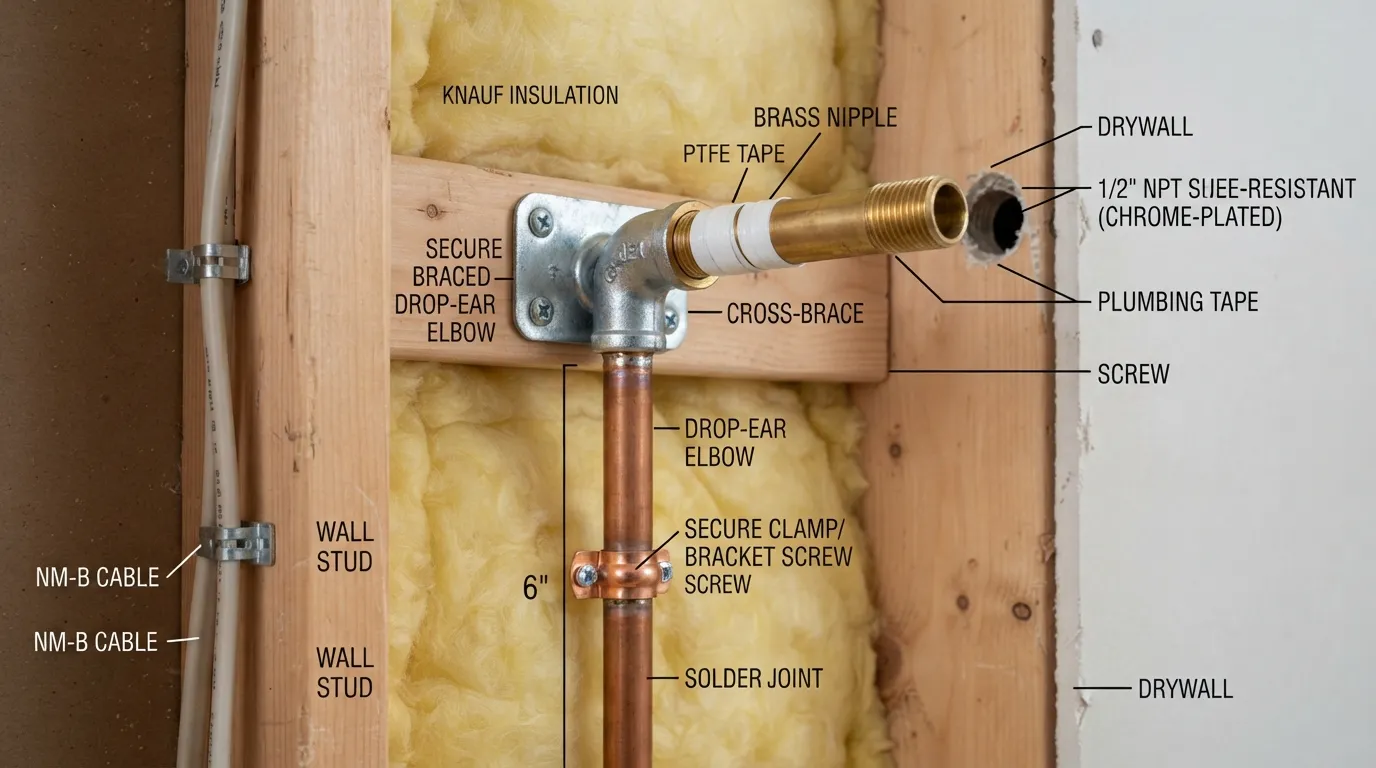 Completing the supply-side rough-in plumbing involves running the vertical riser pipe from the mixing valve up to the showerhead location. Securing this upper assembly correctly guarantees stability when users adjust or torque the final shower arm and fixture trim.
Run the Riser From the Valve’s Shower Outlet
Extend your piping material upward from the mixing valve’s upper shower outlet port toward the designated overhead height.
- Vertical Routing: Keep the riser pipe completely plumb and secure it along the stud cavity to prevent vibration or water hammer.
- Height Planning: Measure carefully to ensure the top of the riser matches your targeted showerhead height, accounting for the finished wall thickness and trim requirements.
Secure the Drop-Ear Elbow to the Blocking
A drop-ear elbow provides a secure anchoring point for the threaded shower arm, preventing the pipe from twisting or loosening behind the wall when the showerhead is adjusted.
- Solid Attachment: Screw the drop-ear fitting firmly into a horizontal wood blocking brace spanning between your wall studs.
- Depth Alignment: Set the fitting flush or slightly recessed so that the finished shower arm will thread in correctly after the wall finish is installed.
Cap the Outlets Before Testing
Before closing up walls or conducting pressure tests, seal all open lines to keep debris out and allow safe pressure testing of the entire supply system.
- Temporary Plugs: Thread test plugs or caps onto the drop-ear elbow and any other active supply outlets.
- Debris Prevention: Keeping the system sealed prevents drywall dust, tile mortar, or stray particles from clogging your mixing valve cartridges later.
Tub Spout Line Tub-and-Shower Combo Only
If your installation includes a bathtub spout rather than a shower-only setup, the lower outlet routing requires specific attention to back-pressure rules.
- Downward Drop: Run a dedicated line straight down from the lower valve port to the tub spout stub-out, avoiding any high loops that can trap water and cause the showerhead to drip.
- Rigid Drop-Ear Use: Anchor the lower drop-ear elbow securely to prevent movement when attaching the tub spout diverter.
Shower Drain Plumbing: Size P-Trap Slope and Vent
Mastering shower drain plumbing is essential for preventing slow drainage, clogs, and hazardous sewer gas leaks. Because drain systems rely heavily on gravity, proper sizing, sloping, and venting make the difference between a reliable bathroom and a continuous maintenance headache.
How to Properly Plumb a Shower Drain
Laying out and connecting a shower drain requires a methodical approach to ensure waste water flows smoothly down to the main stack.
- Drain Location & Alignment: Mark the exact center of your shower pan or custom mud bed drain hole and line up your rough subfloor opening accordingly.
- P-Trap Integration: Install a code-compliant P-trap directly beneath or close to the shower drain to maintain a water seal.
- Drain Line Run: Route the waste pipe downward toward the main building drain, maintaining a consistent downward slope.
- Vent Connection: Tie the drain into a proper vertical vent line to ensure smooth air exchange and prevent siphoning.
Does a Shower Need a 2-Inch Drain?
Modern national plumbing codes explicitly require a minimum 2-inch drain pipe for standard showers to handle high-volume modern showerheads and body sprays without backing up.
- High Flow Capacity: Modern multi-head or rain shower systems output more water than older fixtures, making a 2-inch line mandatory for proper evacuation.
- Code Compliance: Almost all contemporary plumbing codes specify 2 inches as the baseline standard for standalone shower waste lines.
Can You Use a 1 1/2-Inch Drain for a Shower?
While some older homes or legacy codes permitted 1 1/2-inch shower drains, modern standards heavily restrict or prohibit them for new installations.
- Code Limitations: Most current building codes do not allow 1 1/2-inch pipes for standard showers because they risk overflowing under high water volume.
- Local Code Check: Always verify with your local municipal code authority before attempting to use an existing 1 1/2-inch line during a remodel.
Do You Need a P-Trap for a Shower Drain?
Yes, installing a P-trap is non-negotiable for every single shower drain installation.
- Sewer Gas Blockage: The curved design of the P-trap holds a standing pool of water that physically blocks toxic sewer gases and foul odors from entering your living space.
- Mandatory Safety Feature: Building codes strictly require a trap on every fixture drain to protect indoor air quality and health.
Drain Slope and Venting Basics
Gravity and atmospheric pressure drive your drainage system, meaning slope and venting must be engineered precisely.
- Slope Rule of Thumb: Horizontal drain lines must maintain a downward slope of 1/4 inch per foot toward the main sewer line to ensure solid waste and water move efficiently.
- Vent Function: A dedicated vent pipe admits air behind the moving water, preventing vacuum locks, gurgling, and trap siphoning.
Can a Shower and Toilet Share the Same Drain?
Fixtures can share a drainage network under specific configuration rules, known as branch drains, but it depends heavily on pipe sizing and layout.
- Branch Drain Concept: Smaller fixture drains like showers can tie into a larger main branch or stack, provided the main pipe is adequately sized (often 3 inches or larger for toilets).
- Professional Verification: Consult a licensed plumber or local plumbing code guidelines to ensure your wet-venting and shared-line layout meets safety standards.
Shower Pan Base Considerations
The interface between your shower pan and the drain assembly requires careful waterproofing to protect your subfloor.
- Flange Sealing: Use compression or solvent-weld drain fittings specifically designed for your shower pan type (acrylic, cast iron, or tiled mud bed).
- Subfloor Support: Ensure the subfloor beneath the shower pan and trap is completely rigid to prevent shifting and joint leaks over time.
Pressure and Leak Testing Before Closing the Wall
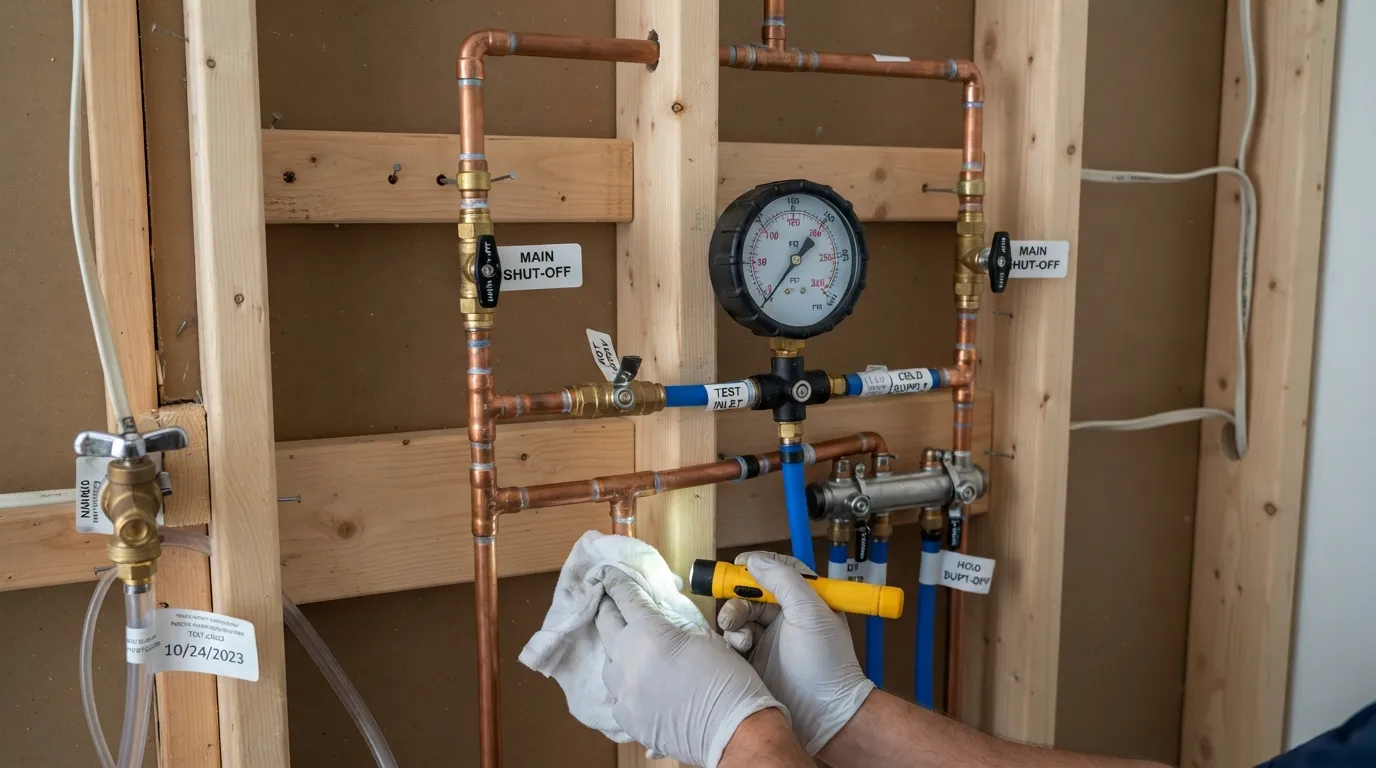 Skipping the pressure and leak testing phase before closing your walls is one of the riskiest mistakes in plumbing. Taking the time to rigorously check every supply joint and drain connection ensures you catch minor leaks while they are still easily accessible, saving you from catastrophic water damage down the road.
Step by Step Pressure Test
Verifying the integrity of your new supply lines requires isolating the system and subjecting it to working water pressure.
- Install Test Caps: Screw heavy-duty test plugs or threaded caps tightly onto all open supply outlets, including the drop-ear elbow and shower arm stub.
- Pressurize the System: Slowly turn on the main water supply to the house or open the shut-off valves feeding the shower line, allowing water to fill the pipes and build pressure up to normal household levels.
- Inspect All Joints: Examine every soldered, crimped, or threaded connection with a flashlight and dry paper towel to spot any immediate weeping or active drips.
How Long Should You Wait and What to Look For
A thorough pressure test requires giving the pressurized lines adequate time to reveal slow, hidden defects or microscopic joint failures.
- Observation Window: Maintain full water pressure on the roughed-in supply lines for a minimum of 30 to 60 minutes, though leaving it pressurized for several hours or overnight is ideal for high-stakes projects.
- Monitoring Indicators: Check that your water meter isn’t ticking while all home fixtures are off, and carefully inspect every single valve port and fitting for any moisture bead accumulation or pressure drop.
Testing the Drain
Supply lines aren’t the only components that need verification; the waste and drainage system requires an independent check.
- Drain Plug Test: Temporarily cap or plug the main shower drain pipe near the P-trap.
- Water Flood Check: Pour several gallons of water directly into the shower pan or rough drain opening, letting it sit to verify that the P-trap and all under-floor solvent-weld joints hold water without leaking into the subfloor.
Checklist Before You Close the Wall
Before putting up any cement backer board or drywall, run through this final verification checklist to ensure everything is code-compliant and secure:
- All Supply Joints Checked: Every hot and cold connection verified under pressure.
- Drain and Vent Secured: P-trap filled, sloped properly, and checked for leaks.
- Wood Blocking Solid: Mixing valve and drop-ear elbows anchored firmly against movement.
- Depth Alignment Verified: Valve body position matches your planned finished wall thickness.
Shower Valve Types Compared: 3-Way Diverter Single-Handle and Mixer
Choosing the correct rough-in valve dictates how user-friendly, reliable, and versatile your shower system will be. Understanding the differences between standard single-handle mixers, multi-outlet diverters, and advanced temperature-regulation valves ensures your setup meets both your daily comfort needs and plumbing layout requirements.
Valve Types Comparison Table
Review this quick comparison guide to evaluate each valve type based on its core function, ideal use case, and installation complexity:
| Valve Type | Primary Function | Best For | Install Difficulty |
|---|---|---|---|
| Single-Handle Mixer | Blends hot and cold water with a single lever controlling volume and temp. | Standard shower-only or tub-and-shower combos. | Easy to Moderate |
| 3-Way / Diverter Valve | Directs water flow to multiple different fixtures (e.g., showerhead, handheld). | Multi-fixture custom showers and combo setups. | Advanced |
| Pressure-Balance Valve | Automatically balances hot/cold pressure to prevent sudden temperature spikes. | Everyday family bathrooms requiring baseline safety. | Moderate |
| Thermostatic Valve | Allows precise temperature selection and maintains it regardless of pressure changes. | Luxury spa showers and multi-head body spray systems. | Complex |
Single-Handle Valve
The single-handle valve remains the most common and reliable choice for straightforward residential bathrooms.
- Simplified Operation: Moving the handle up increases water flow, while rotating it left or right adjusts the temperature mix.
- Minimal Maintenance: Fewer internal moving parts mean fewer failure points and simpler cartridge replacements down the road.
3-Way Valve and Diverter
When your bathroom layout includes multiple delivery points—such as a fixed showerhead, a handheld shower, and a tub spout—a 3-way or diverter valve is necessary.
- Flow Direction Control: A diverter valve channels water to your chosen outlet, allowing you to use fixtures independently or simultaneously depending on the cartridge design.
- Valve Diagram Reference: Always consult the manufacturer’s rough-in valve diagram to match port designations with your specific water lines and avoid cross-connection errors.
Pressure-Balance vs Thermostatic Valves
Temperature control mechanisms dictate how safe and comfortable your shower experience will be when other household fixtures are running.
- Pressure-Balance: Uses a spool or diaphragm mechanism to react instantly to pressure drops (like someone flushing a toilet), keeping water temperature stable.
- Thermostatic Control: Features a wax-element or expansion cartridge that physically measures water temperature and blends incoming lines precisely to your exact dial setting.
How to Choose the Right Valve for Your Bathroom
Selecting the ideal rough-in valve comes down to balancing your layout goals with plumbing code requirements.
- Fixture Count: Count how many water outlets you plan to install to determine if you need a standard mixing valve or a multi-port diverter.
- Code Mandates: Ensure your chosen valve complies with local building codes, which almost universally require anti-scald pressure-balance or thermostatic protection for showers.
Common Shower Plumbing Mistakes and How to Avoid Them
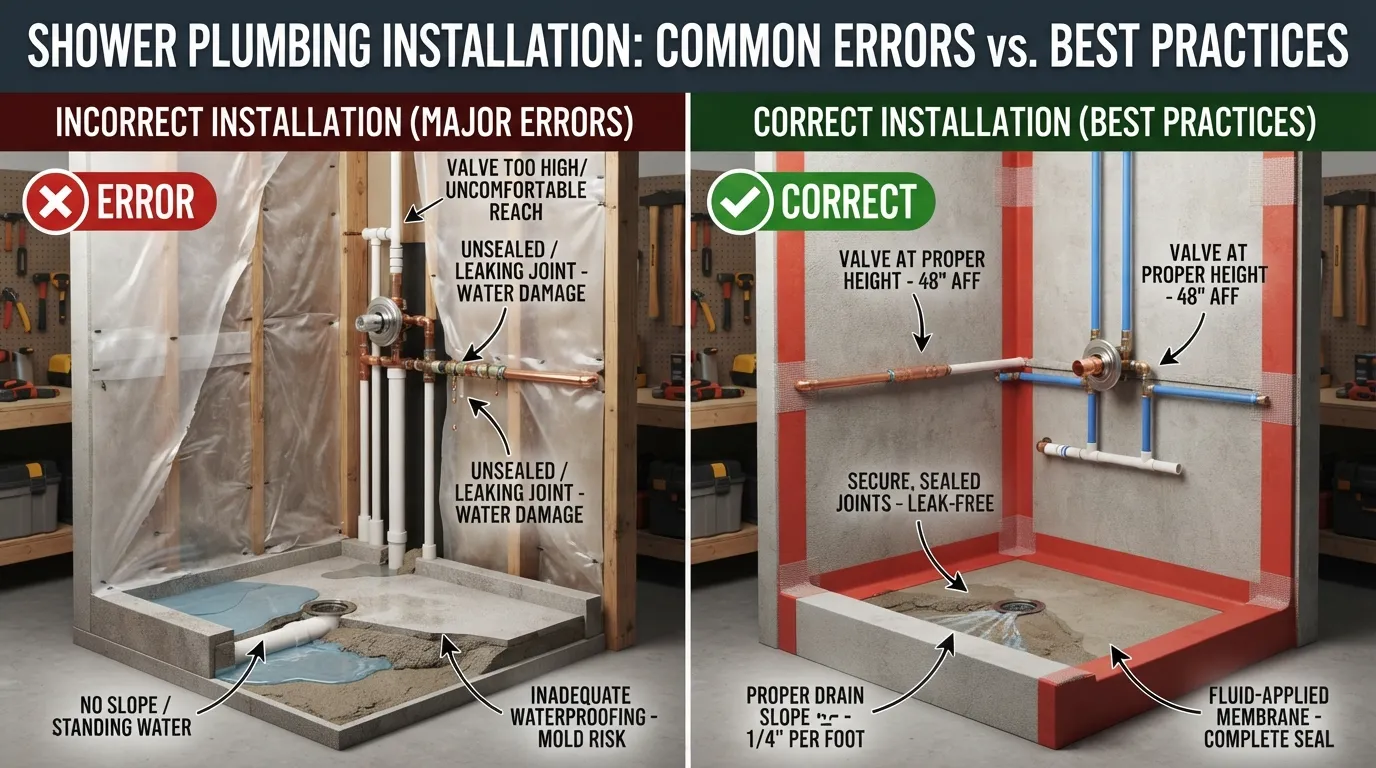 Even experienced DIYers and seasoned contractors can run into trouble if minor layout details or torque guidelines are overlooked during a rough-in. Learning from common installation pitfalls helps you spot potential design flaws before they transform into costly behind-the-wall leaks.
Wrong Valve Depth
One of the most frequent and frustrating errors is mounting the mixing valve too deep inside the wall cavity or letting it stick out too far.
- The Issue: If the valve sits too deep behind the studs, the trim handle won’t reach or seal against the finished tile. If it’s too shallow, the trim plate will float off the wall surface.
- The Fix: Always check the manufacturer’s plaster guard lines against your exact finished wall build-up (including backer board, waterproofing membrane, and tile thickness).
Weak or Missing Blocking
Failing to anchor structural supports behind the plumbing creates long-term mechanical instability.
- The Issue: Unsecured mixing valves and drop-ear elbows flex every single time someone adjusts the handle or tugs on a shower hose, eventually causing soldered or threaded joints to fracture.
- The Fix: Install solid 2×4 or 2×6 wood blocking directly behind the valve body and drop-ear fittings, screwing them down tightly before running any pipes.
Skipping the Pressure Test
Closing up the wall cavity without putting the piping system under sustained pressure is a gamble that rarely pays off.
- The Issue: A microscopic solder flaw or un-primed PVC joint can hold a trickle of ambient water yet burst or weep under full household water pressure once the drywall is painted.
- The Fix: Always cap your lines and maintain a rigorous pressure test for at least 30 to 60 minutes before sealing up any wall spaces.
Poor Drain Slope or Missing Vent
Drainage failures turn a brand-new shower into an unsanitary, slow-draining nuisance.
- The Issue: Horizontal waste pipes lacking the proper drop accumulate soap scum and hair rapidly, while unvented lines suffer from air lock and trap siphoning.
- The Fix: Maintain a strict 1/4-inch per foot downward slope and tie into an approved vertical vent line to keep wastewater moving freely.
Mixing Up Hot and Cold
Reversing supply lines during soldering or PEX routing creates instant user frustration.
- The Issue: Hooking the hot supply line to the cold port (and vice versa) means your shower handle operates backward, or modern anti-scald mechanisms lock up entirely.
- The Fix: Double-check your supply orientation against the valve body markings (typically marked “H” and “C” or with directional arrows) before making permanent connections.
Over-Tightening or Wrong Thread Sealing
Applying excessive torque or incorrect sealants to threaded fittings causes hidden cracks in brass and plastic components.
- The Issue: Over-tightening male threaded fittings into drop-ear elbows can stress the brass casting, leading to delayed cracking weeks after installation.
- The Fix: Use appropriate thread sealant or Teflon tape correctly (3 to 4 wraps clockwise), and snug threaded fittings firmly without applying brute force.
Lessons From a Real Job
On a custom bathroom remodel last season, a minor miscalculation with tile backer board thickness nearly compromised the entire trim installation.
- The Real-World Lesson: The homeowner opted to upgrade from a standard thin ceramic tile to a thick stacked stone finish after the rough valve was already anchored.
- How We Handled It: Because we documented the exact rough-in measurements and left accessible blocking, we were able to unbolt the valve bracket and adjust its depth forward using spacer shims before the waterproofing membrane went up—saving the project from expensive drywall demolition.
How Much Does It Cost to Run Plumbing for a Shower?
Planning your bathroom budget requires understanding the financial breakdown between raw materials, specialized plumbing components, and professional labor. Whether you are tackling a DIY rough-in or hiring a licensed contractor, knowing what drives costs helps prevent unexpected budget overruns.
Cost Breakdown: Materials vs Labor
Review this regional market cost breakdown comparing raw supplies and installation labor for a standard shower plumbing rough-in:
| Expense Category | Description | Estimated Cost Range (PKR) |
|---|---|---|
| Concealed Piping Materials | PPRC hot/cold pipes, PVC drainage pipes, fittings, and adhesives. | PKR 25,000 – PKR 45,000 |
| Rough-In Valve & Hardware | Pressure-balance mixing valve body, drop-ear elbows, and test caps. | PKR 20,000 – PKR 55,000 |
| Plumber Installation Labor | Chasing walls, pipe routing, soldering/welding, and pressure testing. | PKR 35,000 – PKR 60,000 |
| Total Rough-In Estimate | Combined material and labor baseline for a standard single shower setup. | PKR 80,000 – PKR 160,000+ |
DIY vs Plumber Cost Comparison
Choosing between a do-it-yourself install and hiring a professional involves weighing direct savings against potential risks.
- DIY Approach: Eliminates labor expenses entirely, leaving you to pay only for raw pipe lengths, fittings, and basic tools. However, mistakes in valve depth or joint sealing can lead to expensive wall repairs.
- Professional Hiring: While higher upfront, hiring a skilled plumber guarantees code compliance, proper pressure testing, and accountability if a behind-the-wall leak occurs.
What Makes the Cost Go Up
Several structural and design modifications can quickly elevate your rough-in plumbing expenses:
- Relocating the Shower: Moving a shower to a brand-new wall requires running long extension lines for both supply and main 2-inch drainage through existing framing.
- Slab Penetrations: Breaking through concrete foundation slabs to tie into sub-floor drainage adds heavy labor, core drilling, and concrete patching costs.
- Multi-Outlet Upgrades: Upgrading from a single showerhead to a custom system with a handheld wand, body jets, or thermostatic diverters requires extra valve bodies and complex manifold routing.
How to Save Money Without Cutting Corners
You can optimize your bathroom remodeling budget safely by sticking to smart procurement strategies:
- Keep the Existing Layout: Retaining the current wet wall location avoids major DWV (drain, waste, and vent) reconfiguration work.
- Buy Reliable Mid-Tier Brands: Invest in trusted local or international valve bodies and PPRC pipe brands (such as Popular, Master, or Beta) rather than ultra-cheap generic fittings that fail prematurely.
- Do the Demolition Yourself: Clear out old drywall, tiles, and insulation on your own to reduce the hours billed by your trade professionals.
Plumbing Codes Permits and When to Call a Licensed Plumber
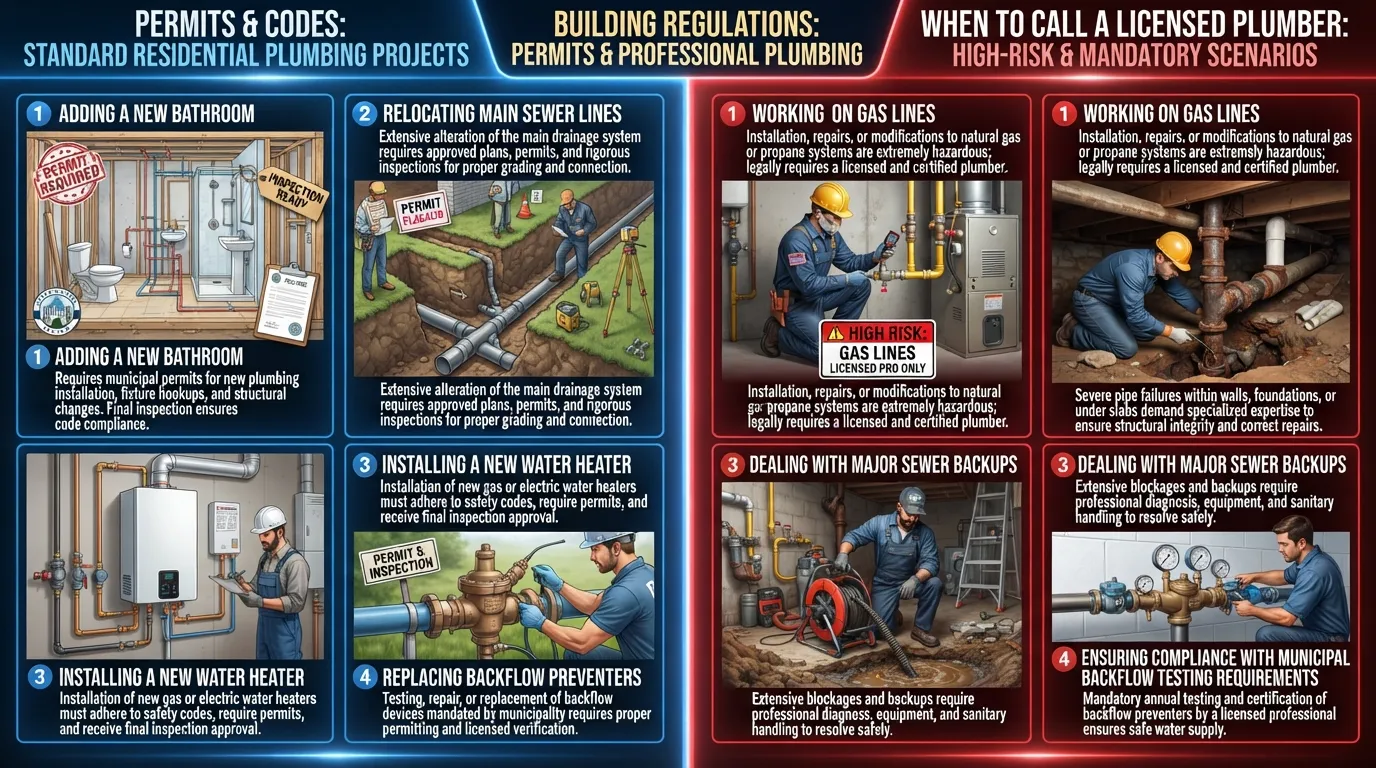 Adhering to established plumbing codes and safety regulations is the ultimate safeguard against costly water damage, system failures, and legal liabilities. Whether you are managing a minor bathroom renovation or building a custom home from scratch, knowing when to pull a permit or bring in an expert protects both your investment and your household safety.
Why Local Plumbing Code Matters
Plumbing codes are not arbitrary rules; they are engineered standards designed to protect public health and structural integrity.
- Drain Size Requirements: Codes dictate minimum pipe diameters—such as a 2-inch requirement for standalone showers—to guarantee wastewater evacuates rapidly without backing up.
- Venting and Trap Rules: Proper venting and P-trap specifications prevent lethal sewer gases from entering living quarters and stop vacuum siphoning from emptying your water seals. You can consult official regulatory standards through guidelines like the plumbing code reference to ensure complete alignment with regional safety mandates.
- Jurisdictional Variations: Municipalities frequently adopt specific iterations of the International Plumbing Code (IPC) or Uniform Plumbing Code (UPC) with local amendments tailored to regional climate and ground conditions.
Do You Need a Permit for Shower Plumbing?
Navigating building permits is a critical step that many DIYers overlook during bathroom overhauls.
- When Permits Are Required: Adding a brand-new shower layout, cutting into structural load-bearing studs to run drain lines, or modifying main stack connections almost always requires an official municipal permit and inspection.
- Why It Matters for Resale: Unpermitted plumbing work can create major hurdles when selling a home, often requiring costly retroactive inspections or forced exploratory demolition by city officials.
Signs You Should Hire a Licensed Plumber
While minor cosmetic updates or straightforward fixture replacements are great DIY projects, certain complexities warrant professional intervention.
- Major DWV Reconfiguration: Altering complex drain, waste, and vent stacks or tying into main cast-iron sewer lines requires specialized tools and expert knowledge.
- Concrete Slab Penetrations: Breaking through foundation concrete to reroute underground drainage requires heavy-duty core drilling, precise grading, and professional waterproofing.
- Persistent Inspection Failures: If your rough-in pressure test or drain slope fails municipal inspection, bringing in a licensed contractor ensures the underlying code violations are corrected immediately.
Frequently Asked Questions About Shower Plumbing
Explore concise, direct answers to common questions regarding shower installation, conversion projects, electrical considerations, and plumbing troubleshooting.
Can you install your own shower head?
Yes, replacing or installing a standard showerhead is a straightforward DIY task that requires no special plumbing experience. Simply wrap the threaded shower arm with Teflon tape in a clockwise direction, screw the new showerhead on by hand until snug, and give it a final gentle tightening with a wrench using a protective cloth rag to avoid scratching the finish.
How do you install new shower fixtures?
Installing new shower fixtures begins after the rough-in valve is securely mounted and your wall finish is complete. First, screw the decorative trim plate and handle onto the valve cartridge following the manufacturer’s manual. Next, thread on the shower arm and tub spout, ensuring all connections are sealed with appropriate thread tape to prevent leaks.
How do you install a shower where a toilet was?
Converting a toilet space into a shower requires substantial plumbing reconfiguration because toilet waste lines use a large 3-inch or 4-inch pipe, whereas standard standalone showers require a dedicated 2-inch drain line equipped with its own P-trap and vent. You must break into the subfloor or concrete slab, resize the drainage, and tie into an approved vent stack.
How long does it take to add a shower to convert a half bath into a full bath?
Converting a half bath into a full bath typically takes anywhere from 3 to 7 working days for experienced professionals, or significantly longer for a DIY project. The timeline depends heavily on the extent of structural framing modifications, subfloor drainage rerouting, waterproofing cure times, and local municipal inspection schedules.
Is a new shower installation responsible for water leakage in an adjoining bathroom?
A new shower installation can cause water damage in an adjoining room if waterproofing membranes, pan liners, or behind-the-wall supply connections are improperly sealed. Thoroughly conducting pressure tests on supply lines and flood-testing the shower pan before closing up the walls is essential to preventing lateral leaks into neighboring spaces.
Do plumbers install electric showers?
Licensed plumbers can mount and connect the water supply lines for electric instantaneous shower units, but the high-voltage electrical wiring must be handled by a qualified electrician. Electric showers require dedicated high-amp circuits and specialized grounding to operate safely in wet environments.
How do you frame a bathroom shower?
Framing a shower involves building sturdy 2×4 or 2×6 wood stud partitions designed to support cement backer boards and finished tile weight. Crucially, framing must include solid horizontal wood blocking braces positioned at exact heights to anchor your mixing valve body, drop-ear elbows, and grab bars securely in place.
Conclusion and Final Pro Tips
Mastering shower plumbing rough-in and installation requires patience, precision, and adherence to strict building codes. Whether you successfully completed your DIY rough-in or decided when to call in a professional, thoughtful planning ensures your bathroom remains leak-free and functional for years to come.
Key Takeaways
Keep these core principles in mind as you wrap up your shower installation project:
- Precise Rough-In Depth: Always calculate your exact finished wall build-up (including backer board and tile) before securing your mixing valve.
- Mandatory Pressure Testing: Never close up your wall cavity without keeping supply lines under pressure and flood-testing your drain and P-trap.
- Code-Compliant Drainage: Use a dedicated 2-inch drain line with a proper 1/4-inch per foot slope and correct venting to prevent clogs and sewer gas leaks.
- Solid Structural Support: Install heavy-duty wood blocking behind every valve body, drop-ear elbow, and fixture mounting point to eliminate pipe movement.
Final Pro Tips
Incorporate these field-tested strategies from seasoned plumbers to avoid common headaches:
- Label Your Lines: Clearly mark hot and cold supply pipes with waterproof tape before soldering or crimping to prevent costly cross-connection errors.
- Protect Open Ports: Keep test caps or plugs on all drop-ear elbows and drain openings during construction to prevent debris, drywall dust, and tile mortar from clogging your system.
- Double-Wrap Threaded Fittings: Apply 3 to 4 wraps of high-density Teflon tape clockwise on male pipe threads to achieve a tight, leak-free seal without over-torquing.
What to Do Next
Now that you understand the complete shower plumbing process, evaluate your project scope and choose your next steps wisely:
- If You’re Confident & Equipped: Proceed with your rough-in layout, double-check your local plumbing codes, and perform rigorous pressure tests before scheduling your municipal or final inspection.
- If You Encounter Complexities: Reach out to a licensed plumber if your project involves breaking through concrete foundation slabs, altering main DWV stacks, or managing unpermitted structural modifications.

Oscar Vance | Master Plumber & Drainage Expert
Meet Oscar Vance, a licensed master plumber sharing practical solutions on residential repairs, preventive maintenance, and thoughtful home upkeep.

