How to Plumb a Shower Drain
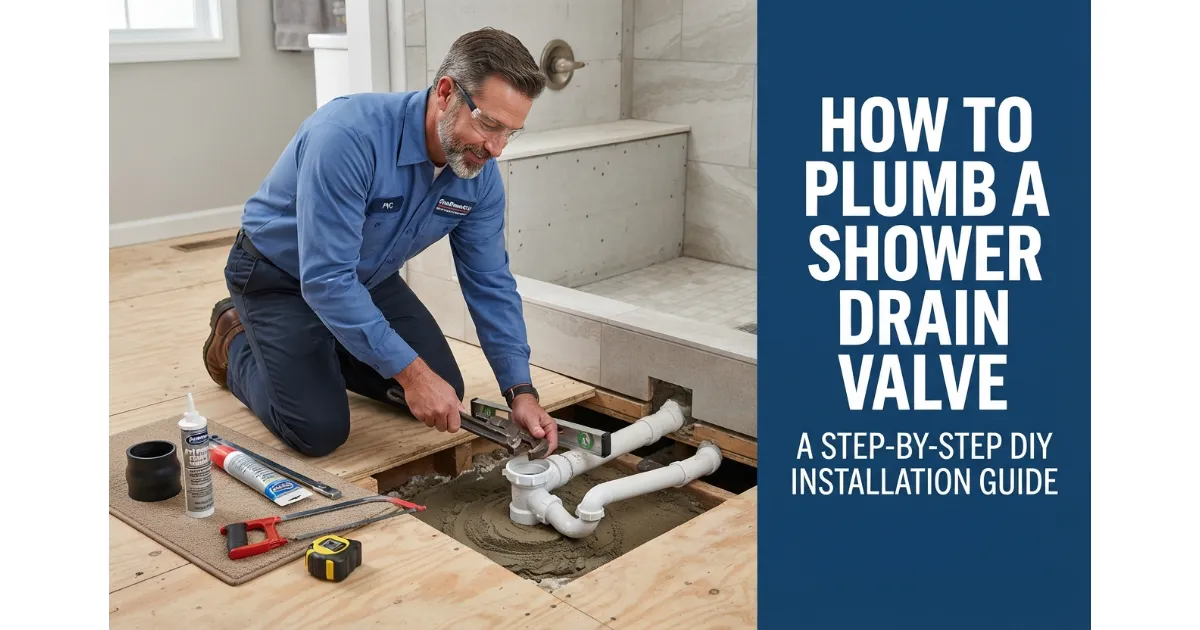
Plumbing a shower drain requires running a 2-inch drain pipe with a consistent slope of 1/4 inch per foot toward the main stack, installing a compliant P-trap, and ensuring a proper vent connection to prevent sewer gas. Success relies heavily on precise alignment with the shower pan and completing a mandatory flood test before sealing the subfloor.
The 6 Steps at a Glance
- Locate Drain: Measure and mark the exact center point for the shower drain based on your chosen shower pan or custom mud bed design.
- Run 2″ Drain Line: Install a 2-inch PVC or ABS drain pipe, ensuring a downward slope of 1/4 inch per foot toward the main waste line.
- Install P-Trap: Position a 2-inch P-trap directly beneath the drain assembly to trap wastewater and block sewer gases from entering the home.
- Connect Vent: Tie the drain assembly into a proper vent pipe to maintain atmospheric pressure and ensure smooth, continuous water flow.
- Connect Drain to Pan: Attach the shower drain fitting securely to the shower pan or liner using rubber gaskets and compression nuts to prevent leaks.
- Flood Test: Plug the drain, fill the shower pan with water up to the threshold, and let it sit for at least 24 hours to verify zero leaks.
How Shower Plumbing Works Drain Side vs Supply Side
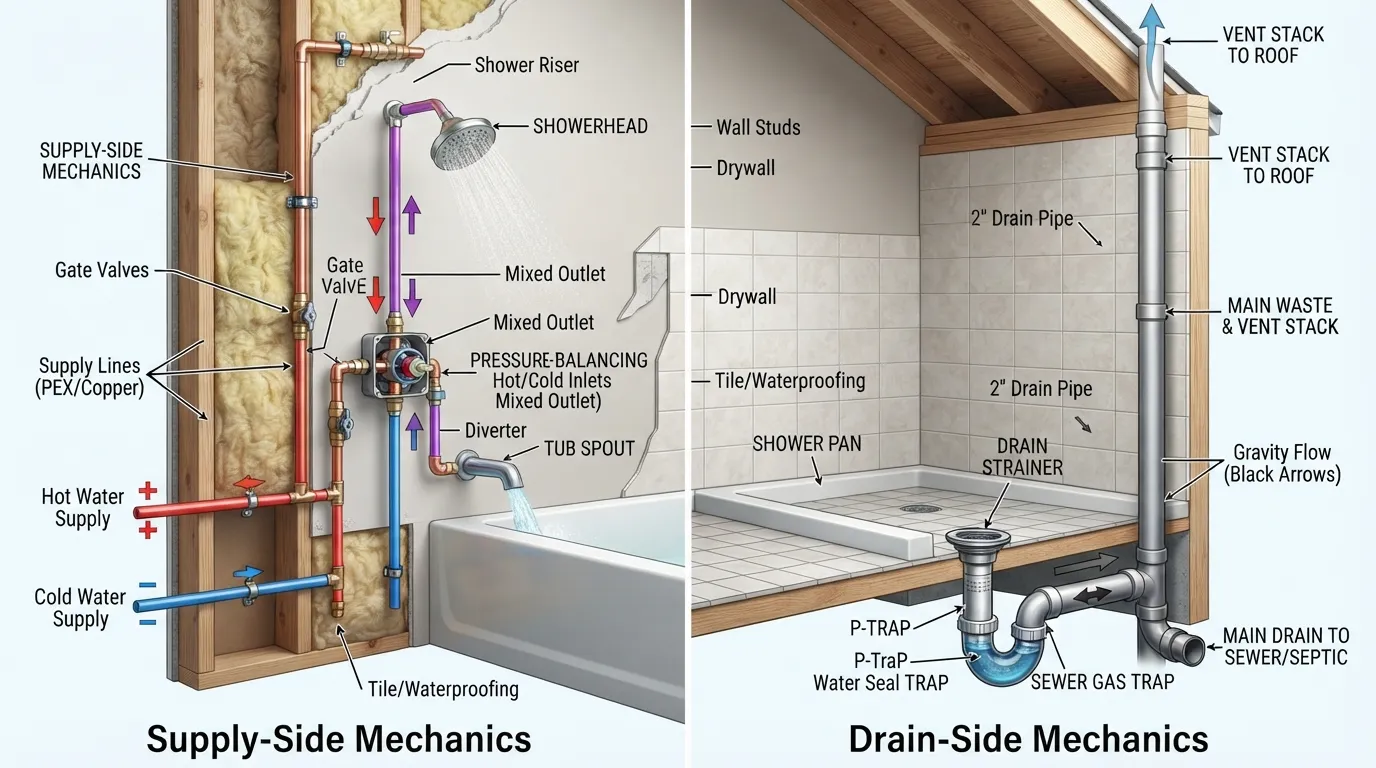
Shower plumbing is broadly split into two independent networks: the supply side and the drain side. The supply side delivers hot and cold water under pressure through the shower valve and mixing pipes, whereas the drain side operates via gravity within the Drain, Waste, and Vent (DWV) system to safely remove used wastewater.
Parts of a Shower Drain System
A compliant shower drain setup relies on several specialized mechanical components working in tandem to prevent leaks and blockages. Each part plays a critical structural and safety role:
- Drain Body & Clamping Ring: Secures the shower liner or pan tightly to prevent water seepage into the subfloor.
- P-Trap: Retains a small pool of water to block dangerous sewer gases from entering your bathroom.
- Trap Arm: Connects the P-trap directly to the main vertical waste stack.
- Vent Pipe: Equalizes atmospheric pressure in the lines to ensure smooth drainage and prevent trap siphoning.
- Shower Pan/Base: Directs all surface water runoff efficiently toward the central drain assembly.
Where the Drain Fits in the Whole Shower
Understanding the complete shower architecture helps coordinate rough-in stages effectively. Supply lines handle high-pressure water delivery near the top and middle wall studs, while the drain components integrate strictly at floor level to catch runoff, meaning both systems must be planned simultaneously before closing up walls and subfloors.
Before You Start Code Permit & Planning
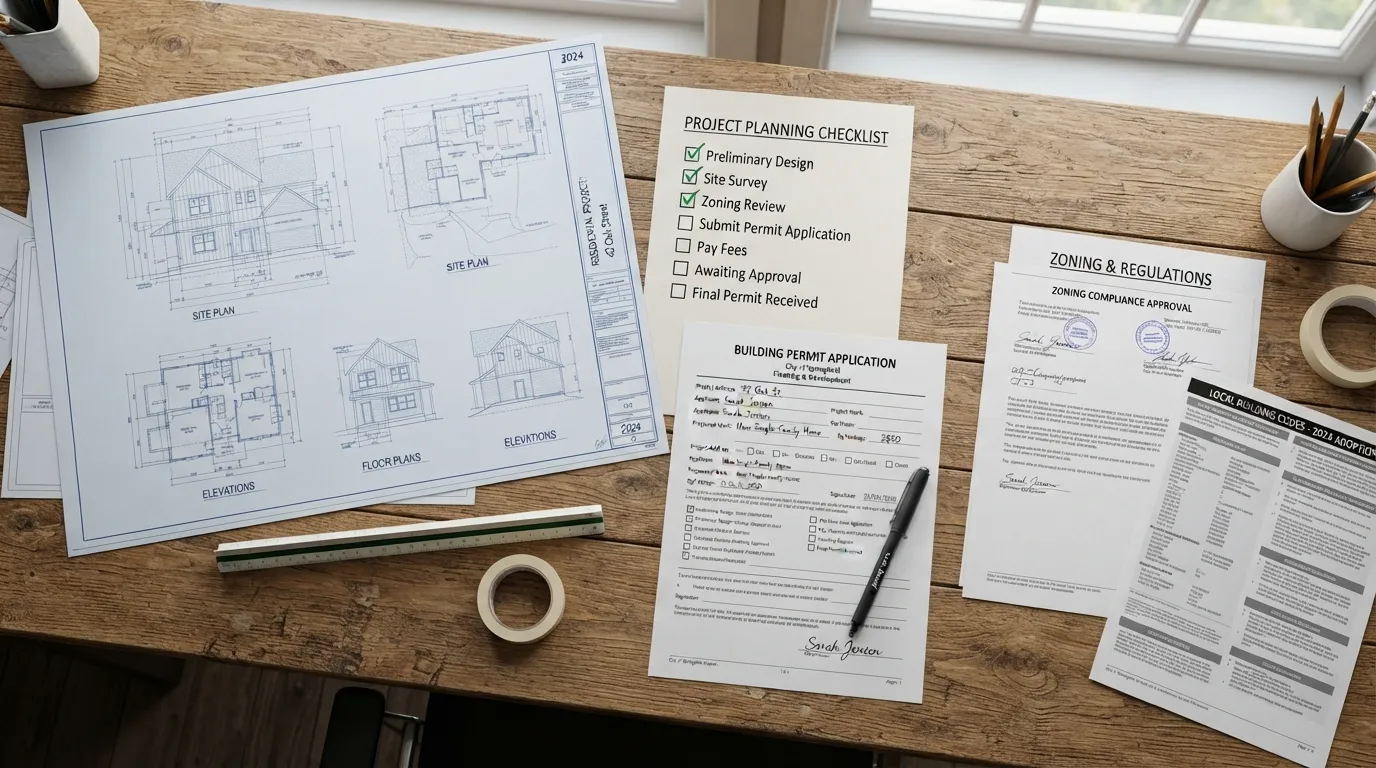
Most local municipalities require a building and plumbing permit before adding or relocating a shower drain. Skipping this step can lead to failed home inspections, fines, or insurance claim denials if a water leak causes structural damage down the line.
Drain Size and Slope Rules
Plumbing codes under both the IPC and UPC mandate specific technical requirements for proper wastewater drainage. Adhering to these strict dimensional rules prevents slow drains, chronic clogs, and costly repairs:
- Minimum Pipe Size: New shower drains must connect to a minimum 2-inch drain pipe; 1.5-inch pipes are typically restricted to bathtubs only.
- Required Slope: Horizontal drain lines must maintain a consistent downward slope of 1/4 inch per foot toward the main stack.
- Code Verification: Always check your local building department guidelines, as regional amendments can modify national code standards.
Which Shower Pan Type Do You Have?
The chosen shower base dictates how the drain assembly is sealed and positioned during the rough-in stage. Selecting the right foundation ensures a watertight seal and proper alignment with your subfloor plumbing:
- Pre-Formed Base: Acrylic or fiberglass bases come with integrated slopes and fixed drain locations, making alignment straightforward.
- Tile-Ready Base: Manufactured foam pans accept direct tile installation while providing pre-sloped surfaces and factory-fitted drain assemblies.
- Mortar-Bed with Liner: Traditional custom showers require a hand-troweled mortar slope built over a flexible waterproof PVC or CPE pan liner.
Slab vs. Crawlspace vs. Basement vs. Upper Floor
The structural layout of your home drastically changes how you access and install shower plumbing lines. Concrete slab foundations require breaking through concrete to tie into buried lines, whereas crawlspaces and basements offer open ceiling access for easier pipe routing. Upper-floor installations require careful joist modification planning, and basements sitting below the main sewer line may require a specialized sewage ejector pump system.
New Build vs. Remodel
New construction allows you to design your DWV layout freely without structural obstructions, making rough-ins faster and cleaner. Remodeling projects require inspecting existing pipes for corrosion or incorrect sizing, often forcing you to tie into older cast iron or ABS lines while navigating finished walls and subfloors.
Tools & Materials for Plumbing a Shower Drain
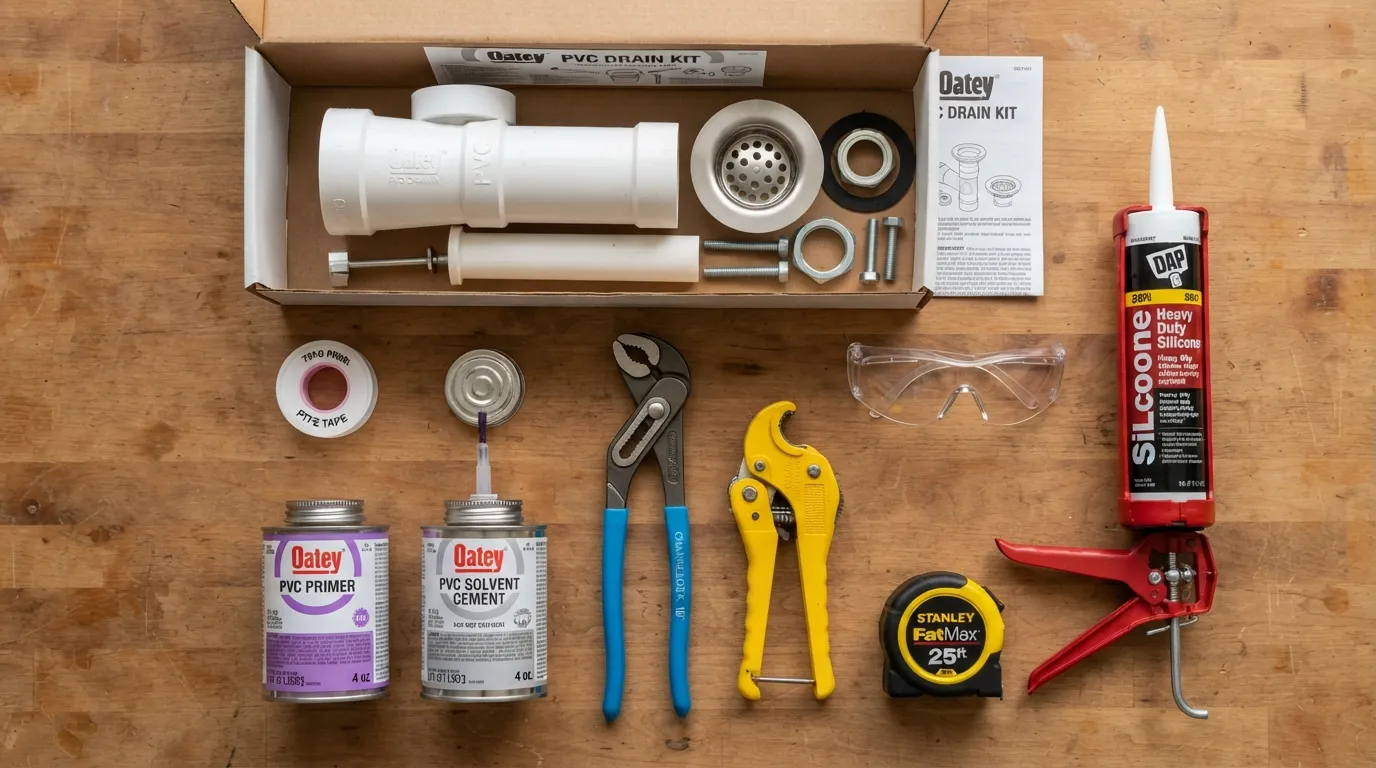
Having the right tools on hand ensures clean cuts, precise measurements, and secure pipe assemblies. Preparing your workspace with these essential instruments prevents mid-project delays and guarantees code-compliant connections:
- Pipe Cutter or Hacksaw: For making clean, square cuts on PVC or ABS plastic pipes.
- Level: Essential for verifying the mandatory 1/4-inch per foot slope on horizontal drain lines.
- Tape Measure: For precise layout planning and accurate pipe length calculations.
- Deburring Tool or Utility Knife: To smooth out rough pipe edges and burrs before gluing.
- Permanent Marker: For marking cut lines, fitting depths, and layout alignments.
- Adjustable Pliers: For tightening slip-joint nuts and drain body compression rings securely.
Materials Checklist
Gathering all necessary plumbing supplies beforehand keeps your installation efficient and uninterrupted. Make sure you have these core structural components and chemical agents ready:
- 2-Inch PVC or ABS Pipe: The standard diameter required for modern code-compliant shower drain lines.
- 2-Inch P-Trap: Creates a vital water seal to prevent sewer gases from leaking into the bathroom.
- Fittings and Elbows: Long-sweep 90-degree elbows or combinations to direct wastewater smoothly.
- Shower Drain Body: The structural assembly that connects the shower pan or liner to the waste pipe.
- Purple Primer and Solvent Cement: Chemical agents required to chemically weld PVC or ABS pipe joints together.
- 2-Inch Test Plug: Essential for sealing the line during the mandatory 24-hour pressure or flood test.
PVC vs. ABS Don’t Mix Without a Transition Cement
Never mix PVC and ABS pipes using standard all-purpose glue, as they are chemically different plastics that will fail under pressure over time. If your existing home plumbing uses one material and your new run uses the other, you must use a special multi-purpose transition cement or approved mechanical transition couplings to ensure a permanent, leak-free bond.
How to Install Shower Drain Plumbing Rough-In Step by Step
Measure and mark the exact center point for your drain based on the manufacturer’s specifications for your shower pan or custom mud bed [00:00:50]. Whether you are setting a center drain or an off-center model [00:01:06], precise alignment with your framing studs and subfloor joists ensures you won’t have to cut structural supports unexpectedly later [00:00:58].
Step 2: Cut the Subfloor or Slab Opening
Cut an access hole through your plywood subfloor or concrete slab large enough to accommodate the 2-inch drain pipe, P-trap, and surrounding fittings [00:01:28]. For crawlspaces or basements, clear away any insulation or debris to give yourself a clean, safe working space directly beneath the shower area [00:01:48].
Step 3: Dry-Fit Before You Glue
Assemble your pipes, couplings, and P-trap without any primer or solvent cement to verify exact measurements and alignments [00:04:10]. Dry-fitting is a critical step that lets you catch minor misalignments, adjust pipe lengths, and ensure the drain assembly connects smoothly to the shower pan outlet without binding [00:04:17].
Step 4: Run the Drain Line with the Right Slope
Position your 2-inch drain line so it maintains a steady, downward slope of 1/4 inch per foot toward the main waste stack [00:01:06]. Use a spirit level along horizontal runs to confirm the correct pitch, ensuring wastewater will drain rapidly and completely without pooling.
Step 5: Glue the Joints
Apply purple primer to clean and soften the plastic on all mating surfaces of the pipe ends and fittings [00:04:29]. Follow up quickly with solvent cement, push the components together with a slight quarter-turn to evenly distribute the glue, and hold pressure on the joint for 20 seconds to guarantee a permanent, pressure-tight chemical weld [00:05:41].
Catching Alignment Errors Early
During a recent rough-in, a common oversight occurred when dry-fitting the vertical drop: failing to account for the exact depth the pipe inserts into the coupling hubs [00:02:50]. Measuring strictly from edge-to-edge without factoring in the socket stop depth left the vertical run a quarter-inch too short [00:02:55]. Catching this during the dry-fit phase saved the entire assembly from misalignment and prevented a costly rework after gluing [00:04:17].
How to Plumb a Shower Drain Trap
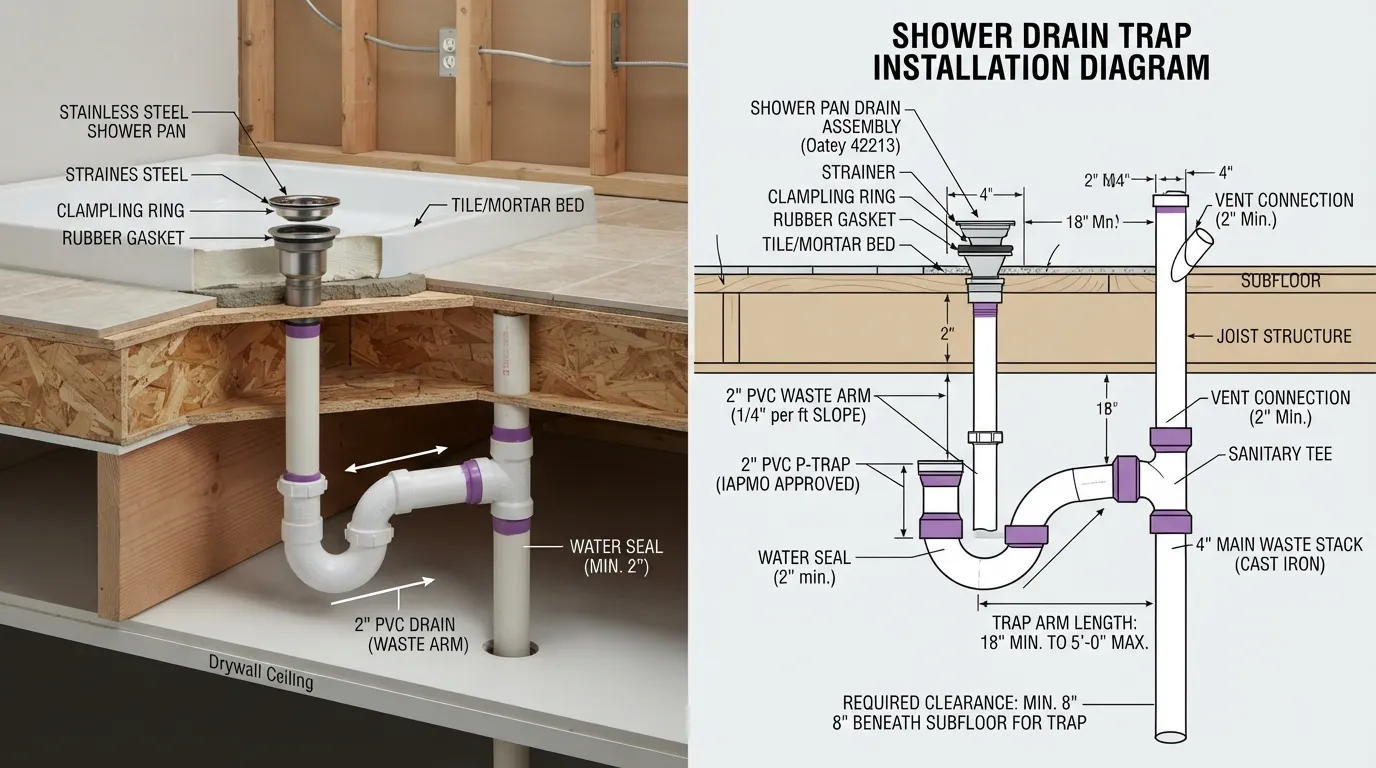
A shower P-trap holds a standing pool of water that creates an airtight physical barrier inside the pipe. This crucial water seal prevents toxic and foul-smelling sewer gases from backing up through the drain and entering your home.
What Size P-Trap Does a Shower Need?
Building codes strictly mandate a 2-inch P-trap for all standard residential showers to match the minimum capacity of the 2-inch drain pipe. Using smaller 1.5-inch traps is typically restricted to bathtubs and can cause dangerous slow-drain backups during high-volume shower use.
How Close Must the Trap Be to the Drain?
Plumbing regulations enforce strict distance boundaries between the shower drain opening and the trap weir to prevent siphonage and pressure loss. As outlined in IPC 2024 Chapter 10: Traps, Interceptors and Separators, the code caps the vertical distance from fixture outlet to trap weir at 24 inches and the horizontal distance at 30 inches.
How to Connect the P-Trap Step by Step
Connecting a P-trap requires careful alignment of the trap arm and proper directional pitch toward the main waste stack. Follow these installation standards to ensure a secure, code-compliant fit:
- Align the Inlet: Position the trap inlet directly under the shower drain tailpiece without applying lateral stress to the pipe.
- Maintain Slope: Ensure the horizontal trap arm slopes downward toward the waste stack at a consistent rate of 1/4 inch per foot.
- Select Joint Type: Use solvent-welded PVC or ABS joints for permanent hidden installations, reserving slip-joint connections only for accessible locations where local codes allow.
Why Shower Traps Dry Out
Infrequently used guest showers or vacant properties can experience trap seal evaporation over several weeks, allowing sewer gases to enter the room. You can easily prevent dry traps by periodically running water down the drain or pouring a small amount of mineral oil on top of the water seal to slow evaporation.
How to Vent a Shower Drain
A proper vent pipe allows air to enter the DWV system, balancing atmospheric pressure so wastewater flows smoothly without creating a vacuum. Without adequate venting, rushing water can pull the water straight out of your P-trap—a dangerous process known as trap siphoning—leaving an open pathway for noxious sewer gases to infiltrate your living space.
Vent Options Individual Vent Wet Vent or Air Admittance Valve AAV
Choosing the right venting strategy depends on your bathroom layout, structural constraints, and local plumbing code limitations. Understanding these primary methods ensures your installation remains fully functional and legal:
- Individual Vent: A dedicated vent pipe runs straight up from the shower drain line through the roof, providing uninterrupted airflow.
- Wet Vent: Uses a shared vertical or horizontal pipe section—such as a nearby bathroom sink or toilet drain—to serve as both a drain and a vent simultaneously.
- Air Admittance Valve (AAV): A mechanical one-way valve that opens to let air in when water drains and seals shut to prevent gas leaks; note that AAVs are prohibited in many jurisdictions under regional building codes.
How Far Can the Vent Be from the Trap?
Plumbing codes enforce strict maximum distances between a shower trap weir and its vent connection to maintain reliable pressure balance. Because permitted maximum lengths vary based on pipe diameter and regional codes (such as IPC versus UPC standards), always verify exact allowable distances with your local building authority before roughing in your lines.
Signs of a Venting Problem
A failing or absent vent system creates distinct warning signs that indicate trapped air and pressure imbalances within your plumbing lines. Look out for these common symptoms:
- Gurgling Sounds: Bubbling or gurgling noises coming from the shower drain or nearby fixtures as water empties.
- Slow Drainage: Water pooling in the shower pan even though the drain pipes are completely free of physical hair or soap clogs.
- Foul Odors: Unexplained sewer smells lingering in the bathroom due to compromised or dry water seals.
How to Plumb a Shower Pan
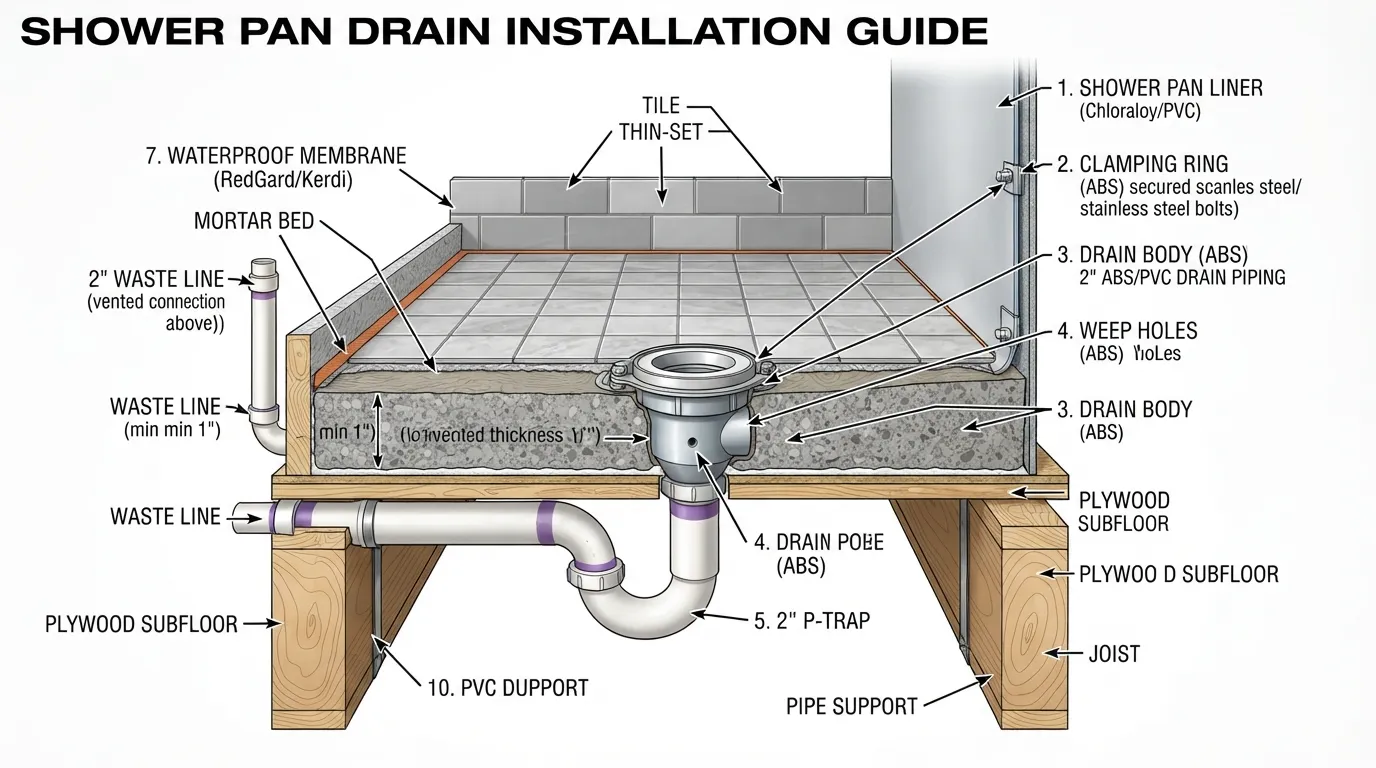
Pre-formed fiberglass, acrylic, or foam tile-ready shower bases feature built-in slopes and a factory-threaded or compression drain opening. Connecting these units requires securing the upper drain body directly to the pan floor with a specialized rubber gasket and tightening nut, ensuring a watertight squeeze against the base before it drops onto the rough-in pipe.
Mortar-Bed Pan with Liner Two Piece Drain Clamping Ring Weep Holes
Traditional custom-sloped shower pans built with a flexible waterproof liner require a specialized two-piece drain assembly. The bottom half ties into the subfloor waste pipe, the PVC or CPE liner sandwiches tightly over it via a bolted clamping ring, and the upper barrel threads down. Crucially, this design relies on integrated weep holes around the drain throat to catch and drain any moisture that penetrates the mortar bed above.
Center Drain vs. Linear Drain
Choosing between a traditional center drain and a modern linear drain changes both your pan framing and plumbing rough-in layout. Center drains require compound slopes pitched evenly from all four sides, whereas linear drains sit flush against one wall or threshold, allowing you to use large-format tiles by pitching the entire floor in a single unified direction toward a single-slope channel.
Slope of the Pan Floor Toward the Drain
Building codes and manufacturer specifications require the shower sub-floor or mortar bed to maintain a consistent upward slope ranging from 1/4 inch to 1/2 inch per foot toward the drain. This precise pitch guarantees that all surface water flows rapidly and completely into the waste system without leaving stagnant puddles on the shower floor.
Real-World Insight Preventing Weep Hole Blockages
A frequent rookie mistake that ruins custom mortar-bed showers is letting wet mortar or spilled silicone block the crucial weep holes inside the clamping ring. To protect these drainage channels, wrap the drain throat and weep holes loosely in plumber’s mesh or pea gravel before packing your mortar bed, ensuring trapped subsurface moisture always has a clear path back into the pipe.
How to Flood Test a Shower Drain and Pan
Performing a rigorous flood test before installing any tile or cement backer board is the ultimate safeguard against catastrophic structural water damage. Catching a tiny pinhole leak or imperfect drain seal while the subfloor is fully exposed [00:04:10] makes repairs simple and inexpensive, whereas discovering a leak after finished tiling can force a complete, costly gut-reno remodel [00:04:11].
Is a Flood Test Required?
Tile Council of North America (TCNA) guidelines heavily recommend flood testing every newly installed shower pan to verify total waterproof integrity [00:03:04]. Furthermore, most municipal building inspectors strictly mandate a formal 24-hour flood test before signing off on rough-in plumbing permits.
Step-by-Step Flood Test
Executing a reliable shower pan test requires systematic preparation, proper sealing, and careful water level monitoring over an extended period [00:00:21]:
- Insert Test Plug: Secure a 2-inch pneumatic or mechanical test plug tightly into the drain pipe to block all water escape [00:00:30].
- Fill the Pan: Slowly fill the shower basin with water until it sits roughly 1/2 inch below the top of the threshold or curb [00:02:13].
- Mark Water Level: Use a permanent marker to draw a precise line at the exact waterline once the surface stops rippling [00:02:18].
- Wait 24 Hours: Let the water sit undisturbed for a minimum of 24 hours (or longer if required by local plumbing code) [00:00:30].
- Verify Level: Inspect the baseline mark against the water surface to confirm zero loss or seepage [00:03:20].
What If the Water Level Drops?
If you notice the water level has decreased after 24 hours, do not panic immediately; first verify whether your test plug is leaking or sweating moisture [00:05:01]. If the plug is completely airtight, check the waterproof membrane or liner for micro-perforations, patch the affected area with fresh sealant or liquid membrane, let it cure fully, and repeat the test until the water level remains completely stable [00:04:36].
Common Shower Drain Plumbing Mistakes
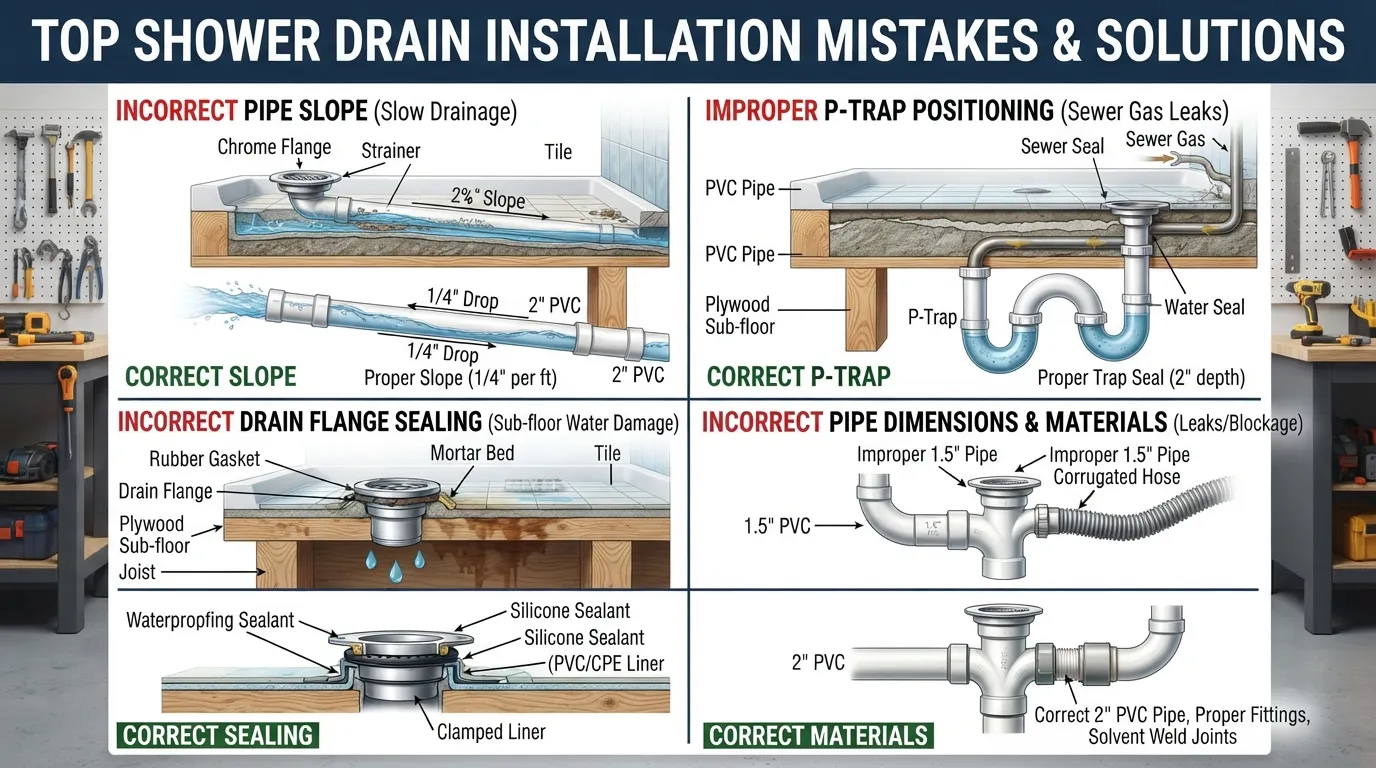
Failing to maintain a consistent downward slope of 1/4 inch per foot is one of the most frequent installation errors [00:01:06]. Without this proper pitch, wastewater crawls too slowly or pools completely in the pipes, leading to chronic, recurring clogs and foul odors.
Skipping the Vent
Omitting a dedicated or wet vent [00:05:29] creates severe pressure vacuums whenever high-volume water rushes down the waste line. This vacuum instantly sucks the standing water straight out of your P-trap [00:01:36], leaving an unsealed opening for hazardous sewer gases to flood your bathroom [00:01:01].
Not Dry-Fitting or Not Gluing the Trap
Rushing straight into gluing pipes without a thorough dry-fit phase almost always results in alignment errors, crooked assemblies, or incorrect pipe insertion depths [00:04:10]. Conversely, forgetting to apply primer and solvent cement properly to every joint guarantees eventual joint separation and hidden leaks under the floor.
Mixing PVC and ABS
Attempting to bond PVC and ABS plastic pipes together using ordinary all-purpose glue or standard cement leads to structural bond failure over time. Because these two plastics have entirely different chemical compositions, you must always use approved transition cement or mechanical transition couplings.
Skipping the Flood Test Before Tile
Rushing to install tile, backer board, or cement screed without executing a 24-hour flood test is a massive gamble [00:03:04]. Discovering a liner puncture or loose drain seal after the finished tile is laid requires destroying your brand-new shower floor to make repairs [00:04:11].
Blocked Weep Holes
Allowing mortar beds, thinset, or silicone sealant to spill over and choke the weep holes around a two-piece clamping drain traps subsurface moisture permanently. This trapped water saturates the mortar sub-base, causing premature structural breakdown, mold growth, and eventual floor failure.
Frequently Asked Questions
A slow shower drain usually points to a physical blockage in the trap or a compromised pipe slope that fails to carry water away efficiently. Inspect the drain strainer first for accumulated hair and soap scum, and if the trap is clear, verify that your vent system is letting air flow freely to prevent suction resistance.
Why Does My Shower Drain Gurgle?
Gurgling noises occurring while water drains indicate a trapped air pocket or a failing vent system struggling to equalize atmospheric pressure. When air cannot enter the vent stack properly, rushing wastewater pulls air bubbles through neighboring P-traps, creating characteristic bubbling sounds and erratic drainage.
Why Does My Shower Smell Like Sewer?
Unpleasant sewer odors emerging from the drain are a classic sign of an empty or compromised water seal within the P-trap. Check if the shower has sat unused long enough for the water to evaporate, or inspect your roof vent to ensure it hasn’t become blocked by leaves, debris, or bird nests.
How Do I Find a Leak Around the Shower Drain?
Locating a hidden leak requires inspecting the subfloor or crawlspace beneath the shower while running water directly into the basin. Look for damp wood, active drips around the clamping ring, or water seeping past the P-trap joints, and re-check that your waterproofing membrane and weep holes are functioning correctly.
Conclusion Key Takeaways
Successfully plumbing a shower drain comes down to executing a series of precise structural steps in the correct order. Review this essential checklist before closing up your subfloor and walls:
- 2-Inch Drain Pipe: Ensure your entire waste run utilizes a minimum 2-inch PVC or ABS pipe to handle high-volume water safely.
- Compliant P-Trap: Install a proper 2-inch P-trap to maintain a reliable water seal against harmful sewer gases.
- Adequate Venting: Tie into a dependable individual, wet, or stack vent to prevent trap siphoning and ensure smooth, rapid drainage.
- 1/4-Inch Slope: Verify that all horizontal drain runs maintain a consistent downward pitch of 1/4 inch per foot toward the main stack.
- Secure Pan Connection: Fasten your shower drain body tightly to your pre-formed base, tile-ready pan, or mortar liner.
- 24-Hour Flood Test: Perform a thorough water pressure and leak test for at least 24 hours before installing any tile or backer board.
Final Safety & Code Reminder
Plumbing regulations and building codes vary significantly by region, city, and state. Always verify your local municipal requirements, pull the necessary plumbing permits, and schedule formal inspections to ensure your new shower installation is completely safe, compliant, and built to last.

Oscar Vance | Master Plumber & Drainage Expert
Meet Oscar Vance, a licensed master plumber sharing practical solutions on residential repairs, preventive maintenance, and thoughtful home upkeep.

