How to Release Push-Fit Plumbing Fittings
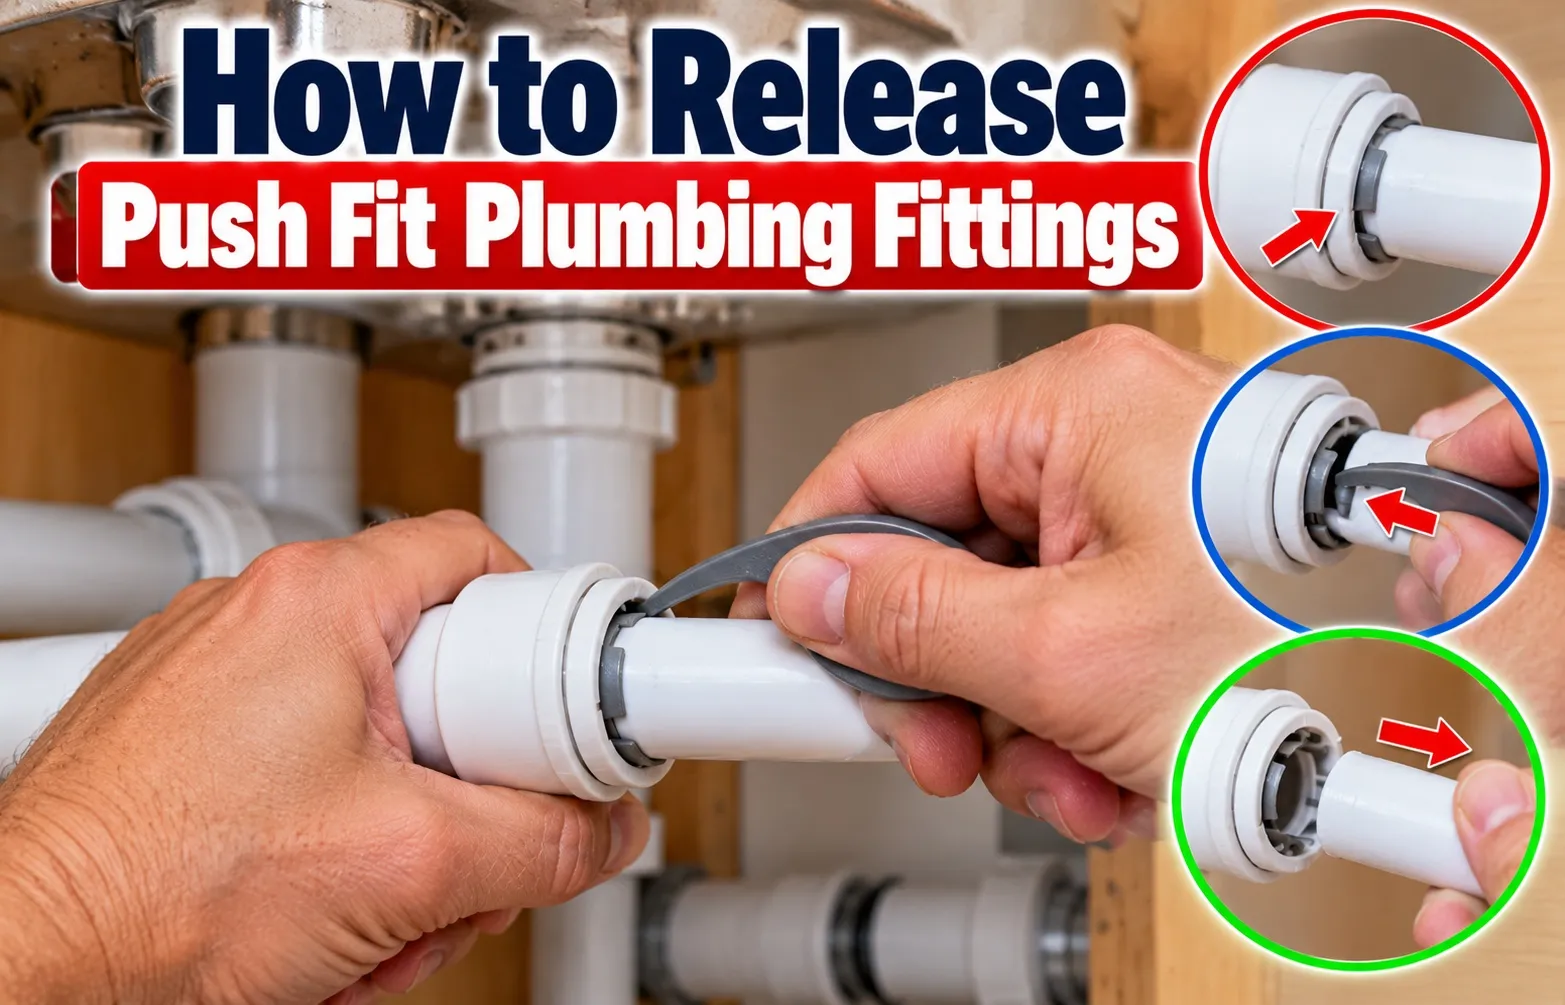 To release push-fit plumbing fittings, you must press the outer release collar (collet) firmly flat against the body of the fitting while simultaneously pulling the pipe straight out.
This action depresses the internal stainless steel grab ring teeth that bite into the pipe, releasing their grip and allowing the internal O-ring seal to slide off cleanly without damaging the connection.
How to Disconnect a Push-Fit Fitting in 3 Quick Steps
Follow these core execution steps to remove any standard push-to-connect fitting safely in seconds:
- Press the Release Collar: Place a disconnect clip, tongs, or an open-end wrench around the pipe and push the plastic release collar (collet) completely flush against the fitting body.
- Apply Counter-Pressure: While holding the collar fully depressed, push the pipe slightly inward (1/16th of an inch) to unseat the stainless steel grab ring teeth embedded in the pipe wall.
- Pull the Pipe Straight Out: Maintain steady pressure on the collar and pull the pipe directly outward without twisting or pulling at an angle to protect the internal O-ring seal.
Essential Pre-Removal Safety Steps
Performing proper preparation prevents sudden water damage, localized flooding, and internal fitting damage during the removal process.
- Shut Off the Main Water Valve: Locate the primary water shut-off valve or local fixture isolation valve and close it completely before touching the fitting.
- Relieve Line Pressure: Open the lowest faucet or fixture in the plumbing line to drain remaining water and eliminate lingering static line pressure.
- Remove Security Clips: Pop off any secondary locking clips or collet spacers installed on brand connections like John Guest or Speedfit before attempting collar compression.
Required Tools & Improvised Alternatives Checklist
Having the right tools on hand ensures a quick release without damaging the pipe wall, fitting body, or internal seals.
Whether you use dedicated tools or common household alternatives, ensuring proper fit against the collet is critical for adhering to IAPMO Plumbing Safety Standards during any pipe modification.
Specialized Disconnection Tools
Manufacturer-approved tools offer the safest and fastest way to depress the release collar evenly across all pipe diameters.
- Disconnect Clip: A plastic, horseshoe-shaped clip designed to snap around the pipe and push the release collar flush against the fitting body. Available for standard 1/2 inch, 3/4 inch, and 1 inch pipes.
- Plastic Removal Tongs: Pliers-style tools that give you extra leverage, making them ideal for tight spaces or stubborn, stiff fittings.
- Brand-Specific Keys (HepKey & Demount Clips): Custom keys engineered specifically for brands like Hep2O or Speedfit to disengage specialized locking mechanisms.
Household Alternatives
If you do not own a specialized removal tool, standard household tools can successfully release push-fit connections when used correctly.
- Adjustable Crescent Wrench: Adjust the jaw width to fit snugly around the pipe directly behind the collet, then push the wrench flat against the fitting to apply even pressure.
- Open-End Spanner: Select a spanner size matching your pipe diameter to depress the collar evenly without scratching the pipe surface.
- Flathead Screwdriver: Ideal for small 1/4 inch tubing (such as RO water filter lines or ice maker feeds); gently press opposite sides of the tiny collet ring flat against the fitting body.
Removal Guide (Standard Method)
Executing a standard push-fit removal requires a controlled sequence to disengage the internal components without scratching the pipe or damaging the rubber seal.
Following this structured procedure prevents leaks and ensures both the pipe and fitting remain fully reusable for your plumbing project.
Step 1: Depress the Outer Collet (Release Collar)
The first step requires pushing the outer release collar (collet) flat against the main body of the fitting to open the internal locking mechanism.
- Locate the Collet: Identify the movable plastic or metal ring facing outward on the connector.
- Apply Even Pressure: Push the collet uniformly inward so it sits flush against the edge of the fitting.
- Check Engagement: Ensure the entire circumference of the collar is depressed to release the internal stainless-steel grab ring evenly.
Step 2: Apply Inward Pipe Pressure to Disengage Grab Ring Teeth
Pushing the pipe slightly inward before pulling releases the bite of the internal stainless-steel grab ring from the pipe wall.
- Push Inward: While keeping the collet fully depressed, push the copper pipe, PEX tubing, or CPVC pipe roughly 1/16th of an inch deeper into the fitting.
- Relieve Friction: This micro-movement unbinds the teeth that have locked into the pipe material during standard operation.
- Maintain Hold: Keep continuous pressure on both the collet and the pipe before transitioning to the final extraction motion.
Step 3: Pull the Pipe Straight Out (Avoiding Angular Drag)
Pulling the pipe straight out in strict alignment prevents angular drag that can score the pipe wall or cause severe O-ring damage.
- Maintain Straight Alignment: Keep the pipe perfectly parallel with the fitting’s entry channel to avoid bending or tilting.
- Pull Firmly: Pull the pipe straight out in a smooth, confident motion while keeping the collet pressed down.
- Inspect the Output: Verify that the pipe slides out cleanly without catching on internal components or tearing the rubber seal.
Brand-Specific Removal Variations
Different plumbing manufacturers design their push-fit connectors with slight mechanical variations that require specific handling techniques for successful removal.
Understanding these brand distinctions prevents component damage and ensures you apply the correct technique whether working with heavy-duty brass valves or delicate plastic water filter tubing.
How to Release SharkBite & Brass Push-to-Connect Fittings
SharkBite fittings feature robust brass bodies with internal stainless-steel teeth that require firm, uniform pressure to release.
- Use the SharkBite Removal Tool: Snap the plastic horseshoe tool or tongs around the pipe to depress the brass or plastic collar ring evenly.
- Handle Tight Angles: For fittings installed close to studs or joists, rotate the disconnect clip to access hard-to-reach sides of the collet.
- Check the Teeth: Inspect the internal grab ring after extraction to ensure the brass body and teeth remain undamaged before any re-installation.
Removing Plastic Quick-Connects (John Guest, Speedfit & Hep2O)
Plastic push-fit systems often incorporate secondary security features and specialized locking mechanisms to prevent accidental disconnection.
- John Guest Locking Clips: Always pop off the colorful collet locking clip or spacer ring before attempting to depress the collet.
- Speedfit Twist-and-Lock Collets: Some plastic fittings require a slight twist of the outer cap to unlock the collet before pushing it downward.
- HepKey Demounting: Use official brand keys (such as a HepKey) to apply even, reverse demounting pressure across delicate plastic fittings.
Handling Small-Diameter Tubing (Refrigerator Lines & RO Systems)
Miniature quick-connect fittings used in reverse osmosis systems and refrigerator water lines require a gentle touch to avoid crushing thin walls.
- Remove Securing Collet Collar: Pull out any horseshoe-shaped locking collet wedge or safety clip from beneath the collet flange.
- Fingernail Compression: Press the small plastic collet inward using your thumbnails or a flathead screwdriver tip.
- Protect Food-Grade Plastic Tubing: Pull the soft plastic or LLDPE tubing straight out slowly to prevent tearing or scoring the soft exterior surface.
How to Remove Push-Fit Fittings Without a Tool or in Tight Spaces
Facing a stuck plumbing connection under a cramped vanity cabinet or inside a narrow wall cavity without official disconnection clips can be stressful. Knowing how to execute a tight space removal using clever makeshift techniques allows you to disconnect quick-connect fittings safely without specialized equipment.
The Adjustable Crescent Wrench Trick (Equal Pressure Method)
An adjustable crescent wrench serves as an effective makeshift tool when official horseshoe tongs are unavailable, providing the necessary leverage to depress the collet uniformly.
- Open and Position Wrench: Adjust the jaws of a standard crescent wrench so they fit loosely around the pipe directly behind the fitting’s release collar.
- Apply Uniform Pressure: Push the flat face of the wrench evenly against the outer collet to compress it flush into the fitting body without tilting or binding.
- Extract the Pipe: Hold the wrench firmly against the collar with one hand while pulling the pipe straight out with your other hand.
DIY Hacks for Tight Spaces (Zip-Ties, Slotted PVC, & Needle-Nose Pliers)
When working in a restricted wall cavity or tight corner where wrenches cannot maneuver, alternative DIY household items can act as makeshift levers to achieve a successful tight space removal.
- The Heavy-Duty Zip-Tie Trick: Wrap a thick zip-tie around the pipe right behind the collet, pull it tight to form a ring, and use it to push the collar inward.
- Slotted PVC Pipe Segments: Cut a small notch or slot into the end of a short piece of plastic tubing to slide over the pipe and press the collet evenly.
- Needle-Nose Pliers Caution: Use needle-nose pliers only if there is sufficient clearance, gently pressing against opposite sides of the collar while ensuring you do not gouge the pipe wall.
Small Tubing Hacks (Fingernail & Flathead Screwdriver Techniques)
Miniature push-fit fittings found on 1/4 inch or 3/8 inch refrigerator water lines and reverse osmosis systems do not require heavy tools for successful disconnection in a confined space.
- Fingernail Pressure: For tiny plastic fittings, simply pressing your fingernails against the small collet ring is often enough to release the internal teeth.
- Flathead Screwdriver Leverage: Carefully use the tip of a small flathead screwdriver to nudge the micro-collet flush against the fitting body.
- Remove Locking Wedges First: Always slide out any tiny blue or black locking clip wedged beneath the collar before attempting to press it inward to remove push fit without tool assistance.
Troubleshooting Stuck or Corroded Fittings
When a push-fit fitting has been installed for years, mineral deposits, paint overspray, or pipe scoring can cause the release mechanism to freeze in place.
Understanding how to address a stuck push fit connector using gentle, targeted techniques prevents damaged pipes, broken fittings, and costly plumbing repairs.
Dealing with Mineral Scale, Limescale, and Corrosion
Hard water crust and limescale build-up can cement the outer collet to the internal stainless steel teeth, preventing the release collar from moving inward.
- White Vinegar Soak: Wrap a rag soaked in warm white vinegar around the corroded fitting for 15 to 20 minutes to dissolve mineral scale and hard water deposits naturally.
- Apply Penetrating Oil: Spray a small amount of plumbing-safe penetrating oil or WD-40 Specialist directly into the collet gap to lubricate frozen internal components.
- Gently Tap the Body: Lightly tap around the brass or plastic fitting body with a small wrench handle to break up stubborn scale bonds before attempting removal again.
How to Free Bites Gouges Locked on Copper Pipes
Over time, high water pressure or pipe vibration can cause the stainless steel grab ring to dig deep score marks into soft copper pipes, locking the pipe in place.
- Push and Twist Technique: While holding the collet fully depressed, push the copper pipe inward slightly and twist it back and forth a quarter-turn to disengage the buried grab teeth from the score marks.
- Maintain Constant Collet Pressure: Ensure the collet remains completely flush against the fitting body throughout the rotational movement to prevent the teeth from re-grabbing the pipe.
- Inspect Pipe Ends: Once removed, check the pipe surface closely; severe gouges must be cut away with a pipe cutter before installing a new fitting.
Extracting Stuck Plastic Stiffeners Inserts
When disconnecting PEX tubing, the internal plastic pipe stiffener sometimes remains stuck inside the fitting or stays lodged within the pipe end.
- Removing Inserts from the Fitting: If the PEX pipe stiffener remains wedged inside the fitting, gently grip its exposed lip with needle-nose pliers and pull it straight out.
- Extracting Inserts from Tubing: If the insert stays inside the PEX tubing, leave it intact if you plan to re-install a push-fit connector on that exact line.
- Avoid Scratches: Never pry against the internal rubber O-ring seal with sharp tools during internal insert extraction, as any nick to the rubber will cause immediate leaks.
Inspection Reusability & Pipe Re-Preparation
Inspecting both the pipe end and the internal components of the fitting after removal is essential for preventing structural failures and catastrophic leaks during re-assembly.
Proper re-installation preparation ensures your plumbing line retains a watertight, leak-free seal capable of handling full continuous water pressure.
Can You Reuse Push-Fit Fittings? (Safety Criteria Checklist)
Most standard brass and plastic push-fit connectors are reusable, provided the internal grab ring teeth and sealing components remain completely undamaged.
- Check the Internal EPDM O-Ring: Look inside the fitting using a flashlight to verify the rubber O-ring is soft, pliable, and free of tears, cracks, or missing chunks.
- Inspect Stainless-Steel Teeth: Ensure none of the internal metal grab ring teeth are bent, missing, or clogged with debris from previous extractions.
- Test Internal Stiffeners: For PEX installations, confirm the plastic support insert remains straight, rigid, and correctly seated before deciding to reuse push fit fittings.
Inspecting Pipes for Gouges Burrs and Distortion
Re-inserting a damaged or improperly prepared pipe end will tear the internal rubber seal, causing immediate pinhole leaks once the main water line is pressurized.
- Identify Deep Scratches: Examine the outer surface of copper gouges or PEX score marks; if a scratch can be felt with a thumbnail, it will bypass the O-ring seal.
- Check Pipe Ovality: Ensure the pipe end remains perfectly round and was not crushed or flattened during removal or cutting.
- Cut Damaged Ends: If deep score lines or structural distortions exist, cut off the damaged 1-inch section using a sharp pipe cutter to restore a clean surface.
Deburring and Sanding Pipes for Re-installation
Thorough mechanical preparation of the pipe end ensures a smooth entry that slides past internal seals without catching or cutting the rubber.
- Use a Pipe Deburring Tool: Rotate a deburring tool along both the inside and outside edges of the pipe to remove sharp burrs and metallic ridges.
- Sand Copper Pipe Ends: Lightly polish the outer 1.5 inches of copper tubing using fine-grit emery cloth to remove corrosion, oxidation, and burrs.
- Mark Depth Insertion: Clean off dust and draw a depth mark on the pipe to ensure full insertion into the fitting for a permanent, watertight connection.
Frequently Asked Questions
Addressing common user questions directly resolves edge cases, safety concerns, and specific troubleshooting scenarios associated with push-to-connect plumbing systems.
Understanding these practical answers ensures you maintain a safe, leak-free installation while avoiding costly property damage and safety hazards.
How do you release push fit plumbing without damaging the pipe?
To release push fit plumbing without causing a damaged pipe surface, you must ensure the release collar (collet) is pressed completely flat against the fitting body before attempting to extract the pipe.
- Depress Fully First: Apply even pressure across the entire collet to lift the internal stainless steel teeth away from the pipe wall completely.
- Avoid Angular Force: Pull the pipe directly straight out in perfect alignment; bending or yanking at an angle causes the teeth to gouge the copper or PEX tubing.
- Relieve Internal Friction: Push the pipe inward slightly (1/16th of an inch) while depressing the collet to unseat the teeth before pulling outward.
Can you use SharkBite or push-fit fittings on gas lines?
No, push-fit fittings and SharkBite connectors must never be used on natural gas, propane, or fuel gas lines under any circumstances.
- Water Supply Lines Only: Standard push-connect fittings are engineered exclusively for potable water, hydronic heating systems, and specific liquid applications.
- Severe Safety Warning: Gas lines require specialized threaded, flared, or press connections built specifically to handle volatile gas molecules without catastrophic leaking.
- Internal Rubber Breakdown: The internal EPDM rubber seals inside water fittings can degrade when exposed to fuel gas additives, creating a dangerous gas leak and fire hazard.
What causes a push-fit fitting to leak after re-connecting?
A push-connect leak after re-installation usually occurs due to improper pipe preparation or damage sustained during the removal process.
- Damaged O-Ring Seal: A torn, nicked, or displaced internal rubber O-ring allows water to bypass the seal immediately when pressurized.
- Scratched Pipe End: Deep score marks or gouges on the outer wall of the pipe create micro-channels that allow water to seep past the O-ring.
- Incomplete Insertion Depth: Failing to push the pipe fully past both the grab ring and the inner seal prevents the fitting from making a complete, watertight seal.
Is a special tool required to remove push-fit fittings?
No dedicated tool requirement exists for removing push-fit connectors, though specialized tools make the process much easier and faster.
- Official Removal Tools: Plastic disconnect clips and removal tongs are inexpensive and specifically designed to compress the collet uniformly.
- Everyday Alternatives: You can safely disengage the fitting using standard household items such as an adjustable crescent wrench, open-end spanner, or small flathead screwdriver.
- Small Tubing Clearance: For small 1/4-inch tubing found on ice makers or reverse osmosis systems, pressing the collet ring with your fingernails is often enough to release the line.

Oscar Vance | Master Plumber & Drainage Expert
Meet Oscar Vance, a licensed master plumber sharing practical solutions on residential repairs, preventive maintenance, and thoughtful home upkeep.