Understanding Kitchen Faucet Pressure Drops
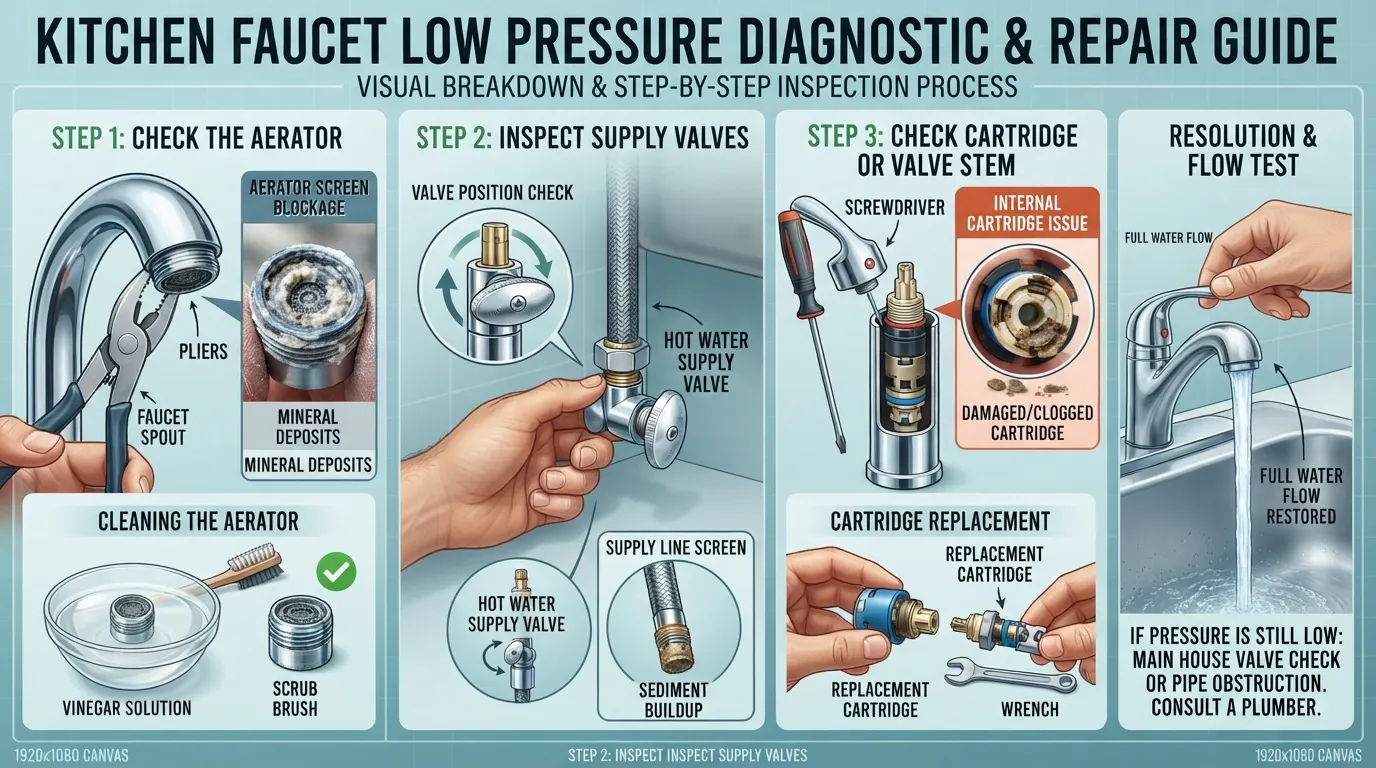
A sudden drop in kitchen faucet water pressure usually points to a localized blockage rather than a municipal supply failure. Isolating the problem immediately prevents unnecessary plumbing repairs and targets the exact point of restriction.
Diagnostic Check Is It Just Your Faucet?
Determining whether the low pressure is isolated to the kitchen sink or affecting the entire home is the fastest way to find the root cause. A localized issue typically stems from a clogged aerator or a faulty cartridge, while whole-house issues involve main supply valves or pressure regulators.
- Test other faucets and showers throughout your home to check if water flow remains normal elsewhere.
- Check both the hot and cold handles on your kitchen sink to see if the pressure drop affects only one temperature line.
- Inspect the under-sink shutoff valves to ensure they are fully open and unhindered by mineral deposits.
If hot and cold water both show restricted flow exclusively at the kitchen sink, the blockage is nearly always trapped within the faucet aerator or mixing valve. Cleaning or replacing these components usually restores full performance within minutes.
Common Causes of Low Water Pressure in a Kitchen Faucet
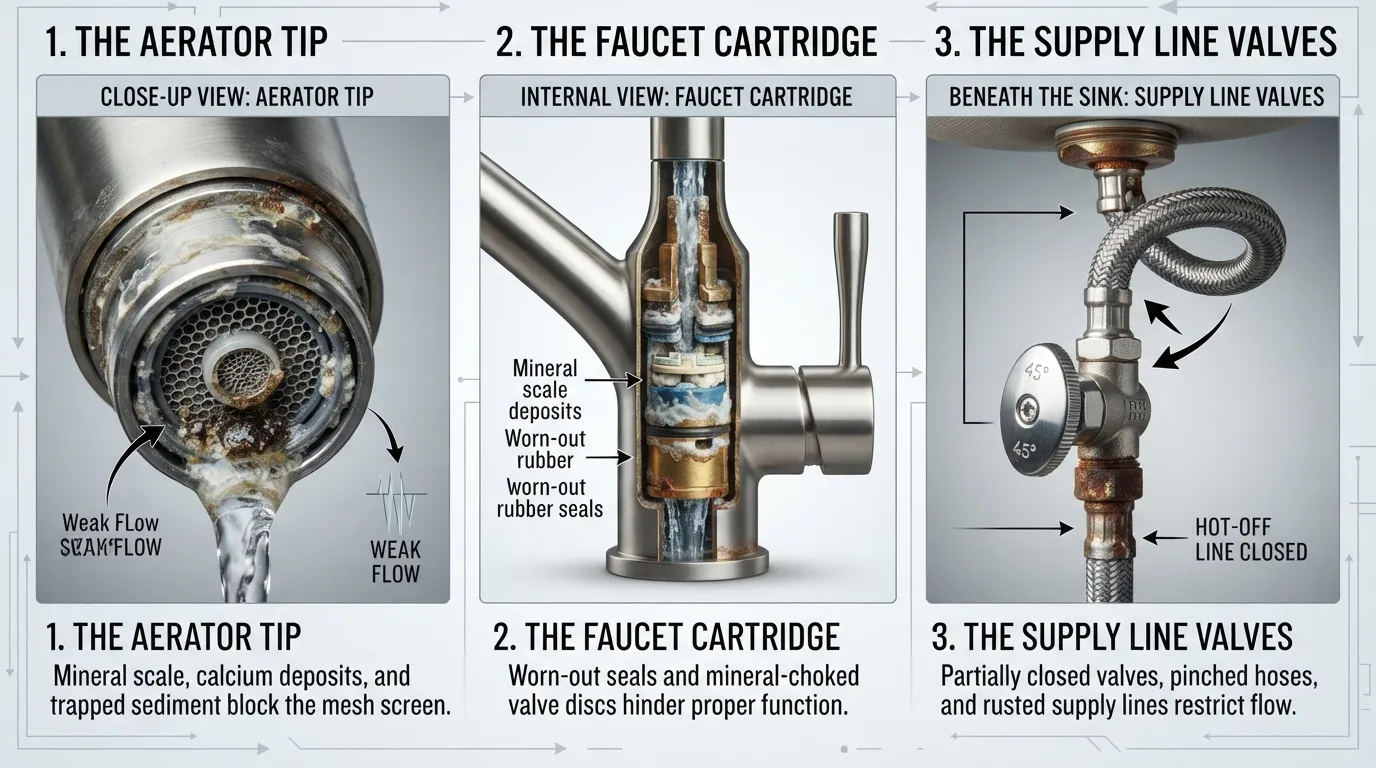
Pinpointing the exact cause of a pressure drop requires evaluating every component along the water delivery path, from municipal lines down to the aerator screen. Identifying these issues systematically helps prevent minor sediment buildup from turning into a major plumbing failure.
Clogged Aerator or Spray Head Screen
Mineral scale, calcium, and fine sediment frequently accumulate inside the aerator or spray head screen, choking off water flow. This is by far the most common culprit behind a sudden drop in kitchen sink water pressure.
- Remove the aerator tip by unscrewing it counterclockwise, using a cloth to prevent scratching the finish.
- Soak the components in a mixture of warm water and white vinegar to dissolve trapped mineral scale.
- Flush the screen thoroughly before reattaching it tightly to the faucet spout.
Partially Closed or Faulty Shut-Off Valves
Under-sink shutoff valves can slip out of position or become restricted by internal debris over time. If these valves are not fully open, water volume and pressure will suffer noticeably.
- Locate the hot and cold water shutoff valves underneath your kitchen sink cabinet.
- Turn both handles counterclockwise as far as they will go to ensure they are fully open.
- Inspect the valve stems for leaks or corrosion that could indicate internal failure.
Clogged or Worn-Out Cartridge
The mixing cartridge inside your faucet body regulates water flow and temperature via delicate internal channels. Debris or worn-out internal seals can obstruct these pathways entirely.
- Shut off the water supply beneath the sink before dismantling the faucet handle.
- Pull out the cartridge and inspect it for mineral buildup, warped rubber seals, or structural damage.
- Soak the cartridge in vinegar or replace the component entirely if wear and tear are severe.
Kinked or Damaged Supply Lines
Flexible braided supply lines beneath the sink can get twisted, pinched, or kinked during routine cleaning or storage. Any restriction in these hoses directly chokes the water volume reaching your spout.
- Inspect the hot and cold supply lines for sharp bends, twists, or accidental pinches against the cabinet wall.
- Ensure the lines have a smooth, sweeping arc from the wall valves to the faucet shank.
- Replace old, collapsed, or damaged supply lines immediately to restore safe, optimal flow.
Faulty Diverter Valve Sprayer Models
Pull-down or pull-out faucets rely on a diverter valve to switch water flow between the main spout and the side sprayer. If this valve sticks halfway, water leaks past or gets blocked, drastically reducing pressure.
- Check if the water pressure drops exclusively when using the main spout while the sprayer leaks simultaneously.
- Locate the diverter mechanism inside the spout assembly or beneath the mounting base.
- Clean out trapped debris or replace the faulty diverter valve to restore proper directional flow.
Whole-House Pressure Regulator PRV Issue
A failing pressure-reducing valve (PRV) can cause a sudden and dramatic drop in water pressure across every single plumbing fixture in your entire home. This mechanical device controls incoming municipal water pressure to protect your pipes.
- Test multiple faucets and showers in different rooms to verify if the pressure loss is universal.
- Inspect the bell-shaped PRV valve typically located near your main water shutoff valve.
- Contact a licensed plumber to adjust or replace the PRV if its internal diaphragm has failed.
Shared Plumbing Branch Fixture Conflict
Heavy water usage from other high-demand appliances on the same branch line can starve your kitchen sink of adequate volume. Simultaneous operation creates a temporary pressure drop.
- Notice if the kitchen faucet pressure drops whenever the washing machine, dishwasher, or upstairs shower runs.
- Evaluate your home’s pipe sizing and branch line layout if high-demand fixtures consistently interfere.
- Avoid running multiple heavy water appliances at the exact same time during peak hours.
Municipal Supply Interruption or Well Pump Issue
External supply failures stemming from city main repairs or a failing well pump will directly affect your household water delivery. These issues originate outside the home plumbing network.
- Check with neighbors to see if they are experiencing similar pressure drops in the neighborhood.
- Inspect your well system pressure tank gauge and pump switch if your property relies on well water.
- Wait for municipal repairs to conclude or contact a well technician if your pressure tank fails to re-pressurize.
Only My Kitchen Faucet Isolated Low Pressure Troubleshooting
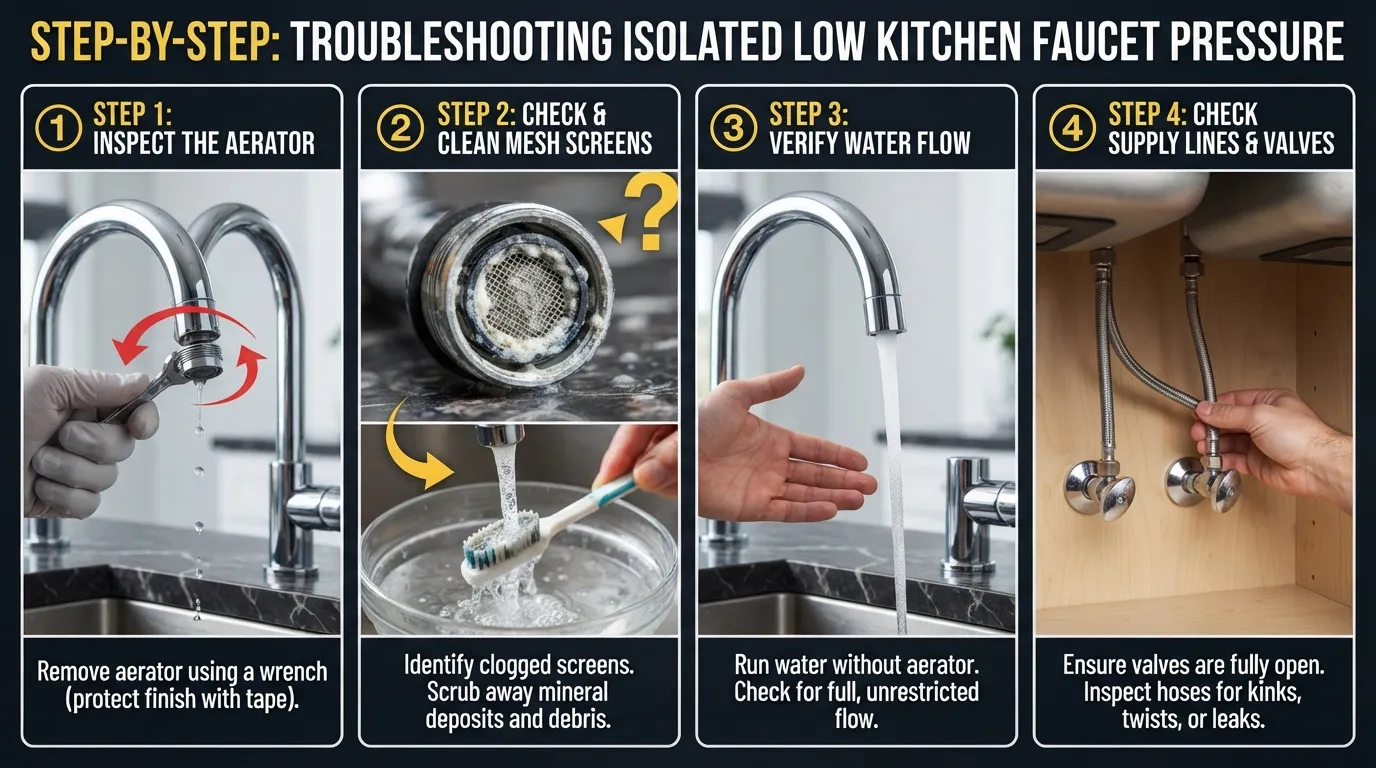
When the rest of your home enjoys steady, high-pressure water flow, troubleshooting becomes much simpler and points directly to localized fixtures. Narrowing down the problem prevents unnecessary tinkering with main water lines or pressure regulators.
Test Other Faucets in the House
Verifying the pressure at nearby bathrooms and utility sinks confirms whether the issue is isolated or systemic. This foundational diagnostic step saves valuable time before you begin unthreading parts.
- Open the bathroom vanity faucet and check both hot and cold streams for normal flow strength.
- Test the shower and laundry room taps to ensure full municipal or well supply delivery is active.
- Confirm that only the kitchen sink exhibits weak flow while all other fixtures perform normally.
Why Isolated Low Pressure Almost Always Means Aerator or Cartridge
An isolated fixture problem means the blockage is trapped between the under-sink shutoff valves and the faucet tip. Mineral scale and debris inevitably travel through home plumbing and lodge in these tight, restrictive areas.
- The aerator acts as a fine mesh filter that traps microscopic mineral flakes, clogging water exit paths over time.
- Internal cartridge channels restrict flow if hard water deposits accumulate around the ceramic discs or rubber seals.
- Targeting these two specific components resolves the vast majority of single-faucet pressure drops instantly.
Example Diagnosing a Single-Faucet Pressure Drop
During a recent field diagnostic, a homeowner reported severe pressure loss exclusively at their pull-down kitchen faucet while every bathroom shower ran at full blast. Systematic inspection revealed a heavily calcified aerator screen alongside a partially jammed check valve in the flexible hose assembly.
- Soaking the aerator in warm white vinegar dissolved the calcium crust within thirty minutes.
- Flushing the supply lines cleared out loose sediment that had migrated during a prior municipal pipe repair.
- Reassembling the cleaned components instantly restored the kitchen faucet to its original factory flow rate.
Low Pressure After Replacing the Faucet New Faucet Same Problem
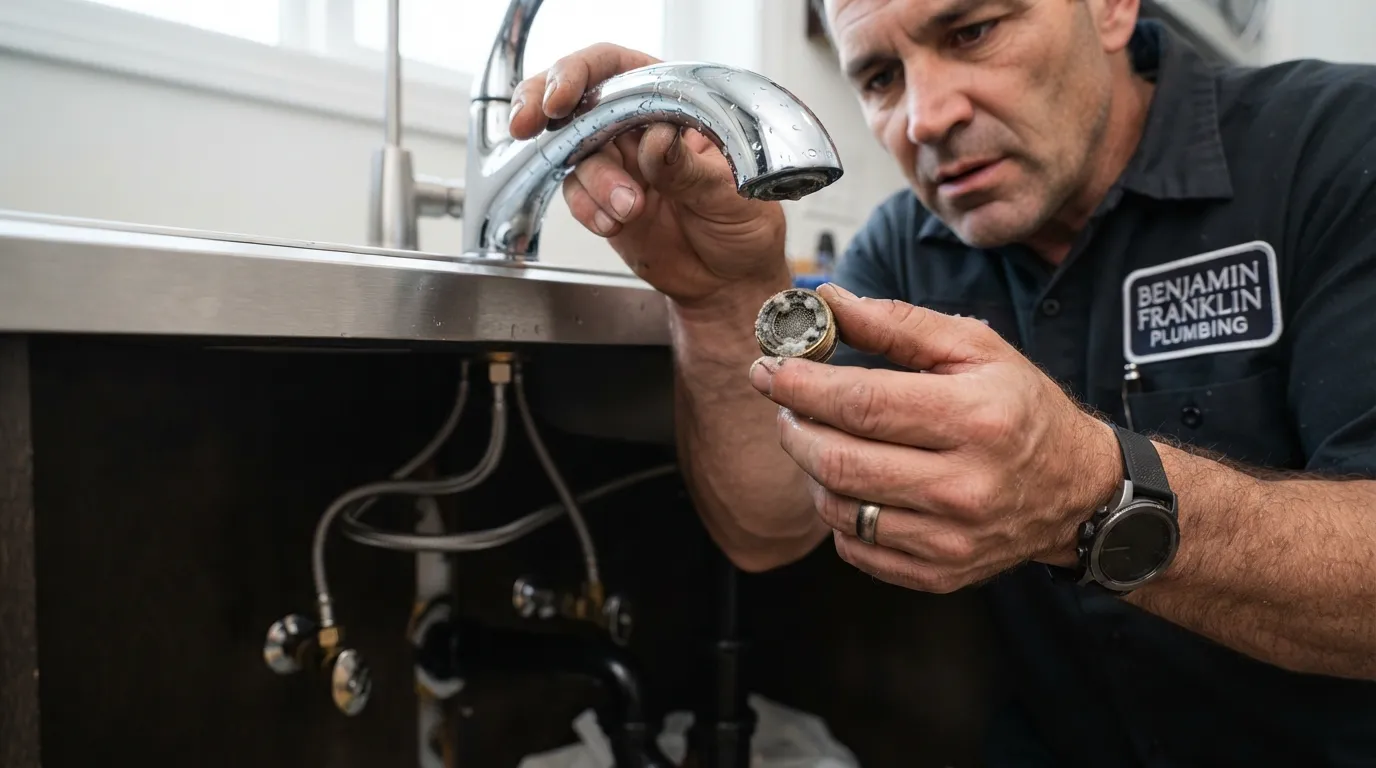
Installing a brand-new kitchen faucet should instantly restore strong water flow, but low pressure often persists because the root issue lives upstream in the plumbing network. Swapping the hardware alone cannot resolve hidden clogs or restricted supply paths lurking deeper in the system.
Upstream Causes That Survive a Faucet Swap
Replacing your faucet only upgrades the final delivery point while leaving older infrastructure untouched. If debris or mechanical failures exist further down the line, the new fixture will suffer the exact same pressure restrictions.
- Old under-sink shutoff valves choked with internal mineral scale restrict water volume before it reaches the new supply hoses.
- Debris and pipe scale dislodged during the installation process frequently travel upward and jam the new faucet’s internal check valves or aerator.
- Modern water-saving flow restrictors built into certified faucets can make high-flow households feel like they have low pressure if they are accustomed to unrestricted older models.
How to Flush the Lines Before Blaming the New Faucet
Flushing your supply lines clears out trapped sediment and construction debris that may have entered the pipes during the installation process. This simple step ensures unobstructed water delivery to your new hardware.
- Turn off the hot and cold water shutoff valves beneath the sink and disconnect the flexible supply hoses from the faucet shanks.
- Place the open ends of both supply lines securely inside a bucket to catch any discharged water and debris.
- Slowly open the under-sink shutoff valves for a few seconds to let a strong stream of water flush out loose particles and pipe scale.
Here’s What’s Really Causing Your Low Pressure
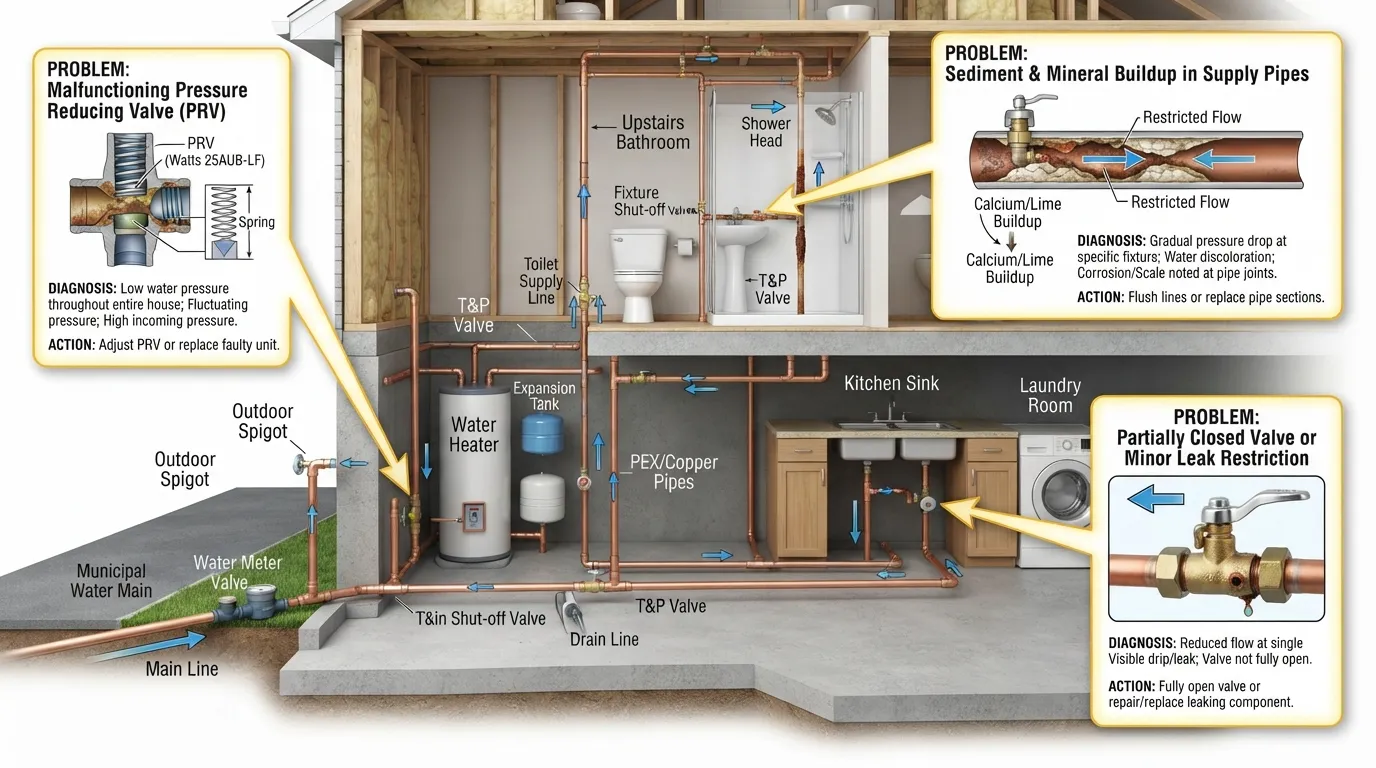
Modern or minimalist faucet designs often conceal their aerators or omit traditional screw-on tips entirely, making troubleshooting confusing when pressure drops. Without an exposed screen to inspect, the restriction must be tracked down within the internal valve architecture.
Skip Straight to the Cartridge and Valve Body
When an exterior aerator is absent, mineral buildup has nowhere to escape and settles directly inside the internal mixing chamber. This makes internal components the primary suspects for restricted flow.
- Remove the handle lever using an Allen wrench to expose the central housing and retainer nut.
- Pull out the ceramic or plastic cartridge assembly to examine its inlet ports for trapped debris.
- Soak the entire cartridge in a descaling solution to clear blocked internal water channels.
Checking the Main Body Hub for Blockage
Sediment can bypass the cartridge entirely and wedge itself tightly inside the main faucet body hub or swivel spout pivot. This hidden bottleneck severely restricts water volume before it exits the spout.
- Detach the faucet spout or swivel neck completely if your model features a multi-piece design.
- Shine a flashlight down the main valve body hub to inspect for lodged scale flakes or rubber gasket fragments.
- Flush the open valve body with a squeeze bottle or compressed air to dislodge any stubborn debris trapped in the curves.
How to Fix Low Water Pressure in a Kitchen Faucet Step by Step DIY Guide
Restoring strong water flow to your kitchen faucet requires a systematic diagnostic approach, starting from the easiest exterior fixes and working inward toward internal valves. Following these step-by-step procedures safely resolves the vast majority of pressure issues without requiring a professional plumber.
Tools You’ll Need Before You Start
Gathering the right equipment ahead of time ensures a smooth, uninterrupted repair process under the sink. Having these basic household tools ready prevents unnecessary delays during disassembly.
- Adjustable wrench and channel-lock pliers for loosening stubborn supply fittings.
- White vinegar and an old toothbrush for dissolving and scrubbing mineral scale.
- A clean bucket and old towels to catch residual water during line flushing.
- Hex key (Allen wrench) for removing faucet handle set screws.
Step 1 — Clean the Aerator Vinegar Soak Method
Mineral buildup inside the aerator screen is the most frequent culprit behind reduced water flow at the kitchen sink. Cleaning this component immediately eliminates the most common bottleneck.
- Gently unscrew the aerator tip from the end of the faucet spout in a counterclockwise direction[cite: 1].
- Submerge the aerator parts in a small container filled with warm white vinegar for 20 to 30 minutes.
- Scrub away loosened calcium deposits with a soft brush, rinse thoroughly under running water, and screw it back on securely.
Step 2 — Check and Fully Open the Shut-Off Valves
Under-sink shutoff valves can get bumped or partially closed during routine cabinet storage, restricting water volume. Verifying their position ensures maximum supply entry.
- Open the cabinet doors beneath your kitchen sink and locate the hot and cold water shutoff valves[cite: 1].
- Turn both valve handles completely counterclockwise until they stop to ensure they are fully open[cite: 1].
- Test the faucet handle at the top to check if water volume and pressure have improved[cite: 1].
Step 3 — Inspect Supply Lines for Kinks
Flexible braided hoses underneath the sink can become twisted or pinched against cabinet walls, choking water delivery. Straightening these lines restores smooth hydrodynamic flow.
- Look closely at the hot and cold flexible supply hoses running from the wall valves to the faucet shank.
- Gently untwist any sharp bends, loops, or pinches to give the hoses a smooth, uniform arc.
- Replace any old, kinked, or collapsed supply lines that fail to hold an uninhibited shape.
Step 4 — Remove and Clean Replace the Cartridge
When external cleaning fails to fix the issue, trapped sediment inside the mixing cartridge is usually to blame. Servicing this internal core clears deep-seated blockages.
- Shut off the water valves beneath the sink and open the faucet handle to drain remaining pressure[cite: 1].
- Remove the handle set screw using an appropriate hex key, lift off the handle, and pull out the securing nut.
- Extract the cartridge, soak it in white vinegar to clear internal ports, or install a matching replacement cartridge if seals are damaged.
Safety Note — Always Shut Off Water First
Attempting any plumbing repair without shutting off the water supply can result in accidental indoor flooding. Always isolate the local lines before unthreading hardware[cite: 1].
- Turn both hot and cold under-sink valves completely perpendicular to the supply pipes to shut off flow[cite: 1].
- Open the kitchen faucet handle to release trapped pressure and drain remaining water from the lines[cite: 1].
- Keep a bucket and towels ready directly underneath the workspace to catch any unexpected spills[cite: 1].
Low Pressure on Only Hot or Only Cold Water
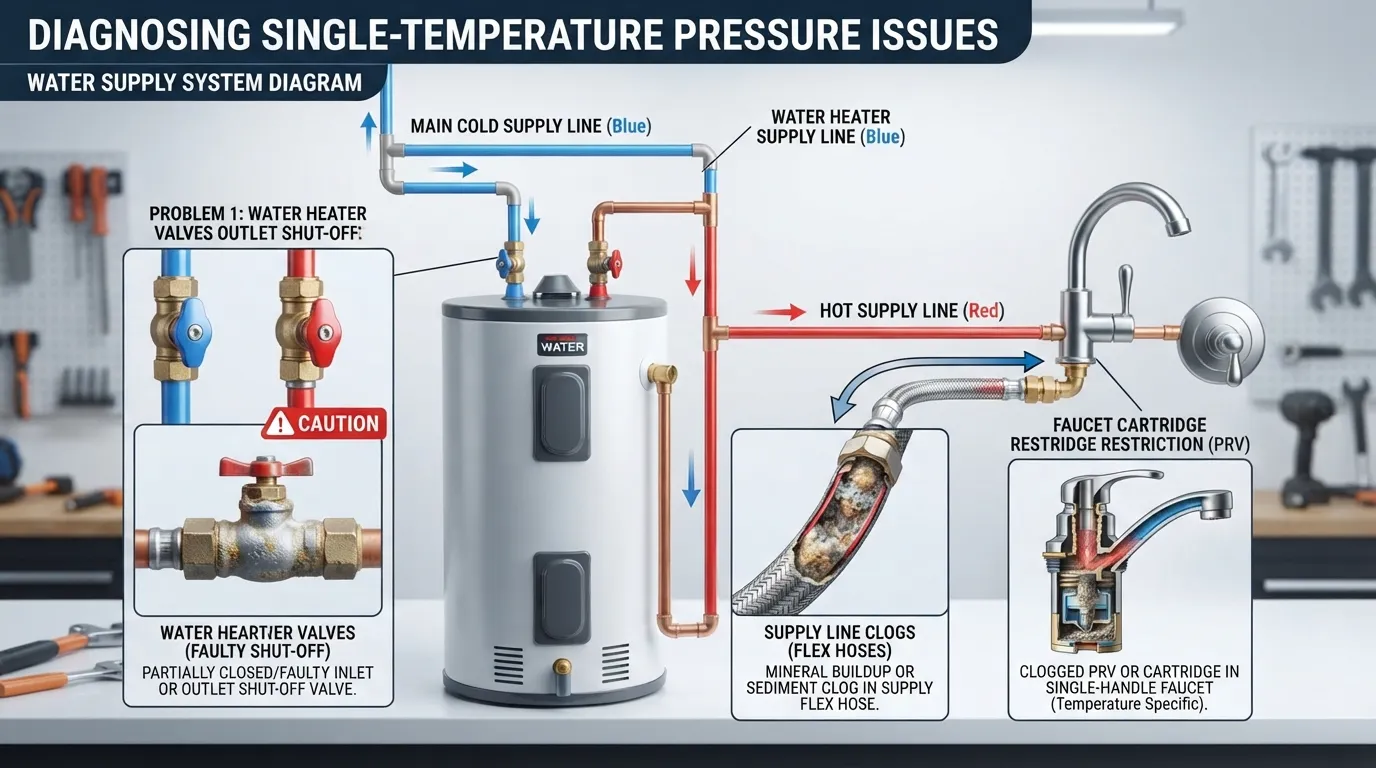
Experiencing low water pressure on strictly one temperature line points to a blockage specific to that side of your plumbing network. Isolating the issue to either the hot or cold supply helps you quickly locate whether the restriction originates at the water heater or the under-sink valves.
Why One Side Can Be Affected While the Other Isn’t
Kitchen faucets mix hot and cold streams inside a single internal chamber, meaning each temperature line travels through completely independent pathways upstream. Mineral buildup, valve failures, or source restrictions can obstruct one line while leaving the other completely unaffected.
- The hot water line originates directly from your home’s water heater, making it vulnerable to tank sediment and scale accumulation.
- The cold water line connects directly to the main municipal supply or pressure tank, carrying different particulate profiles.
- Internal cartridge mixing channels can experience asymmetrical wear or clogging on only one inlet port.
Hot-Side-Specific Cause Water Heater or Hot Line Sediment
If your hot water pressure is weak while the cold side runs strong, the restriction almost always links back to mineral sediment inside the water heater tank or supply pipe. Over time, calcium flakes and rust particles travel down hot water lines and lodge in the faucet inlet.
- Inspect the hot water shutoff valve beneath the sink to ensure it is completely open and free of scale.
- Flush your water heater tank to remove heavy sediment buildup that regularly migrates into household plumbing lines.
- Check the flexible hot supply hose for internal collapsing or blockages caused by mineral buildup.
Cold-Side-Specific Cause Shut-Off Valve or Cartridge Seal
When cold water pressure drops significantly while hot water flows normally, the issue is typically localized near the cold supply valve or the mixing cartridge. Cold water lines are prone to calcium crusting around valve seats due to colder mineral precipitation rates.
- Examine the cold water under-sink shutoff valve to confirm the internal gate or ball mechanism is opening fully.
- Inspect the cartridge inlet port corresponding to the cold water channel for trapped debris or warped rubber seals.
- Soak the cartridge and cold supply connector in white vinegar to dissolve any localized mineral restrictions.
Pull-Down Pull-Out Sprayer Faucets A Different Kind of Fix
Modern pull-down and pull-out kitchen faucets introduce unique internal routing mechanisms that standard stationary fixtures lack. When pressure drops specifically in a sprayer model, the issue often stems from a malfunctioning internal component rather than just a clogged tip.
The Diverter Valve What It Does and How It Clogs
The diverter valve is a specialized mechanical gate located inside the faucet body or spout assembly that automatically toggles water flow between the main spout and the pull-out sprayer hose[cite: 2]. Over time, mineral scale and tiny debris can jam this valve halfway, splitting water volume between both outlets and causing an immediate pressure drop[cite: 2].
- Notice if water simultaneously dribbles out of the main spout while you are trying to use the pull-down sprayer[cite: 2].
- Calcium crusting can freeze the internal spring mechanism, preventing the diverter from sealing completely.
- Sediment buildup inside the valve channels chokes the overall volume flowing into the hose assembly.
Checking Pressure With the Sprayer Hose Disconnected
Isolating the pull-down hose and spray head helps you determine whether the pressure restriction is trapped inside the flexible line or the main faucet body[cite: 2]. This diagnostic test isolates the exact point of failure[cite: 2].
- Unscrew the spray head from the end of the pull-down hose and check for a hidden washer screen clogged with sediment.
- Disconnect the flexible sprayer hose underneath the sink from its quick-connect fitting or adapter port[cite: 2].
- Turn on the faucet to see if water surges freely through the main connection, confirming whether the hose itself is the bottleneck.
Cleaning or Replacing the Diverter Valve
If your diverter valve is stuck or heavily calcified, servicing or replacing the part will restore full hydrodynamic pressure to your sprayer[cite: 2]. Most models allow straightforward access once the spout or handle assembly is removed[cite: 2].
- Remove the spout retaining screw or collar to expose the internal diverter channel housing[cite: 2].
- Extract the small cylindrical diverter valve and soak it in a warm white vinegar bath for 30 minutes to dissolve scale.
- Install a matching replacement diverter valve if the internal rubber seals are warped, or clean out trapped debris to resume normal toggling[cite: 2].
Sudden Drop vs. Gradual Decline Does the Timeline Matter?

The timeline of your water pressure drop is the single most valuable diagnostic clue you have. Whether your kitchen faucet lost pressure overnight or experienced a slow, months-long decline points directly to two entirely different categories of root causes.
Sudden Pressure Loss Check for Recent Plumbing Work or Main Line Breaks
An abrupt, overnight loss of water pressure almost always points to a major mechanical disruption or a physical blockage that traveled through the system all at once. When pressure vanishes instantly, static sediment or external supply changes are usually to blame.
- Recent municipal pipe repairs or city main flushes often dislodge heavy rust and scale, sending debris straight into your service line to jam aerators instantly.
- A partially closed main water shutoff valve or a sudden failure in your home pressure-reducing valve (PRV) will cause an immediate, whole-house drop.
- Internal check valves or flexible hose connectors can experience sudden internal structural collapse, blocking water flow overnight.
Gradual Pressure Loss Sediment and Mineral Buildup Over Time
A slow, progressive decline in water flow over several weeks or months is the classic signature of mineral accumulation. Hard water minerals deposit microscopic layers of calcium and lime every time the faucet is turned on.
- Aerator screens slowly constrict as calcium crystals multiply and bridge across the tiny mesh openings.
- Mixing cartridges accumulate stubborn scale layers around their ceramic discs, gradually restricting internal water pathways.
- Water heater tanks build up thick sediment beds that slowly migrate into hot water lines, choking flow rates over extended periods.
When to Call a Plumber vs. Fix It Yourself Including Rough Cost

Knowing when to put down the wrench and call a licensed professional saves you from causing accidental water damage or expensive pipe fractures. While simple aerator cleanings and cartridge swaps are ideal DIY projects, complex whole-house pressure issues require licensed expertise and specialized pressure gauges.
Signs You Can Fix It Yourself Today
Minor flow restrictions located entirely at the kitchen fixture are almost always safe and straightforward to handle without professional assistance. You can easily resolve these issues using basic tools and household cleaning supplies.
- Low pressure is isolated exclusively to the kitchen sink while all other home fixtures run normally.
- Unscrewing the aerator reveals visible calcium crust and trapped sediment blocking the mesh screen.
- Hot and cold water shutoff valves beneath the sink appear partially turned or restricted.
Signs You Need a Licensed Plumber
When low pressure affects your entire home or points to hidden infrastructure failures, attempting a DIY fix can worsen the damage. Calling a certified plumbing professional ensures safe and code-compliant repairs.
- Every single faucet, shower, and appliance in the home experiences a simultaneous drop in water pressure.
- Main pressure-reducing valves (PRVs) or water supply lines inside the wall show signs of active leaking or corrosion.
- Standard DIY steps like flushing lines and cleaning aerators fail to improve flow rates at the kitchen sink. For guidance on safe water conservation and plumbing standards, consult resources such as the EPA WaterSense Plumbing Guidelines.
Average Cost of Professional Repair Cartridge Valve PRV Replacement
Understanding average professional repair costs helps you budget effectively if your diagnostic steps reveal a part that needs total replacement. Labor fees and parts pricing generally vary based on your local market rates.
- Cartridge replacement by a plumber typically ranges from one hundred fifty to three hundred dollars, including parts and labor.
- Replacing a faulty under-sink shutoff valve or a kitchen faucet diverter valve usually costs between one hundred and two hundred fifty dollars.
- Installing a brand-new main pressure-reducing valve (PRV) generally runs from three hundred to six hundred dollars due to the complexity of main water line access.
Frequently Asked Questions
Quick answers to common questions regarding kitchen faucet water pressure help resolve lingering doubts and provide immediate guidance for tricky troubleshooting scenarios.
Why is my kitchen sink water pressure low even though I replaced the faucet?
Low pressure persisting after a faucet replacement usually means the restriction lives upstream in the plumbing network. Debris trapped in the supply lines, old under-sink shutoff valves choked with scale, or home pressure regulator issues can survive a fixture swap.
Why do I have low water pressure in only one faucet?
An isolated pressure drop means the blockage is restricted entirely to that specific fixture’s components. Clogged aerators, mineral-choked mixing cartridges, or a partially closed under-sink valve are almost always responsible.
Why do I have water pressure everywhere but my kitchen sink?
When the rest of your home enjoys normal water flow while the kitchen sink struggles, the issue is localized to the kitchen supply pathway. Check the kitchen aerator, under-sink valves, or flexible hose connections for kinks and mineral scale.
Why is barely any water coming out of my faucet?
A severe trickling flow indicates a major blockage or near-total closure along the water delivery path. This is commonly caused by a heavily calcified aerator screen, a jammed diverter valve in sprayer models, or a nearly closed supply shutoff valve.
How to increase water pressure in a kitchen faucet?
Start by unscrewing and soaking the aerator in white vinegar to dissolve mineral scale. Next, ensure the under-sink shutoff valves are turned completely open and inspect the flexible supply hoses for accidental kinks or twists.
What is the most common cause of low water pressure?
Mineral scale, calcium, and hard water sediment buildup clogging the faucet aerator screen represent by far the most frequent cause of reduced water flow. Regular cleaning prevents this gradual restriction.
Can I increase water pressure yourself?
Yes, cleaning aerators, flushing supply lines, and replacing worn-out cartridges or shutoff valves are straightforward DIY tasks. These simple maintenance steps successfully resolve most household water pressure issues without professional help.
Can water pressure come back on its own?
Pressure can return on its own if the temporary drop was caused by a municipal main repair, temporary city line flushing, or heavy simultaneous appliance usage. However, pressure drops caused by physical mineral scale will not resolve without cleaning.
Do plumbers fix low water pressure in a house?
Yes, licensed plumbers diagnose and repair whole-house pressure issues, failing pressure-reducing valves (PRVs), and complex plumbing obstructions. They use specialized gauges to test incoming psi and replace damaged infrastructure.
Would an under-sink filter reduce my water pressure?
An under-sink water filtration system can reduce water pressure if its internal filter cartridge is old, heavily clogged, or past its replacement lifespan. Regularly changing filter elements maintains normal flow rates.
Conclusion Quick Recap Checklist
Troubleshooting low water pressure in your kitchen faucet doesn’t have to be overwhelming or require an immediate call to a professional. Working systematically from the aerator down to the supply lines quickly pinpoints the issue and restores optimal water flow.
Quick Recap 5-Point Checklist Before You Call a Plumber
Reviewing these five essential checks ensures you have covered all the bases before spending money on professional plumbing services. Going through this checklist saves both time and unnecessary repair costs.

Oscar Vance | Master Plumber & Drainage Expert
Meet Oscar Vance, a licensed master plumber sharing practical solutions on residential repairs, preventive maintenance, and thoughtful home upkeep.

