Introduction Featured Snippet Bait
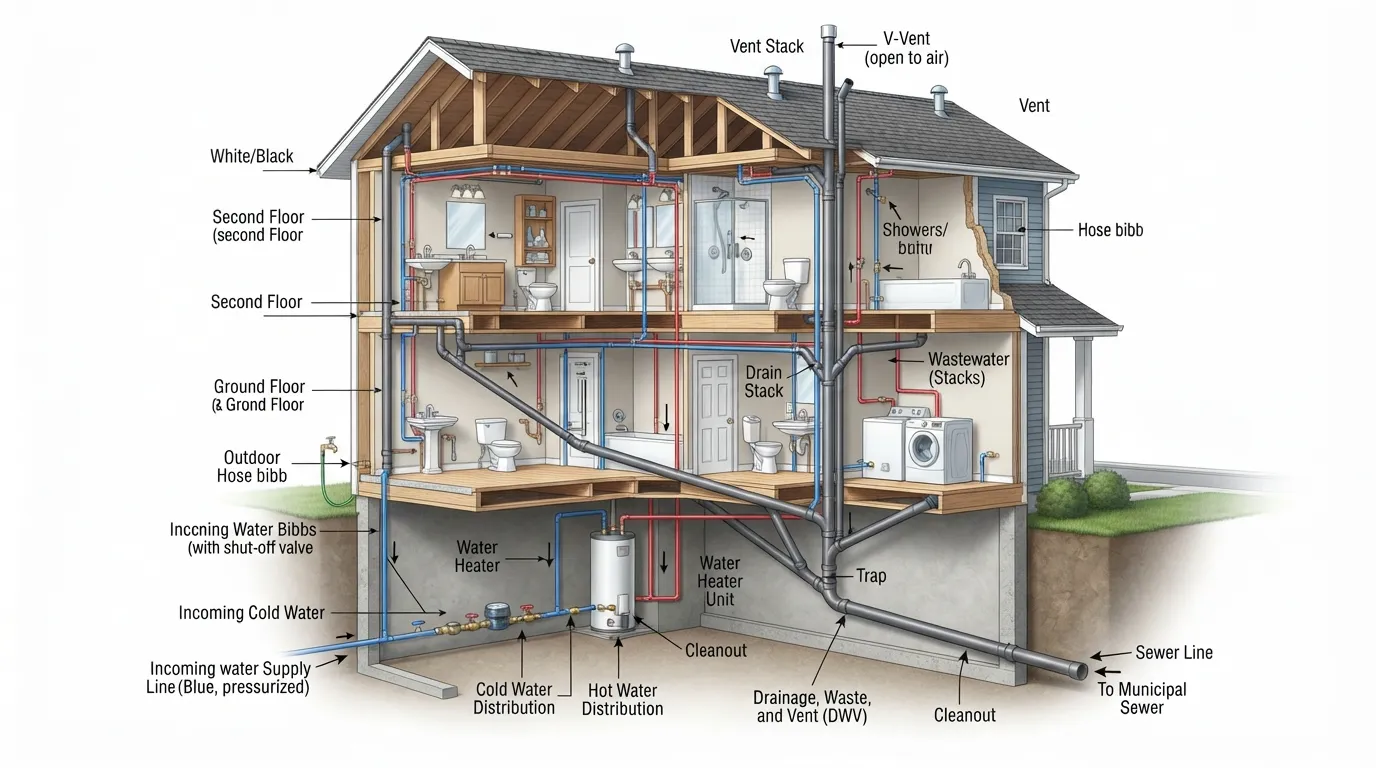
A house plumbing system is a complex network of pressurized water supply pipes and gravity-fed drainage channels designed to deliver clean water for daily consumption while safely removing hazardous wastewater and sewer gases from the property.
Google’s AI Overview and featured snippets prioritize direct definitions that immediately explain core functional mechanics. Understanding how these integrated sub-networks function prevents costly repairs and ensures household sanitation compliance.
What Is a House Plumbing System? One-Line Definition
A house plumbing system is an engineered infrastructure of pipes, valves, fixtures, and traps that works continuously to supply potable water under pressure and evacuate greywater and blackwater via gravity.
- Delivers pressurized clean water to appliances, sinks, showers, and toilets.
- Safely routes household wastewater through sanitary drainage pipes.
- Vents harmful sewer gases safely above the roofline using specialized stack pipes.
Two Systems One Job Supply In Waste Out
Residential plumbing operates on two distinct yet interdependent circuits that separate incoming potable water from outgoing contaminated waste. Balancing pressure and drainage velocity is essential for proper hydraulic performance.
- Supply System: Operates under municipal or private pump pressure to push treated, clean water across fixtures and appliances.
- Drain-Waste-Vent (DWV) System: Relies entirely on gravity and air pressure balance to clear wastewater without backups or trap siphoning.
- System Synergy: Both networks require proper sizing and venting to prevent pressure locks, slow drains, and potential contamination of the water supply.
The Two Core Systems Big Picture Overview

Residential plumbing operates on two entirely independent networks that must function in harmony to maintain a healthy home environment. Understanding this foundational architecture helps homeowners diagnose water pressure drops, slow drains, and odor issues before they escalate.
Every fixture in a modern home connects to both the incoming supply network and the outgoing waste network. Keeping these circuits physically separated is critical for public health and structural safety.
The Supply System Clean Water In
The supply system brings potable water into the home under high municipal or pump pressure, routing it efficiently to every faucet and appliance. This network relies heavily on closed pipes and active pressure management.
- Water Pressure: Incoming lines typically maintain pressure between 40 and 60 psi to ensure water reaches upper floors and high-demand fixtures.
- Supply Lines: Durable pipes made of PEX, copper, or CPVC carry treated, clean water directly to water heaters, showers, and sinks.
- Shut-Off Valves: Strategic valves allow homeowners or technicians to isolate specific zones or fixtures for emergency repairs without shutting off the main supply.
The DWV System Wastewater Out
Unlike the pressurized supply network, the Drain-Waste-Vent (DWV) system operates entirely on natural physical forces to remove used water and biological waste. It ensures sanitary conditions without relying on mechanical pumps for drainage.
- Gravity Flow: Drainage pipes are installed with a precise downward slope (typically 1/4 inch per foot) to pull wastewater down and out toward the main sewer or septic line.
- Drain Pipes & Traps: P-traps hold a small amount of standing water to create a physical seal that blocks foul sewer odors from entering living spaces.
- Vent Stack: Vertical vent pipes extend through the roof, equalizing air pressure within the drainage system and preventing siphon action from emptying P-traps.
Why These Two Systems Never Mix
Absolute separation between incoming clean water and outgoing wastewater is the foundational rule of plumbing engineering. Cross-contamination can introduce severe biological hazards into a household’s drinking water supply.
- Air Gaps: Physical gaps between supply faucets and flood-level rims of fixtures prevent wastewater from siphoning back into clean lines.
- Backflow Preventers: Check valves and specialized backflow assemblies stop pressurized water from reversing direction during sudden pressure drops.
- Structural Integrity: Independent pipe routing ensures that supply and drain lines never share pathways or internal connections.
How the Water Supply System Works Step by Step
The home water supply system functions as a continuous, pressurized circuit that delivers clean water from its origin directly to your household fixtures. Tracing this pathway clarifies how pressure, valves, and heating elements work together seamlessly.
Every gallon of water entering a residence follows a carefully structured sequence of monitoring, control, distribution, and heating before emerging from a faucet.
Step 1: Water Source City Main Line vs Private Well
Water originates from one of two primary sources before entering private property lines. The source determines how initial pressure and treatment are managed.
- City Main Line: Municipal systems pump treated water under high pressure through public mains directly to residential service lines.
- Private Well: Submersible pumps draw groundwater from subterranean aquifers into a pressurized pressure tank located on the property.
Step 2: The Water Meter Tracking Usage
Positioned right where the service line enters the property, the water meter measures total consumption for billing and leak detection. Homeowners can monitor this meter to identify hidden plumbing leaks instantly.
- Measures volume in gallons or cubic feet as water flows through the meter housing.
- Includes a small low-flow indicator triangle or sweep hand that spins when any fixture leaks.
- Typically housed in an outdoor utility box or a secure basement utility room.
Step 3: Main Shutoff Valve Emergency Control Point
The main shutoff valve is the most critical emergency hardware in a residential plumbing layout. Shutting this valve stops all incoming water instantly during a major pipe burst or plumbing repair.
- Located immediately downstream of the water meter or where the main line enters the foundation.
- Available in gate valve or ball valve configurations, with quarter-turn ball valves offering the fastest shutoff.
- Every resident should know its exact location to prevent catastrophic water damage.
Step 4: Water Heater Hot Cold Split Explained
Once past the main control, the supply pipe branches into two distinct paths: one feeds cold water fixtures directly, while the other routes water into the water heater.
- Cold Water Lines: Deliver ambient-temperature water directly to toilets, cold refrigerator taps, and outdoor hose bibbs.
- Water Heater Integration: Incoming cold water fills the tank or passes through a tankless heat exchanger to supply hot water lines.
- Thermal Distribution: Dedicated hot water lines carry heated water to showers, washing machines, and kitchen sinks.
Step 5: Water Pressure How Instant Flow Is Maintained
Sufficient water pressure ensures that upper-story bathrooms and distant kitchen sinks receive a steady, powerful stream. Pressure regulators protect delicate internal fixtures from excessive force.
- PSI Regulation: Residential systems maintain a safe pressure range between 40 and 60 PSI using pressure-reducing valves (PRVs).
- Friction Loss: Narrower pipe diameters and long vertical runs reduce pressure, requiring strategic pipe sizing during installation.
- Immediate Delivery: Because the network remains pressurized at all times, opening any valve yields instant water flow without delay.
How the Drain-Waste-Vent DWV System Works
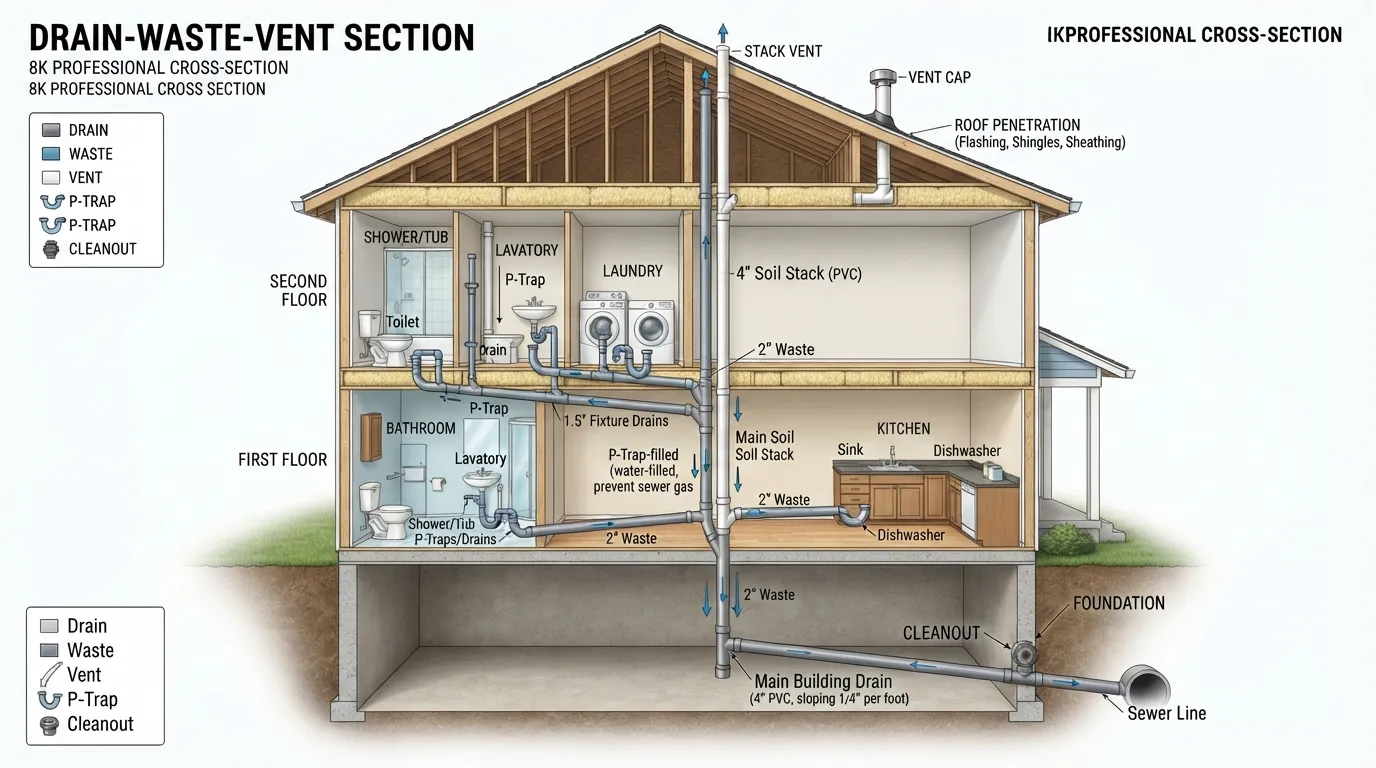
The Drain-Waste-Vent (DWV) system is an intricate network designed to remove wastewater and biological waste from a home while ensuring harmful gases cannot escape into living areas. Unlike the supply side, this system operates entirely without pressurized mechanical force.
Reliable gravity flow, fluid-sealed traps, and precise atmospheric ventilation are the three pillars that keep a home’s drainage network sanitary, efficient, and compliant with safety regulations.
Gravity Drains How Waste Moves Without Pumps
Drainage relies exclusively on gravity and downward pipe grading to move wastewater out of the home. Every horizontal waste pipe must maintain a strict, uniform slope to prevent clogs and standing water.
- Downward Slope: Standard building codes require horizontal drain pipes to slope downward by 1/4 inch per foot to maintain optimal self-cleansing water velocity.
- Branch Drains: Smaller pipes from sinks, tubs, and showers feed into larger vertical waste stacks running downward through the structure.
- Sizing Standards: Proper pipe diameters prevent waste accumulation, ensuring heavy solids move smoothly toward the main drainage exit.
P-Traps The Silent Gas Blockers
The curved pipe located directly beneath every sink fixture is known as a P-trap. This simple engineering feature plays a critical role in indoor air quality and health safety.
- Water Seal: The bend in the trap retains a small volume of standing water after every fixture use, creating an airtight barrier.
- Odor Prevention: This liquid seal blocks toxic and foul-smelling sewer gases from traveling backward through the pipe into the home.
- Cleanout Access: Most P-traps feature a threaded cleanout plug, allowing homeowners or technicians to retrieve dropped items and clear minor clogs easily.
Vent Pipes Why Your Roof Has Pipes Sticking Out
Vent pipes extend upward from the drainage network to pierce the roof, connecting the indoor plumbing system to outdoor atmospheric air. Without adequate venting, drainage fails to flow properly.
- Pressure Equalization: Vents allow air to enter the drainage system behind rushing wastewater, preventing vacuum locks and slow drains.
- Protecting Trap Seals: Balanced air pressure stops siphoning action from pulling water out of P-traps when nearby toilets flush or tubs drain.
- Code Compliance: Professional installations adhere strictly to established guidelines outlined by regulatory bodies such as the International Residential Code regarding vent sizing, height above the roofline, and clearance from windows.
Main Sewer Line Municipal Sewer vs Septic Tank
All individual drain branches and waste stacks converge into a single main sewer line that exits the building foundation. The destination of this line depends on municipal infrastructure or rural property design.
- Municipal Sewer: The main line routes wastewater directly into public city sewers for centralized wastewater treatment.
- Septic Tank: For rural properties, the line empties into an underground septic tank where anaerobic bacteria break down solid waste before liquid effluent flows into a drain field.
- Cleanout Plugs: An exterior cleanout riser allows plumbers to snake the main line quickly if tree roots or heavy debris cause an obstruction.
House Plumbing Diagram Visual Breakdown How to Draw One
Visualizing a residential plumbing network transforms abstract piping into a clear, manageable blueprint. Whether you are planning a DIY bathroom remodel, diagnosing a chronic leak, or inspecting a prospective home, mastering plumbing layouts is an invaluable asset.
A comprehensive plumbing diagram maps out both supply lines and drain-waste-vent (DWV) circuits, showing exactly how water enters and exits every fixture. Understanding these schematics eliminates guesswork during repairs and ensures code compliance.
Simple Labeled House Plumbing Diagram Custom Visual
A standard residential plumbing layout connects the main water entry point directly to branch lines while linking all waste fixtures to a central drainage stack. Viewing this layout highlights the relationship between wet rooms and the main sewer line.
- Water Supply Paths: Blue lines trace cold water distribution, while red lines track hot water output from the central water heater.
- DWV Pathways: Thicker vertical lines represent the main soil stack and roof vent, while horizontal branch lines catch waste from sinks, tubs, and toilets.
- Fixture Grouping: Placing bathrooms and kitchens in close proximity simplifies pipe routing and reduces material costs significantly.
How to Draw a Basic Plumbing Diagram Yourself
Creating your own plumbing diagram requires a structured approach starting with the building’s architectural layout. Accurate sketches help you visualize pipe runs before cutting any material.
- Step 1: Sketch the Floor Plan: Draw the perimeter of your home and mark the exact locations of all plumbing fixtures, including toilets, sinks, showers, and washing machines.
- Step 2: Map the Supply Lines: Trace lines from the main water meter or pressure tank to the water heater, then branch hot and cold lines out to each fixture.
- Step 3: Route the DWV System: Draw drain lines sloping away from fixtures toward the central waste stack, ensuring every fixture includes a nearby vent connection.
Symbols Used in Plumbing Diagrams Beginner Guide
Standardized plumbing symbols streamline technical drawings, making it easy to identify valves, fittings, and pipe types at a glance. Familiarizing yourself with these conventions is essential for reading professional blueprints.
- Valves and Controls: Circles crossed with lines or hourglass shapes represent gate valves, ball valves, and pressure-reducing valves.
- Fittings and Bends: Sharp 90-degree angles indicate standard elbows, while sweeping curves denote smooth sanitary tees designed for waste flow.
- Vents and Cleanouts: Specialized notations indicate where roof vents penetrate the ceiling and where cleanout plugs are accessible for maintenance.
Plumbing in Home Construction What Comes First?
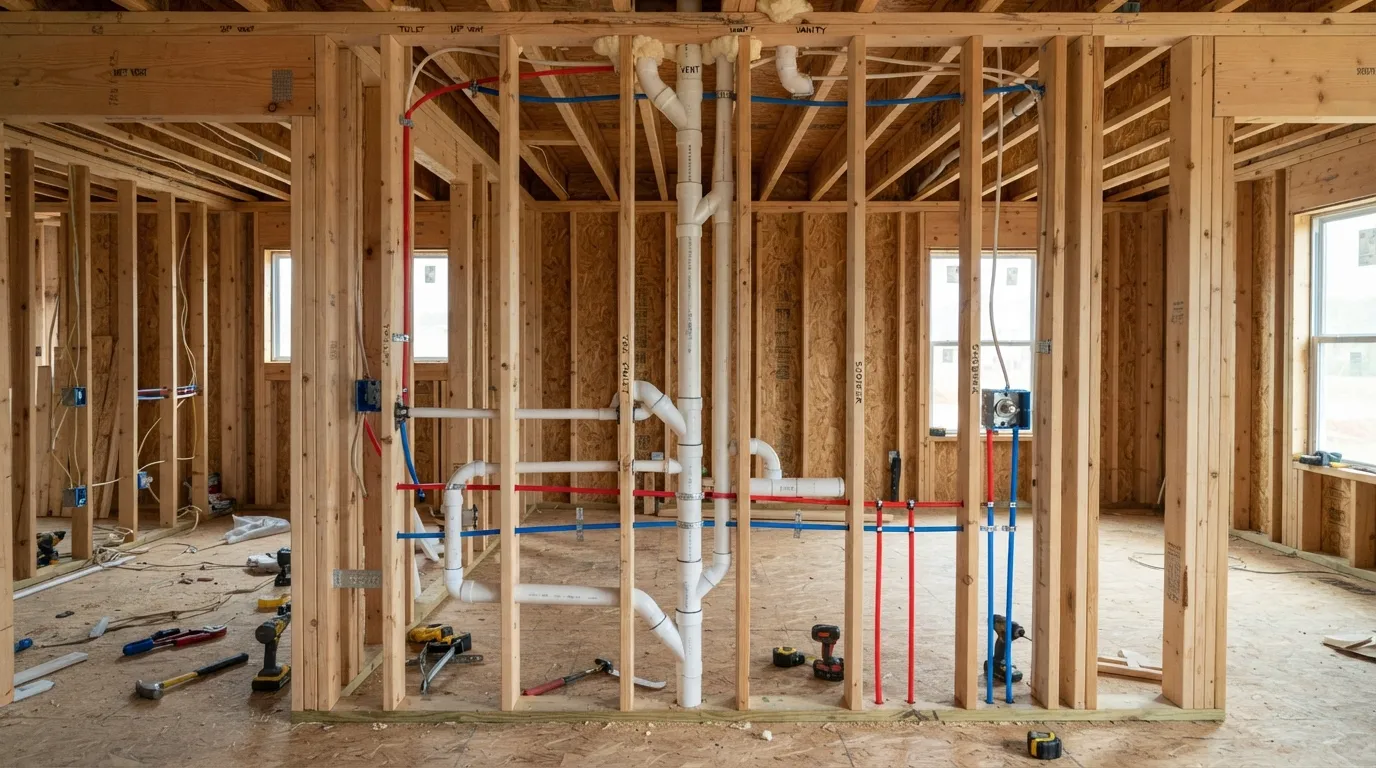
Coordinating plumbing installations with structural milestones is critical during new home construction or major renovations. Establishing the correct timeline prevents costly teardowns, structural compromises, and code violations.
Plumbing installation is divided into distinct, sequential phases that align with the building’s structural progress. Understanding this workflow ensures pipes are safely integrated before concrete pours or drywall goes up.
Foundation vs Plumbing The Correct Order
Underground plumbing must be installed before the concrete slab foundation is poured. This sequence ensures that main drain lines and water supply entry points are securely embedded beneath the slab.
- Excavation and Trenching: Trenches are dug according to architectural blueprints to establish correct drainage slopes before any concrete is laid.
- Sub-Slab Piping: DWV pipes and main supply lines are laid in the trenches, pressure-tested for leaks, and inspected by local building authorities.
- Slab Pouring: Once inspection passes, concrete is poured over the subterranean plumbing, locking the drainage network permanently in place.
What Is 1st Fix Plumbing? Rough In Stage
First fix plumbing, commonly known as the “rough-in” stage, takes place after the framing and roof are complete but before wall insulation and drywall are installed.
- Concealed Piping: Plumbers run vertical vent stacks, supply lines, and drain branches through wooden or steel wall studs and ceiling joists.
- Fixture Anchors: Shower mixing valves, bathtub units, and toilet flanges are securely anchored to the framing structure.
- Pressure Testing: Systems are pressurized with air or water to verify that all soldered, glued, or crimped joints hold firm before walls are closed.
What Is 2nd Fix Plumbing? Final Fixture Stage
Second fix plumbing occurs near the end of construction, after painting and wall finishes are fully completed. This stage brings the entire network to life by connecting visible fixtures.
- Fixture Installation: Toilets, sinks, faucets, showerheads, and dishwashers are bolted into place and connected to their respective supply and waste lines.
- Appliance Hookups: Water heaters, garbage disposals, and washing machine valves are tested for smooth operation and leak-free performance.
- Final Inspection: Technicians perform a final operational check to confirm proper water flow, adequate drainage speed, and secure trap seals.
Plumbing Cost & Timeline for a House
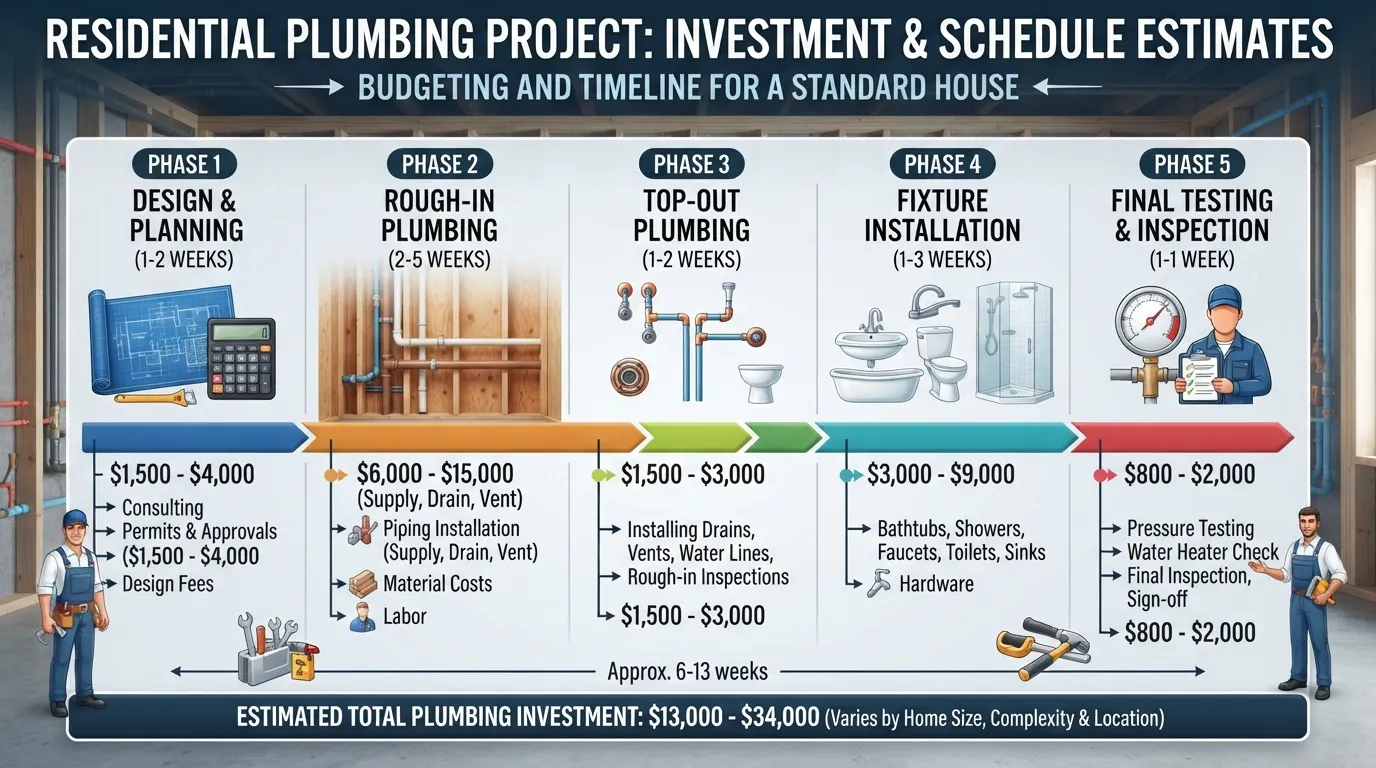
Budgeting for a residential plumbing system requires balancing material choices, labor rates, and project scope. Because plumbing infrastructure accounts for a substantial percentage of total building costs, upfront estimation prevents unexpected financial overruns.
Understanding average cost structures, individual price drivers, and installation timelines helps homeowners and builders plan efficient schedules from the initial excavation phase down to final fixture trim-out.
Average Cost of Plumbing a New House
Complete plumbing installation costs for a standard 2,000-square-foot home typically range between $8,000 and $12,000 for materials and labor combined. On a broader market scale, plumbing costs average between $4.00 and $10.00 per square foot depending on structural layout and fixture complexity.
- Per Square Foot Benchmark: Standard single-story layouts with two to three bathrooms generally land near the $4.50 to $6.00 per square foot mark.
- Rough-In vs. Trim-Out: The rough-in phase accounts for roughly 60% of total plumbing expenses, while final fixture installation (trim-out) covers the remaining balance.
- Room-by-Room Breakdown: Full bathrooms average $2,000 to $5,000 each, while kitchens typically range from $1,500 to $4,000 depending on appliance connections.
Cost Factors Pipe Material House Size Fixtures
Final project costs fluctuate based on specific material selections, geographic labor rates, and the total number of connected water-using appliances.
- Pipe Materials: Flexible PEX piping offers the most cost-effective supply solution ($0.40 to $2.00 per linear foot), whereas rigid copper piping significantly increases material and labor expenses ($2.00 to $8.00+ per linear foot).
- Fixture Quality: Standard builder-grade faucets and toilets cost significantly less to install than custom, commercial-grade, or spa shower systems.
- Layout Complexity: Multi-story homes require vertical drain stacks, complex vent routing, and pressure-boosting equipment that elevate total labor hours.
How Long Does Plumbing Installation Take?
Plumbing installation is divided into phases that align strictly with overall framing and construction milestones. Total active working time usually spans across several days distributed over weeks of building progress.
- Underground Rough-In: 1 to 3 days to lay sub-slab drainage and sewer lines prior to pouring concrete foundations.
- Above-Ground Rough-In (1st Fix): 3 to 7 working days to run supply lines, waste stacks, and vent pipes through open wall studs and floor joists.
- Trim-Out (2nd Finish): 2 to 4 days near the end of construction to mount sinks, toilets, faucets, and water heaters once interior painting and wall finishes are complete.
Common Plumbing Problems & Troubleshooting
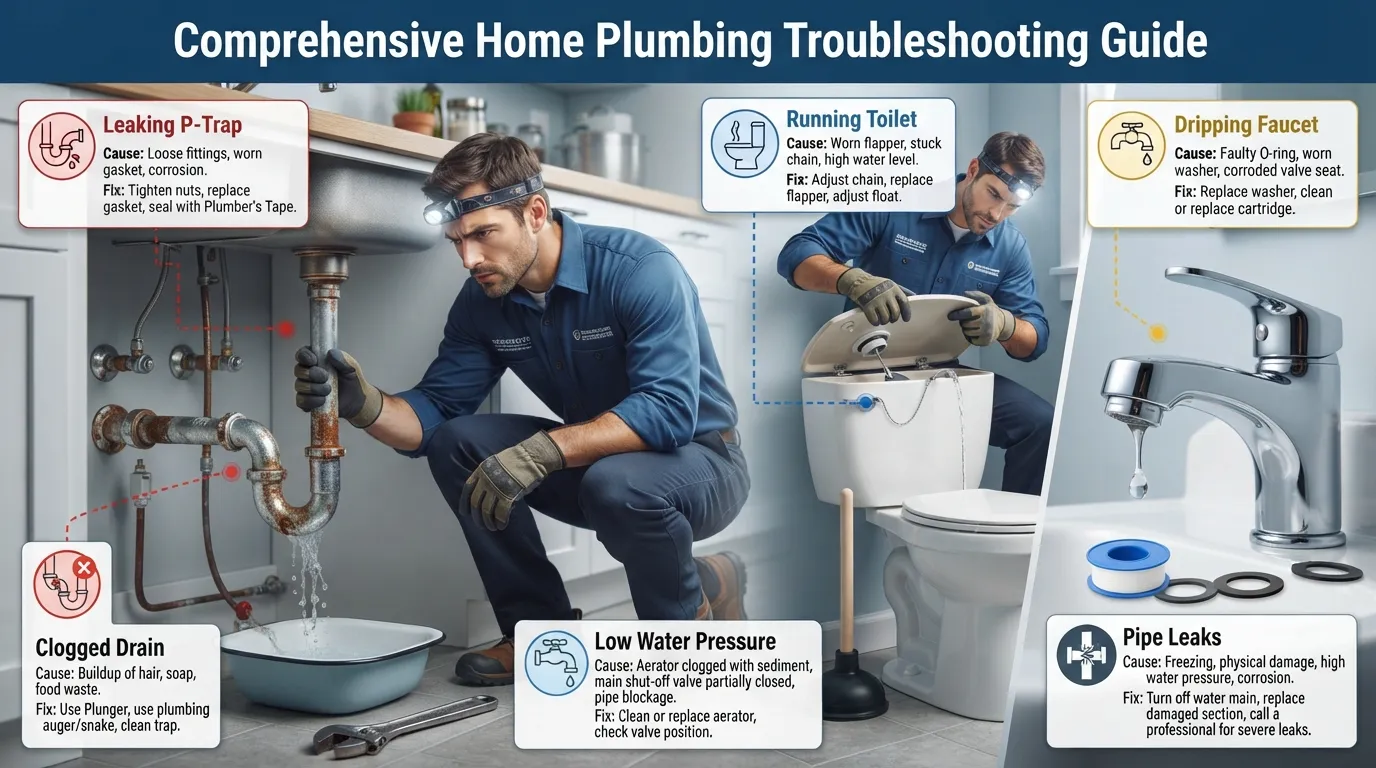
Every residential plumbing system experiences occasional hiccups, ranging from minor slow drains to major pipe leaks. Recognizing early warning signs allows homeowners to resolve minor issues before they escalate into costly emergency repairs.
Knowing how to identify specific symptoms and understanding when a problem requires professional intervention saves time, money, and structural damage.
Signs of a Clogged Drain
Early detection of drainage restrictions prevents messy overflows and severe pipe backups. Recognizing subtle warnings helps clear blockages before they harden.
- Slow Draining Water: Sinks or bathtubs that take noticeably longer to empty indicate grease, soap scum, or hair buildup along pipe walls.
- Gurgling Sounds: Bubbling noises coming from drains when a toilet flushes or a washing machine drains point to trapped air in blocked vent lines.
- Unpleasant Odors: Lingering smells around floor drains or sinks often signal trapped organic debris or dried-out P-traps.
Most Common Household Plumbing Problems
Certain plumbing failures occur frequently across residential properties due to regular wear, mineral buildup, or fluctuating water pressure.
- Running Toilets: A warped flapper valve or misaligned chain allows water to continuously spill from the tank into the bowl, drastically inflating water bills.
- Low Water Pressure: Aerators clogged with mineral deposits or partially closed supply valves restrict smooth water flow at individual faucets.
- Leaking Pipes: Joint corrosion, high water pressure, or freezing temperatures can cause pinhole leaks along copper or PEX supply lines.
DIY Fixes vs When to Call a Plumber
While many minor plumbing maintenance tasks are suitable for do-it-yourself enthusiasts, complex repairs demand licensed professional expertise.
- DIY Friendly Tasks: Clearing minor sink clogs with a plunger, cleaning aerators, and replacing worn toilet flappers require basic tools and minimal time.
- Professional Intervention: Main sewer line blockages, slab leaks, gas line repairs, and burst supply pipes require specialized diagnostic equipment and licensed technicians.
- Safety First: Whenever structural integrity, electrical proximity, or sewage contamination is involved, always shut off the main water supply and contact a professional.
Plumbing Maintenance & Pipe Lifespan
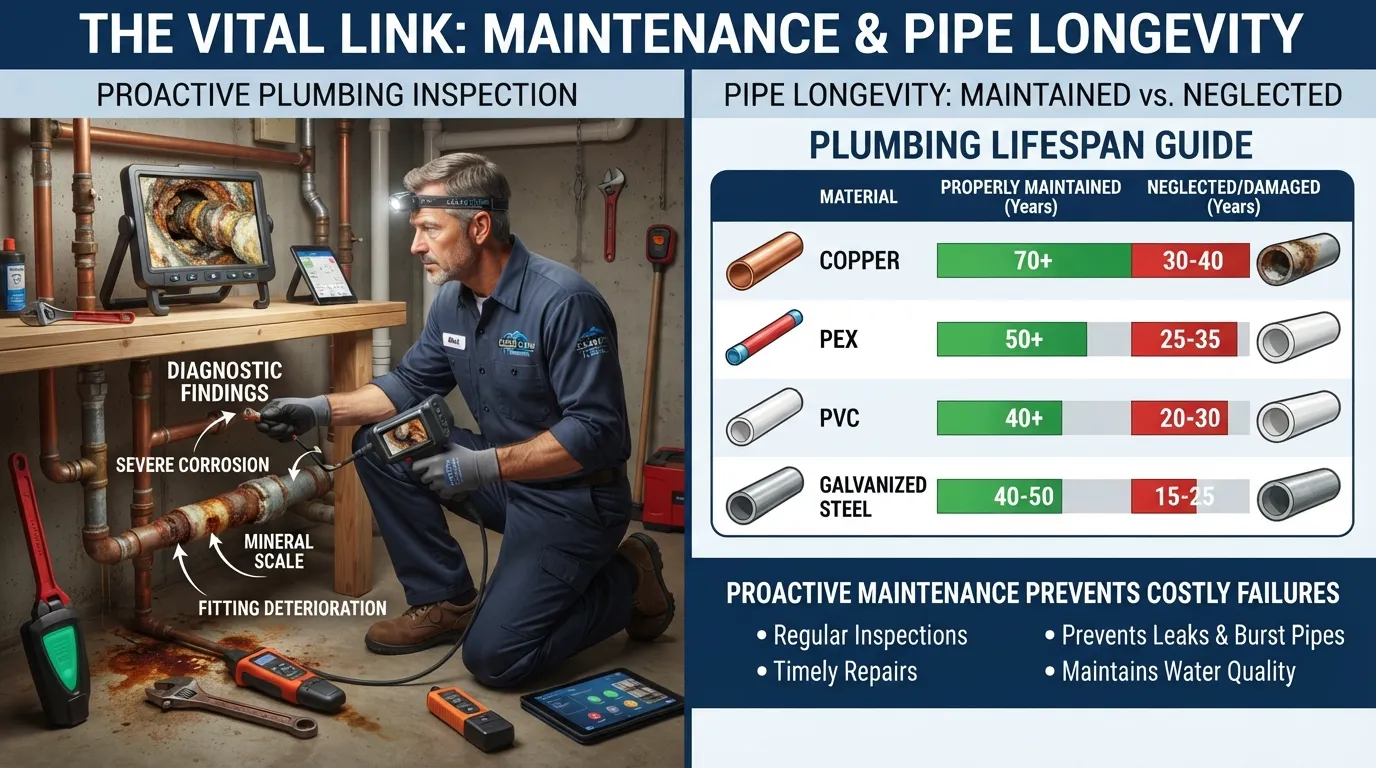
A residential plumbing network is built to last for decades, but individual components wear down at different rates depending on material quality, water chemistry, and usage intensity. Proactive maintenance preserves pipe integrity and prevents catastrophic structural failures.
Understanding the expected lifespan of various pipe materials and adopting simple preventative habits protects your home from hidden leaks, severe corrosion, and expensive emergency replacements.
Average Lifespan by Pipe Material Copper PVC PEX Galvanized
Different plumbing materials have distinct degradation timelines. Knowing what type of piping is installed in your home determines when you should budget for system upgrades.
- Copper Pipes: Extremely durable and corrosion-resistant, lasting anywhere from 50 to 70 years under normal operating conditions.
- PEX Pipes: Flexible cross-linked polyethylene holds strong for 40 to 50 years while resisting mineral scale buildup and freezing damage.
- PVC / ABS Pipes: Rigid plastic drain and vent pipes easily last 50 to 80+ years when properly supported and protected from UV exposure.
- Galvanized Steel Pipes: Prone to internal rust and mineral blockage over time, typically requiring replacement after 20 to 50 years.
Signs Your Home Plumbing Needs Replacement
Older homes or properties with substandard piping materials often display physical symptoms indicating that spot repairs are no longer sufficient.
- Discolored Water: Brown, yellow, or rust-tinted water coming from taps usually signals internal pipe corrosion.
- Frequent Leaks: Repeated pinhole leaks in different sections of supply lines point to systemic pipe degradation or excessive water pressure.
- Drop in Water Flow: Noticeable reductions in overall water volume often indicate heavy mineral or rust accumulation restricting the internal diameter of aging pipes.
Simple Maintenance Habits That Extend Pipe Life
Routine upkeep significantly reduces daily stress on your plumbing infrastructure, keeping water flowing smoothly and preventing premature wear.
- Regulate Water Pressure: Ensure your pressure-reducing valve (PRV) keeps PSI levels between 40 and 60 to prevent high-pressure stress on pipe joints.
- Flush the Water Heater: Drain sediment from your water heater tank annually to improve heating efficiency and prevent bottom-tank corrosion.
- Avoid Chemical Drain Cleaners: Use mechanical snakes or enzymatic cleaners instead of harsh chemical agents that can degrade older metal and plastic pipe walls.
Bathroom Plumbing Basics Room Specific Breakdown
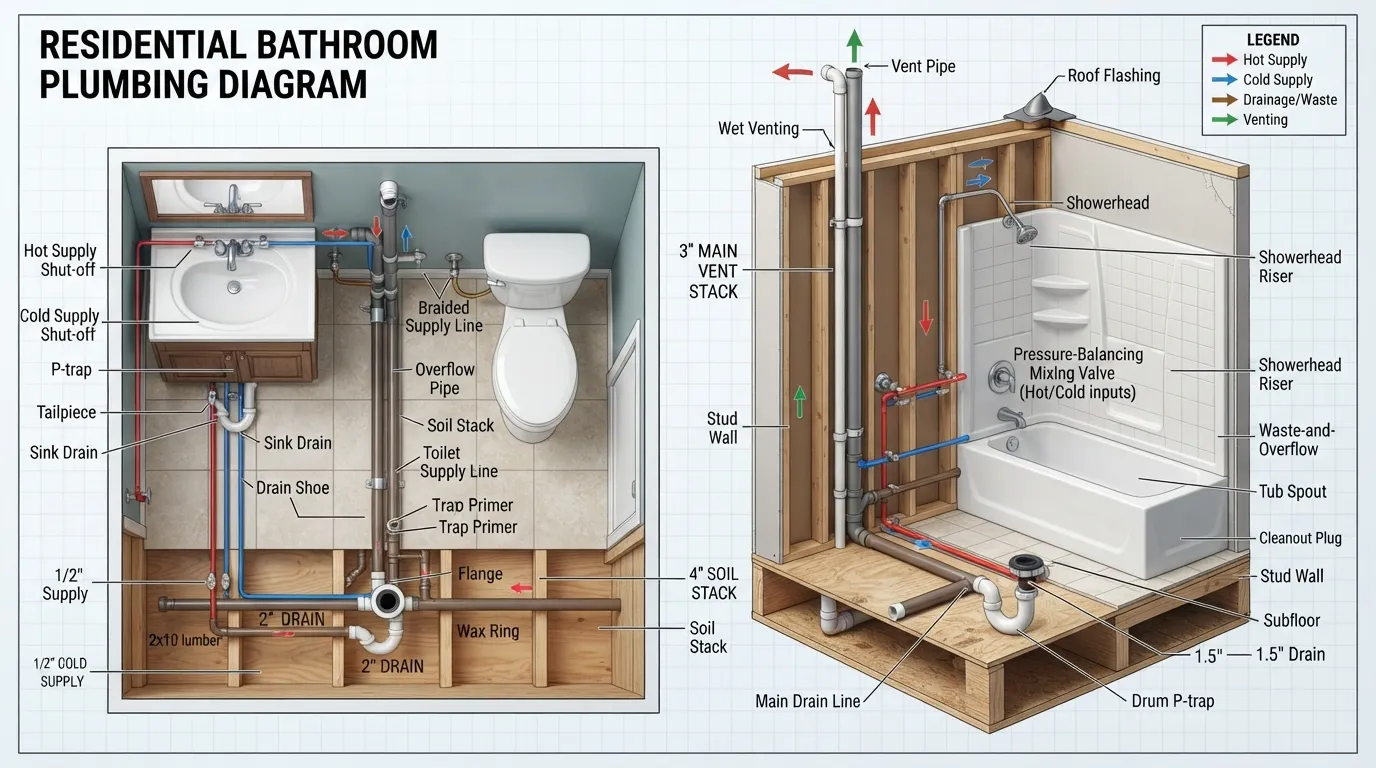
The bathroom is the most water-dense zone in any residential property, housing supply lines, complex drainage networks, and specialized venting configurations. Understanding how bathroom fixtures interconnect is essential for troubleshooting leaks and planning renovations.
Every bathroom fixture relies on a precise balance of pressurized incoming water and gravity-fed waste removal to function efficiently while maintaining strict sanitary standards.
How Water Reaches Your Bathroom Fixtures
Hot and cold supply lines branch out from the main distribution network to feed individual bathroom fixtures through dedicated shut-off valves.
- Sink and Toilet Feeds: Small-diameter supply lines connect wall-mounted shut-off valves directly to bathroom faucets and toilet tanks.
- Shower and Tub Mixers: Pressure-balancing shower valves blend hot and cold water streams inside the wall before sending tempered water to the showerhead or tub spout.
- Individual Isolation: Dedicated angle-stop valves beneath sinks and behind toilets allow homeowners to shut off water to a single fixture without interrupting service to the rest of the house.
How Bathroom Drainage & Venting Formulas Work
Bathroom drainage requires careful slope engineering and proper atmospheric venting to handle high-volume discharges from toilets, tubs, and sinks simultaneously.
- Fixture Branch Drains: Waste from sinks, showers, and tubs travels through horizontal sloped pipes toward the main vertical waste stack.
- Toilet Drainage: Because toilets carry solid waste, they require large 3-inch or 4-inch drain pipes connected directly to the primary soil stack.
- Wet Venting: Many bathroom groups utilize wet venting, where a single vertical pipe serves as both a drain for one fixture and a vent for another, optimizing space and material.
Common Bathroom Plumbing Issues
High daily usage makes bathroom fixtures prone to specific mechanical wear and clogs that require regular attention.
- Hair and Soap Clogs: Shower and sink drains frequently collect hair and soap residue, slowing water flow and requiring periodic snaking.
- Running Toilets: Worn-out flappers or stuck fill valves cause water to run constantly, wasting gallons and driving up utility bills.
- Leaking Faucet Cartridges: Worn internal seals cause dripping faucets that waste water and leave mineral deposits on fixtures.
Plumbing Terms & Glossary Technical Deep-Dive
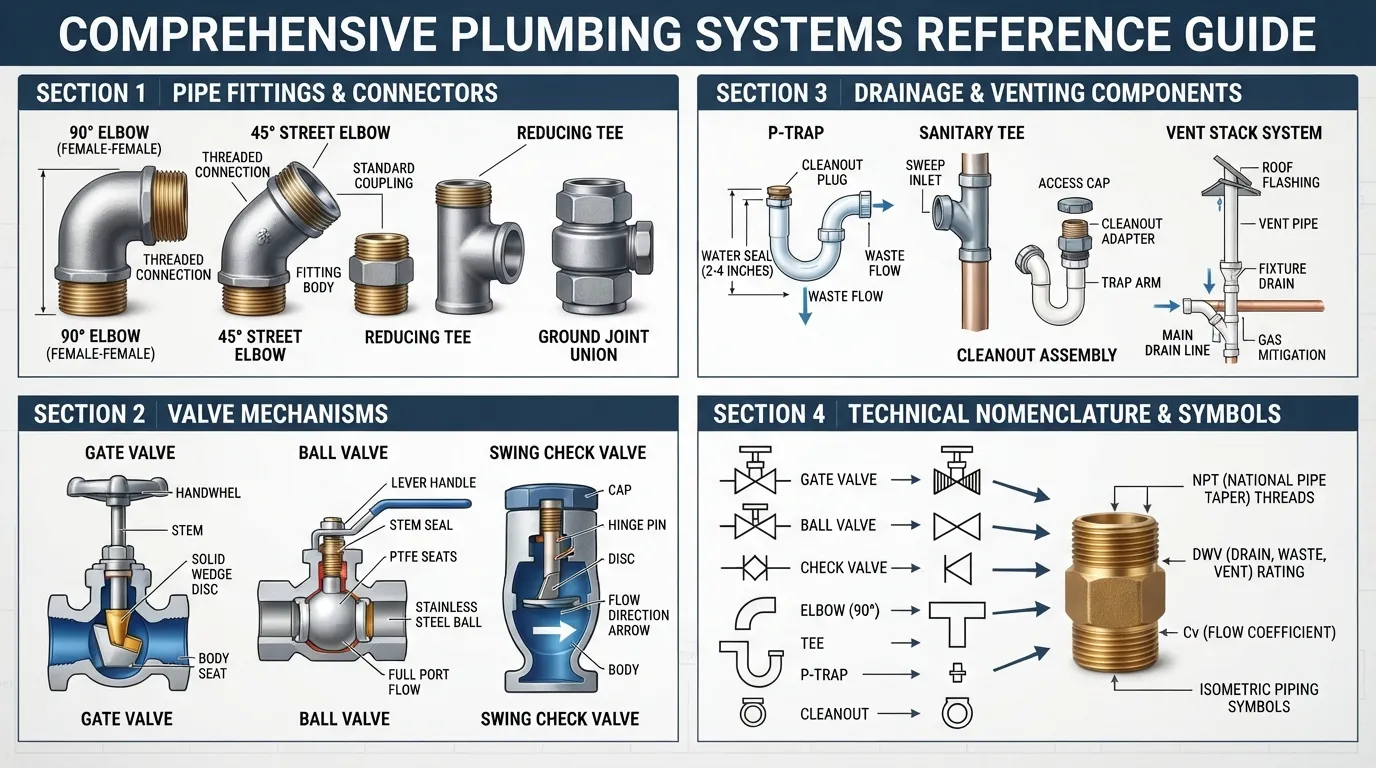
Professional plumbing relies on precise calculations, standardized terminology, and strict mathematical rules to ensure safe water flow and structural integrity. Understanding these technical concepts helps demystify how pipe slopes and layouts are meticulously planned behind the walls.
Decoding industry jargon allows homeowners to communicate effectively with contractors during major remodels or emergency repairs. Mastering these fundamental definitions provides clear insight into residential water dynamics.
What Is the 135 Rule in Plumbing? Explained Simply
The 135 rule is a fundamental code guideline dictating that a horizontal drain pipe cannot change direction by more than 135 degrees total without requiring an accessible cleanout. This standard prevents excessive twists that cause slow drainage and recurring clogs.
- The Math Behind the Rule: It typically equates to one 90-degree bend (a sharp elbow) combined with one 45-degree bend in a single drain run.
- Flow Efficiency: Limiting directional changes ensures gravity-fed wastewater maintains enough momentum to carry solid debris without settling inside the pipe.
- Code Compliance: Exceeding a 135-degree change without adding a cleanout will fail building inspections because it prevents drain augers from navigating the pipe during maintenance.
Does Plumbing Involve a Lot of Math?
Yes, professional plumbing requires constant mathematical applications to manage pressure, volume, and gravitational flow. Plumbers rely on geometry, fractions, and algebra daily to design systems that function silently and efficiently.
- Pipe Slope Calculation: Horizontal drain lines must be calculated to drop exactly 1/4 inch per foot of run to balance liquid speed and solid waste movement.
- Offset Measurements: Navigating pipes around structural framing requires trigonometric calculations to determine the exact length of a connecting pipe between angled fittings.
- Volume and Pressure: Sizing water heaters, determining the correct pipe diameter for fixture demand, and calculating pressure loss over distance are entirely math-based operations.
P-Trap Vent Stack DWV Rough-In
Familiarizing yourself with core plumbing terminology bridges the communication gap between DIY efforts and professional contracting. These four terms represent the most common components and phases of a residential water system.
- P-Trap: The U-shaped pipe beneath sinks and tubs that holds a small water seal to block toxic sewer gases from entering the living space.
- Vent Stack: The vertical roof-penetrating pipe that introduces atmospheric pressure into the drainage network, preventing vacuums from siphoning water out of P-traps.
- DWV (Drain-Waste-Vent): The collective non-pressurized system dedicated entirely to removing wastewater, biological matter, and foul odors via gravity.
- Rough-In: The initial construction phase where all internal supply lines and drain pipes are installed through wood framing before walls are closed with drywall.
Can You DIY Your Own House Plumbing?
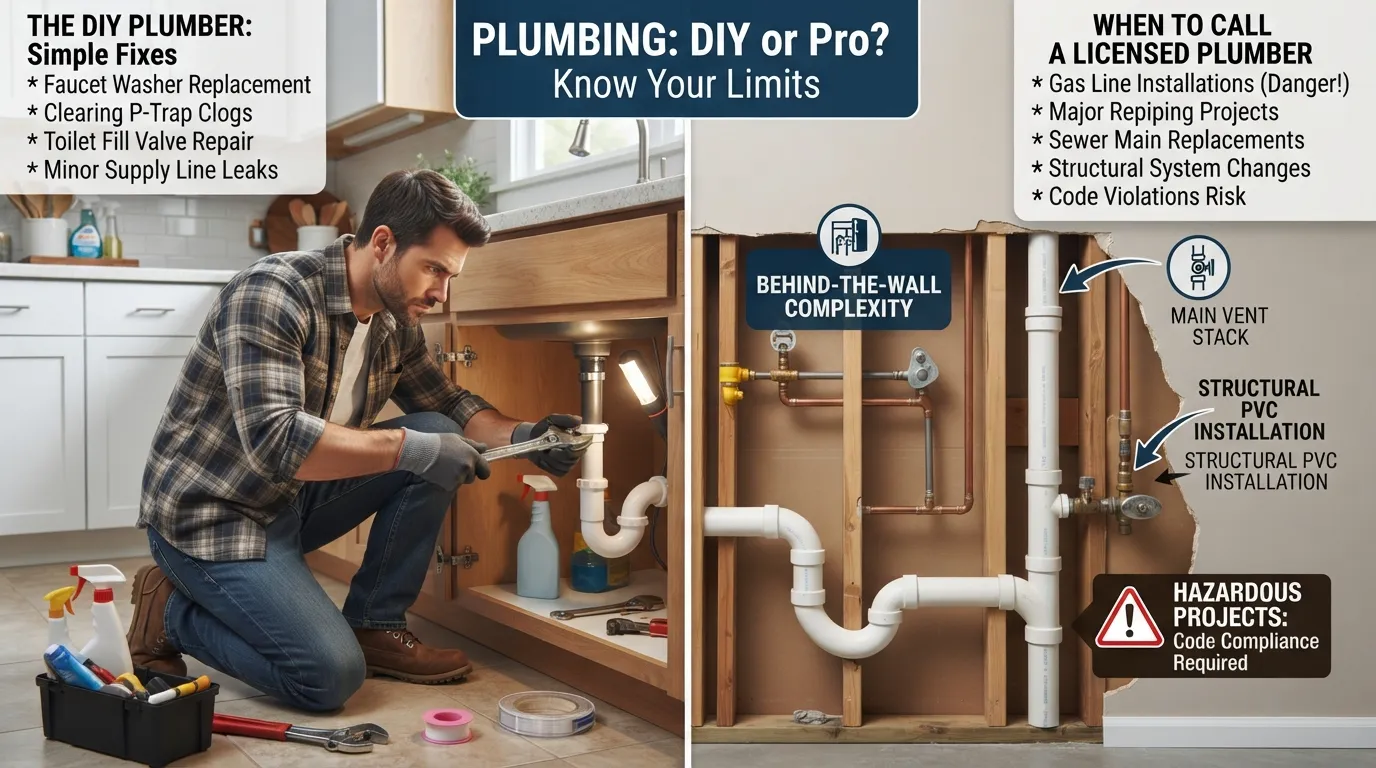
Taking on plumbing projects yourself can save money and build confidence, but knowing your limits prevents minor leaks from turning into catastrophic home damage. Understanding which tasks are beginner-friendly versus when to call a licensed professional is essential for every homeowner.
Balancing DIY ambition with legal code requirements ensures your modifications remain safe, fully functional, and compliant with local municipal regulations.
What Homeowners Can Safely DIY
Minor cosmetic repairs and routine fixture replacements require basic tools and minimal technical experience, making them ideal weekend projects for confident do-it-yourselfers.
- Replacing Faucets and Showerheads: Swapping out old or damaged faucets involves standard wrench work and straightforward supply line connections.
- Fixing Running Toilets: Replacing internal tank components like flappers, fill valves, and flush chains requires no pipe cutting and takes very little time.
- Clearing Minor Clogs: Using a basic hand plunger or a manual drum auger to clear hair or soap buildup in sink traps is safe and effective.
What Should Always Be Left to a Licensed Plumber
Complex structural installations, gas line modifications, and major drainage overhauls carry high risks of property damage and code violations if handled incorrectly.
- Main Sewer Line Repairs: Excavating or replacing underground sewer lines requires heavy equipment, precise slope calculations, and municipal permits.
- Gas Line Work: Modifying gas pipes for water heaters or stoves carries extreme safety hazards; mistakes can result in toxic leaks or explosions.
- Structural Pipe Alterations: Cutting into load-bearing framing or altering main supply stacks requires professional expertise to protect home stability.
Basic Tools Every Homeowner Should Have
Equipping your home utility closet with a few essential plumbing tools prepares you to handle unexpected leaks and minor maintenance tasks immediately.
- Tongue-and-Groove Pliers (Channel Locks): Adjustable pliers provide a secure grip on nuts, fittings, and pipes of various sizes.
- Plumber’s Tape (PTFE Tape): Wrapping threaded pipe joints creates a watertight seal to prevent slow leaks at connections.
- Flanged Toilet Plunger: Unlike standard cup plungers, a flanged model creates an effective seal inside toilet bowls to clear stubborn blockages.
What Plumbers Wish Homeowners Knew E-E-A-T Expert Insight
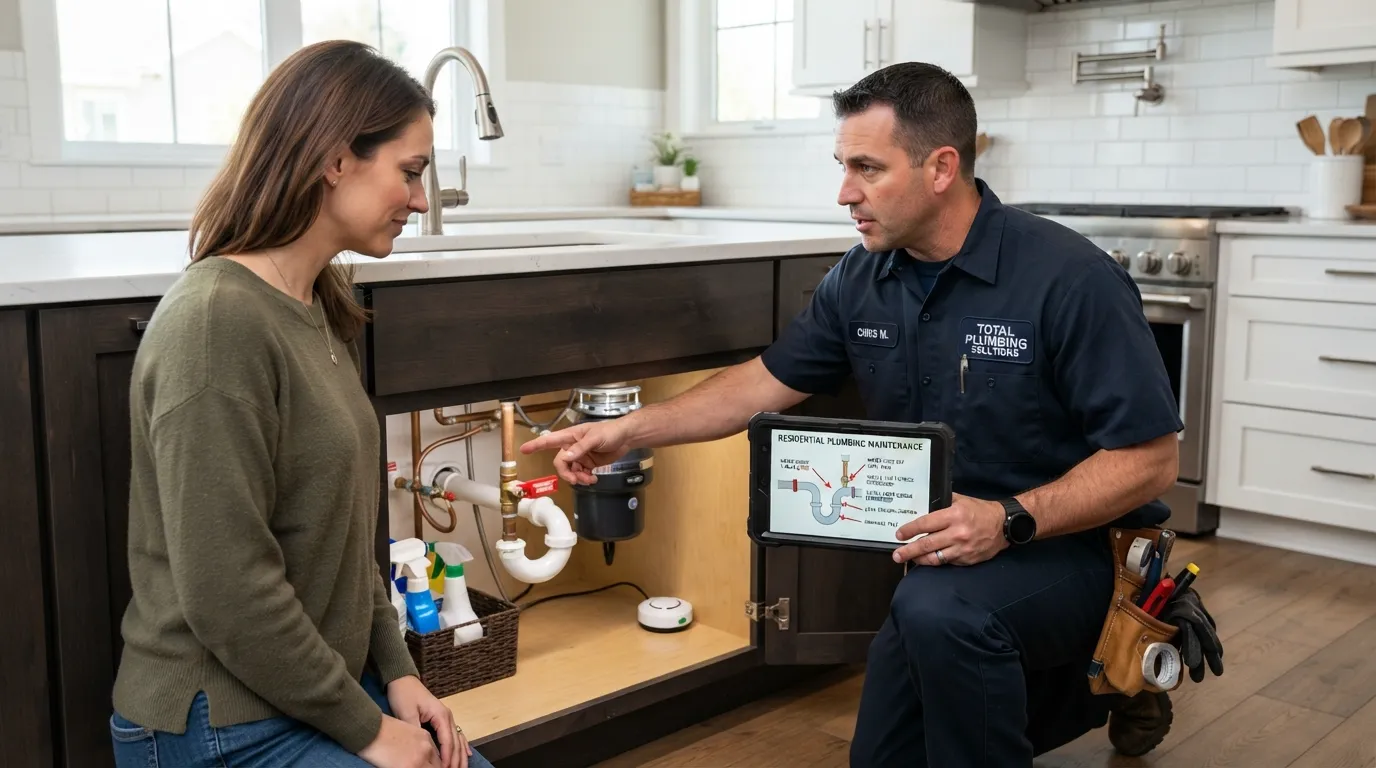
Professional plumbers encounter recurring issues on service calls that could easily have been avoided with basic preventative knowledge and proper fixture usage. Gaining insight from field professionals helps homeowners protect their plumbing systems and avoid costly emergency repairs.
Bridging the gap between everyday habits and technical reality empowers residents to maintain a healthier, longer-lasting home water network.
Mistakes Homeowners Commonly Make
Well-intentioned maintenance efforts or convenient daily habits often cause unexpected damage to residential piping and municipal infrastructure.
- Treating Garbage Disposals Like Trash Cans: Disposing of fibrous vegetables, coffee grounds, and grease creates stubborn clogs and damages impeller blades.
- Over-Tightening Supply Connections: Twisting flexible supply nuts too tightly crushes rubber or silicone washers, causing premature leaks instead of sealing them.
- Pouring Chemical Drain Cleaners Frequently: Harsh chemical formulas generate extreme heat that can warp plastic pipes and corrode metallic joints over time.
Practical Tips From Real Plumbing Experience
Field-tested advice from experienced service technicians highlights small actions that make a massive difference in system longevity and safety.
- Locate Your Shutoffs Immediately: Every family member should know how to operate the main water shutoff valve before an emergency freeze or pipe burst occurs.
- Never Ignore a Slow Drain: Minor slow-downs always worsen into total blockages; addressing them early with a plunger or snake prevents midnight overflows.
- Inspect Hoses Annually: Check flexible stainless-steel braided lines on washing machines and dishwashers once a year for blistering, bulging, or mineral crust.
Preventive Habits That Save Thousands in Repairs
Consistent, low-effort maintenance routines protect your property investment and ensure uninterrupted water service year-round.
- Flush Sediment Annually: Draining a few gallons from your water heater tank once a year prevents mineral buildup and extends appliance life.
- Protect Outdoor Spigots: Disconnect garden hoses and shut off interior isolation valves before freezing winter temperatures arrive to prevent split hose bibbs.
- Schedule Periodic Inspections: Having a licensed professional evaluate your water pressure and main lines every few years catches hidden issues early.
Frequently Asked Questions PAA + Quora Combine
Homeowners often have specific questions regarding construction timelines, repair costs, maintenance schedules, and technical plumbing rules. Reviewing these concise answers provides clarity on the most common residential plumbing inquiries.
What goes first, plumbing or foundation?
Underground plumbing and sub-slab drainage lines must always be installed and pressure-tested before the concrete slab foundation is poured. This ensures that main waste pipes and water entry points are securely embedded beneath the structure.
How to tell if a house drain is clogged?
Key warning signs of a clogged drain include water emptying noticeably slower than usual, gurgling or bubbling sounds coming from pipes when fixtures drain, and unpleasant odors lingering near sinks or floor drains.
How much does plumbing work cost on a house?
Complete plumbing installation for a standard new construction home typically ranges from $8,000 to $12,000, averaging between $4.00 and $10.00 per square foot depending on layout complexity and material choices.
How long does plumbing take in a house?
Plumbing installation is divided into phases: underground rough-in takes 1 to 3 days, above-ground rough-in takes 3 to 7 working days, and final fixture trim-out takes 2 to 4 days near the end of construction.
How often should plumbing be replaced in a house?
High-quality piping materials like copper (50 to 70 years), PEX (40 to 50 years), and PVC (50 to 80+ years) last for decades, whereas older galvanized steel pipes typically require replacement after 20 to 50 years.
What’s the hardest thing to do in plumbing?
Navigating exact drain slopes in tight spaces, routing main sewer lines through existing concrete slabs, and tying into pressurized municipal water mains are widely considered the most difficult tasks in plumbing.
Is plumbing a lot of math?
Yes, plumbing requires continuous mathematical calculations for determining proper pipe slopes (1/4 inch per foot), calculating offsets using geometry, and sizing pipe diameters to match fixture water demand.
What is the 135 rule in plumbing?
The 135 rule states that horizontal drain pipes cannot change direction by more than 135 degrees total (such as one 90-degree bend and one 45-degree bend) without requiring an accessible cleanout to prevent chronic clogs.
What are the most common plumbing problems?
The most frequent household plumbing issues include running toilets due to worn flapper valves, low water pressure caused by mineral-clogged aerators, and slow sinks blocked by hair and soap residue.
Can you install plumbing in your own house by yourself?
While homeowners can safely handle minor tasks like replacing faucets, fixing running toilets, and clearing basic sink clogs, complex installations involving gas lines, main sewer connections, and structural pipe alterations always require a licensed professional and local permits.

Oscar Vance | Master Plumber & Drainage Expert
Meet Oscar Vance, a licensed master plumber sharing practical solutions on residential repairs, preventive maintenance, and thoughtful home upkeep.


Pingback: How to Clear a Clogged Plumbing Vent: 8 Safe Steps