How to Plumb a Reverse Osmosis System
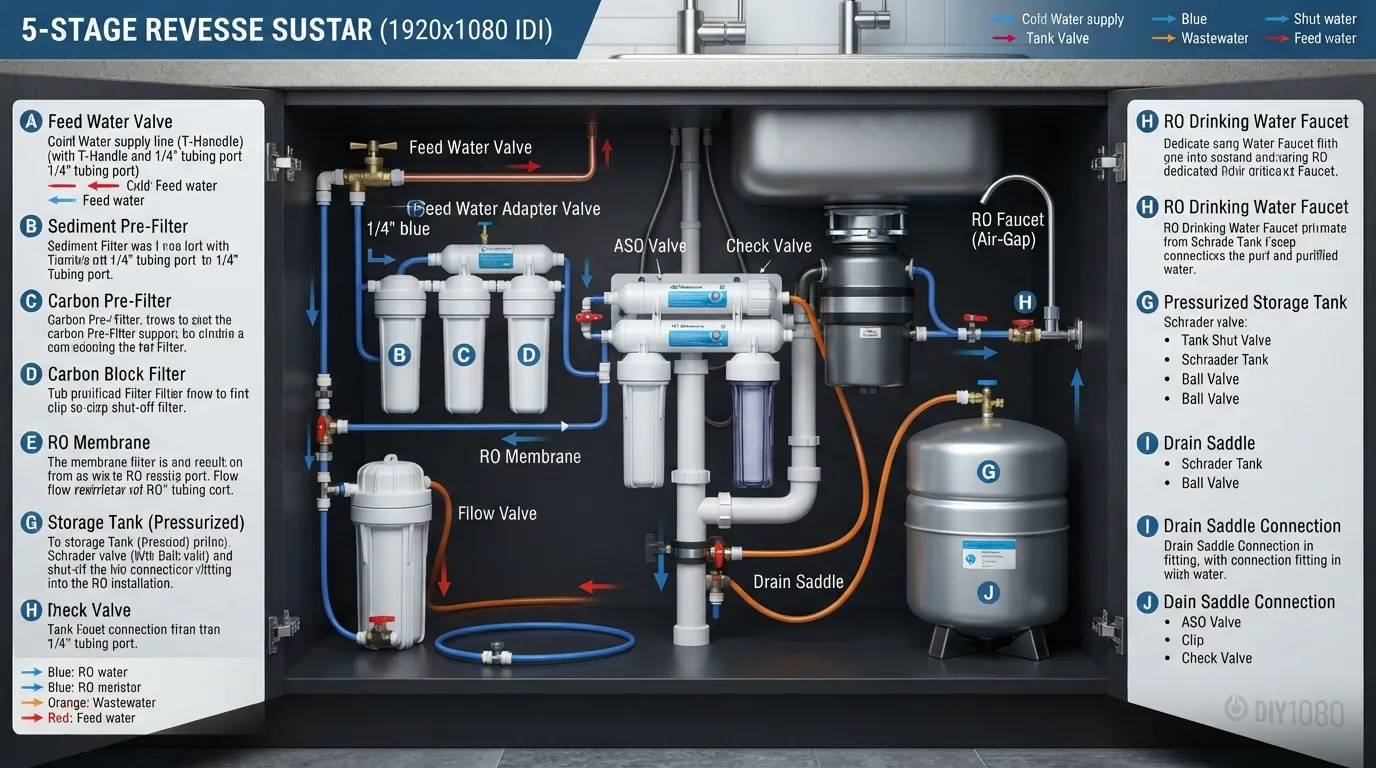
Plumbing a reverse osmosis system requires connecting your under-sink unit to five primary touchpoints: the main cold water supply, a dedicated RO faucet, a wastewater drain line, and the pressurized storage tank. Successfully installing this filtration setup ensures clean, purified drinking water right from your kitchen counter.
The 5 Connections You Need to Make
An under-sink reverse osmosis system relies on a closed-loop network to separate impurities from your tap water. You must correctly route water through the feed valve, pre-filters, the RO membrane, the storage tank, and finally out through your dedicated faucet while expelling wastewater safely down the drain line.
- Cold Water Supply Line: Feeds untreatable raw water into the system via a feed water adapter valve.
- Dedicated RO Faucet: Delivers the final purified drinking water directly above your kitchen sink.
- Drain Line: Discharges the concentrated wastewater containing filtered-out contaminants into your home’s main drainage pipe.
- Storage Tank: Holds pressurized purified water so you have an immediate supply ready on demand.
- System Manifold: Houses the sediment, carbon, and reverse osmosis membrane filters sequentially.
How Long Does It Take?
Installing an under-sink reverse osmosis system typically takes between 2 to 4 hours for a DIYer with basic plumbing tools. The difficulty level is moderate, primarily requiring careful tubing connections and proper wrench tightening to prevent leaks
Can You Plumb an RO System Yourself? DIY vs Plumber
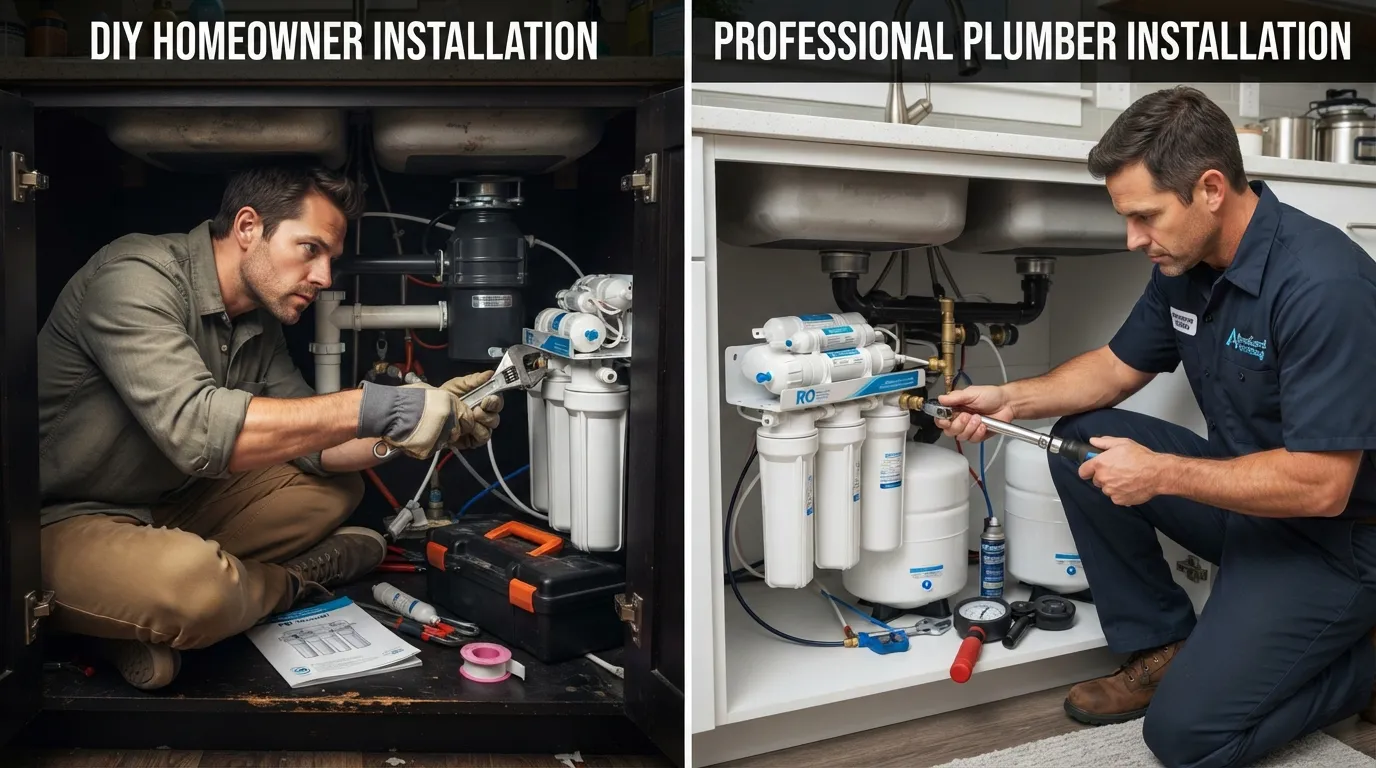
Installing an under-sink reverse osmosis system is a very manageable DIY project for homeowners with basic plumbing tools and careful attention to instructions. However, certain structural challenges, countertop materials, or local plumbing codes may require hiring a professional licensed plumber to ensure compliance and avoid damage.
Can I Install an RO System Myself?
Yes, you can easily install an RO system yourself if you are comfortable working under a sink with basic hand wrenches and tubing cutters. Most modern kits come with quick-connect fittings and step-by-step manuals designed for a straightforward weekend installation.
- Tools Required: Adjustable wrench, utility knife, tubing cutter, and potentially a drill for mounting the drain saddle.
- Time Investment: Expect to spend 2 to 4 hours completing the setup from unboxing to the initial flush.
- Skill Level: Beginner-friendly, provided you follow leak-prevention guidelines closely.
When to Hire a Plumber
Certain installation scenarios present unique complications that exceed standard DIY capabilities. Calling a professional plumber saves you from costly mistakes or accidental property damage.
- Hard Countertops: Drilling through thick granite, quartz, or marble requires specialized diamond hole-saw bits and proper technique to prevent cracking.
- Complex Drainage or Codes: Tight under-sink spaces or non-standard pipe configurations may require custom adjustments to fit the drain saddle correctly.
- Damaged Plumbing: Rusted, corroded, or heavily worn supply valves should be replaced by a professional before connecting new equipment.
Check Local Plumbing Code and Warranty First
Before starting your installation, always verify local regulations and manufacturer stipulations. Compliance protects your home and keeps your coverage valid.
- Air Gap Faucets: Certain municipal plumbing codes strictly mandate an air gap faucet to prevent any possibility of backflow contamination from the drain.
- Warranty Mandates: Some high-end filtration manufacturers void parts or labor warranties unless a certified technician performs the initial installation.
Choose a Certified System
Selecting a reliable unit ensures your water is rigorously purified and safe for daily consumption. Always look for systems backed by recognized industry standards.
- NSF/ANSI 58 Standard: This specific certification verifies that a reverse osmosis system effectively reduces total dissolved solids (TDS) and contaminants.
- Independent Verification: For detailed criteria on certification protocols, review the guidelines outlined by NSF International Standards.
Tools Parts and RO Connection Map Before You Start
Gathering your tools, verifying all components against the parts sheet, and mapping out your under-sink space before turning off any water is crucial. Proper preparation prevents installation delays, leaks, and compatibility issues with your specific filtration setup.
Tools and Materials Checklist
Gathering the right tools and checking your system components beforehand ensures an uninterrupted installation process. You will need standard household tools alongside specific plumbing adapters included in your kit to secure every water and drain connection tightly.
- Tools: Adjustable wrench, drill with bits, utility knife, and a small bucket.
- Fittings & Hardware: Feed water adapter tee, angle stop valve, drain saddle, P-trap, push-to-connect fittings, and locking clips.
- Filtration Elements: Sediment filter, carbon filter, and the RO membrane.
- Sealants: Teflon tape for threaded pipe connections.
Measure Your Cabinet and Plan Placement
Measure your under-sink clearance carefully to ensure both the vertical filtration manifold and the pressurized storage tank fit comfortably. Leaving enough space around the units makes routine filter changes and maintenance much easier in the future.
- Vertical Clearance: Check that housing canisters or quick-twist filters can drop down fully for replacement.
- Tank Footprint: Verify if the storage tank fits vertically or horizontally beside your plumbing pipes.
- Accessibility: Ensure you can easily reach the shut-off valve and tubing lines without contorting your body.
RO Connection Map What Connects to What
Understanding the water routing path clarifies how each component interacts within an installation diagram and filtration loop. The feed water flows from the supply into the system, splits between the faucet and storage tank, and discharges waste through the drain saddle.
Tubing Color Guide
Color-coded tubing simplifies assembly, though specific color assignments can vary depending on the manufacturer. Always consult your specific manual’s installation diagram to confirm exact tube pathways before making final push-to-connect insertions.
Standard vs Tankless vs Permeate Pump vs Air Gap Systems
Different reverse osmosis configurations alter standard under-sink plumbing requirements and connection points significantly. Selecting the right variant depends on your space availability, water pressure needs, and local plumbing code mandates.
- Standard Systems: Rely on an external storage tank and require basic pressure balancing to fill properly.
- Tankless RO Units: Eliminate the bulky tank using internal booster pumps, saving significant under-sink cabinet space.
- Permeate Pump Systems: Utilize hydraulic pressure to enhance efficiency, reduce wastewater volume, and optimize tank filling speeds without electricity.
- Air Gap Systems: Feature specialized multi-port plumbing fittings integrated directly into the faucet base to satisfy local anti-siphon building codes.
Shut Off Water Install the Faucet and Feed Line
Proper preparation begins by cutting off the water supply and safely releasing internal line pressure. Securing your dedicated reverse osmosis faucet and mounting the feed water adapter to your cold water line establishes the structural foundation for your entire purification loop.
Step 1: Shut Off the Cold Water and Release Pressure
Locate the angle stop valve underneath your kitchen sink and turn the handle clockwise to shut off the cold water supply completely. Open your kitchen faucet briefly to drain any residual water and relieve remaining pressure from the lines before disassembling connections.
- Verify Valve Closure: Confirm the water has stopped flowing entirely by testing the main kitchen tap.
- Identify Supply Lines: Trace the lines carefully to ensure you are modifying the cold water supply rather than the hot water line.
Step 2: Install the Dedicated RO Faucet
Mount your dedicated reverse osmosis faucet either through an existing pre-drilled hole (such as a soap dispenser slot) or by drilling a new hole through the sink deck. Secure the hardware underneath using the provided rubber washers, metal backing plates, and threaded locking nuts.
- Hole Preparation: Use a specialized drill bit suited for your countertop material if drilling a new mounting hole.
- Washer Alignment: Place the chrome escutcheon plate and rubber gasket on top of the counter to prevent water seepage into the cabinet below.
Step 3: Connect the Cold Water Feed with the Adapter Tee
Attach the feed water adapter tee directly onto your cold water angle stop valve. Apply Teflon tape only to male threaded joints that require a mechanical seal, keeping push-to-connect fittings clear of tape to ensure a secure, leak-free locking grip.
- Adapter Installation: Disconnect the existing faucet riser line, screw the feed water tee onto the valve, and reconnect the riser to the top of the tee.
- Tubing Insertion: Push the supply tubing firmly into the adapter’s quick-connect fitting until it seats completely past the internal O-ring.
Experience Box
When installing your dedicated faucet, double-check that the handle clearance clears the outer rim of your sink basin and backsplashes comfortably. Taking an extra moment to test the swing radius before final tightening prevents restricted movement later.
Step by Step Drain Saddle Storage Tank and Filter Tubing
Completing your reverse osmosis installation requires setting up the wastewater drainage, mounting the pressurized storage tank, and routing all color-coded tubing lines securely. Precision during these steps prevents leaks, backflow issues, and system operational failures.
Step 4: Install the Drain Saddle Above the P-Trap
Position the drain saddle clamp onto the vertical or horizontal tailpiece of your sink drain pipe, always placing it well above the P-trap to prevent wastewater backup. Align the built-in guide hole of the saddle, drill through the pipe wall carefully using the recommended drill bit size, and bolt the clamp down securely.
- Alignment Check: Ensure the drilled hole in the pipe matches the center aperture of the rubber gasket inside the saddle to avoid flow restrictions.
- Secure Fastening: Tighten the bolts evenly on both sides so the clamp seals tightly against the pipe without crushing or cracking it.
Step 5: Set Up the Storage Tank
Wrap Teflon tape clockwise around the male threaded nipple on top of the storage tank three to four times to ensure a water-tight seal. Thread the plastic tank shut-off valve firmly onto the fitting, and verify that the pre-charge air pressure inside matches the manufacturer specifications (typically around 7 to 8 psi when empty).
- Valve Positioning: Keep the tank shut-off valve in the closed position while you complete the rest of the under-sink tubing connections.
- Tank Placement: Place the tank upright on its stand or on its side using a dedicated base support bracket depending on your cabinet layout.
Step 6: Mount the System and Insert Filters and Membrane
Securely mount your filter manifold bracket to the cabinet wall if desired, or let it rest flat on the cabinet floor depending on your unit design. Insert the sediment filter, carbon block filters, and the RO membrane element into their respective housings, making sure each component is fully seated and O-rings are lubricated.
- Membrane Insertion: Push the reverse osmosis membrane firmly into its housing until it clicks past the internal seal, ensuring it faces the correct directional flow.
- Housing Tightening: Use the supplied housing wrench to snug the filter canisters gently, avoiding over-tightening which can warp the O-ring seals.
Step 7: Connect the Tubing and Lock the Fittings
Cut each color-coded plastic tube cleanly with a sharp utility knife to ensure a flat, square edge. Push each tube firmly into its corresponding quick-connect fitting on the manifold until it seats completely past the internal O-ring, then tug gently and attach locking clips.
- Full Insertion: Confirm the tube enters about a quarter-inch into the push-to-connect socket to achieve a secure mechanical lock.
- Safety Clips: Snap the small horseshoe locking clips under the collet collars of every fitting to prevent accidental release under water pressure.
Real DIY Walkthrough
Watching a real homeowner tackle an under-sink reverse osmosis project provides helpful visual context for mapping out tight spaces, routing lines, and handling unexpected plumbing configurations without professional assistance.
Pressurize Check for Leaks and Flush the System
Activating your newly installed reverse osmosis system requires a controlled startup sequence to test for water-tight seals and clear out residual manufacturing preservatives. Executing these final checks properly guarantees your drinking water is clean, great-tasting, and completely safe from the very first glass.
How to Pressurize and Check for Leaks
Open the cold water supply valve and the tank shut-off valve slowly to introduce water pressure into the system. Keep the dedicated RO faucet closed while inspecting every fitting, filter housing, and drain connection thoroughly with a paper towel for any signs of moisture over the first two to four hours.
- Gradual Pressurization: Opening valves slowly prevents water hammer surges and gives quick-connect seals time to seat evenly.
- Inspection Points: Pay close attention to the feed water adapter, filter canister threads, drain saddle clamp, and quick-connect collets.
How to Flush a New RO System Before Drinking
While quick AI overviews often suggest simply draining the first two tanks of water, you should always follow your specific manufacturer’s exact fill-and-drain guidelines. This initial flushing process washes away harmless carbon fines and protective membrane preservatives that cause initial discoloration and unusual tastes.
- Carbon Fines Elimination: Brand new carbon block filters release loose black dust particles that must be completely rinsed out before consumption.
- Membrane Conditioning: Purging the initial batches of water helps stabilize total dissolved solids (TDS) rejection rates across the reverse osmosis membrane.
How Long Until the Tank Fills?
A standard under-sink reverse osmosis system takes approximately 2 to 4 hours to completely fill an empty storage tank under normal household water pressure. Production speed varies depending on your incoming water pressure, feed water temperature, and the daily gallon capacity rating of your specific RO membrane.
Experience Box
During our initial startup, we noticed a tiny slow drip forming around the drain saddle connection after about an hour of pressure buildup. Giving the clamping bolts a quarter-turn tighter completely resolved the leak, proving why it is essential to monitor your system closely during those crucial first few hours of operation.
How to Connect an RO System to a Refrigerator or Ice Maker
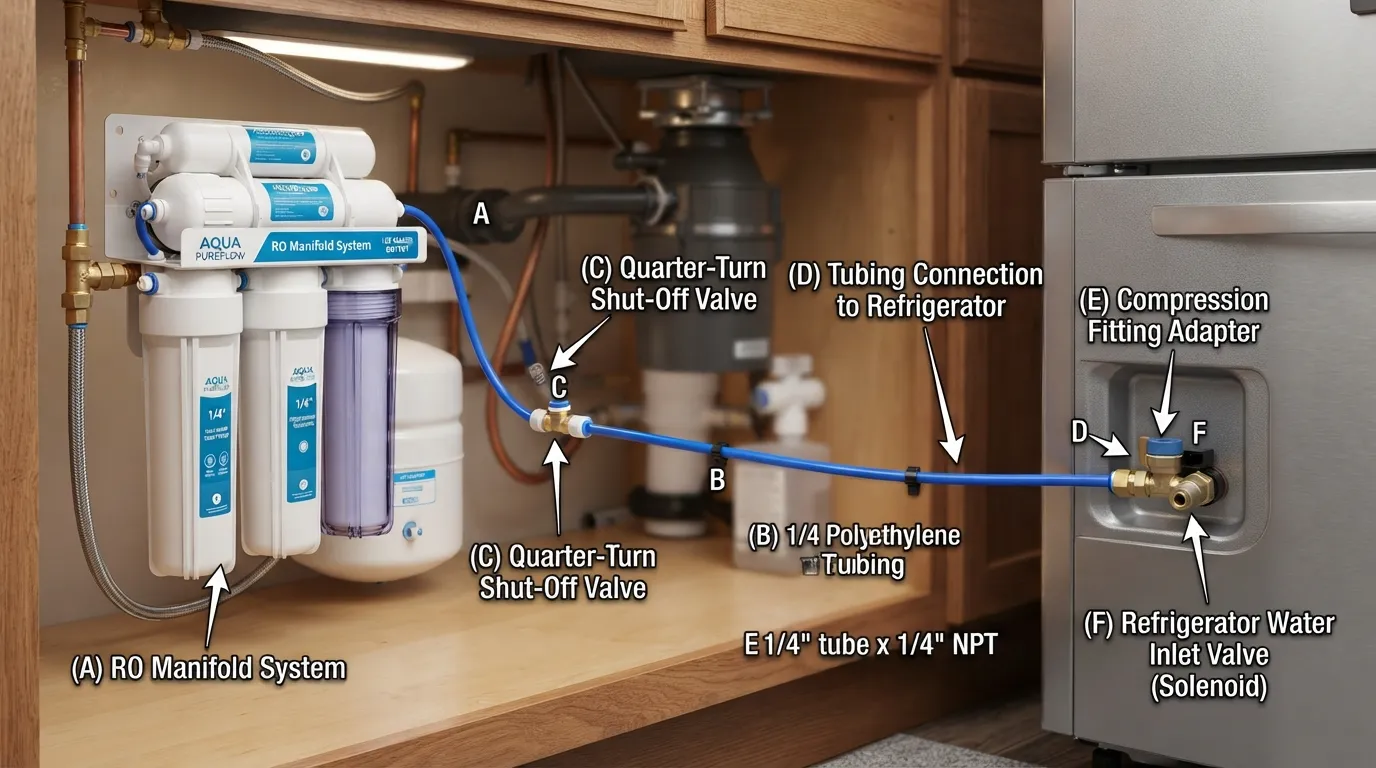
Connecting your reverse osmosis system to your refrigerator or ice maker allows you to enjoy purified, great-tasting ice cubes and chilled water directly from your fridge door dispenser. This plumbing addition routes purified water from your under-sink manifold straight to the appliance inlet valve using food-grade polyethylene tubing.
Can You Connect RO to a Fridge Line?
Yes, you can easily connect your reverse osmosis system to a refrigerator ice maker or water dispenser using a simple tee-fitting diversion. The purified water travels seamlessly through flexible tubing behind your kitchen cabinets to supply both your sink faucet and your refrigerator simultaneously.
- Dual Dispensing: Supplies filtered water to both your dedicated counter faucet and your refrigerator dispenser at the same time.
- Pure Ice Quality: Eliminates cloudiness, strange odors, and mineral deposits from your freezer ice cubes for better-tasting beverages.
What You Need T-Fitting Tubing and Inline Filter
Gathering the right specialized components ensures a secure, leak-free extension from your main under-sink filter setup to your refrigerator. You will need standard food-grade connection hardware to bridge the distance safely.
- T-Fitting Adapter: A push-to-connect union tee that splits the purified water line heading from the post-carbon filter.
- Extra Polyethylene Tubing: Long-reach flexible tubing (usually quarter-inch) designed to route behind cabinets to the fridge inlet.
- Inline Post-Filter (Optional): An extra carbon polishing filter if your refrigerator manufacturer requires an additional localized stage.
Step by Step Fridge Line Connection
Run your refrigerator feed line cleanly and safely by following a methodical installation sequence behind your kitchen counters. Proper routing prevents kinks and protects the tubing from accidental pinches or appliance damage.
- Install the Tee Fitting: Insert a push-to-connect tee fitting into the final purified water line right after your under-sink RO system’s post-carbon filter.
- Route the Tubing: Feed the extension tubing carefully from the under-sink cabinet behind your dishwasher or stove to the refrigerator shut-off valve.
- Connect to Fridge Inlet: Attach the tubing securely to the refrigerator’s water inlet valve using the appropriate compression nut or quick-connect adapter.
- Test and Flush: Turn on the supply valves, check for leaks along the entire length of the run, and discard the first few batches of ice and water.
Pressure and Tank Size Considerations
Routing purified water to a refrigerator places an extra demand on your reverse osmosis system’s output capacity and internal pressure. Matching your setup prevents weak dispenser flow and premature booster pump wear.
- Pressure Drops: Long tubing runs over 15 feet can reduce water pressure at the fridge door dispenser, sometimes requiring a booster pump.
- Storage Volume: Standard 3.2-gallon tanks may cycle more frequently when supplying both a sink faucet and an ice maker, making larger tanks ideal for busy households.
How to Plumb a Whole House RO System Overview
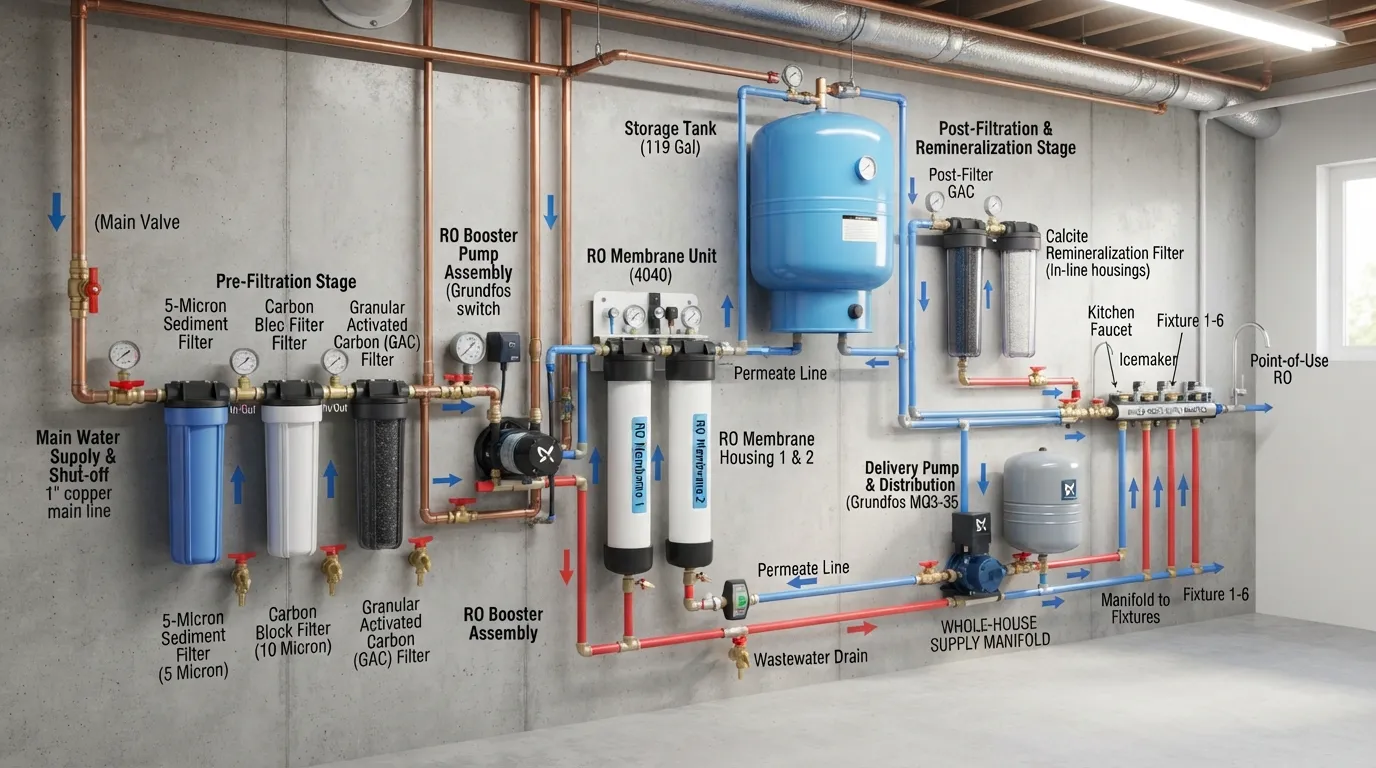
Plumbing a whole-house reverse osmosis system scales up water purification from a single kitchen tap to every plumbing fixture, shower, and appliance in your home. This advanced installation requires heavy-duty commercial-grade components, precise pressure management, and careful handling of large volumes of wastewater.
Under-Sink vs Whole-House RO Key Differences
While an under-sink reverse osmosis unit treats a few gallons a day for drinking and cooking, a whole-house system is engineered to handle thousands of gallons daily for your entire home. Understanding these structural differences helps you evaluate capacity needs and space requirements.
- Capacity Output: Whole-house systems generate anywhere from 500 to over 2,000 gallons per day (GPD) compared to standard 50-to-100 GPD under-sink units.
- Infrastructure Needs: Entire home setups require atmospheric storage tanks, heavy-duty booster pumps, and large drain lines to handle massive wastewater discharge.
Basic Plumbing Layout of a Whole-House System
The layout of a whole-house reverse osmosis network integrates multiple specialized mechanical components into your main water line. Every element must be positioned sequentially to maintain consistent household water pressure and continuous flow.
- Pre-Filtration Setup: Sediment and carbon filters remove large debris and chlorine before raw water reaches the delicate RO membranes.
- Atmospheric Storage Tank: Large treated water storage tanks hold hundreds of gallons of purified water ready for household demand.
- Booster Pump: Delivers high-pressure water from the storage tank reliably to showers, sinks, and laundry appliances throughout the house.
- Bypass Valve: Allows you to isolate and bypass the entire filtration system easily during routine maintenance or emergency repairs.
When a Professional Is Recommended
Installing a whole-house reverse osmosis system is an advanced mechanical engineering project that goes far beyond standard DIY plumbing skills. Hiring a certified water treatment professional is strongly advised to prevent severe property damage or system failure.
- High Water Pressure Risks: Improperly balanced high-capacity pumps can cause catastrophic pipe bursts or water hammer damage.
- Code Compliance: Municipal backflow prevention requirements and complex electrical wiring for pumps demand licensed plumbing expertise.
Common Mistakes and Troubleshooting
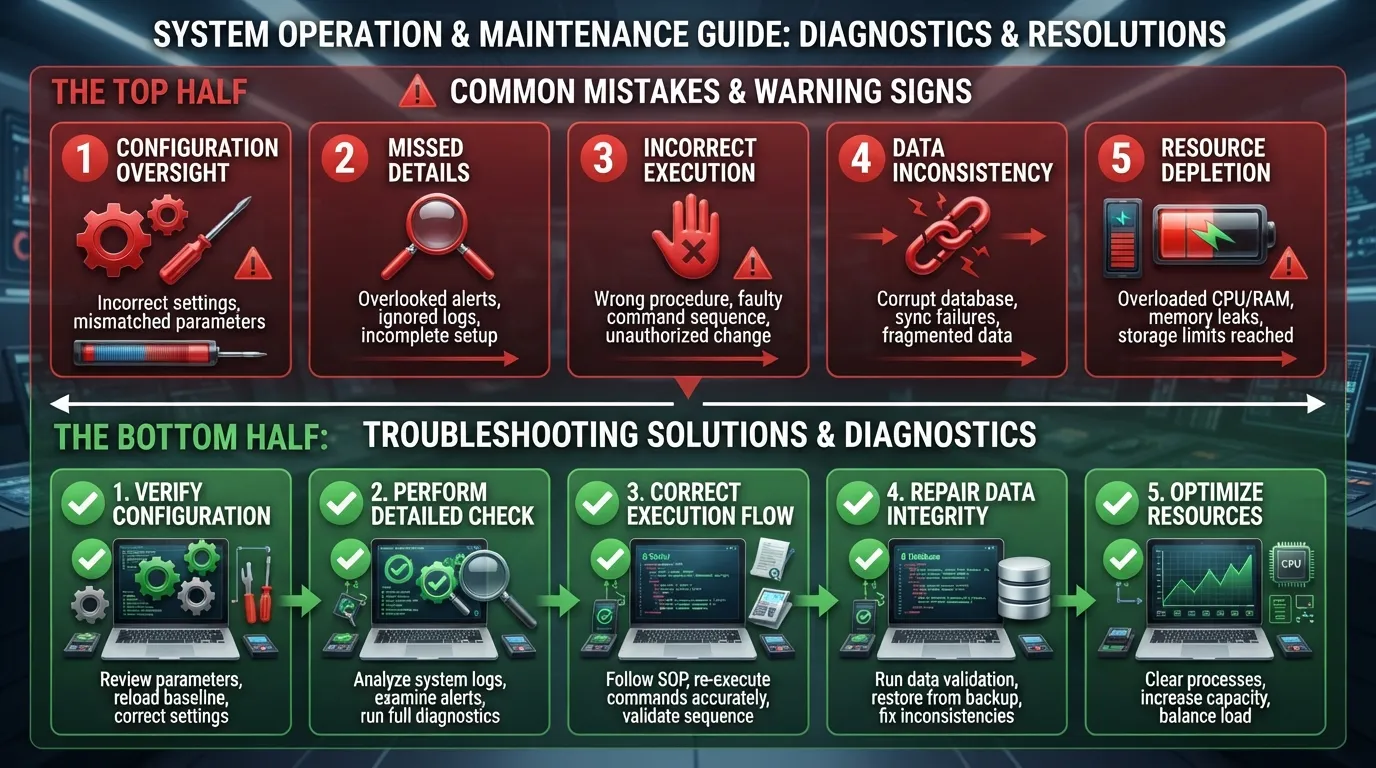
Even with careful preparation, minor installation oversights can lead to annoying leaks, slow water flow, or unusual tastes during your reverse osmosis system setup. Identifying these common plumbing errors quickly helps you troubleshoot issues efficiently without second-guessing your work.
7 Common RO Plumbing Mistakes
Avoiding these frequent installation pitfalls ensures your system operates smoothly from the moment you turn on the supply valves. Paying close attention to minor assembly details saves you hours of troubleshooting later.
- Jagged Tubing Cuts: Cutting plastic tubing at an angle with dull scissors prevents a proper seal inside quick-connect fittings.
- Incomplete Insertion: Failing to push tubing a full quarter-inch past the internal O-ring causes sudden high-pressure leaks.
- Misaligned Drain Saddle: Drilling the drain pipe off-center from the saddle’s aperture creates severe wastewater clogs and slow backups.
- Excessive Teflon Tape: Applying tape incorrectly over push-to-connect threading or wrapping too thickly interferes with mechanical seating.
- Low Drain Placement: Clamping the drain saddle below the P-trap allows foul sewer gases and gurgling noises to enter the system.
- Cramped Cabinet Layout: Mounting filters too close to the floor makes replacing canister housings impossible during routine maintenance.
- Ignored Air Pressure: Skipping the pre-charge air pressure check on the storage tank leads to weak water pressure at your faucet.
RO System Leaking What to Check
If you discover moisture under your sink, trace the water source methodically starting from the highest elevation connections. Most leaks stem from unseated tubing, loose housing canisters, or missing O-ring seals.
- Quick-Connect Collets: Verify that safety locking clips are in place and that the tubing is shoved completely home into the fitting.
- Filter Canisters: Inspect the rubber O-rings inside each filter housing to ensure they are lubricated and seated flat in their grooves.
- Drain Saddle Seal: Check that the rubber gasket inside the drain clamp is centered correctly over the drilled pipe hole.
Tank Not Filling or Slow Flow
A tank that refuses to fill or delivers a weak stream usually points to water supply restrictions or improper internal air pressure. Diagnosing the pressure balance restores normal dispensing performance.
- Closed Valves: Confirm that both the cold water feed adapter valve and the storage tank shut-off valve are fully open.
- Low Tank Pressure: Check the tank’s Schrader valve with a pressure gauge; an empty tank should read between 7 and 8 psi of air.
- Clogged Filters: Heavily clogged sediment or carbon pre-filters restrict water volume before it ever reaches the RO membrane.
Drain Noise or Strange Taste
Gurgling drain noises or unusual water tastes usually indicate improper air gap connections or initial carbon residue that needs purging. These minor issues resolve quickly with proper maintenance.
- Gurgling Sounds: Straighten out the black drain line to eliminate loops or sags where wastewater can trap air and cause noisy gurgling.
- Off Taste: Ensure you have completed the mandatory full tank flushes to wash away harmless residual carbon fines from new filters.
Experience Box
During one of our early installations, we forgot to remove the protective plastic wrapping from inside a brand-new carbon filter before screwing the housing back on. Water flow stopped completely within minutes, teaching us the hard way to always inspect and unwrap every single filter element before final assembly.
RO Installation Cost Lifespan and Maintenance
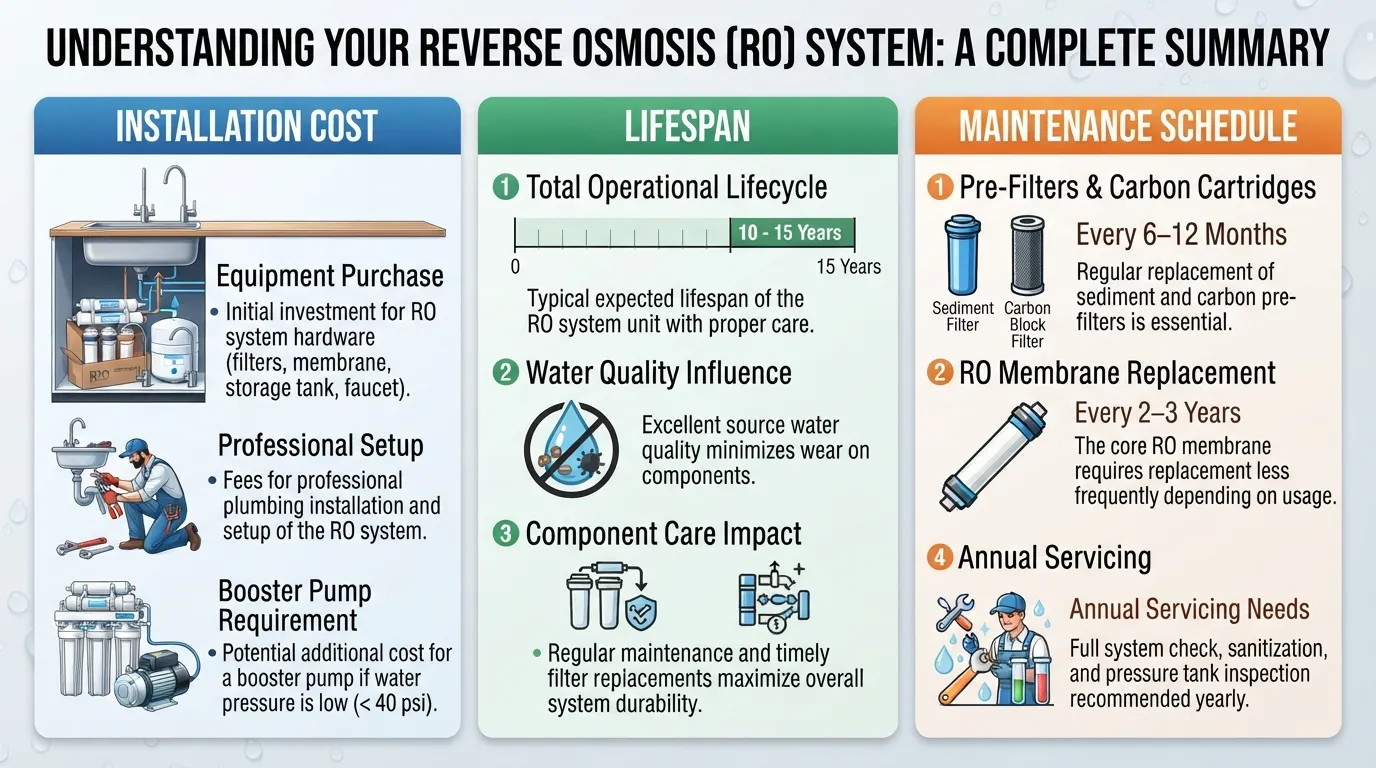
Understanding the total financial investment, replacement schedules, and long-term maintenance requirements of a reverse osmosis system helps you budget effectively. Evaluating DIY savings versus professional plumbing fees ensures you choose the most cost-effective path for your household.
How Much Does RO Installation Cost?
The total cost of adding a reverse osmosis system to your kitchen depends heavily on whether you choose to install it yourself or hire a professional plumber. Equipment prices and labor rates vary based on unit complexity and local service fees.
- DIY Installation: Costs between 150 to 400 dollars for the unit itself, with zero labor expenses if you handle the setup using basic household tools.
- Professional Plumber: Hiring a licensed plumber typically adds 150 to 350 dollars in labor fees, bringing total professional installation costs to between 300 and 750 dollars.
How Long Does an RO System Last?
A high-quality under-sink reverse osmosis system can easily last 10 to 15 years with proper care and routine component replacements. While the main manifold and storage tank endure for years, internal filters and membranes wear out and require scheduled maintenance intervals.
- Sediment & Carbon Pre-Filters: Must be replaced every 6 to 12 months to protect the delicate membrane from chlorine and debris damage.
- RO Membrane: Typically lasts between 2 to 3 years depending on your incoming water hardness and total dissolved solids (TDS) levels.
- Post-Carbon Filter: Usually changed annually alongside your final pre-filter replacement to maintain fresh drinking water taste.
Store Bought vs Specialty RO Costco etc.
Retail warehouse clubs like Costco, big-box hardware stores, and online retailers offer standard residential reverse osmosis systems ranging from basic 4-stage models to advanced 6-stage remineralization units. Specialty water treatment dealers provide custom configurations tailored to unique well-water or heavy-mineral profiles.
- Retail Models: Highly affordable, widely available, and compatible with universal replacement filters that make DIY upkeep straightforward and inexpensive.
- Specialty Systems: Often feature proprietary filter cartridges, heavy-duty commercial construction, and professional-grade support backed by local water experts.
Cheapest Ways to Get RO Water
Investing in a standard residential under-sink reverse osmosis system is ultimately the most cost-effective long-term solution for clean drinking water compared to buying bottled water or using delivery services. Producing purified water at home drops your per-gallon cost to mere pennies while reducing single-use plastic waste.
- DIY Upkeep: Purchasing universal replacement filter multipacks online and changing them yourself eliminates recurring service contract fees.
- Reusable Containers: Filling reusable stainless steel or glass bottles from your home kitchen RO faucet saves hundreds of dollars annually over store-bought bottled water packs.
RO Water Wastewater Health and Alternatives
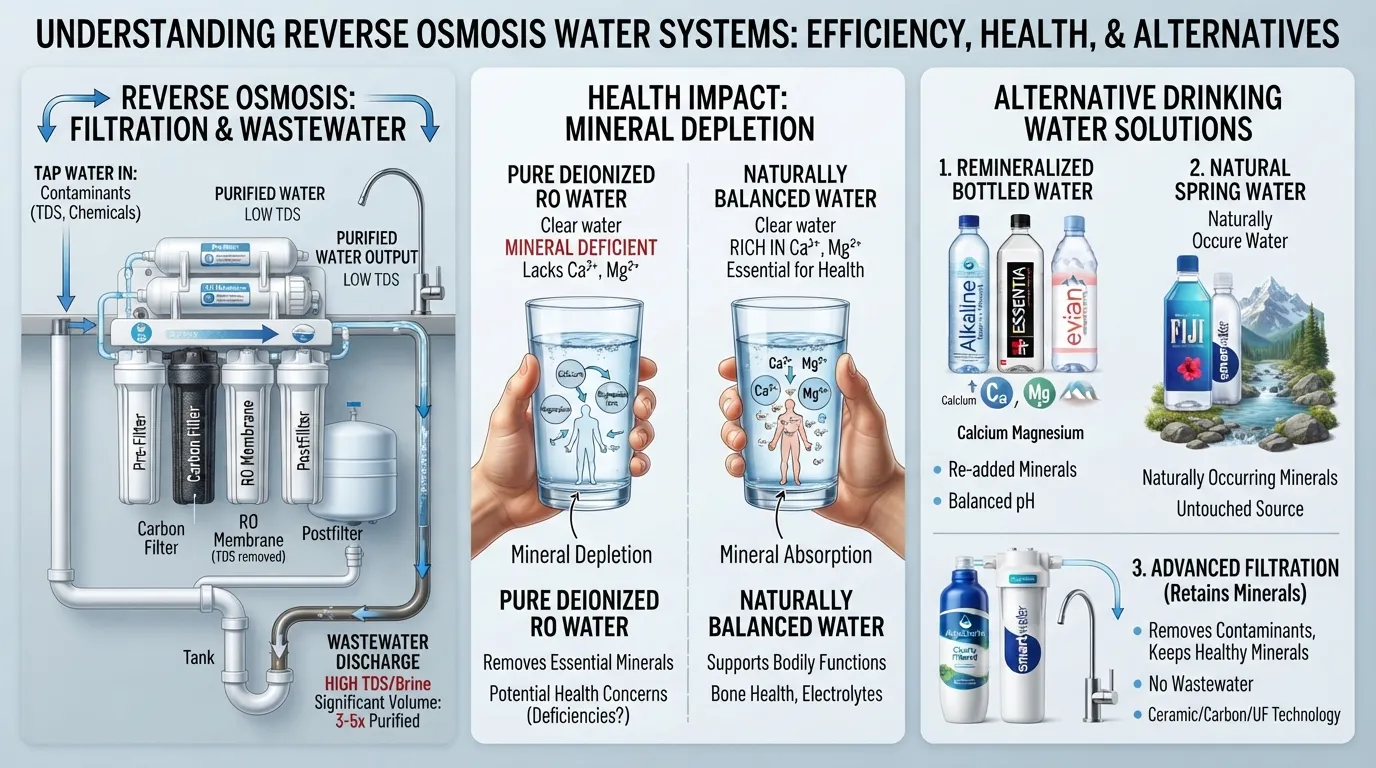
Exploring the broader implications of reverse osmosis filtration covers common concerns regarding water wastewater efficiency, daily mineral consumption, and alternative purification technologies. Reviewing these balanced perspectives helps you make an informed decision about your home water treatment setup.
What Is the Downside of RO? Wastewater Explained
The primary drawback of a standard reverse osmosis system is its wastewater ratio, which flushes impurities down the drain as it purifies water. Older or unoptimized systems can waste anywhere from 3 to 5 gallons of water for every single gallon of purified drinking water produced.
- Waste Ratio Range: Modern high-efficiency systems reduce this ratio significantly to a 1:1 or 2:1 waste-to-pure ratio, while permeate pump upgrades improve overall hydraulic performance.
- Wastewater Destination: This rinse water is completely non-toxic and can occasionally be diverted for irrigation or household cleaning if local plumbing codes permit.
Can You Route the RO Drain Back to a Tank?
Diverting reverse osmosis wastewater back into a secondary household holding tank or underground storage tank is generally not recommended due to sanitary risks and local plumbing code violations. Storing concentrated wastewater can breed bacteria and introduce cross-contamination into secondary water supplies.
- Code Restrictions: Municipal plumbing codes strictly require direct, air-gapped discharge into the sanitary sewer drain line to prevent backflow contamination.
- Consult a Professional: Always verify greywater diversion regulations with a licensed local plumber before attempting any custom drainage modifications.
Is RO Water Safe to Drink?
Yes, reverse osmosis water is entirely safe to drink and provides exceptional purity by stripping out heavy metals, lead, chlorine, and dissolved solids. Because RO filtration removes nearly all minerals, many homeowners choose a remineralization stage to add back beneficial calcium and magnesium for improved taste.
- Mineral Content: While balanced diets provide the vast majority of human mineral intake, consult a qualified healthcare provider if you have specific nutritional or dietary concerns regarding low-mineral drinking water.
- Remineralizers: Post-filter calcite or alkaline cartridges dissolve healthy trace minerals back into the stream right before it reaches your faucet.
Is There Anything Better Than RO?
Whether reverse osmosis is superior depends entirely on your specific water contamination profile and personal purification goals. Comparing alternative filtration methods helps determine if a different technology better suits your household needs.
- Distilled Water: Uses boiling and condensation to achieve near-total purity similar to RO, but requires dedicated countertop appliances that consume electricity and process water slowly.
- UV Purification Systems: Excellent at neutralizing living bacteria and viruses, but do not remove dissolved chemicals, heavy metals, or total dissolved solids (TDS) like a reverse osmosis membrane.
- Standard Carbon Filters: Great for improving taste and reducing chlorine, but incapable of removing microscopic salts, fluoride, and heavy metal contaminants targeted by RO units.
FAQs
Can you hook up reverse osmosis to a regular faucet?
No, standard kitchen faucets cannot handle the dual-stream requirements and internal pressure separation of a reverse osmosis system. You must install a dedicated RO air-gap or non-air-gap auxiliary faucet on your sink deck or countertop to dispense purified water separately from your regular tap.
Can a plumber install RO?
Yes, professional plumbers routinely install residential and commercial reverse osmosis systems. Hiring a licensed plumber is recommended if your countertop requires specialized granite drilling, if local building codes mandate professional installation, or if your existing under-sink plumbing is heavily corroded.
Can I Install an RO System Myself?
Yes, installing an under-sink reverse osmosis system is a very manageable DIY project for homeowners with basic hand tools. Most kits include quick-connect push fittings and clear instruction manuals, allowing you to complete the setup in two to four hours.
What is the average cost to install a reverse osmosis system?
The total cost to install an RO system ranges from $150 to $400 if you complete a DIY installation using retail equipment. Hiring a professional plumber typically adds $150 to $350 in labor fees, bringing total service installation costs to between $300 and $750.
What is the life expectancy of an RO system?
A standard residential reverse osmosis system lasts between 10 and 15 years with proper ongoing maintenance. While the main manifold housing and storage tank endure for years, internal pre-filters require replacement every 6 to 12 months, and the RO membrane lasts 2 to 3 years.
How to plumb a whole house RO system?
Plumbing a whole-house reverse osmosis system requires integrating commercial-grade pre-filtration, high-capacity booster pumps, atmospheric storage tanks, and large drain lines into your home’s main water supply. Because of the complex mechanical engineering involved, professional installation by a certified water treatment specialist is strongly advised.
What is the recommended faucet for a reverse osmosis system?
The recommended faucet for a reverse osmosis system is a dedicated single-handle auxiliary tap that matches your kitchen decor and satisfies local plumbing codes. Depending on your municipality, you may need an air-gap faucet or a standard non-air-gap drinking water faucet.
How do I remove a reverse osmosis system?
To remove a reverse osmosis system, first turn off the cold water supply valve and the storage tank valve, then open the RO faucet to relieve all line pressure. Disconnect the quick-fitting tubing lines, unscrew the drain saddle from the pipe, remove the faucet, and drain any remaining water from the components before unmounting.
Is there a reverse osmosis system that does not waste too much water?
Yes, modern high-efficiency reverse osmosis systems and units equipped with permeate pumps drastically reduce wastewater volumes. While older systems waste up to 5 gallons for every purified gallon, high-efficiency models achieve optimized 1:1 or 2:1 wastewater ratios.
Conclusion and Next Steps
Successfully plumbing a reverse osmosis system transforms your home water quality by delivering exceptionally pure, bottled-quality drinking water straight from your kitchen counter. By mastering the core connection sequence, following strict leak-prevention guidelines, and adhering to manufacturer maintenance schedules, you ensure long-lasting performance and peace of mind.
of the 5 Connections
Every successful under-sink reverse osmosis setup relies on routing purified water through five primary touchpoints. Reviewing this structural loop ensures your installation covers every necessary pathway from source to glass.
- Cold Water Supply: Routes untreatable raw source water into the filtration manifold via the feed water adapter tee.
- Dedicated RO Faucet: Dispenses the final purified drinking water smoothly right above your kitchen sink.
- Drain Line: Discharges the concentrated wastewater containing filtered-out impurities safely down through the drain saddle and P-trap.
- Storage Tank: Holds pressurized purified water on demand so you always have an immediate supply ready.
- Manifold System: Houses the sediment pre-filters, carbon blocks, and RO membrane in proper sequential order.
Final Safety Checklist
Before celebrating your completed installation, run through this final safety and compliance checklist to protect your home against unexpected leaks or operational hiccups.
- Valve Verification: Confirm that both the cold water feed valve and the storage tank shut-off valve are fully open.
- Leak Monitoring: Inspect all quick-connect fittings, tubing lines, and canister threads with a paper towel for the first few hours.
- System Flushing: Complete the mandatory fill-and-drain cycles recommended in your product manual to clear out carbon fines.
- Code & Manual Review: Double-check that your setup complies with local plumbing codes and manufacturer warranty guidelines.
Conclusion and Next Steps
Successfully plumbing a reverse osmosis system transforms your home water quality by delivering exceptionally pure, bottled-quality drinking water straight from your kitchen counter. By mastering the core connection sequence, following strict leak-prevention guidelines, and adhering to manufacturer maintenance schedules, you ensure long-lasting performance and peace of mind.
of the 5 Connections
Every successful under-sink reverse osmosis setup relies on routing purified water through five primary touchpoints. Reviewing this structural loop ensures your installation covers every necessary pathway from source to glass.
- Cold Water Supply: Routes untreatable raw source water into the filtration manifold via the feed water adapter tee.
- Dedicated RO Faucet: Dispenses the final purified drinking water smoothly right above your kitchen sink.
- Drain Line: Discharges the concentrated wastewater containing filtered-out impurities safely down through the drain saddle and P-trap.
- Storage Tank: Holds pressurized purified water on demand so you always have an immediate supply ready.
- Manifold System: Houses the sediment pre-filters, carbon blocks, and RO membrane in proper sequential order.
Final Safety Checklist
Before celebrating your completed installation, run through this final safety and compliance checklist to protect your home against unexpected leaks or operational hiccups.
- Valve Verification: Confirm that both the cold water feed valve and the storage tank shut-off valve are fully open.
- Leak Monitoring: Inspect all quick-connect fittings, tubing lines, and canister threads with a paper towel for the first few hours.
- System Flushing: Complete the mandatory fill-and-drain cycles recommended in your product manual to clear out carbon fines.
- Code & Manual Review: Double-check that your setup complies with local plumbing codes and manufacturer warranty guidelines.

Oscar Vance | Master Plumber & Drainage Expert
Meet Oscar Vance, a licensed master plumber sharing practical solutions on residential repairs, preventive maintenance, and thoughtful home upkeep.

