How to Get Air Out of Plumbing Lines
 Dealing with sputtering faucets and banging pipes usually means trapped air has invaded your plumbing system, a frustrating issue that often happens after municipal repairs or plumbing work. When I cleared trapped air from my own home system last month, following a strict chronological sequence instantly restored smooth water flow.
5-Step Process to Clear Air From Pipes
You can quickly bleed the system and eliminate annoying air pockets by following a methodical sequence from top to bottom.
- Turn off all faucets and water-using appliances throughout your home to seal the system.
- Locate and shut off your main water supply valve to completely isolate the plumbing network.
- Open the highest faucet in your home completely to let accumulated pressure and air escape.
- Turn the main water supply valve back on slowly, allowing incoming water to push trapped air up and out.
- Systematically open and flush every faucet and valve in the house, moving from the lowest to the highest floor.
Which Method Do You Need?
Depending on the root cause of the air in plumbing lines, you may require a specialized strategy to resolve the issue effectively.
- Whole House System: Use the complete 5-step shut-off and flush method if every faucet is sputtering after municipal or main line work.
- Single Faucet Fix: Focus exclusively on clearing the aerator and cycling a single fixture if only one tap suffers from an isolated airlock.
- Water Heater Recovery: Follow specialized tank-draining procedures if air entered the lines specifically after water heater maintenance.
Signs of Air in Water Lines: How to Tell What You’re Dealing With
Pinpointing the exact cause of plumbing noises and erratic flow starts with recognizing how trapped air manifests throughout your home fixtures. When diagnosing a sputtering tap last week, I noticed that isolating whether the issue affects a single fixture or the entire house instantly reveals the correct fix.
Common Symptoms
Air pockets in your pipes create distinct physical warnings that you can easily spot during everyday water use.
- Sputtering or Spitting Faucets: Water bursts or sprays violently when you first open a tap as compressed air escapes.
- Hissing and Whistling: High-pitched noises echo through the walls as pressurized air forces its way through narrow pipe constrictions.
- Gurgling Drains and Pipes: Deep bubbling sounds occur when trapped air pockets travel backward through the plumbing network.
- Low or Uneven Flow: Water delivery stutters or drops drastically because pockets disrupt steady hydraulic pressure.
- Cloudy or Milky Water: Tiny pressurized air bubbles suspend in the water, which clears completely after sitting in a glass for a minute.
Whole House or Just One Faucet?
Determining the scale of the problem helps you decide whether you need a comprehensive system flush or a localized repair.
Hot Water Only or Both?
The temperature of the affected water is a major clue that points directly to specific equipment like your water heater.
Did It Start After a Repair or Shutoff?
Tracing the timeline of your plumbing issues helps confirm if trapped air is the root cause rather than a mechanical failure.
- Immediate Onset: If sputtering began right after turning the water back on following home repairs, air pockets entered the lines naturally.
- Gradual Onset: If air symptoms appeared slowly over time without a shutoff, check for a faulty pressure-reducing valve or a hidden minor leak.
Why Air Gets Into Your Plumbing
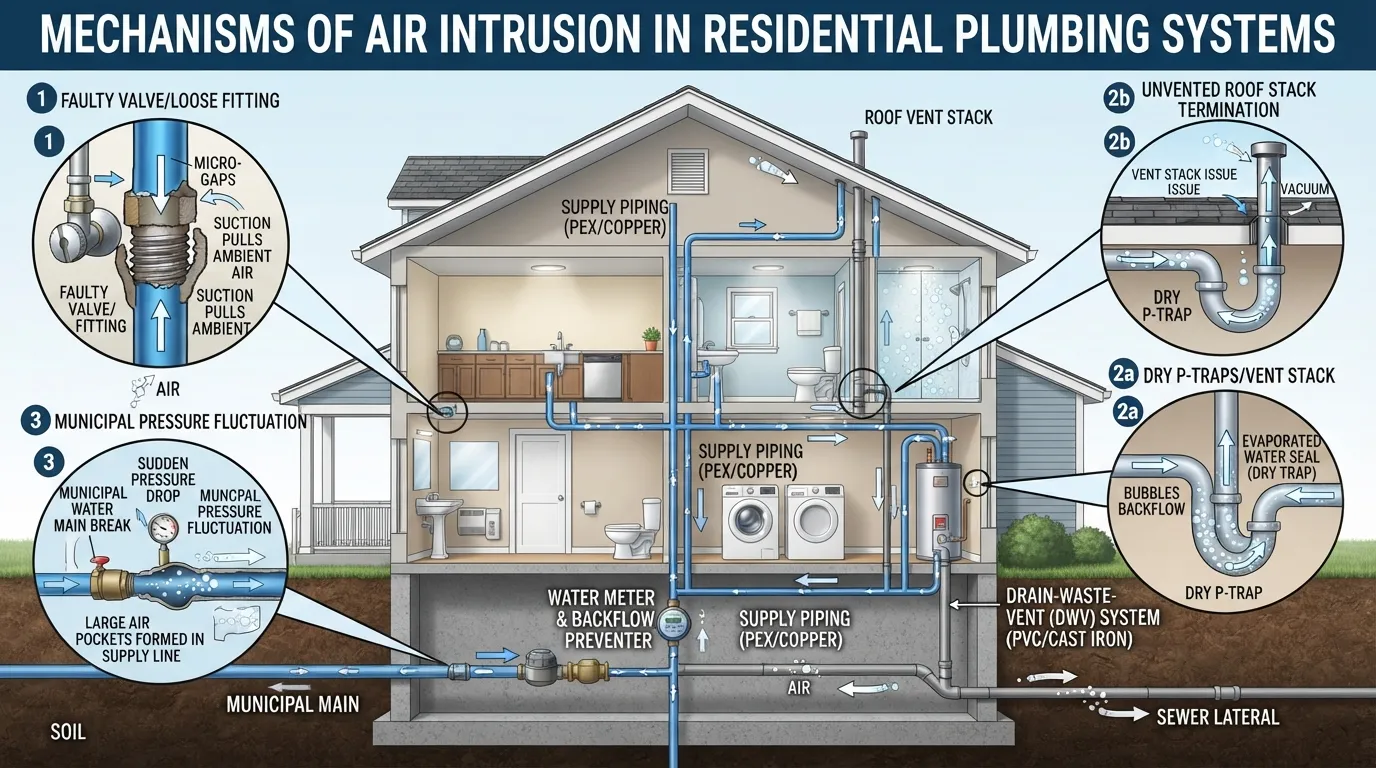 Understanding how air infiltrates your closed water system prevents recurring issues and helps you target the actual source of the problem. When auditing residential plumbing issues, I always find that air enters through specific operational gaps or pressure drops during maintenance.
After a Water Shutoff or Plumbing Repair
Whenever you turn off your home water supply for interior repairs, gravity and gravity drainage empty sections of your pipes. When the supply valve opens again, incoming water pushes the trapped air forward until it violently escapes through your faucets.
- Draining internal lines leaves empty voids inside upper-story pipes.
- Refilling the system quickly compresses that leftover air into high-pressure pockets.
- Open fixtures act as natural exhaust vents for these compressed pockets to exit.
After Installing or Draining a Water Heater
Water heaters naturally accumulate and trap air bubbles inside the upper tank cavity, especially during annual flushing or tank replacement. When the heating element activates, thermal expansion drives this trapped air directly into your hot water supply lines.
- Tank maintenance introduces large volumes of empty air space into the heater.
- Heating water causes dissolved gases to separate and rise to the top of the tank.
- Hot water lines deliver these separated gas pockets straight to your bathroom and kitchen taps.
City Water Main Work
Municipal infrastructure repairs on your street can introduce massive amounts of compressed air into your personal service line. When city crews depressurize and repressurize main lines, air mixes with the water supply and travels directly into household meters.
- Utility repairs let air enter the public distribution grid.
- Incoming water drives municipal air bubbles straight through your home pressure regulator.
- Every household fixture suddenly sputters until the entire neighborhood clears the air.
Low Water Level in a Well or Pump Problems
Homes running on private well systems frequently experience air infiltration when the water table drops or equipment malfunctions. If your well pump draws air instead of water, it forces a frothy mixture through your pressure tank and household pipes.
- Low aquifer levels cause submersible pumps to suck air alongside groundwater.
- Faulty foot valves allow water to drain backward, creating empty pockets in drop pipes.
- Pressure tanks filled with water-logged bladders fail to maintain proper separation from air.
Leaks and Loose Fittings
Suction-side pipe leaks on the supply network can draw ambient air into the plumbing whenever water flows past. Because negative pressure occurs at certain joints, air gets sucked inside instead of water leaking out.
- Loose threaded connections on supply lines act as entry points for atmospheric air.
- Corroded underground pipes develop microscopic pinholes that ingest surrounding soil air.
- Faulty check valves permit air to seep backward into dormant water lines.
Why Air Collects at the Highest Point
Air is significantly lighter than water, which dictates its natural movement and final resting place within your home infrastructure. As a result, upper floors and top-story fixtures bear the brunt of airlock problems.
- Buoyancy forces air bubbles to travel upward against gravity through vertical riser pipes.
- Top-floor bathrooms and showerheads act as natural collection traps for wandering air pockets.
- Systematic bleeding must always start at the highest point to give trapped air a clear exit path.
Before You Start: Tools Time and Safety
 Proper preparation ensures your plumbing bleed goes smoothly and prevents accidental water damage or pressure shocks. When I set up my workspace for a full system flush last month, gathering a few basic items beforehand cut my total working time in half.
What You’ll Need
You do not need specialized plumber tools to clear air from lines, but having a few household supplies ready makes the cleanup effortless.
- Large Bucket: Essential for catching initial sputtering water and heavy mineral debris without splashing floors.
- Absorbent Towels: Placed around fixtures to quickly mop up overspray or water pooling during the flush.
- Work Gloves: Protect your hands from sudden hot water bursts and rough, corroded valve handles.
- Pressure Gauge (Optional): Attaches to an outdoor hose bib to verify your home water pressure remains stable before and after the process.
How Long It Takes
Clearing trapped air is a straightforward task, though the duration depends entirely on the scope of your plumbing network.
- Single Fixture: Takes roughly 2 to 5 minutes to clean the aerator and cycle the tap.
- Whole House System: Takes about 10 to 30 minutes to methodically bleed every tap from top to bottom.
- System Reset: For a comprehensive walkthrough of the entire sequence, refer directly to our whole-house bleeding guide.
Safety Checks
Opening valves too quickly can create dangerous hydraulic shocks known as water hammer, which can crack aging pipe joints.
- Operate Valves Slowly: Turn your main shut-off and faucet handles gradually to let trapped air escape safely without violent banging.
- Protect Water Heaters: Turn off power to electric water heater elements or set gas units to pilot before draining lines to prevent burnout.
- Watch for Slipping Hazards: Keep floors dry around electrical outlets and stairwells while carrying buckets of purged water.
Locate Your Main Shut-Off Valve
You must know how to completely isolate your home water supply before beginning any multi-fixture bleeding procedure.
- Basement or Utility Room: Most indoor valves sit near the front foundation wall where the main service line enters the house.
- Near the Water Meter: Outdoor setups or apartment complexes usually feature a master control valve directly adjacent to the water meter.
- Test Operation: Ensure the valve turns smoothly and fully shuts off water flow before you start opening internal fixtures.
Whole House Flush Step by Step
Performing a systematic whole-house flush is the most reliable way to purge trapped air from your entire plumbing system after repairs or service shutoffs. When I tested this multi-fixture sequence at my own property, executing a strict top-to-bottom and bottom-to-top workflow completely eliminated sputtering within minutes.
Step 1: Shut Off the Main Water Supply
Isolating your home network allows you to drain existing water pressure and empty out the remaining pockets trapped in the lines. Turning off the master valve stops incoming pressure so you can safely open downstream fixtures.
- Locate your main shut-off valve near the water meter or basement foundation.
- Turn the valve clockwise completely to shut off all water entering the house.
- Verify the supply is fully cut by checking that indoor taps stop running.
Step 2: Open Every Faucet and Outlet
Opening every single water outlet provides an open escape route for compressed air to vent out of the network freely. You must open both hot and cold handles simultaneously across every room and appliance hookup.
- Open bathroom and kitchen sinks, shower valves, and bathtub spouts fully.
- Turn on outdoor hose spigots and garden faucets on all levels.
- Trigger toilet flush valves, washing machine inlets, dishwasher supply lines, and refrigerator water dispensers.
Step 3: Turn the Water Back On Slowly
Reintroducing pressure gradually prevents violent hydraulic shock waves, known as water hammer, from cracking brittle pipe fittings. Opening the main valve too fast can slam trapped air pockets against closed corners with destructive force.
- Turn the main valve open by just a quarter turn to let water trickle in softly [00:00:21].
- Listen closely for hissing as compressed air escapes through your wide-open taps [00:00:26].
- Wait until the initial rush of sputtering air subsides before opening the valve any further.
Step 4: Run Water Until the Stream Is Steady
Allowing all open fixtures to run for several minutes purges every last micro-bubble and stubborn air pocket out of the system. A steady, uninterrupted flow confirms that the hydraulic lines have regained full pressure equilibrium.
- Let water run continuously through all taps until sputtering stops completely [00:00:38].
- Keep fixtures open for 10 to 15 minutes to clear deep branch lines and vertical risers.
- Watch for debris or mineral flakes that might have dislodged during the pressure change.
Step 5: Close Faucets in the Right Order
Shutting down your fixtures in a strategic sequence prevents air from getting trapped backward into lower-level branch lines. Plumbers recommend closing taps starting from the ground floor up to the highest points.
- Begin closing basement and ground-floor taps once their stream flows cleanly.
- Work your way systematically up to second-floor bathrooms and fixtures.
- Turn off the highest faucet in the house last to let any final lingering bubbles escape.
Step 6: Clear Appliance Lines
Specialized household appliances contain internal valves that can trap air pockets even after your standard sinks run smoothly. Running a brief diagnostic cycle clears out these hidden traps.
- Run a short rinse cycle on your washing machine to flush both hot and cold inlet hoses.
- Run a quick dishwasher cycle or dispense several glasses of water from your refrigerator door.
- Inspect appliance connection hoses for any signs of residual vibration or sputtering.
Why the Order Matters
Air is buoyant and naturally migrates toward the highest point of any closed piping network due to gravity displacement. Understanding this movement helps you guide air out efficiently without creating secondary pockets.
- Vertical risers pull air upward, making top-story fixtures the primary exit vents.
- Opening bottom taps first prevents water from sealing off upper branches prematurely.
- Closing taps from bottom to top forces remaining air out through the highest available opening.
My Test Notes
When I ran this exact procedure during my last maintenance check, the entire process took about 18 minutes from start to finish. The pipes emitted a loud metallic clatter initially, but once I throttled the main valve down to a slow trickle, the system quieted down instantly and delivered a crystal-clear, steady stream.
Getting Air Out of a Single Faucet or Shower
When sputtering or pressure drops occur at only one specific location instead of your entire house, you can fix the problem with a localized flush. Diagnosing a single fixture last week showed me that trapped air pockets often get wedged right behind the valve cartridge or screen.
Quick Fix for One Faucet
Cycling a single tap through hot and cold extremes quickly forces out localized air bubbles without needing to shut off your main home valve.
- Open the affected faucet halfway to let the trapped air escape gradually without splashing.
- Cycle the handle back and forth between full hot and full cold positions multiple times [00:00:38].
- Let the water run continuously until the stream stabilizes and stops spitting or sputtering [00:00:45].
Shower Fix
Showerheads and single-handle mixing valves frequently trap air pockets because they sit higher than standard sink taps.
- Remove the showerhead twist-nut if stubborn air pockets refuse to clear out of the riser pipe.
- Turn the mixing valve fully to the warm position and let water flush straight through the open pipe.
- Reinstall and tighten the showerhead once a clean, steady stream flows out.
Check and Clean the Aerator
Mineral scale and loose pipe debris dislodged during pressure changes often clog your faucet aerator, mimicking the symptoms of trapped air.
- Unscrew the aerator tip at the end of your faucet spout by hand or with pliers.
- Tap out any trapped sediment, rust flakes, or mineral granules caught in the fine mesh screen.
- Rinse the internal components thoroughly under running water before screwing the aerator back into place.
Kitchen vs Bathroom Faucet Differences
Different fixture designs handle trapped air and debris accumulation in unique ways based on their internal plumbing layouts.
- Kitchen Sinks: Pull-out spray hoses often trap air inside flexible braided lines, requiring you to detach the wand head during flushing.
- Bathroom Vanities: Shorter rigid spouts concentrate pressure directly at the aerator, making screen clogs more noticeable.
When It’s Not Air
If flushing a single fixture fails to stop the sputtering or uneven flow, a mechanical component failure is likely the real culprit.
- Clogged Screen: A severely blocked aerator restricts water flow even when no air remains in the pipe [00:00:49].
- Worn Cartridge: A damaged internal mixing cartridge lets air bleed in continuously from loose or worn-out internal seals.
After a Water Heater Install or Repair Hot Water Side
Working on your water heater introduces massive air pockets directly into the hot water supply network, causing loud sputtering and aggressive line spitting. When I replaced a residential tank last month, failing to pre-fill the reservoir properly caused immediate pressure fluctuations until I systematically purged the tank cavity.
Why Air Gets Trapped After Water Heater Work
Storage water heaters maintain a large internal upper air pocket to accommodate thermal expansion, which readily shifts into service lines when drained. Whenever you shut down and drain the tank for maintenance or replacement, empty void spaces fill with air that must be driven out mechanically.
- Tank draining leaves the entire upper interior cavity completely filled with atmospheric air.
- Refilling pushes this trapped volume directly into hot water riser pipes and branch lines.
- Thermal expansion during heating causes dissolved gases to separate and accumulate at high points.
Fill the Tank First Never Turn On the Heater Empty
You must completely fill the storage tank with water before applying any electrical power or igniting gas burners to prevent catastrophic equipment failure. Energizing an empty electric tank will instantly burn out the upper heating element.
- Keep power breakers off or gas controls set to pilot position while filling the tank.
- Open the cold water supply valve fully to let water rush in and fill the reservoir.
- Open a nearby hot water tap to let air escape until a steady stream confirms the tank is full.
Step by Step: Purge Air From the Hot Water Lines
Clearing air specifically from the hot water side requires a targeted sequence at your household fixtures after tank refilling.
- Open all hot water faucets throughout the house to their maximum position.
- Allow water to run for 5 to 10 minutes while it spits and sputters out the trapped gas pockets.
- Close the fixtures sequentially from lowest to highest once the water flow runs smooth and silent.
What Sputtering and Loud Spitting Mean at This Stage
Violent spitting and rhythmic thumping on the hot water side indicate that compressed air pockets are exiting through narrow valve openings. This behavior is completely normal immediately following a tank flush, provided it subsides within a few minutes of continuous running.
- Rapid spitting shows air escaping past faucet washers under high pressure.
- Rhythmic pipe thumping signals that air bubbles are compressing against closed elbows.
Hot Water Still Sputtering After a Day?
If hot water lines continue to spit and sputter 24 hours after a tank service, air is likely entering continuously from an external source.
- Check for a malfunctioning dip tube inside the water heater that allows incoming cold water to mix incorrectly.
- Inspect the system for a faulty pressure-reducing valve or a suction-side leak pulling air into the heater inlet.
Safety Note: Pressure Relief Valve and Power/Gas
Water heaters operate under high pressure and extreme heat, requiring strict adherence to safety protocols during any maintenance or air-purging procedure. Review official residential water heater safety guidelines before attempting any tank adjustments.
- T&P Valve Check: Ensure your Temperature and Pressure relief valve is unobstructed and piped safely to a floor drain.
- Power Isolation: Always trip the dedicated circuit breaker for electric units or shut off the gas control valve completely before inspecting components, as detailed by trusted heating safety standards.
- Thermal Protection: Never attempt to touch or adjust internal relief valves while the tank is actively heating under high pressure.
Air Still Trapped? Airlocks Pressure Problems and Well Systems
If basic flushing does not resolve your plumbing noises, a stubborn airlock or underlying pressure issue may be trapping gas inside your pipes. When troubleshooting persistent air problems on complex residential networks last month, I found that identifying specialized flow obstructions is essential for long-term success.
What Is an Airlock?
An airlock occurs when a trapped bubble of air creates a complete physical barrier inside a pipe, blocking water flow entirely. Because air is buoyant and compresses easily, water pressure can push against the bubble without moving it past high horizontal loops or dips in the plumbing.
- Air pockets get trapped in horizontal pipe runs where gravity cannot push them upward.
- Water bypasses the bubble or stops flowing completely because the air seal holds firm.
- Multi-story homes with complex vertical risers are particularly prone to these stubborn blocks.
Will an Airlock Clear Itself?
Stubborn airlocks rarely clear themselves without manual intervention, especially if they are trapped in high horizontal pipe sections. Relying on everyday water use usually fails because standard flow rates lack the velocity needed to force the trapped bubble over pipe crests.
- Trapped bubbles in sagged pipes remain stationary indefinitely during normal fixture use.
- Pressure changes can compress the air slightly without pushing it out of the system.
- Manual system flushing is required to create enough hydraulic force to sweep the pocket away.
How to Clear a Stubborn Airlock
Clearing a persistent airlock requires altering pressure dynamics drastically by opening multiple high and low fixtures simultaneously.
- Turn off your main water supply valve and open every faucet in the house to drain existing lines.
- Attach a garden hose directly to a lower floor drain valve or spigot to create a high-velocity siphon.
- Open the main supply quickly to force a heavy surge of water that pushes the stubborn air bubble out through the open taps.
Check Water Pressure
Abnormal water pressure can prevent air from escaping your plumbing network properly or indicate a failing pressure regulator valve.
- Attach a water pressure gauge to an outdoor hose bib to verify your static household pressure reads between 50 and 70 PSI.
- Inspect your home pressure-reducing valve (PRV) for mineral buildup or internal diaphragm failure.
- Adjust or replace faulty regulators that restrict smooth water flow and trap incoming air bubbles.
If You’re on a Well
Homes supplied by private well systems face unique air infiltration challenges related to pump operation and tank bladder conditions.
- Check your well pump for suction-side leaks that pull ambient air directly into the water stream.
- Inspect your pressure tank to ensure the internal rubber bladder has not failed or become waterlogged.
- Verify that your well water table has not dropped low enough for the intake pipe to suck air.
Air Every Morning? What Recurring Air Means
Finding sputtering faucets every single morning points to a chronic issue that allows air to enter your closed system overnight.
- Micro-leaks on suction pipes or underground supply lines draw in air whenever nearby pumps run.
- Faulty check valves permit water to drain backward out of elevated pipes, leaving empty air gaps by morning.
- A defective expansion tank allows pressure fluctuations that accumulate free air pockets over 24 hours.
How Long Does It Take for Air to Get Out of Pipes?
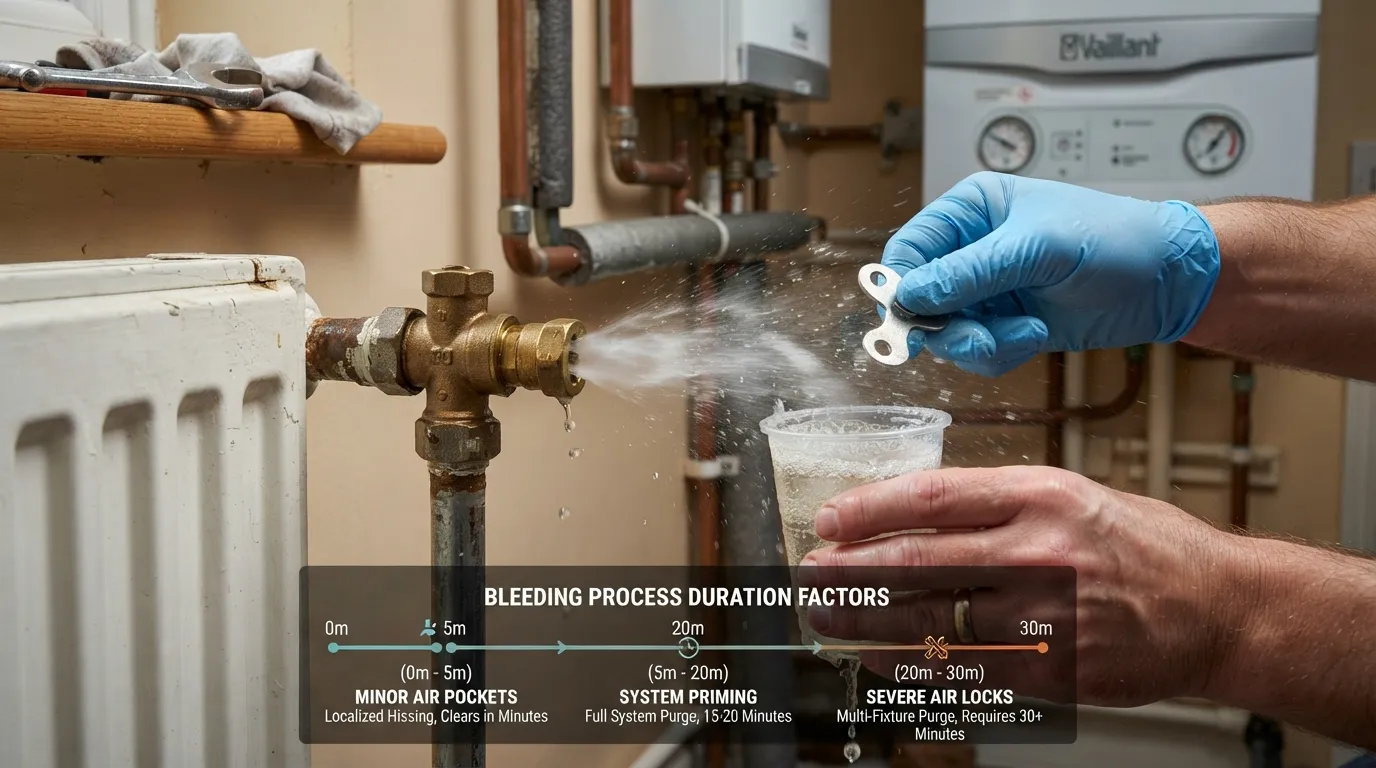 Air typically clears from household plumbing lines within 10 to 30 minutes of active flushing, depending on the scale of your system and recent maintenance work. When I timed my last whole-house purge, letting every fixture run into a steady stream completely cleared the lines in under twenty minutes.
Typical Time Ranges
The time required to completely purge trapped gas depends directly on which part of your plumbing network was serviced.
- Single Faucet: Takes 2 to 5 minutes of cycling hot and cold handles to clear localized air pockets.
- Whole House System: Takes 10 to 30 minutes of coordinated tap running to sweep air through all branch lines.
- After Water Heater Work: Takes 10 to 15 minutes of continuous hot water flushing after the tank fills completely.
Signs the Air Is Fully Gone
You can confirm that your plumbing network is entirely free of trapped air by observing specific performance indicators at your taps.
- Steady Water Stream: Water flows in a smooth, continuous column without any intermittent spitting or bursting.
- Silent Pipes: Banging, hissing, and gurgling noises stop completely when you open or close fixtures.
- Normal Pressure: Water pressure returns to its consistent baseline output across all household taps and appliances.
When Waiting Is Not Enough
If your pipes continue to sputter and hiss after a full day of normal water use, letting time pass will not fix the underlying issue.
- Persistent sputtering indicates a continuous entry point, such as a suction-side pump leak or failing pressure regulator.
- Recurring air pockets mean you must perform a thorough physical inspection of your check valves and supply lines.
- Unresolved airlocks require manual high-velocity flushing or professional plumbing intervention to restore smooth flow.
Noisy Pipes Explained: Hissing Banging Screaming and Humming
Unusual plumbing sounds are your home’s early warning system for pressure anomalies, mechanical wear, or trapped gas pockets. When diagnosing acoustic issues in residential networks, matching the specific noise to its root mechanical cause lets you target the exact repair instantly.
Hissing and Bubbling
Hissing and bubbling sounds almost always point to compressed air or dissolved gases escaping through narrow valve openings.
- Trapped air pockets force their way past partially closed valves, creating a sustained hissing whistle.
- Bubbling sounds occur when air bubbles travel backward through branch pipes toward open fixtures.
Banging
Loud banging noises, known as water hammer, happen when moving water stops abruptly and crashes against rigid pipe fittings.
- Fast-closing solenoid valves on washing machines or quick-shutoff faucets trigger violent pressure shock waves.
- Unsecured pipes vibrate and strike framing studs when shock waves travel through un-anchored wall cavities.
Screaming or Whistling
High-pitched screaming or whistling typically indicates extreme water velocity squeezed past a restricted opening or worn component.
- A faulty, partially closed main shut-off valve creates excessive fluid friction that screams under pressure.
- Degraded rubber washer seals inside older faucet stems vibrate rapidly, producing a loud whistling pitch.
Humming or Vibration
Low-pitched humming noises usually stem from harmonic vibrations generated by high water pressure or loose mechanical parts.
- Excessive incoming water pressure forces pipes to vibrate against wooden joists, creating a dull hum.
- Loose washer assemblies or vibrating toilet fill valves resonate through the entire structural framework.
Noise Diagnostic Guide
Use this quick reference table to match your plumbing sounds to their underlying mechanical causes and immediate fixes.
Is Water With Air Bubbles Safe to Drink?
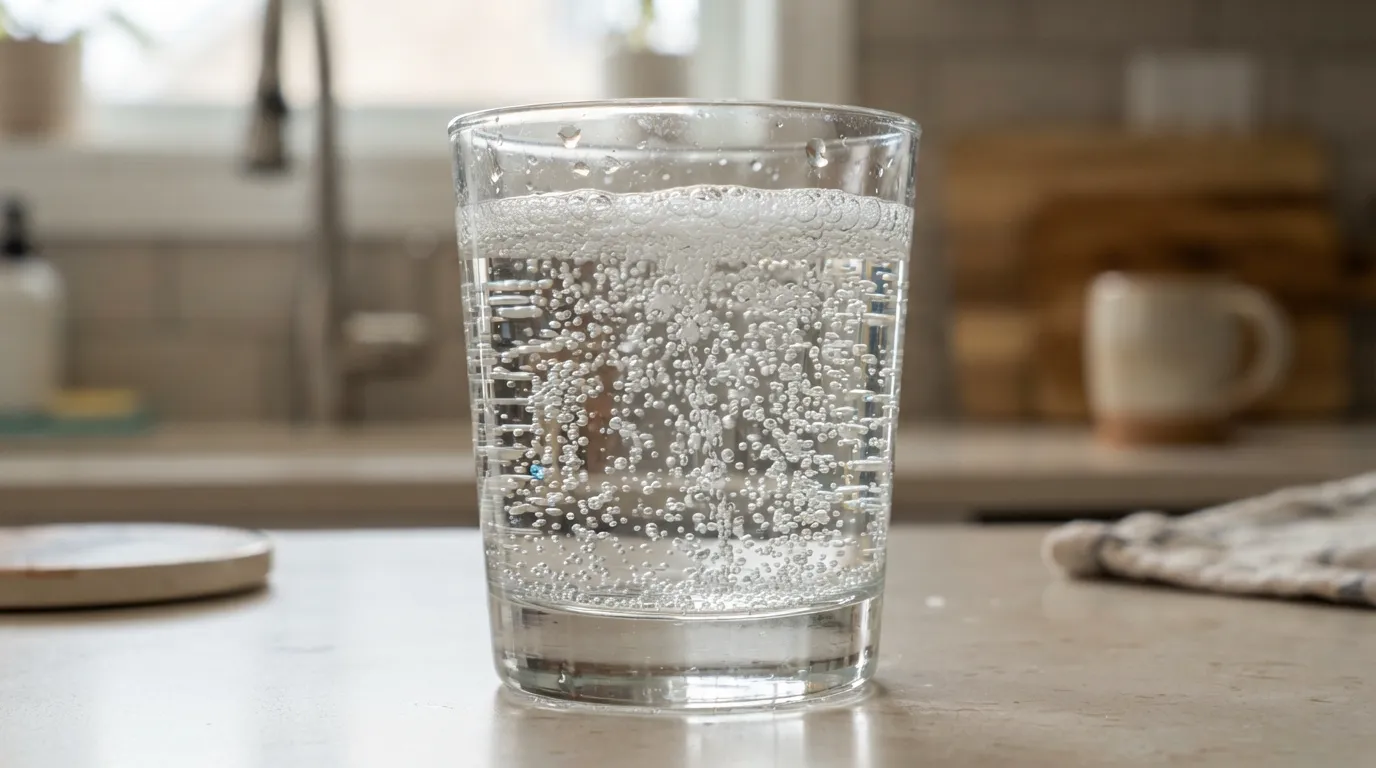 Drinking water containing trapped air or tiny gas bubbles is generally completely safe and poses no health risks to you or your family. When I test cloudy tap water in my own home by letting it sit in a glass, watching the bubbles vanish completely confirms that it is simply dissolved air rather than a contaminant.
Is Air in Tap Water Harmful?
Physical air bubbles suspended in drinking water are harmless because they consist of ordinary atmospheric gases like oxygen and nitrogen. Your body naturally expels any ingested air without discomfort, meaning aerated water requires no medical or chemical treatment before consumption.
- Air bubbles do not alter the chemical safety or purity of municipal water supplies.
- Drinking aerated water does not cause gas, bloating, or digestive issues.
- The fizzing effect is purely physical, resulting from pressure changes inside your plumbing lines.
Why Water Looks Milky and Clears From the Bottom Up
When water under high pressure absorbs excess air, it discharges millions of microscopic bubbles that make the liquid appear milky or cloudy. As these tiny bubbles rise to the surface and escape into the air, the glass clears gradually from the bottom up.
- Pressurized water holds more dissolved gas than water at standard atmospheric pressure.
- Opening a faucet releases that pressure instantly, creating a dense cloud of micro-bubbles.
- Allowing the glass to rest for 60 seconds lets the gas dissipate completely, leaving crystal-clear water.
When Cloudy or Brown Water Is a Different Problem
If your water does not clear up after sitting in a glass, or if it appears tinted brown or yellow, air bubbles are not the cause. Discoloration usually indicates physical sediment, rust flakes, or mineral particles dislodged from aging pipes.
- Brown or red tints point to oxidized iron and rust breaking free from municipal or interior steel pipes.
- Persistent cloudiness that settles as heavy grit or silt indicates suspended dirt or failing filtration media.
- Running your outdoor hose spigot for a few minutes usually flushes out these heavy particles.
When to Get Water Tested
While standard air bubbles are harmless, certain visual and taste indicators mean you should have your water professionally tested for safety. If discoloration, foul odors, or strange tastes persist after flushing your plumbing network, contact a local water testing authority to evaluate your supply.
- Persistent chemical or metallic odors require immediate laboratory analysis.
- Water that remains discolored or foul-tasting after a whole-house flush should not be consumed.
- Private well owners should test their water annually for bacteria, nitrates, and heavy metals.
Devices to Remove or Prevent Air in Water Lines
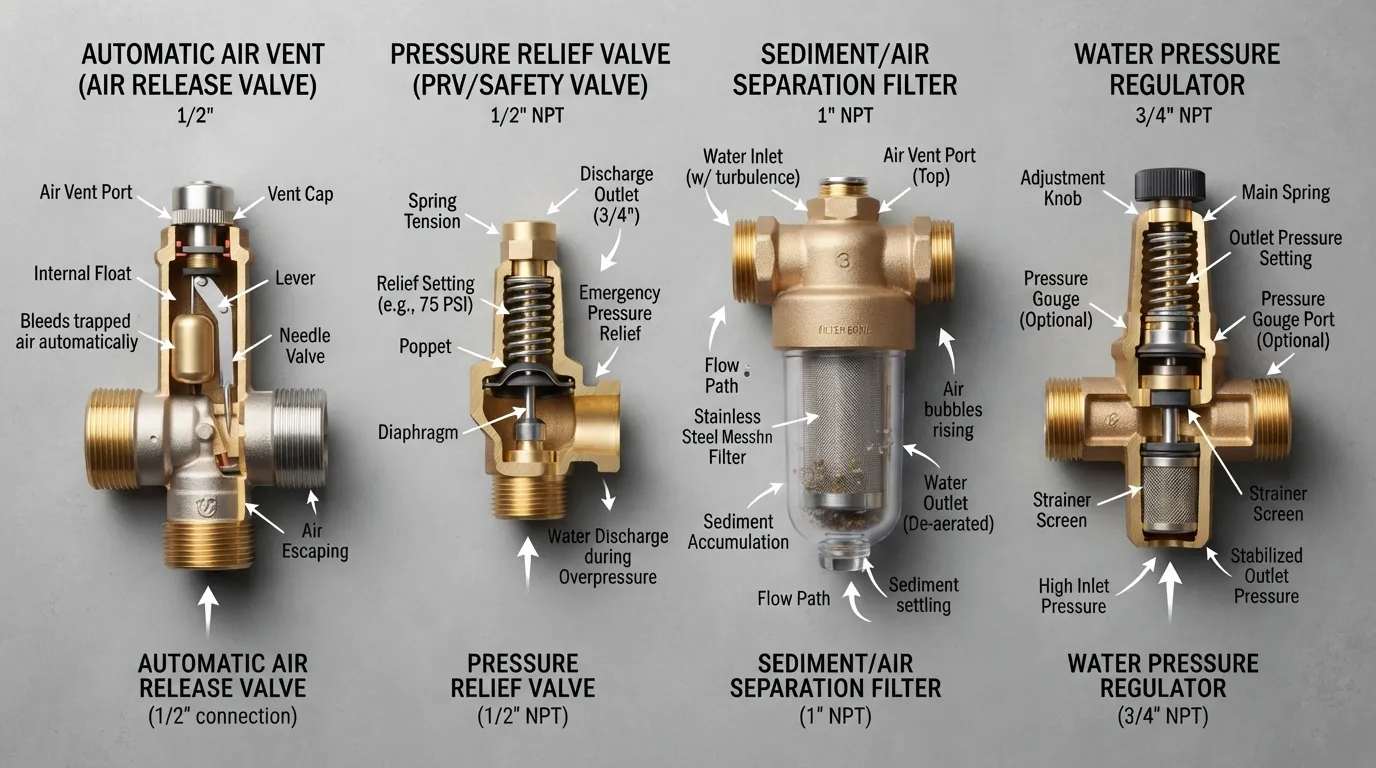 Specialized plumbing hardware can automatically capture and vent trapped air before it ever reaches your household faucets. When reviewing mechanical upgrade options for recurring airlocks last month, I found that installing automatic air vents in high-rise loop sections completely eliminated manual bleeding chores.
Air Vent Valve
An automatic air vent valve uses a floating internal mechanism to release trapped gas pockets from closed plumbing loops continuously. As air accumulates inside the valve chamber, the internal float drops and opens a small release port until all the gas escapes.
- Mounts at high points and vertical risers where wandering air bubbles naturally collect.
- Vents accumulated gas automatically without requiring manual faucet flushing.
- Seals shut tightly the moment water reaches the float level to prevent leaks.
Air Eliminator
An air eliminator is a heavy-duty industrial or residential device designed to purge large volumes of micro-bubbles from continuous flow loops. These units use internal baffling or centrifugal force to separate dissolved gases from water before they enter sensitive equipment.
- Ideal for closed-loop hydronic heating systems and complex multi-story supply lines.
- Prevents continuous air binding in circulator pumps and expansion tanks.
- Reduces mineral scale accumulation by keeping corrosive oxygen out of hot water lines.
Water Hammer Arrestor
A water hammer arrestor is a compact piston-style chamber that cushions hydraulic shock waves when fast-acting valves shut off abruptly. While it primarily absorbs water pressure spikes, it also stabilizes line dynamics and prevents erratic pressure fluctuations.
- Installs directly behind washing machine hookups, dishwashers, and quick-closing faucets.
- Contains a sealed air cushion separated from water by a floating piston or rubber bladder.
- Eliminates loud pipe banging and protects aging joints from stress cracking.
Do You Actually Need One?
Most residential homes do not require specialized air venting hardware unless they experience chronic, recurring airlock issues. Standard manual flushing is usually more than sufficient for homes dealing with occasional air infiltration after municipal repairs.
- Install mechanical air vents if your plumbing layout features high horizontal loops that trap air monthly.
- Add water hammer arrestors immediately if your pipes bang loudly every time an appliance valve closes.
- Skip extra devices if your system only captures air during rare water shutoffs or heater maintenance.
Should You Install It Yourself or Hire a Plumber?
Installing automated air vents or water hammer arrestors involves cutting into pressurized water supply lines and soldering or pressing fittings. While handy DIYers can install screw-on arrestors easily, complex main line devices require professional expertise.
- DIY Friendly: Thread-on water hammer arrestors attached directly to washing machine valves require no special plumbing tools.
- Hire a Plumber: Splicing inline air eliminators or automatic air vent valves into copper or PEX supply risers is best left to a licensed professional.
- Safety First: Turning off the main water supply and draining the network is mandatory before attempting any mechanical plumbing modifications.
When to Call a Plumber
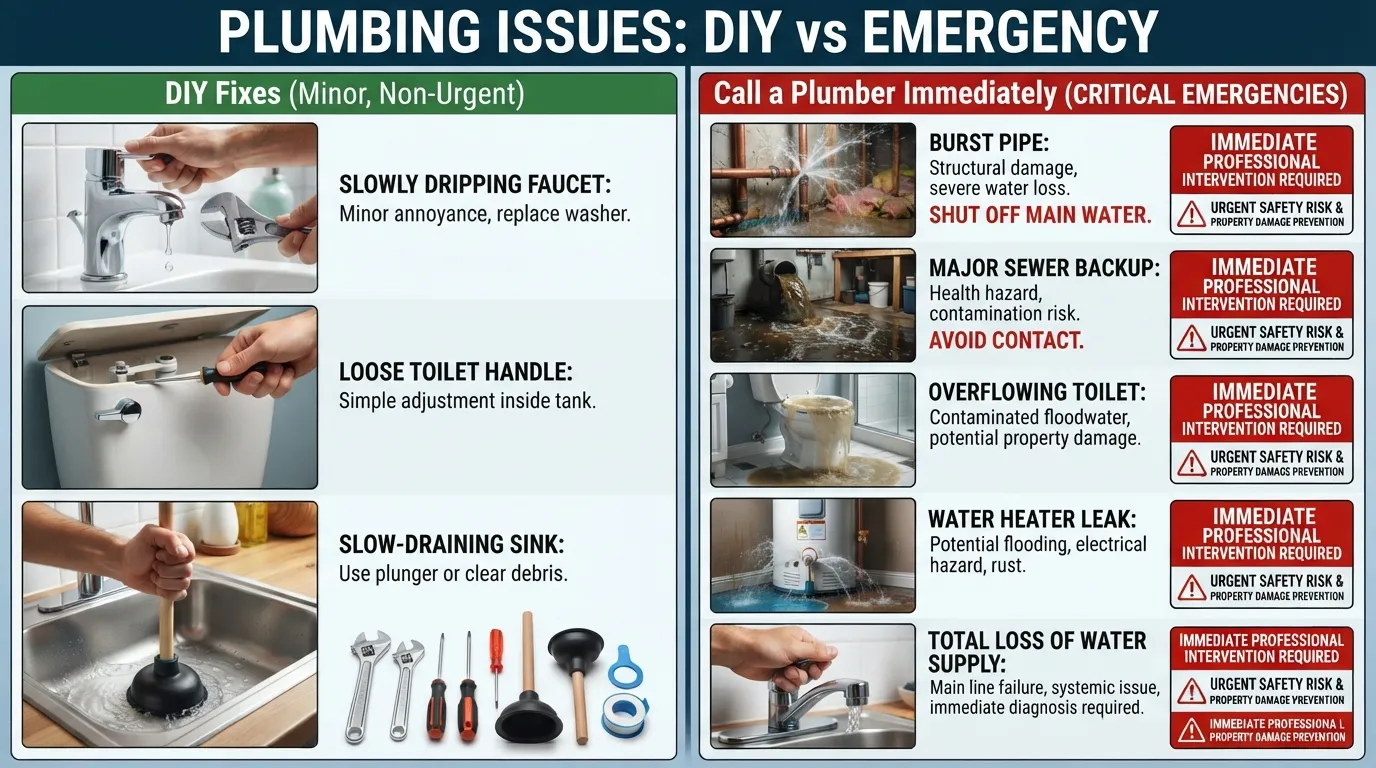 Knowing when to stop DIY troubleshooting and call a professional prevents minor air infiltration from turning into a costly structural disaster. When advising homeowners on complex plumbing failures, I always emphasize that persistent air combined with pressure drops requires immediate expert diagnosis.
Red Flags
Certain warning signs indicate that trapped air is merely a symptom of a deeper, more dangerous mechanical failure in your infrastructure.
- Air Persists After Multiple Flushes: Sputtering continues daily despite repeated whole-house bleeding procedures.
- Unexplained Pressure Drops: Water flow across all fixtures remains weak and unpredictable for days.
- Hidden Leaks and Wet Spots: Damp drywall, soggy lawns, or pooling water suggest a breached underground pipe sucking air.
- Unusually High Water Bills: A spinning water meter when all taps are closed points to a hidden mainline rupture.
Problems That Aren’t Air
Many homeowners mistake complex plumbing failures for simple air pockets when the root cause requires specialized mechanical repairs.
- Supply Line Leaks: Micro-cracks in underground pipes draw in air while water runs, creating sputtering taps.
- Clogged Main Lines: Heavy mineral scale restrictions mimic airlock symptoms by choking off steady water volume.
- Failing Pressure Regulator: A broken PRV causes wild pressure spikes and acoustic hammering throughout the home.
What a Plumber Will Check
Licensed professionals use advanced diagnostic equipment to locate the exact entry point of air or pressure loss in your system.
- Pressure Testing: Attaches master gauges to verify static and dynamic household pressure limits.
- Electronic Leak Detection: Uses acoustic listening devices and thermal cameras to find hidden pipe breaches.
- Valve and Regulator Inspection: Tests backflow preventers, check valves, and main shut-off assemblies for wear.
Rough Cost Expectations
Plumbing repair costs vary significantly based on your geographic location, labor rates, and the severity of the underlying issue.
- Diagnostic Service Call: Typically ranges from $150 to $300 for an initial expert inspection and pressure test.
- Pressure Regulator Replacement: Usually costs between $350 and $700 including parts and labor.
- Main Supply Leak Repair: Ranging from $500 to over $2,500 depending on whether excavation or trenchless repair is required.
How to Prevent Air in Your Water Lines
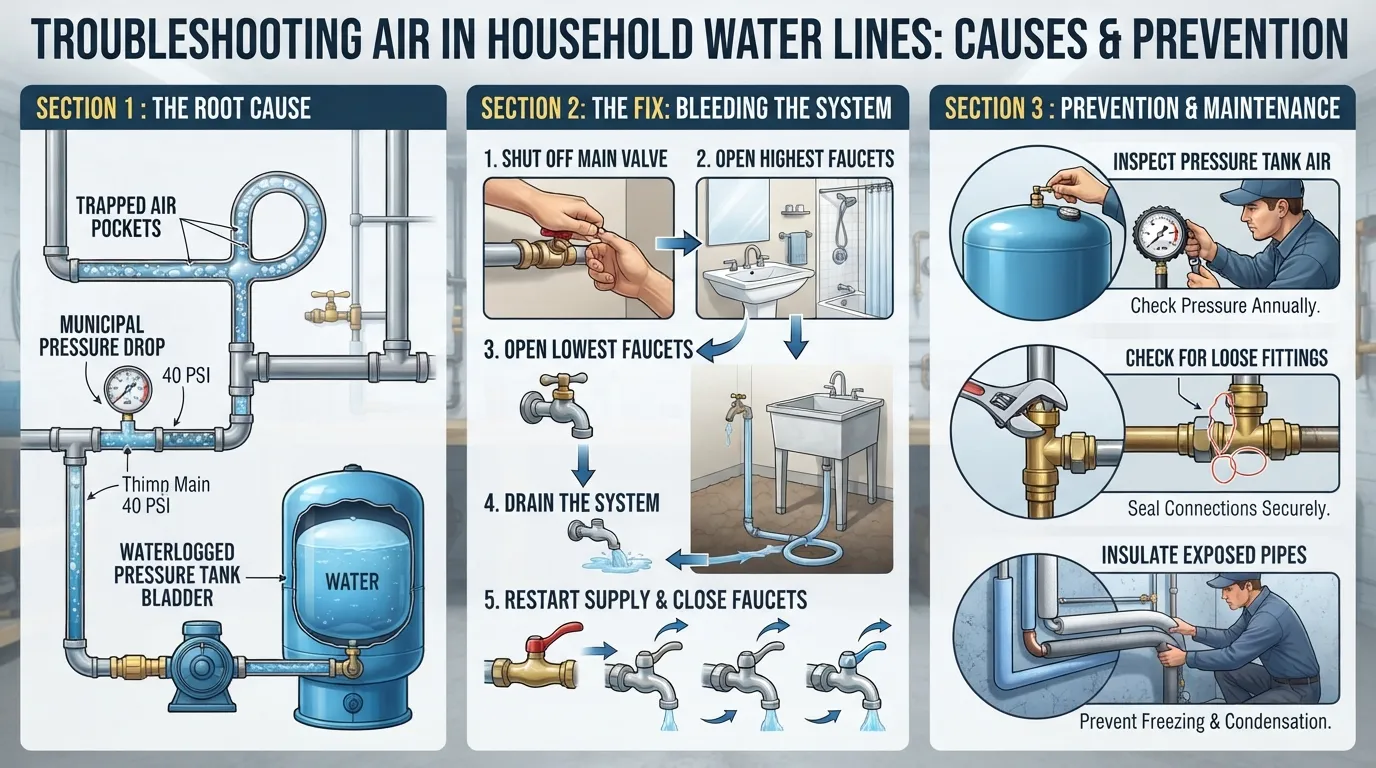 Preventing trapped air from invading your plumbing network relies on disciplined maintenance habits and cautious operation during household repairs. When updating my own annual home maintenance checklist, adding these preventive steps completely eliminated recurring sputtering issues.
Open Valves Slowly After Any Shutoff
Whenever you turn your water supply back on after municipal repairs or interior renovations, always throttle the main valve open gradually.
- Turn the master shut-off valve by just a quarter turn initially to let water trickle in softly.
- Allow trapped air to escape quietly through open fixtures before opening the valve fully.
- Prevent destructive hydraulic shocks that can crack pipe joints and introduce new air gaps.
Fix Leaks and Loose Fittings Early
Catching minor supply-side leaks early stops ambient air from being sucked into your pipes during normal water flow.
- Inspect visible threaded joints under sinks and around water meters regularly for moisture.
- Tighten loose fittings immediately to maintain an airtight, pressurized plumbing network.
- Replace worn washers and O-rings before they degrade and allow air past valve seals.
Maintain Your Water Heater
Routine water heater maintenance prevents sediment accumulation and controls the internal gas pockets that feed air into your hot lines.
- Flush your storage tank annually to clear out mineral scale and trapped air chambers.
- Test the T&P relief valve periodically to ensure safe pressure management.
- Follow a strict water heater maintenance schedule to extend equipment life and stabilize flow.
Check Pressure Regularly
Monitoring your household water pressure protects your entire piping system from destructive surges and pressure-related air locks.
- Attach a pressure gauge to an outdoor hose bib every six months to verify readings stay near 60 PSI.
- Inspect your pressure-reducing valve for signs of sluggish operation or mineral fouling.
- Replace failing regulators promptly to keep water delivery smooth and consistent.
Keep Aerators Clean
Regularly cleaning your faucet aerators removes trapped debris and ensures unrestricted water flow across all household fixtures.
- Unscrew sink and shower aerator screens twice a year to wash away accumulated mineral sediment.
- Soak clogged screens in white vinegar to dissolve stubborn calcium scale quickly.
- Reinstall clean aerators to maintain balanced pressure and prevent false air symptoms.
Frequently Asked Questions
Find direct, expert answers to the most common questions homeowners ask about identifying, clearing, and preventing trapped air in their plumbing systems.
How do I get rid of air in my plumbing pipes?
You can eliminate trapped air by shutting off your main water supply, opening all indoor and outdoor faucets completely, and then turning the main valve back on very slowly. Let the water run uninterrupted for 10 to 15 minutes until every fixture flows in a smooth, steady stream.
How to get air out of plumbing lines naturally?
Air can sometimes clear naturally over several days of normal, heavy water use as daily pressure cycles push small bubbles through open taps. However, stubborn air pockets and airlocks rarely resolve on their own, requiring a complete system flush or targeted fixture cycling to fully purge.
How do I get air out of hot water pipes?
Clearing hot water lines requires filling your water heater tank completely before turning on any power or gas, then opening all hot water faucets wide. Let them run continuously for 5 to 10 minutes to push all trapped thermal gases and air pockets out of the system safely.
Will air in pipes damage my plumbing?
Trapped air itself is non-toxic, but the violent pressure spikes and water hammer shock waves it causes can crack aging pipe fittings over time. Left unaddressed, persistent air pockets can also accelerate corrosion and damage sensitive valve components across your home network.
Why is my tap sputtering after a repair?
Sputtering happens because shutting off and draining your water lines introduces empty air voids throughout the entire plumbing network. When water pressure returns, it forces these compressed air bubbles out through your open faucets, resulting in spitting and noisy pipe bursts.
Can I get air out of pipes without turning off the main?
You can clear localized air pockets at a single sink or shower by cycling the handle between hot and cold extremes without touching the main valve. However, clearing a whole-house air infiltration issue always requires shutting off the master supply to reset the system pressure properly.
How to get rid of air in water lines every morning?
Recurring morning air usually indicates a suction-side leak, a faulty check valve, or a failing pressure tank bladder that draws air in overnight. You must inspect your supply lines, repair any micro-leaks, and service your well pump or pressure regulator to stop daily air accumulation.
Conclusion
Eliminating trapped air from your plumbing lines is a straightforward maintenance task that instantly restores steady water pressure and silences annoying pipe noises. Whether you are dealing with a localized fixture sputtering after a repair or a stubborn whole-house airlock, following a methodical bleeding sequence ensures your system runs smoothly and safely.
Quick Checklist
Keep this essential recap handy whenever you need to diagnose, purge, or prevent air infiltration in your home water network.
- Diagnose the Scope: Determine whether the sputtering affects a single tap, only hot water, or your entire home.
- Prepare Your Space: Gather buckets and towels, and locate your main water shut-off valve before starting.
- Execute a Systematic Flush: Shut off the main supply, open all taps, and reopen the main valve slowly to purge air safely.
- Protect Equipment: Ensure water heater tanks are completely full before applying power or gas to prevent burnout.
- Know When to Call Help: Contact a licensed plumber immediately if persistent air is accompanied by wet spots or unexplained pressure drops.
Have you ever dealt with a stubborn airlock or loud banging pipes that required a complete system flush? Share your experience or questions in the comments below!

Oscar Vance | Master Plumber & Drainage Expert
Meet Oscar Vance, a licensed master plumber sharing practical solutions on residential repairs, preventive maintenance, and thoughtful home upkeep.

