What is PEX Plumbing & Why Homeowners Use It
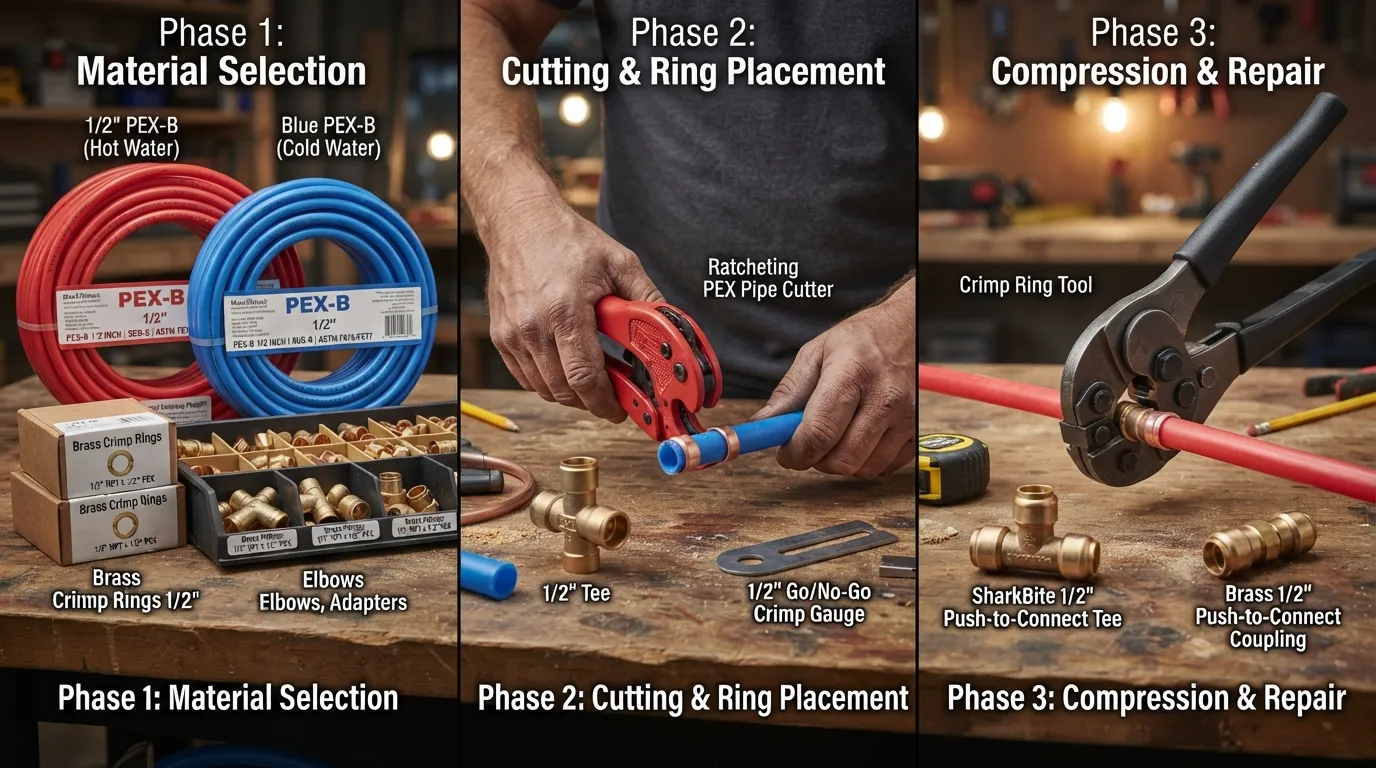
PEX plumbing utilizes flexible, cross-linked polyethylene tubing to replace traditional rigid metal or PVC pipes for residential water supply lines. It delivers superior freeze-resistance, faster installation times, and long-term reliability compared to legacy copper alternatives.
- Engineered polymer material that expands and contracts without bursting under freezing conditions.
- Compatible with modern push-to-connect, crimp, and expansion fitting systems.
- Widely adopted in both new residential construction and whole-house retrofitting projects.
What is PEX Pipe? Cross Linked Polyethylene
PEX stands for cross-linked polyethylene, a high-density polymer processed to alter its molecular structure through electron-beam or peroxide cross-linking. This chemical transformation gives the flexible tubing high thermal stability and remarkable tensile strength.
- Withstands continuous water temperatures ranging from sub-freezing levels up to 200°F (93°C).
- Resists scale buildup, pinhole corrosion, and chemical degradation from aggressive municipal water supplies.
- Bends around structural framing corners smoothly, drastically reducing the number of elbow fittings required in a layout.
Red Blue & White PEX Kya Matlab Hai?
Color-coding in PEX tubing is a visual organizational standard used by plumbers to quickly differentiate fluid temperatures and line purposes during installation. The color of the plastic does not change the core material composition or pressure rating of the pipe itself.
- Red PEX: Traditionally designated for hot water distribution lines running from the water heater to fixtures.
- Blue PEX: Explicitly marked for cold water supply lines coming directly from the main shut-off valve.
- White (or Gray) PEX: Versatile neutral tubing that can be used interchangeably for either hot or cold water lines.
Why PEX is Popular for DIY & Professional Plumbing
PEX has largely supplanted rigid copper alternative piping because it slashes labor hours, minimizes potential leak points, and lowers overall material costs. Its pliability makes home plumbing renovations accessible even to confident do-it-yourselfers.
- Fewer Joints: Long continuous coils eliminate subterranean or in-wall solder joints where leaks typically originate.
- Cost-Effective: Material expenses are significantly lower than copper, and specialized tools remain budget-friendly.
- Quieter Operation: The dampening properties of flexible tubing suppress water hammer noise and high-velocity fluid flow sounds.
Tools & Materials You’ll Need Before Installing PEX Fittings
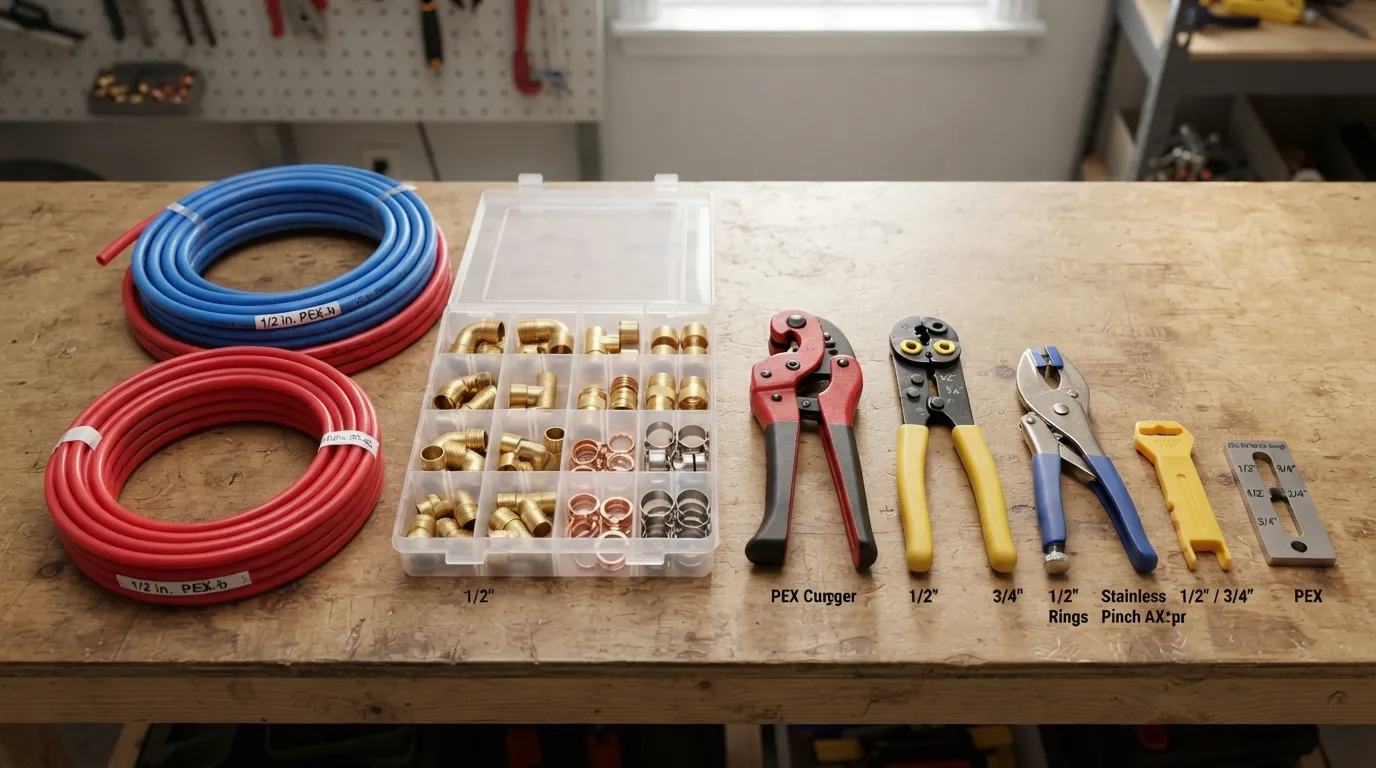
Assembling your specialized PEX joining tools, pipe cutters, and matching connection hardware before cutting your first water line is essential for a leak-free build. Matching your specific connection method—whether crimp, cinch, or expansion—to the correct hardware prevents pressure failures down the line.
- Always test your crimp or clamp compression on a scrap piece of PEX tubing before working on live walls.
- Keep extra replacement fittings, spare copper crimp rings, and a clean towel on hand to wipe away debris.
- Ensure your working area is well-lit and dry to inspect every completed joint accurately.
Essential Tools List PEX Cutter Crimping Tool Cinch Tool Expansion Tool Deburring Tool Go No Go Gauge
Executing a reliable PEX plumbing installation requires specialized mechanical instruments designed to cut, prepare, and compress connections onto the tubing. Selecting the correct system-specific tool—such as a crimping tool or expansion tool—ensures proper joint compression without deforming the polymer.
- PEX Cutter: A ratcheting or scissor-style blade that delivers a clean, square, and burr-free cut perpendicular to the pipe.
- Crimping Tool: A calibrated hand or bench tool used to compress copper crimp rings evenly around barbed fittings.
- Cinch Tool (Clamp Tool): A ratchet-action tool that tightens stainless steel cinch clamps using the integrated protruding lug tab.
- Expansion Tool: A mechanical or battery-powered cone expansion kit used exclusively to stretch PEX-a tubing for expansion sleeves.
- Deburring Tool: Cleans up minor inner plastic lips or rough edges left behind during cutting to preserve optimal water flow.
- Go/No-Go Gauge: A vital quality-control slotted card used immediately after crimping to verify if a copper crimp ring meets required ASTM standards.
Materials List Barbed Fittings Copper Crimp Rings Cinch Clamps Expansion Sleeves
Building a durable PEX distribution network depends on pairing compatible brass or poly barbed fittings with the exact retention hardware designed for your chosen joining method. Mixing incompatible clamps or rings with the wrong fitting type will severely compromise structural integrity under municipal water pressure.
- Barbed Fittings: Rigid lead-free brass, stainless steel, or poly connectors inserted directly inside the open end of the PEX pipe.
- Copper Crimp Rings: Solid copper bands slid over the PEX tubing exterior and permanently compressed with a crimping tool.
- Cinch Clamps: Corrosion-resistant stainless steel interlocking rings that tighten down uniformly around the PEX tubing and barbed fitting.
- Expansion Sleeves: Ring collars placed over the temporarily stretched end of PEX-a pipe that tightly contract back to lock the joint.
PEX-A vs PEX-B vs PEX-C Which One Do You Have?
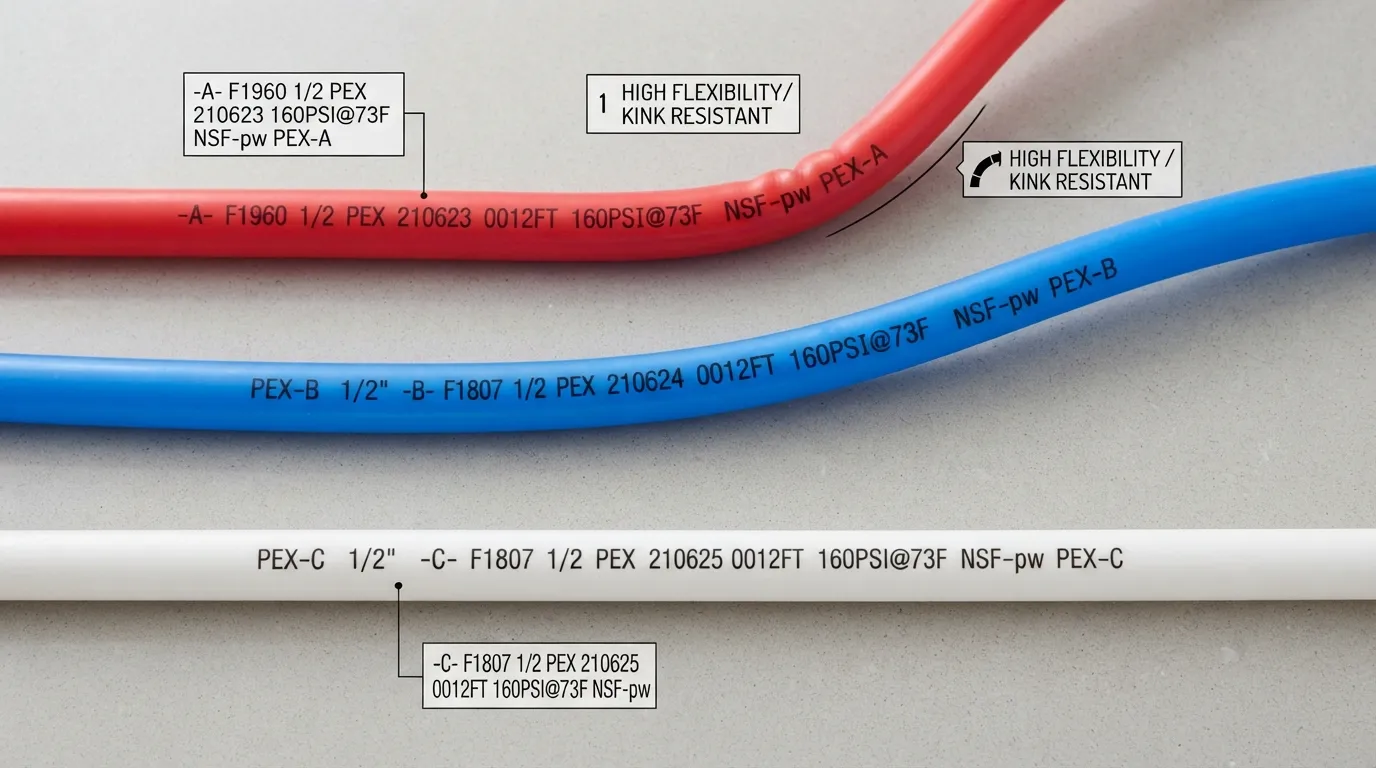
PEX is categorized into three distinct manufacturing methods—PEX-A, PEX-B, and PEX-C—based on how the polyethylene molecular chains are cross-linked. Identifying your exact tubing type determines which expansion or crimp/clamp fittings you can safely install without risking joint failure.
- PEX-A offers maximum flexibility, superior freeze expansion, and works with cold-expansion fittings.
- PEX-B is stiffer, widely stocked at home improvement centers, and standard for copper crimp rings.
- PEX-C is manufactured via electron radiation, resulting in a tighter bend radius and lower overall market share.
Key Differences Between PEX-A, B, and C
PEX-A is manufactured using the Engel peroxide method yielding maximum elasticity and high kink-recovery, PEX-B uses the silane moisture-cure method making it rigid and burst-resistant, while PEX-C uses electron-beam irradiation resulting in a budget-oriented polymer tubing.
- PEX-A (Peroxide Cross-Linked): Features the highest expansion ratio and lowest memory, allowing minor installation kinks to be relaxed with a heat gun.
- PEX-B (Silane Cross-Linked): Delivers the highest hydrostatic burst pressure rating among the three variants, though it feels noticeably stiffer in cold weather.
- PEX-C (Electron-Beam Cross-Linked): Softer than PEX-B but less elastic than PEX-A, commonly utilized for radiant floor heating or small repair sections.
How to Identify Your PEX Type Printing on the Tube
You can instantly identify your PEX type by reading the continuous inkjet print stamped directly along the outer wall of the tubing. Manufacturers print the exact chemical standard, ASTM grade, and PEX classification every few feet of the pipe.
- Agar tube pa “PEX-A ASTM F876/F877” likha ho to wo high-flexibility PEX-A hai jo cold-expansion fittings aur F1960 expansion sleeves ke sath use hoti hai.
- Agar tube pa “PEX-B ASTM F1807” likha ho to wo stiffer PEX-B hai jisme traditional copper crimp rings ya stainless steel cinch clamps lagte hain.
- Look for working pressure and temperature stamps (such as 100 psi at 180°F or 160 psi at 73°F) printed right next to the brand name and PEX rating.
Warning: Can You Mix PEX-A Fittings with PEX-B Pipe? Compatibility Answer
No, you cannot use PEX-A expansion fittings on rigid PEX-B pipe because PEX-B lacks the elastic molecular memory required to shrink back tightly around expansion heads. Forcing an expansion ring onto PEX-B will permanently deform or crack the pipe and cause an immediate blowout.
- Universal Crimp & Clamp: Standard barbed fittings secured with copper crimp rings or stainless steel cinch clamps work safely across PEX-A, PEX-B, and PEX-C tubing.
- Strict Expansion Rule: Cold-expansion sleeve systems (ASTM F1960) are engineered strictly for PEX-A tubing and must never be applied to PEX-B or PEX-C lines.
- Push-to-Connect Safety: Push fittings are compatible with all three PEX types provided you insert a rigid stainless steel tube stiffener inside the pipe end.
How to Install PEX Fittings Using the Crimp Method Step by Step
The copper crimp method is the most widely trusted and straightforward way to join PEX tubing using a barbed fitting and a calibrated PEX crimping tool. Executing each sequence with precision ensures a watertight seal rated for decades behind residential walls.
- Inspect your copper crimp rings for any sharp edges, burrs, or deformation before sliding them onto the line.
- Ensure the pipe end is completely dry and free of dirt, grease, or PVC cement residue prior to assembly.
- Work in a well-lit space so you can visually verify that the ring sits squarely over the barbed ribs.
Step 1: Cut the PEX Pipe Squarely
Make a clean, straight cut across the PEX tubing using a dedicated ratcheting PEX cutter to prevent jagged edges or oval deformation. An angled or crushed cut stops the barbed fitting from seating evenly and creates a slow leak path.
- Hold the cutter perpendicular (90 degrees) to the outer wall of the tube while applying steady, even pressure.
- Trim away any flattened or frayed ends if the tubing was previously pinched in a coil holder.
- Use a deburring tool to clear away any internal plastic shavings that could restrict water volume.
Step 2: Slide the Copper Crimp Ring
Slide a solid copper crimp ring over the cut end of the PEX pipe before pushing the fitting inside the tubing. Position the ring roughly 1/8 to 1/4 inch away from the very edge of the pipe—never right flush at the tip.
- Keep the edge of the copper ring centered directly over the internal barbed ribs of the connector.
- Avoid sliding the ring too far down the pipe, or the compression force will miss the sealing zone.
- Verify that the ring spins and slides smoothly before you insert the brass or poly barbed fitting.
Step 3: Insert the Barbed Fitting
Push the barbed fitting firmly into the open end of the PEX pipe until the shoulder of the fitting touches the cut edge of the tubing. Ensure all raised barbs are completely covered by the polyethylene wall.
- Check the viewing window or gap between the pipe end and the fitting shoulder to confirm full insertion.
- Lubricate the barbs lightly with clean water if necessary—never use petroleum grease or oil-based lubricants.
- Hold the fitting steady with one hand while pressing the tubing straight home with the other.
Step 4: Crimp the Ring at 90 Degrees
Open the jaws of your calibrated PEX crimping tool, place them straight over the copper crimp ring, and squeeze the handles completely until the ratchet releases. Keeping the tool strictly at a 90-degree angle to the pipe is critical for uniform pressure distribution.
- Critical Field Warning: Approaching the crimp ring at a slight diagonal or tilted angle crushes one side deeper than the other, deforming the copper and causing immediate high-pressure leaks.
- Ensure the tool jaws are completely closed around the entire circumference of the ring before releasing your grip.
- Never double-crimp the exact same copper ring, as over-compressing weakens the structural integrity of the copper.
Step 5: Test with a Go No Go Gauge
Slide the appropriate slot of your Go/No-Go gauge over the compressed copper crimp ring immediately after crimping to verify dimensional accuracy. The “Go” side should slide freely over the ring, while the “No-Go” side must not fit over it at all.
- If the “No-Go” side slips over the ring, your crimp tool is out of calibration or under-compressed, requiring you to cut out the joint and re-crimp.
- Mark your verified joints with a quick sweep of a permanent marker so you know which lines have passed inspection.
- Pressure-test the completed distribution line with water or air before closing up drywall or flooring cavities.
Alternative Method 1 Expansion PEX A Fittings
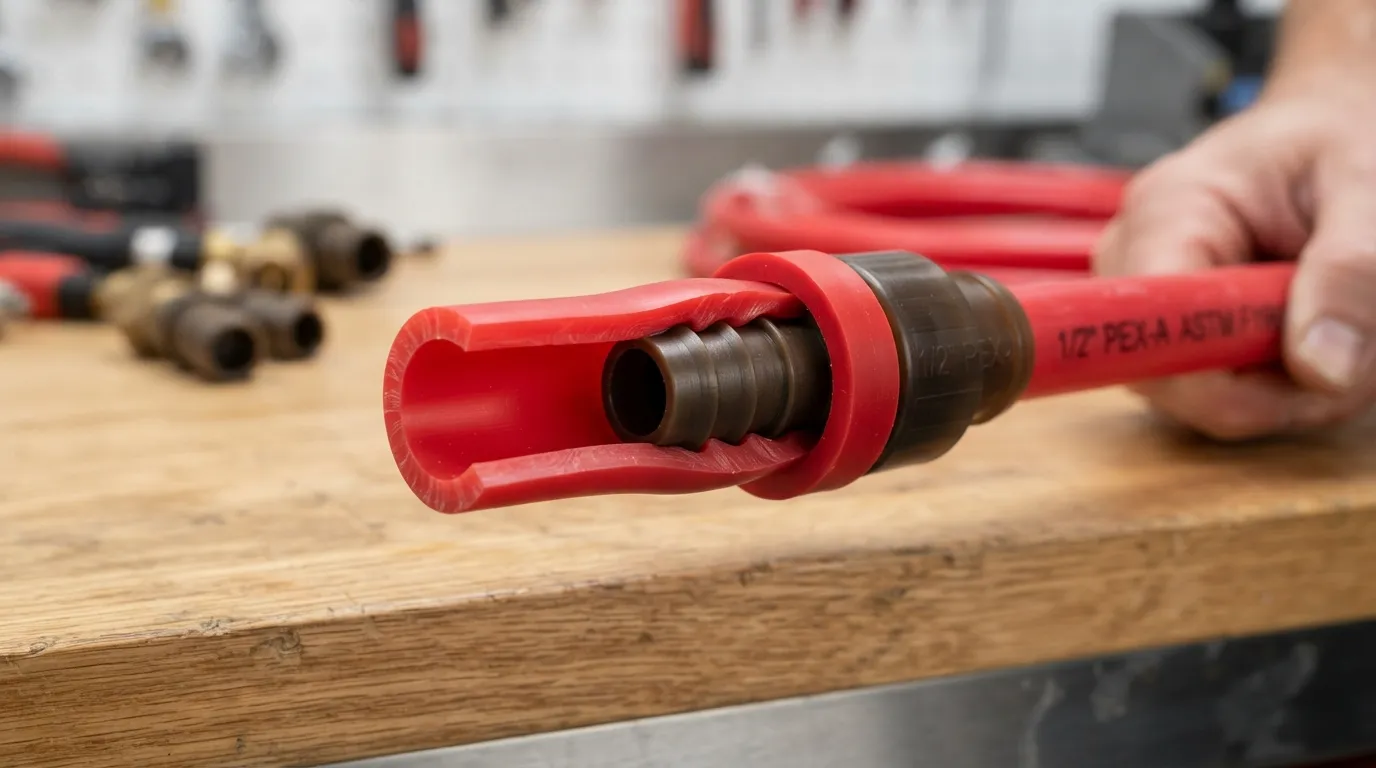
Unlike traditional crimp or clamp systems that squeeze the tubing down onto a fitting from the outside, the PEX-A expansion method leverages the unique thermal memory of cross-linked polyethylene. By inserting an expansion tool head into the end of the PEX-A tubing, the material is mechanically stretched outward alongside an expansion sleeve.
- Ensures maximum inner diameter clearance with zero flow restriction or pressure drop at the joint.
- Utilizes the inherent molecular memory of PEX-A to lock the connection permanently in place.
- Performs exceptionally well in freezing or cold weather conditions where other metals become stiff.
How Expansion Fittings Work
As soon as the expansion tool is removed, the PEX-A begins a natural elastic recovery process—often referred to as a cold shrink/contraction seal. The tubing relentlessly tries to return to its original inner diameter, clamping down around the fitting with immense, uniform radial force that actually strengthens over time rather than weakening.
- The fitting barb and expansion sleeve compress together to create a 360-degree watertight seal.
- Eliminates localized pinch points or uneven ring compression common with manual crimpers.
- Compatible exclusively with ASTM F1960 cold expansion fittings and PEX-A tubing systems.
Step-by-Step: Expansion Sleeve Installation
Executing an expansion connection requires precise sequential handling of the PEX-A pipe, the expansion sleeve, and the cone head tool. Following the correct rotation and seating sequence ensures the sleeve shrinks uniformly over the barbed insert.
- Step 1 (Prepare Tubing): Make a clean, square cut perpendicular to the PEX-A pipe using a sharp ratcheting cutter and deburr the edge.
- Step 2 (Position Sleeve): Slide the expansion sleeve over the end of the PEX-A pipe until it sits flush or hits the integrated stop ridge.
- Step 3 (Expand Pipe): Insert the proper-sized expansion tool head, trigger the expansion, and rotate the tool a quarter-turn between pulls (4 to 6 pulls total).
- Step 4 (Seat Fitting): Immediately pull out the tool and firmly push the expanded PEX-A pipe and sleeve all the way onto the fitting shoulder until it bottoms out.
- Step 5 (Allow Seal to Set): Wait a few moments for the cold shrink/contraction seal to tighten completely around the fitting before testing.
Why This Method is Preferred for PEX-A
PEX-A expansion is widely favored by commercial and residential master plumbers because it speeds up large installations while virtually eliminating installation errors. The self-healing and high-elasticity properties of PEX-A make this the gold standard for reliable plumbing networks.
- Unrestricted Water Flow: Because the pipe is stretched outward rather than crushed inward, the internal diameter matches the pipe seamlessly.
- Superior Joint Integrity: The uniform cold shrink/contraction seal distributes stress evenly across the entire fitting barb.
- Instant Visual Verification: Installers can check the position of the expansion sleeve against the fitting shoulder immediately with zero guesswork.
Alternative Method 2 Push to Connect SharkBite Fittings
Push-to-connect fittings like SharkBite offer a fast, tool-free way to join PEX, copper, or CPVC water lines without crimping or soldering. They rely on an internal stainless steel grab ring and an O-ring seal to lock the pipe mechanically and prevent leaks.
- Zero specialized crimping tools, expansion kits, or torches required to make a permanent or temporary joint.
- Interchangeable across multiple pipe materials including PEX, copper, and CPVC on the exact same fitting.
- Ideal for tight crawlspaces, emergency leak repairs, and retrofitting older residential plumbing.
How Push-to-Connect Fittings Work No Tools Needed
Inside a SharkBite or push-to-connect fitting, a built-in brass or polymer body houses a stainless steel grab ring equipped with sharp teeth. When you push the pipe inward, the teeth bite into the outer wall while a high-performance EPDM O-ring compresses around the circumference to form a watertight seal.
- The internal grab ring grips the tubing tighter whenever water pressure pushes against the fitting.
- An integrated plastic tube stiffener must be inserted inside PEX pipe ends to maintain structural roundness.
- Rotatable design lets you align the fitting or angle the pipe even after the connection is seated.
SharkBite Installation
Preparing the pipe surface properly is the single most important step to prevent cutting or rolling the internal O-ring during insertion. Following a strict mark-and-push sequence ensures the fitting is seated to the correct depth.
- Step 1 (Cut Squarely): Cut the PEX, copper, or CPVC pipe cleanly and perpendicularly using a sharp pipe cutter.
- Step 2 (Deburr and Clean): Use a deburring tool to remove all external and internal burrs, and clean off any dirt or stickers.
- Step 3 (Measure and Mark): Use the manufacturer depth gauge card to mark the exact insertion depth line on the outside of the pipe.
- Step 4 (Push to Depth): Push the pipe firmly into the fitting until the depth mark reaches the edge of the release collar.
- Step 5 (Verify Insertion): Check that the mark aligns with the fitting opening to confirm the pipe has cleared the O-ring and locked past the grab ring.
How to Disconnect a Push-Fit Fitting
Push-to-connect fittings can be easily disassembled and reused using a specialized disconnect clip, disconnect tongs, or a plastic disconnect key tool. Pushing the release collar inward compresses the internal grab ring teeth away from the pipe wall.
- Snap the plastic disconnect clip or metal tongs around the pipe directly against the plastic release collar of the fitting.
- Press the disconnect tool firmly toward the body of the fitting to depress the internal stainless steel teeth.
- Pull the pipe straight out of the fitting while holding the release tool depressed to avoid damaging the O-ring.
- Inspect the internal O-ring and grab ring for any scratches or debris before attempting to reuse the push-fit connector.
Alternative Method 3 Clamp Cinch Fittings
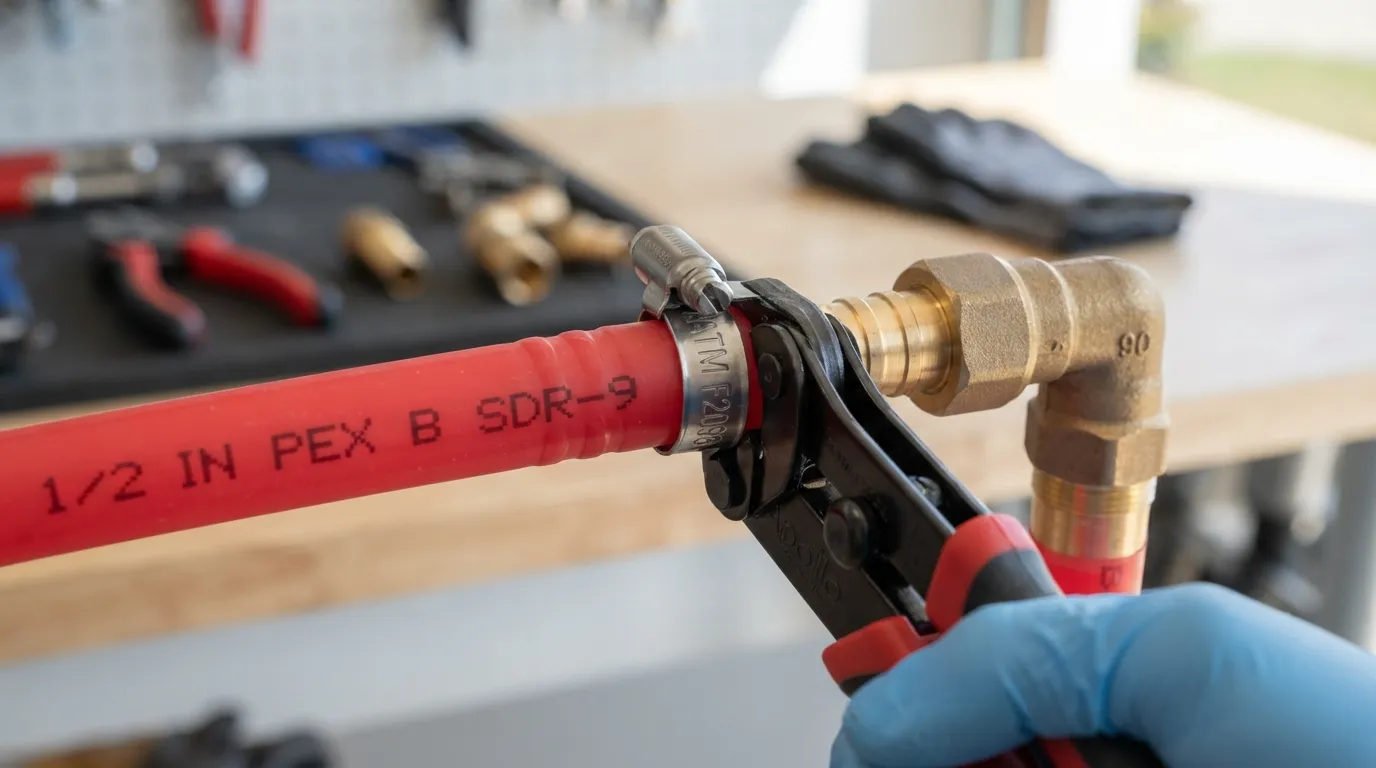
Stainless steel cinch clamps (also known as clamp fittings) provide a universally compatible, one-size-fits-all alternative to traditional copper crimp rings. Using a ratcheting cinch tool, installers squeeze the protruding ear of the clamp until the tool releases, locking the PEX tubing securely over a barbed fitting.
- One single stainless steel clamp size fits all standard PEX tubing diameters from 3/8-inch up to 1-inch.
- Eliminates the need to swap out heavy jaws or purchase multiple copper crimp ring sizes.
- Offers exceptional corrosion resistance and a visible ratcheting mechanism that prevents under-crimping.
How Cinch Clamps Work
A cinch clamp features an open stainless steel band with an integrated interlocking bridge and a raised ear loop. When you position the cinch tool over the ear and squeeze, the loop folds down and permanently cinches the band tighter around the PEX pipe, forcing the inner wall deep into the fitting barbs.
- The mechanical interlock distributes radial compression evenly around the entire circumference of the barbed insert.
- Unlike solid copper rings, stainless steel resists degradation in aggressive soil or high-humidity crawlspaces.
- The raised ear acts as a visual and tactile indicator that the joint has been fully compressed.
Step-by-Step: Cinch Clamp Installation
Installing a stainless steel cinch clamp requires a specialized ratcheting cinch tool that will not release its grip until the proper tension is achieved. Following a clean sequence prevents slippage or misalignment on the barbed fitting.
- Step 1 (Cut and Prepare): Make a square cut on the PEX tubing and slide the stainless steel cinch clamp over the end.
- Step 2 (Position the Clamp): Place the clamp approximately 1/8 to 1/4 inch from the end of the pipe, centered over the barbed fitting ribs.
- Step 3 (Insert the Fitting): Push the barbed fitting completely inside the PEX tubing until the pipe edge touches the fitting shoulder.
- Step 4 (Engage Cinch Tool): Open the jaws of the cinch tool, place the upper jaw over the raised ear of the clamp, and close the handles.
- Step 5 (Ratchet to Release): Squeeze completely until the ratcheting mechanism automatically releases, confirming proper clamping pressure.
Clamp vs Crimp Direct Comparison Answer PAA Snippet Target
Neither method is objectively “better” in terms of holding strength, as both ASTM F1807 copper crimp rings and ASTM F2098 stainless steel cinch clamps meet identical national plumbing standards for pressure and longevity. However, they differ significantly in tooling convenience and job-site versatility.
- Tool Versatility: A single cinch tool can adjust to clamp any pipe size from 3/8-inch to 1-inch, whereas copper crimping tools require you to swap out bulky jaws for every single pipe dimension.
- Access in Tight Spaces: Stainless steel cinch clamps require less vertical swing clearance around the pipe, making them easier to cinch inside cramped joist bays or wall cavities.
- Visual Inspection: Crimp rings are tested with a Go/No-Go gauge, while cinch clamps are verified simply by checking that the ratcheting tool completed its full stroke and closed the ear.
Connecting PEX to Copper or Threaded Pipe Transition Fittings
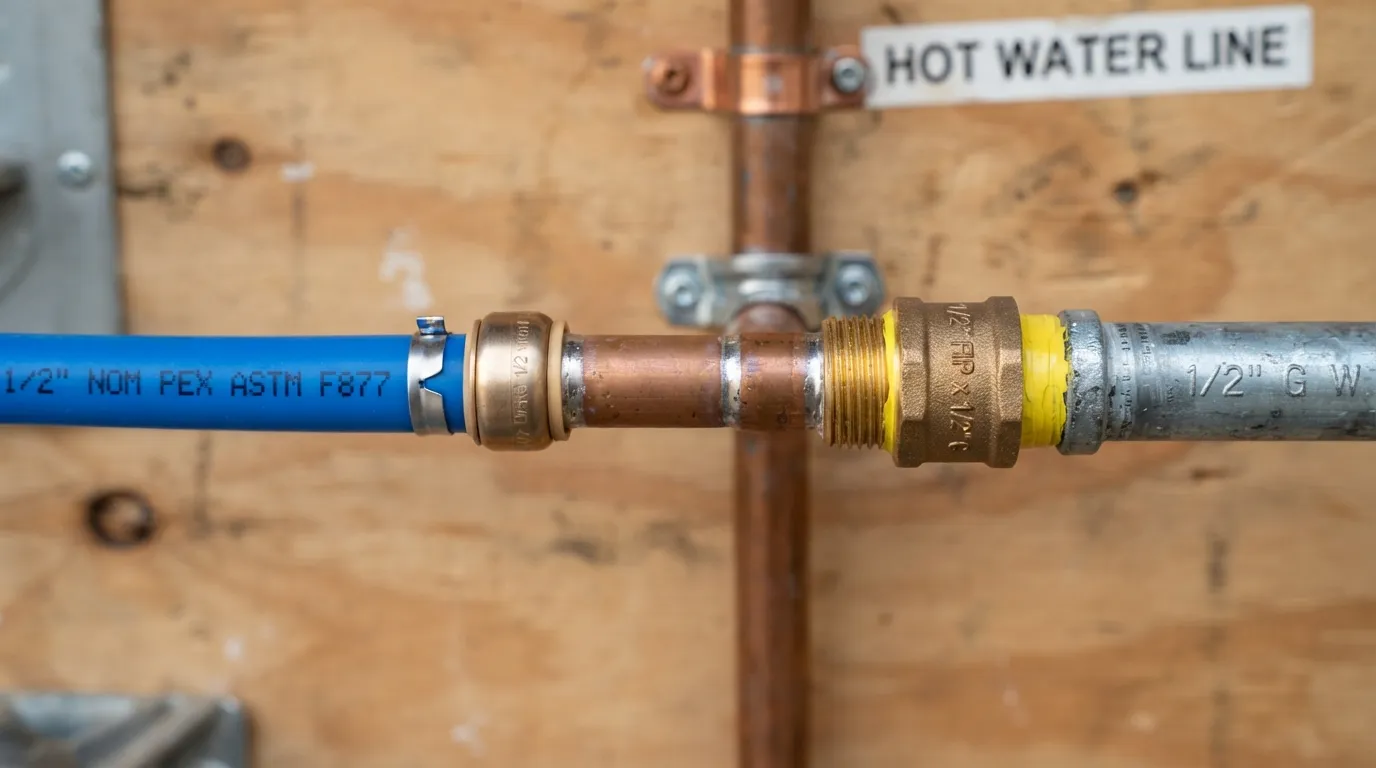
Transitioning from flexible PEX tubing to legacy copper lines or threaded metal shut-off valves requires specialized hybrid transition fittings. Selecting the proper lead-free brass or poly adapter prevents galvanic corrosion, thread leaks, and thermal stress failures at the junction point.
- Always verify whether the metal connection requires male/female NPT threads or sweat-solder copper ends.
- Never apply open flame solder heat directly adjacent to a PEX tube—always sweat copper stubs first.
- Use rated thread seal tape (PTFE) or pipe thread sealant on all threaded metal-to-metal or metal-to-brass joints.
Using Copper-to-PEX Adapters
Copper-to-PEX adapters bridge modern polymer tubing with existing sweat-copper or sharkbite-style copper stub-outs. These fittings feature a smooth solder cup on one end to accept rigid copper and a barbed, expansion, or push-fit connection on the other for the PEX line.
- Sweat-Solder Transition: Solder the copper end of the adapter onto the rigid copper pipe before attaching or crimping the PEX tubing to avoid melting the plastic.
- SharkBite Copper-to-PEX: Use a push-to-connect hybrid coupling to snap directly between clean copper tube ends and PEX without any soldering or crimping tools.
- Dielectric Protection: Modern lead-free brass transition adapters eliminate dissimilar metal corrosion when linking copper to specialized components.
Connecting PEX to Threaded Fittings Valves Water Heaters and Fixtures
Connecting PEX to threaded male or female pipe threads—such as water heater shut-off valves, pressure regulators, or fixture stub-outs—requires a PEX-to-NPT adapter. These fittings pair a standard PEX connection side with tapered National Pipe Thread (NPT) ends.
- Male vs. Female Adapters: Choose a male NPT adapter if threading into a threaded female port, or a female NPT swivel adapter if attaching to a threaded male nipple.
- Thread Sealant Application: Wrap PTFE thread tape clockwise 3 to 5 times around male NPT threads or apply a approved pipe joint compound before tightening.
- Compression Valve Hookups: Use straight or angled PEX compression stop valves to run clean, exposed supply lines directly to sinks and toilets without extra adapter fittings.
What Size PEX Pipe Should You Use? 1/2″ vs 3/4″
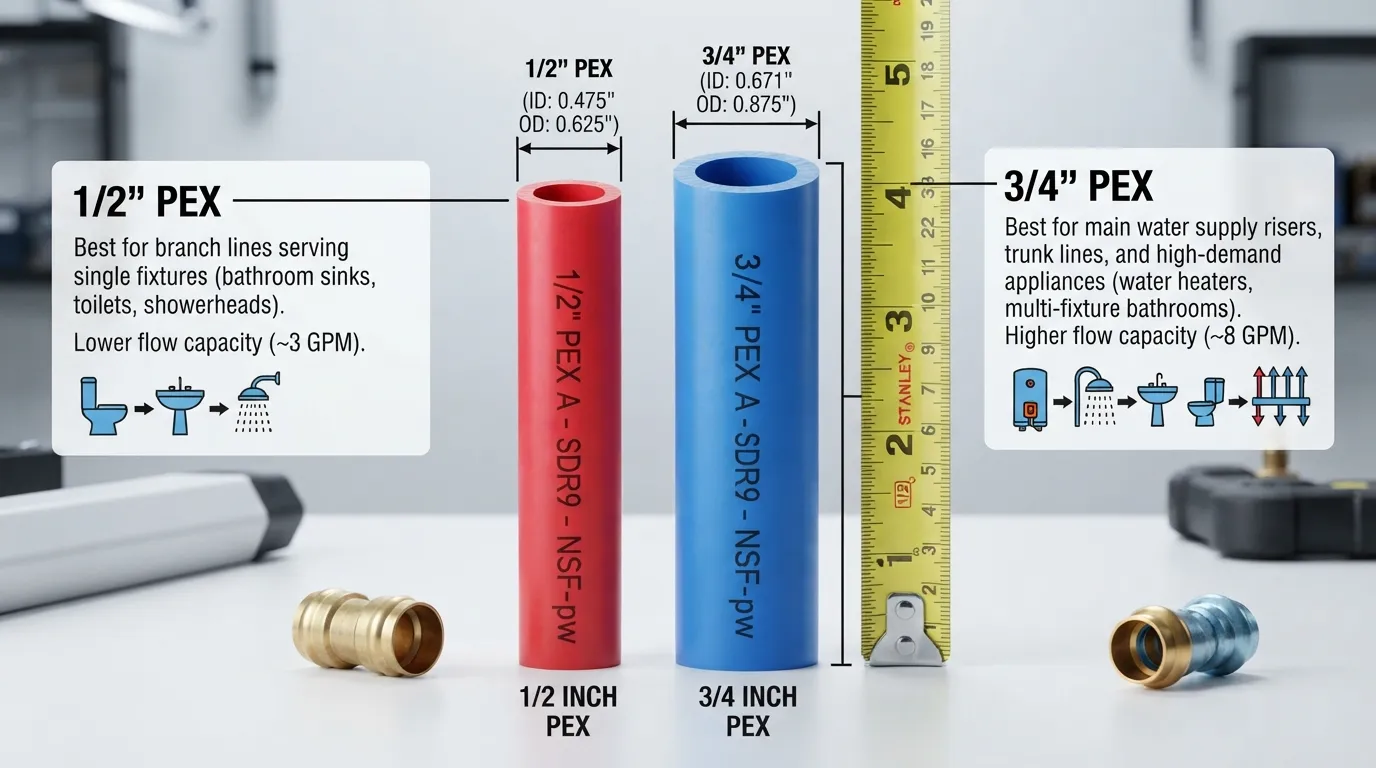
Choosing between 1/2 inch PEX and 3/4 inch PEX comes down to balancing water volume capacity against required flow velocity for your specific fixture layout. Matching the right inner diameter to your main runs and branch lines prevents pressure drops when multiple showers or faucets run simultaneously.
- 3/4-inch PEX acts as the primary trunk line feeding high-demand zones or whole-house manifolds.
- 1/2-inch PEX supplies individual bathroom groups, kitchen sinks, and standard laundry hookups.
- Oversizing branch lines can slow down hot water delivery times, while undersizing main trunks starves fixtures.
When to Use 1/2 PEX Branch Lines
1/2 inch PEX is the industry standard for individual branch lines running from a central manifold or 3/4-inch trunk directly to sinks, toilets, showers, and dishwashers. Its compact inner diameter maintains adequate water velocity without wasting hot water sitting idle in long pipe runs.
- Ideal for connecting individual bathroom vanities, kitchen faucets, and refrigerator ice maker lines.
- Delivers a standard flow rate of roughly 5 gallons per minute (GPM), meeting residential plumbing code demands.
- Easier to snake through tight wall studs, floor joists, and compact sink cabinets than thicker tubing.
When to Use 3/4″ PEX Main Lines
3/4 inch PEX is engineered to serve as the primary main supply line coming off your water heater or main shut-off valve before splitting into smaller branch lines. It carries a higher volume capacity to feed multiple active fixtures at once without a noticeable drop in water pressure.
- Recommended for main hot and cold trunk lines running from the water heater to a central distribution manifold.
- Supports a higher flow rate of approximately 10 gallons per minute (GPM), accommodating simultaneous high-demand usage.
- Reduces friction loss over long horizontal runs across basements or crawlspaces before branching off.
Sizing Rule of Thumb
A dependable residential plumbing rule of thumb is to route 3/4-inch PEX from your main source to a central tee or manifold, and then step down to 1/2-inch PEX lines for each individual fixture or appliance drop.
- Trunk-and-Branch Layout: Run 3/4-inch main lines down the center of the house and branch off to each bathroom with 1/2-inch tees.
- Dedicated Manifold Layout: Run individual 1/2-inch PEX lines straight from a central home-run manifold to every single fixture for balanced pressure.
- High-Flow Exceptions: Use 3/4-inch lines all the way to high-flow Roman tub fillers, multi-head shower systems, or tankless water heater inlets.
How to Test Your PEX Connection for Leaks
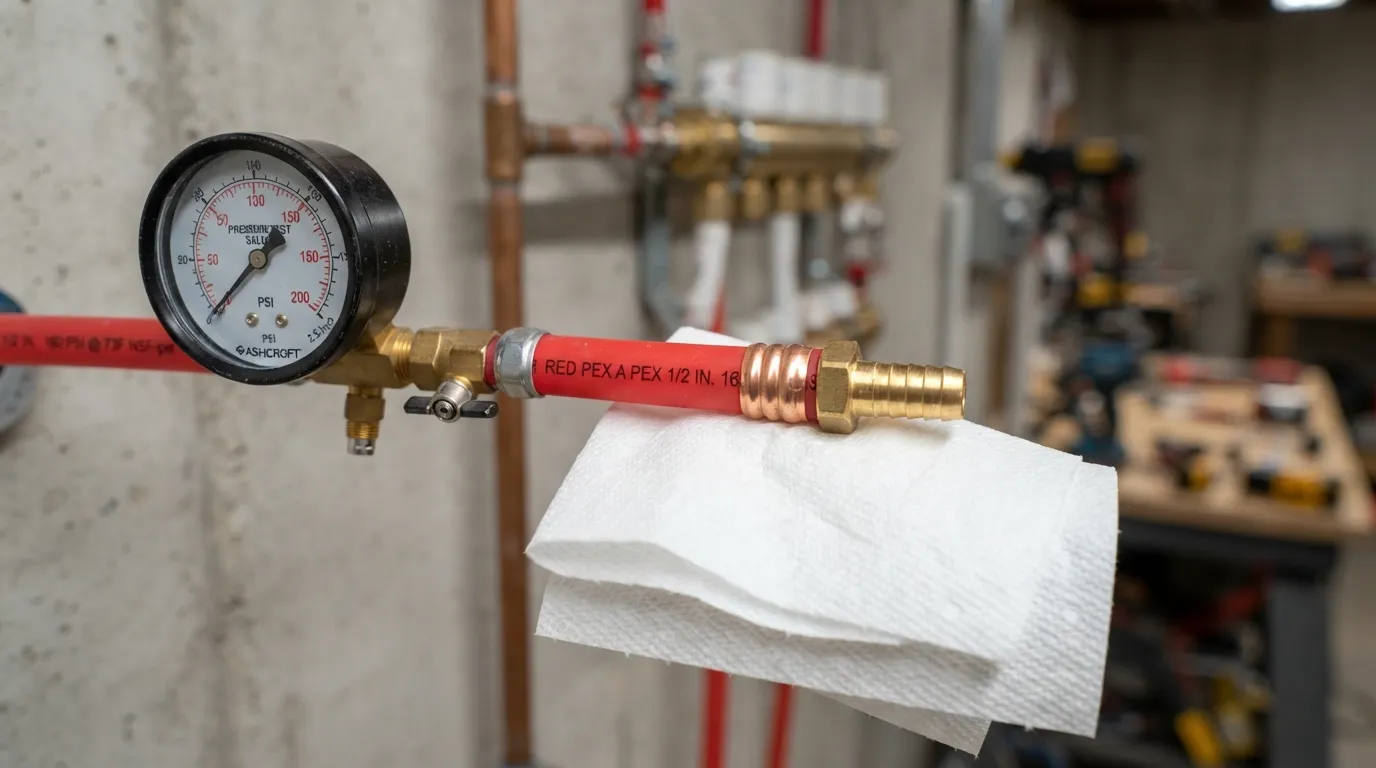
Verifying every completed joint and pressure-testing your newly installed PEX distribution network is a non-negotiable step before closing up drywall or flooring cavities. Systematic mechanical checks and hydrostatic pressure testing catch subtle crimp or fitting errors before they cause catastrophic water damage.
- Inspect every single barbed fitting, clamp, ring, or push-fit connector with a bright work light.
- Never rely solely on visual inspection—always perform a mechanical gauge test or static pressure test.
- Keep a bucket and spare clean shop towels nearby in case a minor bleeder joint needs immediate draining.
Go No-Go Gauge Test
The Go/No-Go gauge test provides an immediate mechanical verification that your copper crimp ring has been compressed to the exact ASTM F1807 wall-thickness tolerance. Slipping the dual-ended slotted gauge over the crimp ring confirms whether the tool applied uniform radial force.
- The “Go” Slot: Should slide smoothly and completely over the compressed copper ring without binding or forcing.
- The “No-Go” Slot: Must not fit over any part of the crimp ring; if it slides over, the crimp is under-compressed.
- Action on Failure: Immediately cut out any failed joint using a PEX cutter, replace the barbed fitting and ring, and re-crimp.
Pressure Testing the Full System
Hydrostatic or pneumatic pressure testing subjects the entire closed PEX network to elevated PSI to ensure every single trunk, branch, and transition holds steady over time. Plumbers typically test with water pressure or a specialized air test kit hooked up to a hose bibb.
- Cap off all open fixture drops, install temporary test plugs, and close all domestic shut-off valves.
- Attach a water pressure tester or pneumatic air gauge to a boiler drain or washing machine connection.
- Pump the system up to roughly 80 to 100 PSI (or local code requirement) and let it sit undisturbed for at least 15 to 30 minutes while monitoring the needle for any pressure drop.
What to Do If a Connection Fails
If your pressure gauge drops or you spot a slow bead of moisture around a fitting, isolate the leaky zone and make a clean repair rather than trying to patch over the defect. Attempting to re-crimp an already compressed copper ring or twist a leaking push-fit under pressure will only worsen the failure.
- Shut off the main water supply and open a low-lying faucet to bleed remaining pressure out of the lines.
- Cut out the faulty fitting and a short 2-inch section of PEX tubing on either side using a clean square cut.
- Install a new PEX coupling or repair union using fresh rings, clamps, or a reliable push-to-connect replacement fitting, then re-test.
Common Mistakes to Avoid When Installing PEX Fittings
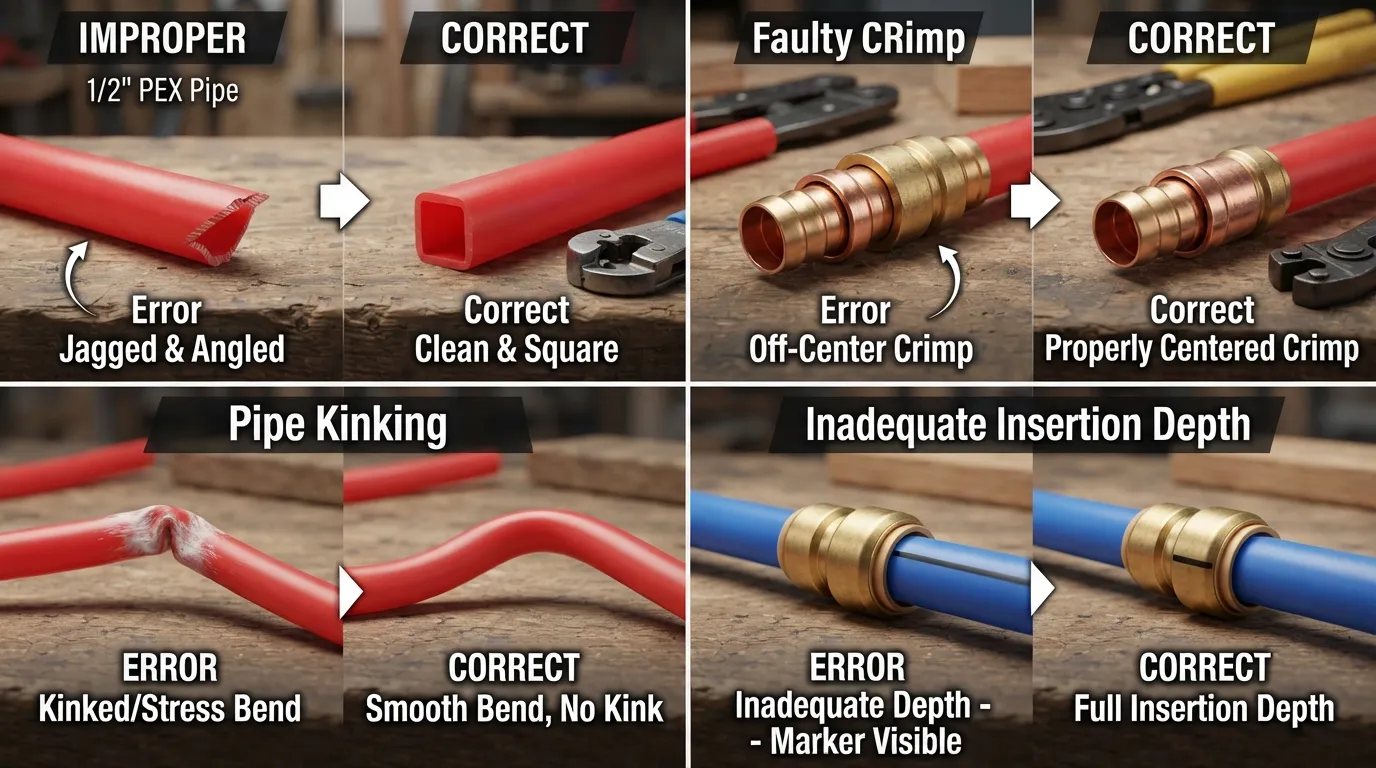
Even though PEX plumbing is remarkably forgiving compared to rigid copper or PVC, small mechanical oversights during assembly can result in premature joint leaks, low water flow, or complete blowouts. Identifying and sidestepping these frequent installation errors protects the longevity of your plumbing network.
- Always double-check your alignment, depth markings, and compression tools before finishing each joint.
- Never rush cuts or skip verification steps just because a connection looks tight from a distance.
- Keep extra replacement fittings and spare rings on hand in case a mistake requires cutting out a section.
Crooked Cuts
Making a diagonal, jagged, or crushed cut instead of a clean 90-degree square edge prevents the barbed fitting from seating evenly inside the PEX tubing. An irregular pipe end creates an uneven gap against the fitting shoulder, leading to a slow, persistent leak path under pressure.
- Always use a sharp, ratcheting PEX cutter designed specifically to slice perpendicularly through flexible polymer walls.
- Never use a standard hacksaw or utility knife that leaves behind plastic burrs, jagged edges, or oval deformation.
- Trim away and discard any section of tubing that was flattened or kinked during uncoiling or storage.
Wrong Crimp Ring Position
Placing the copper crimp ring or stainless steel clamp too close to the very edge of the pipe—or sliding it too far down onto the barrel—causes uneven compression across the internal barbs. A poorly positioned ring fails to compress the O-ring zones effectively, inviting high-pressure joint separation.
- Position every copper crimp ring or cinch clamp squarely centered over the barbed ribs, roughly 1/8 to 1/4 inch from the pipe end.
- Ensure the ring does not hang over the very tip of the tubing where it could catch or deform during insertion.
- Visually inspect all around the circumference of the ring to confirm it hasn’t tilted or slipped before squeezing the tool.
Over Bending PEX Tubing
Bending PEX tubing past its recommended minimum bend radius (typically 6 times the outside diameter of the pipe) causes the polymer wall to buckle, stress, or kink. Kinked PEX suffers from restricted water flow, turbulent noise, and a severe reduction in burst strength at the crease.
- Utilize plastic or metal 90-degree elbow support brackets whenever sharp turns are required inside tight framing bays.
- If you accidentally kink PEX-A tubing, you can often restore structural integrity by gently heating the kinked zone with a heat gun until it pops back out (never use open flame).
- Permanently kinked or whitened PEX-B or PEX-C tubing must be cut out and replaced with a straight coupling.
Forgetting to Gauge Test
Assuming that a crimp or clamp is secure simply because the handles finished their stroke is a dangerous gamble that frequently leads to hidden slow leaks behind finished walls. Skipping the mechanical Go/No-Go gauge test leaves you blind to an out-of-calibration tool or under-compressed ring.
- Test every single copper crimp ring immediately after compression using a calibrated Go/No-Go slotted gauge card.
- If the “No-Go” slot slips over the ring, cut out the fitting immediately and re-crimp a fresh ring onto clean pipe.
- Mark verified, passing joints with a permanent marker to track your progress before filling walls with insulation or drywall.
Pros Cons & Real Concerns About PEX Plumbing
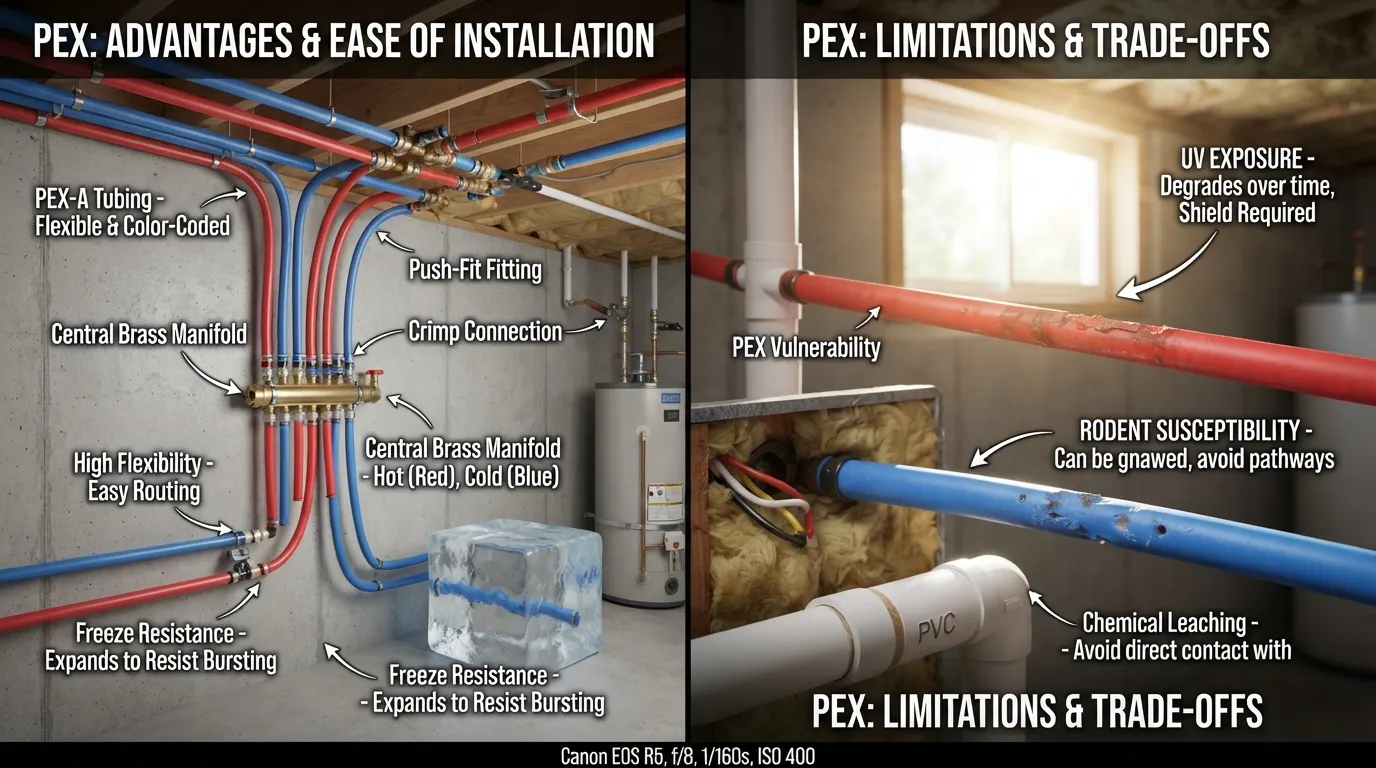
While PEX plumbing has revolutionized residential water supply with unmatched flexibility and speed of installation, it is not without limitations. Weighing its genuine benefits against environmental vulnerabilities, insurance rules, and material safety concerns helps set realistic expectations for your home.
- PEX delivers a 40-to-50-year expected lifespan when installed and protected according to manufacturer specifications.
- Environmental exposure requires careful planning, as direct sunlight and aggressive rodents can compromise unprotected lines.
- Third-party safety certifications confirm that quality PEX tubing is non-toxic and free from harmful endocrine disruptors.
Advantages of PEX Plumbing
PEX outperforms rigid metal and PVC pipes by combining high tensile strength with remarkable elasticity, making it far more forgiving under stress. Its long continuous coils drastically reduce the number of hidden subterranean or in-wall joints.
- Freeze Burst Resistance: PEX expands outward when water freezes inside the line, significantly reducing the likelihood of pipe splits compared to copper or CPVC.
- Corrosion and Scale Immunity: Unlike metallic piping, PEX does not suffer from mineral scale buildup, pinhole oxidation, or acidic water pitting.
- Cost and Labor Efficiency: Lighter weight and tool-driven connections cut installation labor time by half or more on whole-house builds.
Downsides: UV Sensitivity Rodent Damage Chlorine Degradation
PEX polymer chemistry reacts poorly to ultraviolet radiation and aggressive chemical additives if left exposed or installed outside optimal parameters. Proper shielding and routing protect the tubing from premature breakdown.
- UV Sensitivity: Direct sunlight degrades PEX molecules rapidly; tubing should never be stored outdoors or left exposed to direct UV rays for more than a few weeks.
- Rodent Chewing: Mice and rats can chew through soft PEX walls in search of water, making metal protective conduit or clear pathways necessary in crawlspaces.
- Chlorine Degradation: High levels of chloramines or chlorine disinfectants in municipal water supplies can degrade lower-grade PEX over decades if temperatures run excessively high.
Why Some Insurance Companies Are Cautious About PEX
Some property insurers express caution toward PEX installations not due to the polymer tubing itself, but because of historical class-action lawsuits tied to defective brass fitting alloys or improper push-fit installations from past decades. Poor workmanship remains the leading cause of insurance claims rather than the PEX pipe material.
- Early-generation brass fittings from specific manufacturers experienced dezincification and cracking, prompting tighter code scrutiny.
- Insurance underwriters favor certified ASTM-standard systems (such as ASTM F1807 crimps or ASTM F1960 expansions) installed by verified contractors.
- Properly strapped, pressure-tested PEX systems meeting modern municipal plumbing codes are widely accepted across major home insurance providers.
Is PEX BPA-Free? Quora sourced intent
Yes, PEX tubing is completely free of Bisphenol A (BPA) and does not leach estrogenic or endocrine-disrupting chemicals into drinking water. Cross-linked polyethylene is an inert hydrocarbon polymer certified safe for potable water distribution.
- Tested and certified by independent public health organizations like NSF International (NSF/ANSI 61 and NSF 14 standards) for drinking water safety.
- Does not contain plasticizers, phthalates, or heavy metals commonly found in older flexible vinyl hoses.
- Maintains neutral taste and odor quality in residential water supplies even under continuous hot water flow.
PEX Fitting Names & Types Glossary
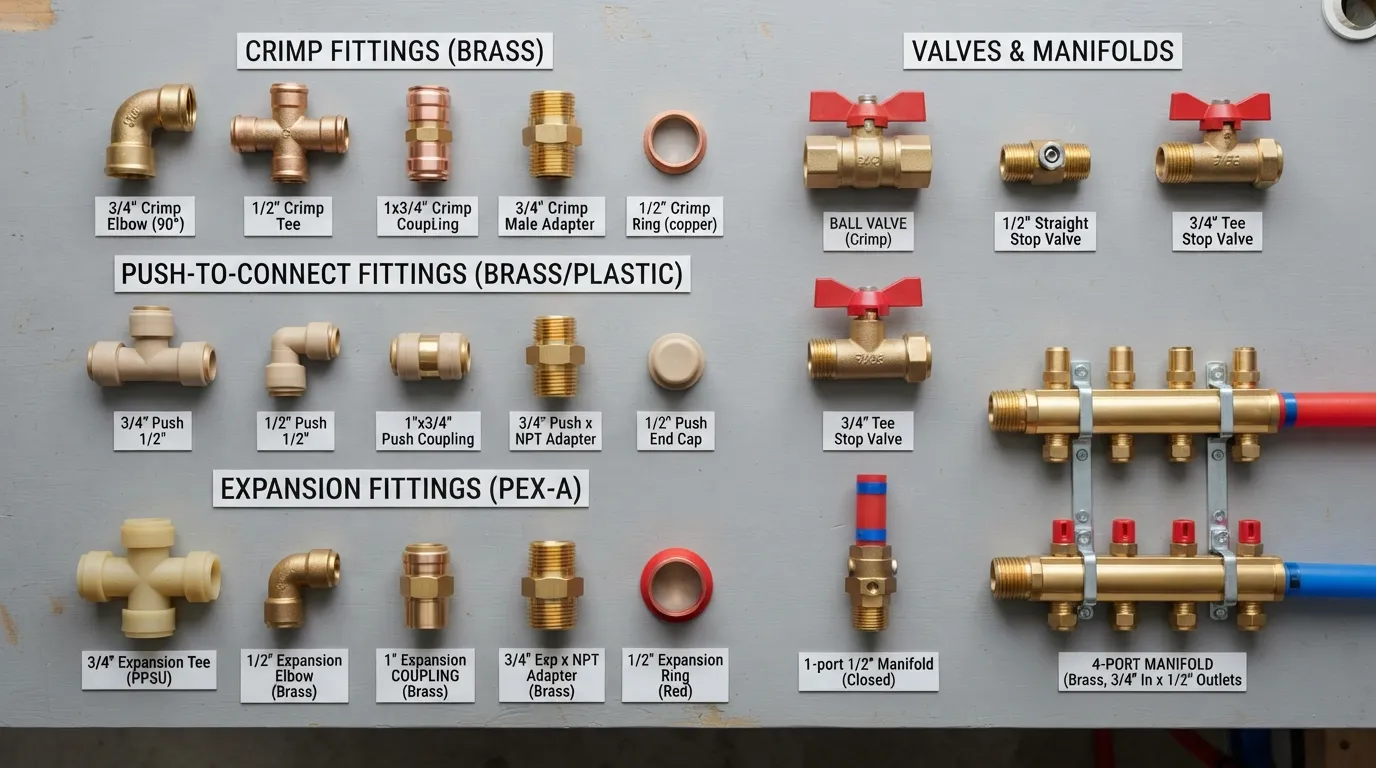
Navigating the various connector styles in a PEX plumbing kit can feel overwhelming for beginners. Familiarizing yourself with foundational hardware names—such as elbows, tees, couplings, and adapter fittings—ensures you pick the exact component required for your layout.
- Every fitting is engineered to either redirect, split, splice, or transition your water lines safely.
- Matching the fitting connection style (barbed, expansion, or push-fit) to your pipe type is vital.
- Always keep a small assortment of basic fittings in your toolbox for sudden repair jobs.
Elbow Tee Coupling, Adapter What’s the Difference?
Each standard PEX fitting serves a distinct geometric or material-transition role within a water supply layout. Knowing how they function keeps your pipe routing clean, efficient, and up to code.
- Elbow Fitting: A 90-degree or 45-degree angled connector used to turn corners around wall studs or floor joists without dangerously kinking the tubing.
- Tee Fitting: A three-way “T”-shaped junction that allows you to branch off a secondary water line from a primary run (such as feeding a sink from a main trunk).
- Coupling (Union Splice): A straight, inline connector used to join two separate pieces of PEX pipe together during a repair or to extend a short line.
- Adapter Fitting: A hybrid connector featuring a PEX connection on one end and a different interface—such as threaded NPT, sweat copper, or a compression valve—on the other.
Frequently Asked Questions About PEX Piping Systems
Is it better to clamp or crimp PEX?
Neither method is objectively better, as both stainless steel clamp rings and copper crimp rings create secure, code-compliant connections when installed with calibrated tools. Stainless steel clamps offer greater versatility by fitting multiple pipe diameters with a single tool, whereas copper crimp rings are traditionally less expensive and provide a slightly stronger outward radial force.
- Stainless Steel Clamps: Use a ratcheting tool, adjust to varying brand tolerances easily, and resist corrosion in damp environments.
- Copper Crimp Rings: Require dedicated size-specific jaws, form a uniform 360-degree seal, and remain a favorite for traditional plumbers.
What is the most reliable way to connect PEX tubing?
Expansion fittings used with PEX-A tubing and cold-expansion sleeves represent the gold standard for long-term reliability and flow rate. This method actually shrinks the tubing and ring tightly around a full-port fitting, eliminating internal constriction and reducing the risk of joint failure over decades of service.
- Cold Expansion (PEX-A): Delivers maximum inner diameter (ID) water flow with zero reduction in pressure at junction points.
- Crimp and Clamp Systems: Provide high reliability for PEX-B and PEX-C when verified with a Go/No-Go gauge after every single crimp.
- Push-to-Connect Fittings: Offer rapid temporary or permanent repairs without specialized tools, though they require a clean, square cut and a proper stiffener insert.
What happens if you use PEX-A with PEX-B fittings?
Mixing PEX-A tubing with standard PEX-B barbed insert fittings and copper crimp rings is completely acceptable and widely practiced in standard plumbing installations. However, you cannot slide PEX-B tubing over an expansion-style PEX-A fitting without damaging or splitting the rigid PEX-B material.
- Compatible Mix: PEX-A tubing secured onto barbed brass or poly alloy fittings using standard crimp or clamp rings.
- Incompatible Scenario: Forcing PEX-B or PEX-C tubing onto an expansion ring designed exclusively for the high memory elasticity of PEX-A.
Should I use 1/2 or 3/4 PEX for my house?
You should use 3/4-inch PEX for your main trunk lines and service entrances, stepping down to 1/2-inch PEX for individual fixture branch lines feeding sinks, toilets, and showers. This hybrid sizing strategy maintains optimal water pressure across multiple simultaneous fixtures while preventing the flow velocity and lag issues common with oversized or undersized plumbing runs.
- 3/4-Inch PEX Trunk: Handles high-volume water supply from the meter or water heater to major manifold distribution zones.
- 1/2-Inch PEX Branch: Delivers adequate flow rates (typically 2.5 to 5 gallons per minute) directly to individual household fixtures.
What type of fitting is best for connecting PEX pipes?
Brass and engineered polymer (PPSU) fittings represent the best overall choice depending on your water chemistry and budget. Lead-free brass fittings offer unmatched structural rigidity, while engineered polymer fittings are completely immune to dezincification and aggressive mineral or acidic water conditions.
- Lead-Free Brass: Industry-standard durability, high thermal tolerance, and ideal for exposed or structural transition areas.
- Engineered Polymer (PPSU): Rust-proof, scale-resistant, and cost-effective for extensive hidden wall or subfloor runs.
Final Thoughts & Quick Recap on PEX Piping
Mastering PEX piping transforms a complex home renovation obstacle into an approachable, high-reliability DIY project that saves thousands in labor costs. By choosing the right tubing grade, matching your connection system to your skill level, and verifying every joint, you ensure decades of leak-free plumbing performance.
Quick Recap Checklist
Review this essential checklist before cutting your first pipe or purchasing fittings to keep your plumbing project on schedule and up to code:
- Select the Right Tubing: Choose PEX-A for maximum flexibility and cold-expansion flow, or PEX-B for rigid durability and cost-effectiveness.
- Match Your Connection Tool: Pair stainless steel clamps, copper crimps, or expansion rings with their exact respective calibration gauges.
- Size Lines Properly: Run 3/4-inch main trunk lines to prevent pressure drops and step down to 1/2-inch lines for individual fixtures.
- Test Every Single Joint: Pressure-test the system and run a Go/No-Go inspection tool over crimps before closing up any drywall.
Final Recommendation Based on Skill Level
Your ideal approach to PEX installation depends heavily on your comfort with specialized tools and the scale of your specific household project:
- Beginner DIYers: Start with a stainless steel clamp system and PEX-B tubing; the single ratcheting tool adjusts easily and forgives minor learning curves.
- Intermediate & Whole-House Builders: Invest in or rent a PEX-A cold-expansion kit to enjoy full-port water flow and zero-constriction reliability.
- When to Call Professional Help: Bring in a licensed plumber immediately if you are tying into main city municipal high-pressure lines, dealing with complex gas-to-water retrofits, or facing strict local municipal permitting laws.

Oscar Vance | Master Plumber & Drainage Expert
Meet Oscar Vance, a licensed master plumber sharing practical solutions on residential repairs, preventive maintenance, and thoughtful home upkeep.

