How to Estimate Plumbing Costs

Accurately estimating plumbing costs requires combining labor, materials, permits, and overhead into a clear, structured formula. Whether you are a professional contractor preparing a formal bid or a homeowner planning a major renovation, mastering this calculation prevents unexpected budget overruns and ensures project profitability.
The Plumbing Estimate Formula in One Line
Professional plumbing estimates rely on a standard calculation model that accounts for all direct and indirect expenses involved in completing the job successfully. Use the exact formula breakdown below for every project bid:
- Labor: Estimated hours multiplied by the hourly technician rate.
- Materials: Total wholesale or retail cost of pipes, fittings, fixtures, and supplies.
- Equipment: Rental costs for specialized machinery like trenchers, hydro-jets, or camera inspection units.
- Travel: Mileage, fuel surcharges, or mobilization fees for remote job sites.
- Permits: Local municipal inspection and licensing fees required by the building department.
- Contingency: A buffer of 10% to 15% allocated for unforeseen complications like hidden pipe corrosion.
- Markup: Combined overhead and profit margin percentage added to the subtotal.
What You Need Before You Start
Creating an accurate plumbing bid requires thorough pre-planning and a complete understanding of the job scope before quoting a final price. Gathering the right documentation and site data eliminates guesswork and protects profit margins.
- Detailed Project Scope: A room-by-room breakdown of all plumbing installations, repairs, or rerouting tasks.
- Site Access Assessment: Evaluation of crawlspaces, concrete slabs, or finished walls that impact labor time.
- Complete Fixture List: Exact specifications, brands, and model numbers for toilets, sinks, faucets, and water heaters.
- Local Labor Rates: Current regional market rates for apprentice, journeyman, and master plumbers.
- Municipal Code Requirements: Knowledge of local plumbing codes that dictate specific material and backflow prevention needs.
Who This Guide Is For
This comprehensive estimating guide serves distinct audiences with tailored insights designed to streamline financial planning and contract negotiations. Understanding your specific role ensures you apply the correct formulas and risk assessments.
- Professional Contractors: Learn how to calculate competitive plumbing bids, factor in accurate overhead, and protect your profit margins.
- Subcontractors: Streamline multi-trade coordination by accurately estimating standalone plumbing packages for larger general construction projects.
- Homeowners: Gain transparency into contractor pricing structures, validate project bids, and prepare accurate renovation budgets. (Homeowners planning a DIY approach or evaluating project feasibility should review Section 10 for detailed homeowner cost-saving strategies).
What Goes Into a Plumbing Estimate: The 7 Cost Components
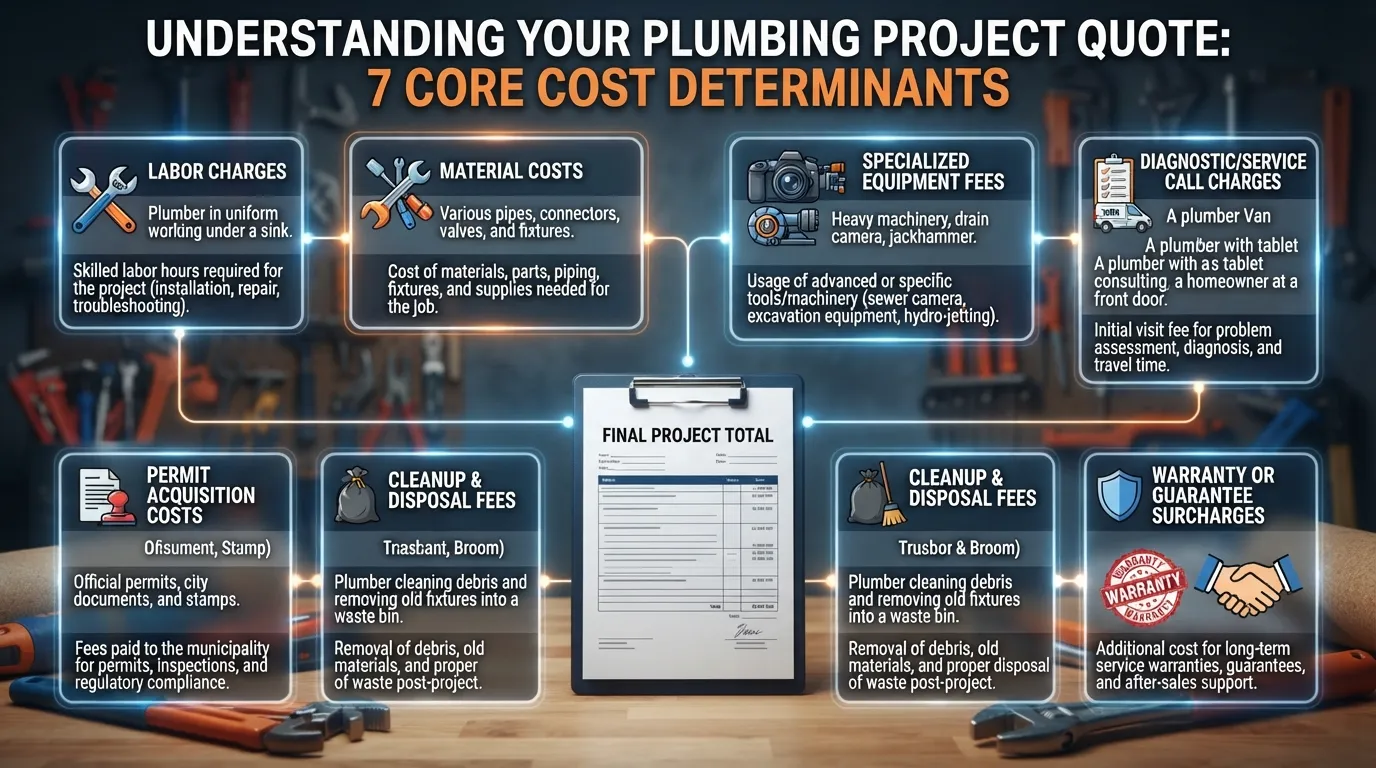
A comprehensive plumbing estimate accounts for seven distinct cost components, moving beyond basic parts and labor to protect overall contractor profitability. Breaking down these expenses accurately prevents under-bidding and ensures complete financial transparency for clients.
Labor Cost Hourly Wage vs Fully Loaded Labor Rate vs Billing Rate
Labor costs make up the bulk of a plumbing bid, but confusing base hourly wages with fully burdened labor rates destroys project profit margins. Contractors must bill for total employment costs rather than just technician take-home pay.
- Hourly Wage: The base pay rate given directly to the plumbing technician.
- Fully Burdened Labor Rate: Includes hourly wages plus benefits and payroll taxes, workers’ compensation, and insurance.
- Billing Rate: The final rate charged to the client, factoring in overhead rate and profit targets.
Material Costs
Material costs encompass all physical supplies needed to complete the installation, including hidden expenses like sales tax and shipping fees. Failing to account for supplier pricing fluctuations can quickly erode estimated margins.
- Pipes and Fittings: Copper, PEX, PVC, and brass components required for water supply and drainage.
- Fixtures and Valves: Toilets, sinks, faucets, and specialized shut-off valves.
- Taxes and Shipping: Sales tax on purchases and freight charges from wholesalers.
Equipment and Tool Costs
Specialized tools and heavy equipment rentals must be explicitly factored into estimates rather than absorbed as general business overhead. Equipment costs vary based on whether you own the machinery or require specific daily rentals.
- Heavy Machinery: Rental costs for trenchers, backhoes, and mini-excavators.
- Specialized Diagnostic Tools: Sewer camera inspection units and high-pressure hydro-jets.
- Tool Wear-and-Tear: Depreciation allowances for high-use core drills and threading machines.
Travel, Trip, and Call-Out Fees
Travel expenses compensate technicians for windshield time, vehicle maintenance, and fuel spent reaching distant job sites. Separating a trip fee or service call fee from labor ensures mobilization costs are fully covered.
- Service Call Fee: A flat dispatch charge covering initial travel and preliminary troubleshooting.
- Trip Fee: Additional mileage or fuel surcharges for remote job locations.
- Urban Logistics: Parking fees and toll expenses incurred in congested metropolitan areas.
Permit and Inspection Fees
Municipal permit fees are mandatory legal requirements for most major plumbing alterations and must be billed directly to the project. Skipping permits leads to severe fines, legal liabilities, and failed building department inspections.
- Building Department Permit: Official filing fees required before starting structural plumbing work.
- Inspection Charges: Municipal fees for rough-in and final plumbing safety sign-offs.
- Administrative Time: Labor hours spent submitting applications and coordinating with inspectors.
Overhead Expenses
Overhead expenses represent the fixed operational costs required to keep a plumbing business running day-to-day. Every job must contribute a calculated percentage toward these shared indirect expenses.
- Insurance and Licensing: General liability policies, bonding, and contractor license fees.
- Fleet Management: Vehicle payments, routine maintenance, and fuel expenses.
- Administrative Costs: Office software, dispatching services, and bookkeeping.
Profit Margin
Profit margin is the net financial return added to a project after covering all direct costs and allocated overhead expenses. Securing a healthy margin ensures business growth, payroll stability, and emergency capital reserves.
- Target Net Profit: Standard residential and commercial margins typically ranging from 15% to 20%.
- Risk Buffers: Additional percentage additions for complex remodeling or aging infrastructure.
- Reinvestment Capital: Funds reserved for business expansion and technology upgrades.
How to Estimate a Plumbing Job Step by Step
Mastering the step-by-step plumbing estimation process ensures precision, protects profit margins, and builds client trust through complete pricing transparency. Following a structured methodology prevents overlooked expenses and guarantees accurate bids for every project.
Step 1: Review the Scope and Do a Site Visit
Always review the contract scope and inspect the physical site thoroughly before examining blueprint drawings. Understanding client expectations and physical site constraints first prevents costly quoting errors and uncovers hidden job complexities.
- Analyze Contract Boundaries: Confirm whether you are pricing rough-ins only, finish plumbing, or underground excavations.
- Check Client Exclusions: Identify if major equipment like water heaters or circulation pumps are free-issued by the client.
- Perform Physical Site Inspections: Walk the job site to evaluate access limitations, existing pipe conditions, and connection points.
Step 2: Do a Material Takeoff
Perform a detailed material takeoff by measuring linear pipe runs and counting fixtures directly from architectural and schematic drawings. Apply standard waste allowances to account for cuts, threading, and material scrap.
- Measure Linear Meterage: Calculate total lengths for water supply, sanitary drainage, and gas piping systems [00:12:02].
- Count Primary Fixtures: Tally toilets, sinks, showers, and specialty drains from equipment schedules [00:12:45].
- Calculate Waste Factors: Add a 5% to 10% material buffer for pipe cuttings, fittings, and installation waste.
Step 3: Estimate Labor Hours
Calculate realistic labor hours based on historical productivity rates rather than wishful, fastest-possible installation times. Factor in job site disruptions, crew size, and the complexity of routing pipes through tight spaces.
- Establish Man-Hour Baselines: Use standard man-hours per unit installed for every specific plumbing activity [00:26:06].
- Account for Job Disruptions: Adjust productivity downwards for difficult access, multi-story setups, or shared work zones.
- Avoid Optimistic Speeds: Base estimates on average team execution speed to maintain profitability under pressure.
Step 4: Calculate Labor Cost
Multiply estimated total work hours by your fully burdened labor rate to determine actual personnel costs. Never use basic take-home wages, as they fail to cover mandatory employer payroll taxes and insurance overhead [00:28:20].
- Determine Fully Burdened Rates: Include base pay, workers’ compensation, payroll taxes, and employee benefits in your hourly figure [00:28:29].
- Multiply by Total Hours: Combine technician hourly costs with total calculated man-hours for the project lifecycle.
- Include Travel Time: Factor in mobilization and transit hours for remote or distant job locations [00:05:01].
Step 5: Add Materials, Equipment, Travel, and Permits
Aggregate all direct out-of-pocket project expenses into your working estimate subtotal before adding operational markups. Gather current supplier pricing to prevent sudden market spikes from eroding your margins [00:22:42].
- Compile Supplier Quotes: Collect current wholesale pricing for pipes, valves, fixtures, and specialty hardware.
- Include Equipment Rentals: Add daily or weekly rates for heavy machinery like trenchers and diagnostic cameras.
- Factor Municipal Fees: Include exact local building department permit and inspection fees.
Step 6: Add Contingency for Older Homes and Difficult Access
Build a strategic financial safety buffer into every estimate to absorb unexpected complications discovered during construction. Older properties and cramped structural layouts frequently introduce hidden expenses that eat away at project profits.
- Allocate Risk Buffers: Add a 10% to 15% contingency margin for renovation projects involving aging infrastructure.
- Account for Corroded Pipes: Anticipate broken cast iron lines, deteriorated framing, and non-compliant legacy plumbing.
- Cover Restricted Access: Buffer extra labor time for tight crawlspaces, concrete slab penetrations, and awkward retrofits.
Step 7: Apply Overhead and Profit
Add calculated percentages for general business overhead and target net profit to finalize your total project quote. Ensuring your markup covers fixed operating costs secures long-term business stability and growth capital.
- Calculate Overhead Share: Allocate a proportional percentage for insurance, fleet maintenance, and administrative software.
- Set Profit Targets: Add standard net profit margins ranging between 15% and 20% for residential and commercial jobs.
- Review Final Subtotal: Ensure the combined pricing structure covers all direct, indirect, and risk-adjusted expenses.
Step 8: Write the Quote
Present your final pricing in a professionally formatted formal proposal that outlines exact deliverables, exclusions, and terms. Clear contract phrasing prevents scope creep and eliminates misunderstandings between contractors and clients.
- Define Scope of Work: Clearly state what installations, systems, and areas are fully included in the bid [00:31:21].
- List Key Exclusions: Explicitly mention what work, materials, or finishes are excluded from the price [00:31:33].
- Specify Terms and Validity: Establish payment schedules, deposit requirements, and a strict expiration date for quote pricing.
Estimator’s Note What to Look For During Real Site Visits
Conducting an exhaustive physical site walkthrough is the single most critical step in preventing unbudgeted project losses. During an actual site inspection, professional estimators closely evaluate several vital environmental and structural factors:
- Main Water Shut-Off Condition: Inspect the primary valve operability and location to ensure emergency isolation is straightforward.
- Drainage Slope and Inverts: Check existing gravity drainage pitch levels to confirm proper wastewater flow without pooling risks.
- Electrical Bonding and Grounding: Verify that metal water pipes are properly bonded to the electrical system to maintain site safety compliance.
- Structural Penetration Paths: Identify existing core holes or framing cavities available for routing new supply and vent lines without structural damage.
Plumbing Estimate Example A Full Worked Calculation
Translating theoretical plumbing formulas into practical, real-world numbers eliminates guesswork and establishes professional pricing standards. This complete numeric breakdown illustrates exact cost accounting for a standard residential repair project.
Example Job: Water Heater Installation
Replacing a standard 50-gallon residential gas water heater involves a structured combination of labor hours, heavy equipment handling, specialty parts, and municipal safety permits. Clear itemization protects contractor profit margins while offering absolute price clarity to the homeowner.
- Project Overview: Removal of an existing failed water heater and installation of a new high-efficiency 50-gallon gas unit.
- Labor Requirements: Estimated 4 total man-hours split across two technicians for safe disconnection, flushing, tank swap, and venting.
- Regulatory Mandates: Requires a local municipal plumbing and gas line permit to ensure code compliance.
Example Job: Toilet Replacement
A standard residential toilet replacement represents a fast, straightforward flat-rate service call that involves minimal material inputs and quick turnaround times. Clean pricing structures for minor replacements build immediate trust and encourage repeat customer business.
- Project Overview: Disconnection and removal of an old cracking toilet, replacement of the wax ring and floor flange, and installation of a new dual-flush toilet.
- Labor Requirements: 1.5 total billable hours for a single journeyman plumber.
- Material Inputs: New toilet unit, wax ring kit, braided supply line, and disposal fees for the old porcelain fixture.
Line-by-Line Breakdown Table
How the Final Price Changes with a Buffer and an Emergency Surcharge
Project estimates shift dynamically when incorporating contingency risk buffers for older infrastructure or applying urgent after-hours dispatch multipliers. Factoring in these variables ensures contractors never lose money on difficult or untimely service calls.
- Adding a Contingency Buffer: Incorporating a 10% risk buffer ($155) for corroded gas lines or outdated shut-off valves raises the subtotal to $1,705 before final markup.
- Applying Emergency Surcharges: Urgent after-hours or weekend calls typically incur a 1.5x to 2x labor multiplier, driving hourly labor costs up to $190/hr and increasing total emergency billing by $380+.
- Final Profit Markup: Adding a standard 18% net profit margin on top of total operational costs yields a final presented customer quote of approximately $2,012.
Estimator’s Note: Actual vs. Estimated Job Costs
Comparing pre-job estimates against finalized post-job accounting sheets is the most effective way to refine future bidding accuracy. Tracking historical variances uncovers hidden operational leaks and improves estimation precision across all project types.
- Material Price Drift: Wholesale plumbing supply hikes frequently add an unbudgeted 5% to 8% variance if quotes are older than 30 days.
- Scope Creep Adjustments: Hidden framing rot or seized threaded fittings regularly push estimated labor hours 15% past initial projections.
- Data Feedback Loop: Logging actual labor hours spent versus estimated hours allows contractors to calibrate future man-hour baselines accurately.
Labor Hours and Material Takeoff How to Estimate Them Accurately
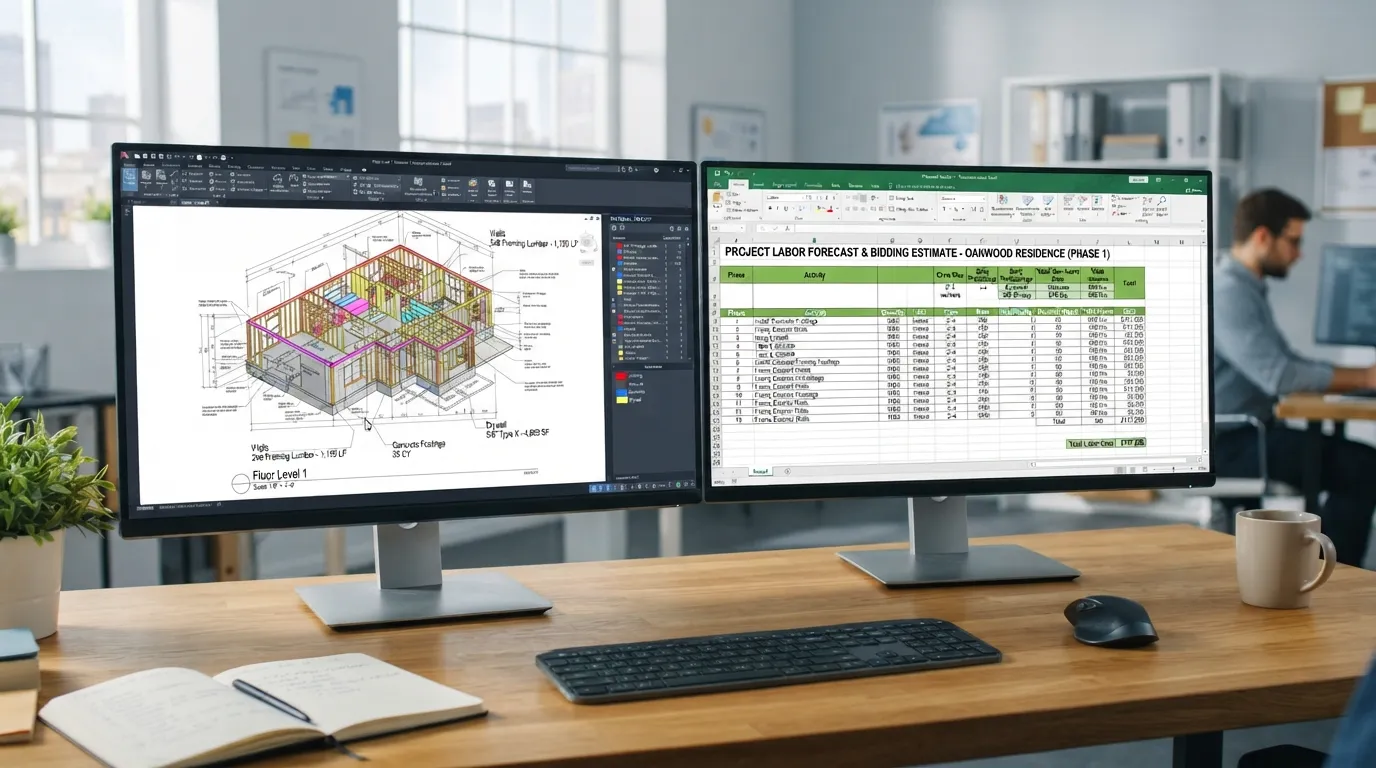
Achieving absolute precision in plumbing estimates relies on mastering structured labor hour formulas and accurate material takeoff techniques. Breaking down projects into discrete tasks eliminates guesswork, protects profit margins, and ensures reliable bidding accuracy across all scales of work.
How to Estimate Labor Hours by Task
Estimating labor requires assigning proven man-hour allocations to specific plumbing tasks rather than guessing total completion times. Utilizing standardized time metrics for individual operations ensures labor costs remain profitable and consistent.
Adjusting Hours for Crew Size Skill Level and Site Conditions
Raw labor estimates must be modified based on real-world variables such as crew composition, technician experience, and job site accessibility. Failing to adjust for operational friction leads directly to budget overruns and missed deadlines.
- Crew Balance: Pairing experienced journeymen with apprentices optimizes efficiency without doubling labor billing rates.
- Site Accessibility: Increase estimated hours by 15% to 25% for cramped crawlspaces, multi-story buildings, or active living areas.
- Skill Level Ratios: Account for slower installation speeds when training new apprentices on complex system layouts.
How to Count Fixtures and Fittings
Conducting a reliable fixture-count takeoff involves tallying primary plumbing units and anticipating secondary connection hardware. Systematic counting prevents material shortages and ensures complete billing alignment with architectural blueprints.
- Primary Unit Tally: Count toilets, sinks, showers, bathtubs, and water heaters directly from equipment schedules.
- Secondary Hardware: Factor in required shut-off valves, supply connectors, escutcheons, and mounting brackets for each fixture.
- Drainage Intersections: Map out all sanitary tee connections, cleanouts, and vent stack tie-ins during the count.
Pipe Takeoff Measuring Runs and Adding Waste Allowance
Accurate pipe takeoffs require precise linear measurement combined with calculated waste allowances to cover cutting scraps and installation errors. Measuring material runs systematically prevents costly mid-project supply reorders.
- Linear Measurement: Measure total lengths of water supply, drainage, and gas piping systems from scale drawings.
- Material Variation: Account for specific pipe types including rigid copper, flexible PEX, PVC, and legacy cast iron.
- Waste Allowance Buffer: Add a standard 5% to 10% material waste factor to cover off-cuts, threading loss, and fitting allowances.
Material Pricing Supplier Quotes vs Price Books
Sourcing material costs accurately requires balancing real-time supplier quotes against standardized internal pricing software. Relying on verified pricing structures protects profit margins against volatile wholesale market shifts.
- Wholesale Supplier Quotes: Secure active price quotes from 3 to 5 local suppliers for high-cost or specialized equipment.
- Standardized Price Books: Utilize updated software price books for fast-moving, high-frequency everyday repair parts.
- Quote Validity Checks: Match supplier price expiration dates against your project bid validity timeline to prevent unexpected cost spikes.
Markup vs. Margin How Much Should You Add?
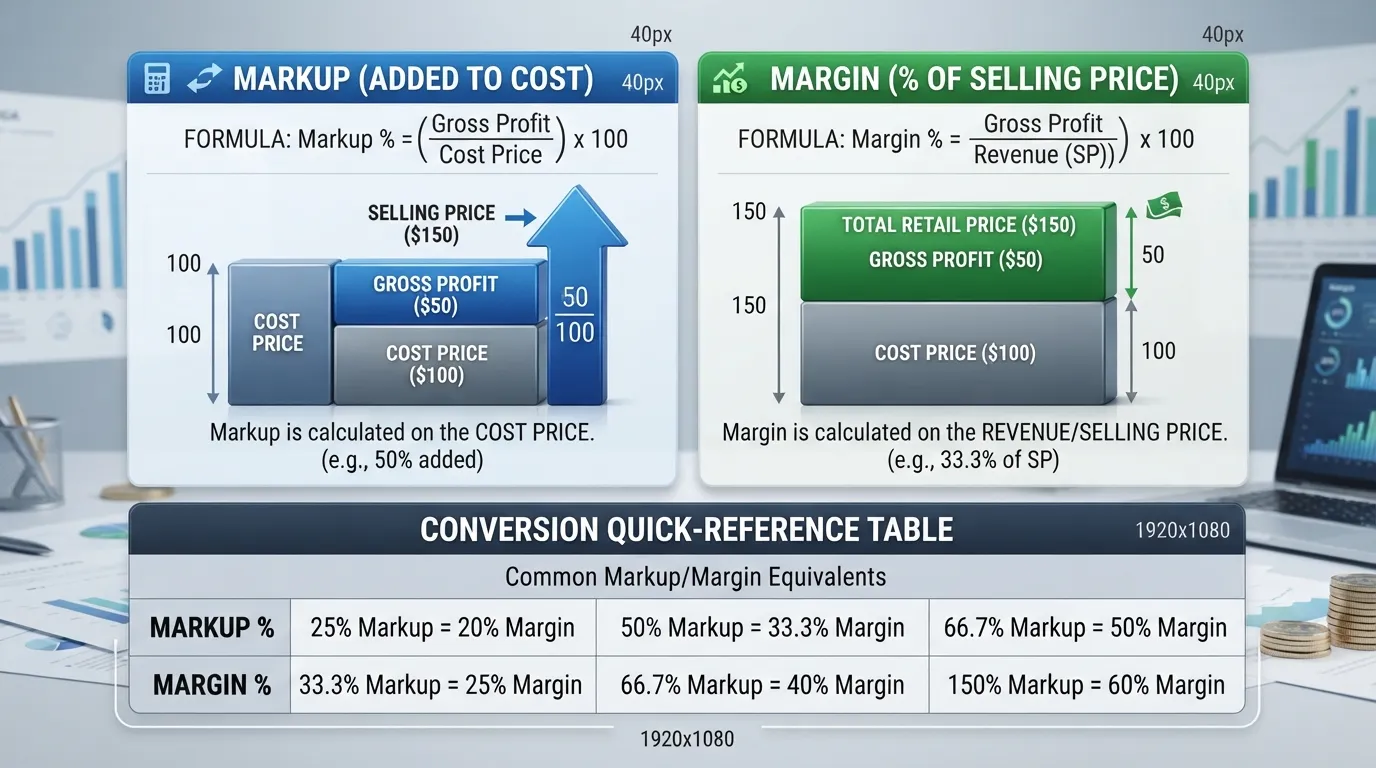
Confusing markup with gross margin is one of the most common financial errors plumbing contractors make, often resulting in silent profit erosion. Mastering the distinct calculations for overhead recovery and net return ensures every project hits target profitability goals.
Markup vs. Margin: The Difference
While both terms relate to the price charged above job costs, they calculate percentages using different denominators. Understanding this mathematical distinction prevents severe under-pricing on competitive bids.
- Markup Percentage: Calculated by adding a percentage directly on top of total job costs (e.g., $100 cost plus 25% markup equals a $125 final price).
- Gross Margin Percentage: Represents the percentage of the final sale price that equals gross profit ($25 profit divided by $125 price equals a 20% margin).
- Revenue Perspective: Margin looks inward at what percentage of revenue is profit, while markup looks outward at how much is added to costs.
How to Hit a Target Margin
To achieve a specific profit margin, contractors cannot simply add that same percentage as a markup; they must calculate the correct reciprocal multiplier. Failing to adjust this formula guarantees your net profit will fall short of expectations.
- The Conversion Rule: To achieve a 25% net profit margin, you must apply a 33.3% markup to your total project costs ($100 divided by (1 – 0.25)).
- Common Multipliers: A 40% target margin requires a 66.7% cost markup to cover overhead and ensure desired take-home returns.
- Pricing Consistency: Program your estimating software to automatically calculate selling prices using margin targets rather than arbitrary markups.
Typical Markup Ranges for Materials Labor and Subcontracted Work
Different cost categories carry unique operational risks and administrative overhead, requiring tiered markup ranges to maintain financial balance. Industry benchmarks help calibrate competitive yet profitable pricing models.
- Material Markup: Typically ranges from 15% to 30% to cover warehouse storage, delivery logistics, and inventory warranty risks.
- Labor Markup: Often ranges from 50% to 100% (or uses a fully burdened hourly rate) to absorb indirect employee costs and downtime.
- Subcontracted Work: Usually marked up 10% to 15% to manage coordination, scheduling, and primary contractor liability.
How to Calculate Your Own Overhead Rate
Determining your exact overhead rate requires analyzing annual fixed business expenses and dividing them by total billable labor hours or direct project costs. Accurate overhead recovery protects your business from cash flow crunches during slow seasons.
- Fixed Cost Aggregation: Total annual rent, insurance, vehicle payments, software subscriptions, and administrative salaries.
- Allocation Method: Divide total annual overhead by expected annual direct labor hours or total direct project costs.
- Overhead Recovery Factor: Add this calculated hourly or percentage factor to every job bid before applying net profit margins.
Estimator’s Note: How Incorrect Markup Destroys Profit
Applying a markup intended for gross margin directly to job costs creates a dangerous shortfall in expected business revenue. Reviewing past financial statements often reveals why gross revenue targets failed to produce net cash growth.
- The 20% Miscalculation Mistake: Adding a 20% markup on a $1,000 job yields $1,200, netting only $200 (a 16.7% margin instead of the assumed 20%).
- Overhead Absorption Failure: When margins slip due to markup confusion, fixed overhead costs eat directly into your targeted net profit.
- Corrective Accounting: Always audit your pricing formulas quarterly to ensure actual margins match your business growth plans.
Hourly vs. Flat-Rate vs. Time & Materials Which Pricing Model to Use
Selecting the right pricing model is crucial for balancing operational risk, customer satisfaction, and business profitability. Choosing between hourly, flat-rate, and time-and-materials structures depends directly on the scope and predictability of each plumbing project.
Hourly Billing: Pros Cons and When to Use It
Hourly billing charges clients a set rate per hour for the technician’s time on site plus material costs. While straightforward to calculate, it often penalizes efficient workers and creates friction with homeowners anxious about open-ended invoices.
- Pros: Ideal for diagnostic work, troubleshooting complex legacy systems, and unpredictable jobs where the final scope is unclear.
- Cons: Punishes speed and efficiency, transfers all workflow risk to the customer, and frequently triggers billing disputes.
- When to Use It: Best reserved for diagnostic troubleshooting, exploratory wall openings, or highly custom commercial renovations.
Flat-Rate Fixed-Price Quotes Pros Cons and When to Use It
Flat-rate pricing offers customers a single fixed price for a defined scope of work before any tools come out of the truck. Utilizing standardized price books builds immediate customer trust and rewards efficient technicians.
- Pros: Absolute price clarity for homeowners, higher profit potential for fast work, and faster quote approvals on site.
- Cons: Requires precise pre-job scoping to prevent unexpected complications from eating into fixed margins.
- When to Use It: Perfect for standard residential service and repair tasks like toilet swaps, water heater installs, and drain clearing.
Time & Materials T&M
Time and materials contracts bill the client separately for actual hours worked, material costs incurred, and equipment rentals used. This model is standard for large-scale commercial builds where scope changes happen frequently.
- Contract Protection: Eliminates contractor financial risk on fluid construction schedules or unmapped utility layouts.
- Detailed Invoicing: Requires transparent record-keeping of receipts, sign-off sheets, and daily labor logs.
- Change Order Integration: Simplifies billing adjustments when structural surprises require extra material or labor.
Emergency Weekend and After-Hours Surcharges
Urgent late-night or weekend calls require specialized pricing multipliers to compensate for disrupted schedules and hazardous working conditions. Standard emergency pricing usually incorporates a dispatch fee plus a labor rate multiplier (Housecall Pro, 2026).
- Emergency Dispatch Fee: A flat upfront fee ranging from $150 to $350 to mobilize a technician after standard operating hours.
- Labor Rate Multipliers: Applying a 1.5x to 3x multiplier to standard hourly rates, driving emergency labor between $200 and $400+ per hour.
- Holiday Surcharges: Premium holiday dispatch rates that account for double-time payroll obligations and restricted supply house access.
Pricing Model Comparison
Common Flat-Rate Benchmarks for Residential Jobs
Establishing reliable flat-rate benchmarks gives plumbing businesses predictable revenue while offering customers clear upfront expectations. Current 2026 U.S. residential pricing guides outline standard regional ranges for common repair tasks (Housecall Pro, 2026).
- Leaky Faucet Repair / Replacement: Typically ranges from $150 to $450 depending on fixture complexity and shut-off accessibility.
- Drain Clog Clearing (Snaking): Standard branch line clearing ranges between $125 and $350 based on pipe depth and cleanout access.
- Toilet Replacement: Complete removal and reinstallation ranges from $250 to $800 including wax ring and supply line updates.
- Water Heater Installation: Standard 50-gallon tank replacements average $1,200 to $2,500 complete with permits and disposal.
- Accessible Pipe Repair: Fixing a localized pinhole leak or burst section in an exposed area ranges from $150 to $400.
- Tub and Shower Valve Swap: Rebuilding or replacing behind-the-wall mixing valves ranges from $300 to $850 due to wall access constraints.
Estimating Special Jobs: Repipe New Construction and Whole-House Plumbing
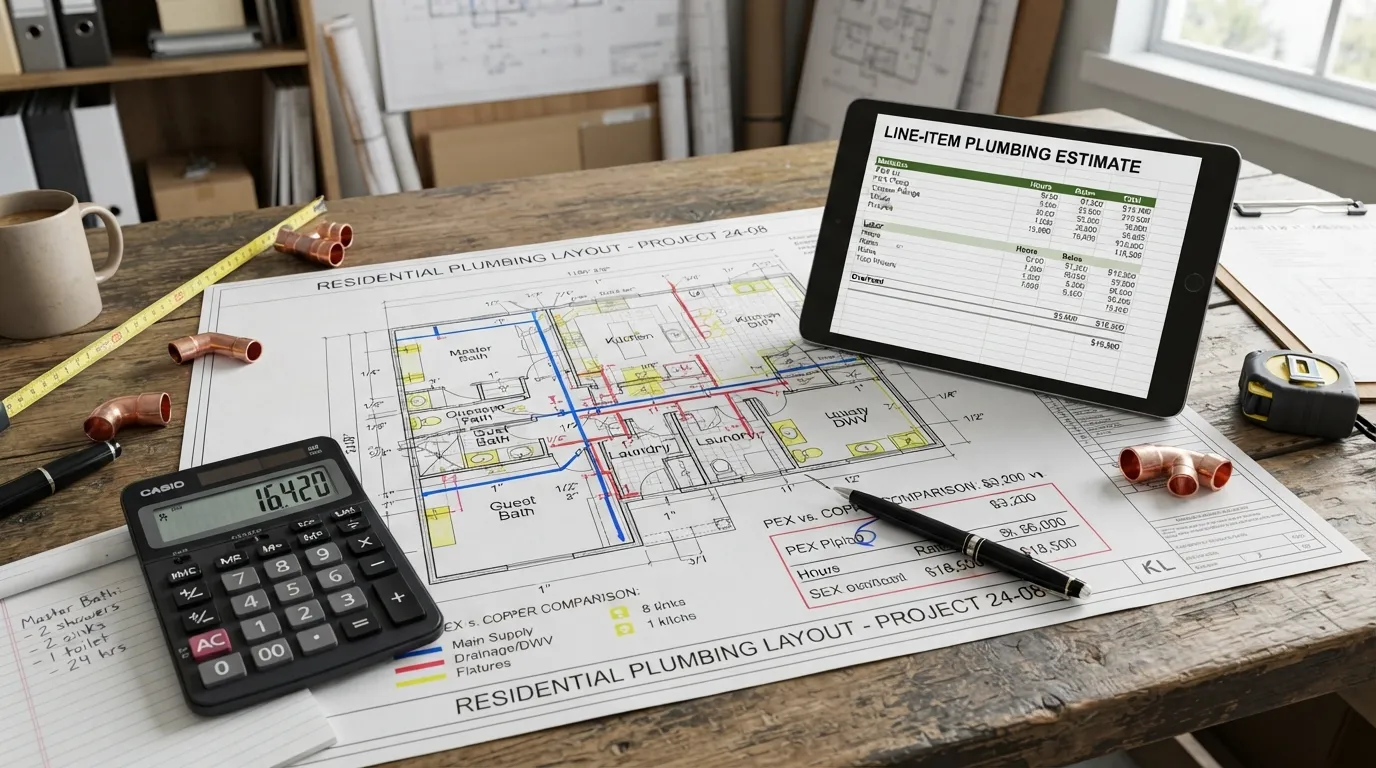
Specialized plumbing projects such as whole-house repipes and new construction builds require shifting away from standard service-call methods toward comprehensive system-wide estimates. Accurately scoping these large projects prevents catastrophic margin erosion and secures project bids.
How to Estimate Plumbing for a Whole-House Repipe
Whole-house repiping estimates depend heavily on linear footage calculations, pipe material selection, and structural wall accessibility. Because every opening cut requires drywall repair, patching labor must be factored directly into the bid.
- Material Assessment: Choose between flexible PEX piping for cost efficiency or copper for premium longevity and value retention.
- Access and Demolition: Evaluate whether supply lines run through crawlspaces, attics, or concrete slabs, as cutting through walls significantly increases labor overhead.
- Fixture Reconnection Count: Tally every fixture stop, water heater tie-in, and washing machine box to ensure complete system integration.
How to Estimate Plumbing for New Construction Per-Fixture vs Per-Square-Foot Method
New construction projects are traditionally estimated using either a granular per-fixture takeoff or a baseline per-square-foot rule of thumb. Combining both methods acts as a critical safety check to ensure your total bid accurately reflects installation complexity.
- Per-Fixture Method: Multiply the total count of rough-in fixtures by standardized unit costs, covering drainage, waste, and vent (DWV) lines simultaneously.
- Per-Square-Foot Method: Apply regional baseline rates ranging from $4.00 to $8.00+ per square foot depending on layout density and fixture grades.
- Phased Delivery: Break billing milestones into distinct construction stages: under-slab rough-in, top-out framing, and final trim-out.
Example: Estimating Plumbing for a 2,000 sq ft House
A standard 2,000 square foot home with two to three bathrooms serves as a prime benchmark for evaluating complete new construction plumbing costs using verified industry pricing models.
- Square Footage Cross-Check: At a standard benchmark rate of $4.50 per square foot, a 2,000 sq ft home yields a baseline estimate of approximately $9,000.
- Fixture-Count Breakdown: Factoring an average of 15 fixtures at $250 to $500 per rough-in unit produces a subtotal range of $3,750 to $7,500 for rough-in labor and materials.
- Total All-In Range: Adding trim-out execution, water heater integration, and service connection fees brings the complete project target to between $8,000 and $12,000.
Commercial Plumbing Estimates What Changes
Commercial plumbing estimations introduce strict engineering specifications, complex multi-story DWV systems, and rigorous regulatory compliance codes. Transitioning from residential bids to commercial projects requires adjusting your estimating formulas.
- Code and Compliance: Factor in mandatory ADA fixture requirements, commercial-grade grease interceptors, and backflow prevention assemblies.
- Material Scale: Account for heavy-duty cast iron piping, commercial water heaters, and engineered hanging support systems.
- Subcontractor Coordination: Incorporate scheduling buffers for overlapping trade work on large-scale commercial job sites.
Why Per-Square-Foot Rules of Thumb Can Mislead
Relying exclusively on square footage metrics without analyzing blueprint layouts can easily skew your pricing and ruin profit margins. Floor plan design dictates actual pipe length and labor intensity far more than overall footprint size.
- Fixture Density Variations: A compact 1,500 sq ft home with three luxury bathrooms requires significantly more plumbing work than a sprawling 2,500 sq ft open-concept ranch with only one and a half baths.
- Multi-Story Vertical Runs: Vertical stack placement across multiple floors increases labor friction and material requirements compared to single-story slab layouts.
- Layout Dispersion: Wet walls grouped closely together reduce material runs, whereas split-wing architectural designs drastically increase piping and trenching costs.
What Makes Plumbing Costs Go Up or Down: Regional and Job Factors
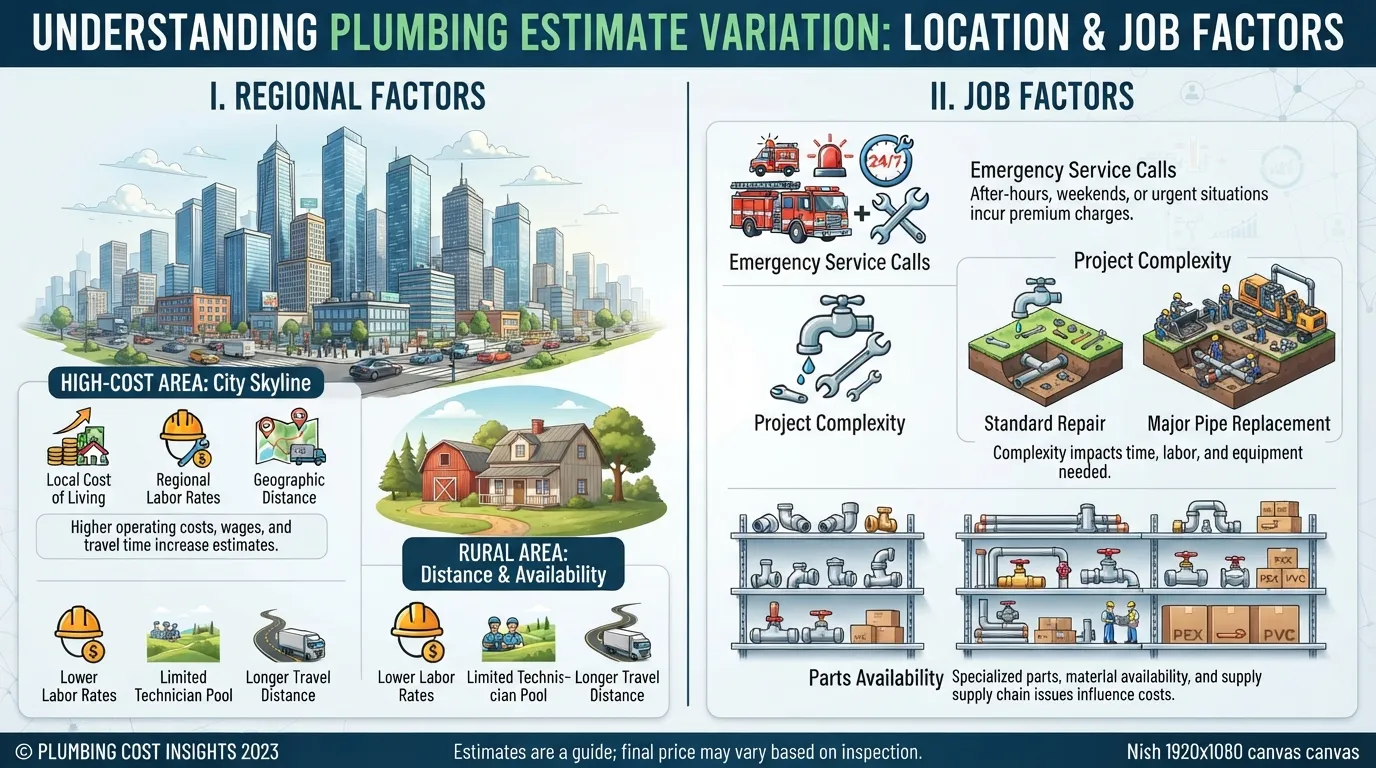
Plumbing project costs fluctuate significantly based on regional wage variations, local municipal regulations, and job-specific physical challenges. Understanding these core drivers allows contractors to adjust their estimates dynamically and maintain profitability across diverse markets.
Labor Rates by Region
Geographic location is one of the most volatile variables in any plumbing estimate due to regional cost-of-living differences, union density, and local market demand. Comparing high-cost metropolitan hubs with lower-cost regions highlights why standardized national pricing formulas fail.
- High-Cost Metros (California & Northeast): States like California, New York, and Massachusetts feature elevated cost-of-living adjustments, stringent environmental mandates, and strong union presence, driving billable contractor rates considerably higher.
- Moderate-Cost Regions (Texas & Sunbelt): Fast-growing southern markets like Texas often experience higher labor availability and competitive contractor pricing, though rapid growth frequently strains local supply chains.
- National Baselines: Referencing verified national plumber wage data helps contractors benchmark base compensation against broader economic trends.
Permit Fees and Local Code Requirements
Municipal bureaucracy directly impacts project overhead through mandatory permit fees, plan-check wait times, and strict local plumbing code enforcement. Ignoring these localized compliance requirements risks costly fines and failed inspections.
- Permit Expense Variability: Local municipalities charge anywhere from $50 for minor water heater swaps to over $1,000 for complex whole-house repipes or new sewer tap-ins.
- Code Complexity: Stricter regional codes—such as seismic bracing mandates in California or mandatory backflow preventers—add necessary material and labor expenses to every bid.
- Inspection Delays: Factoring in mandatory mid-project inspection pauses prevents scheduling bottlenecks and keeps job timelines realistic.
Older Homes Corroded Pipes and Hard-to-Reach Areas
Renovating legacy structures introduces hidden operational risks that can quickly derail standard estimation models. Unforeseen physical obstacles require built-in contingency buffers to protect labor margins.
- Legacy Material Hazards: Working with brittle galvanized steel, degrading cast iron stacks, or obsolete polybutylene piping demands extra time for careful extraction and transition fitting.
- Restricted Access Points: Cramped crawlspaces, low-clearance attics, and tight utility chases dramatically reduce technician productivity and slow down pipe runs.
- Contingency Buffers: Always add a 10% to 15% contingency margin when bidding on vintage residential properties to absorb hidden structural surprises.
Material Choice PEX vs Copper Fixture Quality
The choice of piping materials and architectural fixture grades dictates both baseline material costs and installation speed. Balancing client budget expectations with material performance is essential for a competitive proposal.
- PEX vs Copper: Flexible PEX piping cuts installation labor times significantly compared to rigid copper, which requires extensive torch soldering and structural hangers.
- Fixture Tiering: Standard contractor-grade fixtures streamline mounting and replacement, whereas luxury designer fixtures often demand complex, proprietary mounting hardware.
- Supply Chain Stability: Accounting for ongoing material price volatility ensures that quotes remain profitable even if wholesale costs spike mid-project.
Licensing Level and Experience
The credential tier of the technicians performing the work directly correlates with hourly billing rates and overhead costs. Properly scaling team experience matches labor expenses to job complexity.
- Apprentice Support: Utilizing lower-cost apprentices for heavy lifting and basic trenching lowers overall blended labor costs.
- Journeyman Execution: Certified journeymen handle standard installations and diagnostics efficiently while meeting local code standards.
- Master Plumber Oversight: Complex commercial builds and custom system designs require master-level sign-offs, carrying higher professional labor billing values.
Seasonality and Supplier Price Changes
Plumbing demand fluctuates dramatically throughout the year, driven by seasonal weather extremes and wholesale material inflation. Staying ahead of these market cycles protects your business from sudden cash crunches.
- Weather-Driven Surges: Freezing winter weather triggers massive spikes in emergency burst pipe calls, allowing premium after-hours pricing models.
- Quarterly Material Inflation: Wholesale manufacturers frequently adjust copper, PVC, and brass pricing quarterly, requiring regular updates to internal price books.
- Capacity Planning: Adjusting gross margin targets during slower shoulder seasons helps absorb fixed overhead costs when emergency call volume dips.
Is This Plumbing Quote Fair? A Homeowner’s Checklist
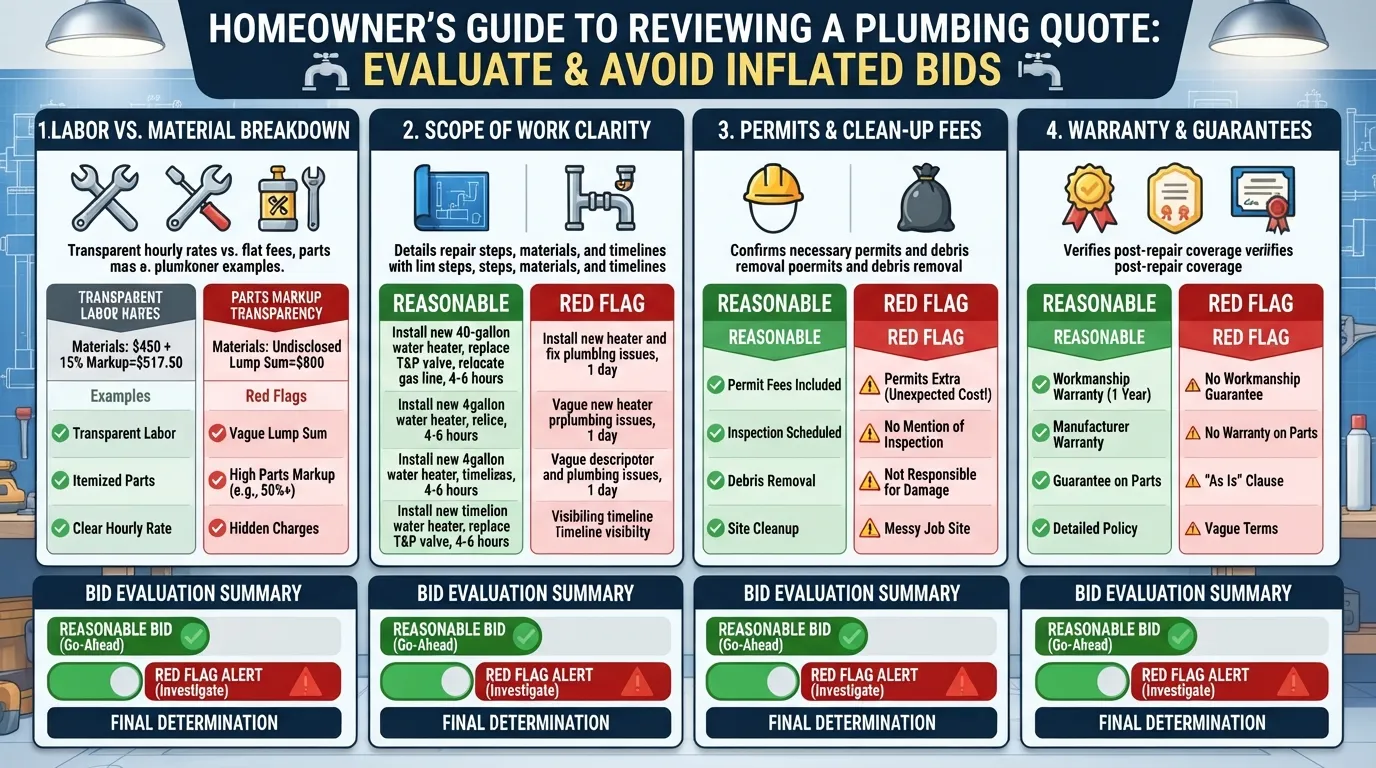
Navigating home repairs can be stressful, especially when evaluating contractor bids for unexpected plumbing issues. Knowing what constitutes a transparent, fair estimate protects homeowners from overpaying while ensuring quality workmanship.
What a Fair Plumbing Quote Should Include
A professional plumbing estimate should provide complete clarity so both parties understand the exact scope of work before tools come out of the truck. Transparency in a proposal builds immediate trust and prevents unexpected invoice surprises.
- Itemized Cost Breakdown: Clear separation between labor charges, specific material parts, and applicable municipal fees.
- Scope of Work Description: A detailed written explanation of the exact repairs, replacements, or installations being performed.
- Warranty and Guarantees: Explicit documentation covering workmanship guarantees and manufacturer part warranties.
Red Flags of an Overpriced or Vague Estimate
Spotting warning signs early helps homeowners avoid dishonest contractors and predatory pricing practices. Vague paperwork or high-pressure tactics are primary indicators of a substandard quote.
- Blanket Lump-Sum Bids: Refusal to provide a written breakdown of material versus labor expenses.
- High-Pressure Tactics: Demanding immediate cash payment or signing on the spot using manufactured urgency.
- Unlicensed Operators: Inability to provide proof of state contractor licensing, bonding, and general liability insurance.
Do Plumbers Give Free Estimates?
Many residential plumbing companies offer free estimates for standard installations or straightforward replacements, but diagnostic service calls usually carry a fee. Understanding the difference between a sales quote and a diagnostic fee prevents billing friction.
- Standard Installations: Upfront pricing quotes for scheduled replacements like water heaters or new toilets are frequently free.
- Diagnostic Trip Fees: Investigating hidden leaks or complex sewer backups requires specialized labor, justifying a dispatch or diagnostic fee ranging from $75 to $200.
- Fee Crediting: Many reputable plumbers apply the initial diagnostic fee toward the total cost of the repair if you approve the work.
What Is the Current Rate for a Plumber?
Plumbing service rates vary based on technician experience tier, licensing level, and regional cost-of-living adjustments across the United States. Current 2026 industry tracking establishes clear hourly billing ranges for residential service calls (HomeAdvisor, 2026).
- Apprentice Plumbers: Typically bill between $45 and $85 per hour for basic support and supervised assist work.
- Licensed Journeymen: Standard professional rates range from $100 to $200+ per hour for independent diagnostics and repairs.
- Master Plumbers: Highly certified specialists command $150 to $300+ per hour for complex system engineering and commercial oversight.
How to Compare Multiple Quotes
Gathering three separate quotes is the most effective defense against overpaying for residential plumbing services. Comparing bids requires evaluating total project value rather than simply selecting the lowest price.
- Apples-to-Apples Scope: Ensure all competing contractors are bidding on the exact same material grades and repair scope.
- Evaluating Discrepancies: Investigate why a quote is drastically lower or higher than the others, checking for missed permit fees or inferior parts.
- Reviewing Contractor Reputations: Cross-reference low bids with verified online customer reviews, licensing verification, and insurance standing.
Questions to Ask Before You Hire
Asking targeted pre-hire questions ensures your chosen plumber is fully qualified, insured, and accountable for the completed work. Establishing these details upfront protects your property investment.
- Are you fully licensed, bonded, and insured for plumbing work in this state?
- Does this project require pulling a local municipal permit, and is that fee included in your quote?
- What specific warranty do you offer on labor workmanship and replacement parts?
Free Plumbing Estimate Template and Calculator
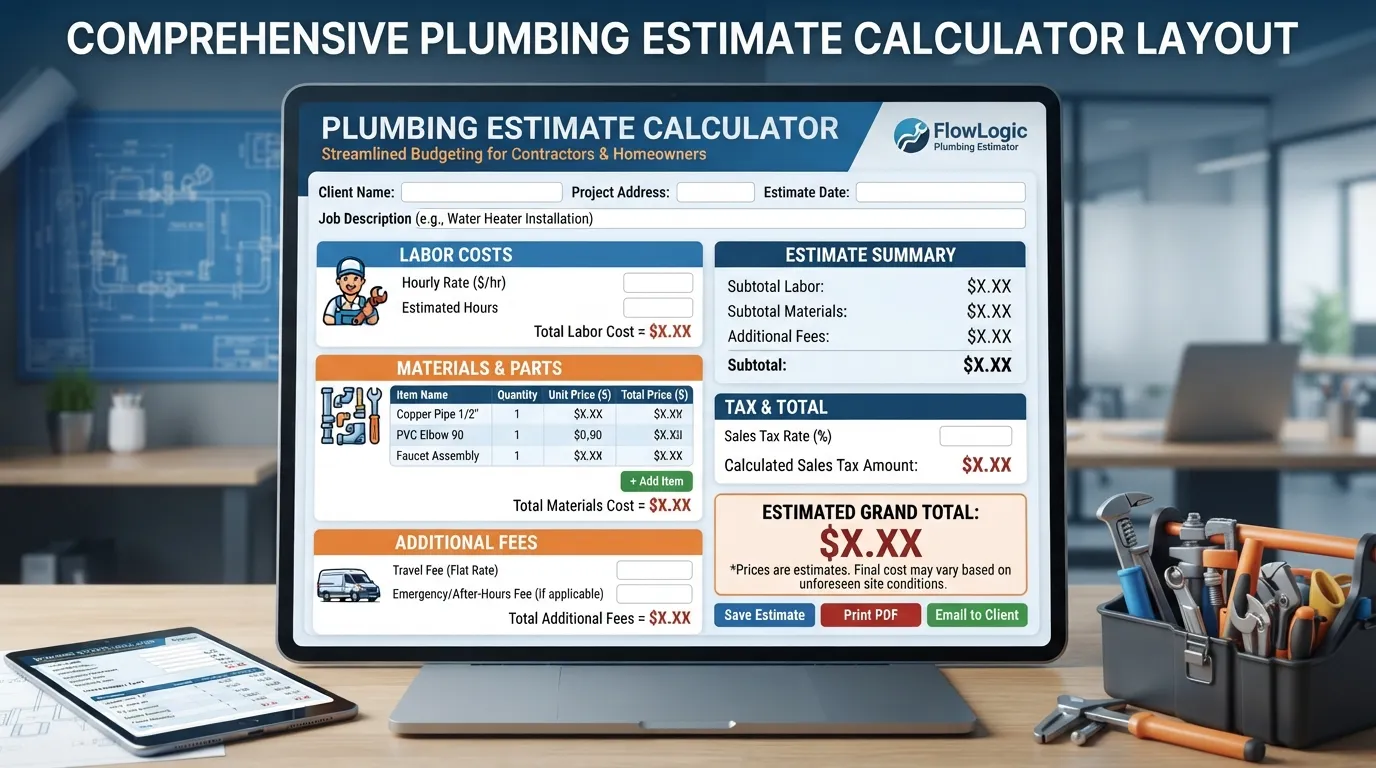
Providing clear, professional estimates is essential for winning client trust and closing jobs quickly. Utilizing standardized templates and calculators ensures your pricing remains consistent, profitable, and transparent across every residential and commercial project.
Free Plumbing Estimate Template
Having a ready-to-use estimate template saves valuable administrative time and ensures critical legal and financial details are never overlooked. Contractors can easily download or replicate this standard format for PDF export or spreadsheet use.
- Digital Accessibility: Download our customizable plumbing estimate template in Excel (.xlsx) or export directly to a professional PDF layout.
- Brand Customization: Easily insert your company logo, license numbers, and insurance details at the top of the document.
- Standardized Formatting: Pre-structured sections for labor, materials, and taxes prevent calculation errors during on-site quoting.
Simple Plumbing Estimate Calculator
Using a dynamic estimation calculator helps technicians compute accurate project totals instantly while standing in front of the customer. Integrating a dependable formula structure eliminates manual math mistakes and protects profit margins.
- Input Automation: Enter material costs, estimated labor hours, and your overhead markup percentage to instantly generate a final client price.
- Tiered Multipliers: Automatically apply standard material markups (e.g., 20%) alongside labor rate calculations.
- Downloadable Tools: Utilize our companion desktop and mobile-friendly spreadsheet calculator to streamline daily bidding operations.
What Every Estimate Document Should Include
A legally sound and professional estimate document must contain specific tracking and terms to protect both the contractor and the homeowner. Omitting core details can lead to billing disputes or unenforceable project agreements.
- Unique Estimate Number & Date: Essential tracking metrics for your accounting software and client communications.
- Detailed Scope of Work: A precise written description outlining exactly what repairs or installations are included.
- Itemized Costs & Terms: Clear separation of labor, parts, municipal permit fees, applicable taxes, and payment terms (e.g., 50% deposit, 50% upon completion).
- Quote Expiry Date: A strict validity window (typically 30 days) to guard against volatile wholesale material price fluctuations.
Estimating Software vs. Spreadsheets Which One to Choose
Deciding whether to use traditional spreadsheets or dedicated field-service software depends on the scale of your plumbing business and your team’s workflow needs. Both approaches offer distinct advantages for managing bids and job costing.
- Spreadsheets (Excel, Google Sheets): Ideal for new or solo contractors looking for zero monthly software fees, complete customization freedom, and deep control over complex formula calculations.
- Dedicated Estimating Software (ServiceTitan, Housecall Pro, Jobber): Best for growing teams needing automated dispatching, integrated flat-rate price books, instant mobile invoicing, and digital client approval signatures.
- Cost vs. Efficiency: While spreadsheets require manual updates, specialized software streamlines office workflows at the cost of recurring monthly subscription fees.
Common Plumbing Estimating Mistakes and How to Avoid Them
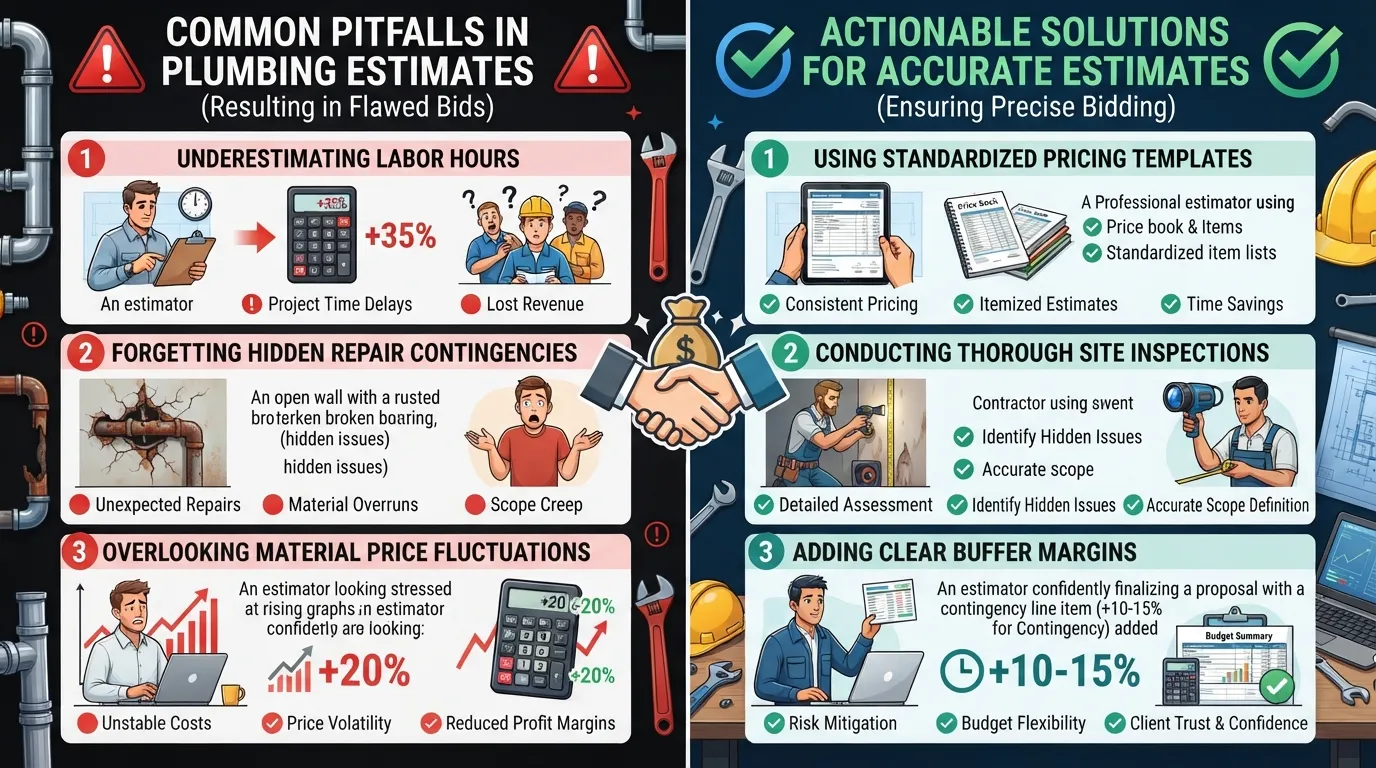
Even experienced plumbing contractors can fall into costly financial traps if their estimating process lacks rigorous discipline. Recognizing and correcting these frequent miscalculations ensures every project protects profit margins and delivers predictable revenue.
Underestimating Labor Hours
One of the most frequent errors in plumbing bids is assuming technicians will work at peak efficiency without any job site interruptions. Failing to account for logistical delays, material retrieval runs, or complex layout snags quickly burns through projected labor profits.
- The Optimism Bias: Estimating completion times based on ideal lab conditions rather than messy, real-world retrofit environments.
- Ignoring Prep and Travel: Forgetting to factor in time spent loading trucks, setting up safety gear, and cleaning up work areas.
- Solution: Track historical job times using field software to establish realistic baseline hours for each specific service task.
Forgetting Permits Trip Fees or Waste Allowance
Overlooking small peripheral expenses can silently bleed cash across dozens of service calls throughout the year. Treating permits and material scraps as afterthoughts guarantees your net profit will fall short of expectations.
- Unbilled Permits: Forgetting local municipal plan-check fees and inspection costs in major repair or installation bids.
- Zero Waste Buffers: Failing to include a standard 5% to 10% material waste allowance for pipe cutting and fitting scrap.
- Solution: Build standard administrative add-ons and material waste factors directly into your automated estimating spreadsheet templates.
Confusing Markup with Margin
Applying a percentage markup directly onto costs when you intended to secure a specific gross profit margin leaves money on the table. This math error makes your business vulnerable to unexpected overhead increases.
- The Shortfall Effect: Adding a 20% markup thinking it represents a 20% margin, resulting in a lower net return than planned.
- Overhead Absorption Risk: Inadequate gross profit generation fails to cover fixed business expenses like insurance and vehicle fleets.
- Solution: Always use precise margin-to-markup conversion formulas to verify that final client pricing hits target profit goals.
No Contingency for Older Homes
Vintage residential properties hide countless structural surprises behind walls and beneath concrete slabs that can double your labor hours instantly. Bidding fixed prices on legacy systems without a safety buffer invites disaster.
- Legacy Material Hazards: Encountering brittle galvanized pipes, crumbling cast iron, or obsolete fittings that break during extraction.
- Hidden Code Violations: Discovering non-compliant venting or framing that must be corrected before new plumbing can be tied in.
- Solution: Include a mandatory 10% to 15% contingency buffer explicitly written into contracts for homes built before 1980.
Vague Scope and No Exclusions
Providing ambiguous project descriptions invites endless homeowner questions, scope creep, and bitter disputes over what was included in the original price. Clear boundaries keep projects profitable and clients satisfied.
- Unbounded Expectations: Leaving drywall repair, painting, or finish carpentry undefined in a plumbing repipe quote.
- Missing Exclusions: Failing to list what is not included (e.g., repairing pre-existing code violations or landscaping damage).
- Solution: Detail an explicit scope of work section paired with a comprehensive exclusions list on every signed estimate.
Not Updating Material Prices
Relying on outdated static price books during periods of wholesale supply chain volatility can turn a profitable installation into a net-loss job. Copper, brass, and PVC pricing fluctuates constantly based on global market conditions.
- Stale Price Lists: Using material costs from six months ago without checking current distributor wholesale rates.
- Quote Expiration Failures: Honoring open-ended project bids long after supplier price quotes have expired.
- Solution: Implement strict 30-day expiration windows on all major estimates and update internal material pricing databases quarterly.
Estimator’s Note Learning From Real World Pricing Errors
A classic field mistake involves bidding a commercial tenant finish project using raw material costs without accounting for strict after-hours delivery restrictions. Because the building prohibited daytime material loading, technicians had to haul pipe manually up three flights of stairs during restricted night shifts, tripling expected labor hours. That painful lesson permanently changed our estimating protocol: always evaluate job site logistical constraints, parking limitations, and working hour rules before finalizing any commercial labor calculation.
Frequently Asked Questions
Quick answers to the most common questions plumbing contractors and homeowners ask about estimating costs, pricing models, and project bids.
How do I estimate plumbing costs?
Estimating plumbing costs requires calculating direct material takeoffs, labor hours by task, and applicable overhead markups. Combine itemized fixture counts with linear pipe measurements and local labor wage rates to build a profitable, data-backed project total.
How do I quote a plumbing job?
To quote a plumbing job accurately, define a clear scope of work, itemize labor and material expenses, and apply your target gross profit margin. Present the final proposal in writing with a defined validity period to secure client approval.
How to do a plumbing estimate?
Start your plumbing estimate by reviewing architectural blueprints or conducting an on-site diagnostic inspection. Count all fixtures, measure pipe runs, multiply by standard task labor hours, add material waste allowances, and include overhead recovery factors.
What is the current rate for a plumber?
Current residential plumbing service rates range from $45 to $85 per hour for apprentices, $100 to $200+ per hour for licensed journeymen, and $150 to $300+ per hour for master plumbers, depending on regional labor markets.
Do plumbing companies give free estimates?
Many plumbing companies offer free upfront quotes for scheduled standard installations like water heaters or toilet replacements. However, diagnostic service calls involving hidden leak detection or complex troubleshooting typically carry a trip fee.
How much does plumbing cost for a 2,000 sq ft house?
Complete new construction plumbing for a 2,000 square foot home typically ranges between $8,000 and $12,000. This estimate depends on fixture counts, bathroom density, piping materials, and local municipal permit fees.
How much does it cost to redo plumbing in a 1,500 sq ft house?
Rewrapping or repiping an existing 1,500 square foot house generally costs between $4,500 and $9,000. Total expenses vary based on wall accessibility, pipe material choice (PEX vs copper), and necessary drywall repair labor.
How to tell if your plumber is overcharging you?
You can identify potential overcharging by requesting an itemized quote that clearly separates labor, materials, and trip fees. Comparing multiple independent bids ensures your pricing aligns with fair regional market rates.
How to avoid getting ripped off by a plumber?
Protect yourself by hiring licensed, bonded, and insured contractors, verifying written scopes of work before starting, and avoiding high-pressure cash demands. Always secure three separate quotes for major repairs.
How do you estimate man-hours for plumbing work?
Estimate man-hours by breaking projects into discrete tasks like rough-in framing, pipe running, and fixture trim. Multiply each task by historical productivity benchmarks and adjust for crew skill levels and job site accessibility.
What software is used for plumbing estimating?
Contractors use specialized field-service software like ServiceTitan, Housecall Pro, and Jobber for automated quoting and price books, while others rely on custom Excel or Google Sheets templates for detailed job costing.
Conclusion and Next Steps
Mastering plumbing estimating is an ongoing process that directly separates thriving, profitable contracting businesses from those struggling with cash flow. By implementing structured labor hour calculations, accurate material takeoffs, and disciplined markup strategies, you protect your margins and build long-term client trust.
The 7-Step Estimating Checklist
Reviewing these core operational pillars ensures every project bid remains accurate, competitive, and profitable from initial inspection to final invoice sign-off.
- 1. Systemic Takeoffs: Conduct precise fixture counts and linear pipe measurements using standardized blueprints or site visits.
- 2. Task-Wise Labor Hours: Multiply individual operational tasks by historical productivity benchmarks rather than guessing total completion times.
- 3. Accurate Pricing & Margins: Apply correct markup formulas to hit true target gross margins and fully recover business overhead expenses.
- 4. Model Selection: Choose the appropriate pricing structure—flat-rate, hourly, or time-and-materials—based on job predictability and scope.
- 5. Regional & Site Adjustments: Factor in local labor rates, municipal permit fees, and vintage home contingency buffers.
- 6. Professional Documentation: Present transparent, itemized estimates with clear scopes of work, exclusions, and quote expiry dates.
- 7. Ongoing Tracking: Audit past job costs regularly to refine your estimating spreadsheet or software price books over time.
Your Next Step
Stop leaving money on the table with guesswork and start bidding with absolute precision today.
- Download Your Resources: Grab our professional plumbing estimate template and companion calculator to streamline your next client proposal.
- Refine Your Process: Implement structured task-wise labor tracking and margin-based pricing models across your entire service team.

Oscar Vance | Master Plumber & Drainage Expert
Meet Oscar Vance, a licensed master plumber sharing practical solutions on residential repairs, preventive maintenance, and thoughtful home upkeep.

