Immediate Solutions and Diagnostics When Your Faucet Runs Dry
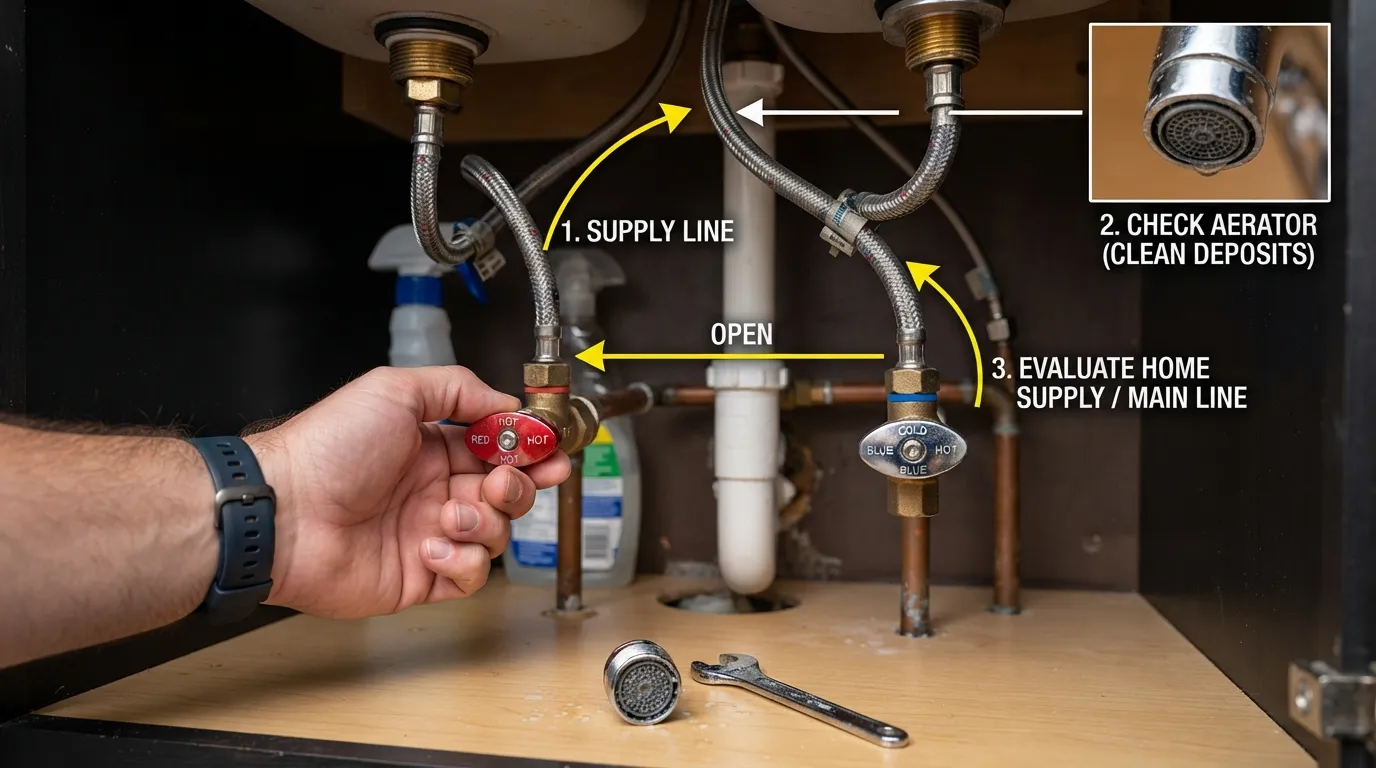
When water suddenly stops flowing from your faucet, the issue typically stems from a closed shut-off valve, a clogged aerator, a temporary main water supply interruption, a faulty pressure regulator, or a frozen pipe. Pinpoint the root cause quickly by testing other plumbing fixtures throughout your home to determine whether the disruption is localized to a single fixture or affecting the entire property.
Common Reasons Water Isn’t Coming Out of Your Faucet
Review this rapid diagnostic checklist to identify the exact mechanical or supply failure preventing water delivery at your sink:
- Closed Shut-Off Valve: Inspect the under-sink valves to ensure both the hot and cold supply handles are fully turned counter-clockwise into the open position.
- Clogged Aerator: Mineral scale, sediment, and debris often accumulate inside the faucet’s tip, completely blocking water pressure and stream output.
- Main Water Supply Interruption: Check exterior spigots or nearby showers; if multiple fixtures lack water, the municipal line or your home’s main water supply valve may be shut off.
- Faulty Pressure Regulator: A broken or failing pressure-reducing valve can drastically restrict flow, reducing water pressure across your entire plumbing system.
- Frozen Pipe: During sub-freezing temperatures, exposed water lines can freeze solid, blocking liquid transmission until safely thawed.
First Diagnostic Step Is It One Faucet or the Whole House?
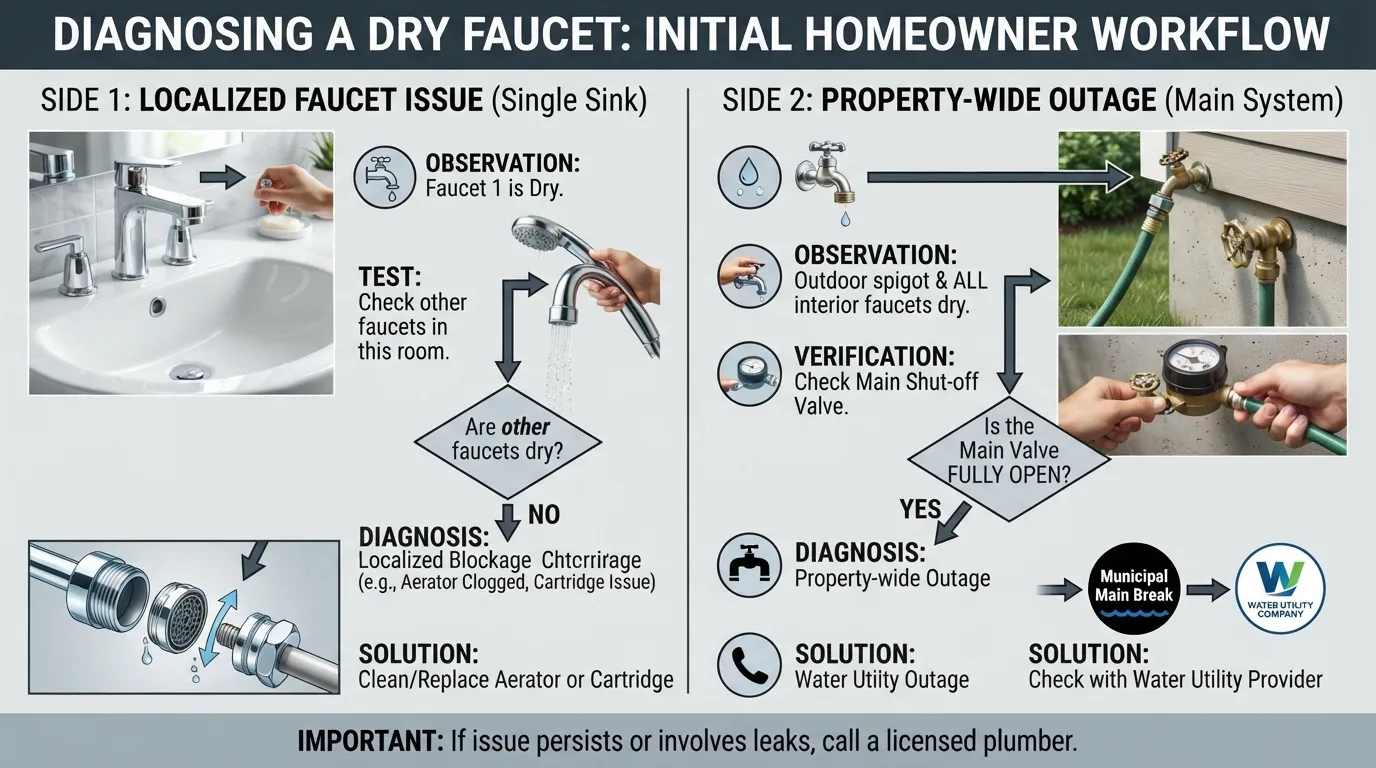
Differentiating between a localized fixture failure and a total household water outage is the fastest way to isolate the problem. Testing multiple water sources helps you determine whether you need to service an individual sink component or investigate your main supply line.
Test Other Faucets & Flush the Toilet
Perform a quick walk-through of your property to evaluate the scope of the water loss before attempting any plumbing repairs. Checking multiple areas isolates the fault to either a single hardware assembly or your home’s central infrastructure.
- Turn on nearby bathroom and kitchen sinks to see if hot, cold, or both lines are affected.
- Test your shower or bathtub valves to check for consistent water pressure throughout the plumbing grid.
- Flush a toilet and observe how rapidly the tank refills to verify active water delivery to major fixtures.
- Check outdoor hose bibs or spigots to determine if the issue extends outside your immediate living space.
If No Water Anywhere in the House
A complete lack of water across every fixture usually points to a central supply failure rather than an issue with your specific sink. Look for these major infrastructure culprits when your entire property goes dry:
- Inspect your home’s main shut-off valve, typically located near the water meter or where the main pipe enters the foundation, to ensure it is fully open.
- Contact your local utility provider or check neighborhood alerts to confirm whether a municipal water main break or emergency repair is underway.
- Verify that your property’s pressure regulator has not seized or completely failed, which cuts off supply to all internal lines.
If Only One Faucet Is Affected
When surrounding fixtures operate normally while a single sink runs completely dry, the problem is isolated to that specific hardware location. Narrow down the culprit by examining these localized points of failure:
- Check the individual hot and cold shut-off valves hidden directly beneath the affected sink basin.
- Inspect the flexible supply lines connecting the wall valves to the faucet base for kinks, sharp bends, or severe internal blockages.
- Examine the faucet cartridge, stem, or internal mixing valve for mechanical failure or trapped debris.
Core Causes Shut-Off Valves Aerators & Cartridges
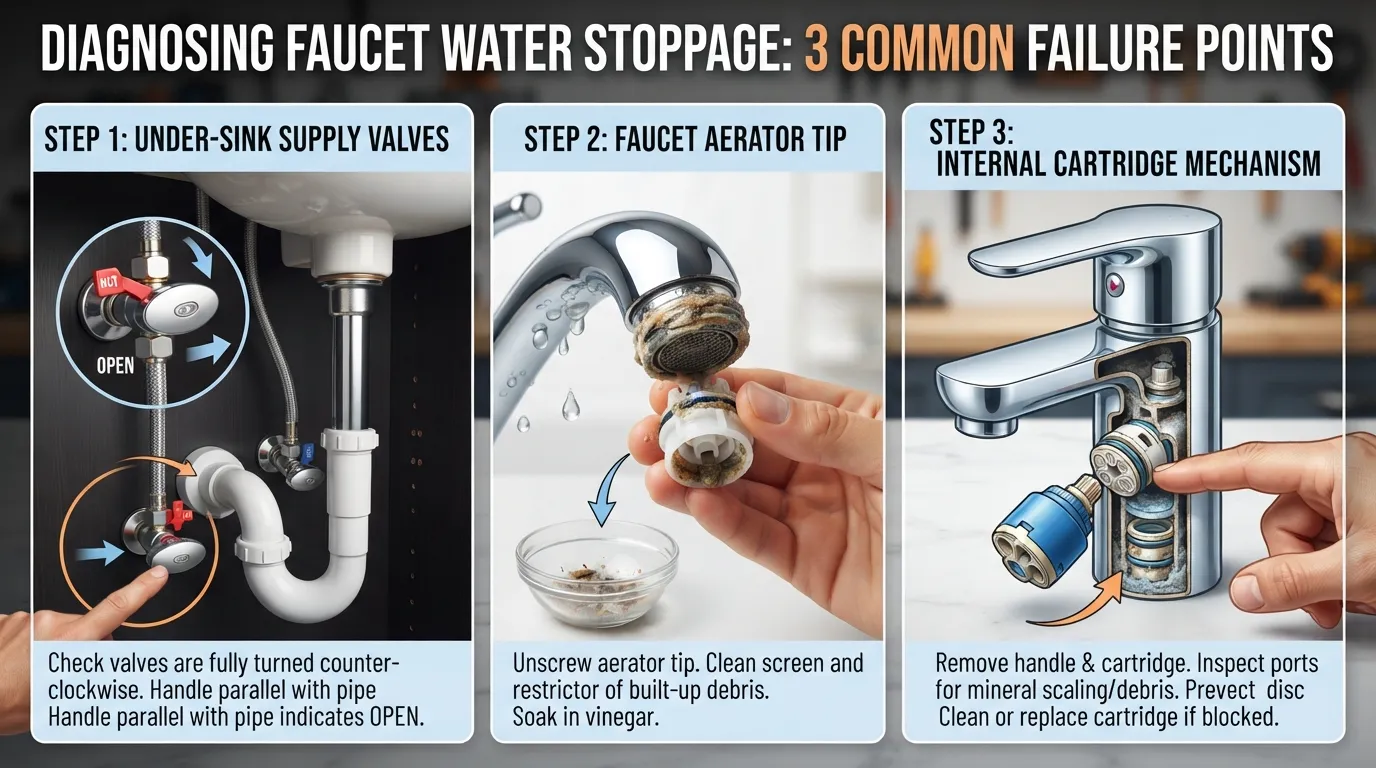
When a specific fixture fails to deliver water, mechanical obstructions and valve malfunctions are typically to blame. Systematically inspecting these core components helps you pinpoint the blockage and restore normal flow without unnecessary plumbing expenses.
Closed or Partially Open Shut-Off Valve Hot & Cold
Supply valves beneath sinks can accidentally get bumped, partially closed during previous maintenance, or seized over time due to mineral corrosion. Inspecting these mechanical connection points ensures that your water lines are fully open and unrestricted [00:02:03].
- Locate the hot and cold supply handles under the affected sink basin, remembering that the hot supply is typically on the left and the cold is on the right [00:02:03].
- Rotate both handles completely counter-clockwise to ensure they are fully open and allowing maximum water flow.
- If a valve is stuck or fails to turn smoothly, avoid forcing it with excessive torque to prevent snapping the internal stem.
Clogged Aerator Mineral Sediment Buildup Vinegar Cleaning
Hard water minerals, rust particles, and pipe debris frequently travel up the line and accumulate inside the faucet aerator tip, choking off water pressure entirely [00:03:38]. Cleaning this mesh screen is a quick fix that often resolves low-flow and no-flow issues instantly [00:04:49].
- Wrap a cloth around the aerator housing and gently unscrew it counter-clockwise using pliers to avoid scratching the finish.
- Inspect the internal mesh screen and washers for trapped sediment, sand, or white calcium buildup [00:03:58].
- Submerge the components in a small container of warm white vinegar for 15 to 30 minutes to dissolve mineral deposits, then scrub clean with an old toothbrush.
Stuck or Faulty Cartridge Diverter
If your supply valves and aerator are completely clear yet the faucet still yields no water, the internal cartridge or diverter mechanism may be jammed or broken [00:05:03]. Mineral scaling inside the mixing valve can lock the internal stems in place, blocking water transit to the spout.
- Turn off the main water supply to the sink before dismantling any part of the faucet body.
- Remove the decorative handle cap, loosen the handle screw, and pull off the lever to expose the internal cartridge assembly.
- Pull out the cartridge, inspect it for broken seals or heavy scaling, and soak it in vinegar or replace it entirely if damaged.
Failed Pressure Regulator PRV
When multiple fixtures throughout the house experience a sudden drop in pressure or restricted flow, a failing pressure-reducing valve (PRV) is often the culprit. The internal spring mechanism inside the PRV can degrade over time, restricting incoming municipal water pressure below functional levels.
- Locate your home’s main pressure regulator, typically situated near the main water shut-off valve where the supply line enters your home.
- Test the system pressure using a standard water pressure gauge attached to an outdoor hose bib.
- If the pressure reads abnormally low and adjusting the top calibration bolt yields no change, contact a licensed plumber to replace the faulty regulator.
Hot Water Not Working But Cold Is Fine or Vice Versa
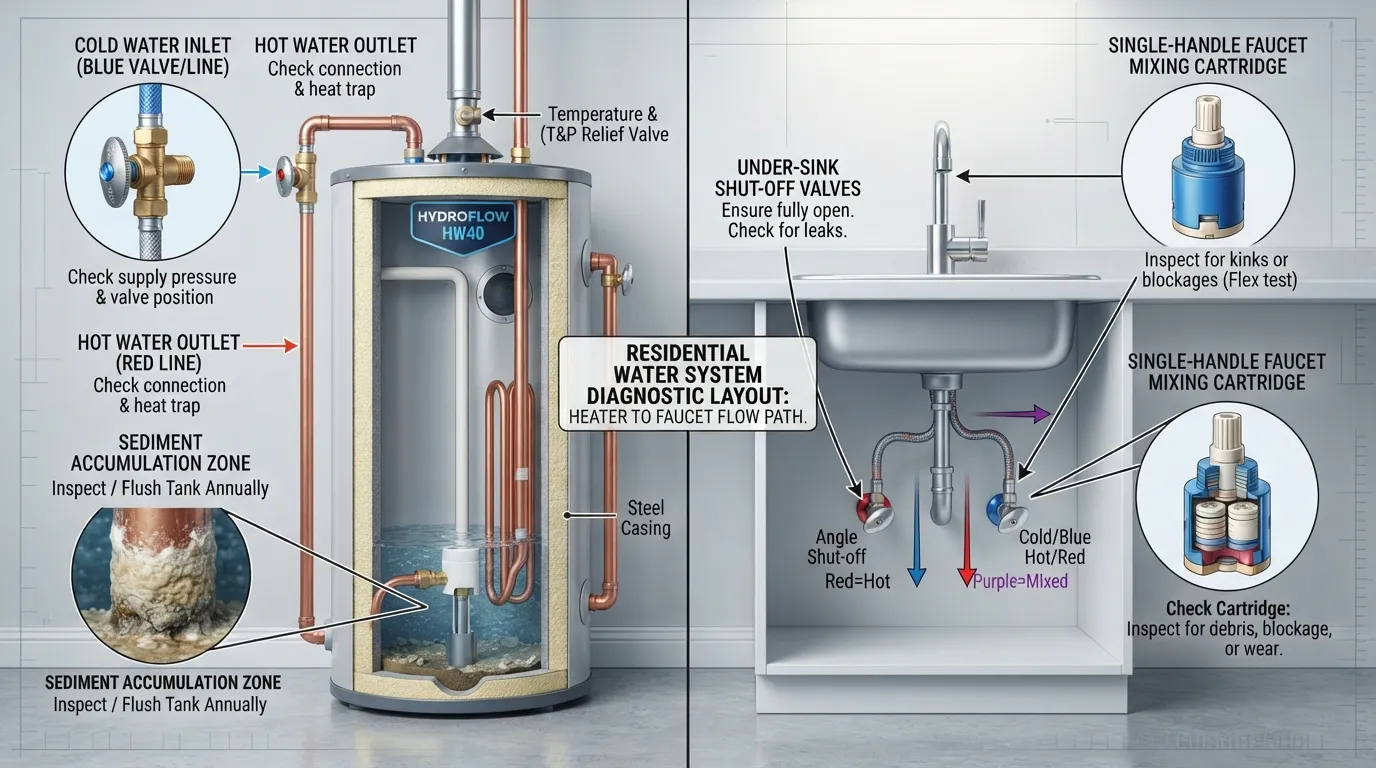
When cold water flows normally from your faucet but the hot side yields nothing, the issue is isolated to your home’s water heating system or the dedicated hot supply line. Investigating these specific thermal components helps you quickly identify why hot water delivery has halted.
Water Heater Shut-Off Valve Check
Accidentally bumping or failing to fully reopen the shut-off valves connected to your water heater during routine maintenance will instantly halt hot water throughout your property. Verifying these valves ensures that water can freely enter and exit the heating tank.
- Locate the cold water inlet valve on top of your water heater and confirm it is completely open to allow incoming supply.
- Check the hot water outlet valve on the tank to ensure it is fully turned on and directing heated water into your home supply lines.
- Inspect any inline isolation valves installed along the main hot water pipe run for accidental closures.
Sediment Buildup Inside the Water Heater Tank
Hard water minerals naturally precipitate out of solution over time, settling at the bottom of the water heater tank and choking off internal components. This heavy sediment layer can block the dip tube or plug the hot water outlet pipe entirely.
- Flush your water heater tank annually to drain accumulated mineral sediment and prevent severe internal blockages.
- Inspect the tank’s dip tube for structural deterioration, as a broken dip tube forces cold water straight out the hot side without letting it heat up.
- Listen for rumbling or popping noises inside the tank, which signal heavy sediment buildup obstructing thermal transfer.
Faulty Hot Water Cartridge
When the water heater functions properly and delivers hot water to other rooms, a single sink lacking hot water points to a localized mixing failure. Internal cartridge components can become warped or clogged by localized mineral scaling specific to the hot line.
- Shut off the water supply beneath the affected sink and remove the faucet handle to access the mixing cartridge.
- Examine the hot water inlet port on the cartridge body for lodged mineral flakes, debris, or rubber seal damage.
- Soak the cartridge in a warm vinegar solution to clear internal blockages or swap out the assembly if the internal thermal channels remain blocked.
Well Water Faucet Issues Special Case
Homes supplied by private well water systems face unique mechanical variables compared to municipal lines. When a well water faucet runs dry, the disruption often points directly to pump failure, electrical interruptions, pressure switch malfunctions, or a waterlogged pressure tank.
Well Pump Not Running or Tripped Breaker
Submersible or jet well pumps rely on dedicated heavy-duty electrical circuits that can occasionally trip due to power surges or motor overheating. Verifying your power supply is the quickest way to determine if your well system is actively running.
- Locate your home’s main electrical panel and check for a tripped double-pole circuit breaker dedicated to the well pump.
- If the breaker has tripped, reset it once, but do not repeatedly force it if it trips again immediately, as this signals an electrical short or motor burnout.
- Check the pressure switch contact points to see if they are engaging when system pressure drops.
Faulty Pressure Switch
The pressure switch acts as the mechanical brain of your well system, telling the pump when to turn on and off based on household water demand. Mineral buildup or burnt contact points inside the switch can prevent it from sending the signal to pump water.
- Remove the plastic cover on the pressure switch and inspect the metal contacts for corrosion, insect nesting, or carbon buildup.
- Use a thin piece of emery cloth or fine sandpaper to gently clean the electrical contacts if they appear fouled.
- Carefully clear any tiny sediment clogs inside the small copper or plastic tube connecting the switch to the water line.
Waterlogged Pressure Tank
A standard well pressure tank contains an internal bladder that maintains stable water pressure throughout your plumbing lines. When this bladder fails or the tank becomes completely waterlogged, your system experiences severe pressure fluctuations and intermittent flow at the faucets.
- Test the Schrader valve on top of the pressure tank using a standard tire pressure gauge to check internal air charge.
- If water spurts out of the Schrader valve, the internal rubber bladder has ruptured and the tank must be replaced.
- Drain the tank completely and re-pressurize it to the correct PSI rating if it has simply lost its air charge.
When to Reset vs When to Call a Well Technician
Knowing when to handle simple adjustments versus hiring a professional prevents costly equipment damage and ensures your water safety. Minor fixes like resetting a breaker or cleaning points differ greatly from deep mechanical well failures.
- DIY Safe Zones: Resetting a single tripped breaker, cleaning pressure switch contacts, or clearing aerator screens are safe homeowner tasks.
- Call a Professional When: You encounter burnt pump motors, ruptured pressure tanks, dry wells, or wiring faults requiring specialized high-voltage testing tools.
- Warning Sign: If your well pump runs continuously without building pressure, shut it off immediately to prevent total pump burnout.
Gurgling Sounds & Air Lock in the Pipes
When you open your taps and hear a distinct gurgling, sputtering, or rushing wind sound instead of a steady stream, trapped air or a vapor lock is likely disrupting your plumbing. These air pockets compress inside the lines, acting as an invisible barrier that completely blocks or severely restricts water flow to your fixtures.
What Causes Air Locks in Plumbing
Air locks typically occur after your water supply has been temporarily shut off for home repairs, municipal maintenance, or plumbing upgrades. When the lines are drained and refilled, pockets of air become trapped at high points throughout the piping network.
- Main water supply shutdowns that allow empty pipes to fill with air pockets as pressure re-enters the system.
- High plumbing loops or complex overhead pipe runs where buoyant air naturally rises and gets trapped without an escape route.
- Sudden pressure drops that draw air into horizontal pipe runs through loose joints or faulty fixture valves.
How to Release Trapped Air Safely
Purging trapped air from your home plumbing network requires bleeding the lines systematically from the lowest point to the highest fixture. Follow this step-by-step procedure to eliminate air locks and restore smooth water flow:
- Turn off all faucets and water-using appliances throughout your home to re-establish a closed, pressurized system.
- Locate the lowest fixture in your home, such as a basement utility sink or a ground-floor bathtub, and open both the hot and cold handles fully.
- Move sequentially to the highest fixtures in your house, opening each tap to allow the compressed air to hiss, sputter, and escape.
- Let the water run continuously for two to three minutes at each location until the sputtering stops and a smooth, uninterrupted stream flows from every spout.
Low Pressure or Just a Dribble Not Fully No Water
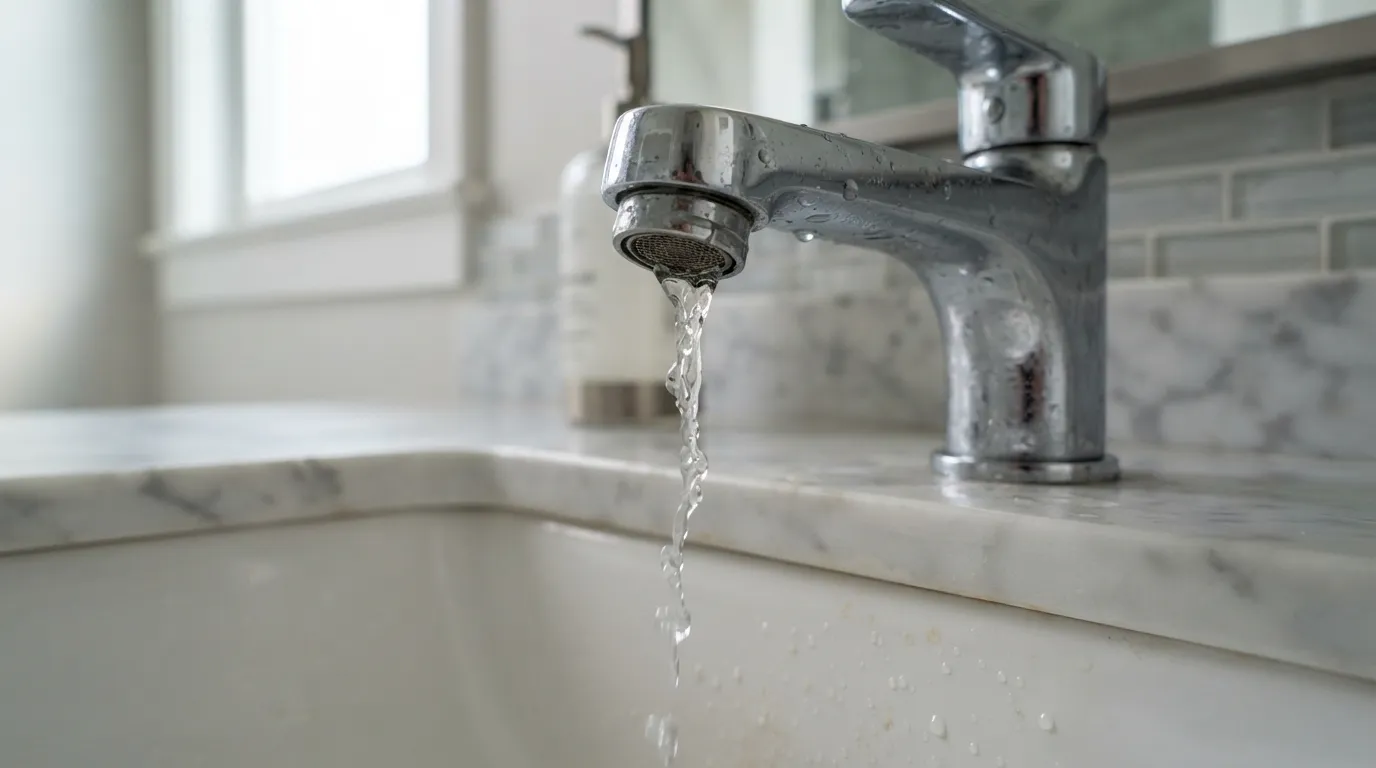
When water trickles out rather than stopping completely, the issue typically points to a partial obstruction, a failing pressure reducer, or internal pipe corrosion rather than a total supply cutoff. Differentiating between a complete blockage and partial restriction helps you focus on cleaning or replacing the right components.
Partial Clog vs Complete Blockage
Mineral scale, solder debris from past plumbing work, or degrading rubber washers often create a partial dam inside supply lines or cartridge assemblies. This partial barrier allows a tiny stream of water through while severely choking overall volume and pressure.
- Inspect flexible braided supply lines for sharp kinks or twists that constrict interior water volume.
- Check the internal flow restrictor or eco-gasket built into modern faucet spouts, which can trap fine debris.
- Disconnect the supply hoses beneath the sink and test water flow directly into a bucket to see if the restriction is inside the faucet or the wall lines.
Pressure Loss From Municipal Supply
If every faucet in your home exhibits a sudden drop in pressure rather than just one sink, the limitation may originate outside your property. Local water utility work, high-demand peak hours, or municipal supply restrictions can temporarily reduce incoming pressure.
- Check with immediate neighbors to see if they are experiencing similar pressure drops on their properties.
- Review local utility notifications for scheduled main repairs or emergency system upgrades in your area.
- Inspect your main water meter valve to ensure it is fully open and not partially restricted.
Fixture Age & Pipe Corrosion
Older galvanized steel pipes accumulate heavy internal rust and mineral scaling over decades of use, shrinking the inner diameter of the pipe until water flow is reduced to a crawl. Aging faucets can also suffer from internal mineral adhesion that blocks internal waterways.
- Examine exposed piping in your basement or utility room for signs of external rust, flaking, or discoloration.
- Consider replacing outdated galvanized pipes with modern PEX or copper plumbing to restore full flow capacity.
- Upgrade older faucets whose internal waterways have become permanently choked by decades of hard water scaling.
Brown or Dirty Water
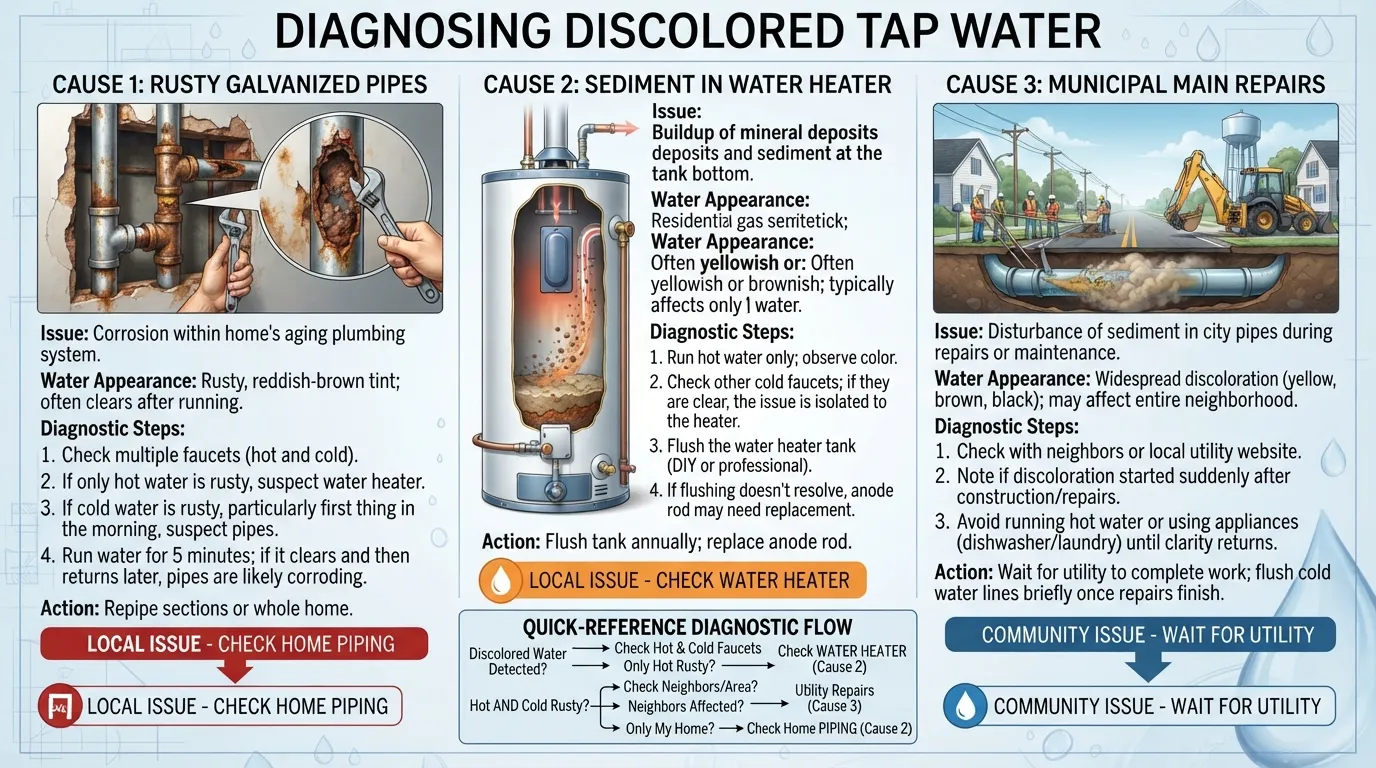
When discolored, brown, or sediment-heavy water emerges from your faucet instead of a clear stream, it typically signals displaced rust, mineral disruption, or municipal line disturbance. Identifying the source of the discoloration determines whether you can clear the lines yourself or if you need to wait out a public utility issue.
Rusty Pipes or Water Heater Sediment
Aging galvanized steel plumbing lines can shed internal rust particles over time, especially when water flow is suddenly turned on after a period of non-use. Similarly, accumulated mineral sediment inside your water heater tank can get stirred up and pushed through hot water lines.
- Run the affected faucet for three to five minutes to flush out loosened rust flakes and trapped sediment.
- Determine if the discoloration is isolated to the hot water side, which indicates that your water heater tank needs flushing.
- Inspect exposed metal pipes for advanced corrosion that requires professional repiping.
Recent Water Main Work in Your Area
Utility maintenance, neighborhood fire hydrant flushing, or local water main repairs can violently shake loose mineral deposits clinging to municipal pipes. This stirred-up debris travels directly into home service lines, resulting in temporarily discolored tap water.
- Check local municipal alerts or community boards to see if recent repairs or hydrant testing occurred on your street.
- Avoid using washing machines or dishwashers while municipal water is discolored to prevent staining clothes and clogging appliance filters.
- Wait until utility work concludes, then flush your main cold water line from an outdoor spigot or bathtub until the water runs completely clear.
Is It Safe to Use Brown Water?
Using discolored or rust-laden water for drinking, cooking, or food preparation is strongly discouraged until the source is identified and the supply runs clear. While brief exposure from a municipal flush poses minimal health risks, consuming heavy metal particles or unknown contaminants can cause illness.
- Do not drink, cook with, or brush your teeth using brown or heavily sedimented tap water.
- Use discolored water strictly for non-consumption purposes like flushing toilets until clarity returns.
- Contact your local water utility if discolored water persists for more than 24 hours without an explanation.
Step-by-Step DIY Fix Guide
Fixing a dry or restricted faucet doesn’t always require hiring a professional plumber. Following a structured diagnostic sequence allows you to systematically test, clean, and repair the most common failure points safely in your own home [00:00:09].
Step 1: Confirm the Scope of the Problem
Before disassembling any hardware, determine whether the issue is isolated to a single fixture or affecting your entire home. Checking multiple taps ensures you focus your repair efforts on the right component [00:00:09].
- Test surrounding sinks, showers, and toilets to verify if water is flowing normally elsewhere on the property.
- If only one faucet lacks water, the restriction is localized to that specific hardware assembly or its supply line.
- If multiple rooms lack water, investigate your main shut-off valve, pressure regulator, or municipal service.
Step 2: Check & Fully Open Shut-Off Valves
Under-sink valves control hot and cold water delivery to your faucet and can occasionally get bumped or partially closed. Inspecting these valves is a quick initial diagnostic step [00:00:09].
- Open the cabinet doors beneath the affected sink and locate the hot and cold supply valves.
- Rotate both handles completely counter-clockwise to ensure they are fully open and unrestricted.
- Disconnect the flexible supply hoses into a bucket if the valves appear open but water still fails to flow, testing line pressure directly.
Step 3: Remove & Clean the Aerator
Mineral scale, pipe solder, and sediment debris frequently accumulate inside the faucet tip, completely blocking water flow. Cleaning the aerator screen often restores full pressure instantly [00:00:38].
- Plug the sink drain before starting to prevent small parts or debris from falling down the pipe [00:02:30].
- Unscrew the aerator housing counter-clockwise using your fingers, pliers, or a specialized aerator wrench [00:01:00].
- Clear out trapped gunk, rinse the mesh screen under running water, or soak it in warm vinegar to dissolve mineral scale [00:01:24].
Step 4: Inspect the Cartridge
If your supply lines and aerator are completely clean yet the faucet still yields no water, the internal mixing cartridge may be jammed. Mineral scaling or broken seals inside the cartridge can lock internal waterways.
- Turn off the water supply beneath the sink before dismantling the faucet handle.
- Remove the decorative cap and handle screw to lift off the lever and expose the internal cartridge assembly.
- Inspect the cartridge ports for trapped debris, rinse or soak in vinegar, and replace the unit if internal damage is present.
Step 5: Test Water Flow Again
Once all components are cleaned, reassembled, and tightened securely, re-establish your water supply to verify the repair. Testing the fixture ensures your troubleshooting steps successfully resolved the blockage [00:02:52].
- Slowly reopen the under-sink hot and cold shut-off valves to allow pressure to build back up gradually.
- Turn on the faucet handle and let the water run for one to two minutes to purge any remaining air or loosened debris [00:02:12].
- Check all connection points and supply hoses underneath the sink for leaks or moisture before closing the cabinet.
When to Call a Plumber Safety Cost Estimate
While many faucet blockages and pressure drops can be resolved with basic DIY tools, certain plumbing failures require professional intervention. Recognizing when a situation exceeds basic troubleshooting protects your home from catastrophic water damage and expensive structural repairs.
Signs You Need a Professional Burst Pipe No Access to Main Valve etc.
Some plumbing emergencies demand immediate licensed expertise to prevent structural flooding or electrical hazards. If you encounter any of the following critical warning signs, stop DIY attempts right away and contact a qualified professional:
- A ruptured or burst supply pipe hidden behind drywall, under floorboards, or within exterior foundation walls.
- A main water shut-off valve that is completely seized, stripped, or leaking heavily when turned.
- Continuous water flow that cannot be halted because emergency shut-off valves are broken or missing.
- Electrical sparks, smoking outlets, or water leaking near electrical panels and household wiring.
Average Plumber Visit Cost Estimate Range
Understanding standard industry pricing helps you budget appropriately when hiring a professional for complex faucet or supply line repairs. According to industry data and consumer reporting guides, service costs typically fall within predictable ranges:
For more detailed safety considerations and troubleshooting perspectives, you can review expert plumbing guidelines.
Emergency Safety Steps While You Wait
Taking immediate preventative actions while waiting for a professional plumber to arrive can drastically minimize property damage and personal risk. Follow these critical steps to secure your home:
- Locate and close your home’s main water shut-off valve immediately to cut off pressure to the entire plumbing system.
- Turn off your water heater’s circuit breaker or gas supply if the hot water lines are compromised or draining empty.
- Clear personal belongings, furniture, and electronics away from standing water pools to prevent mold growth and electrical shock.
- Open lower-level faucets to help drain residual water trapped inside the upper piping runs.
Frequently Asked Questions
Find direct, concise answers to the most common questions homeowners ask when dealing with unexpected water flow stoppages and pressure drops at their faucets.
Why is my faucet turned on but no water is coming out?
When a faucet is open but completely dry, the issue usually stems from a closed supply shut-off valve beneath the sink, a severely clogged aerator choked by mineral scale, or a temporary main water shutoff affecting your property.
Why is barely any water coming out of the faucet?
A weak trickle or reduced flow typically indicates a partial obstruction, such as trapped sediment inside the aerator screen, a pinched flexible supply line, or internal mineral buildup narrowing the faucet cartridge waterways.
Why is there no water even if I open the faucet?
If the valve handles are fully open yet no water emerges, the restriction is deeper in the system. Check your home’s main water supply valve, examine municipal outage reports, or inspect your well water pressure switch and pump breaker.
Why did water stop coming out of the faucet?
Sudden water loss in a single fixture is generally caused by a jammed internal diverter, a closed valve, or debris breaking loose during plumbing work and lodging inside the spout assembly.
Why is there suddenly no water?
A total loss of water across multiple household fixtures points to a main supply interruption, a tripped well pump circuit breaker, a failed pressure-reducing valve (PRV), or a major municipal main break in your neighborhood.
What to do if water won’t come out of the faucet?
Begin by testing other sinks to isolate the problem, check and fully open the under-sink shut-off valves, unscrew and clean out the aerator tip with vinegar, and inspect your main water supply if the issue affects the entire home.
How to get more water to come out of a faucet?
Restore full volume by removing mineral scale from the aerator mesh screen, straightening any kinks in the braided supply hoses beneath the sink, and ensuring both hot and cold supply valves are turned completely counter-clockwise into the open position.
Why is my hot water not coming out but my cold water is?
When cold water flows normally but the hot side yields nothing, the problem is isolated to your water heater. Check the water heater inlet and outlet valves, inspect for heavy sediment tank buildup, or examine the hot side of the faucet mixing cartridge.
What can I do if my faucet isn’t flowing properly?
Diagnose and fix improper flow by systematically checking the under-sink valves, flushing out trapped pipe debris from the aerator, testing line pressure directly into a bucket, and cleaning or replacing a worn-out faucet cartridge.
Quick Recap Checklist Conclusion
Resolving an unexpected water stoppage at your faucet is entirely manageable when approached systematically. Reviewing this structured diagnostic checklist ensures you catch every common failure point before calling a professional.
Faucet No-Water Troubleshooting Checklist Bullet Recap
Keep this rapid-reference summary handy the next time a sink or fixture stops delivering water unexpectedly:
- Test Multiple Fixtures: Check surrounding sinks and showers to determine if the issue is isolated to one faucet or affects your entire home.
- Inspect Shut-Off Valves: Ensure both the hot and cold supply handles beneath the sink are turned fully counter-clockwise into the open position.
- Clean the Aerator: Unscrew the faucet tip and soak the mesh screen in warm vinegar to dissolve mineral scale and trapped sediment blockages.
- Evaluate the Cartridge: Remove the faucet handle and inspect the internal mixing cartridge for scaling, debris, or mechanical failure.
- Examine Well or Main Supplies: Check your home’s main water valve, well pump breaker, or pressure tank if multiple rooms lack water.
By following this methodical diagnostic path, you can quickly identify whether a simple cleaning fixes the problem or if it is time to call a licensed plumber to handle deeper infrastructure repairs.

Oscar Vance | Master Plumber & Drainage Expert
Meet Oscar Vance, a licensed master plumber sharing practical solutions on residential repairs, preventive maintenance, and thoughtful home upkeep.

