Choose Your Setup These 2 Questions First
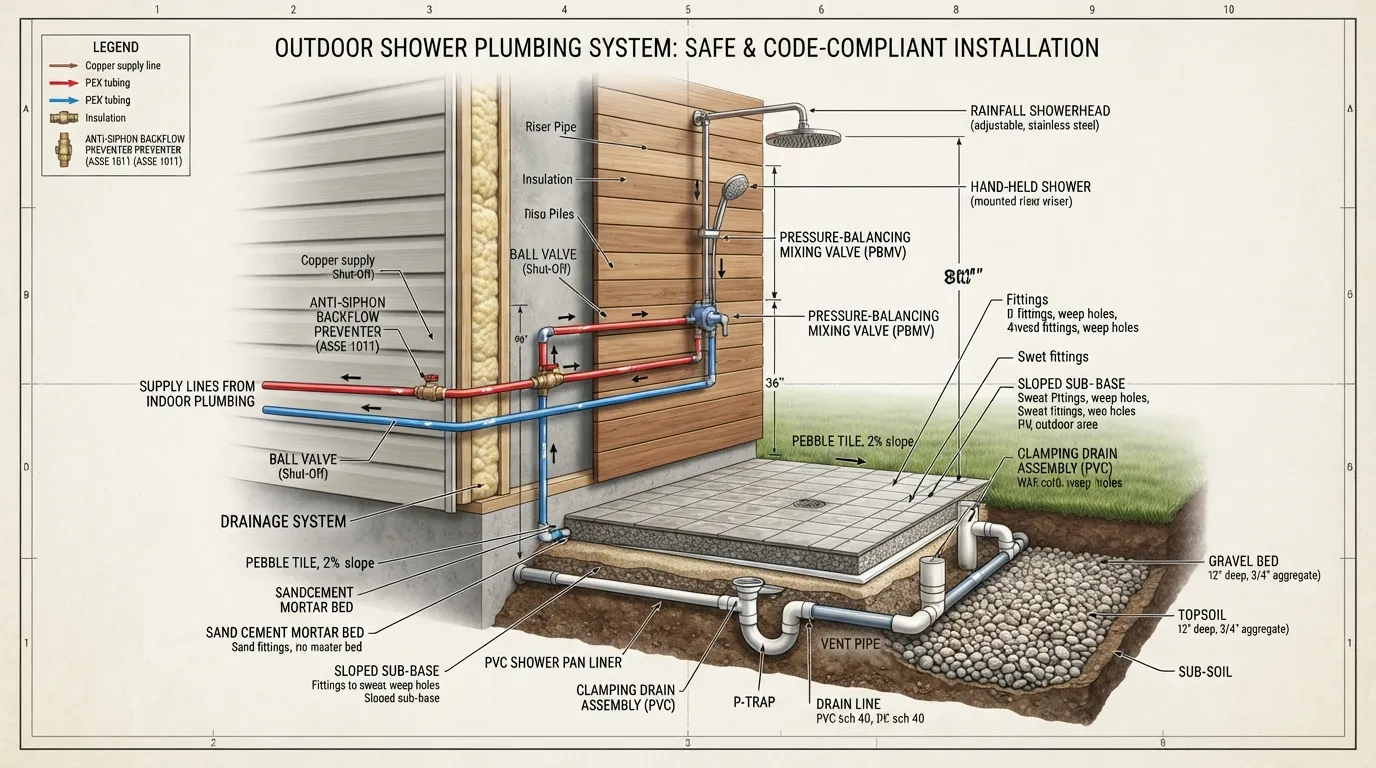
Deciding between a dual-temperature setup and a cold-water-only configuration depends entirely on your climate, intended usage season, and personal comfort preferences. While cold-water setups are simpler to plumb, integrating hot and cold water via an indoor line tie-in ensures year-round versatility and comfort.
- Cold Water Only: Ideal for beach houses, warm climate zones, or quick rinses after swimming and gardening. It utilizes a simple garden hose connection and minimizes plumbing complexity.
- Hot and Cold Water: Essential for extended-season use in cooler regions. Mixing valves allow precise temperature control, making the outdoor shower comfortable during crisp spring and autumn mornings.
- Plumbing Considerations: Connecting hot water requires tapping into an indoor hot water line, whereas cold-only configurations can easily leverage an existing frost-proof sill cock or exterior spigot.
Attached to House vs. Freestanding in the Yard
Choosing between an attached outdoor shower and a freestanding outdoor shower dictates your layout, privacy screen requirements, and plumbing run lengths. Attached units tie directly into existing home infrastructure, while freestanding setups offer flexible placement anywhere in the yard.
- Attached Outdoor Showers: Mounted directly to an exterior house wall, sharing studs and water supply lines from interior bathrooms or utility rooms. This minimizes trenching and pipe freezing risks.
- Freestanding Outdoor Showers: Positioned out in the yard, pool area, or garden. They require dedicated underground supply lines run below the frost line to protect against freezing temperatures.
- Structural Integrity: Attached units provide sturdy support for heavy fixtures and privacy walls, whereas freestanding units require robust anchoring posts set securely in concrete footings.
Materials Comparison PEX vs Copper vs Galvanized vs PVC
PEX tubing is the modern gold standard for residential water supply lines due to its remarkable flexibility, freeze resistance, and ease of installation. It handles expansion exceptionally well during sudden temperature drops, significantly lowering burst risks in outdoor applications.
- Pros: Highly resistant to freezing, flexible enough to snake through tight wall cavities, quick push-fit or crimp installation, and corrosion-free.
- Cons: Highly vulnerable to ultraviolet (UV) degradation; exposure to direct sunlight will cause PEX to rapidly degrade and fail.
- Best Use Case: Running hidden supply lines inside exterior walls or protective sleeves up to the outdoor shower mixing valve.
Copper Pipe Pros Cons & Best Use Case
Copper pipe represents the traditional, premium choice for outdoor plumbing due to its rigid structural strength, superior longevity, and professional finish. It stands up well to exposed exterior environments when properly insulated and maintained.
- Pros: Impervious to UV rays, highly durable, rigid enough for exposed surface mounting, and fully recyclable.
- Cons: Expensive material costs, requires soldering or professional torch work, and can rupture if water freezes solid inside rigid joints.
- Best Use Case: Visible exterior risers and custom overhead shower fixtures where aesthetics and rigidity matter most.
Galvanized Pipe Pros Cons & Best Use Case
Galvanized steel pipe offers rugged industrial durability and impact resistance, making it popular for rustic or vintage-style outdoor aesthetics. However, modern plumbing standards have largely phased it out for primary water supply lines.
- Pros: Extremely tough, highly resistant to physical damage, and provides a classic industrial look for surface-mounted fixtures.
- Cons: Prone to internal mineral scale buildup, rust corrosion over decades, and difficult to cut or thread without specialized heavy-duty tools.
- Best Use Case: Vintage aesthetic accent pieces or short, low-pressure standalone risers in non-potable setups.
PVC Pipe Can You Use It? Direct PAA Answer
Standard PVC pipe should never be used for pressurized outdoor hot water lines or main water supply delivery. While PVC is cheap and easy to glue, it becomes brittle under pressure spikes, degrades under UV sunlight, and can release toxic compounds when exposed to hot water.
- Pros: Inexpensive, lightweight, exceptionally easy to cut, and simple to assemble using standard PVC primer and solvent cement.
- Cons: Code violations for pressurized indoor/outdoor supply lines, structural cracking under cold stress, and zero thermal rating for hot water.
- Best Use Case: Low-pressure drainage pipes, gravity-fed rain barrels, or serving strictly as an exterior protective PVC sleeve to shield vulnerable PEX lines from UV exposure.
Tools & Materials Checklist
Gathering the correct tools before starting ensures your outdoor shower installation goes smoothly without unexpected mid-project trips to the hardware store. Having specialized cutting and tightening tools guarantees secure, leak-free connections across your entire plumbing line.
- Pipe Cutter: Essential for making clean, burr-free cuts on copper or PVC lines without deforming the pipe diameter.
- PEX Crimping Tool & Rings: Required if you are utilizing PEX tubing for your supply lines to secure fittings tightly.
- Adjustable Wrenches & Pliers: Used for tightening threaded connections, mixing valve bodies, and shower arm assemblies.
- Level and Tape Measure: Critical for ensuring vertical alignment of mounting posts and accurate positioning of wall fixtures.
Materials & Fixtures Shopping List
Purchasing a complete kit and proper structural supports prevents compatibility issues and protects your investment from weather damage. Quality materials ensure long-term durability against moisture, fluctuating temperatures, and daily use.
- Outdoor Shower Valve Kit: A dedicated mixing valve designed to blend hot and cold water while offering easy temperature regulation.
- Shower Arm and Head: Weather-resistant fixtures, ideally made of brass or stainless steel, to prevent premature rusting.
- Fittings and Connectors: Assorted 90-degree elbows, adapters, and pipe nipples to navigate corners and secure lines.
- Sealants and Support: Plumber’s tape (Teflon tape) for threaded seals, structural timber or a sturdy backing post, and stainless steel mounting screws.
Connect Your Water Supply
Connecting your outdoor shower directly to an existing exterior wall spigot using a heavy-duty garden hose provides the quickest, least invasive installation route. This setup is ideal for seasonal beach houses or quick rinse stations where hot water is unnecessary.
- Spigot Selection: Ensure your outdoor spigot is frost-proof and equipped with an anti-siphon valve to prevent backflow contamination into your household water system.
- Hose Rating: Use a reinforced, kink-resistant rubber or stainless steel braided hose rated for continuous water pressure to link the spigot to the shower inlet.
- Seasonal Disconnection: At the end of the warm season, simply disconnect the hose from the exterior wall and store it indoors to eliminate freezing hazards.
Tapping Into Indoor Hot & Cold Lines
Tapping directly into your indoor plumbing provides consistent hot and cold water for year-round or extended-season comfort. This method requires cutting into interior supply lines and running PEX tubing through the exterior wall to a dedicated mixing valve.
- Locate Supply Lines: Identify accessible hot and cold water lines in a basement, crawlspace, or utility room adjacent to the planned outdoor shower location.
- Install Shut-Off Valves: Incorporate dedicated shut-off valves with built-in drain bleeders inside the house so you can easily drain the exterior lines before winter.
- Wall Penetration: Drill precise holes through the exterior rim joist or wall studs, inserting protective sleeves before running your PEX lines to the exterior mixing valve.
Using a Y-Splitter for Cold Water Setup
A Y-splitter allows you to split a single outdoor spigot into two separate lines, giving you flexibility to maintain a standard garden hose hookup while feeding your outdoor shower.
- Dual Control: Heavy-duty brass Y-splitters feature individual shut-off levers, enabling you to control water flow to the shower without disconnecting other garden accessories.
- Thread Sealing: Wrap all male threaded connections with plumber’s tape (Teflon tape) before attaching the splitter to prevent high-pressure leaks.
- Secure Anchoring: Support the heavy splitter with a short connecting hose or wall bracket to prevent stress fractures on the copper outdoor spigot.
Run the Supply Lines Trenching & Frost Protection
Burying outdoor supply lines below the local frost line is critical to prevent water from freezing and bursting your pipes during deep winter freezes. Trench depth varies significantly by geographic region, ranging from 12 inches in mild climates to 48 inches or deeper in northern regions.
- Check Local Codes: Consult your local municipal building code or extension office to determine the exact frost line depth required in your area before picking up a shovel.
- Trench Preparation: Dig the trench with a slight downward slope toward a low point to facilitate complete drainage when winterizing your system.
- Bedding Material: Lay a 2-inch bed of sand or pea gravel at the bottom of the trench to cushion the pipe and prevent sharp rocks from puncturing the line.
Protecting PEX Tubing Inside a PVC Sleeve
While PEX tubing handles ground movement and minor freezing exceptionally well, it is vulnerable to ultraviolet (UV) radiation and physical punctures from rocks or burrowing pests. Running your PEX supply lines inside a larger PVC conduit sleeve provides robust armor underground and above ground.
- Conduit Sizing: Slide your 1/2-inch or 3/4-inch PEX water lines through a larger schedule 40 PVC pipe to act as a protective structural shield.
- UV Shielding: For any sections of PEX exposed above ground before entering the shower fixture, a PVC sleeve completely blocks destructive sunlight.
- Pulling Lines: Feed the PEX tubing through the PVC sleeve prior to laying it in the trench to make installation significantly faster and smoother.
Installing Indoor Shut-Off Valves & Drain Plugs
The most foolproof way to winterize an outdoor shower is installing dedicated indoor shut-off valves paired with drain plugs or bleeder caps. This allows you to completely isolate the exterior plumbing and purge all remaining water before freezing temperatures arrive.
- Location Strategy: Install the shut-off valves in an accessible indoor space like a basement, crawlspace, or utility closet located on the warm side of the building envelope.
- Bleeder Caps: Use valves equipped with a side bleeder port so you can open the cap and let trapped water drain out into a bucket safely.
- Blow-Out Procedure: In freezing climates, use an air compressor to blow out any residual moisture from the lines after shutting off the main indoor supply.
Install the Valve & Fixtures
Proper positioning of your outdoor mixing valve ensures comfortable everyday use and ergonomic reach for all household members. Securing the valve body directly to solid backing supports prevents wobbling and pipe fatigue over time.
- Optimal Height: Position the center of the control valve between 38 and 48 inches above the finished shower floor or decking surface for ideal ergonomic operation.
- Backing Support: Mount the valve to solid wood blocking or structural wall studs installed behind your exterior siding or privacy panels.
- Level Alignment: Use a spirit level before securing the mounting bracket to ensure the valve body sits perfectly plumb and square.
Sealing Connections with Plumber’s Tape
Achieving a waterproof, leak-free seal across all threaded pipe joints requires correct application of thread sealant tape. Proper wrapping technique prevents high-pressure leaks and protects metal threads from galvanic corrosion.
- Wrapping Direction: Wrap plumber’s tape (Teflon tape) clockwise around male threads 3 to 4 times, pulling firmly so the tape molds into the thread grooves.
- Avoid Over-Wrapping: Too much tape can cause threaded fittings to bind or crack plastic or brass components during tightening.
- Thread Compound: For high-pressure threaded adapters, pair Teflon tape with a compatible pipe joint compound if specified by the manufacturer.
Attaching the Riser Elbow & Shower Head
Running the vertical supply line upward from your mixing valve to the overhead shower head requires precise alignment and secure fittings. Using quality weather-resistant components ensures your shower handles water pressure fluctuations smoothly.
- Riser Installation: Connect a secure riser pipe from the top port of the mixing valve straight up to the desired overhead height (typically 72 to 84 inches).
- Elbow Securing: Anchor a 90-degree drop-ear elbow firmly to the framing backing block to stabilize the connection where the shower arm enters the wall.
- Fixture Attachment: Screw the shower arm into the drop-ear elbow using Teflon tape, then thread on your weather-resistant shower head using strap wrenches to avoid scratching finishes.
Ground Prep & Best Base for an Outdoor Shower
Selecting the right foundation material is essential to prevent muddy water accumulation, slip hazards, and standing puddles around your outdoor shower. The ideal base depends on your local drainage conditions, aesthetic preference, and overall budget.
- Gravel or Pea Stone Base: Excellent natural drainage, affordable, and easy to install. Water filters instantly through the stones into the soil below, preventing any puddling.
- Stone Pavers or Blue Stone: Provides a sturdy, elegant, and slip-resistant surface. Pavers require a properly leveled sub-base of compacted crushed stone and sand.
- Composite Decking Slats: Offers a warm, barefoot-friendly platform that elevates you above wet ground. Ensure gaps between boards allow fast water runoff.
- Concrete Pad: Permanent and extremely durable, but requires careful sloping toward a dedicated drain or surrounding landscape beds to prevent pooling.
How to Prepare the Ground Before Installation
Proper ground preparation guarantees structural stability and prevents your outdoor shower base from shifting, sinking, or accumulating stagnant water over time. Investing time in earthworks ensures long-term performance.
- Excavation and Grading: Dig out the shower area to a depth of 4 to 6 inches, sloping the sub-grade slightly away from structural foundations or home walls.
- Weed Barrier Installation: Lay down a heavy-duty geotextile weed fabric across the excavated dirt to prevent invasive plant growth from pushing through your gravel or pavers.
- Compaction and Base Layer: Fill the excavated area with crushed stone or gravel, tamping it down thoroughly with a hand tamper to create a solid, stable foundation.
Drainage System Do You Need a Drain?
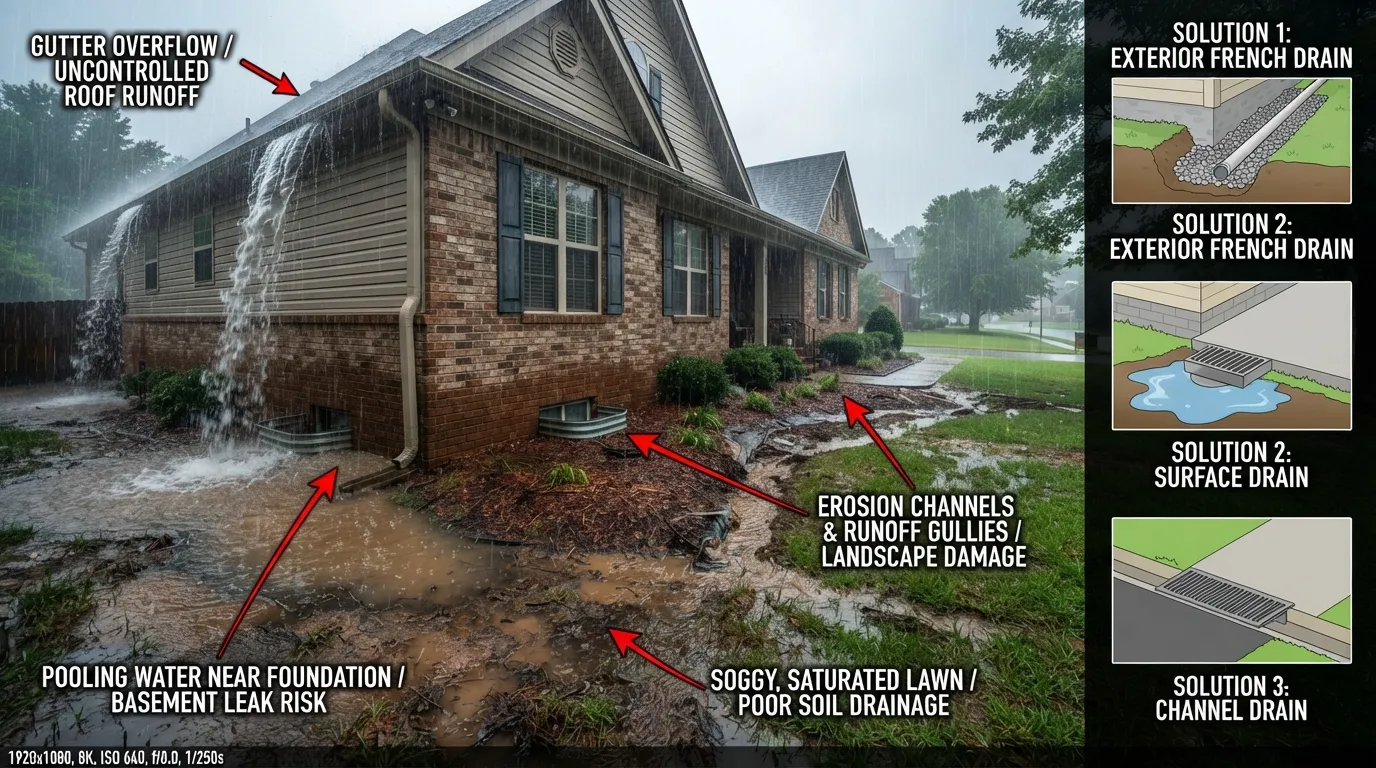
Most residential outdoor showers do not require a complex tied-in plumbing drain, provided your soil has high permeability and the shower sits far enough from your home’s foundation. However, improper runoff management can lead to standing puddles, muddy patches, or structural water damage near exterior walls.
- Soil Permeability Test: Pour a 5-gallon bucket of water directly onto your chosen shower site to check how fast it absorbs; if it takes longer than 5 minutes to drain, you need an engineered drainage solution.
- Foundation Protection: Always direct wastewater away from your home’s exterior walls and foundation to prevent basement seepage and moisture intrusion.
- Municipal Compliance: Review local building guidelines and Walpole Outdoors plumbing considerations regarding greywater disposal, as some jurisdictions restrict open ground runoff near property lines or water bodies.
Option 1: Natural Drainage Gravel Bed
Natural drainage relies on gravity and porous earth to let shower runoff filter safely into surrounding landscaping beds or lawn areas without any buried piping.
- Eco-Friendly Simplicity: Ideal for sandy or loose soils where soapy runoff (using biodegradable soaps) can safely irrigate nearby grass or non-edible plants.
- Gravel Sub-Layer: Excavate a 4-to-6-inch basin beneath your shower platform and fill it with washed river rock or pea gravel to facilitate rapid downward absorption.
- Elevation Strategy: Elevate your shower base slightly above the surrounding grade so water flows outward naturally without pooling around your feet.
Option 2: Dry Well Installation
A dry well is an underground pit filled with coarse gravel and stones that collects heavy runoff and allows it to dissipate gradually into the surrounding soil underground.
- Pit Excavation: Dig a hole roughly 3 feet deep and wide directly beneath or adjacent to the shower base, extending slightly beyond the perimeter.
- Geotextile Lining: Line the pit with heavy-duty landscape fabric before filling it with crushed stone to prevent surrounding dirt from clogging the gravel voids over time.
- High-Clay Soil Solution: This method is exceptionally effective in dense clay or slow-draining yards where surface water would otherwise pool indefinitely.
Option 3: Tying Into a Greywater Municipal Drain
When local ordinances prohibit open greywater discharge or your shower sits directly against a finished basement wall, tying into a dedicated drainage line is mandatory.
- Sewer vs. Greywater: Depending on local code enforcement, you may be permitted to run a greywater line to a sub-surface leaching bed or require a direct tie-in to the municipal sanitary sewer.
- P-Trap Integration: Incorporate an outdoor P-trap into your drain line to block sewer gases and unwanted pests from traveling back up through the shower floor.
- Professional Consultation: Consult a licensed plumber or local building official to ensure your sub-grade drainage layout complies completely with local plumbing codes.
Permits Local Codes & Backflow Prevention
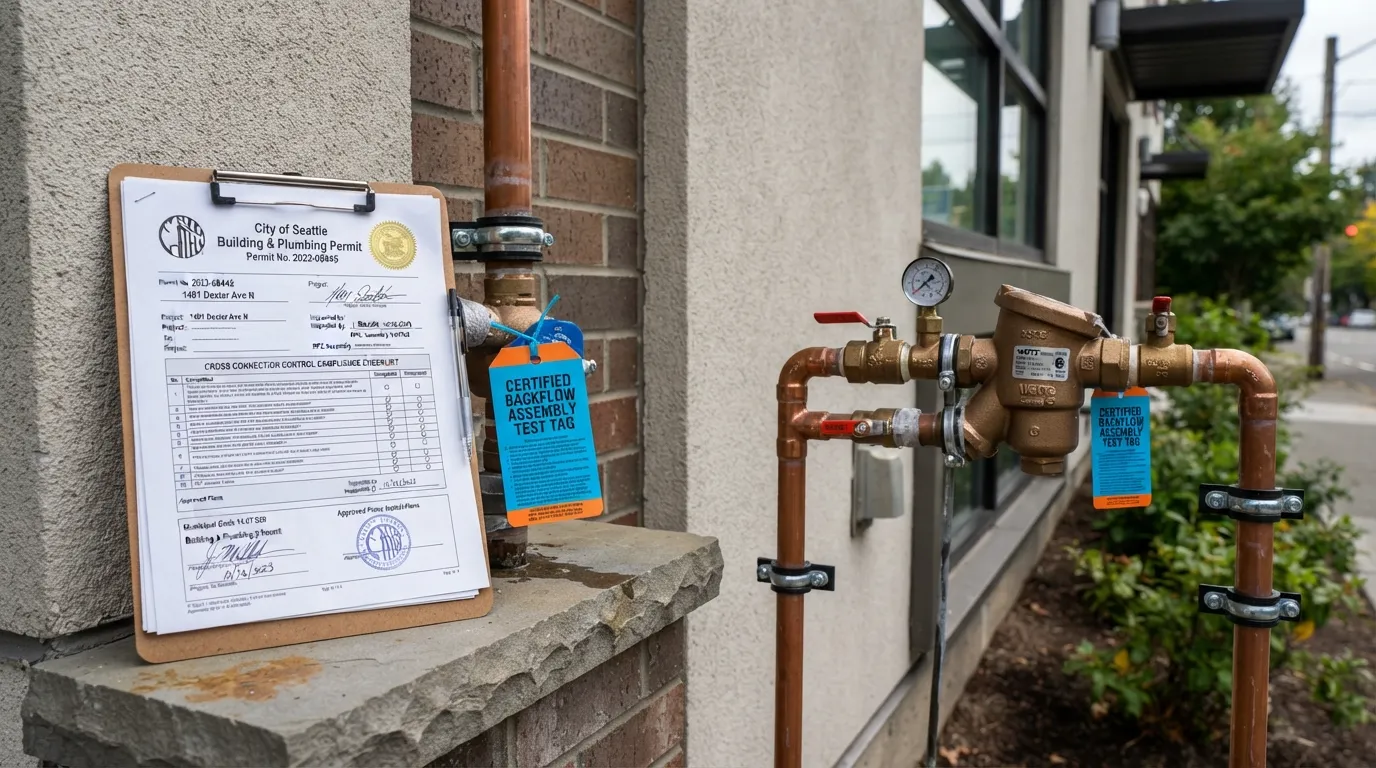
Whether you need a building or plumbing permit for an outdoor shower depends on whether you are simply attaching a hose to an existing spigot or tying directly into your home’s pressurized indoor water supply and sewage lines. Simple hose-connected, portable setups rarely require permits, whereas permanent plumbing tie-ins almost always do.
- Hose-Only Systems: Temporary, surface-mounted setups connected via a standard garden hose generally bypass permit requirements in most municipalities.
- Permanent Plumbing Tie-Ins: Any project involving cutting into interior hot and cold water lines, running underground supply trenches, or tying into sanitary drains requires a formal municipal permit.
- Inspection Requirements: Permitted installations typically require a rough-in plumbing inspection and a final check to ensure backflow prevention compliance before use.
When You Need a Backflow Preventer Code Requirement
A backflow preventer is a mandatory plumbing code device designed to stop contaminated outdoor water, stagnant standing water, or soapy runoff from siphoning backward into your home’s potable drinking water supply.
- Cross-Connection Hazard: Outdoor water sources present a high cross-connection risk where fertilizers, bacteria, or dirty standing water can reverse-flow into indoor lines during a pressure drop.
- Atmospheric Vacuum Breakers (AVB): Most plumbing codes require an approved atmospheric vacuum breaker or dual-check valve installed on any exterior water supply line feeding an outdoor shower.
- Code Enforcement: Installing a certified backflow assembly protects public and household health, ensuring your custom outdoor build passes official local inspection standards.
How to Check Your Local Plumbing Code
Navigating local zoning and plumbing codes before starting construction prevents costly fines, failed inspections, and forced teardowns of your completed outdoor shower project.
- Visit the Local Building Department: Check your city or county municipal website’s building and zoning division to review residential plumbing amendment guidelines.
- Ask About Setbacks: Verify property line setbacks and environmental conservation rules if your shower drains directly into soil near coastal areas, wetlands, or property boundaries.
- Consult a Licensed Plumber: When in doubt, a brief consultation with a certified local plumber can clarify whether your specific setup requires engineered drawings or licensed contractor sign-off.
Test for Leaks Pressure Test

Conducting a thorough pressure test before closing up wall cavities, burying supply trenches, or installing privacy panels ensures your new plumbing system is completely airtight and watertight. Testing prevents hidden leaks from causing structural water damage to your home or outdoor framing.
- Flush the Lines: Before attaching finish shower fixtures, open the main water supply slowly to flush out any debris, copper shavings, or dirt trapped inside the new PEX or copper pipes.
- Gradual Pressurization: Turn the main water supply back on slowly and allow the lines to pressurize gradually to prevent water hammer shock to new fittings and valves.
- Inspection Hold: Keep the system under full household water pressure for at least 30 to 60 minutes while inspecting every single joint, valve, and connection.
Common Leak Points to Check
Knowing where plumbing connections are most vulnerable allows you to quickly identify and resolve minor weeping or dripping issues before they escalate into major water damage.
- Threaded Connections: Check all male and female threaded adapters where shower arms, mixing valves, and supply nipples meet, tightening gently with wrenches if weeping occurs.
- Crimp and Push-Fit Joints: Inspect PEX crimp rings or push-to-connect fittings to ensure they are seated fully square and show no signs of moisture seepage.
- Valve Cartridge Seals: Test the mixing valve handle through its full hot-and-cold range to verify that the internal cartridge seals properly and stops water flow completely when turned off.
Winterizing Your Outdoor Shower
Failing to properly winterize your outdoor shower before the first hard freeze introduces severe risks of catastrophic pipe bursts, cracked valve bodies, and costly structural water damage. When trapped water freezes inside PEX, copper, or brass fittings, it expands with immense force, fracturing rigid materials within minutes.
- Split Pipes and Fittings: Expanding ice exerts thousands of pounds of pressure per square inch, splitting copper walls and popping PEX crimp connections apart.
- Destroyed Mixing Valves: Internal brass valve cartridges and ceramic discs easily crack under expanding ice pressure, requiring total replacement in the spring.
- Hidden Structural Damage: A frozen supply line hidden inside an exterior wall can rupture behind siding or drywall, leaking gallons of water into your home when temperatures thaw.
Step by Step Winterization Process
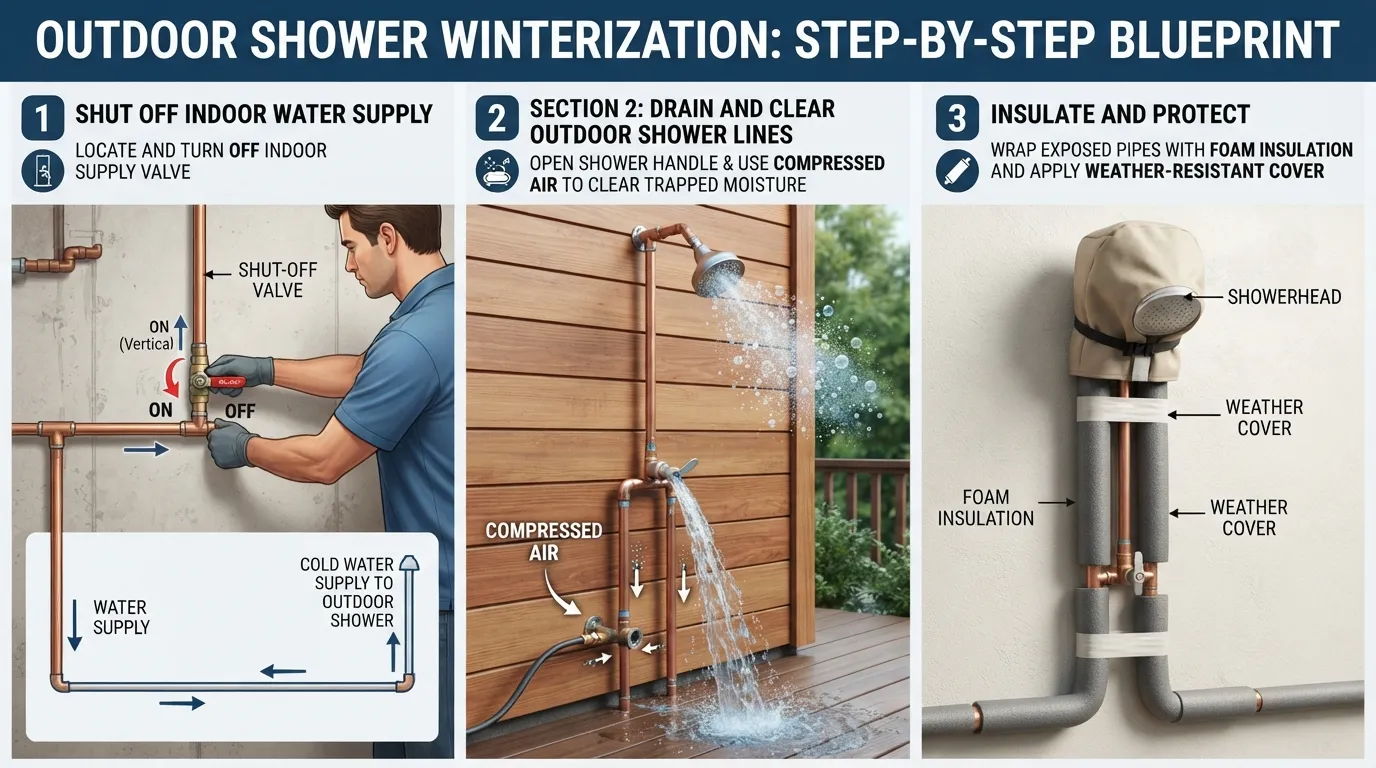
Executing a reliable winterization routine takes less than 30 minutes each autumn and completely protects your outdoor shower plumbing system from sub-zero weather hazards.
- Shut Off the Indoor Supply: Turn off the dedicated indoor shut-off valve located on the warm side of your building envelope to cut off water flow to the exterior lines.
- Drain and Bleed the Lines: Open the bleeder cap on your indoor shut-off valve and place a bucket underneath to catch all residual water draining backward out of the outdoor pipes.
- Open All Outdoor Fixtures: Prop open the outdoor mixing valve handle halfway and remove any detachable hand showers or hoses, storing them indoors for the winter.
- Compressed Air Blow-Out: For complete peace of mind in northern climates, attach an air compressor to the line and gently blow out any remaining droplets of moisture trapped in high points.
How Much Does It Cost to Plumb an Outdoor Shower?
Building and plumbing an outdoor shower yourself is a highly cost-effective weekend project, with expenses primarily driven by your choice of materials and whether you opt for a simple hose connection or a permanent indoor plumbing tie-in.
- Basic Hose-Connected Setup: Total DIY material costs range from $50 to $150, covering a basic shower kit, Y-splitter, garden hose, and simple cedar or gravel backing.
- Full Hot & Cold Plumbing Tie-In: Materials range from $250 to $600, including a quality mixing valve, PEX tubing, fittings, drainage gravel, and a durable shower head fixture.
- Tool Investments: If you lack basic plumbing tools like a PEX crimping tool, pipe cutters, or a level, expect an additional $50 to $100 in equipment costs.
Professional Plumber Installation Cost
Hiring a licensed professional plumber to run permanent underground supply lines, tie into indoor hot and cold water pipes, and install proper backflow prevention ensures complete code compliance.
- Labor and Standard Materials: Professional plumbing installation typically ranges from $1,200 to $3,500 depending on trenching distance, wall penetration complexity, and local labor rates.
- Permits and Inspections: Municipal permits and required plumbing inspections can add an extra $150 to $400 to your total professional project cost.
- Site Preparation: Heavy trenching through concrete, rock, or complex landscaping will increase total labor hours and overall expense.
Framing & Enclosure Basics
Constructing a sturdy wooden frame and privacy enclosure transforms your functional outdoor plumbing setup into a private, resort-style outdoor retreat. Using rot-resistant timber ensures your structure weathers coastal moisture and rain without rotting or warping.
- Material Selection: Opt for naturally decay-resistant lumber such as western red cedar, redwood, or pressure-treated southern yellow pine for all framing posts.
- Post Anchoring: Set 4×4 or 4×6 vertical support posts securely into concrete footings or anchor them directly to a reinforced wooden deck framing structure.
- Privacy Slat Layout: Attach horizontal or vertical slats with small gaps to allow airflow and quick drying while ensuring complete visual privacy from neighbors.
Mounting Plumbing Fixtures to the Frame
Securing your mixing valve, riser pipe, and shower head directly to your enclosure frame requires solid internal blocking to prevent pipe movement and fixture loosening over time.
- Internal Blocking: Install horizontal 2×4 blocking between your main vertical posts at the exact height (38 to 48 inches) where your mixing valve will be mounted.
- Pipe Straps and Clamps: Use stainless steel or plastic pipe straps every 3 to 4 feet along vertical PEX or copper risers to keep supply lines rigidly aligned against the frame.
- Weatherproof Fasteners: Always use coated exterior deck screws or marine-grade stainless steel hardware to prevent rust streaks and structural corrosion.
Maintenance & Cleaning Tips
Routine cleaning keeps your outdoor shower free from mineral scale, hard water stains, soap scum, and mold accumulation caused by constant moisture exposure. Establishing a regular maintenance schedule preserves the like-new finish of your fixtures and platform.
- Mild Cleaning Solutions: Wash down wooden slats, stone pavers, and fixtures monthly using a mixture of warm water and mild dish soap or eco-friendly cleaner.
- Clearing Mineral Scale: Soak detachable shower heads in a 50/50 water and white vinegar solution annually to dissolve stubborn calcium buildup inside spray nozzles.
- Preventing Mold and Mildew: Scrub composite or wood decking periodically with a soft-bristle brush to remove organic debris and prevent slippery algae growth.
How to Seal & Protect Fixtures from Weather
Protecting your outdoor plumbing fixtures and wooden enclosures from harsh ultraviolet rays, rain, and freezing winds significantly extends the lifespan of your installation. Proactive sealing prevents rust corrosion and wood splintering.
- Wood Sealing: Apply an exterior-grade UV-blocking penetrating sealer or water-repellent stain to cedar and redwood panels every one to two years.
- Metal Protection: Apply a light coat of non-toxic paste wax or metal protectant to brass, copper, and matte black fixtures to guard against oxidation and salt corrosion.
- Hardware Inspection: Check stainless steel screws, brackets, and pipe straps annually, tightening any fasteners loosened by seasonal wood expansion and contraction.
Frequently Asked Questions
Yes, PEX tubing is an excellent choice for outdoor shower supply lines due to its superior freeze resistance and flexibility. However, because PEX degrades rapidly when exposed to ultraviolet (UV) sunlight, you must shield all exposed outdoor runs inside a protective PVC conduit sleeve or wall cavity.
- Freeze Tolerance: PEX expands safely when trapped water freezes, dramatically lowering the risk of burst pipes compared to rigid copper.
- UV Protection: Always enclose outdoor PEX lines inside schedule 40 PVC pipe to prevent direct sunlight exposure from breaking down the material.
Can you connect an outdoor shower to a hose?
Yes, connecting an outdoor shower directly to an exterior wall spigot using a heavy-duty garden hose is the easiest and most popular method for cold-water-only seasonal setups. This eliminates the need to cut into interior drywall or run underground supply trenches.
- Quick Installation: Allows you to set up a fully functioning rinse station in under an hour without complex plumbing modifications.
- Easy Disconnection: You can quickly detach the hose at the end of the warm season to prevent winter freeze damage.
What is the best base for an outdoor shower?
The best base depends on your drainage needs and aesthetic preference, with crushed gravel and stone pavers ranking as the top overall choices. Gravel provides natural, instantaneous water runoff, while stone pavers offer a sturdy, slip-resistant platform.
- Gravel Beds: Inexpensive and provide immediate natural percolation for soapy water runoff.
- Stone Pavers & Wood: Blue stone, slate, or raised composite decking slats elevate you above wet ground for a comfortable barefoot experience.
Do I need a permit for an outdoor shower?
Whether you need a permit depends entirely on your installation method. Simple garden-hose-connected portable setups never require a permit, whereas permanent plumbing tie-ins involving underground trenching or cutting into indoor water lines almost always require local municipal permits.
- Hose-Connected: Surface-mounted and temporary builds bypass local permitting rules.
- Permanent Plumbing: Tapping into indoor hot and cold water lines or sanitary drains requires residential plumbing permits and inspection.
How expensive is it to build an outdoor shower?
A basic DIY hose-connected outdoor shower costs between $50 and $150 in materials, while a permanent DIY hot and cold plumbing tie-in ranges from $250 to $600. Hiring a professional plumber for permanent underground lines and custom installation typically ranges from $1,200 to $3,500.
- DIY Budget: Minimal investment required for hose setups and basic cedar framing kits.
- Professional Cost: Higher expenses driven by labor rates, trenching length, and backflow prevention requirements.
How can I build a DIY outdoor shower in my backyard?
Building a DIY backyard outdoor shower involves four core phases: choosing your water source setup (hose vs. indoor tap), preparing a well-drained gravel or paver base, mounting weather-resistant structural framing and privacy panels, and plumbing your mixing valve and shower head.
- Step-by-Step Flow: Plan your water source, excavate and level the base, erect structural support posts, install supply lines, and pressure test for leaks.
- Winterization Planning: Always install accessible indoor shut-off valves and drain bleeders so you can easily purge the system before winter freezes.
Conclusion Final Checklist
Quick Recap Checklist
Successfully completing your outdoor shower project requires careful planning, adherence to local plumbing codes, and proper winterization safeguards. Review this comprehensive final checklist to ensure every aspect of your build is secure, functional, and fully optimized for long-term enjoyment.
- Setup Strategy Decided: Confirmed whether your build requires hot and cold water or a simpler cold-water hose connection based on your climate zone and usage season.
- Materials Selected: Utilized durable PEX tubing or copper pipe, keeping all PEX fully shielded from UV rays inside protective PVC conduit sleeves.
- Water Supply Secured: Tied into indoor hot and cold lines with accessible interior shut-off valves and drain bleeders, or connected securely to a frost-proof exterior spigot using a heavy-duty Y-splitter.
- Base and Drainage Built: Prepared a well-drained gravel basin, stone paver platform, or elevated composite deck base to prevent standing puddles and protect your foundation.
- Valves and Fixtures Installed: Mounted your mixing valve at an ergonomic height (38 to 48 inches) using solid wood blocking, and sealed all threaded joints securely with plumber’s tape.
- Backflow & Permits Handled: Checked local municipal codes, installed required atmospheric vacuum breakers, and acquired necessary plumbing permits for permanent installations.
- Leak Testing Completed: Pressurized the system gradually and inspected every crimp, push-fit, and threaded connection to ensure absolute watertight integrity before finishing your privacy enclosure.
- Winterization Plan Ready: Established a reliable autumn routine to shut off indoor valves, drain exterior lines, and store detachable fixtures safely indoors before the first hard freeze.

Oscar Vance | Master Plumber & Drainage Expert
Meet Oscar Vance, a licensed master plumber sharing practical solutions on residential repairs, preventive maintenance, and thoughtful home upkeep.

