What You Need to Know Before Plumbing a Basement Bathroom
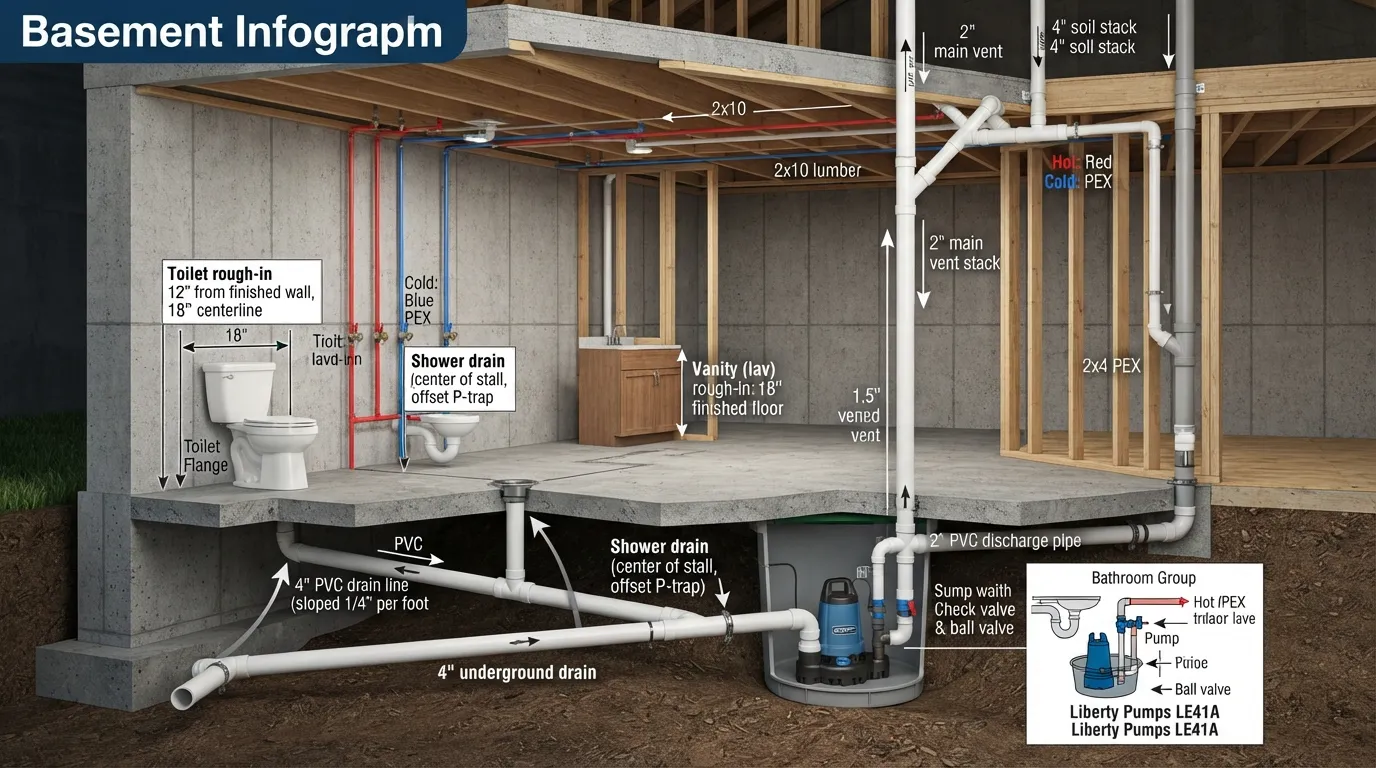
Plumbing a basement bathroom requires understanding your home’s drainage layout before any trenching begins. The single most important factor determining your project’s scope and budget is whether your basement floor sits above or below your home’s main sewer line.
Choosing the correct drainage approach early prevents catastrophic backups, costly code violations, and structural rework. Homeowners must evaluate system depth, vent placement, and pump capacity to ensure long-term reliability.
Gravity-Fed Drainage vs Sewage Ejector Pump Which One Do You Need?
Your choice between gravity-fed drainage and a sewage ejector pump depends entirely on elevation relative to the municipal sewer line. Gravity-fed systems use natural downward slope for waste removal, whereas sewage ejector pumps actively grind and lift waste upward into the main stack.
- Gravity-Fed Systems: Ideal when your basement floor is positioned well above the main sewer line. They require no electricity, feature fewer moving parts, and offer the lowest long-term maintenance costs.
- Sewage Ejector Pumps: Mandatory when basement fixtures sit below the main sewer level. These sealed basin systems grind solid waste and pump fluids upward through a discharge pipe into your primary drainage stack.
- Upflush Toilets (Alternative): Self-contained macerator units that sit directly on top of the finished floor without requiring concrete breaking, best for guest bathrooms with moderate usage.
How to Check If Your Basement Drain Sits Below the Main Sewer Line
Determining your drainage depth requires locating your home’s main sewer cleanout and comparing its elevation to your lowest basement floor drain. Accurate measurement prevents improper system selection and ensures compliance with International Plumbing Code (IPC) standards.
- Locate the main sewer stack where the drainage line exits your house toward the municipal street or septic tank.
- Measure the vertical height difference between your basement floor grade and the point where the sewer line leaves the foundation wall.
- Consult a licensed plumber or perform a slope test using a laser level to confirm whether waste can travel outward via natural gravity alone.
Tools Materials & Pre-Planning Checklist
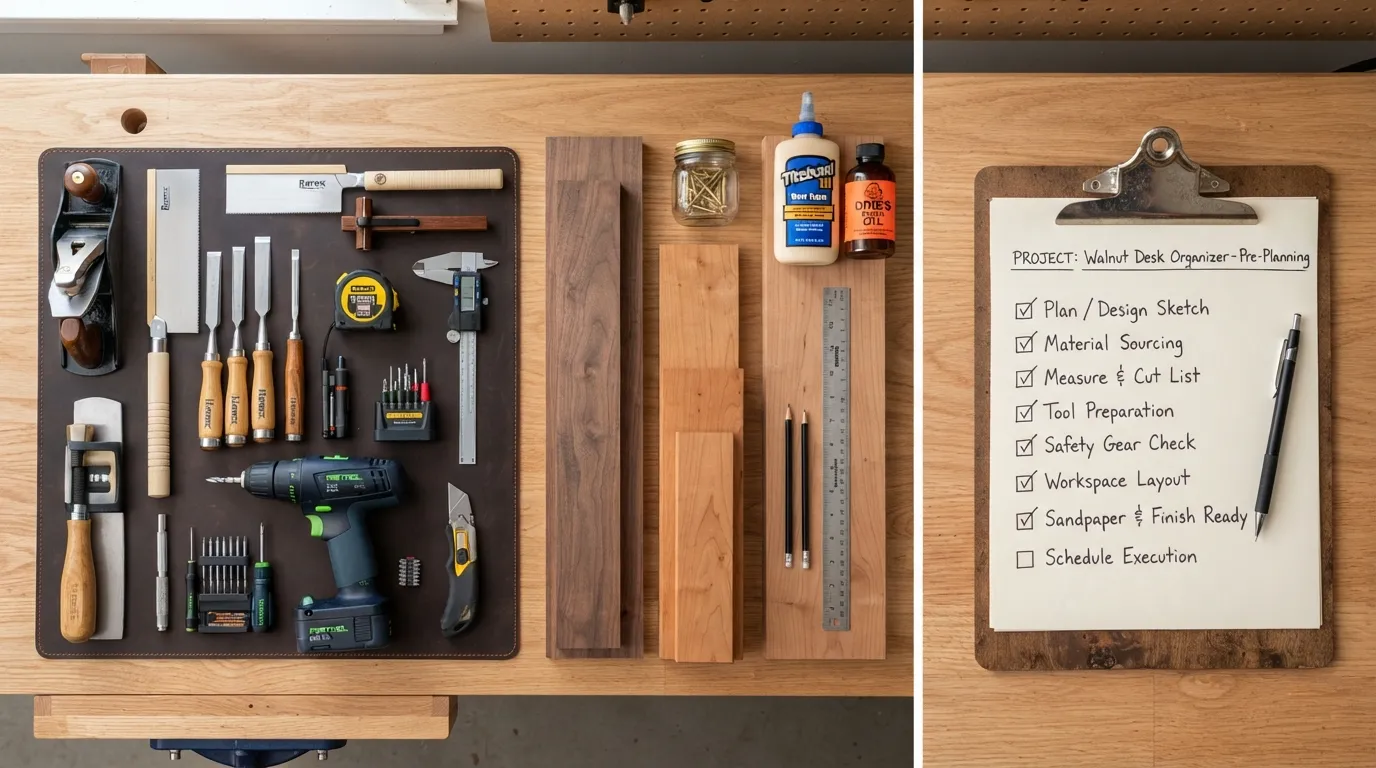
Successful basement bathroom installation relies on meticulous preparation, precise tool selection, and accurate layout planning. Gathering heavy-duty equipment and code-compliant materials before breaking ground prevents mid-project delays and structural mistakes.
Equipping yourself with professional-grade plumbing gear ensures clean cuts, secure pipe joints, and accurate grading for flawless waste management.
Essential Tools List Jackhammer Pipe Cutter Level etc.
Basement concrete breaking and drain assembly demand specialized mechanical and measuring equipment. Renting or purchasing heavy-duty construction tools guarantees safe penetration through thick concrete slabs.
- Electric Jackhammer or Rotary Hammer: Essential for breaking through 4-inch concrete basement floors to expose sub-grade soil.
- Ratchet Pipe Cutter & Deburring Tool: Provides clean, square cuts on PVC pipe without cracking, followed by smooth edge preparation.
- Laser Level & Spirit Level: Critical for verifying exact downward drain slopes of at least 1/4 inch per foot.
- Safety Gear: Heavy-duty work gloves, impact goggles, ear protection, and a dust mask to shield against concrete silica dust.
Materials Checklist PVC Sizes Fittings P-Trap Ejector Basin
Selecting the correct schedule of PVC piping and fixture fittings ensures your system withstands underground pressure and chemical corrosion. Always match pipe diameters to specific fixture discharge demands.
- PVC Pipe & Fittings: 3-inch or 4-inch pipe for main waste lines, 2-inch pipe for sink and shower drains, and 1.5-inch pipe for vent stacks.
- P-Traps & Sanitary Tees: Required under every fixture to prevent sewer gases from entering your living space.
- Sealed Ejector Basin & Pump Kit: A polyethylene basin (typically 18×30 inches or larger) equipped with a heavy-duty submersible sewage pump and check valve.
- PVC Primer and Cement: Solvent welding agents necessary to chemically fuse pipes and fittings into a permanent, leak-proof network.
Sketching Your Layout: Fixture Placement Tips
Creating a scaled floor plan before digging helps visualize wet wall constraints and vent stack connections. Proper spacing ensures your new bathroom meets local building codes and ergonomic standards.
- Position your toilet, sink, and shower as close to the existing main stack or ejector pit as possible to minimize trenching length.
- Ensure minimum clearance zones around fixtures, such as leaving at least 15 inches from the center of the toilet to any side wall.
- Design your drainage path so that secondary fixtures tie into the main waste line downstream from the toilet connection.
How to Plumb a Basement Bathroom GravityEjector Method
Executing a rough-in plumbing installation below grade requires strict adherence to grading angles, mechanical connection standards, and municipal code requirements. Following a structured sequence ensures every fixture drains smoothly without blockages or sewer gas leaks.
Watch this comprehensive video walkthrough to visualize below-slab pipe placement and connection techniques before starting your layout:
Step 1: Locate the Main Drain Line and Plan Your Layout
Accurate mapping prevents costly layout mistakes and ensures proper connection to your home’s waste network. Mark precise fixture centerlines on the concrete slab using chalk before beginning any physical demolition.
- Identify the exact entry point of the main sewer stack or designated sewage ejector basin location.
- Measure fixture clearances, ensuring standard rough-in distances for toilets (12 inches from finished wall) and vanities.
- Map out the connection path, ensuring all branch lines run downhill toward the main collector.
Step 2: Breaking Concrete and Trenching Safety Precautions Included
Breaking through basement concrete requires heavy machinery and strict adherence to personal protective equipment protocols. Excavate sub-grade soil carefully to maintain stable trench walls.
- Use an electric jackhammer to break along your chalk lines, keeping trench widths to roughly 8 to 12 inches.
- Dig out the underlying soil to a uniform depth, maintaining a strict downward slope of at least 1/4 inch per linear foot toward the main outlet.
- Wear a certified respirator mask, eye protection, and ear plugs to protect against airborne concrete silica and loud impact noise.
Step 3: Installing Drains, Toilet 3-inch Shower 2-inch and Wet Vent
Assembling the Drain, Waste, and Vent (DWV) network demands precise solvent welding and correct pipe sizing for each fixture. Integrate a proper wet vent system to equalize air pressure across the entire layout.
- Install a 3-inch PVC drain line for the toilet, incorporating a sanitary tee configured for proper directional waste flow.
- Run 2-inch PVC lines for the shower and bathroom sink, making sure P-traps are positioned correctly beneath every fixture.
- Connect your vertical vent stack upward to tie into the existing home vent system, preventing trap siphonage.
Step 4: Pressure Testing and Inspection Before Pouring Concrete
Never pour concrete over a new rough-in without validating system integrity through a formal pressure test. Municipal building inspectors require this verification to sign off on your construction permits.
- Plug all open pipe ends using test balls or mechanical test caps, and fill the system with water or air to designated test pressures.
- Monitor gauges for pressure drops over a 15-to-30 minute window to verify that all PVC primer-and-cement joints are completely watertight.
- Schedule a formal building inspection to secure official approval prior to backfilling the trenches.
Step 5: Backfilling and Pouring Concrete Correctly
Stabilizing underground pipes with appropriate backfill material prevents shifting and pipe sagging under heavy concrete loads. Finish the floor flat to match the surrounding basement grade.
- Pack crushed stone or gravel tightly around and beneath all exposed PVC pipes to secure their grade alignment.
- Pour high-strength concrete mix into the trenches, screeding it level with the existing basement floor slab.
- Allow the patch to cure completely while keeping it damp for several days to maximize structural slab strength.
How to Plumb a Basement Bathroom Without Breaking Concrete
Installing a below-grade bathroom without jackhammering your concrete slab is entirely achievable using modern upflush plumbing technology. This approach bypasses heavy excavation entirely, saving homeowners thousands of dollars and weeks of labor.
Watch this video walkthrough to see how macerating systems connect externally without sub-grade trenching:
Upflush Macerating Toilet Systems e.g. Saniflo Explained
An upflush or macerating toilet system uses an external rear-discharge unit that sits directly on top of the finished basement floor. These self-contained units eliminate the need to break concrete, trench floors, or connect directly into deep gravity-fed drainage lines.
- Macerator Pump Housing: A durable plastic enclosure containing stainless steel cutting blades and a powerful electric motor.
- Rear-Discharge Toilet Bowl: A specialized fixture engineered to channel human waste and toilet paper straight into the external macerator box rather than downward through the floor.
- Flexible Inlet Connections: Secondary ports on the unit allow direct greywater tie-ins from a bathroom sink, shower, or bidet.
How an Upflush System Works Without Excavation
Upflush units manage waste through mechanical shredding and high-pressure pumping, allowing waste water to travel vertically and horizontally through small-diameter pipes. The entire operation occurs above the concrete slab.
- Shredding Action: When flushed, solid waste enters the pump chamber where rotating stainless steel blades reduce solids into a fine slurry within seconds.
- Vertical Lift: The integrated pump forces the liquefied waste upward through a narrow 3/4-inch or 1-inch discharge pipe hidden inside wall cavities.
- Gravity Transition: Once the waste reaches a height above your home’s main sewer or septic line, it transitions into standard gravity drainage.
Pros Cons & Best Use-Cases for Upflush Systems
Evaluating the advantages and limitations of macerating systems helps determine if no-excavation plumbing fits your specific basement layout and lifestyle. They offer incredible installation speed but come with distinct operational trade-offs.
- Pros: Zero concrete cutting required, highly cost-effective for retrofits, fast installation times, and flexible placement anywhere in the home.
- Cons: Requires a dedicated electrical circuit, produces mechanical operating noise, and demands strict adherence to user rules regarding non-flushable items.
- Best Use-Cases: Perfect for finished basements, guest suites, home offices, or rental conversions where breaking the concrete foundation is structurally or financially impractical.
Venting Your Basement Bathroom Plumbing Correctly
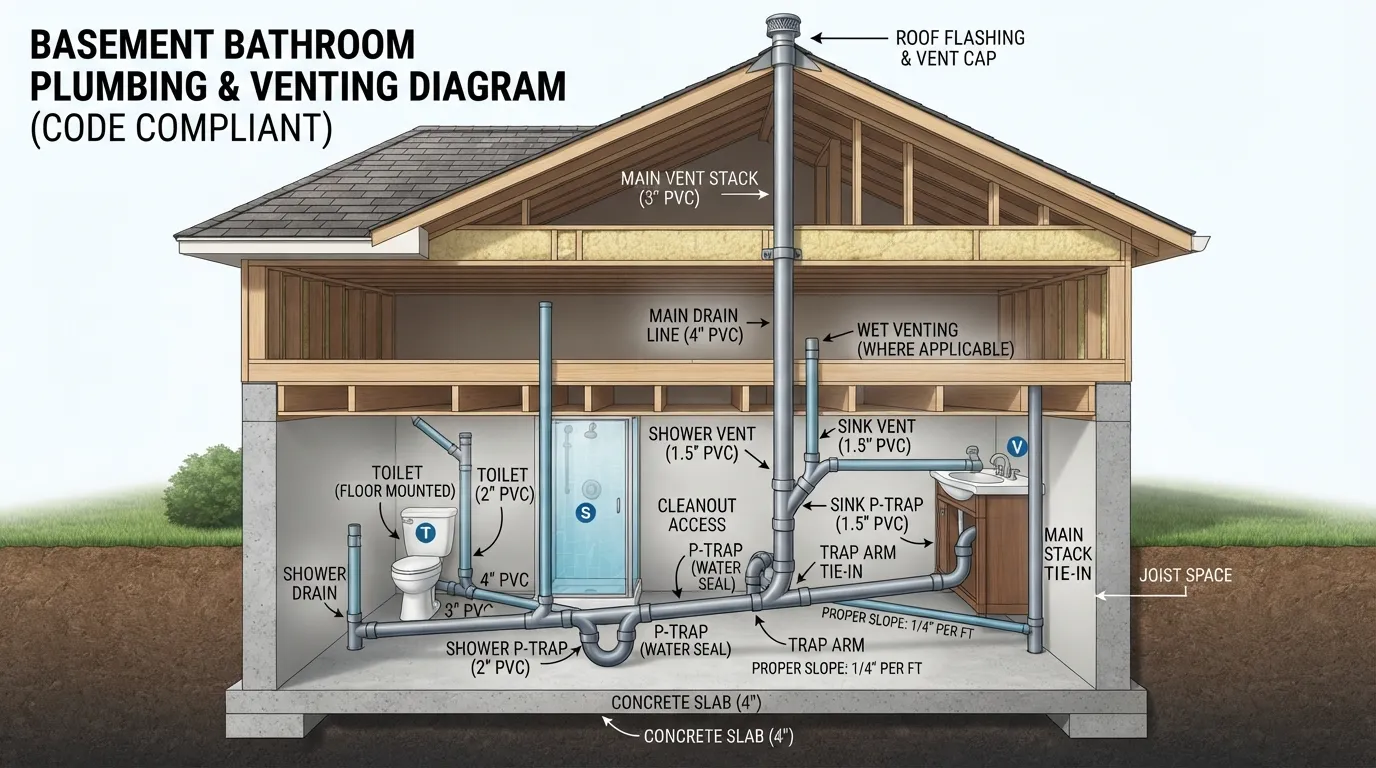
Proper venting is the most critical component for maintaining safe air pressure and preventing foul sewer gases from entering your living space. Without a properly configured vent network, wastewater fixtures will drain sluggishly and water seals inside P-traps will siphon completely dry.
Basement bathrooms present unique hydraulic challenges because they sit at the absolute bottom of the drainage network, requiring specialized venting configurations to comply with building safety codes.
Why Basement Venting Is Different from Upper-Floor Plumbing
Upper-floor fixtures rely on natural upward airflow through continuous vertical stacks that extend past the roofline. Basement fixtures, however, are positioned far below existing roof vents and often require longer horizontal runs before connecting to an air source.
- Atmospheric Balance: Every flush and drain discharge creates a vacuum that must be neutralized immediately with fresh air to maintain smooth water flow.
- Trap Seal Protection: Proper vent design prevents air pressure fluctuations from sucking the protective water barrier out of your sink, shower, and toilet P-traps.
- Code Constraints: Plumbing codes strictly regulate maximum horizontal distances between a fixture trap and its corresponding vent connection.
Tying Into the Existing Vent Stack vs Running a New Vent
Connecting your basement bathroom vent requires evaluating whether to tie into an existing vertical stack or install an alternative mechanical solution. Choosing the right method depends on your home’s framing and proximity to existing walls.
- Tying Into an Existing Stack: The gold standard for permanent installations, where a 1.5-inch or 2-inch vent line runs up through wall cavities to connect into your home’s main roof vent.
- Air Admittance Valves (AAVs): A one-way mechanical valve that opens to let air in when water drains, then seals shut to lock out sewer gases.
- Local Code Restrictions: Always verify whether your municipal building department permits AAVs for below-grade sewage applications, as some jurisdictions mandate direct roof venting.
Common Venting Mistakes That Cause Sewer Gas Smell
Improper venting compromises system performance and introduces hazardous, foul-smelling sewer gases into your basement. Avoiding classic installation errors ensures a safe, odor-free environment.
- Flat Vent Runs: Running horizontal vent pipes without a slight upward pitch can cause condensation to pool and block airflow entirely.
- Missing Cleanouts: Failing to install accessible cleanout plugs makes it impossible to clear blockages or debris from long vent lines.
- Undersized Vent Piping: Using 1-inch pipe instead of code-compliant 1.5-inch or 2-inch piping restricts necessary airflow across high-volume fixtures.
Backwater Valve The Safety Step Most Guides Skip
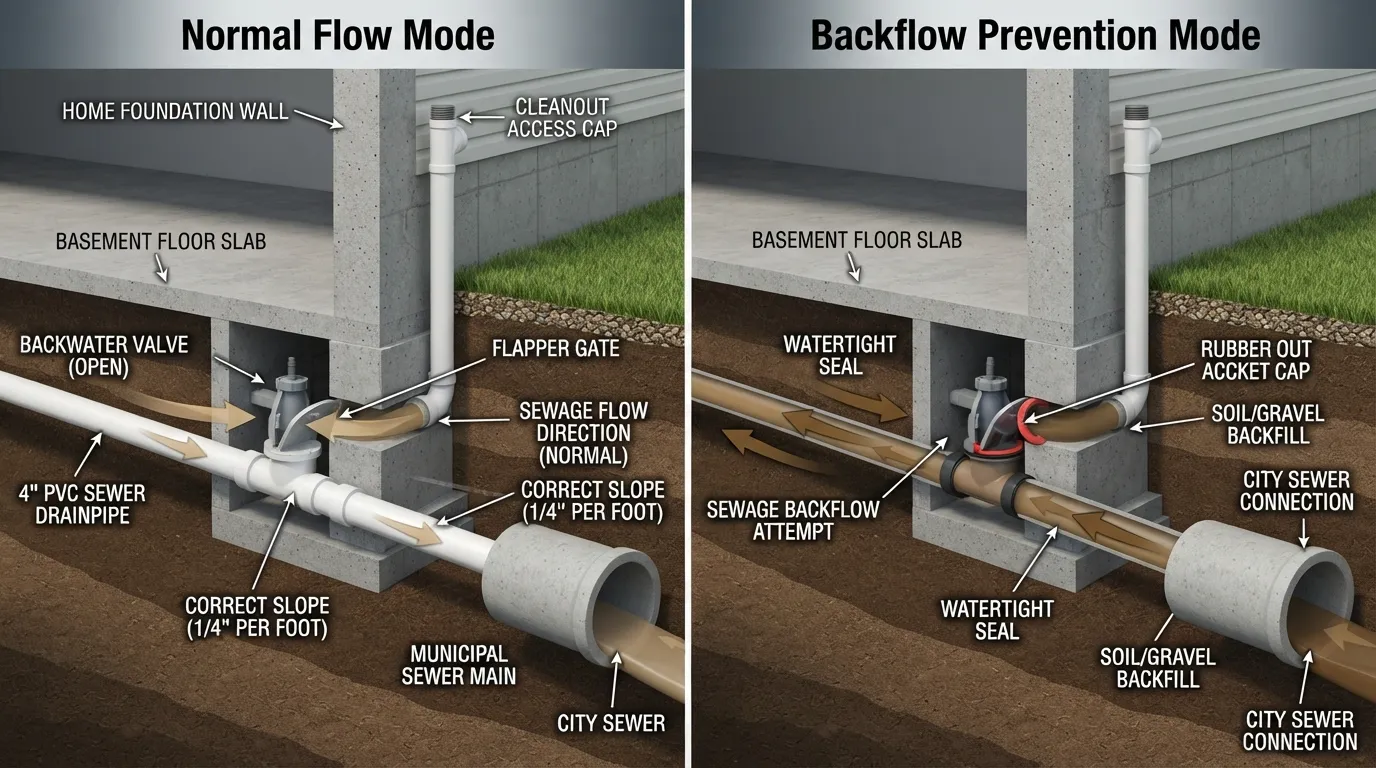
Installing a basement bathroom without a backwater valve leaves your entire lower level vulnerable to devastating municipal sewer backups. While standard plumbing guides focus solely on waste removal, seasoned professionals prioritize flood prevention as a mandatory safeguard for below-grade living spaces.
Integrating this specialized one-way gate protects your investment from catastrophic water damage caused by overloaded city mains during major storm events.
What Is a Backwater Valve and Why Basements Need One
A backwater valve is a mechanical check valve installed on your main sewer line that allows wastewater to flow freely out of your home while automatically sealing shut if municipal water attempts to flow backward. Because basements sit below the street level, they act as the lowest point of entry for overflowing municipal systems.
- One-Way Flapper Gate: A hinged internal flap opens outward as your household flushes and drains, but pivots closed against a rubber gasket if water surges in reverse.
- Clear Access Cover: Features a transparent, removable lid that allows homeowners to inspect internal components and clear trapped debris easily.
- Code Mandates: Many modern municipal plumbing codes require backwater valves on all new basement installations to mitigate city liability during extreme weather.
Where to Install It in Your Plumbing Layout
Strategic placement of the backwater valve ensures it intercepts all basement fixtures before the waste line exits the foundation wall. Proper installation depth also guarantees you can access the unit for routine maintenance.
- Main Collector Line: Position the valve on the primary horizontal drain pipe just before it leaves the basement foundation toward the municipal sewer or septic tank.
- Accessibility Pit: Install a flush-mounted access box in your concrete floor directly above the valve so you can remove the lid for annual cleaning.
- Isolation from Ejector Pits: Note that sewage ejector pumps naturally prevent backflow due to their sealed basins and built-in check valves, but gravity-fed lines require dedicated backwater protection.
Real Risk: What Happens Without One During Heavy Rain Sewer Backup
Ignoring backwater protection during heavy regional rainfall can result in thousands of gallons of raw municipal sewage flooding your finished basement. Understanding this risk highlights why professional builders never skip this critical safety component.
- Uncontrolled Backflow: Municipal sewer mains overwhelmed by stormwater force millions of gallons of mixed runoff backward through residential service pipes.
- Total Property Loss: Unchecked sewage destroys drywall, flooring, electrical outlets, and furniture within minutes, posing severe biological health hazards.
- Insurance Denials: Many homeowner insurance policies explicitly reject basement flood claims if municipal backup protection devices were not installed to local building codes.
How Much Does It Cost to Plumb a Basement Bathroom?
Budgeting for a basement bathroom requires examining labor variables, material choices, and structural modifications. Costs vary widely depending on whether you choose an excavation-heavy gravity layout or a surface-mounted upflush system.
Understanding these financial tiers helps homeowners allocate resources accurately and prevents unexpected overruns during construction.
Cost Breakdown Table: DIY vs Professional Installation
Gravity Drain vs Ejector Pump vs Upflush System Cost Comparison
The specific plumbing architecture you select dictates a significant portion of equipment and installation expenses. System complexity scales directly with how waste must travel to exit your home.
- Gravity-Fed Rough-In: Least expensive in hardware ($300 to $800 in materials), but high in labor if extensive concrete trenching is required to establish proper downward slope.
- Sewage Ejector Pump System: Moderate to high cost ($1,500 to $3,500 total for basin, pump, and pit installation), ideal for deep below-grade bathrooms requiring heavy-duty waste lifting.
- Upflush Macerator Unit: Cost-effective hardware ($900 to $2,000 for unit and specialty toilet) with near-zero labor expenses if installed independently above the finished floor.
Hidden Costs Permits Inspection Concrete Repair
Failing to account for administrative fees and structural restoration can derail your project budget halfway through completion. Always reserve a 15% contingency fund for unforeseen site conditions.
- Permit Fees: Municipal plumbing and building permits typically range from $150 to $400 depending on your local jurisdiction.
- Concrete Patching & Finishing: Buying high-strength concrete mix, gravel backfill, and sub-slab vapor barriers adds $200 to $600 in raw materials.
- Electrical Upgrades: Adding a dedicated GFCI circuit or powering a motorized ejector pump can introduce an extra $300 to $800 in electrician labor and materials.
Permits & Legal Requirements Don’t Skip This
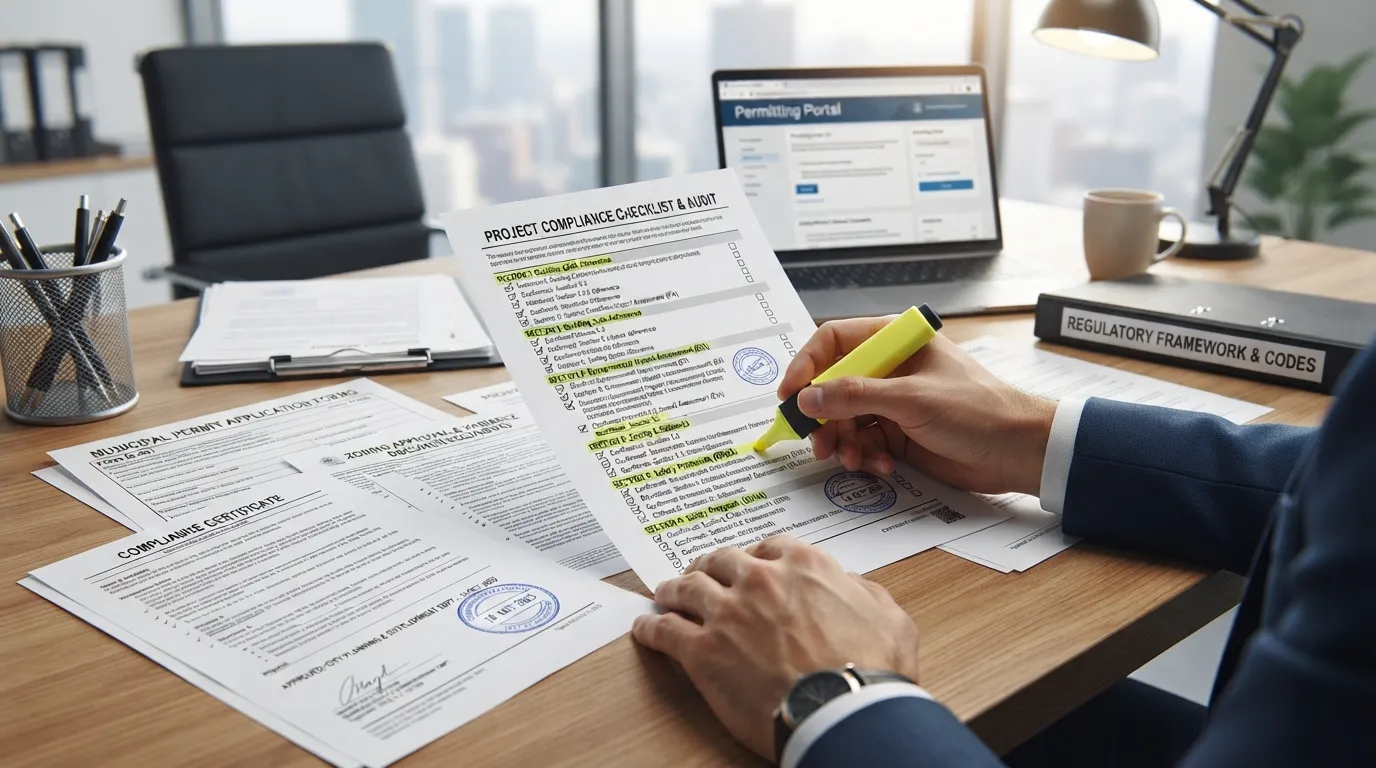
Securing proper legal authorization before starting your basement bathroom project protects you from regulatory fines, safety hazards, and financial penalties during future property transactions. Skipping municipal paperwork may seem like a shortcut, but it exposes homeowners to severe legal liabilities.
Review official guidelines from regulatory authorities such as the International Code Council to ensure your installation meets all regional plumbing standards.
Do You Need a Permit to Add a Basement Bathroom
Yes, almost every local building jurisdiction legally requires a dedicated plumbing and construction permit before adding a below-grade bathroom. Because these projects involve major modifications to your home’s drainage, venting, and structural concrete slab, municipal oversight is mandatory.
- Health and Safety Compliance: Permits ensure your DWV system prevents hazardous sewer gases and cross-contamination from entering your potable water supply.
- Structural Integrity: Building departments review your trenching and concrete-cutting plans to verify that foundation footings and load-bearing elements remain uncompromised.
- Official Inspections: Certified inspectors must visually verify rough-in pressure tests and backwater valve installations before trenches are permanently sealed.
What Happens If You Don’t Pull a Permit
Opting out of the permit process invites severe legal penalties that can disrupt your home life and drain your finances. Municipal enforcement agencies have strict protocols for handling unpermitted construction.
- Stop-Work Orders: If code enforcement discovers unpermitted concrete breaking or plumbing work, they can issue an immediate stop-work order and fine your property.
- Mandatory Tear-Downs: Local authorities can legally force you to tear open finished walls and concrete floors so inspectors can examine hidden pipe joints.
- Insurance Claim Rejections: Insurance providers frequently deny water damage payouts if a flood originates from unpermitted, non-compliant plumbing lines.
Selling a Home With Unpermitted Basement Work The Real Risk
Unpermitted basement bathrooms create massive complications when it comes time to put your property on the real estate market. Savvy buyers and home inspectors quickly identify unauthorized additions during routine pre-sale evaluations.
- Mandatory Disclosures: Most regional real estate laws require sellers to legally disclose whether major renovations were completed without proper municipal permits.
- Buyer Financing Delays: Mortgage lenders routinely withhold loan approvals until home inspection discrepancies and missing permits are fully retrofitted and certified.
- Escrow Deductions: Sellers often have to slash their asking price or pay thousands of dollars in emergency retroactive permit fees just to save a collapsing real estate deal.
Troubleshooting Common Basement Bathroom Plumbing Problems
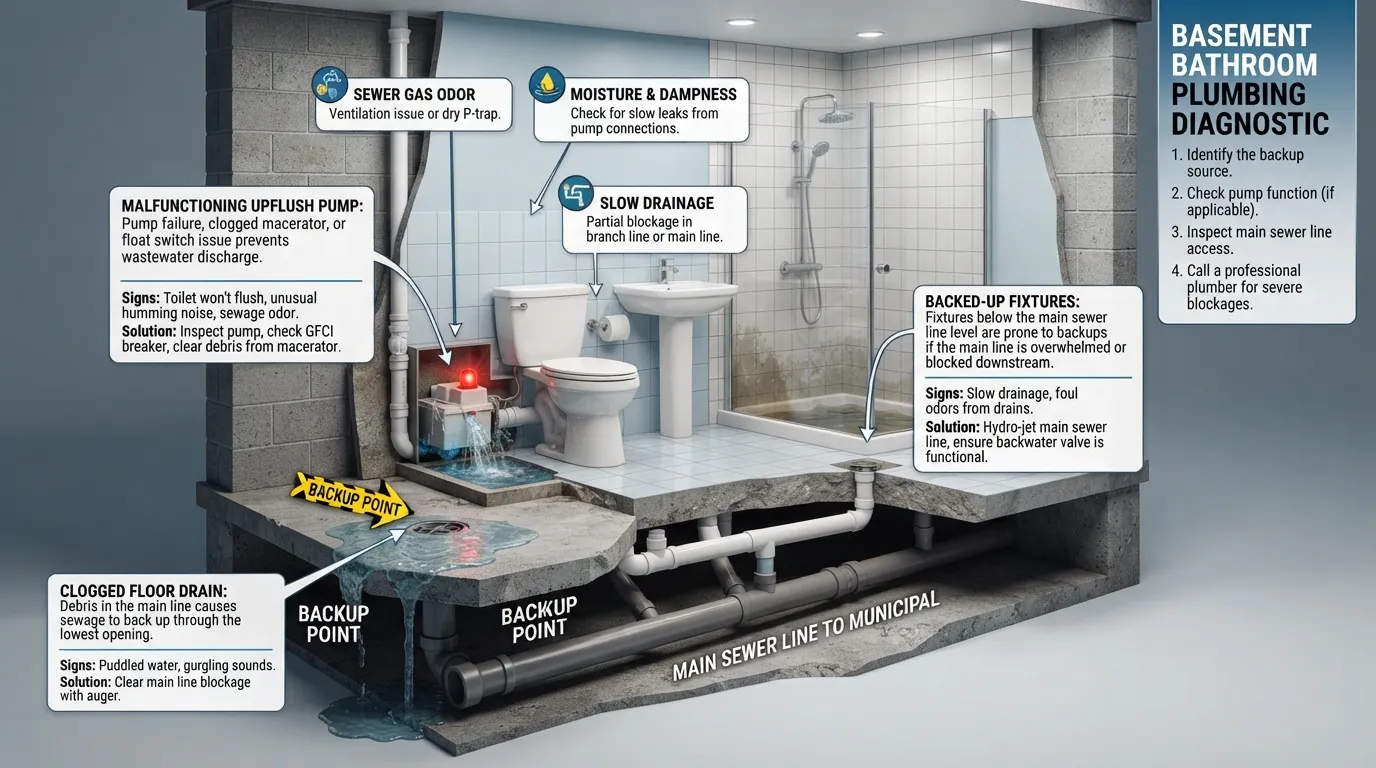
Maintaining a below-grade bathroom requires recognizing early warning signs of pressure imbalances, clogs, and improper grading. Addressing minor operational hiccups immediately prevents major plumbing failures and costly emergency repairs.
Equipping yourself with troubleshooting knowledge ensures your system runs efficiently year-round without unexpected odors or backups.
Why Does the Basement Bathroom Smell Like Sewage When the AC Is On?
Air conditioning units create strong negative pressure inside tightly sealed homes, pulling indoor air toward return vents and exhaust paths. When your HVAC system runs, it can suck air upward through dry or unvented plumbing traps, drawing foul sewer gases straight into your basement living space.
- Evaporated P-Trap Water: Infrequently used basement guest showers or floor drains lose their water seals quickly through natural evaporation.
- HVAC Pressure Pull: Negative indoor air pressure effectively overcomes weak or missing fixture trap seals, bypassing the drain’s natural gas barrier.
- Quick Fix Solution: Pour a full bucket of water down every basement drain monthly, and consider installing a trap primer to keep water seals permanently replenished.
How to Identify a Mysterious Existing Drain Pipe
Many older basements feature capped pipes or mysterious stub-ups left by previous owners or builders during original construction. Determining what these mystery lines connect to prevents accidental cross-contamination or improper fixture pairing.
- Perform a Water Test: Pour a colored dye solution down the mystery pipe while having a helper check downstream cleanouts or municipal sewer access points.
- Check Pipe Diameter: Measure the outside diameter with calipers; 3-inch or 4-inch pipes typically indicate main toilet lines, while 1.5-inch to 2-inch pipes serve sinks and showers.
- Consult Professional Cameras: Hire a plumber to run a flexible drain inspection camera down the mystery line to trace its exact path and structural condition.
Does a Basement Bathroom Always Need a Slope Fall?
Gravity-fed basement plumbing systems require a strict, continuous downward slope to utilize natural momentum for waste transport. However, the operational mechanics change completely when you introduce mechanical lifting pumps.
- Gravity-Fed Requirements: Standard horizontal waste pipes must maintain a consistent downward fall of at least 1/4 inch per linear foot to prevent solid waste from settling and clogging the line.
- Upflush System Exceptions: Macerator and sewage ejector pumps push waste under pressure, meaning discharge lines can travel horizontally or vertically upward before tying into gravity drains.
- Venting Slopes: Vent pipes must also maintain a slight upward pitch toward the exterior roof or air admittance valve to prevent condensation pooling inside the tube.
Frequently Asked Questions
Homeowners planning a below-grade plumbing project often have questions regarding cost-effectiveness, equipment requirements, and system independence. Reviewing these direct answers clarifies common uncertainties before starting construction.
Explore these expert responses to the most frequently asked questions about basement bathroom installations.
Is It Worth Putting a Bathroom in the Basement?
Adding a basement bathroom yields one of the highest returns on investment for home remodeling projects, frequently recovering 70% to 75% of its total cost upon resale. It expands your home’s functional square footage and dramatically increases overall property value.
- Home Value Boost: Transforming an unfinished basement into a full or half bath makes multi-story homes significantly more attractive to prospective buyers.
- Lifestyle Convenience: Eliminates the need to walk upstairs from basement rec rooms, home offices, or guest suites.
- Rental Income Potential: Enables you to convert your basement into an independent apartment or mother-in-law suite.
Do You Need a Special Toilet for a Basement Bathroom?
You only need a specialized toilet if your basement floor sits below the main sewer line and you choose an upflush or macerating system. If your plumbing layout uses traditional gravity-fed drainage, you can install a standard household toilet.
- Gravity Systems: Standard floor-mounted gravity toilets work perfectly if your basement sits above the sewer line and connects to a standard 3-inch sub-slab drain.
- Upflush Systems: Require rear-discharge macerating toilets that bolt to the floor and connect directly to an external pump box housing stainless steel cutting blades.
- Ejector Basin Systems: Standard floor-mounted toilets can be used, provided they drain downward into a sealed sub-floor ejector pit rather than a wall-mounted macerator.
Can You Add a Bathroom Without Breaking the Concrete Floor?
Yes, you can easily add a basement bathroom without breaking your concrete floor by installing an above-floor upflush macerating toilet system. These self-contained units sit directly on top of the finished slab and pump waste vertically through narrow wall pipes.
- Zero Excavation: Eliminates the need for heavy jackhammers, dust containment, concrete cutting, and trench backfilling.
- Fast Installation: Can be fully installed, plumbed, and wired by a DIYer or contractor in a single weekend.
- Flexible Placement: Allows you to add a bathroom in virtually any corner of your basement regardless of main drain locations.
Can a Basement Bathroom Be Independent of the Main Plumbing System?
A basement bathroom cannot operate entirely independently because all residential wastewater must eventually exit through your home’s main sewer line or private septic tank. Even self-contained upflush and ejector systems ultimately tie into your primary municipal drainage infrastructure.
- Ultimate Discharge: Every sewage ejector pump, macerator, and gravity line terminates at your home’s primary waste stack.
- Electrical Independence: While wastewater paths merge, systems like sewage pumps and macerators require their own dedicated electrical circuits to operate safely.
- Ventilation Integration: Basement vent stacks must ultimately tie into the house roof vent or utilize code-approved air admittance valves to equalize atmospheric pressure.
Final Thoughts Is DIY Basement Bathroom Plumbing Right for You?
Embarking on a basement bathroom installation is a major home improvement undertaking that demands careful self-assessment of your plumbing skills, time availability, and physical endurance. Balancing the satisfaction of hands-on remodeling against the technical demands of building codes ensures a successful, stress-free project.
Weighing your capabilities against potential challenges helps you decide whether to tackle the rough-in yourself or bring in licensed professionals for specialized tasks.
When to DIY vs When to Hire a Licensed Plumber
Deciding between a DIY build and professional contractor support depends heavily on your chosen plumbing method, local permit requirements, and comfort level with heavy construction. Knowing your limits prevents costly structural errors and code violations.
- When to DIY: Surface-mounted upflush systems, above-floor fixture assembly, cosmetic finishes, and minor drywall work are excellent projects for experienced, detail-oriented DIYers.
- When to Hire a Plumber: Deep concrete excavation, complex gravity-fed slope calculations, backwater valve integrations, and major municipal sewer tie-ins require licensed professional expertise.
- Hybrid Approach Strategy: Many savvy homeowners hire a licensed plumber strictly for the complex sub-slab rough-in and inspection sign-off, saving money by completing the fixture installations and cosmetic finishes themselves.

Oscar Vance | Master Plumber & Drainage Expert
Meet Oscar Vance, a licensed master plumber sharing practical solutions on residential repairs, preventive maintenance, and thoughtful home upkeep.

