What Is a Stub Out in Plumbing?
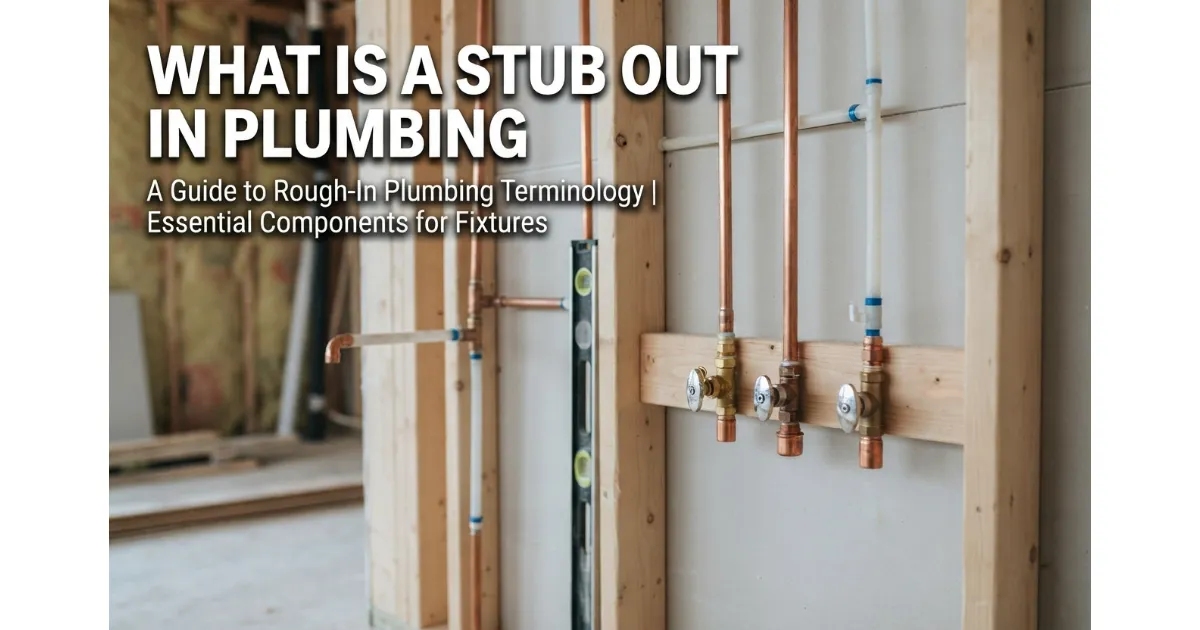 A plumbing stub-out is a short segment of pipe that protrudes from a wall or floor during the rough-in construction stage, serving as the designated termination point where plumbing fixtures will eventually connect. These capped lines temporarily seal water supply and drain systems behind unfinished drywall or tile, bridging the gap between behind-the-wall rough framing and final fixture installation.
Stub-Out Meaning in Simple Words
A stub-out is a short, sealed section of pipe extending from a wall or floor to mark where a fixture like a sink, toilet, or shower will connect. A common real-world example is the capped supply pipe sticking out beneath a bathroom vanity wall before the shut-off valve is attached.
- Acts as the temporary endpoint for water supply lines and drain lines.
- Secured with a tight cap to maintain system pressure and block dust or debris.
- Converts complex framing-stage plumbing into accessible attachment points for the finishing stage.
Why Plumbers Install Stub-Outs Before Walls Are Finished
Plumbers install stub-outs early in construction so that exact fixture locations are permanently locked in before drywall and tile conceal the inner piping networks. This precision prevents costly structural alignment errors down the road.
- Precise Fixture Location: Establishes exact rough-in coordinates for sinks, toilets, and showers so cabinets and tiles align perfectly.
- Debris Protection: Fitted with a durable cap to keep drywall dust, paint, and construction debris out of active water supply lines.
- Easy Final Connection: Simplifies the finishing stage by allowing plumbers or homeowners to quickly attach valves and fixtures without cutting open finished walls.
Types of Stub-Outs: Supply vs Drain
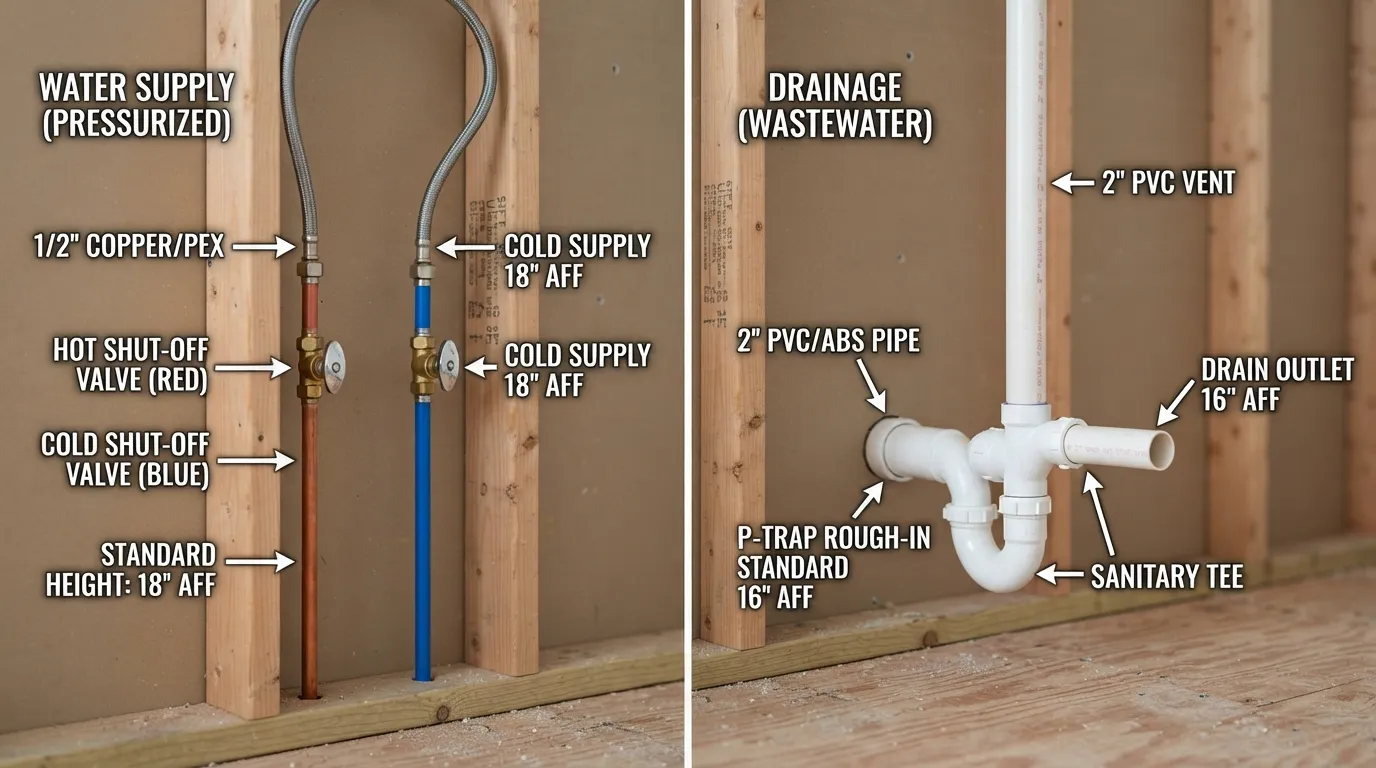 Plumbing systems rely on two distinct categories of stub-outs to function properly: water supply lines that deliver clean pressurized water and drain lines that safely carry wastewater away. Understanding the differences between these types is essential for proper rough-in installation and fixture hookup.
Water Supply Stub Outs
Water supply stub-outs deliver hot and cold water under pressure to fixtures like sinks, toilets, and washing machines. They are typically constructed from rigid copper or flexible PEX tubing.
- Material Options: Copper pipes are soldered securely in place, while PEX lines use crimp rings and specialized fittings.
- Hot and Cold Lines: Usually installed side-by-side, with hot water positioned on the left and cold water on the right.
- Valve Attachment: Capped initially during construction, these pipes eventually receive shut-off valves before the final fixture hose is attached.
Drain Stub Outs
Drain stub-outs handle wastewater leaving sinks, tubs, and showers, directing it safely into the main sewer or septic system via gravity. These lines operate under gravity flow rather than water pressure.
- Material Options: Built using durable plastic materials like PVC or ABS piping.
- Size Variations: Generally larger in diameter than supply lines to accommodate waste, soap scum, and debris (e.g., 1.5-inch or 2-inch pipes).
- Sewer Connection: Connects directly through sanitary tees and vent stacks down to the main building drain.
Stub Out Diagram Labeled
Visualizing a complete rough-in layout helps prevent alignment errors during cabinetry and finish work. The labeled diagram below illustrates the exact positioning of a supply stub-out, drain stub-out, protective cap, and stop valve location.
Gas and Other Stub Outs
Beyond water and drainage, specialized stub-outs are sometimes installed for gas appliances, outdoor hose bibs, or ice makers. Because gas lines carry extreme safety risks, any gas stub-out installation must strictly be performed by a licensed professional.
- Gas Lines: Usually crafted from black iron or coated corrugated stainless steel tubing (CSST) with a dedicated shut-off valve.
- Specialized Connections: Designed to supply fuel safely to stoves, dryers, or outdoor fire pits.
- Regulatory Compliance: Must pass rigorous pressure testing and local building inspections prior to wall closure.
Stub Out vs Rough-In vs Stub Up: What’s the Difference?
Plumbing terminology can be confusing, especially when terms like rough-in, stub-out, and stub-up are used interchangeably by homeowners and contractors. Understanding these precise distinctions ensures better communication with your plumber and clarifies the exact phase of your construction project.
Stub-Out vs Rough-In
A rough-in is the overarching preliminary phase where all hidden water supply, vent, and drain lines are installed inside open walls and floors before drywall goes up. A stub-out, by contrast, is a specific component or result of that phase—the actual short, capped pipe ending that protrudes into the room to await a future fixture.
- Rough-In: The comprehensive framework stage covering the entire layout of internal plumbing piping.
- Stub-Out: The individual termination point or endpoint created during the rough-in process.
- Relationship: You complete a plumbing rough-in to install multiple functional stub-outs.
Stub-Out vs Stub-Up
While both refer to pipes emerging to meet future fixtures, they differ primarily by directional orientation and structural location. A stub-out typically exits horizontally out of a wall, whereas a stub-up extends vertically upward through a floor slab or subfloor.
- Stub-Out: Projects horizontally out of wall studs (commonly seen under sinks and behind toilets).
- Stub-Up: Extends vertically upward through the floor or a concrete slab (frequently used for island sinks or freestanding tubs).
- Installation: Both require secure capping during construction to maintain system integrity and keep out debris.
Comparison Table
Where Stub-Outs Are Used: Fixture-by-Fixture Guide
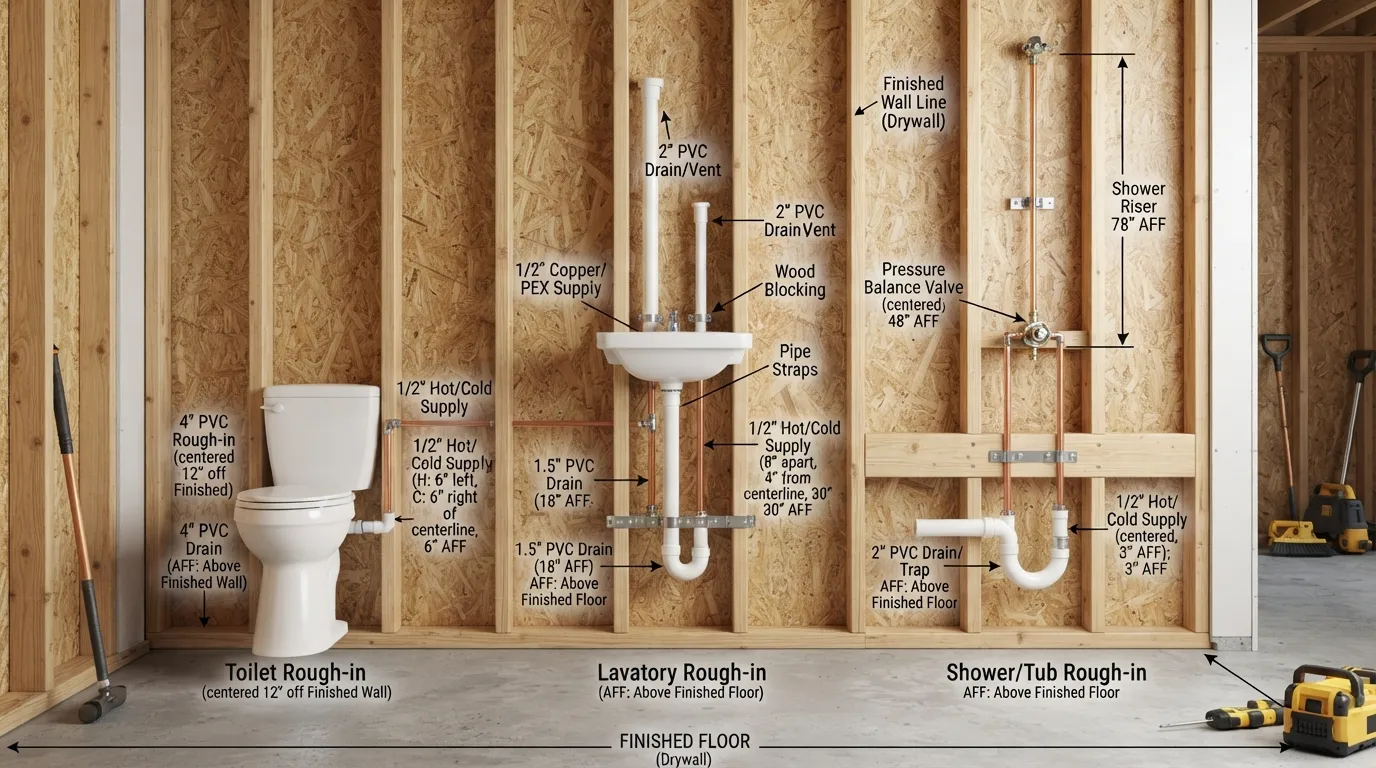
Plumbing stub-outs must be positioned with pinpoint accuracy for each specific fixture in your home. Even a fractional measurement error during the rough-in stage can prevent vanities, toilets, or trim kits from fitting correctly during finish plumbing.
Sink and Kitchen Stub-Outs
Kitchen and bathroom sinks require both hot and cold water supply lines alongside a central drain stub-out. These are traditionally coordinated to fit neatly inside the cabinet cavity behind the eventual sink basin.
- Supply Lines: Typically positioned about 2 to 4 inches apart horizontally and centered beneath the sink location.
- Drain Line: Placed centrally at a lower height to allow waste to flow downward into the main sanitary tee.
- Common Site Mistake: Failing to account for cabinet shelf bracing or drawer glides, which can block the angle stop valve once installed.
Toilet Stub-Outs
Toilet stub-outs consist of a single water supply pipe paired with a large floor-mounted waste drain flange (closet flange). Precision here is governed tightly by standard rough-in building codes.
- Supply Pipe: Usually stubbed out of the wall roughly 6 inches to the left of the toilet centerline and about 6 to 8 inches off the finished floor.
- Waste Flange: Set precisely 12 inches away from the finished back wall for standard toilets to ensure the tank clears the wall.
- Common Site Mistake: Not accounting for thicker tile or baseboard installations, causing the toilet tank to push against or fail to clear the wall.
Shower and Tub Stub-Outs
Shower and bathtub configurations involve concealed mixing valves with multiple short stub-outs routing water to the showerhead, tub spout, and pressure-balancing control valve.
- Tub Spout Stub: Typically positioned about 4 inches above the finished tub rim or specified floor height, projecting straight out from the wall.
- Showerhead Arm Stub: Rises up inside the wall to roughly 70 to 80 inches above the floor level for comfortable overhead spraying.
- Common Site Mistake: Leaving copper stub-outs too short to grab with a pipe wrench or failing to secure drop-ear elbows rigidly, causing the shower arm to wobble inside the wall.
Washing Machine and Other Appliances
Laundry rooms and ice makers require dedicated supply and drainage stub-outs housed within specialized recessed outlet boxes. These ensure hoses do not kink against drywall or restrict appliance placement.
- Laundry Box: Houses hot and cold supply valves alongside a downward-facing 2-inch drain stub-out.
- Height Standards: Typically installed 40 to 45 inches above the finished floor to remain easily accessible behind the washer.
- Common Site Mistake: Installing drain lines without a proper P-trap or failing to secure the standpipe height to local code minimums.
How Long Should a Copper Stub-Out Be?
A standard copper water supply stub-out should generally project 3 to 4 inches past the finished wall surface. This leaves ample length to attach an angle stop valve, slide on an escutcheon plate, and still have enough pipe remaining to cut or re-solder if future adjustments are needed.
Copper vs PEX vs PVC Stub-Outs: Which Is Better?
Choosing the right material for your plumbing stub-outs involves balancing cost, ease of installation, and long-term durability. While traditional copper has long been the gold standard for visible stub-outs, modern materials like PEX and PVC offer significant advantages in flexibility, labor savings, and corrosion resistance.
Is It Better to Stub Out Copper or PEX?
For visible wall stub-outs where a shut-off valve attaches, copper remains the preferred choice because it is rigid, looks professional, and withstands UV exposure. However, PEX shines for concealed runs due to its speed and flexibility.
- Cost-Effectiveness: PEX tubing and fittings are substantially cheaper than rigid copper tubing and soldered joints.
- Flexibility & Fewer Joints: PEX bends smoothly around corners, reducing the total number of fittings required behind the wall.
- Freeze-Resistance: PEX expands slightly when water freezes inside, making it far less prone to bursting than rigid copper.
- Fitting Methods: Copper requires soldering (sweat joints) or compression fittings, whereas PEX relies on crimp rings, clamp rings, or expansion tools.
Copper vs PEX Comparison Table
Do New Homes Use PEX or Copper?
The vast majority of new residential construction relies on PEX piping for water supply systems, capturing over 60% of new builds. Builders favor PEX because it dramatically reduces labor hours and material costs, allowing entire home runs to be installed in a fraction of the time required for traditional copper.
Why Do We No Longer Use Copper Pipes as Much?
While copper is still valued for its rigidity and antimicrobial properties, its market share has declined due to economic and practical factors. Copper is expensive to purchase, requires skilled labor to solder safely without fire risks, and can suffer from pinhole leaks when exposed to highly acidic or aggressive hard water chemistry over time.
What Is the Average Lifespan of Copper Pipes?
When installed correctly in homes with balanced water chemistry, copper pipes boast an impressive lifespan of 50 to 70 years. However, aggressive water quality, high mineral content, or stray electrical currents can cause premature corrosion and pinhole leaks well before that timeframe.
Why Do Plumbers Use PVC Instead of Copper?
It is vital to distinguish between water supply lines and drain lines. Plumbers use PVC (or ABS) exclusively for drain, waste, and vent (DWV) systems rather than copper. PVC is lightweight, smooth-bored to prevent clogs, highly resistant to chemical corrosion from household cleaners, and vastly more cost-effective for large-diameter waste pipes.
What Are Plumbers Using Instead of Copper Pipe?
For water supply lines, plumbers have widely transitioned to PEX tubing for concealed runs, often pairing it with copper stub-out elbows or pre-fabricated copper stub-out brackets where the pipe exits the wall. This hybrid approach gives the installer the cost and speed benefits of PEX behind the wall, combined with the clean, rigid aesthetic of copper at the finish connection point.
How to Install and Connect a Stub-Out
Whether you are roughing in a brand-new line or facing a finished copper stub-out wondering how to hook up your new vanity, following a structured workflow prevents leaks and costly mistakes. Professional plumbers always emphasize that proper preparation and pressure testing are the two steps DIYers skip most often.
Before You Start: Tools and Materials Checklist
Having the correct tools on hand ensures a clean installation without emergency trips to the hardware store during your project.
- Pipe Cutter: Designed specifically for copper or PEX tubing to guarantee clean, burr-free cuts.
- Deburring Tool or Sandpaper: Essential for smoothing sharp edges on copper pipe before installing fittings.
- Angle Stop Valve: Quarter-turn compression shut-off valve for the final fixture connection.
- Adjustable Wrenches: Two wrenches are required when tightening compression fittings to prevent twisting the pipe.
- Pressure Test Gauge Kit: Used to verify system integrity before closing up drywall.
How to Install a Supply Stub-Out
Installing a sturdy supply stub-out during the rough-in framing stage lays the foundation for a flawless finish later.
- Plan Fixture Coordinates: Measure and mark exact heights for your specific fixture (e.g., sink, toilet, or shower) according to manufacturer instructions.
- Mount Support Brackets: Secure a drop-ear elbow or mounting bracket firmly to a wood stud or added 2×4 blocking to prevent pipe movement.
- Run Supply Line: Connect your PEX or copper supply line from the main trunk line down to the mounting bracket.
- Secure and Cap: Leave 3 to 4 inches of pipe protruding past where the finished wall will be, and twist or solder a temporary cap on the end.
How to Connect a Fixture to an Existing Stub-Out
If you are looking at a protruding copper stub-out behind a newly finished wall and wondering what to do next, follow these steps to connect your shut-off valve.
- Remove the Temporary Cap: Turn off the main water supply to the house, carefully cut off the temporary test cap using a mini tubing cutter, and deburr the outside edge of the copper pipe.
- Slide on Escutcheon Plate: Slip the decorative wall flange (escutcheon) over the copper pipe and push it flush against the finished drywall or tile.
- Attach Compression Valve: Slide the compression nut and brass ferrule (olive) onto the copper stub-out, then seat the quarter-turn angle stop valve onto the pipe.
- Tighten Fitting: Hold the valve body steady with one wrench while turning the compression nut with a second wrench until snug, plus an additional quarter-turn.
Copper Stub Out with Compression Fitting: What to Know
Compression fittings create a watertight seal without requiring torches or solder, making them ideal for DIY fixture hookups. However, you must never reuse an old brass ferrule if you remove a valve, as compressed brass deforms permanently and will cause chronic slow leaks if re-tightened.
How to Test for Leaks Before Closing the Wall
Never close up walls or cabinets before validating your plumbing work under pressure. Attach a test gauge to the stub-out manifold, pressurize the system with air or water to normal operating levels (typically 50–80 psi), and monitor the gauge for at least 15 to 30 minutes to ensure zero pressure drop.
When to Call a Licensed Plumber
While installing a bathroom sink valve or connecting a vanity supply line is a manageable DIY task, certain situations demand professional expertise. Always hire a licensed plumber for gas line stub-outs, main sewer or stack connections, and any complex plumbing modifications requiring municipal code inspection sign-offs.
Plumbing Code Requirements for Stub Outs
 Plumbing codes govern every aspect of rough-in and finish work to protect public health, prevent contamination, and ensure structural safety. Because codes vary widely by state and municipality, understanding basic compliance parameters helps ensure your stub-out installations pass inspection on the first attempt.
Do Stub Outs Have Code Requirements?
Yes, stub-outs are strictly regulated by regional plumbing codes such as the International Plumbing Code (IPC) and the Uniform Plumbing Code (UPC). Because local jurisdictions often adopt modified versions of these model codes, you must always confirm specific requirements with your local building authority or inspector before starting work.
Common Areas Codes Usually Address
Building inspectors evaluate stub-out installations closely during rough-in inspections to verify system safety and durability. Key compliance checkpoints typically include:
- Secure Pipe Support: Stub-outs must be rigidly clamped or braced to framing members to prevent movement when valves are turned or connected.
- Proper Capping and Pressure Testing: All active supply stub-outs must be securely capped and subjected to hydrostatic or air pressure tests before walls are closed.
- Material Approvals: Piping and fittings must carry official certifications (such as NSF or ASTM ratings) confirming they are approved for potable water or sanitary drainage.
- Corrosion Protection: Provisions must prevent dissimilar metals from touching or shield pipes passing through concrete foundations from corrosive elements.
What Is the 135 Rule in Plumbing?
In drainage design, plumbers frequently reference the 135-degree rule, which limits the total aggregate change in horizontal direction (such as a 90-degree bend combined with a 45-degree bend) before an additional cleanout access point is required by code. Keeping total direction changes under this threshold ensures proper wastewater flow and prevents chronic clogging in sink and shower drain lines.
How to Check Your Local Requirements
Never rely solely on general online guides when planning complex plumbing layouts. You can review national regulatory standards directly through resources like the International Code Council codes library, and you should always visit your local municipal permit office or consult a licensed local plumber to verify exact regional amendments.
Common Stub Out Mistakes and How to Fix Them
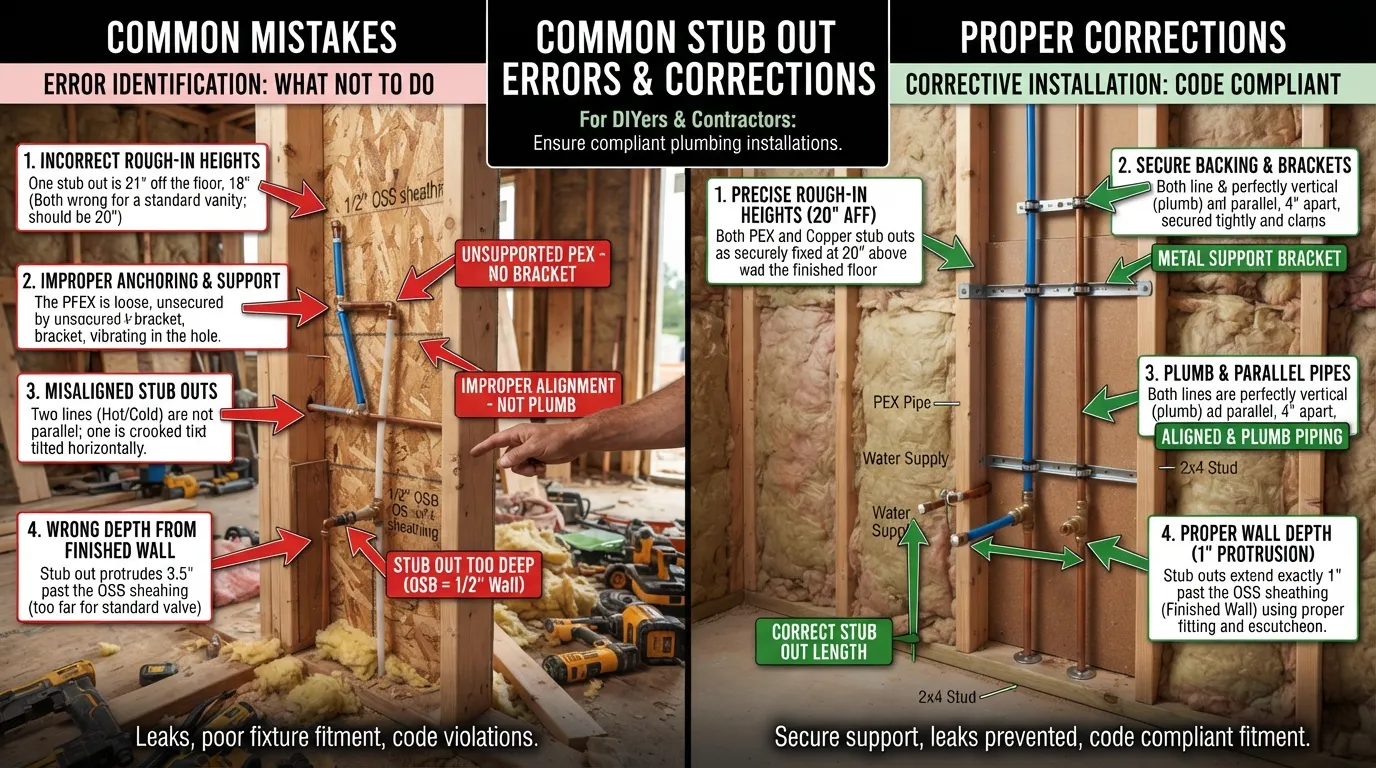 Even seasoned DIYers and apprentice plumbers occasionally make installation errors during the frantic rough-in phase. Catching these mistakes before drywall goes up prevents disastrous leaks, ruined finishes, and costly teardowns later on.
Stub-Out Too Short or Too Long
If a stub-out protrudes too far past the wall, escutcheon plates won’t sit flush, and cabinets may not fit correctly. Conversely, if it is too short, you won’t have enough pipe to grip with a wrench or attach a compression valve safely.
- Too Short Fix: Use an approved internal pipe extender or carefully chip away a small amount of drywall or backing to expose enough copper or PEX for a secure coupling.
- Too Long Fix: Use a mini tubing cutter to trim the excess pipe squarely, ensuring you deburr the cut edge before tightening any valves.
- Pro Tip: Professional plumbers always dry-fit vanities and trim kits before finalizing wall board to catch length discrepancies instantly.
Wrong Height or Wrong Position
Misjudging vertical or horizontal heights by even an inch can throw off toilet tank clearance or cause supply lines to collide with internal vanity drawers and shelving.
- Fixing Off-Center Lines: If PEX was used, gently re-route the flexible line before clamping it down. If rigid copper was soldered in place, you may need to cut out the fitting and resolder with an offset coupling.
- Cabinet Interference: Always measure the interior clearance of your exact sink vanity model before mounting supply lines.
Uncapped or Poorly Capped Stub-Outs
Leaving a stub-out open during drywall sanding and painting is one of the most common site errors, allowing fine drywall dust and debris to jam valves or ruin internal cartridge seals.
- The Mistake: Wrapping a pipe with simple plastic tape or leaving it completely open while contractors work nearby.
- The Fix: Always ensure every single water and drain line is securely threaded, soldered, or glued with a proper test cap immediately upon installation.
Leaking or Corroded Stub-Out
Corrosion often occurs when dissimilar metals (like copper touching galvanized steel without a dielectric union) interact, or when flux is not properly cleaned off after soldering.
- Fixing Galvanic Corrosion: Cut out the affected section and replace it using approved dielectric transition fittings or brass connectors.
- Solder Residue: Always wipe freshly soldered joints thoroughly with a damp rag to remove acidic flux residue that eats away at copper over time.
Mixing Incompatible Materials or Fittings
Using incorrect adapters or forcing push-fit fittings onto poorly prepped, scratched pipes almost always results in slow, hidden leaks behind finished walls.
- Material Mismatches: Never connect copper directly to certain metals without proper dielectric isolation to prevent rapid electrochemical decay.
- Fitting Care: Always check that PEX stiffeners are fully inserted and copper pipes are perfectly deburred before tightening compression nuts.
Before You Close the Wall Checklist
Review this vital checklist before hanging a single sheet of drywall or tile to guarantee your stub-out installation is airtight and code-compliant.
- Rigid Support: Are all stub-outs securely braced to studs or blocking so they don’t wiggle or wobble?
- Pressure Test Passed: Has the system held stable pressure on a test gauge for at least 30 minutes?
- Correct Protrusion: Do all supply lines extend exactly 3 to 4 inches past the estimated finished wall surface?
- Capped and Sealed: Are all line ends securely capped to prevent dust and debris contamination?
DIY or Hire a Plumber? Cost and Safety Considerations 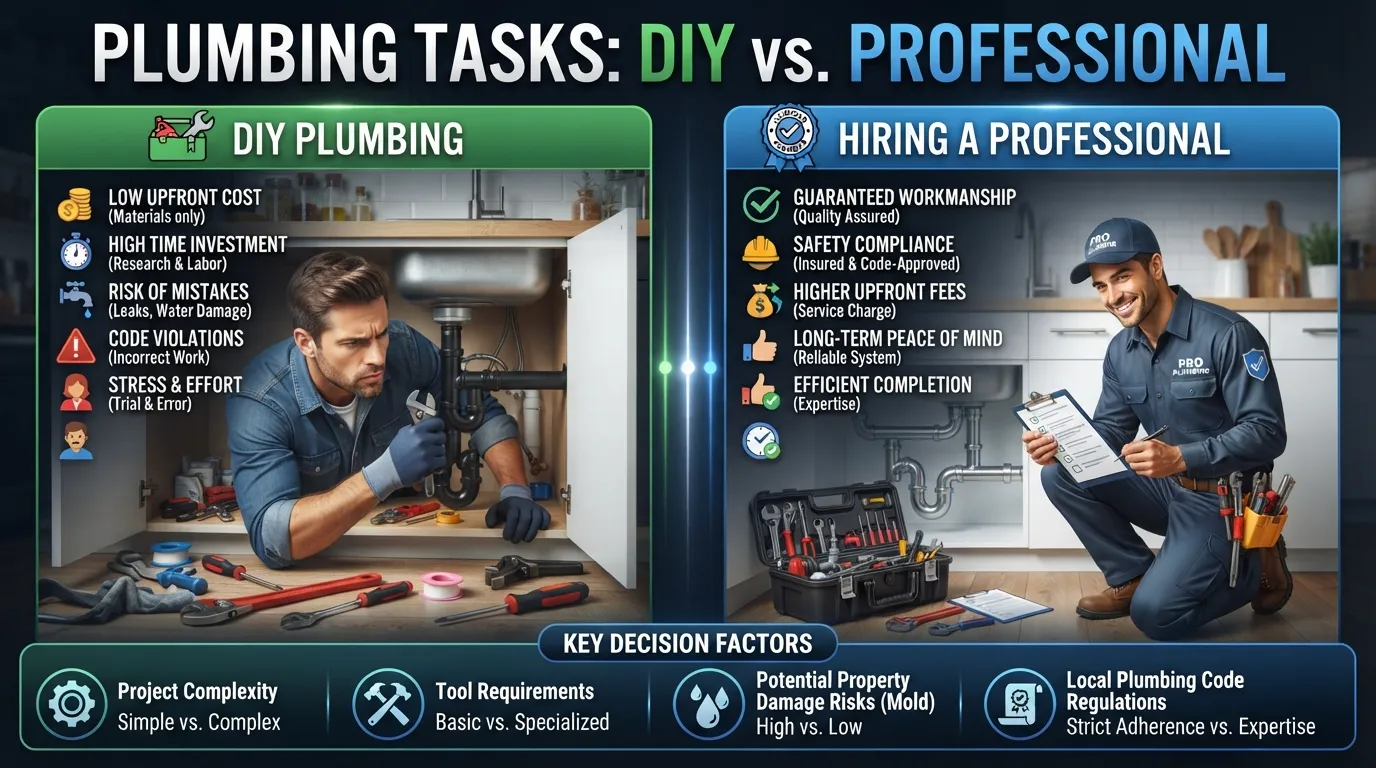
Deciding whether to tackle your plumbing stub-outs yourself or hire a licensed professional depends on your skill level, local building regulations, and the complexity of the project. Balancing upfront savings against the risk of costly water damage is crucial for any remodeling or new construction timeline.
What You Can Usually DIY
Homeowners with basic mechanical skills can successfully handle certain straightforward plumbing tasks without professional intervention.
- Attaching Finish Valves: Screwing quarter-turn compression stop valves onto pre-installed copper stub-outs under a vanity.
- Replacing Damaged Escutcheons: Sliding new decorative wall plates over existing pipes during cosmetic bathroom updates.
- Dry-Fitting Fixtures: Measuring and checking fixture alignments before final connections are made.
When to Call a Licensed Plumber
Certain plumbing tasks carry severe risks if performed incorrectly, making professional licensing and insurance essential.
- Gas Line Stub-Outs: Any installation or modification involving gas supply lines requires professional expertise and mandatory safety sign-offs.
- Main Stack and Drainage Modifications: Tying into core cast iron or PVC vertical waste stacks requires precise sloping and venting knowledge.
- Code-Sensitive New Construction: Whole-house rough-ins that require formal municipal permits and official inspection sign-offs.
Factors That Affect Cost
Hiring a professional plumber for rough-in and stub-out work involves several variables that influence overall project pricing.
- Material Selection: Installing traditional copper with soldered fittings generally requires more labor time than crimping flexible PEX systems.
- Number of Fixtures: Multi-bathroom homes or complex kitchens with island sinks increase the total number of required supply and drain stub-outs.
- Accessibility: Working inside cramped crawlspaces, multi-story framing, or thick concrete slabs drives up labor costs.
Stub Out in Other Contexts: Electrical and Construction
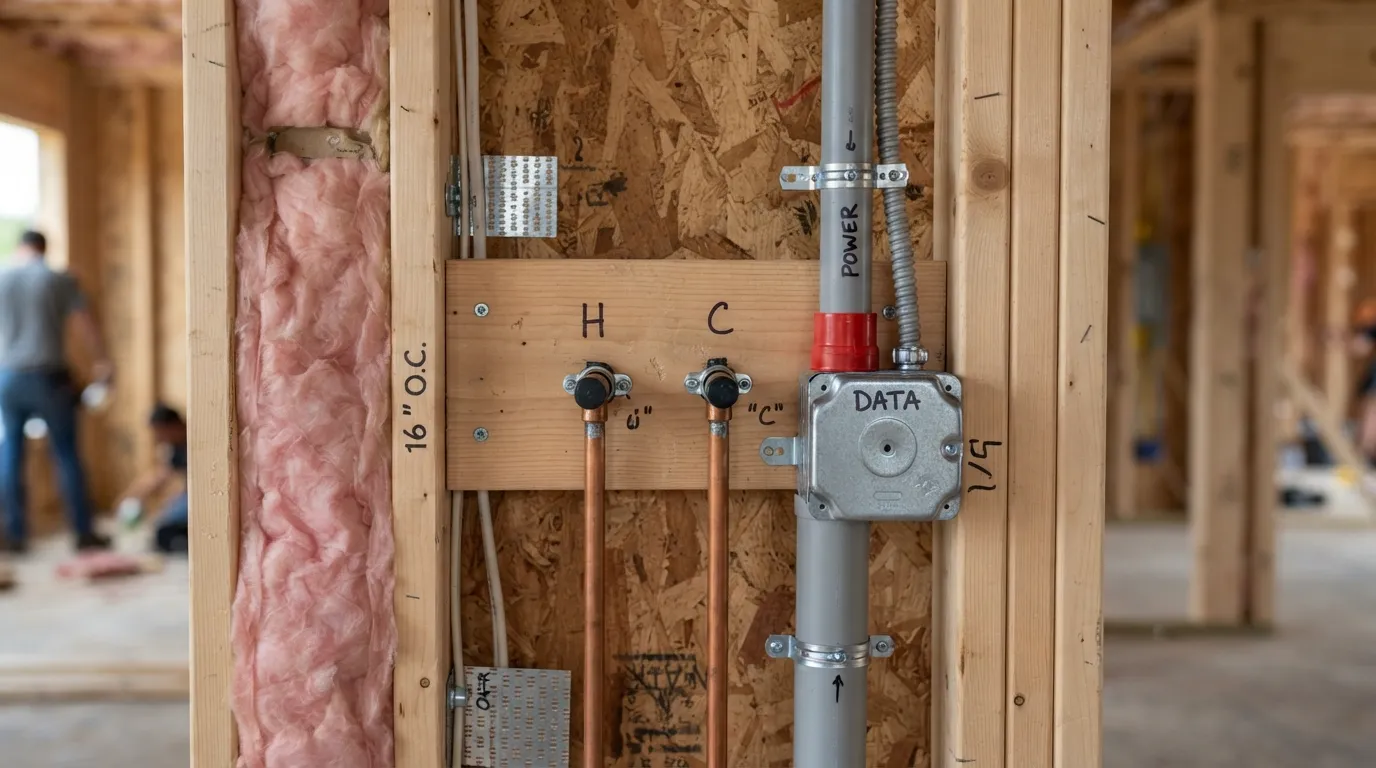 While the term “stub-out” is most frequently used in plumbing, the underlying concept appears across multiple trades in residential and commercial construction. Knowing how other trades utilize stub-outs prevents miscommunication on multidisciplinary job sites.
Stub-Out Meaning in Construction
In general construction and civil engineering, a stub-out refers to any partially completed utility line, conduit, or structural sleeve left protruding from a foundation, slab, or wall to facilitate future connections. These temporary or interim connection points ensure that future phases of a build can tie into core infrastructure without requiring destructive excavation or core drilling later on.
- Foundation Sleeves: PVC pipes cast directly into concrete footings to allow future plumbing or electrical runs to pass underneath without weakening the slab.
- Utility Stub-Outs: Water, sewer, or electrical conduits extended just past a property line or building footprint for easy hookup by secondary contractors.
Stub-Out in Electrical Work
In electrical contracting, the equivalent term is often a “stub-up” or utility conduit stub, referring to an empty electrical conduit that rises out of a concrete floor or wall cavity. Electricians run these curved conduit sections through framing or slabs so that power and low-voltage wiring can be pulled safely through walls without exposure to structural damage.
Frequently Asked Questions
What does stub out mean in plumbing?
A stub-out is a short segment of pipe protruding from a wall or floor during the rough-in stage, acting as the designated connection point for future plumbing fixtures like sinks or toilets (as covered in Section 1).
What is a copper stub-out used for?
A copper stub-out is used primarily for water supply lines to bridge hidden in-wall piping with visible finish shut-off valves, offering structural rigidity and a professional aesthetic.
How do you cap a stub-out?
A stub-out is capped using a threaded plug, soldered copper cap, or mechanical test cap secured tightly over the pipe end to maintain system pressure and block construction dust and debris.
Can I move or extend a stub-out?
Yes, stub-outs can be extended or shifted, though rigid copper lines require cutting and resoldering with couplings, while flexible PEX lines can be easily re-routed before walls are closed.
What is a stub-out connection?
A stub-out connection refers to the interface where an angle stop valve or supply line attaches directly onto the protruding rough-in pipe during the finish plumbing phase.
Is a stub-out the same as a rough-in?
No, a rough-in is the comprehensive framework stage for all hidden building pipes, whereas a stub-out is an individual termination point resulting from that process (see Section 3 for full details).
Are stub-outs always capped?
Yes, active water supply and drain stub-outs must always be securely capped during construction to preserve internal system pressure and keep drywall dust out of the lines.
Conclusion and Key Takeaways
Mastering the mechanics of plumbing stub-outs bridges the gap between rough framing and a flawless, leak-free finish. Whether you are remodeling a bathroom, planning a new kitchen, or simply preparing to install a shut-off valve, understanding how these critical endpoints function ensures long-term system reliability.
Key Takeaways
- Definitional Clarity: A stub-out is a short, securely capped pipe extending from a wall or floor that acts as the transition point between hidden rough-in lines and finish fixtures.
- Material Strengths: Copper provides rigid durability for visible wall stub-outs, while PEX and PVC streamline behind-the-wall runs and drainage systems.
- Precision Matters: Exact measurements for fixtures like sinks, toilets, and showers prevent misalignment during cabinetry and drywall installation.
- Mandatory Testing: Always perform air or hydrostatic pressure tests and verify local plumbing codes before closing up walls

Oscar Vance | Master Plumber & Drainage Expert
Meet Oscar Vance, a licensed master plumber sharing practical solutions on residential repairs, preventive maintenance, and thoughtful home upkeep.

