Standard Dimensions of a Single-Gang Electrical Box
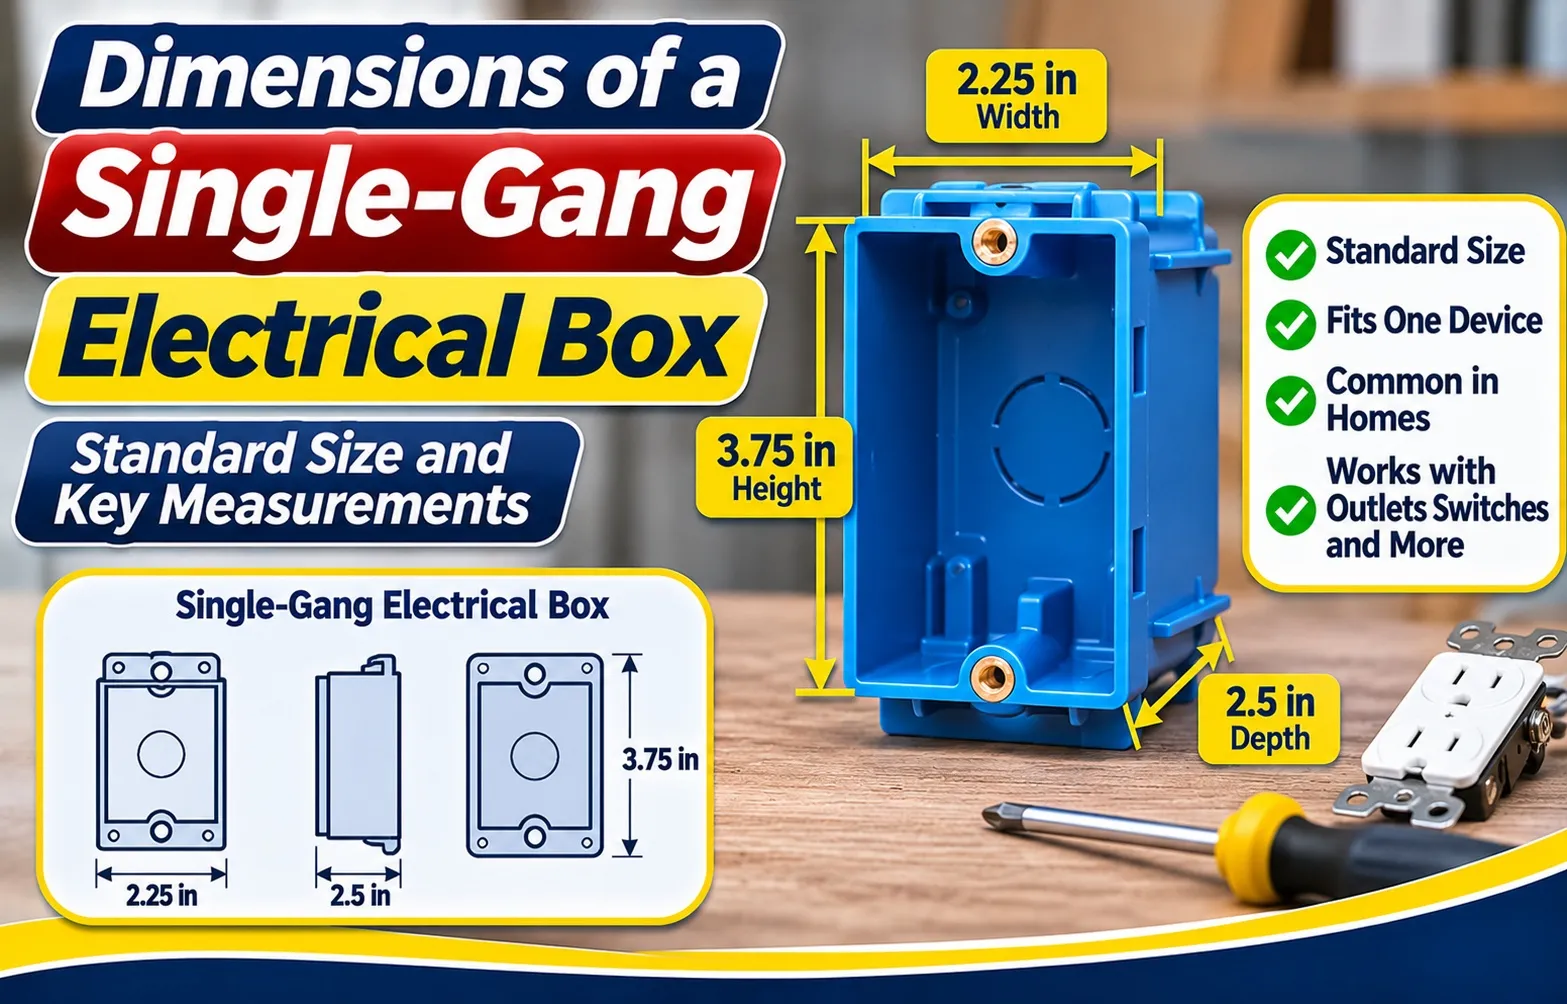 A standard single-gang electrical box typically measures approximately 2 inches wide by 3 inches high, with depths ranging from 1.5 inches to 3.5 inches. These core standard measurements provide the necessary interior volume to safely house standard single-gang wiring devices, switches, outlets, and cable connections within residential and commercial wall cavities.
Overview of Standard Single-Gang Sizes
Physical dimensions vary slightly depending on the specific box material, application style (such as new work vs. old work boxes), and intended wiring capacity:
- Standard Width: Typically ranges between 2 inches and 2.25 inches to match standard wall stud spacing and drywall cutouts.
- Standard Height: Usually spans between 3 inches and 4 inches, accommodating standard switch plates and receptacle covers.
- Standard Depth: Ranges from shallow 1.5-inch boxes up to deep 3.5-inch boxes required for bulky smart home switches and dimmers.
Imperial and Metric Conversion Summary
For precise technical planning and international measurement standards, standard single-gang electrical box dimensions convert into metric units as follows:
- Width Conversions: 2 inches equals approximately 50.8 mm (5.08 cm); 2.25 inches equals 57.15 mm (5.71 cm).
- Height Conversions: 3 inches equals approximately 76.2 mm (7.62 cm); 4 inches equals 101.6 mm (10.16 cm).
- Depth Conversions: 1.5 inches equals 38.1 mm (3.81 cm); 3.5 inches equals 88.9 mm (8.89 cm).
Single-Gang Electrical Box Size & Capacity Master Chart
Selecting the correct single-gang electrical box requires evaluating both physical dimensions and interior cubic-inch capacity to comply with electrical codes. Understanding precise measurements across various configurations ensures safe wiring management without overcrowding wall cavities.
Comprehensive Box Dimensions Comparison Table
Reviewing standardized specifications across standard box types helps installers select optimal hardware for new construction, retrofits, or shallow wall cavities. The following master chart details standard dimensions, metric conversions, and volume capacities:
Plastic vs. Metal Material Breakdown
Material selection dictates how an electrical box handles grounding, structural durability, and interior box volume requirements during installation. Each material serves distinct functional roles depending on wiring configurations:
- PVC Plastic Boxes: Brand lines like Carlon provide lightweight non-conductive enclosures that do not require manual grounding wire attachments, making them popular for residential wiring.
- Metal Utility Boxes: Steel options like the Raco 509 offer high physical impact resistance and durability, commonly used in industrial settings or surface-mount applications.
- New Work Configurations: Engineered with integrated mounting nails or brackets to secure directly to studs before drywall installation.
- Old Work Configurations: Equipped with swing-brackets or wing clips that clamp onto existing drywall edges for secure retrofit mounting without wall demolition.
- Cubic-Inch Capacity Management: Metal and plastic enclosures vary significantly in usable interior box volume, dictating how many electrical conductors can safely pass through without violating safety codes.
Old-Work Electrical Box Cutout Dimensions: The Ultimate Drywall Guide
Cutting the correct drywall opening for an old-work electrical box prevents loose fittings, wall damage, and installation failures. Precision is essential because retrofit boxes rely on flange lips and internal wing clips to secure tightly against the drywall surface.
Exact Drywall Cutout Sizing for Plastic Retrofit Boxes
Standard single-gang plastic retrofit boxes require specific wall hole dimensions to ensure proper alignment and secure mounting within the wall cavity. Minor miscalculations can compromise the stability of the entire device.
- Standard Cutout Dimensions: Most single-gang plastic old-work boxes require an opening measuring approximately 2-1/4 inches wide by 3-5/8 inches high.
- Manufacturer Templates: Always verify the physical cardboard or plastic template packaged with the retrofit box, as minor dimensional variances exist between brands.
- Flange Overlap Safety: Cutting even a quarter-inch too wide can cause the mounting ears or clamping screws to slip through the drywall hole, destroying the mount.
Metal Old-Work Box Template Dimensions
Metal old-work electrical boxes utilize specialized support brackets or retrofit clips that demand exact cutout margins. Because metal lacks the flexible give of PVC plastic, precision is critical.
- Cutout Measurements: Metal retrofit utility and switch boxes typically demand a cutout width of 2-1/8 inches and a height of roughly 3-3/4 inches.
- Tracing Perimeters: Trace the exact outer body perimeter of the metal box (excluding the exterior mounting flanges) to ensure a snug wall fit.
- Preventing Movement: A tight metal cutout prevents the enclosure from shifting, rocking, or loosening when heavy switches or plugs are repeatedly inserted.
Step-by-Step Drywall Tracing and Cutting Tips
Executing clean wall openings requires proper marking tools and methodical drywall removal techniques to protect surrounding finishes. Following a structured cutting process ensures professional results.
- Use the Box as a Stencil: Hold the open face of the old-work electrical box against the wall at your desired height and trace its outer perimeter with a pencil.
- Scale Inward: Draw a second inner line matching the exact manufacturer-specified cutout dimensions to ensure the outer flange completely hides any gaps.
- Cutting Tools: Use a sharp utility knife to score the paper face first, followed by a jab saw to cut cleanly through the gypsum core without chipping paint.
- Dry-Fitting: Insert the retrofit box into the finished cutout before pulling wires to confirm that the wing clips rotate and clear internal studs properly.
How to Calculate NEC Wire-Fill and Box Capacity
Complying with the National Electrical Code (NEC) requires ensuring that an electrical box provides enough interior cubic-inch capacity to safely accommodate all incoming wires, devices, and clamps. Overcrowding box volume increases electrical resistance and creates severe fire hazards.
National Electrical Code (NEC) Volume Requirements
The National Fire Protection Association (NFPA) standards dictate strict box fill calculations to prevent heat buildup inside residential and commercial wall spaces. Every internal component takes up specific cubic-inch space based on wire gauge sizes:
- Conductor Volume Allowances: 14 AWG requires 2.0 cu. in. per conductor; 12 AWG requires 2.25 cu. in.; 10 AWG requires 2.5 cu. in.
- Ground Wire Deduction: All internal ground wires combined count as a single deduction equal to the largest single ground conductor present in the box.
- Internal Clamp Allowance: One or more internal cable clamps count as a single conductor volume equivalent based on the largest wire connected to the box.
- Device Yoke Deduction: Standard switches or outlets (devices) count as two conductor volumes based on the largest wire connected to their terminals.
Step-by-Step Box Fill Calculation Formula
Calculating total box volume requirements involves tallying every individual element entering the enclosure and comparing the sum against the manufacturer’s labeled box capacity.
- Count Current-Carrying Wires: Total all hot and neutral conductors terminating inside the box (each counts as 1 volume unit). Wires passing straight through without joining count as 2 units.
- Add Ground Wires: Group all ground wires together and count them as a single conductor volume unit based on the wire gauge size.
- Account for Clamps and Devices: Add 1 volume unit for internal cable clamps, and add 2 volume units for each installed switch, receptacle, or dimmer device.
- Calculate Minimum Cubic Inches: Multiply the total count of conductor equivalents by the required cubic-inch volume per conductor for your wire gauge. Ensure your chosen electrical box exceeds this minimum requirement.
Choosing the Right Depth for Smart Switches, Dimmers, and USB Outlets
Modern electrical upgrades often fail during installation because older wall boxes lack the physical space needed for bulky electronic devices. Choosing the correct box depth prevents crushed wires, unsafe pinching, and device malfunctions.
Why Standard 1.5-Inch Boxes Fail with Smart Devices
Standard shallow enclosures provide minimal cubic-inch capacity, creating severe physical constraints when housing advanced wall hardware. Traditional metal or plastic boxes measuring only 1.5 inches deep frequently trigger installation bottlenecks.
- Bulky Device Bodies: A modern smart switch or high-end dimmer switch features thick integrated relay blocks and radio modules that occupy significantly more volume than standard mechanical toggles.
- Neutral Wire Requirements: Smart switches require an extra neutral wire bundle connection inside the enclosure, which drastically increases wire crowding.
- USB Receptacle Density: A built-in USB receptacle houses an integrated power transformer block directly behind the faceplate, leaving almost zero clearance in shallow enclosures.
- Thermal Heat Dissipation: Overcrowded wiring traps electrical heat, creating thermal risks and shortening the operational lifespan of electronic switches and dimmers.
When to Upgrade to Deep Boxes (2.75″ to 3.5″)
Replacing shallow enclosures with an oversized deep electrical box eliminates cramping and ensures compliance with wiring capacity codes. Upgrading is essential when retrofitting advanced electronics into older homes.
- Multiple Cable Entries: Upgrade to deep boxes whenever three or more heavy-gauge NM-B cables enter a single switch location.
- Smart Home Hub Installations: Any wall location designated for Wi-Fi or Zigbee connected switches should use boxes measuring 2.75 inches to 3.5 inches deep.
- Effortless Folding: Deeper enclosures allow installers to neatly fold conductors accordion-style without placing excessive strain on terminal screws or wire nuts.
Frequently Asked Questions
Answering common installation questions helps clarify electrical box specifications, sizing rules, and selection criteria for DIYers and contractors alike.
What are the dimensions of a 1-gang metal box?
A standard single-gang metal electrical box typically measures approximately 2 inches wide by 3 inches high, with standard depths ranging from 1.5 inches to 2.5 inches. Heavy-duty utility or handy boxes often measure around 4 inches long by 2 inches wide by 1-7/8 inches deep.
- Depth Variations: Metal boxes come in shallow, standard, and deep profiles to accommodate various wiring setups.
- Nominal Size: The nominal designation refers to a single device opening designed for one switch or outlet.
What is the standard size of an electrical utility box?
Standard electrical utility boxes, commonly referred to as handy boxes, are manufactured in rectangular single-gang sizes. They are most frequently utilized for surface-mount wiring or exposed conduit runs.
- Typical Dimensions: 4 inches in length, 2 inches in width, and 1-7/8 inches in depth.
- Capacity: Typically provides around 12 to 13 cubic inches of interior wiring volume.
How do you measure a single-gang electrical box correctly?
Measuring an electrical box accurately requires checking both outer structural dimensions and interior usable space. Proper technique ensures the enclosure fits securely into wall cavities and satisfies code limits.
- Measuring Width and Height: Measure from the outermost edges of the box opening or mounting flanges using a precision tape measure or caliper.
- Measuring Depth: Measure from the back interior wall of the box straight out to the front opening edge to determine true usable depth.
- Evaluating Nominal Size: Always verify cubic-inch capacity stamped inside the box rather than relying purely on external dimensions.
What is the difference between new work and old work single-gang boxes?
The primary difference between new work and old work single-gang boxes lies in how they mount to wall structures during construction or remodeling phases.
- New Work Boxes: Designed for open framing; feature integrated side nails or brackets that attach directly to exposed wooden or metal studs before drywall is installed.
- Old Work Boxes: Built for retrofit projects; feature flip-out wing clips or retention tabs that clamp onto existing drywall edges without requiring wall demolition.

Oscar Vance | Master Plumber & Drainage Expert
Meet Oscar Vance, a licensed master plumber sharing practical solutions on residential repairs, preventive maintenance, and thoughtful home upkeep.