Immediate Safety & Diagnosis
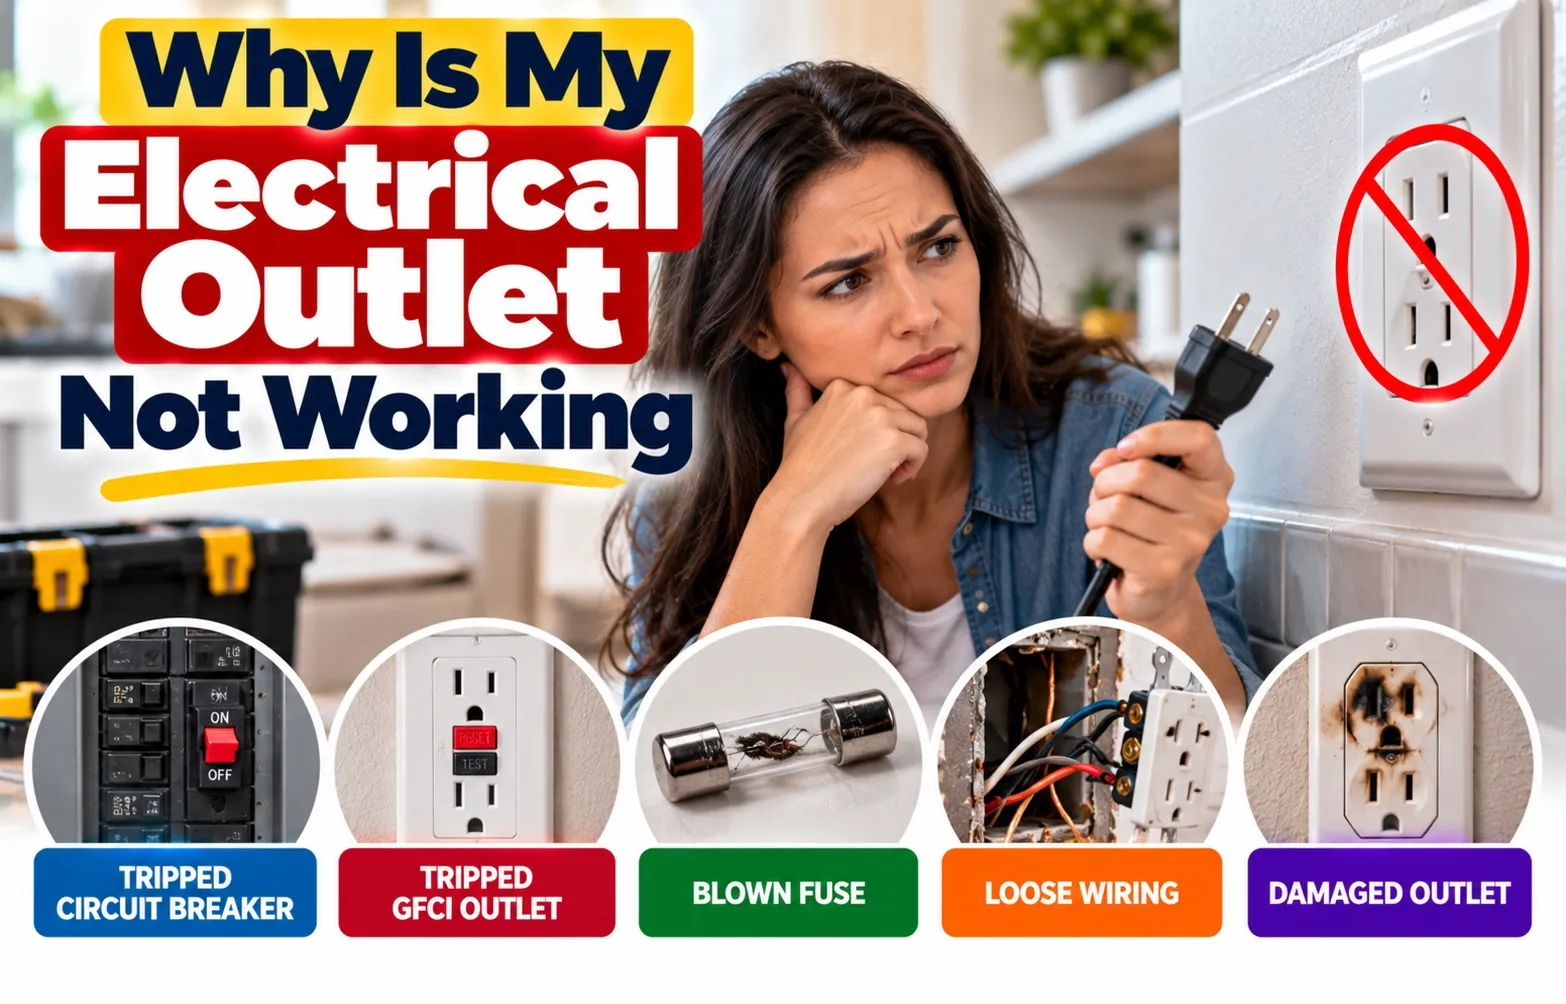 An electrical outlet suddenly losing power is usually caused by a tripped circuit breaker, a tripped GFCI outlet, a loose wire connection, or an overloaded circuit. Resolving the issue quickly requires systematic troubleshooting to identify whether the cause is a simple switch reset or a critical wiring fault.
Direct Answer: The 4 Primary Reasons Your Outlet Lost Power
When a wall receptacle stops delivering power, the issue almost always stems from one of four primary electrical disturbances within your home’s wiring network:
- Tripped Circuit Breaker: A sudden power surge or circuit overload prompts the main breaker panel to cut power to that entire electrical zone to prevent overheating.
- Tripped GFCI Outlet: A Ground Fault Circuit Interrupter outlet has detected a power imbalance and tripped, shutting off power to itself and any standard outlets wired downstream from it.
- Loose or “Backstabbed” Wires: Push-in wire terminations on the back of the receptacle can loosen over time due to thermal expansion, breaking the continuous flow of electricity.
- Worn-Out or Charred Receptacle: Internal metal contact strips wear out after years of use, leading to electrical arcing, localized heat buildup, and complete internal failure.
When to Stop Reading and Call a Professional Immediately
Electrical troubleshooting carries inherent risks. While simple breaker or GFCI resets are safe for homeowners, certain visual and sensory warning signs indicate an active electrical fire hazard or severe line fault. If you encounter any of the conditions below, stop troubleshooting immediately, turn off the main circuit breaker, and call a licensed electrician.
- Visible Burn Marks or Charring: Discoloration, melting, or black soot marks around the receptacle slots or cover plate signal active electrical arcing.
- Pungent Burning Smell: A distinct fishy or metallic burning odor coming from the wall outlet indicates overheating wire insulation.
- Buzzing or Sizzling Sounds: Audible humming, clicking, or cracking noises behind the wall point to loose, sparking hot wires inside the junction box.
- Persistent Breaker Tripping: A circuit breaker that immediately snaps back to the middle position after being reset indicates a dangerous short circuit or hard ground fault.
- Hot Faceplates: An outlet cover plate that feels warm or hot to the touch even when nothing is plugged into it.
Prioritize safety at all times: always verify that power is fully disconnected using a reliable non-contact voltage tester before touching or removing any wall outlet cover plate.
DIY Troubleshooting Guide
Isolating a dead electrical outlet requires a systematic, step-by-step diagnostic process moving from simple external verification to electrical panel resets. Following a logical chronological order ensures you can safely and quickly pinpoint why power has stopped flowing without unnecessary guesswork.
Step 1: Verify the Appliance and Wall Switches (Half-Hot Outlets)
Before assuming the receptacle is completely dead, confirm the issue does not stem from a faulty appliance cord or an active wall switch. Plug a known working lamp or device into both the top and bottom receptacles to see if power is present in either slot.
- Switched Outlets: Many residential rooms feature a switched outlet or half-hot outlet where a wall switch controls one half of the receptacle while the other half stays permanently live.
- Appliance Verification: If the test lamp works in another room but fails here, check whether a nearby wall switch needs to be toggled to activate that specific socket.
Step 2: The GFCI Reset Sequence (Uncovering Hidden Downstream Trips)
A dead outlet is frequently caused by a tripped Ground Fault Circuit Interrupter located elsewhere in the home. Because downstream outlets are daisy-chained to protect against electrical shock, a single tripped GFCI in a bathroom, garage, or kitchen can cut power to multiple connected rooms.
- Locate the GFCI: Scan nearby wet areas, bathrooms, kitchens, unfinished basements, and exterior walls for a receptacle featuring physical test button and reset button components.
- Perform the Reset: Firmly press the reset button until you hear a distinct clicking sound. If the button fails to stay depressed, an active ground fault or short circuit remains present on that circuit.
Step 3: How to Correctly Identify and Reset a Tripped Breaker (The Middle-Position Fix)
When external checks and GFCI resets fail to restore power, inspect your home’s main electrical panel for an overloaded circuit. A tripped breaker halts current flow across the internal bus bar, shutting down power to a designated zone of the house.
- Center-Tripped Breaker Position: Inspect the breaker box for a switch resting in an ambiguous center-tripped breaker position—it may not look completely off, but it will feel loose or sit between the standard “on” and “off” markers.
- The Proper Reset Technique: Firmly push the tripped breaker switch all the way to the “OFF” position until you hear it click into place, then flip it fully back to the “ON” position to re-engage the circuit.
The “Breaker Is On, But Outlet Is Dead” Mystery
When a circuit breaker remains firmly in the “On” position but an outlet completely lacks power, the fault lies in a broken electrical continuity loop rather than the main panel. This frustrating scenario usually points to hidden connection failures concealed behind walls or inside junction boxes.
Understanding Upstream Disruption & Parallel Daisy-Chain Wiring
Residential circuits do not power every outlet independently from the breaker panel. Instead, electricity flows through a daisy-chain circuit where power travels sequentially from one receptacle to the next, meaning that an upstream failure closer to the panel cuts power to everything following it.
- The Power Path: A break or loose connection in the hot wire or neutral wire at an early receptacle stops electrical current from reaching any subsequent downstream outlets.
- Tracing the Loop: Identifying the outage requires inspecting receptacles preceding the dead outlet to find where the continuous circuit loop was broken.
Why Backstabbed (Push-In) Wires Fail Over Time
Many homes feature backstabbed connections where solid copper conductors are pushed directly into spring-loaded grip holes on the rear of the receptacle rather than being wrapped around screws. Over years of use, these spring mechanisms lose tension and cause sudden power loss.
- Spring Tension Loss: Daily electrical loads cause microscopic shifting that weakens the internal grip on the hot wire or neutral wire inside push-in terminals.
- Complete Circuit Separation: When a backstabbed wire slips free, it severs the electrical path instantly without drawing enough current to trip the circuit breaker.
How Thermal Expansion Causes Loose Terminal Screws Inside Junction Boxes
Even when wires are secured under side terminal screws rather than push-in slots, continuous electrical usage triggers thermal expansion that physically alters metal connections. As conductors heat up and cool down, screws inside the junction box gradually loosen over time.
- Resistance and Arc Buildup: A loosening terminal screw increases electrical resistance, creating localized heat that can damage wire insulation and melt wire nuts.
- Ground and Conductor Integrity: If the ground wire or primary power conductors lose their secure mechanical bond inside the junction box, intermittent or total power failure occurs across the circuit.
Advanced Testing & Internal Inspection
When basic external checks fail to isolate the cause of a dead outlet, hands-on diagnostic testing allows you to measure voltage levels and verify wire integrity safely. Performing internal inspections requires adhering strictly to electrical safety protocols and industry installation guidelines.
Safely Isolating Power & Using a Non-Contact Voltage Tester
Before executing any faceplate removal or touching internal electrical components, you must verify that power has been completely cut to the junction box. Always test your diagnostic tools on a live power source first to confirm they are functioning properly before relying on them for safety checks.
- Disconnect Power at Panel: Switch off the corresponding circuit breaker in the main panel, then double-check local compliance guidelines under National Electrical Code (NEC) standards for proper outlet grounding and box clearances.
- Verify Zero Voltage: Insert a non-contact voltage detector into both slots of the receptacle, then remove the wall plate and place the probe tip directly against the side terminal screws to ensure no live current remains.
Checking Voltage Drop Across Hot, Neutral, and Ground with a Multimeter
Using a digital multimeter set to AC voltage ($V_{\text{AC}}$) allows you to diagnose specific line disruptions by measuring the electrical potential between individual wire conductors while the circuit is safely energized for testing.
Replacing an Old or Worn-Out Receptacle (15–25 Year Lifespan)
Standard residential receptacles have a typical operational lifespan of 15 to 25 years. Internal contact clips loosen over time due to repeated friction, eventually causing loose plug retention, high electrical resistance, or complete failure of the dead receptacle.
- Identify Rating Requirements: Match your existing breaker rating by installing a 15-amp receptacle on a 14-gauge wire circuit, or a 20-amp receptacle on a 12-gauge wire circuit (distinguished by a horizontal T-slot).
- Execute Side-Wire Termination: Unscrew the old outlet, use wire strippers to expose fresh copper if necessary, loop the conductors clockwise around side terminal screws, and tighten securely to maintain a reliable, continuous circuit.
Scenarios & Edge Cases
Standard troubleshooting guides often fail when dealing with complex household electrical failures. Addressing real-world dilemmas extracted from actual homeowner experiences helps resolve edge cases where standard diagnostic steps fall short.
One Outlet Burnt Out Slightly, and 3 Other Outlets Stopped Working
If a single receptacle exhibits a scorched faceplate and causes multiple downstream outlets to lose power simultaneously while the breaker remains on, you are dealing with a critical open neutral or severed hot feed at the damaged receptacle.
- The Root Cause: Severe arcing at the burnt outlet destroyed the internal bridge or wire nut connecting the daisy-chained circuit, severing the path of electricity to the rest of the room.
- Immediate Action: Shut off power at the main panel immediately. Do not attempt to turn the breaker back on until the burnt receptacle and its damaged wiring leads are fully replaced.
How to Safely Remove a Broken Plug Prong Stuck in an Outlet Slot
A metal plug prong snapping off inside an outlet slot creates an immediate shock hazard and renders the receptacle unusable. Extracting the broken prong safely requires absolute electrical isolation before attempting physical removal.
- Isolate Power First: Turn off the circuit breaker controlling the outlet, then test both slots with a non-contact voltage tester to confirm zero electrical current.
- Extraction Technique: Use rubber-insulated needle-nose pliers to firmly grip the exposed tip of the broken prong and pull it straight out without twisting or damaging the internal contact clips.
Hear a Clicking Noise Before Outlets Lost Power?
Hearing an audible relay click immediately before power cuts out indicates that a protective safety device activated to prevent localized electrical damage or a structural fire.
- AFCI or GFCI Activation: Arc Fault Circuit Interrupters (AFCI) and GFCI devices use internal electronic relays that snap open with a distinct clicking sound when detecting dangerous arcing or ground faults.
- Locating the Source: Check your breaker panel for an AFCI breaker with a reset button, or inspect nearby walls for a master GFCI receptacle that tripped during the event.
Frequently Asked Questions
Quick answers to common troubleshooting questions about sudden outlet failures, safety risks, and breaker issues.
Why did all the outlets in one room stop working suddenly?
A whole-room outage typically occurs when a single electrical circuit feeds every receptacle in that space and encounters a disruption at its starting point. This is usually triggered by an overloaded circuit that trips the main breaker, a failure at the primary upstream receptacle, or a single tripped master GFCI outlet protecting that entire downstream branch circuit.
Can a single bad outlet start a house fire?
Yes, a damaged or worn-out receptacle poses a severe electrical fire risk due to electrical arcing and intense resistance heating. Loose internal contacts or unsecured backstabbed wire connections generate high temperatures capable of melting plastic faceplates, scorching wire insulation, and igniting surrounding wooden wall studs or drywall paper inside the junction box.
How do I reset an outlet that does not have a reset button on it?
To restore power to a standard receptacle without physical test and reset controls, you must reset its protective source. Locate and press the reset button on any master GFCI outlet positioned upstream on the same circuit (often found in nearby bathrooms, kitchens, or garages), or reset the corresponding branch circuit breaker inside your main breaker panel.
Why won’t my outlet breaker reset after turning it off and back on?
When a circuit breaker immediately snaps back to the middle position or refuses to stay in the “ON” position, it is actively engaging its short circuit protection. This indicates an unresolved hard ground fault, a direct short circuit between hot and neutral wires along the line, a failed appliance plugged into the circuit, or a severely damaged breaker that requires professional replacement.

Oscar Vance | Master Plumber & Drainage Expert
Meet Oscar Vance, a licensed master plumber sharing practical solutions on residential repairs, preventive maintenance, and thoughtful home upkeep.