How to Plumb a Shower in a Basement
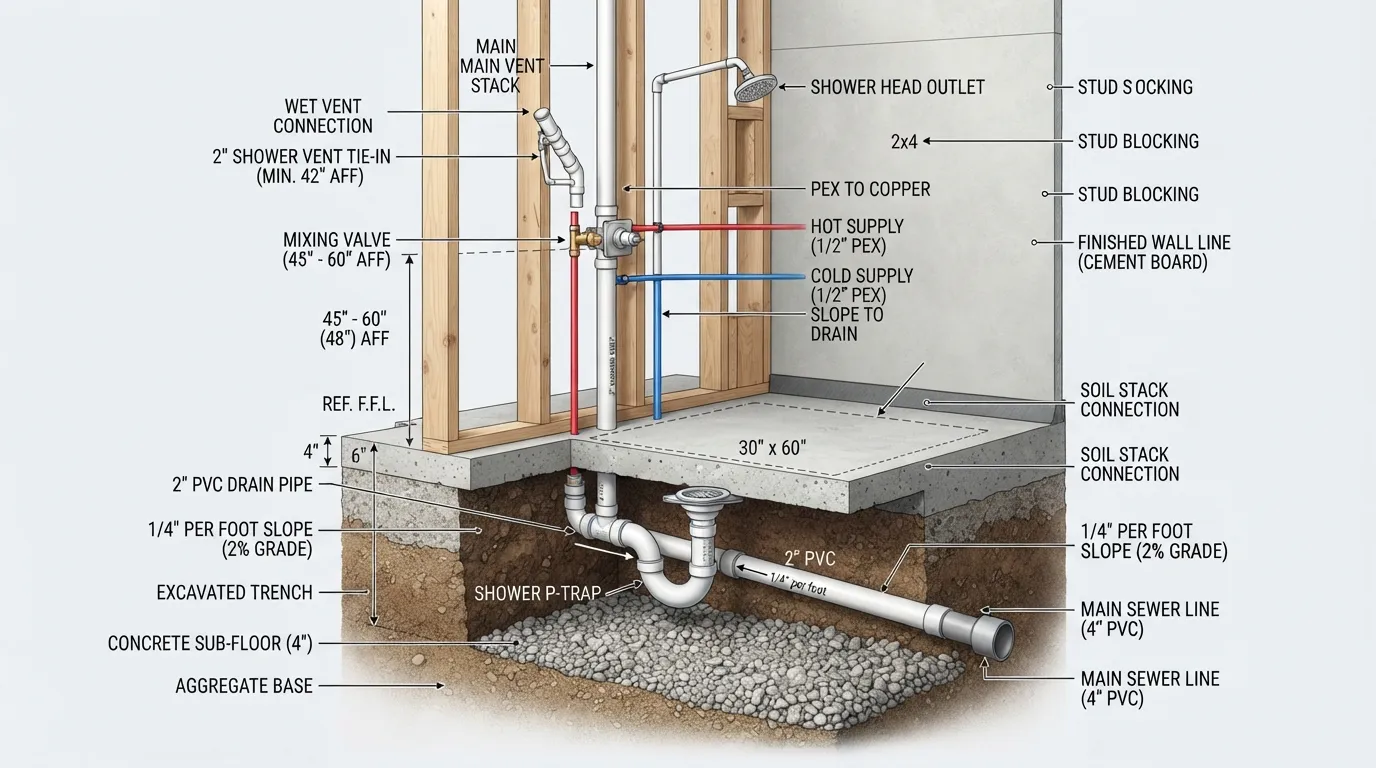
Basement shower plumbing differs fundamentally from upper-level installations because basement drains typically sit below or level with the main sewer line. Overcoming this gravity challenge requires specialized drainage planning, precise slope calculations, and potentially a sewage ejector system to ensure proper wastewater removal without backups.
Basement Shower Plumbing
Installing a functional shower in a subterranean level demands strict adherence to specific plumbing dimensions and mechanical requirements to pass inspection and prevent drainage failures.
- 2-Inch Drain Pipe: Showers require a minimum 2-inch diameter drain line to handle high-volume water flow and prevent clogs.
- P-Trap Installation: A code-compliant P-trap must be integrated beneath or just below the concrete slab to block sewer gases from entering the basement.
- Quarter-Inch Slope: Horizontal drain pipes must maintain a mandatory downward slope of 1/4 inch per foot toward the main sewer stack or ejector pit.
- Ejector Pump Option: If the basement floor lies below the municipal sewer line, a dedicated sewage ejector pit and pump system become mandatory.
Why Basements Need Special Plumbing Considerations
Working below grade introduces unique structural and hydraulic obstacles that do not exist on main or upper floors. Understanding these limitations prevents costly structural modifications and code violations.
- Sub-Grade Gravity Deficits: Standard plumbing relies entirely on gravity to pull wastewater downward; basements often lack the natural elevation required to reach the main drain line by gravity alone.
- Concrete Breaking and Trenching: Installing or tying into drainage lines usually requires cutting through existing concrete slabs, digging trenches, and managing subterranean soil stability.
- Venting Constraints: Proper venting is critical in basements to prevent siphoning water out of the P-trap, which can be challenging when routing vent lines up through finished upper stories.
Planning Before You Start Codes Permits & Site Assessment
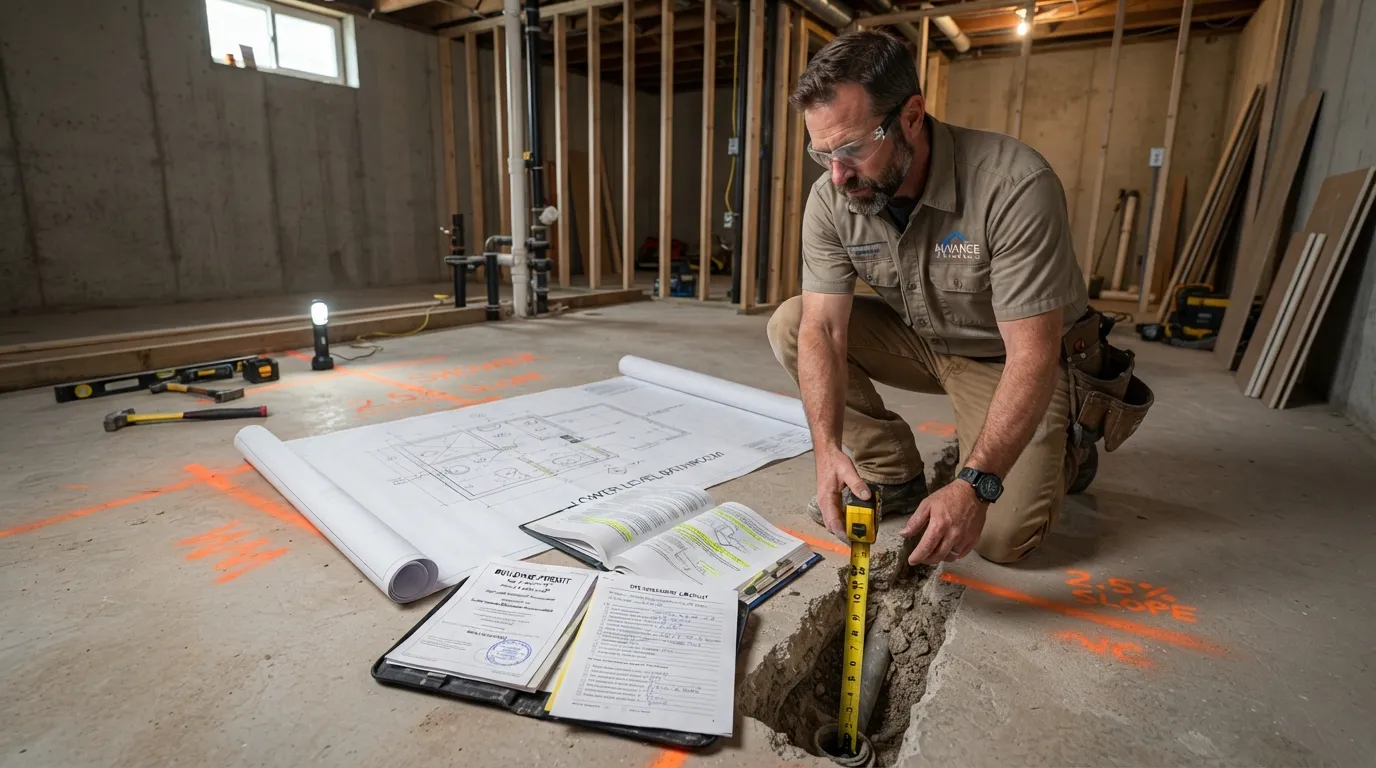
Thorough site preparation and regulatory compliance prevent catastrophic plumbing failures and expensive do-overs. Before breaking ground on a basement shower, you must verify local plumbing code requirements, confirm drainage depths, and carefully map your physical layout.
Do You Need a Permit for Basement Shower Plumbing?
Yes, adding a basement shower legally requires a plumbing permit from your local building department to ensure adherence to safety standards governed by the International Code Council. Skipping permits can result in hefty fines, failed home inspections, and dangerous code violations.
- Legal Compliance: Local authorities mandate permits to verify that your drainage, venting, and water supply lines align with the local plumbing code.
- Inspection Milestones: Inspectors require rough-in evaluations before any excavated concrete trenches are permanently repoured.
- Resale Protection: Unpermitted plumbing installations can legally complicate future property sales and insurance claims.
How to Check If Your Drain Line Sits Low Enough
Executing a reliable drain depth check requires performing an exploratory hole test to measure the exact elevation drop between your proposed shower base and the main sewer line. If the existing pipe elevation is too high, gravity drainage will fail.
- Locating the Main Stack: Identify where the primary sanitary line leaves the foundation wall or exits below the basement floor.
- The Exploratory Hole Method: Chisel a small test opening in the concrete near your proposed site to expose sub-slab piping and evaluate depth.
- Slope Verification: Measure the vertical and horizontal distance to ensure you can achieve the required 1/4-inch per foot downward slope.
Marking Your Shower Layout Before Cutting Concrete
Accurately outlining your shower pan layout directly on the basement floor before breaking concrete prevents costly alignment mistakes. Precise mapping ensures correct spacing for studs, plumbing rough-ins, and waterproofing components.
- Footprint Dimensions: Chalk out standard dimensions (such as 36×36 or 48×36 inches) to visualize the finished enclosure size.
- Wall Thickness Allowance: Account for framing, cement backer board, and tile layers so the interior finished space meets minimum size codes.
- Drain Center Targeting: Pinpoint the exact center of the 2-inch drain pipe to minimize unnecessary concrete cutting and trenching.
Can You Install a Shower Below the Sewer Line? Gravity vs Ejector Explained
Installing a shower below the main sewer line is entirely possible, but your drainage strategy depends on your home’s elevation relative to municipal sewer connections. Selecting the correct pumping or gravity-fed method ensures reliable wastewater removal without risking messy, unsanitary basement backups.
Gravity-Fed Drain: When It Works
A gravity-fed drain functions only when your basement floor sits high enough above the municipal sewer line or septic entry point to maintain a continuous downward slope. If elevation permits, this is the most reliable and maintenance-free approach.
- Elevation Requirement: The shower drain must sit at least 1/4 inch higher per foot than the entry point of the main sewer stack over the entire horizontal run.
- System Simplicity: Because it requires no mechanical parts, pumps, or electrical connections, a gravity drain operates quietly and rarely fails over time.
- Inspection Ease: Building inspectors readily approve gravity systems as long as slope, venting, and trap requirements meet local code standards.
Sewage Ejector Pump System: How It Works
When sub-grade installation makes natural gravity flow impossible, a dedicated sewage ejector pump system becomes necessary. Wastewater flows into a sealed sub-floor pit, where a heavy-duty pump forces it upward and out into the main sewer line.
- Sub-Floor Basin: A plastic or fiberglass basin is permanently embedded deep into the concrete floor to collect shower and greywater runoff.
- Float Switch Activation: As water fills the pit, an internal float switch automatically triggers the pump motor once a specific threshold is reached.
- Check Valve Protection: A mandatory check valve on the discharge line prevents pumped wastewater from flowing backward into your shower basin when the cycle ends.
Upflush Macerating System Saniflo type
Upflush or macerating systems offer a non-invasive alternative for basements where breaking up concrete slabs is impractical. These self-contained units sit directly on top of the finished floor behind or near the plumbing fixtures.
- Above-Floor Placement: Eliminates the need for heavy demolition, concrete cutting, or trenching, significantly reducing installation time and physical labor.
- Greywater Handling: Specialized greywater models manage high-volume drainage from showers, sinks, and washing machines without clogging.
- Discharge Versatility: Powerful internal impellers push wastewater through small-diameter flexible tubing that can be routed through walls or ceilings to reach existing drain stacks.
Comparison Table Gravity Drain vs Ejector Pump vs Upflush System
Tools & Materials Checklist
Assembling the correct inventory of heavy-duty demolition tools, specialized plumbing pipes, and code-approved fittings before starting ensures uninterrupted workflow. Having every component on hand prevents mid-project delays and keeps your basement installation moving efficiently.
Plumbing Tools Needed
Executing a basement shower installation requires heavy equipment to break through concrete slabs alongside standard plumbing hand tools for cutting and securing lines.
- Concrete Saw & Jackhammer: Essential for cutting cleanly through basement concrete and breaking up sub-slab material to clear utility trenches.
- PVC/ABS Pipe Cutters & Deburring Tool: Ensures square, smooth cuts on drain lines to guarantee leak-free solvent welds.
- PEX Crimping or Expansion Tools: Required for secure, watertight connections if running flexible PEX supply lines to the mixing valve.
- Torpedo Level & Measuring Tape: Critical for verifying the exact 1/4-inch per foot downward slope across all horizontal drain runs.
Materials List Pipes Fittings Valve PEX
Selecting durable, code-compliant building materials protects your investment against subterranean moisture, pressure fluctuations, and shifting soil conditions.
- 2-Inch PVC or ABS Drain Pipe & P-Trap: Forms the primary subterranean waste and trap assembly required by code for high-capacity shower drainage.
- Shower Pan Drain Assembly: Must be specifically compatible with your chosen shower pan base type (such as tile-ready, acrylic, or fiberglass).
- Pressure-Balanced Shower Mixing Valve: Regulates hot and cold water supplies to prevent scalding and maintain comfortable water temperatures.
- PEX Tubing & Fittings: Flexible hot and cold water supply lines that resist freezing and adapt easily to tight wall-framing cavities.
Installing the Vent Line Vent Stack vs AAV
Proper venting is essential for a basement shower to prevent negative pressure from siphoning water out of the P-trap and releasing dangerous sewer gases into your home. Depending on your building layout and local code allowances, you can either tie directly into an existing house vent stack or use an approved mechanical valve.
Tying Into the Existing Vent Stack
Connecting your new basement shower drain line to the home’s main vertical vent stack is the gold standard for plumbing installations because it provides active, open-air roof ventilation.
- Upward Routing Requirements: Route your 1-1/2 inch or 2-inch vent line vertically upward from the shower drain waste arm until it ties into the main stack at least 6 inches above the flood level rim of the highest fixture.
- Sanitary Tee Fittings: Use directional sanitary tee fittings properly oriented upward to ensure wastewater never enters the dry vent lines.
- Code Permanence: A direct tie-in to the main roof stack satisfies all municipal plumbing codes nationwide without future mechanical maintenance requirements.
Using an Air Admittance Valve Where Code Allows
An Air Admittance Valve (AAV) is a mechanical, one-way valve that opens to allow air in when negative pressure occurs during drainage, then closes tightly to seal out sewer gases.
- Local Code Restrictions: Always check your regional building code before installation, as some jurisdictions prohibit AAVs on basement fixtures or below-grade systems.
- Accessible Placement: Mount the AAV in an accessible location (such as inside an access panel or unfinished utility space) because mechanical valves eventually wear out and require replacement.
- Vertical Elevation Rule: Install the AAV vertically at least 4 inches above the horizontal branch drain connection to prevent flooding of the valve mechanism.
Running Water Supply Lines PEX Installation
Running flexible PEX tubing for your basement shower supply lines simplifies routing around obstacles and minimizes connection points compared to rigid copper pipes. Securing correct valve heights and conducting rigorous pressure tests prevents concealed leaks before drywall goes up.
Running Hot & Cold PEX Lines
Running PEX from your main water heater and cold supply lines requires clean cuts, secure support clips, and proper protection where lines pass through wall studs or concrete frames.
- Expansion and Contraction: Leave slight slack or expansion loops in long PEX runs to accommodate natural pipe movement caused by temperature shifts.
- Stud Protection Plates: Install steel nail plates wherever PEX lines run through wood framing members to protect pipes from accidental drywall screws or punctures.
- Secure Fastening: Support horizontal and vertical PEX lines with approved plastic clamps every 32 inches to prevent sagging and vibration noise.
Positioning the Shower Mixing Valve 45–60 Inches
Mounting the pressure-balanced shower mixing valve at the correct height ensures ergonomic operation and complies with standard accessibility and comfort guidelines.
- Standard Height Range: Position the center of the mixing valve between 45 and 60 inches above the finished shower floor for comfortable daily reach.
- Sturdy Backing Support: Secure the valve body firmly to a horizontal wood brace between studs so it will not flex or push backward when handling the shower handle.
- Depth Alignment Marks: Align the front of the valve body precisely with the future finished wall depth according to your tile and backer board thickness markings.
Is 1/2-Inch PEX Enough? Flow Rate Explained
Standard 1/2-inch PEX tubing easily handles normal residential basement shower flow requirements, delivering adequate gallons per minute (GPM) for standard single-head fixtures.
- Flow Rate Capacity: A typical 1/2-inch PEX line comfortably supplies 2.5 to 3.0 GPM, matching modern EPA WaterSense showerhead maximum output restrictions.
- Restriction Awareness: Because PEX inside diameter is slightly smaller than copper or rigid PVC, avoid unnecessary 90-degree elbow fittings that can unnecessarily restrict water velocity.
- Multi-Head Exceptions: If you are installing multiple body jets or a high-flow rain shower system alongside a hand shower, step up to 3/4-inch supply lines up to the main valve split.
Pressure Testing Before Closing the Wall
Conducting a comprehensive pressure test before closing up wall cavities or pouring concrete confirms that every crimp and connection is completely watertight.
- Test Kit Attachment: Connect a test gauge and air pump (or water test pump) directly to the closed mixing valve outlets.
- Required PSI Level: Pressurize the system to approximately 50 to 100 PSI (following local inspector guidelines) and isolate the test.
- Observation Period: Monitor the gauge for at least 15 to 30 minutes to verify zero pressure drop before scheduling rough-in inspections or finishing walls.
Running Water Supply Lines PEX Installation
Running flexible PEX tubing for your basement shower supply lines simplifies routing around obstacles and minimizes connection points compared to rigid copper pipes. Securing correct valve heights and conducting rigorous pressure tests prevents concealed leaks before drywall goes up.
Running Hot & Cold PEX Lines
Running PEX from your main water heater and cold supply lines requires clean cuts, secure support clips, and proper protection where lines pass through wall studs or concrete frames.
- Expansion and Contraction: Leave slight slack or expansion loops in long PEX runs to accommodate natural pipe movement caused by temperature shifts.
- Stud Protection Plates: Install steel nail plates wherever PEX lines run through wood framing members to protect pipes from accidental drywall screws or punctures.
- Secure Fastening: Support horizontal and vertical PEX lines with approved plastic clamps every 32 inches to prevent sagging and vibration noise.
Positioning the Shower Mixing Valve 45–60 Inches
Mounting the pressure-balanced shower mixing valve at the correct height ensures ergonomic operation and complies with standard accessibility and comfort guidelines.
- Standard Height Range: Position the center of the mixing valve between 45 and 60 inches above the finished shower floor for comfortable daily reach.
- Sturdy Backing Support: Secure the valve body firmly to a horizontal wood brace between studs so it will not flex or push backward when handling the shower handle.
- Depth Alignment Marks: Align the front of the valve body precisely with the future finished wall depth according to your tile and backer board thickness markings.
Is 1/2-Inch PEX Enough? Flow Rate Explained
Standard 1/2-inch PEX tubing easily handles normal residential basement shower flow requirements, delivering adequate gallons per minute (GPM) for standard single-head fixtures.
- Flow Rate Capacity: A typical 1/2-inch PEX line comfortably supplies 2.5 to 3.0 GPM, matching modern EPA WaterSense showerhead maximum output restrictions.
- Restriction Awareness: Because PEX inside diameter is slightly smaller than copper or rigid PVC, avoid unnecessary 90-degree elbow fittings that can unnecessarily restrict water velocity.
- Multi-Head Exceptions: If you are installing multiple body jets or a high-flow rain shower system alongside a hand shower, step up to 3/4-inch supply lines up to the main valve split.
Pressure Testing Before Closing the Wall
Conducting a comprehensive pressure test before closing up wall cavities or pouring concrete confirms that every crimp and connection is completely watertight.
- Test Kit Attachment: Connect a test gauge and air pump (or water test pump) directly to the closed mixing valve outlets.
- Required PSI Level: Pressurize the system to approximately 50 to 100 PSI (following local inspector guidelines) and isolate the test.
- Observation Period: Monitor the gauge for at least 15 to 30 minutes to verify zero pressure drop before scheduling rough-in inspections or finishing walls.
Pouring Concrete & Setting the Shower Base
Once rough-in plumbing passes inspection, you can securely anchor your sub-slab drainage lines and restore the basement floor. Completing this stage correctly provides a rigid, level platform required for installing either a pre-fabricated or custom-tiled shower base.
Backfilling the Trench
Properly backfilling your excavated concrete trenches prevents soil settlement and structural shifting that could crack or misalign your newly installed PVC drain pipes.
- Gravel Foundation Layer: Fill the bottom of the trench around the 2-inch drain pipe with washed crushed gravel, tamping it firmly to provide uniform support.
- Sand or Controlled Fill: Add a secondary layer of sand or compactable soil over the pipe to cushion the plastic lines before pouring concrete.
- Compaction Check: Ensure the backfill is thoroughly compacted to eliminate hidden voids that could cause the finished concrete slab to sink or crack later.
Pouring & Patching the Concrete Floor
Restoring the basement floor requires mixing and pouring high-strength concrete to match the surrounding slab thickness and seal the utility trenches completely.
- Sub-Slab Bonding: Apply a concrete bonding adhesive to the raw edges of the existing slab to ensure the new patch adheres securely.
- Level Surface Screeding: Pour the concrete mix into the trench, tamp to remove trapped air pockets, and screed the surface flush with the surrounding floor.
- Curing Period: Allow the concrete patch to cure fully according to manufacturer instructions—typically several days to a full week—before applying heavy loads or installing finish materials.
Installing the Shower Pan Base Pre-Fab vs Custom Tiled
Setting your shower base requires absolute levelness to ensure proper water drainage toward the drain assembly without pooling in corners.
- Pre-Fab Acrylic Bases: Lay down a structural mortar or plaster bed beneath acrylic or fiberglass shower pans to eliminate flex and lock the unit solidly in place.
- Custom Tiled Bases: Build a custom mortar shower pan with a minimum 1/4-inch per foot slope toward the weep-hole drain, followed by a professional waterproof membrane.
- Final Level Check: Place a spirit level across all four edges of the installed shower pan to confirm correct grading before securing wall panels or backer boards.
Waterproofing a Basement Shower Moistureb Specific Guide
Basements present unique subterranean moisture challenges due to natural ground humidity, cold concrete temperatures, and restricted airflow. Implementing a rigorous, multi-layered waterproofing strategy protects your framing and prevents chronic mold growth unique to below-grade bathrooms.
Why Basement Moisture Is a Bigger Risk
Subterranean environments combine high relative humidity with naturally cold foundation walls, creating an ideal breeding ground for trapped condensation and moisture accumulation.
- Sub-Slab Vapor Drive: Moisture constantly migrates upward through concrete slabs, threatening to rot wood framing and lift finished flooring if vapor barriers are missing.
- Thermal Bridging Risks: Uninsulated basement concrete walls chill warm shower humidity rapidly, causing heavy condensation buildup behind wall cavities.
- Lack of Natural Ventilation: Most basements lack operable windows, making mechanical exhaust ventilation and continuous waterproofing barriers mandatory.
Waterproof Membrane Application
Applying a continuous liquid-applied or sheet-based waterproof membrane over your cement backer board creates an impermeable barrier that stops water from reaching structural studs.
- Liquid Applied Coatings: Roll or trowel two heavy coats of a elastomeric waterproofing membrane across all shower walls, seams, and fastener penetrations.
- Seam and Corner Reinforcement: Embed waterproof reinforcing fabric into wet membrane corners and screw joints to prevent tears from building movement.
- Flood Testing the Pan: Plug the shower drain and fill the pan with water for 24 hours to confirm zero leaks before installing wall or floor tile.
Preventing Mold & Condensation
Controlling humidity through proper exhaust design and vapor management ensures your basement shower remains hygienic and structurally sound over time.
- Dedicated Exhaust Fan: Install a high-CFM exhaust fan ducted directly to the outdoors, running it during and for 30 minutes after every shower.
- Vapor Retarder Installation: Staple heavy-duty polyethylene vapor barriers behind framing studs against exterior concrete walls to block moisture transfer.
- Mold-Resistant Materials: Use mold-resistant greenboard or cement backer boards alongside epoxy-based grout to inhibit fungal growth in damp environments.
Alternative Method Installing a Shower Without Breaking Concrete
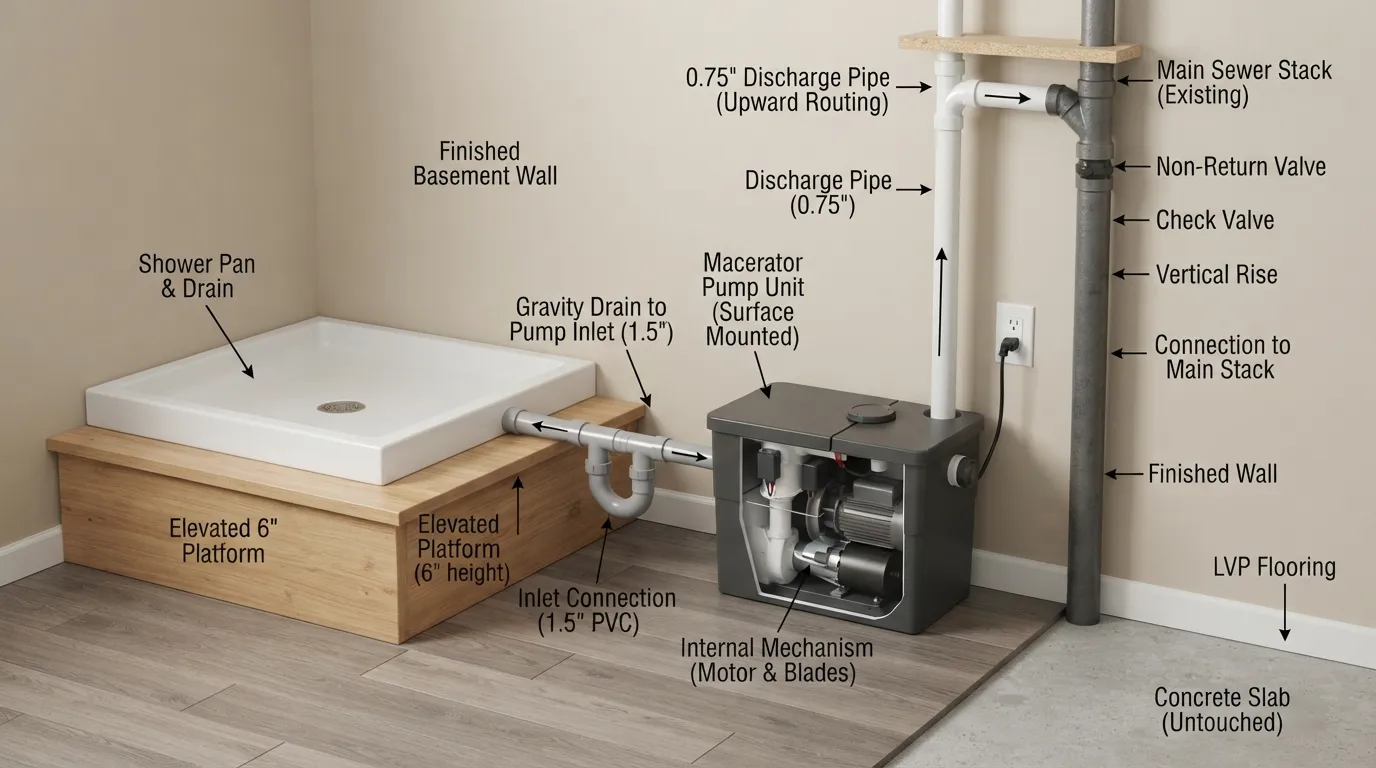
If cutting through thick concrete slabs, excavating sub-slab gravel, and patching floors sounds overly disruptive, you can install a fully functional basement shower without breaking concrete. Using above-floor upflush or macerating pump systems allows you to complete the plumbing installation cleanly and rapidly.
Upflush Systems Explained No-Dig Solution
An above-floor upflush or greywater pumping system collects wastewater in an external cabinet sitting directly on your finished basement floor rather than in a sub-slab basin.
- Surface Mounting: The pump enclosure and associated plumbing components rest entirely on top of the concrete slab, eliminating heavy demolition work.
- Gravity Flow to Unit: The shower base must be elevated slightly on a platform or custom riser so that wastewater can drain via gravity into the side inlet of the pump.
- Overhead Discharge Routing: Once activated, the internal pump forces greywater upward through small-diameter discharge piping hidden in ceiling cavities or wall spaces to reach the main sewer stack.
Pros & Cons vs Traditional Rough-In
Evaluating the operational advantages and inherent limitations of no-dig plumbing helps determine if surface-mounted systems suit your specific basement layout and lifestyle.
- Speed and Labor Savings: Eliminates days of exhausting jackhammer work, concrete disposal, and trench digging, drastically cutting installation time.
- Aesthetic Trade-Offs: Because the shower pan sits elevated on a platform and the pump unit requires a visible enclosure, custom finish work is necessary to blend the components seamlessly.
- Electrical Requirements: Upflush systems require a dedicated GFCI-protected electrical outlet nearby to power the internal pump motor.
Cost Comparison No Break vs Break-Concrete Method
Comparing financial outlays reveals that while upflush equipment carries a higher initial hardware cost, traditional methods incur heavy labor and material expenses.
- Traditional Break-Concrete Costs: Involves equipment rentals (saws, jackhammers), concrete disposal fees, professional plumbing labor, and extensive floor restoration materials.
- No-Break System Costs: Higher upfront price tag for specialized greywater pump units and shower platforms, but significantly lower labor and remediation overhead.
- Long-Term Maintenance: Mechanical pumps require occasional servicing or component replacement over years of use, whereas traditional gravity pipes require virtually no ongoing mechanical maintenance.
Common Basement Shower Plumbing Mistakes to Avoid
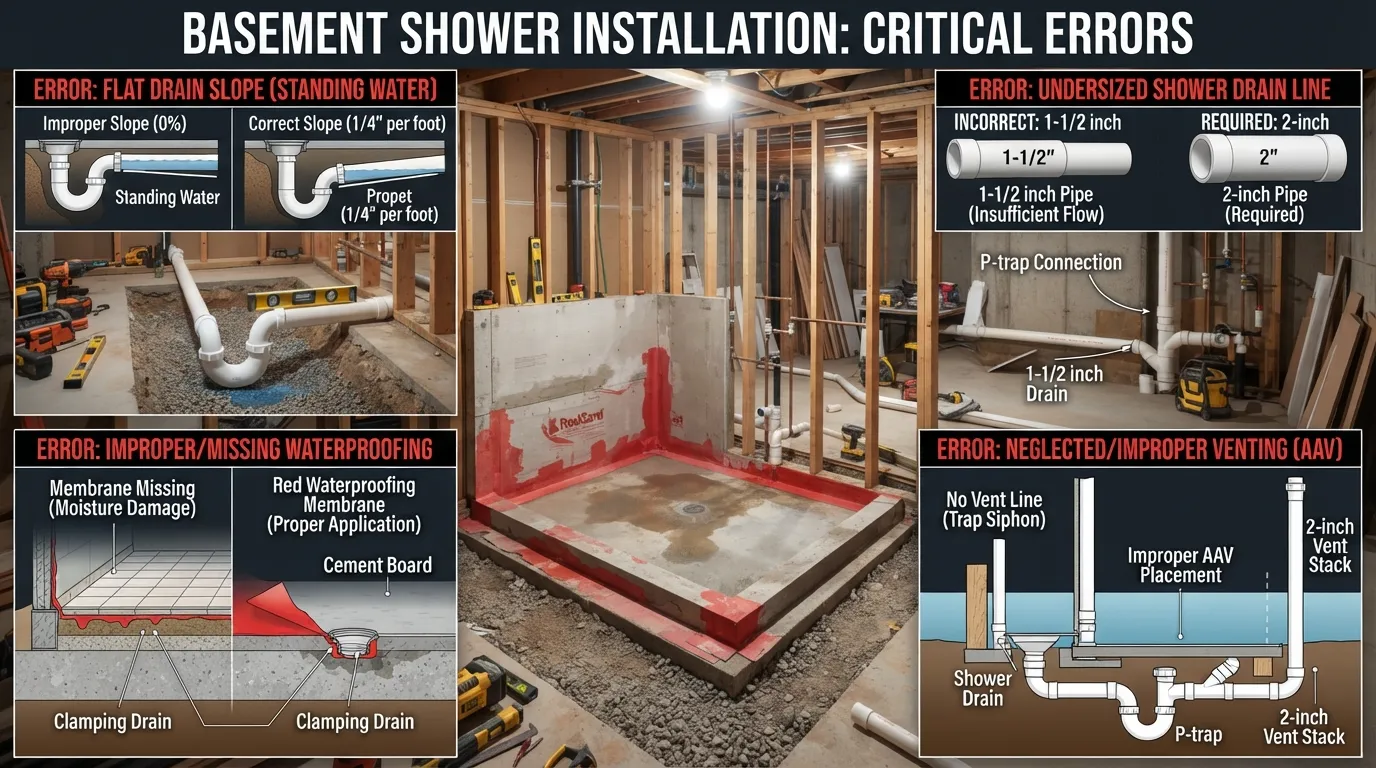
Basement shower installations involve complex mechanical and structural variables where minor installation oversights lead to catastrophic leaks, drainage backups, and expensive structural damage. Avoiding these frequent, real-world mistakes ensures your bathroom remodel remains durable and code-compliant.
Incorrect Slope or Undersized Drain
Failing to maintain proper drainage geometry is the leading cause of standing water, sluggish drainage, and chronic clogs in subterranean bathrooms.
- Inadequate 1/4-Inch Fall: Falling short of the mandatory 1/4-inch per foot downward slope causes greywater to pool inside the pipe rather than clearing out efficiently.
- Using 1-1/2 Inch Pipe: Installing undersized 1-1/2 inch drain lines instead of the code-mandated 2-inch pipe chokes high-volume shower discharge.
- Improper Pipe Bedding: Leaving uncompacted soil beneath horizontal drain runs lets pipes sag over time, ruining the drainage grade.
Skipping the Vent Wrong AAV Placement
Improper venting disrupts hydraulic balance, allowing sewer gases to enter your living space and sucking water completely out of the P-trap.
- Neglecting Vent Connections: Trying to run a shower drain without a dedicated vent line causes violent air locking and slow drainage.
- Mounting AAVs Too Low: Placing Air Admittance Valves below the flood level rim or inside unventilated, inaccessible wall cavities violates safety codes.
- Incorrect Tee Orientation: Using standard horizontal sanitary tees instead of directional sweep fittings on vent lines leads to messy blockages.
Poor Waterproofing Leading to Leaks
Ignoring below-grade vapor dynamics and skipping multi-layered waterproofing invites hidden mold growth and severe structural rot behind basement walls.
- Omitting Flood Tests: Skipping the 24-hour shower pan water test allows undetected pinhole leaks in the membrane to ruin sub-slab structures.
- Skipping Vapor Barriers: Failing to install moisture retarders against cold exterior concrete walls traps condensation inside the framing cavity.
- Unsealed Fastener Penetrations: Forcing screws through backer boards without sealing fastener heads creates direct pathways for water migration.
Ignoring Permit/Inspection Requirements
Bypassing local building permits and rough-in inspections can trigger legal fines, mandatory demolition of finished walls, and severe insurance claim denials.
- Pouring Concrete Prematurely: Sealing up trenches before the plumbing inspector visually signs off on the rough-in layout forces costly excavation.
- Unpermitted Renovations: Skipping permit applications complicates future home sales and invalidates standard homeowner insurance policies if water damage occurs.
- Non-Compliant Fixtures: Installing equipment that fails regional plumbing codes results in failed final occupancy evaluations.
Estimated Cost of Plumbing a Basement Shower
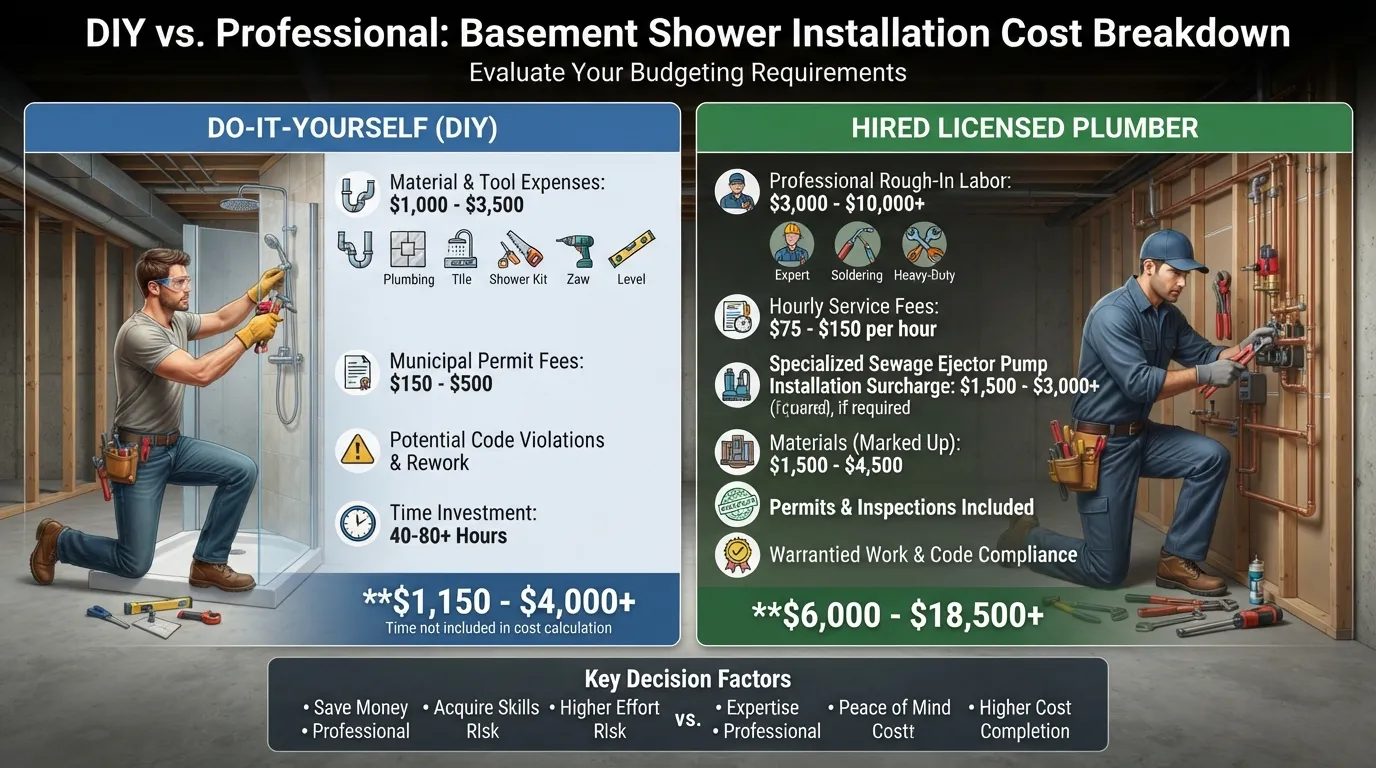
Plumbing a basement shower requires a balanced budget accounting for heavy labor, specialized sub-slab components, and finish materials. Total expenses vary heavily depending on whether you tackle the heavy demolition yourself or hire professional contractors.
DIY Cost Breakdown Materials + Tools
Doing the work yourself drastically reduces labor costs, keeping your total project budget focused squarely on raw materials, permit fees, and necessary tool rentals.
- Raw Materials and Fixtures: Expect to spend between $1,000 and $3,500 on PVC pipes, fittings, a shower pan, mixing valves, PEX tubing, and backer boards.
- Tool Rental Expenses: Renting a concrete saw, heavy-duty jackhammer, and pressure testing equipment typically ranges from $150 to $400 for a weekend.
- Permit and Inspection Fees: Local building permits usually cost between $150 and $500 depending on your municipality.
Hiring a Licensed Plumber: Average Cost
Bringing in a professional contractor or licensed plumber ensures code compliance and handles the exhausting concrete trenching, but labor fees drive up overall expenses.
- Standard Rough-In Labor: Professional plumbing rough-in work for a basement bathroom addition generally ranges from $3,000 to $10,000+.
- Hourly Plumber Rates: Licensed plumbing professionals charge between $85 and $175 per hour, plus service call fees.
- Sewage Ejector Pump Installation: If your layout requires a sub-floor ejector pit and pump system, add an extra $850 to $3,500 for equipment and installation.
When It’s Worth Hiring a Professional
While DIY saves money on straightforward installations, certain complex structural hurdles make hiring a licensed professional a safer, more cost-effective decision long-term.
- Sub-Slab Obstacles: If cutting concrete uncovers hidden electrical lines, main structural footings, or unexpected utility mains, professional intervention is mandatory.
- Complex Venting Requirements: Tying into multi-story vent stacks or dealing with strict municipal AAV restrictions requires expert code knowledge.
- Warranty and Inspection Guarantee: Professional installations come with workmanship warranties and guarantee compliance that simplifies future home resale evaluations.
Frequently Asked Questions
Find direct, authoritative answers to the most common questions regarding basement shower plumbing, drainage limitations, and installation methods.
Can I install a shower in my basement without a drain?
No, you cannot install a shower without a dedicated drainage path because high-volume wastewater requires a proper disposal route to prevent indoor flooding. Every shower needs a minimum 2-inch drain connected either to a gravity-fed main sewer line or a sewage ejector pump system.
Code Mandates: Building codes strictly prohibit unmanaged wastewater discharge due to severe health and safety hazards.
Overflow Prevention: Without a dedicated drain and P-trap, water will rapidly pool across your basement floor during standard use.
Can you use a basement floor drain for a shower?
Generally, you cannot use an existing basement floor drain for a shower because standard floor drains are only 1-1/2 inches in diameter and typically tie into perimeter weeping tiles rather than the sanitary sewer.
Undersized Piping: Floor drains lack the 2-inch diameter required by code to handle continuous high-volume shower discharge.
Sewer Gas Risks: Floor drain traps often dry out or connect improperly, risking dangerous sewer gas leaks into your basement living space.
How do I build a floor-level curbless shower in a basement?
Building a curbless or walk-in floor-level shower in a basement requires recessing a sloped area directly into the concrete slab during the initial demolition phase to achieve a flush transition.
Sub-Slab Recession: Chisel out and lower the concrete sub-floor in the shower zone to allow room for framing, waterproof membranes, and tile thickness.
Continuous Slope: Maintain a strict 1/4-inch per foot inward slope toward the linear or center drain to keep water from spilling out onto the main basement floor.
Can you put a shower in a basement without damaging the floors?
Yes, you can install a basement shower without breaking concrete by utilizing an above-floor upflush or macerating pump system that sits directly on top of your finished slab.
No-Dig Installation: Surface-mounted pumps eliminate the need for heavy jackhammering, concrete cutting, and trench excavation.
Platform Requirement: The shower base must be elevated slightly on a custom platform so greywater can feed via gravity into the surface pump inlet.
How do you install a shower in a basement quick recap?
Installing a basement shower successfully requires a systematic, step-by-step approach from initial site assessment to final waterproofing and fixture attachment.
Step 1 – Planning & Permits: Check local building codes, secure permits, and verify your main drain depth via an exploratory hole test.
Step 2 – Rough-In Plumbing: Cut concrete trenches (or set up an upflush unit), install a 2-inch drain with a P-trap, and maintain a 1/4-inch per foot slope.
Step 3 – Venting & Supplies: Connect a vent line or approved AAV, run PEX water supply lines, mount the mixing valve, and pressure test.
Step 4 – Finishing: Backfill trenches, repour concrete, set your shower base, apply multi-layered waterproofing, and complete inspections.
Conclusion Final Recommendations
Plumbing a basement shower is a complex remodeling project that transforms subterranean square footage into a valuable, functional bathroom retreat. Successfully executing the installation requires strict adherence to local building codes, proper drainage geometry, and rigorous waterproofing.
Key Takeaways
Mastering the fundamental mechanics of basement drainage ensures your installation remains durable, compliant, and leak-free for years to come.
- Gravity vs Pumps: Always verify your main drain elevation first to determine whether you can use a gravity-fed line or require a sewage ejector or upflush system.
- Precise Slope and Venting: Maintain a strict 1/4-inch per foot drainage slope and proper venting to eliminate backups, slow draining, and sewer gas risks.
- Uncompromising Waterproofing: Implement multi-layered waterproof membranes and continuous vapor barriers to protect your basement from chronic sub-grade moisture.
Should You DIY or Hire a Plumber?
Deciding between a DIY approach and hiring a licensed professional depends on your plumbing experience, comfort with heavy demolition, and local code complexity.
- Choose DIY If: You have intermediate plumbing skills, own or can rent concrete demolition equipment, and feel comfortable navigating local inspection milestones.
- Hire a Professional If: Your layout requires complex sub-slab ejector pump installations, structural concrete trenching near load-bearing footings, or multi-story vent tie-ins.
- Final Inspection Priority: Whichever route you take, always schedule required rough-in and final municipal inspections to protect your home’s safety and property value.

Oscar Vance | Master Plumber & Drainage Expert
Meet Oscar Vance, a licensed master plumber sharing practical solutions on residential repairs, preventive maintenance, and thoughtful home upkeep.

