Introduction & The True Cost of Neglect
 Ignoring minor plumbing maintenance leads directly to catastrophic financial loss, as standard home insurance policies frequently deny claims stemming from gradual wear and unaddressed leaks. Investing a small fraction of time and money in preventative care protects your property, maintains water efficiency, and prevents sudden architectural damage that costs tens of thousands of dollars to remediate.
Why Routine Plumbing Prevention Saves Thousands
Routine preventative maintenance costs a fraction of the expenses associated with structural restoration, mold remediation, and emergency service calls. According to home safety data from insurance industry research organizations, water damage claims represent one of the most frequent and costly types of property loss, averaging over $10,000 per incident.
Establishing a regular maintenance schedule mitigates financial risk across several core areas:
- Emergency Plumber Fees: Off-hours service calls for burst pipes or severe backups carry premium hourly rates, often double or triple standard commercial rates.
- Structural Water Damage: Subfloor rot, ruined drywall, and warped hardwood floors require extensive construction repairs beyond simple pipe fixes.
- Mold Remediation: Uncontrolled indoor moisture creates ideal environments for toxic mold spores, requiring specialized containment and professional abatement.
- Plumbing System Lifespan: Regulated water pressure and clean supply lines prevent premature degradation of copper, PEX, and PVC piping systems.
How Most Household Plumbing Failures Begin Unnoticed
Severe pipe blowouts and catastrophic ceiling collapses rarely occur without prior warning signs; they almost always originate as silent pipe leaks behind walls, under cabinets, or beneath concrete foundations. Unchecked pinhole leaks from internal pipe corrosion gradually weaken structural joists, deteriorate drywall, and create hidden pockets of rot long before visible water stains appear.
Monitoring your home water meter serves as the first line of defense against undetected leaks before minor issues escalate into structural emergencies:
- Shut Off All Fixtures: Ensure all faucets, showers, washing machines, and dishwashers are completely turned off inside and outside the house.
- Locate the Water Meter: Find your municipal water meter, typically housed in an underground box near the street curb or inside your basement.
- Observe the Leak Indicator: Watch the low-flow indicator triangle or small dial on the meter face; if it spins despite zero indoor water usage, water is actively leaking somewhere in your supply system.
- Take Meter Readings: Note the exact meter number, wait two hours without using any water, and check the reading again to catch ultra-slow line drips.
Core Drain Protection & Chemical Warnings
Protecting residential drain lines requires eliminating improper disposal habits, replacing harsh chemical openers with bio-enzymatic solutions, and deploying physical strainers. Most clogs stem from the daily accumulation of fats, non-biodegradable personal products, and hair buildup within system P-traps.
What Never to Pour Down Kitchen Sinks and Toilets
Preventing severe pipe blockages begins with strict disposal boundaries, as kitchen drains and toilets are engineered solely for wastewater and human waste. Pouring grease or flushing non-disintegrating products creates stubborn obstructions that frequently require professional hydro-jetting or mechanical snaking to clear.
- Fats, Oils, and Grease (FOG): Liquid cooking fats cool and solidify inside drain pipes, narrowing the internal diameter and trapping suspended food particles.
- Coffee Grounds and Starchy Foods: Rice, pasta, and coffee grounds accumulate in P-trap curves rather than dissolving, cementing debris blockages together.
- The “Flushable” Wipes Myth: Pre-moistened baby wipes, paper towels, and personal hygiene products do not break down in water like toilet paper, wrapping tightly around main sewer line roots and bends.
Chemical vs. Bio-Enzymatic Drain Cleaners (Why Acids Destroy PVC Joints)
Avoid aggressive lye and sulfuric acid drain cleaners because their violent exothermic reactions generate extreme heat that degrades PVC pipe glue and warps plastic junctions. Routine maintenance should instead rely on bio-enzymatic formulas that safely digest organic waste without compromising plumbing infrastructure.
- Exothermic Destruction: Strong chemical openers produce high heat when reacting with organic material, melting or weakening threaded PVC connections and solvent-welded joints.
- Pipe Corrosion: Acidic solutions eat away at metal P-traps and corrode older galvanized steel lines, creating silent pinhole leaks behind finished walls.
- Bio-Enzymatic Safety: Natural bacteria and enzyme treatments consume grease, soap scum, and organic residue over hours without harming underlying pipe integrity.
The Mesh Strainer & Hair Catcher Protocol for Bathrooms
Installing stainless steel mesh strainers across all shower, tub, and bathroom sink drains stops hair and soap scum before they enter the P-trap. This low-cost physical barrier eliminates the primary source of slow bathroom drainage without requiring mechanical augering.
- Stainless Steel Construction: Opt for rust-resistant stainless steel hair catchers that sit flush against the drain flange to capture debris effectively.
- Weekly Cleaning Routine: Empty and sanitize mesh strainers weekly to prevent soap scum buildup and maintain optimal water drainage flow rates.
- Sink Stopper Maintenance: Remove popup sink stoppers monthly to clear accumulated hair clumps and toothpaste residue from the pivot rod mechanism.
Supply Lines, Hoses & Water Pressure Regulation
Managing water pressure and upgrading appliance connections prevent sudden, catastrophic structural floods. High water pressure silently destroys pipe joints over time, while aging rubber supply hoses rupture without warning and flood living spaces within minutes.
Ideal Household Water Pressure (40–60 PSI vs. High-Pressure Pipe Strain)
Maintaining home water pressure between 40 and 60 PSI protects plumbing fixtures, valves, and pipe joints from destructive mechanical stress. Pressure exceeding 80 PSI accelerates pipe wear, creates loud water hammer noises, and dramatically increases the risk of sudden fitting blowouts.
- Optimal Range: Operating between 40 and 60 PSI ensures robust shower performance while safeguarding home supply lines.
- High-Pressure Strain: Pressures above 80 PSI continuously strain washing machine solenoids, toilet fill valves, and water heater tanks.
- Pressure Spikes: Thermal expansion in closed systems can drive baseline pressure even higher overnight if unregulated.
How to Test and Replace Your Pressure-Reducing Valve (PRV)
Testing your home water pressure requires attaching a screw-on PSI pressure gauge to an exterior hose bib while all indoor water fixtures remain closed. If readings exceed safe thresholds, replacing the faulty pressure-reducing valve (PRV) immediately neutralizes destructive main line pressure spikes.
- Pressure Testing: Screw a standard water pressure gauge onto an outdoor spigot, turn it fully on, and read the static PSI.
- Valve Failure Signs: Fluctuating pressure, banging pipes, or readings consistently above 75 PSI indicate a failing PRV mechanism.
- PRV Replacement: A failing pressure-reducing valve cannot be internally repaired and requires cutting out and replacing the brass unit.
Braided Stainless Steel Hoses vs. Rubber Supply Lines (3-to-5-Year Swap Rule)
Replacing standard rubber washing machine hoses with braided stainless steel flex lines every 3 to 5 years prevents sudden multi-thousand-dollar home floods. Unreinforced rubber hoses degrade rapidly under constant municipal pressure and thermal cycling, leading to explosive washing machine hose bursts.
- Stainless Armor: Braided exterior steel mesh prevents rubber inner tubing from bulging, cracking, or expanding under continuous pressure.
- Proactive Replacement: Adhering to a strict 3-to-5-year swap cycle eliminates material fatigue failures in high-pressure appliance lines.
- Smart Shut-Off Integration: Installing an automatic water shut-off sensor with moisture detection instantly cuts off supply during a line breach.
Water Heater Maintenance & Advanced Protection Systems
Regular water heater maintenance eliminates mineral sediment buildup, prevents premature tank corrosion, and manages thermal expansion pressures in closed plumbing loops. Implementing these advanced protection protocols doubles appliance lifespan and protects your home from catastrophic tank ruptures and water heater failures.
Step-by-Step Annual Water Heater Flush (Sediment Removal Protocol)
Flushing your water heater tank annually removes calcium and mineral sediment that settles at the bottom of the tank, preventing rumbling noises, localized overheating, and premature thermal stress. Hard water minerals insulate the water from the burner or heating element, forcing the system to work harder and consume more energy.
Perform a complete tank flush using a methodical step-by-step draining procedure:
- Shut Off Power or Gas: Turn off the circuit breaker for electric water heaters or switch the gas control valve to the “pilot” setting to protect the heating elements.
- Turn Off Cold Water Supply: Close the cold water inlet valve on top of the water heater to stop new water from entering the tank during the flushing process.
- Connect a Drain Hose: Attach a standard garden hose to the brass drain valve at the base of the unit and route the other end to a safe floor drain or outdoors.
- Open T&P Relief Valve & Faucets: Lift the lever on the temperature and pressure (T&P) relief valve and open a nearby hot water faucet inside the house to vent the system.
- Open Drain Valve: Open the drain valve fully to flush out accumulated sediment and mineral flakes until the discharged water runs completely clear.
Sacrificial Anode Rod Inspection: Doubling Tank Lifespan
Inspect and replace your sacrificial anode rod every three to five years to protect the inner steel tank glass lining from accelerated rust and premature perforation. The anode rod is a magnesium or aluminum core wire that deliberately corrodes in place of your tank walls through electrolytic sacrificial protection.
- Electrolytic Attraction: Minerals and corrosive ions in the water attack the soft metal of the anode rod instead of eating away at the welded steel tank seams.
- Inspection Protocol: Unscrew the hex-head rod from the top of the tank using a socket wrench if more than six inches of steel core wire is exposed or if the rod is heavily pitted.
- Replacement Timing: Replacing a depleted anode rod for a nominal cost doubles or triples the operating lifespan of an expensive water heater tank.
Thermal Expansion Tanks & Dielectric Unions Explained
Installing a thermal expansion tank and dielectric unions prevents dangerous pressure spikes and galvanic corrosion caused by dissimilar metal interactions in closed-loop water systems. When water heats up, it expands significantly; without an expansion tank, this extra volume creates destructive pressure surges that trip safety valves and rupture internal tank bladders.
- Closed-Loop Thermal Expansion: Modern backflow preventers and check valves create a closed system, trapping expanding water inside and driving pressure past safe operational limits.
- Expansion Tank Cushion: A thermal expansion tank contains an internal rubber bladder pressurized with air that absorbs excess water volume during heating cycles.
- Dielectric Unions & Galvanic Corrosion: Connecting copper pipes directly to steel water heater nipples causes galvanic corrosion; dielectric unions use insulating plastic sleeves to prevent direct metal contact and chemical breakdown.
Seasonal Plumbing Preparation & Freeze Protection
Preparing residential plumbing for freezing temperatures eliminates the primary cause of winter pipe bursts and structural water damage. Expanding ice inside uninsulated pipes creates immense hydraulic pressure that ruptures copper, PEX, and PVC lines, making seasonal weather-proofing an essential annual priority.
Winterizing Exposed Pipes in Basements, Attics, and Crawl Spaces
Insulating exposed water lines located in unheated home areas stops cold drafts from dropping pipe wall temperatures below freezing. Fitting pre-slit pipe insulation foam or installing thermostatically controlled heat tape over vulnerable runs provides a reliable barrier against ice formation.
- Foam Insulation Sleeves: Slide thick polyethylene or rubber pipe insulation foam over all exposed supply lines, ensuring all joints and corners are sealed tightly with electrical tape.
- Electric Heat Tape Application: Wrap self-regulating heat tape along metal or rigid plastic pipes in extreme cold zones, plugging the thermostat unit into a GFCI outlet for automatic freeze prevention.
- Draft Sealing: Fill foundation cracks, crawl space vents, and wall penetrations near water lines with expanding spray foam to block sub-zero air currents.
Outdoor Hose Bib Draining and Irrigation System Shutdown
Disconnecting garden hoses and blowing out residual water from exterior spigots before the first hard freeze protects exterior supply plumbing from sudden split bursts. Even frost-free sillcocks will trap water and burst if a hose remains attached during freezing weather.
- Disconnect Garden Hoses: Detach all outdoor hoses, drain them completely, and store them indoors to prevent trapped water from freezing back into the sillcock body.
- Drain Exterior Lines: Shut off the dedicated indoor isolation valve leading to outdoor hose bibs, then open the exterior spigot bleeder cap to drain all lingering water.
- Irrigation System Blow-Out: Perform a complete sprinkler blow-out using compressed air to clear water from underground valves, manifold headers, and popup heads.
Emergency Dripping Protocol During Extreme Sub-Zero Spells
Allowing a slow drip from faucets connected to vulnerable exterior wall pipes during deep freezing weather relieves pressure build-up and maintains continuous water movement. Knowing the precise location of your main water shut-off valve ensures immediate control if a line bursts despite preventative efforts.
- The Faucet Drip Technique: Open faucets served by uninsulated pipes to a faint, steady trickle of both cold and hot water during extreme sub-zero weather events.
- Cabinet Door Opening: Keep kitchen and bathroom sink cabinet doors wide open during freezing spells to allow warm indoor air to circulate around hidden plumbing lines.
- Main Water Shut-Off Readiness: Locate your home’s main water shut-off valve near the water meter or main entry line and verify it turns smoothly for fast emergency closure.
Early Leak Detection & DIY Diagnostic Tests
Identifying silent leaks early prevents gradual structural rot, mold growth, and inflated monthly utility bills. Performing low-cost DIY diagnostic checks allows homeowners to pinpoint hidden water waste and address faulty components before severe damage occurs or expensive emergency service calls become necessary.
The Water Meter Leak Test (Finding Silent Underground & Toilet Leaks)
Performing a water meter leak test isolates hidden supply line cracks and silent fixture runs without opening walls or digging up grounds. Using the water meter low-flow indicator provides an immediate visual confirmation of whether pressurized water is leaving your main line without your knowledge.
- Isolate the Home: Turn off every water fixture, ice maker, washing machine, and outdoor spigot inside and outside the house.
- Check the Low-Flow Indicator: Open your water meter box and inspect the small triangular, star-shaped, or digital low-flow indicator dial on the meter face.
- Evaluate Movement: If the low-flow dial rotates or the digital readouts advance while all home fixtures are off, a silent water line leak exists between the meter and your home or inside a fixture.
Food Coloring Test for Running Toilet Flappers
A worn toilet flapper leak can waste hundreds of gallons of water daily by allowing continuous flow from the tank directly into the overflow pipe and bowl. Performing a simple food coloring test reveals hidden flapper seal degradation within minutes without using specialized tools.
- Remove the Tank Lid: Take off the porcelain toilet tank lid and set it safely on a flat surface.
- Add Dye Drops: Place 5 to 10 drops of dark food coloring or a dye tablet directly into the standing water inside the toilet tank.
- Wait Without Flushing: Do not flush the toilet; leave the fixture completely undisturbed for 15 to 20 minutes.
- Inspect the Bowl: Check the toilet bowl; if colored water appears inside the bowl without flushing, the rubber flapper valve is deteriorated and must be replaced immediately.
Installing Smart Water Leak Detectors & Automatic Shut-Off Valves
Deploying wireless smart water sensor modules beneath high-risk plumbing appliances provides real-time smartphone alerts at the first trace of moisture. Pair these sensors with a smart automatic shut-off valve installed on your main incoming line to instantly cut off water flow when a line breach occurs while you are away from home.
- Targeted Sensor Placement: Position compact leak detectors on the floor directly beneath washing machine connections, water heater bases, refrigerator ice-maker lines, and under-sink P-traps.
- Automatic Main Line Protection: Install an automated valve actuator on your main shut-off valve that triggers automatically upon receiving a signal from any linked moisture sensor.
- Whole-Home Flow Monitoring: Modern smart systems monitor baseline pipe flow patterns and pressure drop variances, automatically flagging micro-leaks long before visible water damage forms.
The Master Seasonal Plumbing Maintenance Matrix
Following a structured seasonal maintenance matrix transforms chaotic home repairs into a simple, predictable routine. Performing targeted checks based on environmental shifts and appliance usage cycles optimizes water efficiency, prevents unexpected pipe failures, and extends the operational lifespan of your entire plumbing system.
Spring & Summer Checklist (Outdoor Lines & AC Drain Lines)
Warmer months require focusing on outdoor water infrastructure and air conditioning drainage systems to handle high summer water demands. Clearing cooling lines and inspecting exterior spigots ensures uninterrupted operation throughout the hot season.
- AC Condensate Line Flush: Pour a cup of distilled white vinegar down the AC drain line access point to clear algae and prevent drain pan overflows.
- Outdoor Spigot & Hose Check: Reconnect garden hoses, pressurized outdoor lines, and check bib seals for leaks caused by winter freeze expansion.
- Irrigation Zone Audit: Inspect sprinkler heads and underground line valves for clogged nozzles, misdirected spray heads, or line breaks.
Fall & Winter Checklist (Insulation & Heater Servicing)
Cold weather preparation focuses on thermal protection for unheated piping runs and optimizing water heating efficiency before severe winter temperatures arrive. Completing these tasks early mitigates freeze risks and reduces seasonal energy costs.
- Water Heater Temperature Setting (120°F): Calibrate thermostat dials to 120°F to prevent scalding risks, minimize mineral scaling, and lower heating bills.
- Freeze Insulation Audit: Verify pipe insulation foam covers all unheated lines in crawl spaces, basements, attics, and exterior wall cavities.
- Sillcock Winterization: Shut off internal isolation valves serving outdoor spigots, disconnect hoses, and open exterior bleeder valves completely.
Monthly & Quarterly Habit Checklist
Establishing regular habit checks keeps minor wear items from escalating into structural damage or emergency plumber calls. Incorporate these quick inspections into your routine household chores to maintain full system integrity.
- Quarterly Pipe Inspection: Conduct a visual sweep under kitchen and bathroom cabinets using a flashlight to catch micro-drips around P-traps and shut-off valves.
- Monthly Strainer Cleaning: Remove, wash, and sanitize all bathroom mesh strainers and sink pop-up stoppers to keep hair and soap scum out of drain lines.
- Main Valve Exercise: Turn supply shut-off valves under sinks and toilets slightly off and on again to prevent internal mineral seize and maintain smooth emergency operation.
Professional Perspective & FAQ
Understanding the boundaries between simple DIY maintenance and complex plumbing repairs saves thousands of dollars while protecting your home’s structural integrity. Consulting licensed plumbing professionals for intricate system diagnostics ensures strict plumbing code compliance and prevents costly installation mistakes.
What Licensed Plumbers Wish Homeowners Knew
Master plumbers regularly encounter severe, expensive home damage caused by well-intentioned DIY mistakes and delayed routine care. Knowing how residential plumbing systems operate under pressure and respecting structural limitations prevents accidental pipe breaches and code violations.
- Chemical Cleaners Are Temporary Hacks: Chemical openers rarely clear complete line blockages; they corrode pipe walls and create hazardous, acid-filled standing water for technicians to clear manually.
- Over-Tightening Causes Fitting Fractures: Cranking down excessively on plastic supply line nuts or brass fittings strips threads and cracks seals, causing low-pressure drips to turn into major blowouts.
- Main Shut-Off Valves Must Be Tested: Waiting for an active burst pipe to test an unmaintained main shut-off valve often leads to seized handles and uncontrolled home flooding.
DIY vs. Professional Repair: When to Call a Licensed Plumber
While homeowners can easily swap faucet aerators, replace toilet flappers, and clear minor P-trap clogs, complex main line diagnostics require specialized machinery and trade expertise. Knowing when to hire a professional protects your home warranty, ensures proper licensing, and avoids hazardous code compliance errors.
- Sewer Camera Scope Inspection: Persistent main line backups, invasive tree root intrusions, or sagging drain lines require a video camera scope to locate structural underground breaks accurately.
- Gas Line & Main Line Modifications: Any work involving fuel gas lines, main water service line replacements, or sub-slab piping must be performed by a technician with valid license verification and local permits.
- Pressure Regulator & Main Valve Replacement: Cutting into main copper or PEX lines to install pressure-reducing valves or main shut-off controls requires commercial-grade soldering, crimping tools, and system venting.
Frequently Asked Questions
What are the most common plumbing problems in homes?
The most frequent residential plumbing issues include running toilets, dripping faucets, slow kitchen and shower drains, low water pressure, water heater sediment noises, and frozen supply lines during winter. Most of these problems stem from mineral buildup, worn rubber seals, or improper drain disposal habits.
What is the 135 rule in plumbing?
In residential plumbing, the 135 rule refers to the standard drain slope calculation requirement where horizontal drainage pipes must drop 1/4 inch per foot (equivalent to a 2% slope ratio, or 1 unit of drop for every 48 units of length, often cited alongside standard 135-degree fitting offsets). Maintaining a consistent 1/4 inch per foot pitch ensures wastewater flows at an ideal velocity to carry solid debris away without leaving solids stranded inside the pipe.
How do I tell if a plumber is overcharging me?
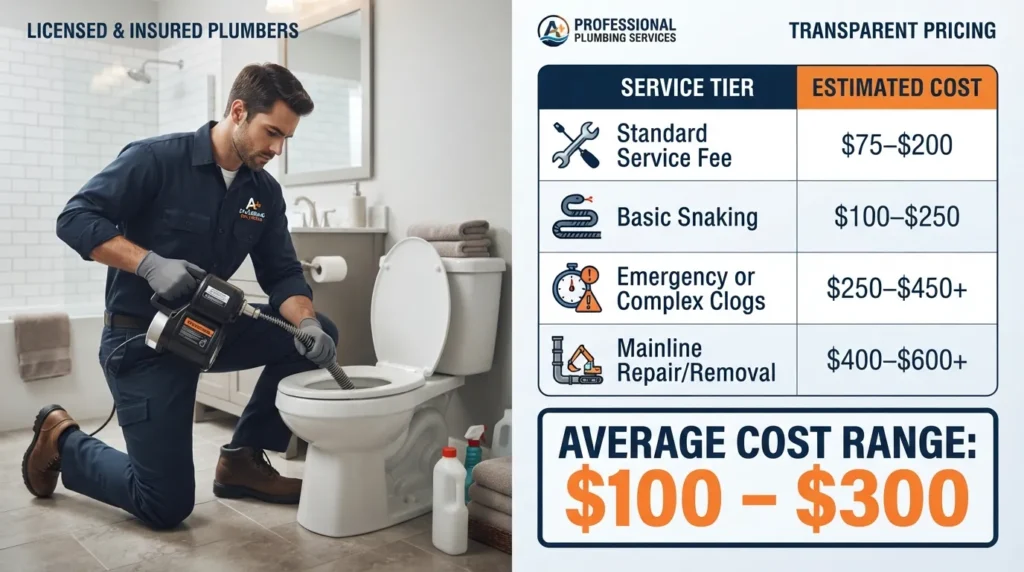
To determine if plumbing charges are fair, obtain at least three itemized estimates detailing material costs, standard labor rates, and permit fees. Be aware that emergency service rates for off-hours or holidays naturally cost 50% to 100% more than standard business hours. Reputable licensed plumbers provide transparent upfront flat-rate pricing, offer clear line-item breakdowns, and back their workmanship with written warranties rather than issuing vague verbal quotes.

Oscar Vance | Master Plumber & Drainage Expert
Meet Oscar Vance, a licensed master plumber sharing practical solutions on residential repairs, preventive maintenance, and thoughtful home upkeep.