Do You Need a Plumber?
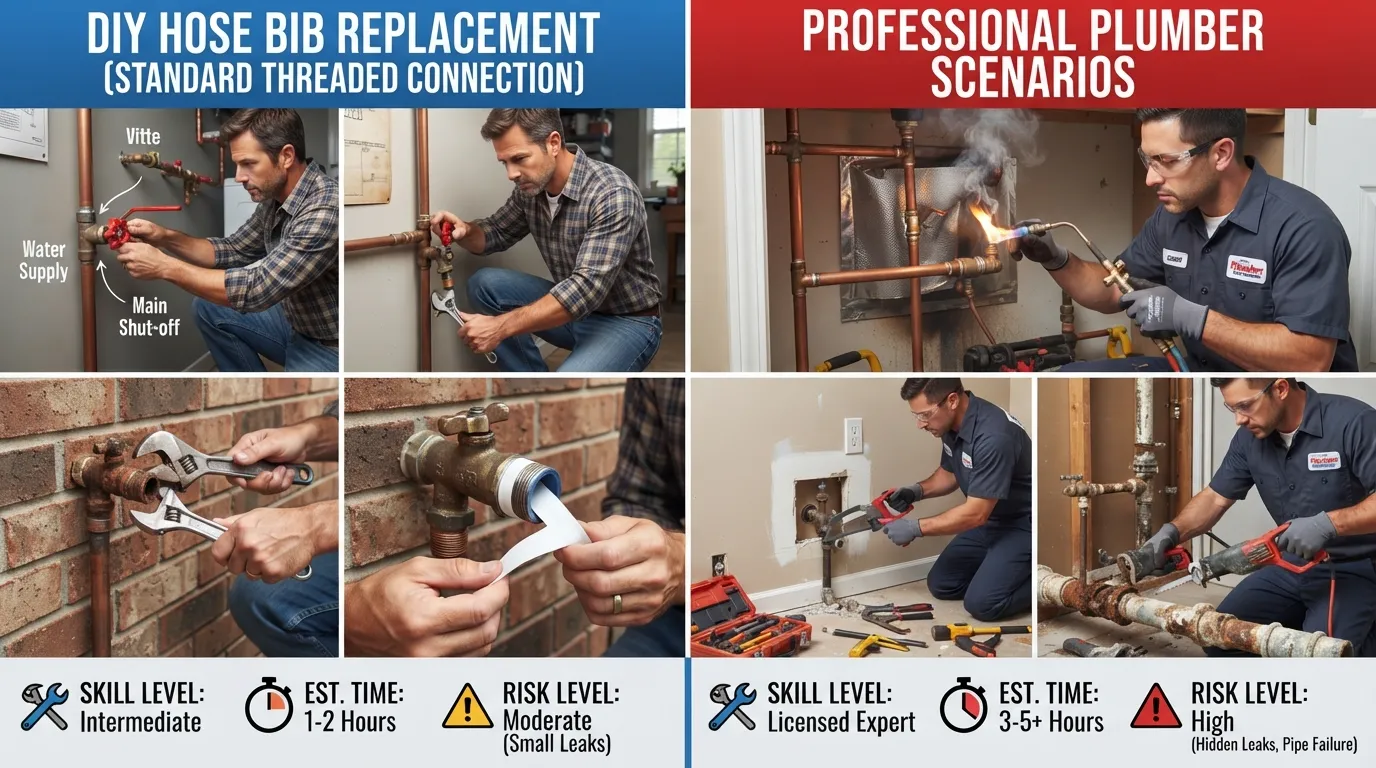
Most outdoor spigot replacements do not require a professional plumber if your home uses a standard threaded connection. Homeowners can typically complete a basic DIY replacement in under an hour with basic hand tools.
However, you will need to call a licensed professional immediately if the pipe involves soldered copper, PEX crimps hidden behind drywall, or shows signs of active structural leaking.
It Depends on Your Connection Type
Your connection type dictates whether you can handle the job yourself or if you need expert assistance. Identifying this setup before starting prevents accidental pipe damage and costly water leaks.
- Threaded Connections (DIY Friendly): If your outdoor spigot screws directly onto a threaded pipe inside the wall or crawl space, you can easily unscrew and replace it.
- Soldered or PEX Connections (Plumber Recommended): If the hose bib is soldered copper or clamped PEX tubing, improper handling risks indoor flooding and requires professional torch work or crimping tools.
- Valves with Internal Damage: If the shut-off valve supplying the spigot is broken or leaking, a plumber must shut off the main water supply safely.
Signs You Can DIY This
Evaluate your current plumbing setup against these three indicators to determine if a DIY replacement is safe and realistic.
- Accessible Shut-Off Valve: You have a dedicated, working shut-off valve located right inside the basement, crawl space, or garage near the spigot.
- Visible Threaded Joints: The pipe connection behind the wall uses standard threaded fittings rather than permanent copper solder or glued PVC.
- Minor Exterior Wear: The leak is coming from the packing nut or handle, rather than a cracked pipe sleeve embedded deep inside your home’s foundation.
How to Identify Your Spigot’s Connection Type
Correctly identifying your outdoor spigot’s connection type prevents costly plumbing mistakes and ensures a secure, leak-free installation. Before purchasing replacement parts, inspect how the spigot attaches to the supply pipe by checking for threads, solder joints, or compression nuts.
- Inspect the pipe material and joint area closely using a flashlight.
- Determine whether you need a pipe wrench, torch, or wrenches for removal.
- Match your physical finding with standard residential plumbing configurations.
Threaded Screw-On Spigots Easiest to Replace
Threaded connections are the most straightforward to identify and replace because they simply screw directly onto a male or female pipe adapter. You will typically see clear screw threads where the spigot meets the building wall or supply pipe, often sealed with plumber’s tape or pipe dope.
- Look for visible exterior or interior threads at the back of the faucet body.
- Use two pipe wrenches to safely unscrew the fixture without twisting the supply pipe inside the wall.
- Ensure the replacement spigot matches the exact thread size and gender (usually 1/2-inch or 3/4-inch NPT).
Soldered or Sweated Copper Pipe Connections
Soldered or sweated connections are permanently fused to copper supply pipes using a torch and metal solder. These spigots lack visible threads or nuts, presenting a smooth, metallic joint where the copper pipe enters the base of the faucet.
- Identify a seamless, shiny metal ring of solder binding the copper pipe directly into the spigot inlet.
- Understand that removal requires cutting the copper pipe slightly behind the joint and using a torch to sweat on a new fitting.
- Exercise extreme caution with open flames near exterior walls and wooden framing during replacement.
Push-Fit Compression Fittings
Push-fit and compression fittings join the spigot to the supply pipe using mechanical pressure rather than solder or permanent threads. Compression fittings use a tight nut and brass ring (ferrule) to grip the pipe, while push-fit systems lock securely onto copper, PEX, or CPVC using internal O-rings and teeth.
- Check for a hexagonal compression nut tightened firmly against a brass sleeve around the pipe.
- Examine for modern push-to-connect collars that allow the pipe to simply snap securely into the valve body.
- Keep specialized disconnect clips or standard adjustable wrenches handy to release or tighten these mechanical seals.
A Homeowner’s Confusion Reddit Case Reference
Many DIYers encounter unexpected plumbing configurations that cause frustration when trying to swap a leaking outdoor faucet. Homeowners frequently share diagnostic challenges and ask for community advice when their specific connection type does not match standard tutorials, as seen in discussions regarding identifying unknown plumbing connections for repair.
- Real-world troubleshooting often reveals painted-over pipes or corroded joints that obscure the actual connection style.
- Consulting peer experiences helps validate whether a DIY repair is safe or if professional plumbing assistance is required.
- Always clear away insulation, dirt, and paint to expose the true pipe structure before attempting any removal steps.
When You Can Safely DIY the Replacement
Replacing an outdoor spigot is completely manageable for a DIYer when the connection is accessible and threaded, requiring only basic tools and about 30 minutes of your time. This beginner-friendly project saves plumbing fees while giving you total confidence in managing basic home water lines.
Tools You’ll Need
Gathering the correct tools before you start prevents frustrating trips to the hardware store mid-project. Keep this lightweight equipment checklist ready:
- Adjustable Wrench (or Pipe Wrench): Used to grip and unthread the old hose bib while stabilizing the interior pipe.
- Plumber’s Tape (PTFE Tape): Wrapped around male threads to create a watertight, leak-proof seal.
- Replacement Hose Bib: The new outdoor spigot matched to your existing pipe size and configuration (threaded or solderless twist-on).
- Bucket and Towels: To catch residual water left inside the pipe when you unscrew the old valve.
Estimated Cost of Parts
Tackling this as a DIY plumbing task is exceptionally cost-effective compared to hiring a professional contractor. Most basic residential repairs fall well within an affordable budget:
Professional plumbing service calls often run between $150 and $300 just for a basic fixture swap, making this an ideal money-saving weekend project.
Skill Level Required: Beginner-Friendly Scenarios
You can safely execute this replacement yourself if your setup meets specific straightforward conditions. Look for these low-risk, beginner plumbing scenarios:
- Threaded Connections: The existing spigot screws directly onto a threaded male pipe protruding from the exterior wall.
- Accessible Shut-Off Valve: You have a working interior shut-off valve located nearby in the basement, crawlspace, or utility room to isolate the line.
- No Cinderblock Obstructions: The pipe is clearly visible and easy to reach without cutting into drywall, brick, or concrete structures.
If your pipe requires heavy torch soldering, or if the interior shut-off valve is completely broken or nonexistent, you should call a licensed plumber instead.
When You Absolutely Need a Professional Plumber
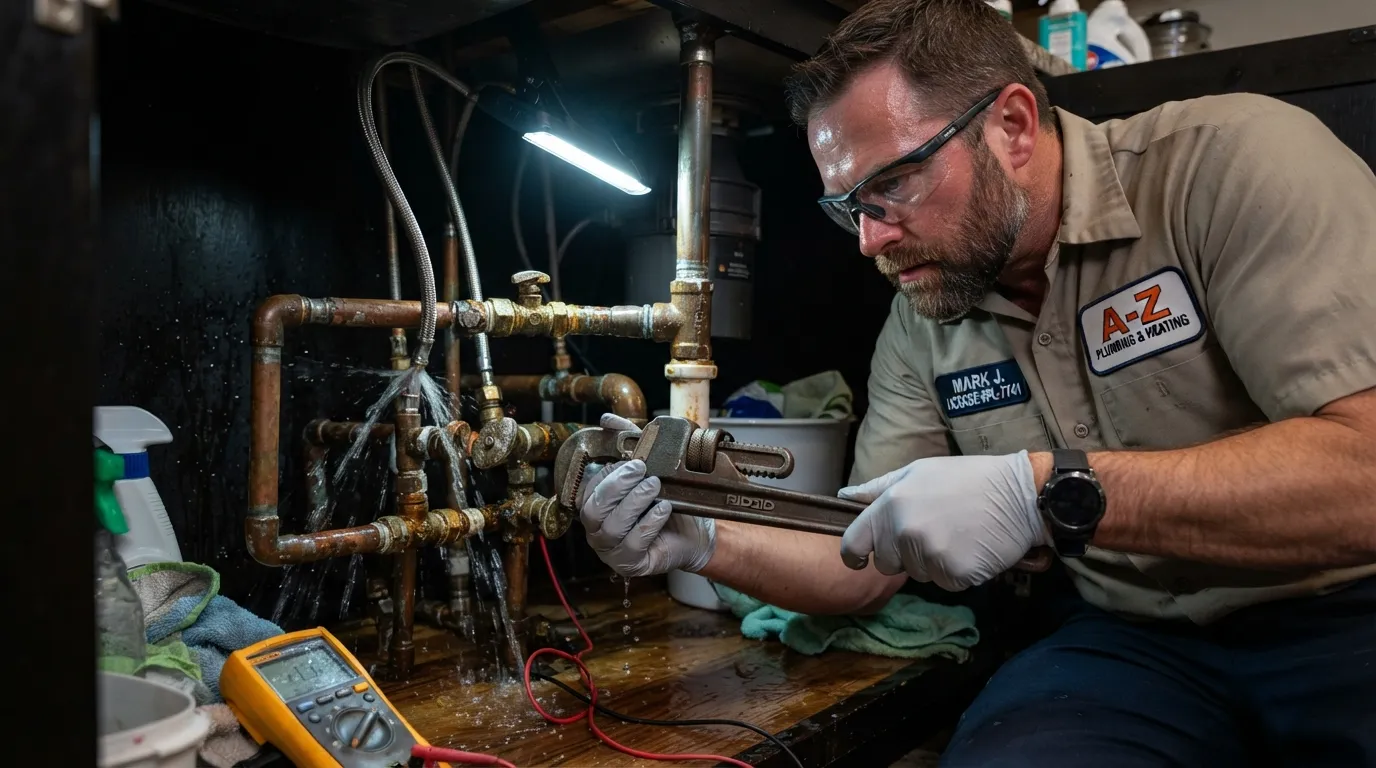
Recognizing the boundary between a manageable DIY fix and a critical plumbing emergency prevents catastrophic structural damage and costly insurance disputes. Certain scenarios involve high-pressure systems, structural components, and toxic hazards that legally or safely require certified expertise.
In-Wall or Underground Leaks
An in-wall or underground leak presents an immediate threat to your home’s foundation and framing because water silently saturates drywall, studs, and concrete slabs. Locating these issues typically requires non-invasive acoustic leak detectors and thermal imaging cameras that standard homeowners do not possess.
- Structural Integrity: Unaddressed moisture inside cavities rapidly triggers black mold growth and rots wooden framing within 48 to 72 hours.
- Excavation Needs: Underground pipe repairs often demand specialized trenching equipment and adherence to local municipal excavation codes.
- Hidden Pathways: Water travels far from its source, meaning the visible damp spot is rarely where the pipe actually ruptured.
Soldering/Sweating Copper Pipes
Soldering copper pipes demands precise flame control, flawless surface preparation, and complete moisture elimination to achieve a permanent, pressure-tight molecular bond. A poorly executed joint can hold initially only to rupture under constant thermal expansion or water pressure weeks later.
- Fire Hazard: Open torches used in confined wall spaces frequently ignite hidden insulation, wooden studs, or electrical wiring.
- System Contamination: Excessive flux or overheating introduces toxic metallic residues and lead-based alloys into your household drinking supply.
- Complete Drainage: Even a tiny droplet of residual water inside the pipe prevents solder from drawing into the joint, causing instant pinhole leaks.
Main Water Line Involvement
The main water line connects your home directly to the municipal supply or private well under high pressure, typically ranging from 40 to 80 psi. Tampering with this line without proper regional utility clearances risks a catastrophic blowout, immediate property flooding, and service interruptions for your entire neighborhood.
- High-Pressure Danger: Main lines lack pressure-reducing valves, meaning a failure unleashes hundreds of gallons per minute into your property.
- Utility Coordination: Certified professionals know how to safely coordinate emergency shut-offs with municipal water authorities.
- Code Compliance: Main line replacements require strict adherence to local plumbing codes, backflow prevention mandates, and official permit sign-offs.
Why Small Leaks Can Turn Into Big Floods
A slow drip behind a cabinet or underneath a floorboard creates a false sense of security while silently eroding building materials and fostering aggressive fungal colonies. Minor leaks escalate into major floods due to continuous pressure, mineral scaling, and gradual material fatigue.
- Pressure Surges: Municipal water pressure spikes overnight, turning a hairline crack into a full-bore pipe rupture while you sleep.
- Corrosion Acceleration: Electrochemical reactions in mixed-metal plumbing continuously weaken pipe walls until structural collapse occurs.
- Exponential Damage: A leak leaking just one gallon per hour wastes over 24 gallons a day, steadily compromising subflooring and electrical outlets.
DIY vs Handyman vs Plumber vs Big-Box Store Full Cost & Time Comparison
Choosing between a DIY fix, hiring a local professional, or using a retail service provider depends entirely on your budget, schedule, and technical comfort level. Understanding the labor rates and time commitments upfront prevents unexpected expenses and ensures your plumbing fixture is installed correctly.
How Much Does a Plumber Charge to Replace a Spigot?
Licensed plumbers charge the highest labor cost due to their specialized certification, insurance, and liability coverage. Most residential plumbing services bill by the hour or charge a flat-rate project fee for standard exterior spigot replacements.
- Standard hourly labor rates typically range from $75 to $150 per hour.
- Emergency or after-hours callout fees can push total replacement costs past $300.
- Best option if rusted pipes require soldering, structural modifications, or interior wall access.
How Much Does a Handyman Charge?
Independent handymen offer a cost-effective middle ground for standard residential maintenance tasks like swapping out standard hose bibbs. Their pricing structures are generally more flexible than licensed trade contractors.
- Average hourly rates range from $40 to $80, or a flat task fee of $50 to $150.
- Ideal for straightforward threaded installations that do not require complex pipe welding.
- Ensure your handyman carries general liability insurance before starting any water-line work.
Lowe’s vs Home Depot Installation Pricing
Big-box home improvement retailers partner with local third-party subcontracted networks to manage home installations. While convenient, pricing depends on regional contractor availability and baseline store policies.
- Standard basic installation fees generally range between $100 and $250, excluding the cost of the actual spigot fixture.
- Scheduling requires an advance consultation fee or an upfront deposit that may or may not apply toward final labor costs.
- Provides guaranteed workmanship warranties backed directly by the retail installation program.
How Long Does Faucet/Spigot Installation Take?
Total project duration depends heavily on whether you encounter frozen isolation valves, corroded fittings, or tight crawlspaces. Planning for potential delays helps keep your water shut off safely.
- Simple threaded replacements on modern PEX or copper lines take approximately 30 to 60 minutes.
- Complex scenarios involving stuck fittings, rusted backing plates, or masonry drilling can extend the job to 2 hours.
- Always locate and test your main water shut-off valve before beginning any timeline estimation.
How to Replace an Outdoor Spigot Yourself
Replacing a damaged or leaking outdoor spigot is a manageable plumbing project that prevents water waste and property damage. By following a systematic approach—from locating your main water supply to performing a final leak test—you can successfully complete a professional-grade hose bib installation in under an hour.
Step 1: Turn Off the Water Supply Shut-Off Valve Location
The first and most critical step in any plumbing repair is shutting off the water supply to prevent indoor flooding. Locate the dedicated interior shut-off valve for your outdoor spigot, which is typically found directly opposite the exterior faucet along the basement ceiling, crawlspace, or utility room wall.
- Locate the dedicated shut-off valve inside your home near the exterior wall penetration.
- Turn the valve clockwise to completely cut off water flow to the outdoor line.
- Open the outdoor spigot fully to drain any residual water trapped inside the pipe.
Step 2: Drain the Line & Remove Old Spigot
Once the water supply line is completely depressurized, you can safely remove the old, worn-out fixture without risking water spillage. Depending on your home’s plumbing configuration, the existing spigot will either be threaded onto a male adapter or soldered directly onto a copper pipe.
- Place a small bucket underneath the interior or exterior connection to catch any remaining water drops.
- Use two pipe wrenches—one to hold the supply pipe steady and the second to turn the spigot counter-clockwise.
- Inspect the exposed threads or pipe stub for rust, mineral buildup, or structural damage before proceeding.
Step 3: Apply Plumber’s Tape & Install New Spigot
Proper sealing is essential to prevent slow, hidden leaks behind your home’s siding or foundation. Wrap quality plumber’s tape clockwise around the male pipe threads 3 to 5 times to create a watertight, lubricated seal for the new hose bib installation.
- Wrap plumber’s tape tightly around the clean male threads in a clockwise direction.
- Hand-thread the new outdoor spigot onto the supply line until it becomes snug.
- Use a wrench to carefully tighten the fixture another half-turn, ensuring the nozzle points directly downward.
Step 4: Test for Leaks
Verifying your installation under pressure ensures there are no hidden leaks inside your walls before you finish the repair process. Slowly restore water pressure to the line while carefully monitoring both the interior connection point and the newly installed outdoor fixture.
- Return to the interior shut-off valve and turn it counter-clockwise about one-quarter turn to let water flow slowly.
- Check the interior connection point thoroughly with a dry paper towel to detect any moisture seepage.
- Turn the outdoor spigot on and off multiple times while checking for any spray or drips at the threaded joint.
Special Scenarios Brick Houses & Well Water Systems
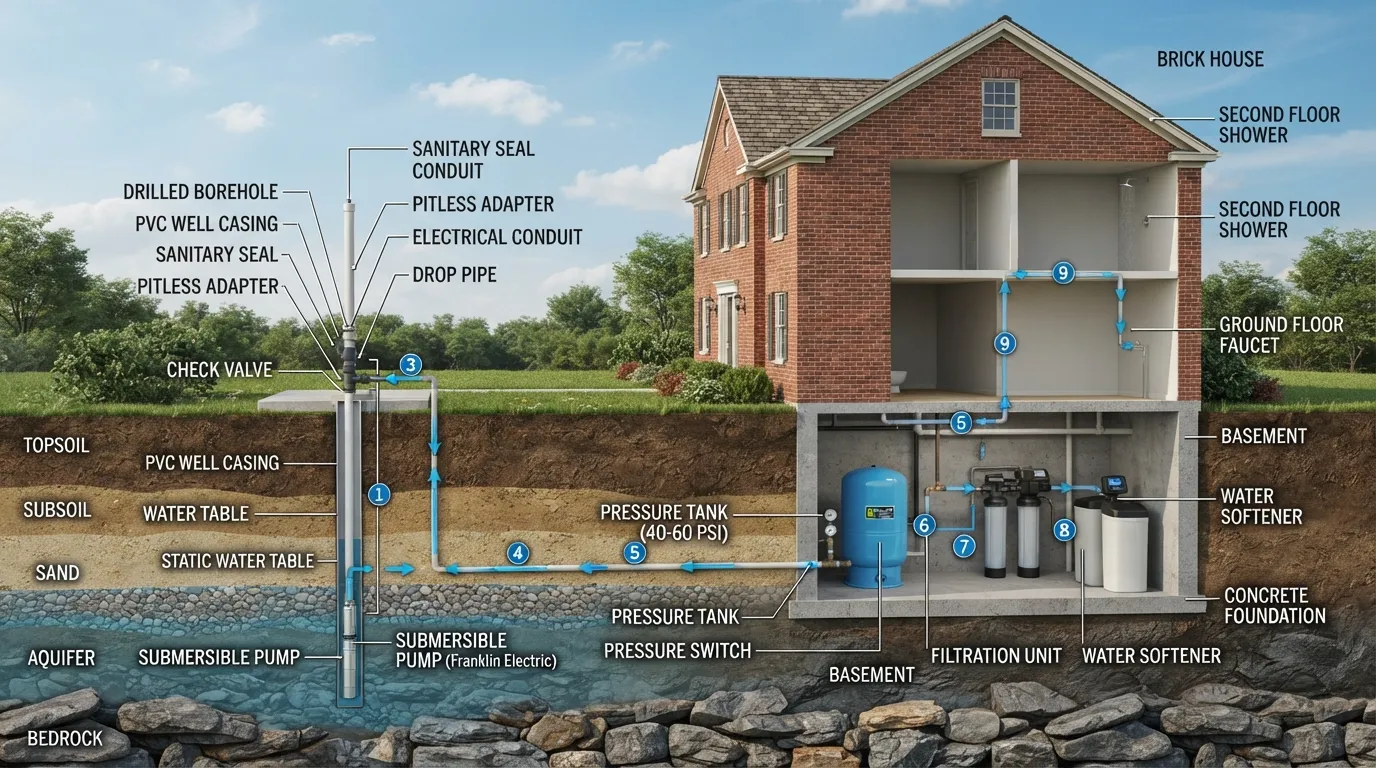
Replacing an outdoor spigot on a brick home or a property utilizing a private well water system introduces unique mechanical challenges that standard residential installations do not require. Navigating masonry anchors, structural stability, pressure tanks, and sediment filtration ensures your plumbing repair remains secure and fully functional.
Replacing a Spigot on a Brick Exterior Wall
Replacing an exterior spigot on a brick or masonry wall requires precision drilling, specialized masonry anchors, and proper gap-sealing to prevent moisture intrusion into your home’s structural framing. Because brick and mortar cannot support plumbing weight through friction alone, securing the pipe assembly directly to solid backing is critical.
- Turn Off the Main Supply: Shut off the main indoor water valve and drain the existing line entirely before cutting or unthreading any fittings.
- Drill Through Masonry: Use a hammer drill equipped with a masonry bit sized correctly for your anchor sleeves or mounting screws, aiming through the mortar joints when possible to minimize brick fracturing.
- Secure the Flange: Fasten the spigot’s mounting flange to the wall using rust-resistant masonry screws and plastic expansion anchors to eliminate pipe movement.
- Seal the Perimeter: Apply a heavy-duty exterior silicone caulk around the penetration point and sleeve to block drafts, pests, and water seepage.
Outdoor Spigot Replacement for Well Water Systems
Working on an outdoor spigot connected to a well water system requires accounting for fluctuating water pressure, sediment accumulation, and seasonal freeze protection. Well systems often operate across wider pressure ranges (such as 30/50 or 40/60 PSI switches) and may carry microscopic grit that accelerates valve wear.
- Relieve Pressure and Drain: Deactivate the well pump at the pressure switch or breaker box, open a low-point drain, and release all pressure from the pressure tank before uncoupling lines.
- Install Full-Port Ball Valves: Upgrade the interior shut-off valve to a full-port brass ball valve to prevent well sediment from clogging narrow gate-valve pathways.
- Use Sediment-Resistant Components: Select heavy-duty brass frost-free hydrants designed to withstand aggressive or mineral-rich well water without premature internal seal degradation.
- Flush Before Reconnection: Turn the well pump back on temporarily and flush the line openly for 60 seconds to clear out any pipe tape, solder flux, or stirred-up sediment before final spigot attachment.
Should You Upgrade to a Frost-Free Faucet?
Upgrading to a frost-free faucet is a proactive, cost-effective defense against costly winter plumbing disasters, especially if you live in regions subject to sub-freezing temperatures. Replacing an outdated spigot eliminates the tedious annual ritual of indoor shut-off valves and foam covers.
What Is a Frost-Free Freeze-Proof Faucet?
A frost-free faucet—often called a freeze-proof spigot—is specifically engineered with an elongated valve stem that positions the actual water shut-off seat deep inside the warm interior of your home. This clever design prevents standing water from sitting near the exterior wall where it can easily freeze, expand, and rupture the pipe.
- Extended Stem Mechanism: The shut-off washer is located several inches to a foot inside the structure, protected by ambient indoor heat.
- Downward Pitch: The pipe is engineered with a slight outward slope to ensure complete gravity drainage when the valve is closed.
- Anti-Siphon Protection: Modern variants typically integrate vacuum breakers to prevent contaminated outdoor water from being siphoned back into your domestic drinking supply.
How to Tell If Your Current Faucet Is Frost-Free
Differentiating a standard outdoor spigot from a frost-free model requires examining both its physical appearance and how it operates from the inside. Standard spiggots shut off immediately at the exterior wall, making them highly vulnerable to winter ice accumulation.
- Examine the Pipe Length: Frost-free faucets feature a heavy, reinforced brass or copper sleeve extending through the exterior wall into the basement or crawlspace.
- Check the Interior Wall: Look inside your home directly opposite the outdoor spigot to locate the long inner tube and the shut-off assembly.
- Test the Handle Turn: A freeze-proof model often requires multiple rotations to fully open or close due to the long internal threaded stem.
Is It Worth the Extra Cost?
Investing in a frost-free spigot is undeniably worth the expense when weighed against the thousands of dollars in water damage caused by a single burst pipe. While traditional spigots require meticulous winterizing, frost-free models offer long-term peace of mind with minimal ongoing maintenance.
- Climate Consideration: Homes in USDA Hardiness Zones 7 and below benefit immensely from this upgrade due to prolonged freezing winters.
- Property Protection: Eliminates the risk of flooded basements or crawlspaces caused by forgotten winter preparations.
- Long-Term Value: Professional installation pays for itself by avoiding emergency plumbing service calls during peak winter freezes.
How Long Does an Outdoor Spigot Last?

An outdoor spigot typically lasts between 5 to 10 years under normal operating conditions, though heavy use or harsh winter freezing can shorten this lifespan. The longevity of your exterior water faucet depends heavily on the manufacturing material, local water chemistry, and whether proper winterization steps are routinely performed.
Average Lifespan by Material Brass vs Plastic
The material composition of your outdoor spigot is the single biggest factor determining how many years it will remain functional. High-quality metal builds withstand environmental stress far better than cheap polymer alternatives.
- Solid Brass Spigots: Lasts 10 to 15+ years. Brass offers superior corrosion resistance and handles high water pressure exceptionally well, making it the industry standard for durability.
- Plastic/Polymer Spigots: Lasts 3 to 5 years. While cheap and resistant to rust, plastic exterior faucets degrade rapidly under prolonged UV exposure and become brittle during sub-zero freezing temperatures.
- Stainless Steel Options: Lasts 12 to 20 years. Premium commercial-grade stainless steel resists rust and physical impact, though it is less common for standard residential installations.
Signs It’s Time to Replace, Not Repair
Minor leaks can usually be fixed by swapping out a worn-out washer or tightening the packing nut, but structural degradation requires a full unit replacement. Knowing when to upgrade saves you from sudden pipe bursts and water damage.
- Visible Cracks or Body Splits: Frost expansion often cracks the actual faucet body or anti-siphon valve, causing unfixable leaks behind the wall or at the nozzle.
- Severe Mineral Corrosion: Heavy calcification, rust buildup, or green scaling that fuses the handle and internal stem together makes standard repairs impossible.
- Internal Stem Damage: If turning the handle does nothing to stop the flow of water because the internal threads or brass stem are completely stripped, a replacement is necessary.
- Leaking Behind the Siding: If water leaks from the wall connection or inside your basement/crawlspace whenever the outdoor valve is opened, the entire frost-free pipe assembly has failed.
Frequently Asked Questions
How do I repair a leaky outdoor faucet?
Repairing a leaky outdoor faucet typically involves replacing a worn-out washer or O-ring, which is the most common cause of leaks. You can complete this fix quickly by shutting off the water supply, removing the handle and packing nut, and swapping out the damaged internal components.
- Turn off the dedicated interior water supply valve or main water line before starting any work.
- Unscrew the handle packing nut with an adjustable wrench to access the valve stem.
- Pull out the stem assembly and check the rubber washer at the end; replace it if it is cracked, flattened, or worn down.
- Reassemble the components tightly, turn the water back on, and test the faucet for any remaining drips.
How do I turn off water to an outside faucet?
You can turn off water to an outside faucet by locating and closing its dedicated interior shut-off valve, which is usually installed along the same water line inside your basement, crawlspace, or utility room. If your home lacks an individual shut-off valve for the exterior line, you will need to shut off the main water meter valve for the entire house.
- Inspect your basement ceiling, crawlspace, or garage wall directly opposite the outdoor spigot location.
- Look for a small gate valve or ball valve inline with the copper or PEX pipe leading to the exterior wall.
- Turn the valve handle clockwise until it stops completely to shut off the flow to that specific spigot.
- Open the outdoor faucet fully to drain any residual water trapped inside the pipe before beginning repairs.
What should I do if my faucet is spraying water everywhere?
If your outdoor faucet is spraying water uncontrollably from the packing nut or handle connection, immediately shut off the main water supply to prevent property damage. A violent spray usually indicates a severely disintegrated valve stem washer, a loose packing nut, or severe internal freeze damage that cracked the brass body.
- Shut off your home’s main water supply valve right away to relieve the intense pressure.
- Tighten the packing nut slightly with a wrench if water is leaking around the handle stem while turned on.
- Inspect the metal body of the faucet closely for hairline cracks caused by winter freezing if tightening the nut fails to stop the spray.
- Replace the entire faucet assembly immediately if structural freezing damage is present.
Can a handyman replace a faucet?
A professional handyman can easily replace a standard outdoor faucet, as the task typically requires basic plumbing tools and straightforward pipe disconnection skills. For complex configurations involving soldered copper lines or frozen shut-off valves, hiring a licensed plumber is often the safer choice.
- Verify that your local handyman has experience with plumbing replacements and carries liability insurance.
- Ensure they check for proper anti-siphon backflow prevention compliance required by modern building codes.
- Confirm whether your setup requires threaded connections, PEX fittings, or torch soldering before work begins.
What is the average lifespan of a faucet?
A high-quality brass outdoor faucet generally lasts between 15 to 20 years with proper seasonal maintenance, such as winterizing and disconnecting garden hoses. However, cheap alloy models or spigots frequently exposed to severe winter freezing without proper drainage may fail in under 5 years.
- Disconnect garden hoses every autumn to prevent trapped water from freezing and bursting the internal mechanism.
- Install frost-free sillcocks in colder climates to extend the overall lifespan of your exterior plumbing system.
- Perform minor component replacements, such as washers and O-rings, every few years to keep the faucet functioning smoothly.
Final Verdict & Recommendation
Making the final call between handling a project yourself or hiring a professional relies entirely on your comfort level, tool availability, and the complexity of the task. Prioritizing safety and long-term structural integrity ensures your home remains protected against costly mistakes.
Our Recommendation Based on Connection Type
Different installation and repair scenarios demand distinct levels of expertise. Matching your specific connection type to the right approach eliminates guesswork and prevents accidental property damage.
- Threaded and Compression Fittings: Generally safe for confident DIYers equipped with standard wrenches and proper thread seal tape or pipe dope.
- Soldered Copper Pipes: Requires intermediate to advanced skills, open flame safety management, and precise pipe preparation. Best left to a professional if you lack torch experience.
- Main Gas Lines and High-Pressure Systems: Absolute professional territory. Any work involving gas supply lines requires licensed expertise to comply with local building codes and safety regulations.
- PEX Tubing Installations: Highly beginner-friendly due to flexible lines and secure crimping or expansion tools, offering a great entry point for DIY confidence.
When in Doubt, Here’s What to Do
Uncertainty in plumbing work is a clear signal to pause and re-evaluate your strategy. Pushing forward without absolute clarity often results in leaks, water damage, or expensive emergency repair bills.
- Assess Your Limits: Stop immediately if a step requires specialized commercial machinery or if you cannot easily access the main water shut-off valve.
- Consult a Licensed Professional: Reach out to a certified local plumber for an initial consultation or to take over complex phases of the project.
- Prioritize Safety First: Always protect your home and family by deferring to expert assistance whenever structural safety or code compliance is called into question.

Oscar Vance | Master Plumber & Drainage Expert
Meet Oscar Vance, a licensed master plumber sharing practical solutions on residential repairs, preventive maintenance, and thoughtful home upkeep.

