How to Plumb a Sink
 Plumbing a sink involves connecting the water supply lines to the faucet, assembling the drain basket or pop-up assembly, and sealing everything together with a P-trap to prevent sewer gases from entering your home. Whether you are installing a brand-new setup or replacing an old unit, executing each phase carefully prevents costly water leaks and ensures optimal drainage flow.
The Short Answer
Plumbing a sink from scratch can be broken down into five core sequential steps that apply to both bathroom vanities and kitchen stations. Following this proven sequence ensures a watertight, functional installation on your very first try.
- Step 1: Install Shut-Off Valves and Supply Lines: Mount your hot and cold shut-off valves onto the water supply stub-outs, then attach braided stainless steel supply lines to the faucet shank.
- Step 2: Mount the Faucet and Drain Assembly: Secure the faucet onto the sink deck using plumber’s putty or silicone, and install the drain flange and tailpiece into the basin sink hole.
- Step 3: Connect the P-Trap and Tailpiece: Link the sink tailpiece to the P-trap using slip-joint washers and nuts, ensuring the open end points toward the wall drain pipe.
- Step 4: Test for Leaks: Turn on your main water supply, let the faucet run for two minutes, and inspect all threaded connections and joints for any signs of dripping.
- Step 5: Apply Silicone Sealant: Caulk around the perimeter of the sink rim or vanity top to seal out moisture and prevent water damage to your cabinetry.
Which Situation Are You In?
Your exact plumbing approach depends heavily on the current condition of your room’s infrastructure and layout. Identify your scenario below to target the right installation steps.
- New Install with Rough-In: The wall supply lines and DWV (Drain, Waste, Vent) pipe stub-outs are already professionally installed, meaning you just need to connect the fixture hardware.
- Replacing an Existing Sink: You are swapping out an old, worn unit, which allows you to reuse existing shut-off valves and drain lines while updating aesthetic components.
- No Existing Plumbing: A total overhaul where you must run new supply pipes and drain lines through studs or concrete slabs to build a brand-new water station.
Is Plumbing a Sink Easy? What DIYers Should Know First
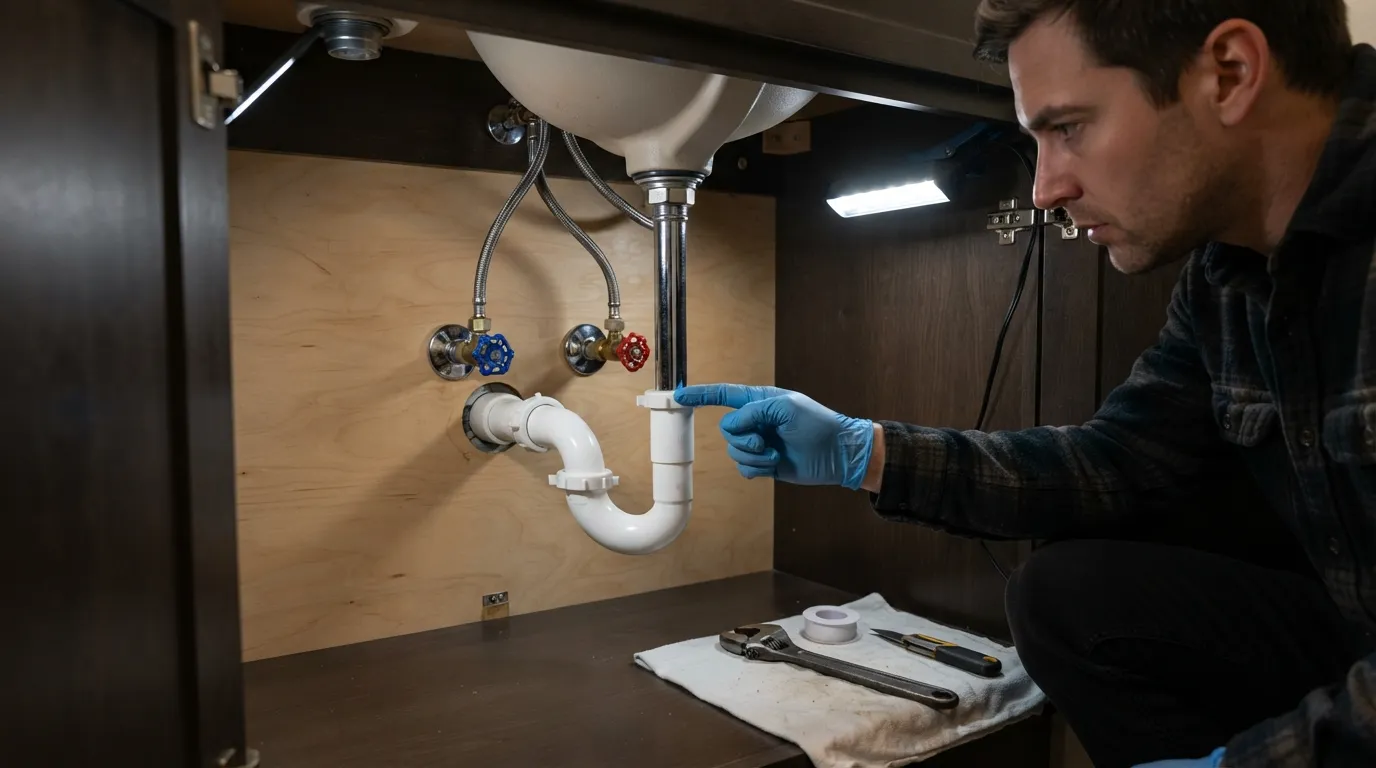 Plumbing a sink is widely considered one of the most accessible home improvement projects for beginners, provided you take your time and follow correct assembly sequences. While connecting modern flexible components requires minimal specialized training, understanding where your personal skill limits lie will prevent frustrating water leaks and property damage.
Which Parts Are Beginner-Friendly
Modern plumbing fixtures are engineered with modular, DIY-friendly connections that require standard hand tools rather than specialized professional equipment. You can comfortably handle these components without prior plumbing experience.
- Water Supply Lines: Flexible braided stainless steel hoses attach easily to shut-off valves and faucet shanks using simple wrench tightening.
- Faucet Installation: Mounting a new faucet deck involves tightening mounting nuts underneath the basin, which is straightforward with a basin wrench.
- P-Trap Assembly: Plastic or PVC slip-joint P-traps and extension tubes use hand-tightened plastic nuts and rubber washers that eliminate the need for harsh chemical glues.
Which Parts Need Experience
While surface-level assembly is simple, modifying hidden infrastructure requires precise measurements, code knowledge, and professional-grade tools. Leave these specific tasks to licensed plumbers if you lack prior experience.
- Rough-In and Wall Positioning: Aligning water supply stub-outs and DWV lines behind drywall requires strict adherence to local building codes and exact height measurements.
- Venting and Drainage Slope: Improper gravity slope or a missing vent pipe can cause slow draining, gurgling noises, or dangerous sewer gas leaks into your home.
- Cast Iron or Hard-Soldered Copper: Cutting, threading, or soldering rigid metal pipes demands advanced thermal safety skills and specialized cutting tools.
Safety Basics Before You Touch Any Pipe
Proper preparation before handling plumbing fixtures protects both your home from accidental flooding and yourself from injury. Always complete these vital safety checks before loosening any fittings.
- Locate and Test Shut-Off Valves: Ensure your local under-sink valves turn completely off, and know the location of your home main water shut-off valve just in case.
- Relieve Pressure and Drain Lines: Open your existing faucet handles after turning off the water to release trapped pressure and drain standing residual water.
- Wear Eye Protection: Always wear safety glasses when working underneath a sink basin to protect your eyes from falling debris, old putty, and chemical residues.
Tools and Materials Checklist
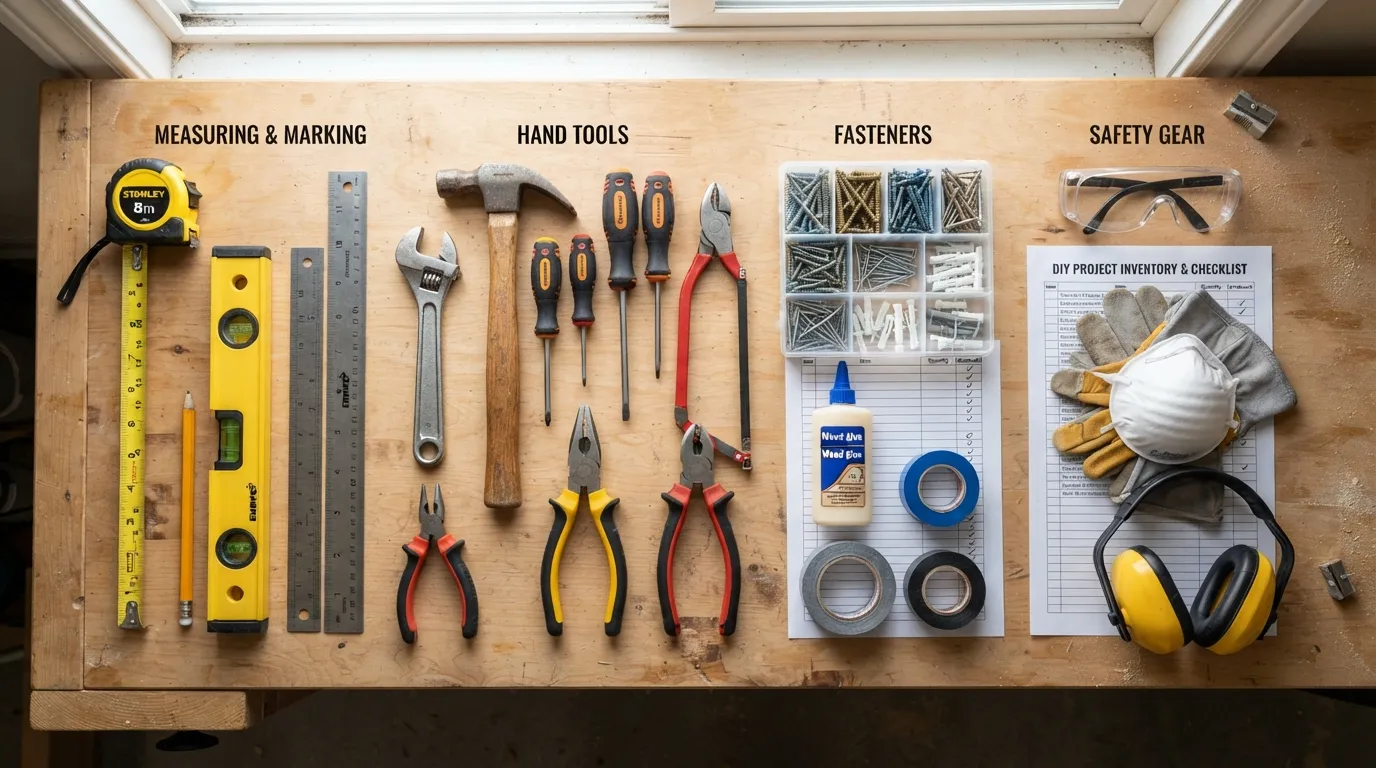 Gathering all required tools and plumbing materials before you begin prevents frustrating mid-project trips to the hardware store. Having a fully prepared workstation allows you to complete the assembly smoothly and ensures all watertight seals are properly established.
Essential Tools
Having the correct hand tools ensures you can grip smooth metal fittings, reach tight spaces underneath cabinets, and secure nuts without stripping threads. Keep these items close at hand:
- Channel Lock Pliers: Essential for gripping and tightening slip-joint nuts and metal fittings securely without slippage.
- Adjustable Wrench: Used for tightening water supply lines onto shut-off valves and faucet shanks.
- Basin Wrench: A specialized tool with a pivoting head designed specifically to reach mounting nuts hidden behind deep sink basins.
- Bucket and Towels: Placed directly underneath the working area to catch residual water trapped inside old traps and lines.
- Flashlight or Headlamp: Provides crucial illumination inside dark under-sink cabinets to inspect for misaligned washers and tiny leaks.
Materials and Fittings
Modern sink installations rely on a standard set of plumbing hardware, replacement parts, and sealing compounds to lock joints into place. Ensure you have these items ready for assembly:
- P-Trap Kit (1-1/4 inch or 1-1/2 inch): The curved PVC pipe assembly that creates a water barrier against sewer gases.
- Tailpiece Extension: Connects the sink strainer basket down to the horizontal trap arm.
- Slip Nuts and Washers: Plastic or rubber washers paired with threaded nuts that form flexible, waterproof connections.
- Braided Stainless Steel Supply Lines: Flexible water hoses connecting your wall valves to the faucet inlets.
- PTFE Thread Seal Tape: Wrapped clockwise around threaded pipe joints to lubricate and prevent water leakage.
- Plumber’s Putty and Silicone Sealant: Used for waterproofing strainers, sink rims, and fixture bases.
Kitchen vs Bathroom Extras
Depending on whether you are plumbing a kitchen workstation or a bathroom vanity, you will need specific auxiliary components. Factor these unique additions into your shopping list:
- Kitchen Sink Disposal Kit: Includes a garbage disposal flange, discharge tube, and dishwasher inlet branch if you are running an automated dishwasher.
- Deep Basket Strainer: Heavy-duty drain assembly built to withstand food debris and heavy kitchen usage.
- Bathroom Pop-Up Drain Assembly: Features a mechanical stopper lever, pivot rod, and strap mechanism built into the vanity sink tailpiece.
Putty vs Silicone: Which One and When
Choosing the correct sealing compound depends heavily on the specific sink basin material you are working with to prevent permanent chemical damage. Understanding these differences protects your investment:
- Plumber’s Putty: Perfect for traditional stainless steel, porcelain, and cast iron sink strainers because it stays pliable and cleans up easily.
- Silicone Sealant: Mandatory for modern natural stone, granite composite, and marble sinks, as oil-based plumber’s putty will stain and ruin porous stone.
How Sink Plumbing Works: Layout and What It Should Look Like
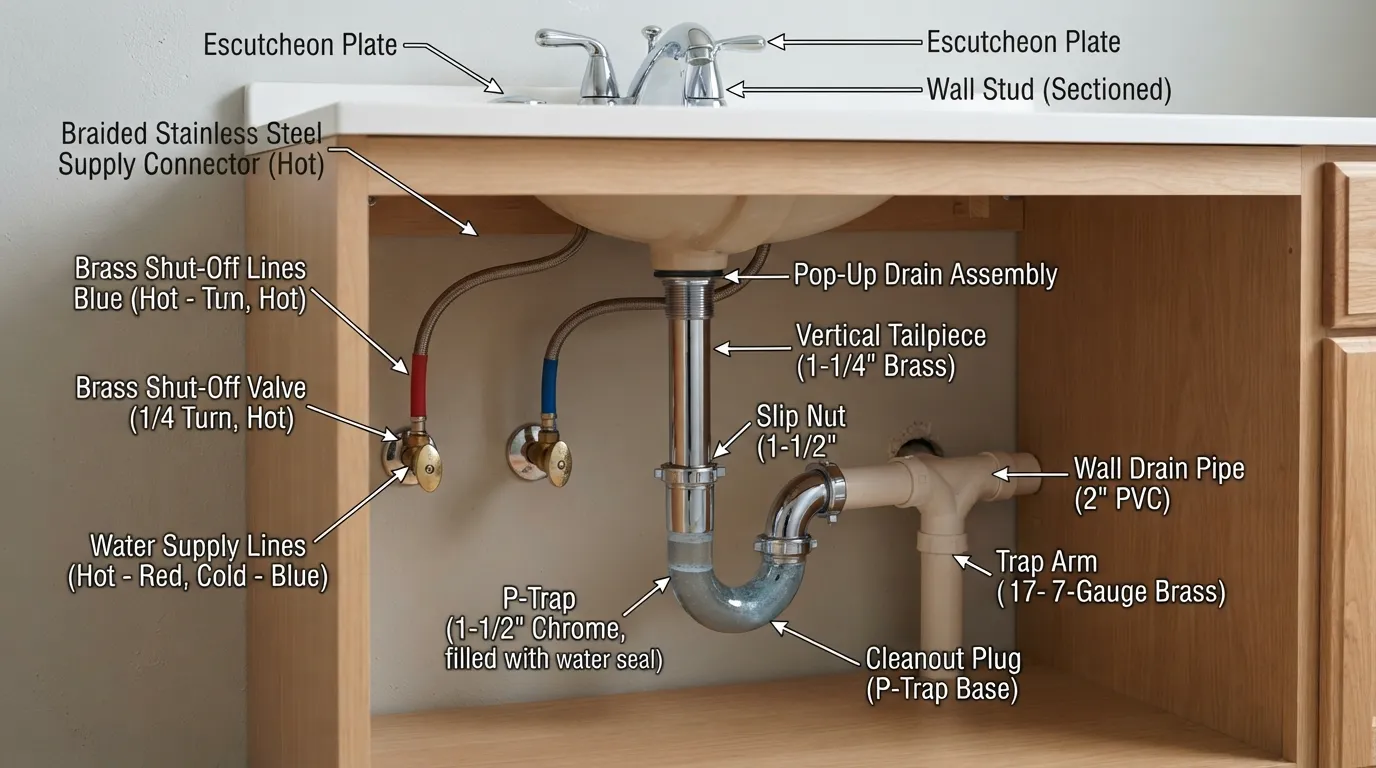 Understanding the fundamental layout of your sink plumbing system ensures your installation functions smoothly and complies with residential building codes. A well-designed configuration separates clean pressurized water intake from gravity-fed wastewater drainage.
Supply Side vs Drain Side Explained
Your under-sink space is divided into two entirely independent systems that work together to provide clean water and remove wastewater. Keeping their roles clear prevents assembly confusion:
- Supply Side: High-pressure copper or PEX pipes deliver hot and cold water to your faucet, controlled by angle stop shut-off valves mounted to the wall or floor.
- Drain Side: Low-pressure, gravity-fed DWV (Drain, Waste, Vent) piping collects used water from the basin and channels it downward into the main home stack.
Sink Plumbing Diagram
Visualizing the layout helps you position every component correctly inside tight cabinet spaces, whether you are setting up a kitchen or bathroom station. Review these configuration blueprints before assembly:
- Kitchen Sink Layout: Features a basket strainer, tailpiece, optional garbage disposal unit, sanitary tee junction, and a P-trap connected to a horizontal wall stub-out.
- Bathroom Vanity Layout: Features a pop-up drain stopper mechanism, a straight tailpiece, a P-trap, and a vertical or horizontal wall drain connection with a dedicated vent pipe.
What Correct Under-Sink Plumbing Looks Like
A professional, code-compliant under-sink setup must adhere to specific mechanical standards to ensure long-term reliability and leak prevention. Check your finished installation against these criteria:
- Proper Downward Slope: The horizontal trap arm must slope downward toward the wall drain at a rate of one-fourth inch per foot to maintain smooth drainage.
- No Kinks or Tension: Braided supply lines should curve naturally without sharp bends, kinks, or twisting that could restrict water flow or weaken lines.
- Aligned P-Trap Position: The P-trap must align vertically with the sink tailpiece without forcing pipes sideways, which causes warped washers and leaks.
Why a P-Trap Matters
The J-bend portion of your P-trap retains a small pool of standing water that acts as an airtight seal against toxic sewer gases and foul odors. Understanding trap dynamics keeps your home safe:
- Sewer Gas Barrier: Without the water barrier inside the trap, hazardous gases from municipal sewer lines would freely enter your living space through the drain opening.
- Why S-Traps Are Prohibited: S-traps curve downward directly into the floor without a proper horizontal vent run, which siphons the water seal dry and violates modern plumbing codes.
Rough-In Plumbing for a Sink New Installations
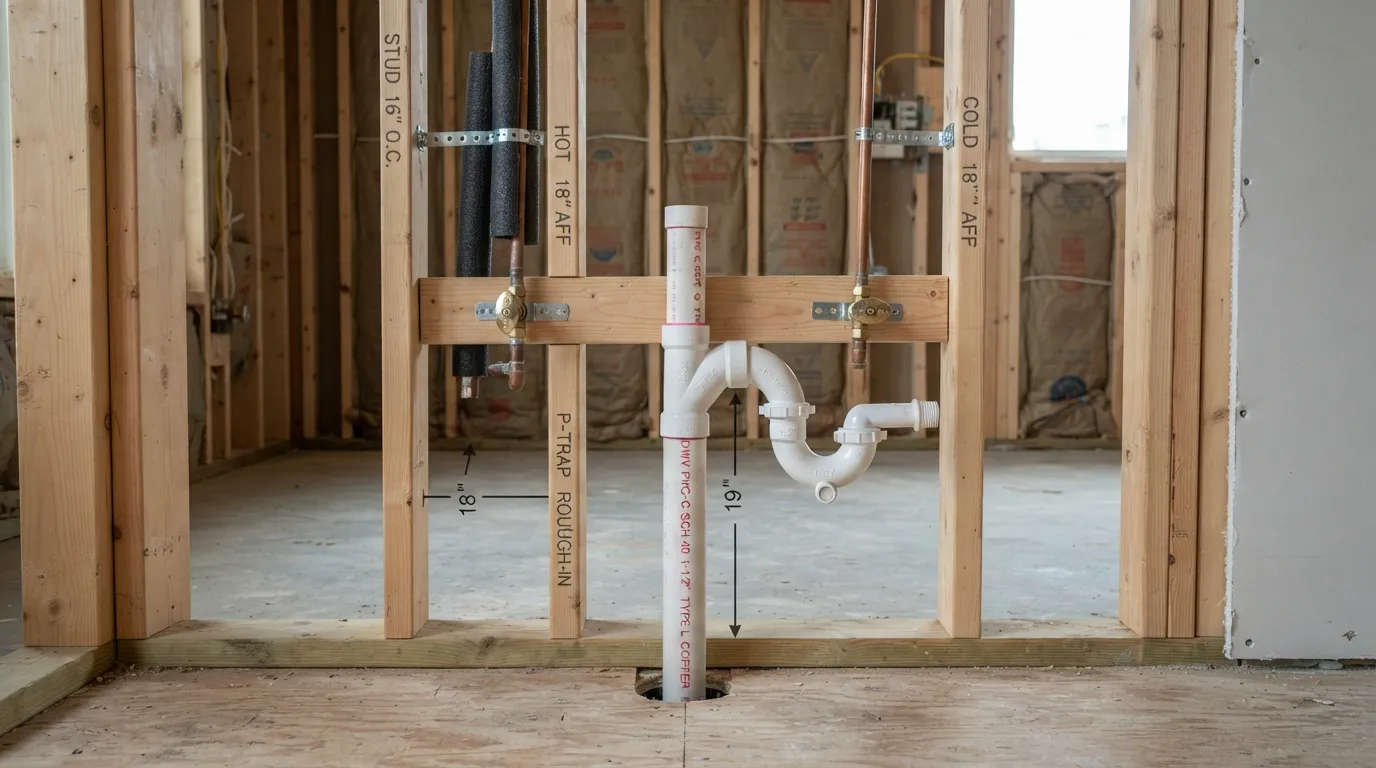 Rough-in plumbing refers to the preliminary installation of hidden water supply lines and drain pipes inside walls or floors before drywall and finishes are applied. Getting these concealed measurements correct during new construction or remodeling ensures your fixtures align perfectly and function efficiently.
What Is a Plumbing Rough-In?
A plumbing rough-in lays down the structural skeleton of your water supply and drainage networks without connecting the visible fixtures. Understanding this phase keeps your project fully compliant with structural and municipal building standards.
- Core Objective: Establishes secure anchoring points, precise pipe heights, and proper waste slopes behind walls and beneath subfloors.
- Inspection Milestone: Local municipal building inspectors must sign off on the rough-in framework before you are legally permitted to close up walls.
Rough-In Heights and Positions for Kitchen and Bathroom Sinks
Precision is critical when setting rough-in stub-outs because minor measurement errors will throw off your cabinet layout and prevent proper trap alignment. Standard heights vary depending on the room:
- Kitchen Sink Rough-In: Hot and cold water supply lines are typically stubbed out at 20 inches from the finished floor, while the central drain waste pipe is set at 18 inches.
- Bathroom Vanity Rough-In: Water supply lines are usually centered at 21 to 22 inches from the floor with a 4-inch spread, and the drain stub-out is centered at 19 to 20 inches.
Drain Slope and Venting Basics
Wastewater must travel smoothly out of your home using gravity rather than pressurized force, requiring precise mechanical angles. Mastering these basics prevents clogs and foul odors:
- Drain Fall Per Foot: Horizontal drain pipes must maintain a consistent downward slope of one-fourth inch per foot toward the main stack to prevent debris accumulation.
- Venting Requirements: Every sink trap requires a vertical vent pipe running upward through the roof or utilizing an approved air admittance valve to equalize air pressure.
Bathroom Sink Plumbing in the Wall vs Through the Floor
Depending on your home framing structure and vanity cabinet design, your drain and supply lines can emerge from either structural plane. Each method has specific structural implications:
- Through the Wall: The industry standard for modern construction; keeps pipes neatly hidden inside the cabinet back and leaves the floor clear for easy cleaning.
- Through the Floor: Commonly found in older historic homes or slab foundations, requiring careful core drilling and a customized aesthetic escutcheon plate.
Can a Kitchen Sink and Toilet Share a Drain?
Homeowners often wonder if multiple high-load fixtures can tie into the same branch line due to space constraints behind walls. Code limitations govern this layout:
- Shared Branch Lines: Yes, a kitchen sink and toilet can tie into the same larger main waste stack downstream, provided the pipe diameters meet minimum sizing codes.
- Wet Venting Rules: Under many building codes, a bathroom sink drain can act as a wet vent for a toilet, provided the pipe is upsized to 2 inches or greater.
What Is the 135 Rule in Plumbing?
When layout constraints force your drain lines to navigate around structural framing, plumbers must keep total directional friction in check. This layout benchmark governs fitting angles:
- Total Directional Change: The 135 rule refers to the practical limit for total accumulated angle changes (such as combining a 90-degree elbow with a 45-degree bend) in a drain section before creating venting or clogging hazards.
- Preventing Restrictions: Staying within this threshold ensures wastewater flows smoothly without turbulent backups or difficult maintenance snaking.
How Many Toilets Can Connect to a 3-Inch Drain?
Drain sizing is calculated using Drainage Fixture Units (DFUs) to ensure pipes can handle peak discharge loads without overflowing. Sizing limits dictate capacity:
- Standard Residential Limit: Under most international plumbing codes, a single 3-inch horizontal branch drain or building drain can accommodate a maximum of 3 water closets (toilets).
- Stack Limits: A 3-inch vertical stack can typically handle up to 3 toilets total, though upgrading to a 4-inch line is heavily recommended for multi-bathroom family homes.
What Rough-Ins Look Like
Visualizing an unfinished wall framework helps you understand how structural piping correlates to finished cabinetry. A proper rough-in displays these visual traits:
- Secure Strapping: All vertical and horizontal pipes are tightly anchored to wall studs with metal brackets to prevent shuddering and pipe hammering.
- Capped End Points: Supply lines and drain pipes are temporarily capped off with test plugs to keep out construction dust, drywall mud, and debris.
Install the Faucet
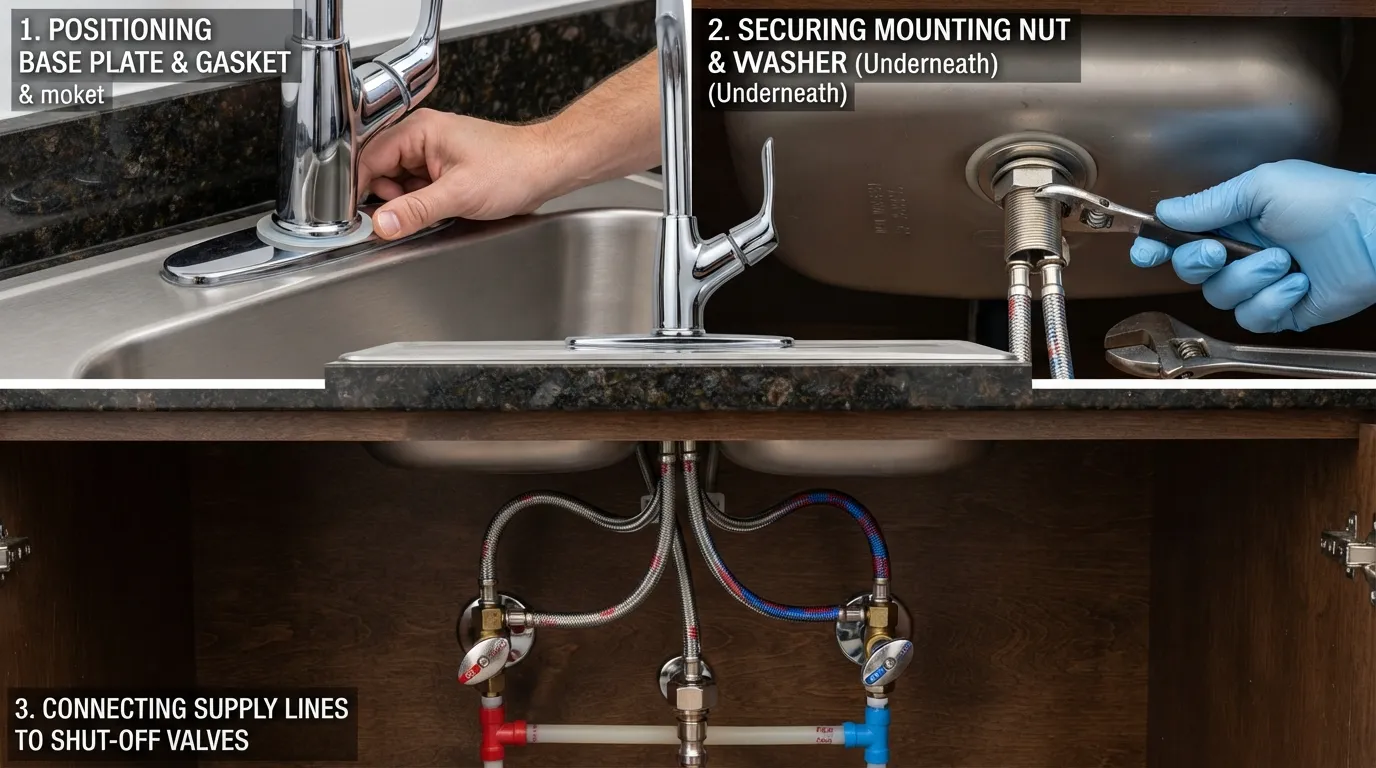 Installing your faucet before dropping the sink basin into the vanity or countertop is the easiest way to ensure secure connections. Working while the fixture is fully accessible saves you from awkward strains inside cramped cabinet spaces.
Mount the Faucet Before Installing the Sink
Attaching your faucet while the sink is unmounted allows you to leverage gravity and clear sightlines for precise alignment. Follow these preliminary steps:
- Unpack and Inspect: Lay out all faucet components, O-rings, mounting hardware, and deck plates to verify every piece is included.
- Position the Deck Plate: If your faucet requires an optional escutcheon plate to cover unused holes on a three-hole sink, center it over a bead of plumber’s putty.
Apply Putty or Silicone and Secure from Below
Creating a reliable waterproof seal between the faucet base and the sink deck prevents water from leaking through to your cabinet interior. Secure the unit using this method:
- Apply Sealing Compound: Roll a pencil-thick rope of plumber’s putty (or silicone if working with natural stone) around the bottom perimeter of the faucet base or deck plate.
- Tighten Mounting Nuts: Insert the faucet shanks through the sink holes, slide the rubber washers and metal retaining brackets onto the threaded shafts underneath, and tighten the mounting nuts by hand before snugging them down with a basin wrench.
Common Faucet Mistakes
Avoiding common installation errors prevents premature loosening, leaks, and cosmetic damage to your sink surface. Keep these warnings in mind:
- Over-Tightening Nuts: Forcing mounting nuts down too aggressively can crack porcelain basins, warp metal shanks, or strip delicate threaded bolts.
- Skipping the Gasket: Forgetting the rubber base gasket or waterproof sealant allows pooling water around the faucet base to seep directly underneath the counter.
Install the Drain Assembly
The drain assembly is the most critical area for preventing leaks, as it handles direct standing water and active discharge from the basin. Assembling this component requires precise stacking of rubber gaskets and friction washers to ensure a watertight seal against the underside of the sink.
Prepare the Drain Flange with Putty
Creating a solid seal at the top drain opening prevents water from slipping past the flange when the sink fills up. Apply your sealant correctly using these steps:
- Roll the Putty: Take a golf-ball sized piece of plumber’s putty and roll it between your palms until it forms an even, pencil-thick rope.
- Press into the Flange: Wrap the putty rope firmly around the underside lip of the chrome or stainless steel drain flange, ensuring a continuous, unbroken circle.
Fit the Gasket Washer and Locknut
The sequence in which you stack components underneath the sink basin dictates whether your assembly will hold water or spray leaks everywhere. Follow this exact order:
- Insert from Above: Push the threaded drain body upward through the sink drain hole, squeezing the putty tightly until excess squeezes out around the rim.
- Stack the Underside Hardware: Slide the tapered rubber gasket (cup side facing down) up the threads against the sink bottom, followed by the flat friction washer and metal locknut.
Tightening Without Cracking Parts
Applying force to plastic or thin metal locknuts requires a delicate touch to avoid warping components or breaking porcelain basins. Secure the locknut safely with these practices:
- Hand-Tighten First: Spin the locknut up the drain body by hand until it firmly compresses the rubber gasket against the underside of the sink.
- Snug with Pliers: Use channel lock pliers to give the locknut an additional one-quarter to one-half turn—never crank it down with maximum force, or you risk cracking the sink basin.
Connect the Water Supply Lines
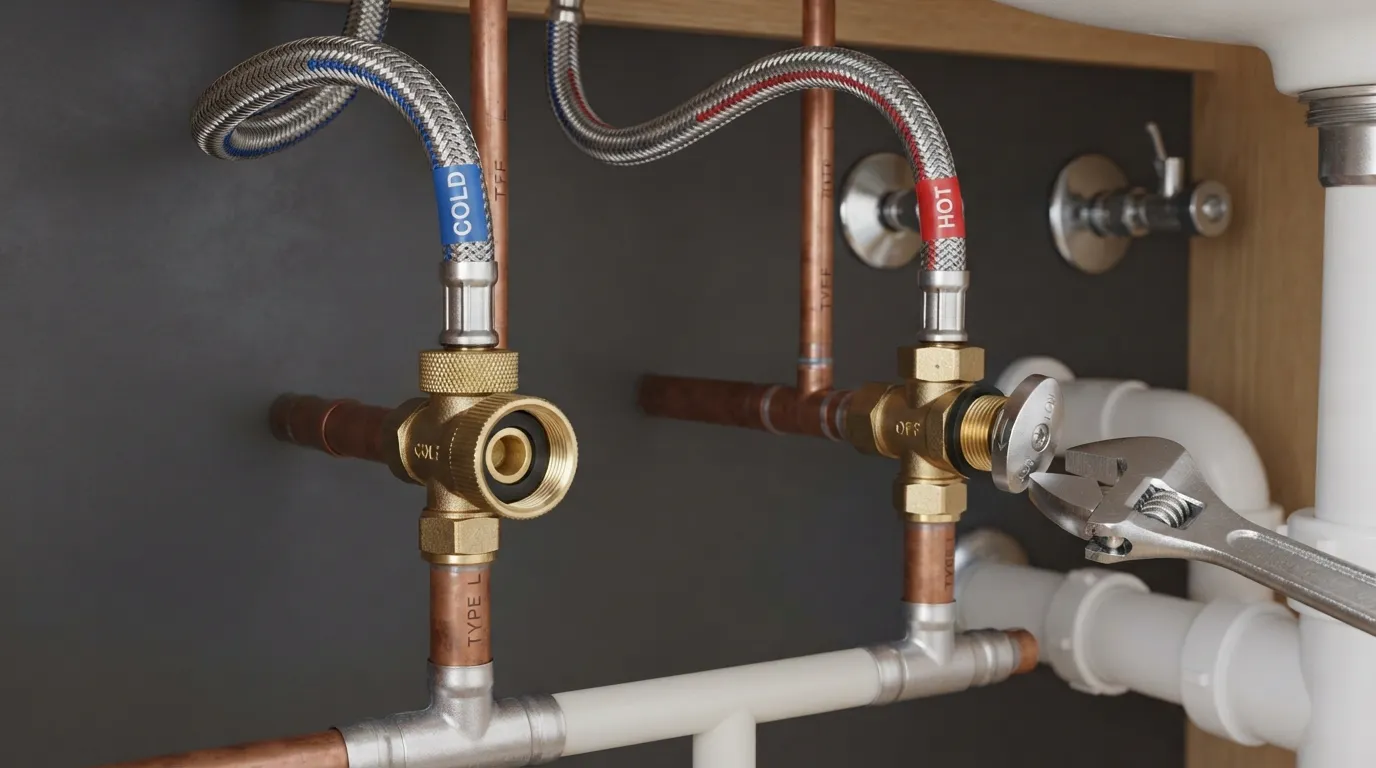 Connecting your water supply lines links your faucet to the pressurized hot and cold water sources inside your wall. Getting this step right ensures full water pressure without risking high-pressure leaks under your cabinetry.
Shut Off Water: Fixture Valve vs Main Supply
Before loosening any old fittings or opening supply ports, you must eliminate water pressure to prevent accidental flooding. Always verify your shutdown points:
- Under-Sink Angle Stops: Turn your dedicated hot and cold shut-off valves clockwise until completely closed if you are performing a simple fixture replacement.
- Main Water Shut-Off: Locate and close your home main water supply valve if you are installing new rough-in valves or if your existing under-sink valves are corroded or stuck.
Hot and Cold: Which Line Goes Where
Connecting supply lines to the wrong inlet ports will reverse your faucet handle controls and frustrate daily usage. Adhere to standard plumbing conventions:
- The Left Side Rule: By universal plumbing convention, the hot water supply line and shut-off valve must always connect to the left side of the fixture.
- The Right Side Rule: The cold water supply line and corresponding shut-off valve must always connect to the right side of the faucet inlet shanks.
Braided Supply Lines: Tightening, Kinks and Length
Flexible braided stainless steel lines make connecting your faucet effortless, but improper positioning can restrict flow or stress fittings. Optimize your hose layout with these tips:
- Hand-Tight Plus a Quarter Turn: Thread the supply line nuts onto the faucet shanks and shut-off valves by hand, then snug them gently with an adjustable wrench—do not over-torque.
- Avoid Sharp Bends and Kinks: Ensure hoses maintain smooth, gentle loops to prevent internal water restriction and premature stress failure at the crimped metal collars.
When to Use PTFE Tape
Knowing exactly where to apply thread seal tape prevents improper sealing and avoids damaging modern compression fittings. Follow proper sealing rules:
- Where to Use Tape: Wrap PTFE thread seal tape 3 to 4 times clockwise around threaded metal-to-metal pipe nipples, such as rough-in pipe threads connecting to shut-off valves.
- Where to Avoid Tape: Never use PTFE tape on compression fittings, braided supply lines, or slip-joint washers, because these connections seal via internal rubber washers rather than thread friction.
Assemble the P-Trap and Drain Pipes
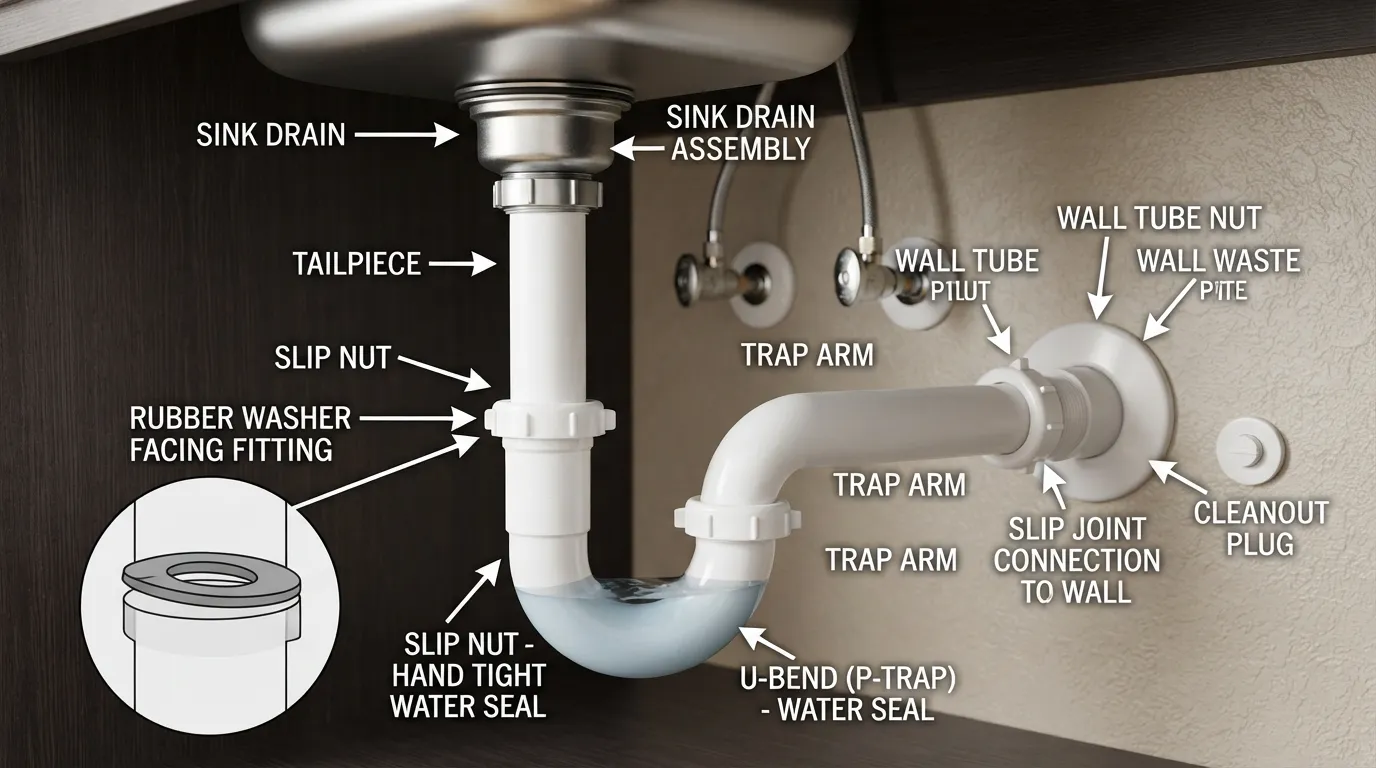 Assembling the P-trap and drainage lines is the final mechanical phase of your sink plumbing project, tying your basin directly into the home waste system. For detailed specifications on connecting drainage components safely, refer to the manufacturer’s installation guide for precise alignment standards.
Attach the Tailpiece and Position the P-Trap
Connecting your upper basin hardware to the lower trap assembly requires dry-fitting components first to verify proper vertical drop. Set up your drainage route using these steps:
- Measure and Cut Tailpieces: Slide the tailpiece extension onto the sink drain body, trimming excess plastic with a hacksaw if the pipe hangs too low into the cabinet.
- Position the J-Bend: Align the curved U-bend portion of the P-trap directly beneath the vertical tailpiece while pointing the outlet arm toward the wall drain stub-out.
Slip Washer Direction
Plastic slip-joint washers are engineered with a specific tapered profile designed to wedge tightly against pipe joints under pressure. Installing them backwards is the leading cause of under-sink leaks:
- The Golden Rule of Tapers: Always ensure the tapered, slanted edge of the rubber slip washer faces toward the open fitting or nut, pointing directly into the direction the pipe is entering.
- Flat Side Placement: The flat, wide base of the washer should rest firmly against the interior lip of the slip nut to create an even compression surface.
- Connecting to the Wall Stub-Out
The final horizontal section of your drainage network bridges the P-trap to the sanitary tee inside your wall. Secure this connection cleanly:
- Insert the Trap Arm: Slide the flanged or straight trap arm through the wall slip nut and rubber washer, sliding the opposite end into the P-trap inlet.
- Check the Grade: Verify that the horizontal trap arm maintains a slight downward slope toward the wall to ensure wastewater drains without pooling.
Hand-Tighten Plus a Quarter Turn
Plastic slip nuts require careful torque management to secure rubber washers without crushing or cracking the fittings. Apply appropriate force:
- Hand-Tightening Baseline: Thread all plastic slip-joint nuts onto their respective fittings using only your bare hands until snug and firm.
- The Pliers Adjustment: Give each nut an additional quarter turn using channel lock pliers to lock the internal washers in place—never over-torque, or you will strip the plastic threads.
Fixing Misaligned Pipes and Drain Height Problems
Cabinets and rough-ins rarely align perfectly on the first try, requiring minor adjustments to bridge offset gaps. Resolve alignment issues with these solutions:
- Swiveling the U-Bend: Rotate the P-trap J-bend slightly left or right on its axis to bridge minor horizontal offsets between the sink tailpiece and wall stub-out.
- Using Baffled Tailpieces or Extensions: Install offset tailpiece extensions or adjustable slip tubes if your sink drain sits significantly higher or lower than the wall plumbing rough-in.
Test for Leaks
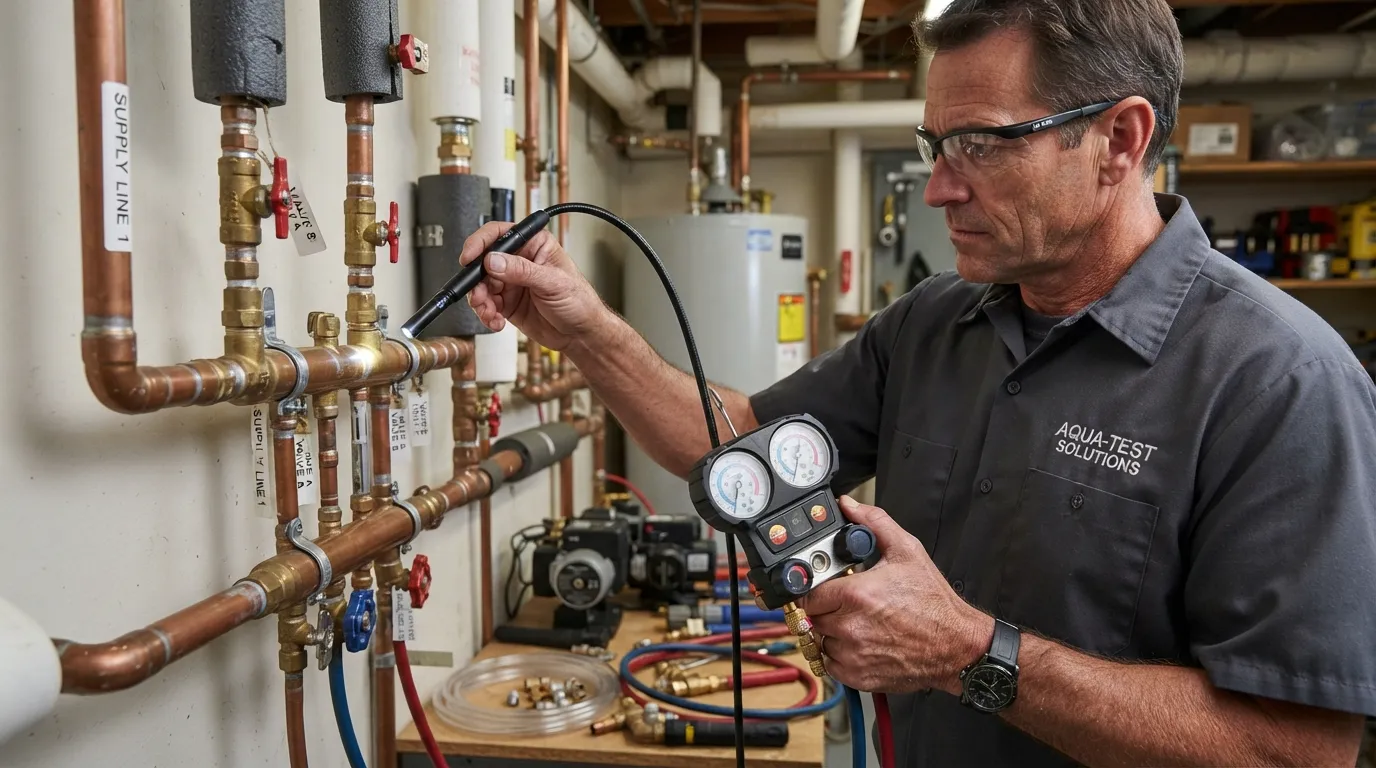 Testing your newly assembled plumbing system is the final quality-assurance check before loading up your cabinet space. Conducting a systematic inspection under pressure ensures your installation is 100 percent watertight and reliable.
Slowly Open the Valves and Check Supply Connections
Introducing water pressure gradually prevents sudden water hammer shock and allows you to catch micro-leaks immediately before they escalate. Execute your supply test using these steps:
- Open Angle Stops Slowly: Crack open your hot and cold water shut-off valves just halfway, listening closely as water fills the braided supply lines and faucet chambers.
- Inspect Supply Joints: Check both ends of the flexible supply hoses where they connect to the shut-off valves and faucet shanks for any spraying or weeping.
Fill-and-Drain Test for the Drain Side
Because the gravity-drain system is unpressurized, you must test it by discharging a full volume of water to verify seal integrity under load. Perform this basin test:
- Plug and Fill the Basin: Insert the sink stopper, fill the basin completely with warm water, and check the upper drain flange for any seepage around the plumber’s putty.
- Release and Flush: Pull the stopper to release the entire volume of water rapidly down the drain, observing the P-trap and tailpiece connections during full flow.
Dry-Paper-Towel Check Under the Cabinet
Even tiny, slow-dripping leaks can be difficult to spot visually on shiny metal or white PVC pipes. Utilize this professional diagnostic trick:
- Wipe Everything Dry: Thoroughly dry all slip nuts, P-trap joints, and supply fittings with a clean towel until no moisture remains on the surfaces.
- Press with Paper Towels: Firmly press a dry paper towel against the underside of every single connection point—if the paper comes away damp, you have identified an active leak.
Fixing a Small Leak
Discovering a minor drip during your test phase is completely normal and easily corrected without dismantling the entire setup. Resolve leaks efficiently with these adjustments:
- Snug the Slip Nut: If a drain joint weeps water, give the plastic slip nut an eighth to a quarter turn using your channel lock pliers to compress the washer further.
- Reseat or Replace Washers: If tightening fails, disassemble the joint to ensure the rubber slip washer isn’t pinched, folded backwards, or worn out, then reassemble correctly.
Kitchen Sink Plumbing: Disposal Dishwasher and Double Sinks
Kitchen sink plumbing is significantly more complex than standard bathroom vanities due to the inclusion of garbage disposals, dual-basin configurations, and motorized dishwasher discharge lines. Mastering these kitchen-specific attachments ensures your workstation operates efficiently without backups or foul odors.
Installing Plumbing With a Garbage Disposal
Integrating a food waste disposer alters your standard vertical drop by shifting the drain outlet lower and off-center. Connect your disposal setup safely using these steps:
- Mount to the Sink Flange: Secure the disposal mounting assembly onto the sink strainer flange using the snap ring and bolts provided by the manufacturer.
- Attach the Discharge Tube: Connect the elbow discharge tube directly to the side outlet of the disposal unit using a rubber gasket and metal flange clamp.
Connecting a Dishwasher Drain Hose
Your automatic dishwasher pumps waste water directly into your kitchen sink plumbing network to utilize the home’s waste stack. Follow proper connection protocols:
- Knockout Plug Removal: If you are using a new garbage disposal, ensure you punch out the internal plastic knockout plug from the dishwasher inlet port before attaching the hose.
- Form a High Loop: Secure the flexible dishwasher drain hose as high as possible against the underside of the countertop using a mounting bracket to prevent dirty sink water from flowing backward into your dishwasher.
How to Plumb a Double Kitchen Sink
Double-bowl sinks require a specialized continuous waste assembly to channel water from both basins into a single central P-trap. Manage your dual-basin layout with these components:
- Continuous Waste Tee: Use an end-outlet or center-outlet baffle tee to connect the tailpieces of both sink bowls together into a shared vertical pipe.
- Maintain Uniform Slope: Ensure both drain baskets feed downward smoothly toward the tee junction to prevent standing water or grease buildup in the inactive bowl.
Can You Install a Dishwasher Without New Plumbing?
Homeowners upgrading kitchens often worry whether adding an automated appliance requires tearing into walls to run dedicated drain lines. Evaluate your current setup:
- Using Existing Inlets: Yes, you can easily install a dishwasher without new in-wall plumbing by routing the supply line to a dual-outlet shut-off valve and connecting the drain hose to an existing disposal inlet or tailpiece branch.
- Air Gap Requirements: Check your local municipal plumbing code, as some regions mandate a sink-mounted air gap fitting on the countertop for backflow prevention.
Replacing Old Kitchen Sink Plumbing Without Removing Cabinets
Swapping out corroded metal or cracked PVC kitchen pipes in tight quarters requires strategic maneuvering to avoid destroying your surrounding cabinetry. Complete your replacement cleanly:
- Disassemble from the Trap Up: Loosen slip nuts starting from the P-trap and work your way upward toward the sink strainers to remove old sections incrementally.
- Use Modular PVC Kits: Cut modern PVC replacement pipes to custom lengths using a fine-toothed hacksaw, allowing you to slip new components into place without altering fixed wall rough-ins.
Bathroom Sink Plumbing: Pedestal Vanity and Pop-Up Drains
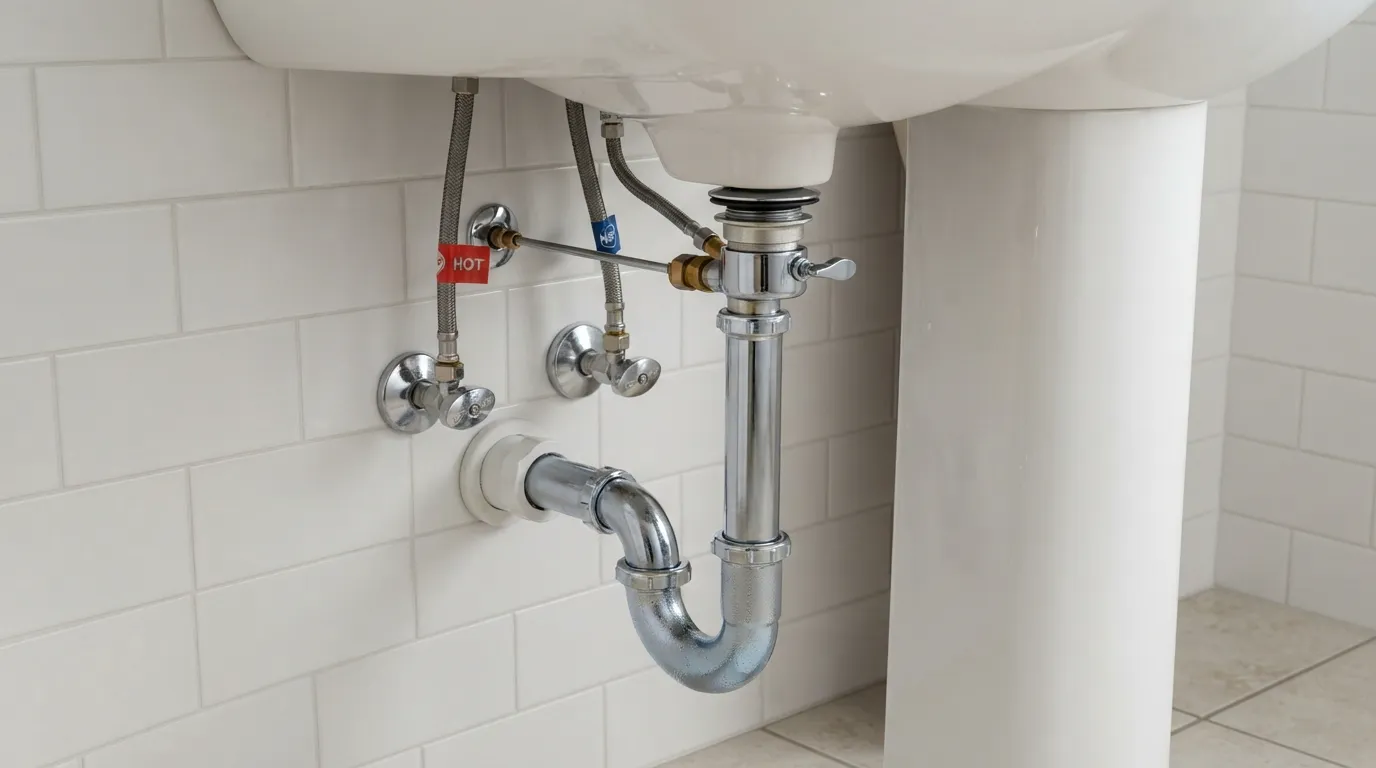 Bathroom sink plumbing focuses on compact vertical spaces, sleek aesthetic finishes, and reliable mechanical stoppers. Whether you are plumbing an open pedestal basin or a fully enclosed bathroom vanity, understanding cabinet constraints and pop-up mechanics ensures a clean, professional finish.
Vanity vs Pedestal Sink Plumbing Differences
While both sink styles utilize identical internal drainage principles, the structural support and visible exposure of the pipes change how you approach the installation. Account for these architectural differences:
- Vanity Cabinets: Enclosed storage provides plenty of hidden space for tools, supplies, and forgiving pipe alignments, making maintenance and repairs effortless.
- Pedestal Sinks: Open architectural columns leave all supply valves, P-traps, and drain pipes fully exposed to view, requiring clean, symmetrical plumbing and polished chrome or brass finishes.
Pop-Up Drain Assembly
Modern bathroom vanities rely on mechanical pop-up stoppers to hold water in the basin, operated by a vertical lever behind the faucet. Assemble your pop-up stopper mechanism correctly using these steps:
- 스와ipe and Insert: Seal the top drain flange with plumber’s putty and slide the main body upward through the basin hole.
- Attach the Pivot Rod: Insert the horizontal pivot rod through the lower body opening, capturing the bottom loop of the stopper plug before tightening the retaining nut.
- Connect the Lift Rod: Link the horizontal pivot strap to the vertical faucet lift rod using the spring clip adjustment screw so pulling the knob smoothly lifts and lowers the stopper.
Plumbing a Bathroom Sink Drain Through the Floor
Older homes and historic properties often route bathroom sink supply lines and drain pipes straight down through the subfloor rather than out the wall. Manage bottom-fed setups carefully:
- Vertical Trap Alignment: Configure your P-trap to drop straight down into a floor stub-out pipe, ensuring a straight vertical drop without lateral stress.
- Using Floor Escutcheon Plates: Slide decorative metal floor plates down over the exposed supply pipes and drain lines before making final connections to hide rough subfloor penetration gaps.
Special Cases: No Existing Plumbing Basement and Utility Sinks
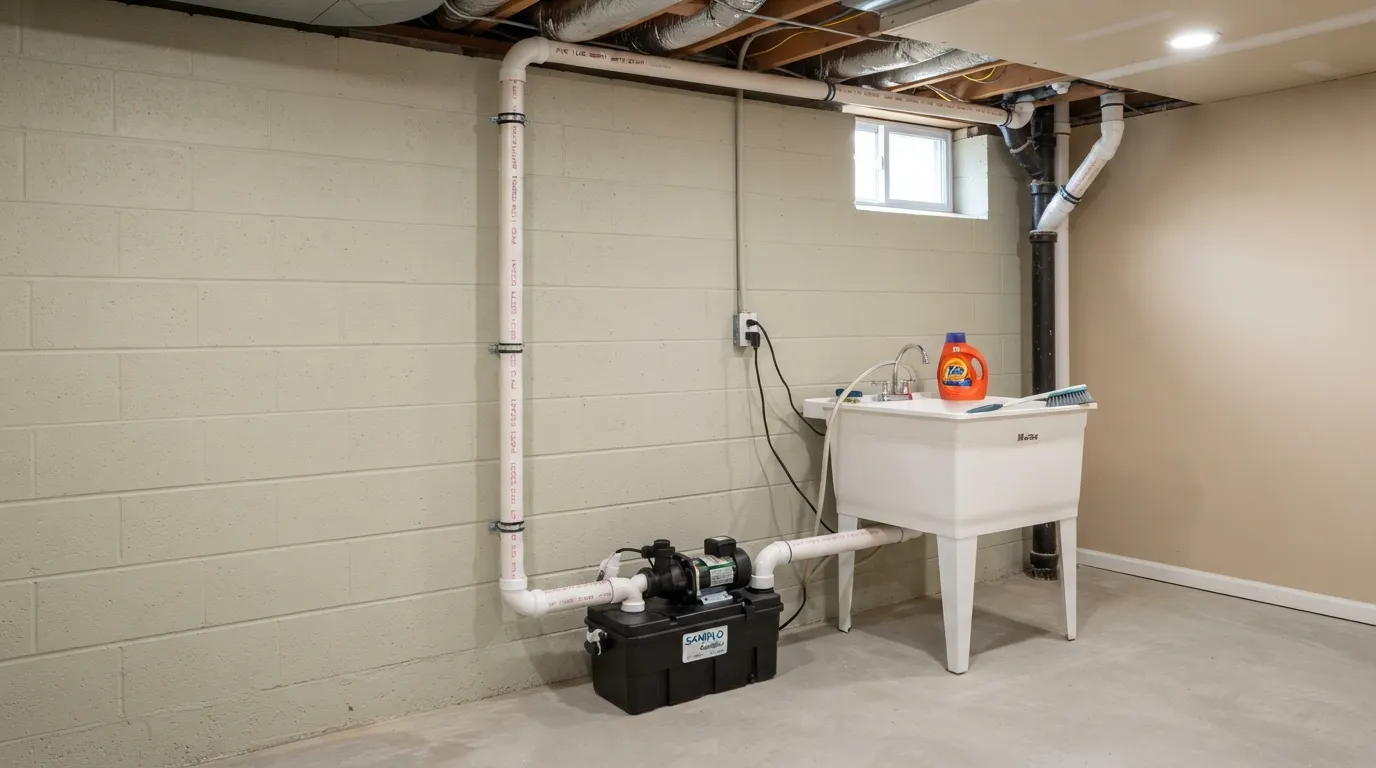 Non-traditional installations—such as adding a sink to a finished basement, laundry room, or workshop without preexisting hookups—require innovative engineering solutions. Addressing unique drainage elevations and water supply runs ensures your auxiliary workstation functions reliably.
Installing a Sink Where There Is No Existing Plumbing
Building a brand-new water station in a room lacking rough-in infrastructure requires planning both supply delivery and wastewater evacuation routes. Tackle a blank-slate install with these core strategies:
- Tapping Supply Lines: Extend hot and cold water supply lines from the nearest existing bathroom, kitchen, or utility room branch using PEX or copper piping.
- Managing Waste Drainage: If gravity-fed DWV lines are inaccessible, you may need to install an auxiliary pump system to push wastewater upward to the main home stack.
Basement Utility Sink Plumbing
Basement installations frequently encounter drainage challenges because the concrete slab sits below the level of the home main sewer line, defying gravity flow. Solve below-grade drainage issues safely:
- Using a Sewage Ejector Pump: When a basement utility sink sits below the main drain grade, route your P-trap into a sealed basin equipped with an automatic sewage and graywater ejector pump.
- Upward Discharge: The ejector pump automatically grinds debris and pushes wastewater vertically up through a check valve before tying into the overhead home gravity drain stack.
Extending or Relocating Existing Plumbing
Remodeling projects often require shifting a sink a few feet to the left or right to accommodate a new cabinet layout or island design. Execute pipe extensions carefully:
- Maintaining Proper Fall: When extending horizontal drain lines behind walls or through floor joists, maintain the strict one-fourth inch per foot downward slope toward the stack.
- Ventilation Distance Limits: Ensure your relocated P-trap does not exceed maximum allowable distance thresholds from the vertical vent pipe, preventing siphoning and code violations.
Common Mistakes That Cause Leaks and Slow Drains
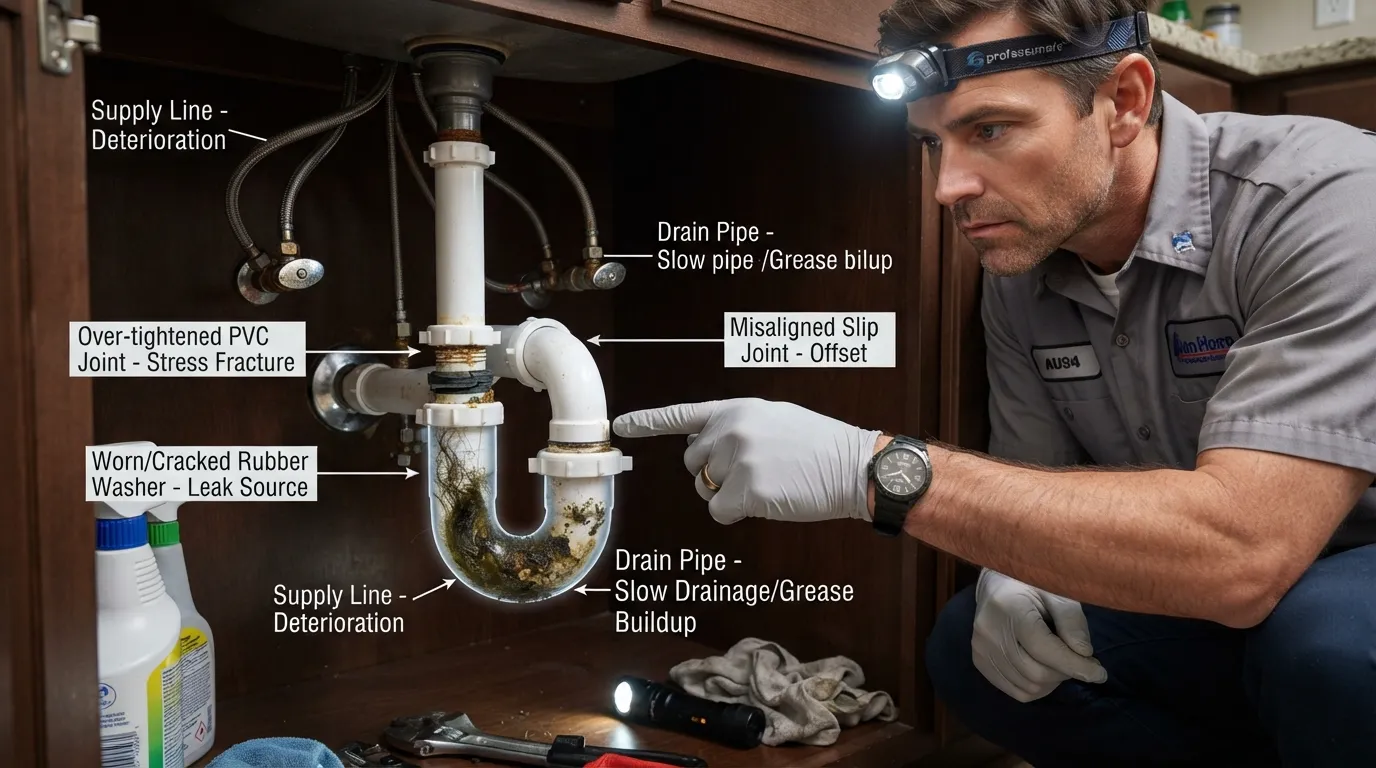 Even experienced DIYers occasionally stumble over subtle assembly errors that lead to frustrating leaks, slow drainage, or gurgling pipes. Understanding these frequent pitfalls before you begin helps you sidestep common installation headaches.
Over-Tightening Plastic Nuts
A common misconception is that maximum force creates the tightest waterproof seal, but plastic slip nuts require a gentler touch. Applying excessive torque strips delicate threads and warps internal washers, causing water to bypass the seal entirely.
- The Fix: Always hand-tighten plastic slip-joint nuts until snug, then give them a mere one-quarter turn using channel lock pliers.
- Preventing Distortion: Overtorquing crushes the rubber washer flat, destroying its flexible rebound capability and creating an immediate leak pathway.
Wrong Slip Washer Direction
The internal rubber slip-joint washers used in P-traps and tailpipes feature a distinct tapered edge that relies on correct orientation to wedge against pipe joints. Installing them backwards prevents the gasket from compressing properly under nut pressure.
- The Correct Orientation: Always ensure the sloped, tapered side of the rubber washer faces toward the open fitting or nut, pointing directly into the incoming pipe direction.
- The Result of Errors: A reversed washer leaves a microscopic gap around the pipe exterior, resulting in a persistent, slow drip every time the sink drains.
Using an S-Trap or Missing a Vent
Improvising drainage connections without a proper vertical vent line or using an old-school S-trap creates a destructive siphoning effect. As wastewater rushes downward, it pulls the protective water seal completely dry out of the trap bend.
- Sewer Gas Hazard: A dry trap leaves an open conduit for foul odors and hazardous sewer gases to enter your living space.
- Code Compliance: Always install a code-approved P-trap paired with a functional vent pipe or air admittance valve to maintain atmospheric pressure balance.
Too Little Drain Slope
Wastewater and soap residue require a consistent gravity grade to travel effectively through horizontal drain lines toward the main home stack. A flat or negatively sloped pipe causes debris to settle and accumulate over time.
- The Golden Rule: Horizontal trap arms and branch lines must maintain a strict downward slope of one-fourth inch per foot.
- Preventing Clogs: Insufficient fall leads to standing water in the pipes, encouraging stubborn sludge buildup and frequent sink clogs.
Using Plumber’s Putty on the Wrong Surface
While traditional oil-based plumber’s putty is exceptional for stainless steel and porcelain, applying it to porous modern materials causes permanent chemical damage and unsightly stains.
- Porous Stone Hazard: Never use plumber’s putty on natural marble, granite composite, or quartz sinks, as the oils will leach into and discolor the stone.
- The Alternative: Always substitute 100 percent silicone sealant when installing drain assemblies on delicate or engineered stone basin surfaces.
What I Learned from Testing This Myself
Having installed, uninstalled, and troubleshot dozens of kitchen and bathroom sinks over the years, the single most important lesson is patience during the dry-fit phase. Forcing misaligned PVC pipes together under mechanical tension almost always guarantees a midnight leak.
- The Value of Dry-Fitting: Assembling every pipe segment without cement, putty, or tightened nuts first ensures every angle and length lines up naturally.
- Testing Pays Off: Taking ten extra minutes to double-check washer orientations and run a rigorous paper-towel test saves hours of frustrating rework underneath cramped cabinets later.
How Much Does Sink Plumbing Cost? DIY vs Plumber
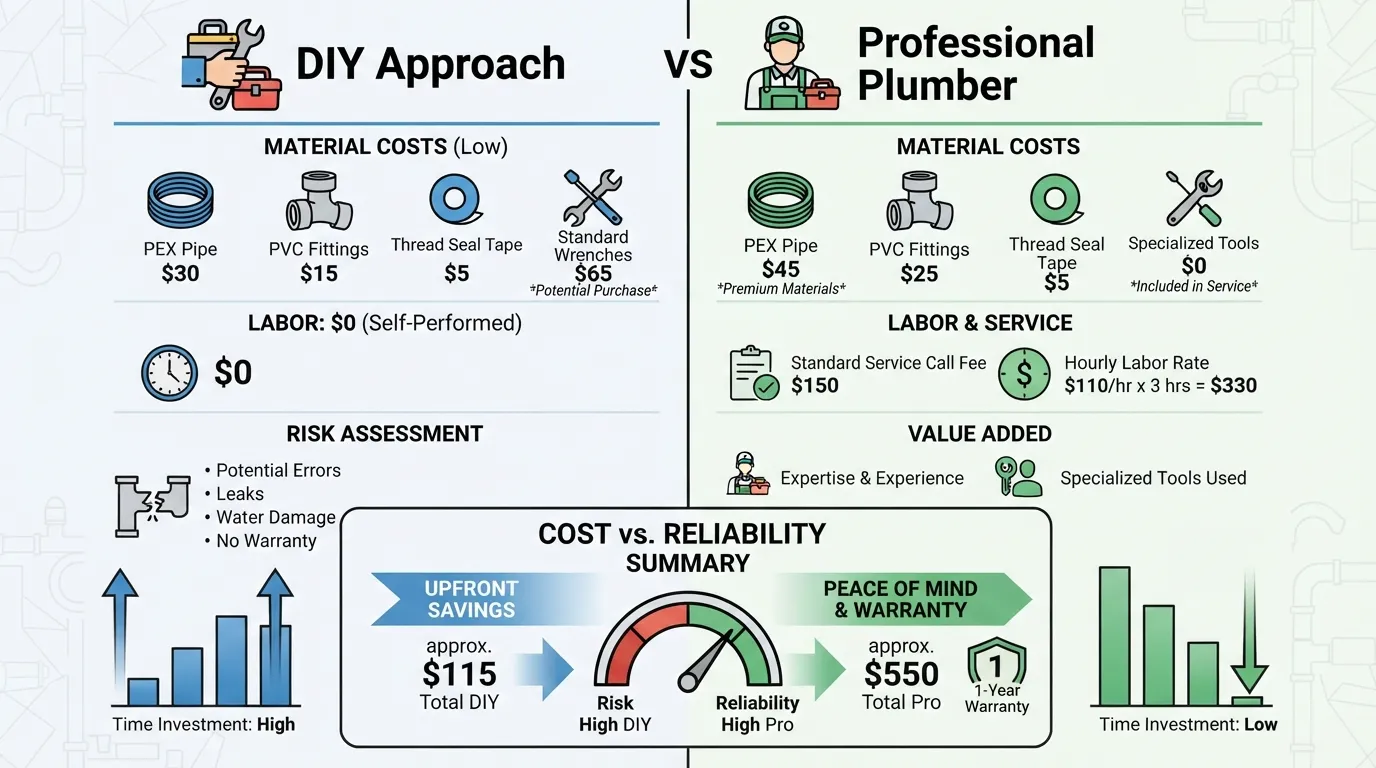 Understanding the financial scope of a sink plumbing project helps you decide whether to tackle the installation yourself or hire a licensed professional. Project expenses vary significantly depending on whether you are purchasing basic hardware or paying for in-wall rough-in labor.
DIY Material Cost Breakdown
Tackling sink plumbing as a weekend DIY project keeps material expenses remarkably low, as most parts are standardized and widely available at local home improvement stores. Expect to spend within these typical ranges:
- Basic P-Trap and Tailpiece Kit: $10 to $25 for standard PVC or polypropylene drainage components.
- Braided Stainless Steel Supply Lines: $15 to $30 for a reliable pair of hot and cold flexible hoses.
- Faucet and Drain Assembly: $45 to $150+ depending on whether you choose a basic builder model or an upgraded architectural finish.
Plumber Charges for Installation and Rough-In
Hiring a licensed professional plumber involves labor rates that reflect specialized training, code compliance, and insurance coverage. Typical contractor pricing structures include:
- Standard Fixture Replacement: $150 to $350 for labor alone to swap out an existing faucet, trap, and supply lines where infrastructure is already sound.
- New In-Wall Rough-In Plumbing: $800 to $2,500+ depending on the complexity of running new water supply lines and DWV waste pipes through studs or concrete slabs.
When DIY Saves Money and When It Doesn’t
While handling surface-level assembly yourself is a fantastic way to pocket hundreds of dollars in labor fees, certain complex scenarios make hiring a professional the smarter financial choice. Evaluate your project scope carefully:
- When DIY Saves Money: Swapping out an old vanity, replacing a leaky P-trap, or installing a new faucet on an existing rough-in requires minimal tools and yields massive labor savings.
- When to Hire a Plumber: Cutting into load-bearing walls, tying into main cast-iron waste stacks, or running new gas and water lines across a basement requires professional expertise that prevents costly code violations.
When to Call a Professional Plumber
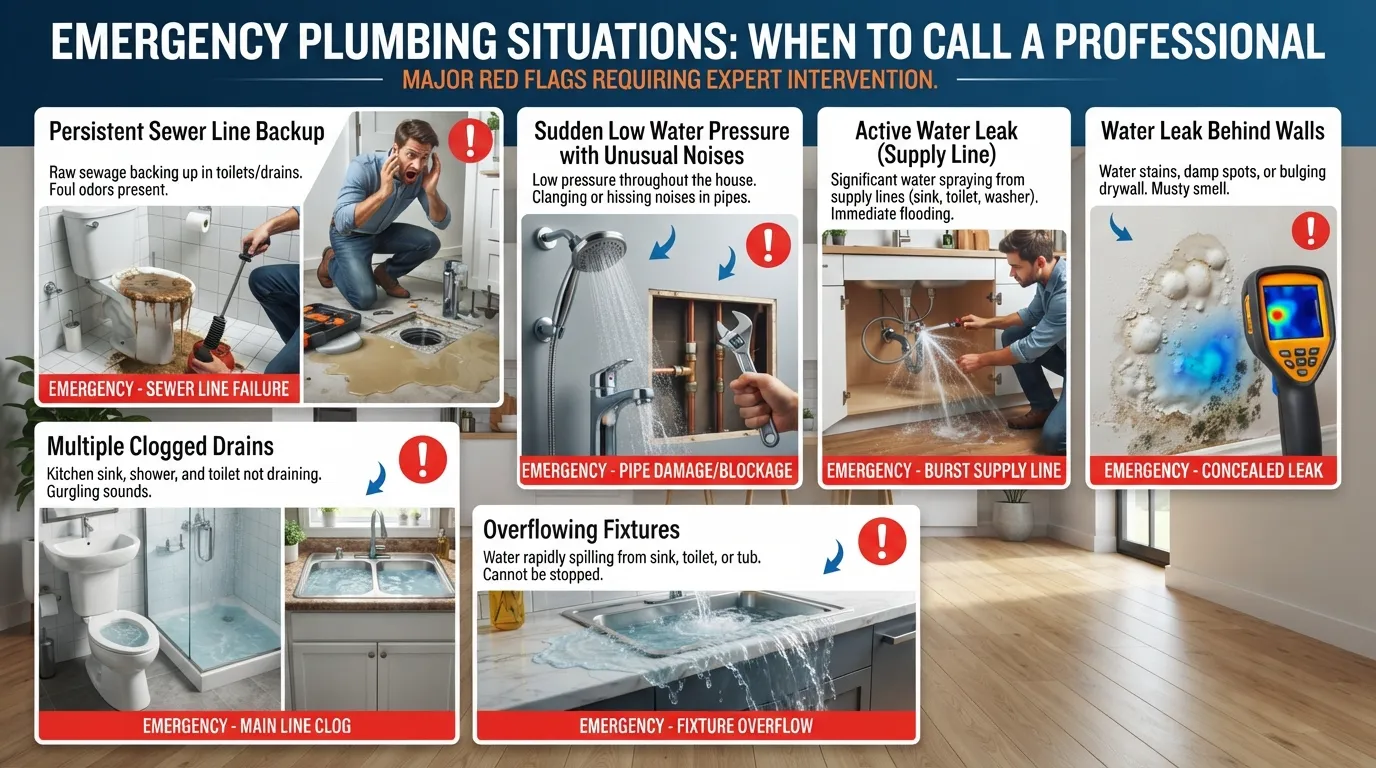 While DIY sink installations are exceptionally rewarding for handy homeowners, recognizing when a project exceeds your skill level is vital for protecting your home’s structural integrity. Knowing your limits prevents minor plumbing glitches from escalating into expensive water damage or code violations.
Signs the Job Is Beyond DIY
Certain complex scenarios involve hidden structural risks or specialized tools that demand a licensed professional’s expertise. Call a qualified plumber immediately if you encounter any of these red flags:
- Persistent Sewer Odors: Unexplained foul smells lingering near walls or cabinets usually indicate a cracked vent pipe or improper trap configuration that requires professional diagnostic testing.
- Corroded Main Stack Connections: Trying to tie into old, crumbling cast-iron or galvanized steel waste pipes often leads to major fractures that require professional pipe cutting and no-hub couplings.
- Unexplained Hidden Leaks: If moisture is warping your subfloor or drywall without an obvious surface source, a professional with electronic leak-detection gear is required.
Plumbing Codes and Permits
Major kitchen and bathroom renovations involving new structural layouts must comply with strict municipal building codes to ensure safety and preserve property value. Keep these regulatory rules in mind:
- Permit Requirements: Modifying or installing brand-new DWV drainage lines and behind-the-wall supply rough-ins typically requires pulling a local building permit and passing a municipal inspection.
- Resale Protection: Hiring a licensed plumber for major infrastructure work guarantees that all modifications are fully compliant with code, protecting you from liability or failed home inspections when selling your property.
Frequently Asked Questions About Sink Plumbing
Review these expert answers to common questions about sink plumbing, installation workflows, and code requirements to ensure your project goes off without a hitch.
What is the 135 rule in plumbing?
The 135 rule in plumbing limits total directional changes in a horizontal drain line to a maximum of 135 degrees between cleanouts or structural fittings. This threshold prevents excessive frictional resistance, keeping wastewater flowing smoothly without creating severe clogs or venting restrictions in your drainage network.
How should plumbing under a sink look?
Proper under-sink plumbing features clean, uncluttered lines with flexible braided supply hoses running from the wall angle stops up to the faucet shanks. Below, a straight tailpiece connects the basin strainer to a U-shaped P-trap, which then feeds into a horizontal trap arm sloping slightly downward toward the wall drain.
Is plumbing a sink easy?
Plumbing a sink is generally very beginner-friendly for DIYers when you are swapping an existing fixture or replacing worn-out P-traps using standard modular parts. However, the task becomes significantly harder and requires professional experience if you must modify behind-the-wall supply rough-ins or run brand-new drainage pipes.
What do plumbers need for a rough-in?
For a rough-in, plumbers need precise framing measurements, building code specifications, water supply pipes, and DWV drainage lines. They also require structural fastening brackets, pipe cutters, soldering or PEX crimping tools, and temporary test caps to seal off the lines securely before inspection.
Do sink and toilet water go through the same sewer drain?
Yes, sink wastewater (graywater) and toilet waste (blackwater) ultimately converge into the same main home sewer stack as they exit your property. However, individual fixture branch lines must maintain proper sizing and venting distances to comply with local plumbing codes and prevent back-siphoning.
How do I install kitchen sink plumbing with a dishwasher?
To install a dishwasher, secure your garbage disposal unit beneath the sink and ensure you punch out its internal plastic knockout plug. Next, connect the dishwasher’s flexible drain hose directly to the disposal inlet port, forming a high loop underneath the countertop to prevent dirty wastewater from backflowing.
How to plumb a sink without an existing drain?
Plumbing a sink without an existing gravity drain requires extending new PEX supply lines from a nearby water source and running a new waste pipe. If the sink sits below the main sewer line grade, you must route the drainage into a sealed sewage ejector basin equipped with an automatic pump.
Conclusion and Final Checklist
Mastering sink plumbing transforms an intimidating home repair task into a manageable weekend project that saves you money and boosts your DIY confidence. By following a structured approach—from dry-fitting pipes to verifying precise slip washer orientations—you ensure a secure, watertight installation that lasts for years.
Final Checklist Before You Finish
Review this final verification checklist before you pack away your tools and reload your cabinets to guarantee everything is fully secure:
- All Slip Nuts Tightened: Verify that every plastic slip-joint nut is hand-tightened plus a quarter turn with pliers without over-torquing.
- Dry Paper Towel Test Completed: Press dry paper towels against every supply fitting and P-trap joint to catch any hidden micro-leaks.
- Consistent Drain Fall Confirmed: Ensure horizontal trap arms maintain a steady downward slope of one-fourth inch per foot toward the wall.
- Shut-Off Valves Accessible: Confirm that your hot and cold angle stops turn smoothly and remain completely unobstructed by stored items.
Key Takeaways
Keep these core principles in mind whenever you tackle future plumbing repairs or fixture upgrades around your home:
- Preparation Prevents Leaks: Taking extra time during the initial dry-fit phase eliminates mechanical tension and stops leaks before they start.
- Respect the Washer Direction: Always face the tapered edge of rubber slip-joint washers toward the open fitting to ensure a perfect compression seal.
- Know Your Limits: Surface-level assembly is ideal for DIYers, but behind-the-wall rough-ins and main stack modifications require licensed professional expertise.

Oscar Vance | Master Plumber & Drainage Expert
Meet Oscar Vance, a licensed master plumber sharing practical solutions on residential repairs, preventive maintenance, and thoughtful home upkeep.

