Connecting PVC to Copper Pipe
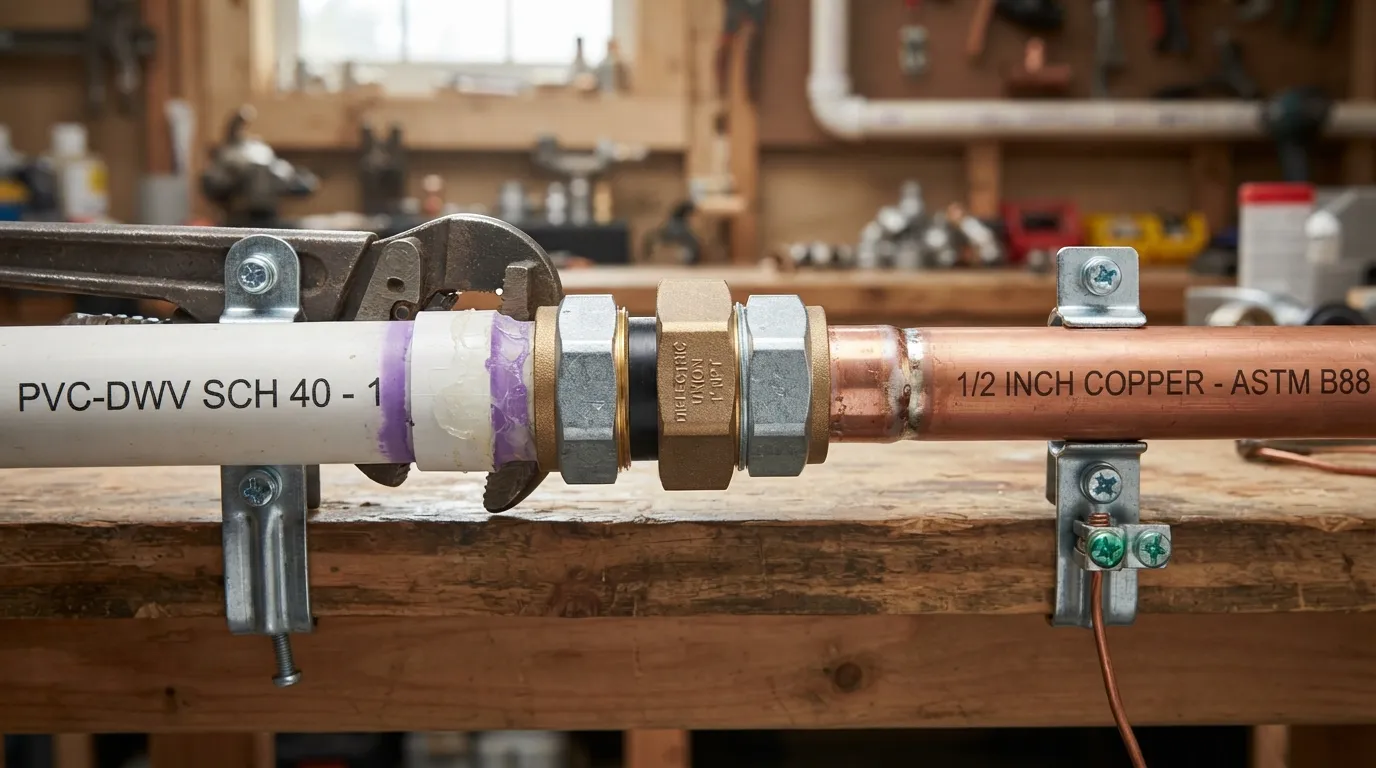
Yes, you can successfully connect PVC to copper pipe, but you cannot solder or glue them directly together. Because they are completely different materials, you must use a specialized transition fitting, such as a threaded adapter, a dielectric union, or a push-fit connector, depending on your specific plumbing application.
Water Supply Line vs Drain Line Which One Are You Working On?
The correct method for connecting PVC to copper entirely depends on whether you are working on a pressurized water supply line or a non-pressurized drain, waste, and vent (DWV) system. Choosing the wrong connector can lead to leaks, joint failure, or severe galvanic corrosion over time.
- Water Supply Lines: These operate under high pressure and require secure mechanical or push-fit solutions like SharkBite fittings or threaded adapters with proper sealing.
- Drain Lines: These gravity-fed systems typically utilize flexible rubber couplings with stainless steel clamps (often called Fernco couplings) to bridge the two materials safely.
- Corrosion Prevention: Mixing dissimilar metals and plastics requires careful attention to prevent chemical breakdown and long-term joint degradation.
Why You Can’t Join PVC and Copper Directly
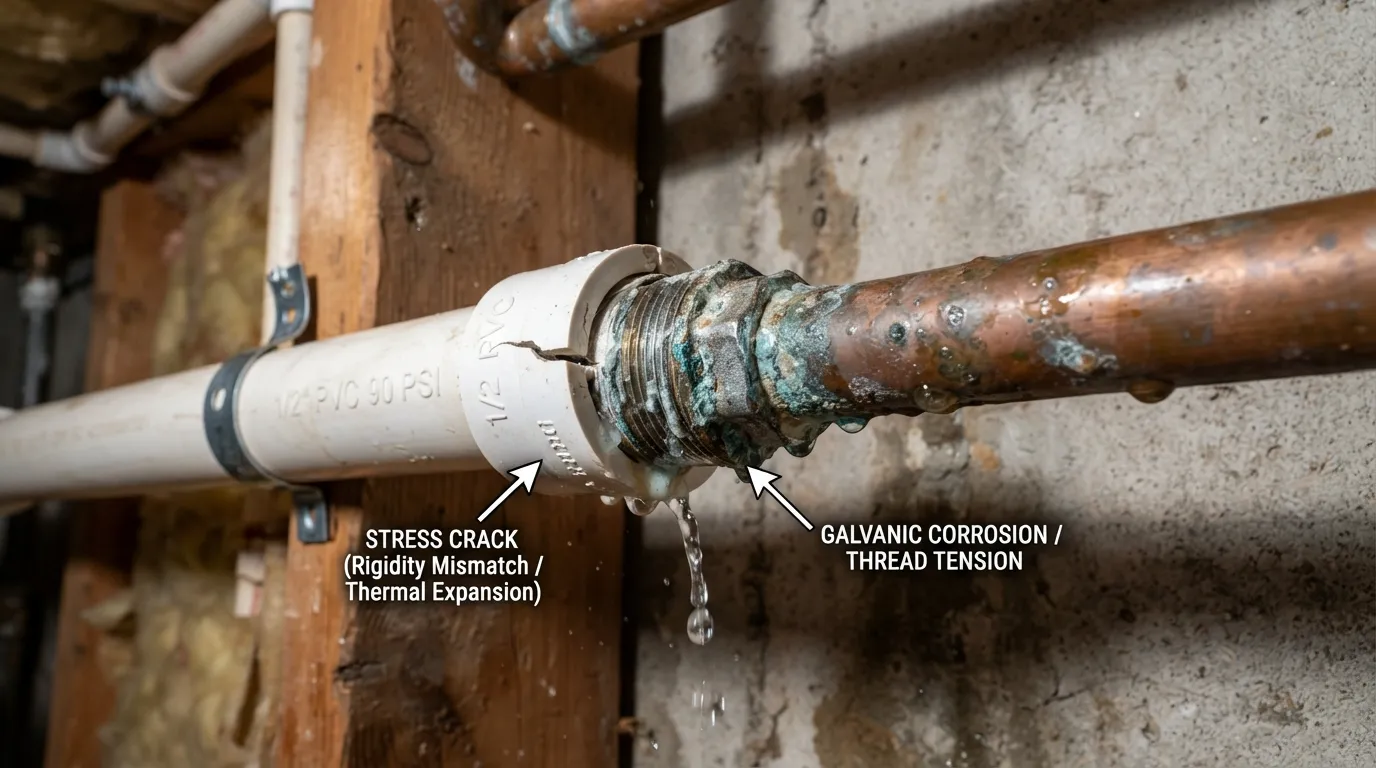
You cannot use standard PVC solvent cement to bond plastic pipe directly to copper because the chemical formulation only melts and fuses PVC plastics. Applying PVC glue to copper creates zero structural bond, resulting in an immediate, high-pressure leak.
- Chemical Incompatibility: Solvent cement relies on chemical welding, which requires plastic-on-plastic contact to cure properly.
- Thermal Expansion Mismatch: Copper and PVC expand and contract at drastically different rates when exposed to hot and cold water cycles.
- Direct Thread Failure: Forcing male and female plastic threads directly onto rigid metal threads without a buffer causes the plastic to split under pressure.
The Golden Rule Male PVC Thread + Female Copper Thread
When threading plastic and metal fittings together, professional plumbers follow a strict safety standard to prevent structural damage. Always thread a male PVC adapter into a female metal adapter rather than the reverse.
- Preventing Expansion Stress: Metal fittings are much stronger and can handle the outward expansion forces exerted by tightened plastic threads.
- The Plastic Crack Risk: If you screw a metal male thread into a female PVC fitting, the metal will act as a wedge and crack the plastic wall over time.
- Sealant Best Practices: Always use rated thread seal tape (Teflon tape) or approved pipe joint compound to ensure a watertight seal without over-tightening.
What Happens If You Skip a Transition Fitting Real-World Failure Example
Skipping proper transition fittings in a plumbing system introduces extreme risks that compromise both structural integrity and property safety. Improvised connections invariably lead to sudden catastrophic failures.
- Joint Blowout: Unsecured or improperly glued dissimilar joints will rupture under standard household water pressure, causing major water damage.
- Galvanic and Chemical Breakdown: While PVC and copper do not suffer from severe galvanic corrosion like brass and steel, improper mechanical joints degrade rapidly due to constant vibration.
- Code Violations: Bypassing approved transition methods violates international plumbing codes, which can void homeowner insurance policies during a water damage claim.
Threaded Transition Adapter Most Reliable
Start by cutting your PVC pipe square and removing any rough burrs from the edge using a deburring tool or sandpaper. Apply purple primer to the outside of the PVC pipe and the inside of the male threaded PVC adapter, followed immediately by PVC cement to create a permanent chemical weld.
- Dry Fit First: Always dry-fit the components before applying cement to ensure correct alignment.
- Hold Securely: Push the PVC pipe fully into the male adapter and hold it firmly for 30 seconds to prevent it from backing out.
- Cure Time: Allow the solvent weld to cure completely according to the manufacturer guidelines before applying pressure or torque.
Step 2 — Prep the Copper Side Soldering the Female Adapter
Clean the end of your copper pipe thoroughly with emery cloth or a wire brush until the metal shines brightly. Apply a thin, even layer of plumbing flux to both the outside of the copper pipe and the inside of the female threaded copper adapter before sliding them together.
- Remove Oxidation: Cleaning the copper removes surface oxides that would otherwise prevent the solder from adhering properly.
- Even Flux Distribution: Ensure flux coats the entire joint surface to draw the molten solder smoothly into the connection via capillary action.
- Torch Application: Apply heat evenly to the fitting cup using a propane or MAPP gas torch until the flux bubbles.
Step 3 — Seal the Threads With Teflon Tape
Wrap PTFE (Teflon) tape tightly around the male PVC threads in a clockwise direction relative to the fitting opening. Wrap the tape 3 to 4 times around the threads, pulling it tight so it molds into the thread grooves.
- Clockwise Direction: Wrapping clockwise ensures the tape does not unroll or bunch up when you screw the fittings together.
- Optional Pipe Dope: You can apply a thin layer of approved pipe dope directly over the Teflon tape for an extra layer of leak protection.
- Avoid Over-Wrapping: Too many layers of tape can place excessive stress on the female adapter and crack the joint.
Step 4 — Hand-Tighten Then Wrench-Tighten Don’t Overtighten
Carefully screw the male PVC adapter into the female copper adapter by hand to ensure the threads catch straight and avoid cross-threading. Once hand-tight, use adjustable wrenches to turn the fitting an additional one to two turns.
- Prevent Cross-Threading: If the connection feels tight or uneven immediately, back it out and restart to avoid stripping the threads.
- Watch for Plastic Stress: Plastic threads can easily warp or split if over-torqued with a heavy wrench.
- Leak Testing: Turn the water supply back on slowly and inspect the joint closely for any signs of seepage.
Pro Tip Let the Solder Joint Cool Before Attaching Plastic
Never apply a plastic adapter or cement a PVC pipe directly onto a hot copper fitting that has just been soldered. The high residual heat from the torch will melt, warp, or structurally weaken the plastic components instantly.
- Allow Natural Cooling: Let the soldered copper joint cool completely to room temperature before handling or threading.
- Use a Damp Rag: You can speed up the cooling process by wrapping a cool, damp rag around the copper pipe a few inches away from the joint.
- Inspect the Seal: Confirm the copper is cool to the touch before introducing any plastic elements to the assembly.
SharkBite Push-Fit Fitting Easiest No Solder Needed
Selecting the correct push-fit fitting size is essential for a reliable connection, as mismatched dimensions will cause immediate leaks under pressure. Confirm the exact outer diameter of both your PVC and copper lines before purchasing a universal transition fitting.
- Match Outer Diameters: Ensure the fitting accommodates standard residential sizing, typically 1/2 inch, 3/4 inch, or 1 inch.
- Universal Compatibility: Use a certified push-fit connector designed specifically to bridge copper, CPVC, and PVC pipes seamlessly.
- Inspect the O-Ring: Check the interior of the fitting to make sure the internal stainless steel grab ring and rubber O-ring are clean and undamaged.
Step 2 — Cut and Deburr Both Pipes
Cut both the copper and PVC pipes completely square using a dedicated pipe cutter to ensure a uniform seal inside the fitting. Use a deburring tool to smooth away any sharp edges, burrs, or ridges that could otherwise tear the internal O-ring.
- Square Cuts Only: Angled or jagged cuts prevent the pipe from seating fully to the internal stop depth.
- Clean Exterior Surfaces: Wipe away dirt, paint, or grease from the last two inches of both pipe ends.
- Mark Insertion Depth: Use a depth gauge or manufacturer marker to indicate how far the pipe must slide into the fitting.
Step 3 — Push Copper Pipe Into the Fitting
Push the prepared copper pipe firmly into one end of the push-fit fitting until you feel it pass through the internal O-ring and hit the solid tube stop. The mechanical teeth inside the fitting will instantly lock the copper pipe securely into place.
- Firm, Even Pressure: Push straight into the fitting with a slight twisting motion to ease past the rubber seal.
- Verify the Depth Mark: Confirm your pre-drawn depth mark aligns with the edge of the fitting to guarantee a full seal.
- Check Alignment: Ensure the pipe is not bent at an angle, as side-loading can compromise long-term joint integrity.
Step 4 — Push PVC Pipe Into the Other End
Align the PVC pipe with the opposite end of the universal transition fitting and push it firmly inward until it reaches the internal depth stop. No chemical glues, primers, or torches are required for this quick mechanical connection.
- Secure Connection: Listen and feel for the firm stop indicating the pipe is fully seated.
- Pull Test: Give both pipes a firm tug outward to verify that the stainless steel grab teeth have engaged correctly.
- Pressure Testing: Turn on the water supply slowly and watch the connection for any signs of weeping or leakage.
How to Connect PVC to Copper Without Welding or Soldering
Push-fit technology revolutionizes plumbing repairs by eliminating hazardous torches, toxic glues, and long curing times. This method allows DIYers to bridge plastic and metal lines safely in tight, confined spaces.
- Zero Open Flame: Perfect for repairs near wooden studs or confined crawlspaces where torches pose a fire hazard.
- Instant Water Restoration: Systems can be pressurized immediately after assembly without waiting for chemical cements to cure.
- Removable Design: Using a simple disconnect clip allows you to detach and reuse the fitting if future modifications are necessary.
How to Connect PVC to Copper Drain Pipe Different Method
Drain lines operate under gravity flow rather than high municipal water pressure, meaning connections focus on watertight sealing against wastewater overflow rather than high-pressure retention. Because drain pipes have larger diameters and carry waste debris, using rigid threaded adapters can cause blockages or stress fractures.
- Gravity-Fed Systems: Waste lines do not experience internal water hammer or high-pressure spikes, allowing for flexible mechanical joins.
- Thermal Movement: Drain pipes shift significantly as hot water flows through them, requiring flexible couplings to absorb structural expansion.
- Debris Flow: Smooth interior transitions prevent hair, grease, and solid waste from snagging on connection ridges.
Using a No-Hub Rubber Banded Coupling
A no-hub coupling consists of a heavy-duty elastomeric rubber sleeve secured by exterior stainless steel bands and tightening clamps. This versatile fitting accommodates slight outer diameter differences between older copper drain pipes and modern PVC tubing.
- Elastomeric Seal: The thick rubber core conforms tightly to both dissimilar pipe materials, creating a completely watertight barrier.
- Stainless Steel Clamps: Integrated metal bands provide high clamping force, resisting shifting and joint separation over time.
- Easy Installation: Slide the rubber sleeve over both pipe ends, position the metal bands, and tighten the bolts with a torque wrench.
Using a Threaded Drain Adapter
When transitioning vertical or horizontal threaded drain stacks, specialized DWV (Drain, Waste, and Vent) adapters provide a rigid, code-compliant connection. These adapters feature smooth internal sweeps designed to maintain wastewater flow velocity without clogging.
- DWV Certified Fittings: Always use adapters marked explicitly for DWV systems rather than high-pressure supply fittings.
- Solvent Welding: Cement the PVC side of the adapter to your plastic run while threading the opposite end into a compatible metal fitting.
- Thread Sealants: Apply approved thread sealant paste or tape to ensure sewer gases cannot escape through the joint.
Common Sizes for Drain Transitions 1-1/2 3
Residential plumbing systems rely on standardized diameters for waste and vent lines, making it vital to match your transition couplings accurately. Using the incorrect size creates alignment lips that catch debris and cause recurring clogs.
- 1-1/2 Inch Sinks & Tubs: Standard sizing for bathroom sinks, kitchen drains, and bathtubs, requiring compact couplings.
- 3 Inch Main Stacks: Heavy-duty sizing utilized for toilets and main vertical stack transitions.
- Reducing Couplings: Specialized transition sleeves can bridge mismatched pipe diameters when connecting older copper stacks to modern PVC lines.
Choosing the Right Pipe Size Diameter-Specific Guide
Standard residential water supply lines rely on specific diameters to maintain optimal water pressure and flow rates throughout the home. Choosing the correct size ensures compatibility with standard transition fittings without causing flow restriction.
- 1/2 Inch Lines: Typically used for branch lines leading directly to individual fixtures like bathroom sinks, toilets, and showers.
- 3/4 Inch Lines: Utilized for main supply runs and water heater connections to support multiple active household fixtures simultaneously.
- Fitting Availability: Transition adapters and push-fit connectors are most widely stocked in these standard residential sizes.
1″ and Larger — Main Lines
Larger diameter pipes handle high-volume water entry points and main distribution lines entering the residential structure. These installations require heavier-duty transition components to manage increased hydraulic pressure and prevent joint displacement.
- 1 Inch and Up: Common for main water supply lines feeding entire homes, multi-story buildings, or irrigation systems.
- Structural Stability: Larger pipes generate significantly more thrust force when water direction changes, requiring rigid bracing or secured mechanical supports.
- Specialized Adapters: Transitioning larger diameters securely requires commercial-grade threaded adapters or heavy-duty mechanical couplings rather than standard components.
1-1/2″ and 3″ — Drain Applications
Waste and vent systems require larger pipe diameters to clear wastewater and solid debris smoothly via gravity. Matching the exact size of your 1-1/2 copper to PVC adapter or 3 inch copper to PVC adapter prevents clogs and structural leaks.
- 1-1/2 Inch Drains: Standard sizing dedicated to individual bathroom sinks, bathtubs, and kitchen laundry drain lines.
- 3 Inch Drains: Main horizontal and vertical waste stacks that handle heavy structural loads from toilets and multiple upstream fixtures.
- Avoiding Size Mismatches: Bridging mismatched diameters requires custom reducing rubber couplings to maintain an even, snag-free interior wall.
PVC vs SharkBite vs Threaded vs PEX Which Method Should You Trust?
Do Professional Plumbers Actually Use SharkBite Fittings?
Professional plumbers generally reserve push-fit fittings for emergency repairs, temporary fixes, or awkward spaces where soldering is impossible. While certified fittings are completely code-compliant and reliable when installed correctly, traditional soldered or solvent-welded joints remain the gold standard for permanent installations.
- Speed vs Permanent Tradition: Plumbers favor soldered copper or glued PVC for new construction because permanent welds eliminate moving internal components like O-rings.
- Code Compliance: SharkBite fittings meet major plumbing codes, making them fully legal for residential behind-the-wall use.
- Proper Deburring Requirement: Many professional service calls to fix “failed” push-fit fittings stem from improper pipe preparation and lack of deburring during DIY installation.
How Long Do SharkBite Fittings Really Last?
High-quality push-fit fittings are manufactured from durable lead-free DZR brass and rated to last up to 25 years under standard residential water pressure and temperature ranges. Their longevity heavily depends on proper installation depth and protection from aggressive environmental corrosion.
- O-Ring Longevity: The internal EPDM rubber O-ring can degrade over decades if exposed to severe chemical water treatment or extreme chlorine levels.
-
Direct Burial Caution: Encasing push-fit fittings directly in concrete or damp soil without protective wrapping will drastically shorten their operational lifespan due to external corrosion.
- Manufacturer Testing: Leading brands rigorously test their mechanical fittings to withstand pressures up to 200 PSI and temperatures up to 200°F.
PEX vs SharkBite Which Is Better for Long-Term Use?
Comparing PEX and push-fit fittings involves looking at two entirely different aspects of plumbing: PEX is a flexible piping material, whereas SharkBite is a brand of mechanical connection fittings. For whole-home repiping projects, running continuous PEX lines provides far superior long-term reliability than relying on individual push-fit connectors.
- Material Continuity: PEX minimizes total joint count by allowing long continuous runs through framing, reducing potential leak points.
- Cost Efficiency: PEX expansion or crimp systems require specialized tools but offer a much lower per-fitting cost for large-scale projects.
- Hybrid Applications: Push-fit fittings are frequently used to tie modern PEX or PVC lines directly into legacy copper networks.
Why Some Insurance Companies Are Cautious About PEX
Some homeowner insurance providers scrutinize specific historical generations of flexible plastic plumbing or push-fit components due to past class-action lawsuits involving defective brass fittings or rodent damage. However, modern cross-linked polyethylene (PEX-a and PEX-b) manufactured to strict ASTM standards is widely accepted across the insurance industry.
- Historical Fitting Failures: Early generation polymer fittings or unverified brass inserts experienced localized failures, causing historical insurance caution.
- Rodent and UV Vulnerability: Exposed plastic lines in crawlspaces can be damaged by rodents or degradation from direct sunlight exposure.
- Proper Installation Documentation: Providing professional installation records ensures full policy compliance and smooth claims processing.
Common Mistakes Code Compliance & Corrosion Risks
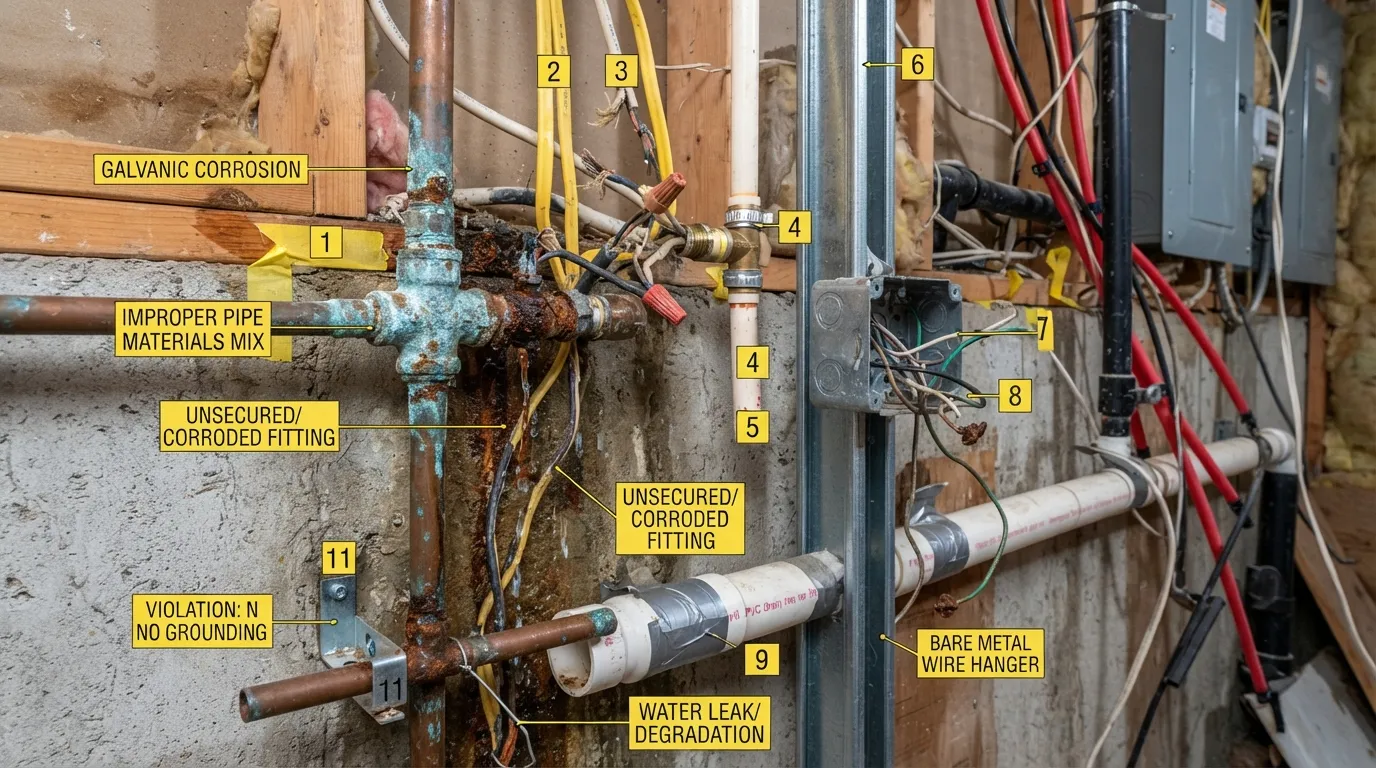
One of the most frequent DIY errors is applying excessive torque when joining plastic and metal threads. Overtightening exerts massive outward pressure on female adapters, immediately leading to hidden cracks or premature joint failure under household pressure.
- Hand-Tight Plus Quarter Turn: Always rely on thread sealant tape rather than brute force to achieve a watertight seal.
- Plastic Vulnerability: Rigid plastic components cannot withstand the high mechanical leverage generated by heavy wrenches.
- Delayed Seepage: Micro-fractures caused by over-torqued threads often expand slowly over weeks before bursting completely.
Skipping the Dielectric Union Corrosion Risk
When transitioning between certain dissimilar metals and materials, failing to account for electrochemical reactions can lead to rapid degradation. For a detailed technical overview of these reactions, review this comprehensive guide on connecting plastic pipe to copper to protect your plumbing infrastructure.
- Galvanic Corrosion: Direct contact between certain active metals accelerates material breakdown in the presence of water electrolytes.
- Dielectric Protection: A dielectric union uses an insulating gasket to stop electrical current flow between dissimilar components.
- System Longevity: Using proper transition buffers ensures structural integrity and prevents unexpected metal thinning.
Not Checking Local Plumbing Code Requirements
Every municipality enforces specific building codes that dictate approved materials, acceptable fittings, and mandatory inspection points for residential plumbing. Ignoring these legal standards can result in failed inspections, fines, or invalidated insurance claims if water damage occurs.
- Permit Necessities: Major plumbing modifications often require local permits and professional review before closing up walls.
- Approved Connectors: Some municipal codes restrict specific push-fit fittings in concealed wall cavities, requiring accessible panels instead.
- Inspection Compliance: Meeting official regional standards ensures your home remains safe, code-compliant, and fully insurable.
Mixing Incompatible Materials at Sharp Angles
Forcing rigid PVC and copper lines together at awkward, unnatural angles introduces extreme physical stress on the joints. Thermal expansion cycles will quickly exploit these stress points, causing rapid wear and structural leaks.
- Stress Concentration: Misaligned piping exerts continuous bending forces on transition adapters, leading to premature cracking.
- Proper Alignment Support: Use pipe straps and hangers to anchor both lines securely before and after the transition point.
- Flexible Relief: Incorporate expansion loops or flexible connectors where high thermal movement is expected.
Frequently Asked Questions
Can You Connect PVC to Metal Plumbing?
Yes, you can connect PVC to metal plumbing, but never directly via glue or direct threading. You must use an approved transition fitting like a threaded adapter, a dielectric union, or a mechanical push-fit connector to bridge the dissimilar materials safely.
- Galvanic and Thermal Protection: Transition fittings prevent thread cracking and chemical degradation caused by differing material expansion rates.
- Application Dependent: Ensure you choose water supply fittings or drain couplings based on whether your metal plumbing is pressurized or gravity-fed.
What Type of Coupling Can I Use to Connect Copper Pipe to PVC?
The type of coupling depends entirely on whether you are working on a pressurized water line or a non-pressurized drain line. Water lines require threaded adapters or universal push-fit connectors, while drain lines use rubber no-hub couplings with stainless steel bands.
- Supply Lines: Male PVC threads paired with female copper adapters ensure a high-pressure seal with proper Teflon tape.
- Drain Lines: Heavy-duty elastomeric rubber sleeves bridge copper and PVC stacks without restricting wastewater flow.
Can You Connect PVC to Copper With SharkBite?
Yes, certified push-fit fittings like SharkBite universal connectors allow you to join PVC and copper directly without soldering, gluing, or special tools. They rely on internal stainless steel teeth and rubber O-rings to lock both pipes securely in place.
- Proper Preparation: Both pipes must be cut square, deburred completely, and marked with the correct insertion depth to prevent leaks.
- Code Compliance: These fittings are approved for residential use, though traditional soldered or welded joints remain preferred for permanent main installations.
Will a Copper Pipe Cutter Cut PVC?
While a standard copper wheel cutter can physically score or cut through softer plastic pipes, it often leaves a raised ridge or cracks the rigid plastic wall. It is always best to use a dedicated plastic pipe cutter or a fine-toothed saw for clean, square PVC cuts.
- Cracking Risk: The sharp cutting wheel of a copper tool applies too much inward crushing force on rigid PVC.
- Clean Edges: A dedicated plastic cutter ensures a smooth edge that seats properly into transition fittings and O-rings.
Is It Safe to Use PVC Cement Near Copper Pipe?
PVC solvent cement and purple primer are strictly formulated to bond plastic and will not adhere to copper or create a structural seal. Furthermore, applying toxic chemical primers near open copper lines can contaminate drinking water systems if allowed to drip inside.
- No Chemical Bond: Solvent welding requires plastic-on-plastic contact to cure correctly.
- Keep Separated: Apply chemical cements away from metal lines, and let all components dry completely before making mechanical connections.
How Do I Join PVC Pipes at an Angle Near a Copper Transition?
When joining PVC pipes at an angle near a metal transition, always use dedicated plastic elbows or sweep fittings rather than forcing the materials to bend. Introduce your transition adapter on a straight run of pipe to avoid placing side-load stress on the joint.
- Stress Prevention: Bending pipes near transition fittings causes continuous mechanical stress that leads to premature cracking.
- Proper Bracing: Secure both the copper and PVC lines with pipe hangers to maintain proper alignment and support system weight.
Can I Replace a Section of Copper Pipe With Flexible PVC?
You should never use flexible irrigation or non-rated vinyl tubing to replace permanent indoor copper supply lines, as they cannot handle residential water pressure. For flexible water upgrades, code-approved PEX tubing is the correct material choice.
- Pressure Ratings: Flexible garden or pool hoses will rupture under standard household water pressure spikes (water hammer).
- Code Approval: Always use certified PEX or rigid PVC/CPVC pipes for permanent interior plumbing replacements.
Final Recommendation & Conclusion
for Beginners
For DIYers looking for a fast, tool-free solution without open flames or toxic glues, push-fit connectors like SharkBite are the most beginner-friendly choice for water supply lines. For gravity-fed drain lines, rubber no-hub couplings offer an forgiving, easy-to-adjust installation method.
- Zero Technical Skill Required: Push-fit and rubber banded couplings eliminate the need for torch soldering or chemical priming.
- Immediate Pressure Testing: Systems can be safely pressurized or used right away without waiting for solvent cement to cure.
- Strict Preparation Still Vital: Beginners must still measure carefully, cut square, and deburr pipe ends to ensure a permanent seal.
for Long-Term Reliability
If you want a permanent, decades-long installation that mirrors professional construction standards, threaded transition adapters combined with soldered copper fittings are the gold standard. These traditional mechanical connections eliminate moving O-rings, providing maximum durability behind finished walls.
- Permanent Material Integrity: Threaded joints and solvent welds fuse or lock components into a single, cohesive structural system.
- Industry Proven: Standardized threaded adapters have been trusted by professional plumbers for generations in high-pressure environments.
- Reduced Maintenance: Permanent joints require virtually zero post-installation upkeep when installed correctly with proper thread sealant.
When to Call a Professional Plumber
While minor residential repairs and fixture retrofits are great DIY projects, certain plumbing scenarios require certified expertise to prevent catastrophic water damage or code violations. Knowing your limits protects your home and insurance validity.
- Main Supply Tie-Ins: If you need to shut off municipal water at the main line or modify high-pressure commercial-grade piping, call a pro.
- Severe Corrosion or Damage: Extensive pipe thinning or crumbling structural lines demand full system replacement rather than patch repairs.
- Strict Local Code Demands: When local building authorities require licensed permits and inspections for concealed behind-the-wall plumbing modifications.

Oscar Vance | Master Plumber & Drainage Expert
Meet Oscar Vance, a licensed master plumber sharing practical solutions on residential repairs, preventive maintenance, and thoughtful home upkeep.

