What Are Electrical Boxes and Why Does the Type Matter?
 Choosing the correct electrical box during a home renovation or wiring project depends entirely on one physical reality: the current state of your walls. An electrical box—often referred to as a junction box—acts as the vital, code-compliant housing that protects wiring splices, switches, and receptacles from damage.
Understanding the fundamental distinction between box types prevents costly installation errors right from the start:
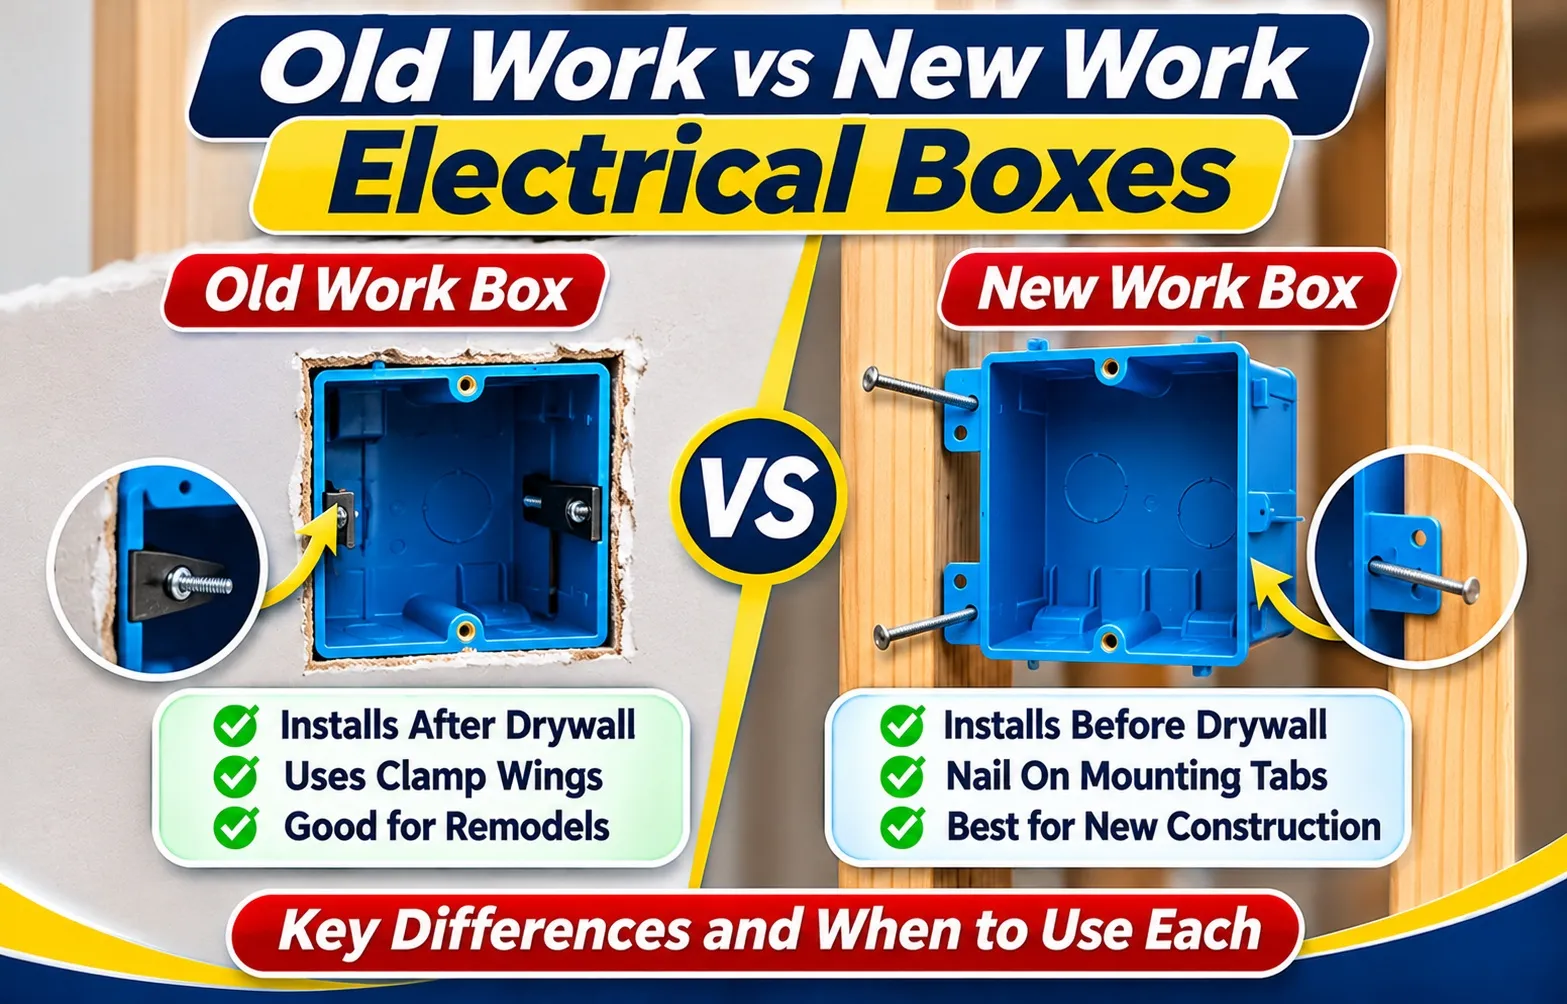
- New construction boxes feature pre-installed brackets or nails designed to mount directly onto exposed framing studs before drywall goes up.
- Remodel boxes (also known as retrofit or old work boxes) are engineered to slip into custom-cut holes in finished walls, held securely in place by flip-out clamping wings.
The Golden Rule of Electrical Box Selection
The golden rule of electrical box selection is that your wall structure dictates your hardware. You cannot install a new construction nail-on box into a finished wall without tearing down the drywall, nor can you easily secure a retrofit box without an open cavity cutout.
Evaluating three key project variables ensures proper selection:
- Framing Accessibility: Determine whether wall studs are fully exposed or completely covered by finished drywall or plaster.
- Mounting Mechanism: Match the box style to the available support structure—either direct stud framing or drywall surface clamping.
- Fixture Weight and Capacity: Account for whether the enclosure will house a lightweight switch or require heavy-duty bracing.
Why Choosing the Wrong Box Can Lead to Failed Inspections or Safety Hazards
Selecting an inappropriate box type compromises mechanical stability and violates electrical codes, frequently resulting in failed home inspections. Forcing the wrong hardware into a wall cavity creates loose fittings, strained wiring connections, and severe safety hazards over time.
Key risks associated with improper box selection include:
- Code Violations: Failing to adhere to National Electrical Code (NEC) standards regarding rigid mounting and physical support.
- Loose Receptacles: Remodel wings that loosen under repetitive plugging and unplugging, causing outlets to push back into the wall.
- Fire Risks: Unsecured boxes or exposed wiring splices that increase the danger of arcing and electrical fires behind finished surfaces.
The Core Difference at a Glance: New Work vs. Old Work Boxes
Understanding the fundamental distinction between electrical enclosures starts with analyzing your wall state and installation timing. Choosing the correct hardware ensures rigid structural stability and code compliance whether you are framing a room from scratch or upgrading an existing space.
The primary variance lies in how each box secures to the building structure. New work boxes rely on direct stud attachment, whereas old work boxes utilize a specialized drywall sandwich mechanism to anchor securely within finished surfaces.
Side-by-Side Comparison Matrix
This comparison matrix highlights the core operational differences between both enclosure styles for quick identification:
To see these physical differences and mounting methods in action, watch the visual demonstration below:
The Structural State of Your Wall Dictates Your Choice
Your project environment dictates whether you use a stud-mounted enclosure or a cut-in retrofit box. Forcing the incorrect box into a wall assembly leads to permanent installation failures and potential code violations.
Key structural factors to evaluate before purchasing your materials include:
- Stud Accessibility: If wall cavities are completely open, sturdy brackets allow for permanent framing attachment.
- Surface Integrity: When drywall is already sealed and painted, cut-in options utilize integrated flanges to bridge the gap without structural demolition.
- Support Security: Understanding how tension locks components in place prevents shifting during heavy daily usage.
Deep Dive: New Work Electrical Boxes
New work electrical boxes are engineered specifically for new construction and major renovation projects where wall framing is completely open and accessible. These heavy-duty enclosures provide maximum structural rigidity and secure permanent mounting directly to building studs before drywall installation.
When and Where to Use New Work Boxes
New work electrical boxes should be installed exclusively during the rough-in stage of building when wall studs are fully exposed and drywall or plaster has not yet been applied. Using these enclosures requires unrestricted physical access to the sides of the framing studs.
Typical application environments include:
- New Construction Homes: Entire residential framing phases where every wall cavity is open and accessible.
- Major Room Additions: Expanding a floor plan with newly framed walls and exposed wooden or metal studs.
- Complete Gut Remodels: Stripping existing interior walls down to bare framing studs to rewire the entire structure from scratch.
Mounting Mechanisms: Nail-on, Screw-on, and Bracket Systems
Mounting mechanisms for new construction boxes rely on rigid attachment directly to structural framing members, utilizing built-in hardware that locks the enclosure in place. This direct stud connection eliminates any risk of shifting or sagging under heavy cable tension.
Common mounting configurations include:
- Nail-on Brackets: Feature pre-driven or angled metal nails molded directly into plastic side flanges for rapid hammer installation on wooden studs.
- Screw-on Brackets: Utilize integrated side screw holes to secure boxes tightly against wood or steel framing using standard driver bits.
- Bar Hangers and Adjustable Brackets: Span across two parallel studs to position ceiling boxes or wall fixtures at exact custom measurements.
Pros and Cons of New Work Construction Boxes
New work boxes offer superior strength and maximum volume capacity, but their installation is strictly limited to open-stud building phases. Weighing the structural advantages against accessibility requirements ensures proper material selection for your project.
Key advantages and limitations include:
- Maximum Stability: Direct attachment to framing delivers unmatched permanent mounting rigidity that never loosens over time.
- Larger Interior Volume: Generally provide greater cubic-inch capacity to easily accommodate multiple cables and wire splices.
- Strict Installation Window: Cannot be installed once drywall or finished wall panels are secured, limiting their use exclusively to open framing phases.
Deep Dive: Old Work (Remodel) Electrical Boxes
Old work electrical boxes—commonly known as remodel boxes or retrofit boxes—are designed specifically for existing finished walls where you cannot or do not want to tear down drywall or plaster to reach the framing studs. These specialized enclosures mount directly into a custom-cut hole in the wall surface.
What is an Old Work (Cut-In) Box?
A cut-in box provides a reliable housing for switches, outlets, and low-voltage connections during upgrades or repairs without disturbing structural drywall. They bypass the need for exposed framing.
- Retrofit Flexibility: Allows adding new outlets or light switches anywhere between wall studs in fully finished rooms.
- No Framing Required: Relies entirely on the drywall or plaster surface itself for physical support rather than wooden or metal studs.
- Surface-Mount Design: Features an exterior flange that rests flat against the wall face to prevent the enclosure from slipping backward into the wall cavity.
Exact Dimensions & Cutout Hole Sizes for Standard Boxes
Knowing the exact cutout dimensions prevents oversized holes that cause the box to slip or loosen. Standard single-gang old work plastic boxes require precise measurements before cutting into drywall or plaster walls.
- Single-Gang Cutout Size: Standard single-gang old work boxes typically require a precise cutout dimension of 2-1/4 inches by 3-3/4 inches.
- Double-Gang Cutout Size: Dual-gang remodel boxes demand a wider opening, usually measuring around 4 inches by 3-3/4 inches depending on the manufacturer template.
- Wall Thickness Compatibility: Engineered to clamp securely onto standard 1/2-inch and 5/8-inch finished drywall or plaster surfaces.
How Swing-Clamps and Flip-Out Wings Secure the Box
The secure mounting of a retrofit box depends on an internal mechanical clamping system that locks the enclosure tightly against the rear of the wall surface.
- Flip-Out Wings: Integrated plastic or metal wings swivel outward automatically as front mounting screws are turned clockwise.
- Drywall Sandwiching: Tightening the screws pulls the clamping tabs firmly against the back of the finished drywall, sandwiching the wall material between the wing and the front box flange.
- Anti-Rotation Design: Built-in stabilizing ridges prevent the entire enclosure from twisting or spinning when inserting plugs into receptacles.
Pros and Cons of Old Work Boxes
While remodel boxes offer unmatched convenience for home upgrades, they have distinct structural limitations compared to new construction framing boxes.
- Fast Retrofit Installation: Enables electrical additions in finished rooms without requiring major drywall demolition or patching.
- Clamping Vulnerability: The internal clamping tabs can occasionally loosen over long periods if subjected to heavy pulling or aggressive cord removal.
- Volume Limitations: Typically offer less interior cubic-inch capacity than deep new construction boxes, making cable management tighter.
Material Breakdown: Blue PVC vs. Fiberglass vs. Metal Boxes
Material selection for electrical enclosures directly impacts structural durability, heat management, and electrical code compliance. Choosing between blue polyvinyl chloride (PVC), thermoset phenolic, fiberglass, and steel boxes depends on wiring types, circuit loads, and environmental exposure requirements.
Different materials offer distinct advantages for residential and commercial environments, influencing how safely a box handles internal heat and physical stress.
Blue PVC Plastic Boxes: Best for Standard Residential Circuits
Blue PVC plastic electrical boxes are the lightweight industry standard for standard residential wiring projects. They accommodate non-metallic sheathed cable (NM-B cable) and feature built-in cable clamps, making them ideal for standard outlets and light switches in wood-framed walls.
Key characteristics of blue PVC boxes include:
- Lightweight Design: Extremely easy to handle, position, and secure during both new construction and retrofit installations.
- Integrated Cable Clamps: Built-in internal tabs lock NM-B cable securely in place without requiring separate strain-relief connectors.
- Non-Conductive Material: Plastic construction eliminates the hazard of accidental housing shorts, though it requires a dedicated ground wire connection to the device.
Grey/Black Phenolic and Fiberglass Boxes: Heat Resistance and Durability
Grey or black phenolic and fiberglass boxes provide superior temperature resistance and structural rigidity compared to standard PVC. These thermoset composite materials do not melt under high heat, making them the preferred choice for demanding environments and heavier fixture loads.
Notable properties of thermoset and fiberglass boxes include:
- Thermoset Stability: Molded from heat-resistant resins that maintain their structural form under high thermal stress or arcing conditions.
- Rigid Composition: Resists cracking or warping in extreme cold temperatures or under aggressive installation pressures.
- Nail-On and Bracket Options: Frequently paired with sturdy mounting brackets for heavy-duty residential framing applications.
Steel and Metal Boxes: When Code Requires Grounded Armor
Steel and metal boxes are mandated by electrical codes when using armored cable, metal conduit, or commercial wiring systems. They provide a continuous ground path, exceptional impact resistance, and maximum physical durability for demanding locations.
Essential advantages of steel enclosures include:
- Integrated Ground Screw: Every metal box includes a designated ground screw terminal to bond the metallic enclosure directly to the equipment grounding conductor.
- Conduit Compatibility: Features knockout ports that accept metal conduit fittings and armored cable connectors securely.
- Maximum Impact Strength: Withstands heavy physical trauma, making them necessary for exposed surface wiring and commercial building standards.
Step-by-Step Installation Guides
Installing electrical boxes correctly requires precise preparation, proper tool selection, and adherence to structural guidelines. Whether you are framing a new room or retrofitting an outlet into finished drywall, following a systematic process ensures secure mounting and clean execution.
Installing a New Work Box on Open Studs
New work box installation is straightforward because the framing studs are completely exposed, allowing for permanent and direct attachment. Proper alignment during this rough-in stage ensures the enclosure sits flush with the future wall surface.
- Position the Box: Hold the box against the side of an exposed wooden or metal stud at your desired room height (standard code is roughly 12 inches for receptacles and 48 inches for light switches).
- Verify Depth Alignment: Align the front edge of the box using the depth-stop tabs or measuring indicators to match the exact thickness of your planned drywall (typically 1/2-inch or 5/8-inch).
- Secure Fastening: Drive the pre-installed nails straight into the wooden stud or screw the side mounting bracket tightly into position to achieve absolute structural rigidity.
- Route and Secure Cables: Feed your NM-B cable through the integrated cable clamp inside the box, leaving 6 to 8 inches of wire slack, and seal any unused openings with knockout seals if applicable.
Cutting and Mounting an Old Work Box in Drywall
Retrofitting an old work box into finished walls requires accuracy to prevent cutting the opening too wide or damaging the surrounding plaster or drywall surface.
- Check the Cavity: Run a reliable stud finder across the wall to verify that no hidden studs, pipes, or electrical wires cross your intended cutout location.
- Trace and Level: Hold the remodel box flat against the drywall, trace its outer perimeter, and use a small level to ensure the outline is completely straight and plumb.
- Cut the Opening: Insert a sharp drywall saw carefully into the traced line and cut out the exact rectangular opening without creating jagged edges.
- Feed the Wires: Reach into the wall cavity, pull your existing electrical cables outward, and feed them through the internal cable clamps of the box.
- Clamp and Lock: Push the enclosure into the drywall cutout and tighten the front mounting screws clockwise; this activates the flip-out wings to clamp the box securely against the rear wall.
Expert Troubleshooting & Critical DIY Fixes
Practical electrical installations often encounter unexpected hiccups, ranging from accidental over-cuts in drywall to hazardous overloads in wiring capacity. Mastering professional troubleshooting techniques prevents expensive structural repairs and ensures total code compliance across every project.
The Drywall Hole Too Big Rescue: How to Fix Oversized Cutouts Without Re-sheetrocking
Cutting an old work box hole too large causes the mounting wings to slip right through the drywall opening instead of clamping tight. Instead of tearing down and patching the entire wall, you can use specialized mechanical fasteners or structural backing to salvage the opening.
Effective methods to rescue an oversized cutout include:
- F-Clips (Retrofit Brackets): Metal support clips that slide between the box and the oversized drywall edge, providing a rigid metal lip to clamp the outer flange securely.
- Drywall Backing Strips: Inserting wooden shims or scrap drywall strips behind the cutout to create a solid anchoring surface for the box screws.
- Fast-Setting Patch Compound: Applying a small mesh tape reinforcement patch around the perimeter to reduce the opening back to standard dimensions before recutting.
The Ceiling Fan Safety Trap: Standard Old Work vs. Fan-Rated Brace Bars
A critical DIY safety hazard is attempting to hang a heavy ceiling fan using a standard plastic old work box or a lightweight wall box. Ceiling fans exert dynamic torque, rotational vibration, and weight that will easily pull standard remodel boxes right out of the ceiling.
Essential safety rules for overhead fixtures include:
- Fan-Rated Enclosures: Enclosures must be explicitly stamped and rated for ceiling fan support, constructed from heavy-duty steel or high-strength thermoset materials.
- Adjustable Joist Braces: Metal span bars that twist and wedge directly between structural ceiling joists to safely bear the dynamic weight of moving fixtures.
- Avoiding Catastrophic Failure: Using standard plastic remodel boxes for ceiling fans risks fixture detachment, exposed arcing wires, and severe injury.
Avoiding Code Violations: Understanding NEC Box Fill & Cubic-Inch Limits
Cramming too many cables and devices into a single electrical enclosure creates dangerous heat buildup and violates safety standards. Calculating exact enclosure volume ensures safe wire management and compliance with the National Fire Protection Association (NFPA) NEC standards.
Key box fill regulations to follow include:
- Cubic-Inch (cu. in.) Volume: Every electrical box is molded or stamped with its specific internal volume capacity to prevent overcrowding.
- Conductor Count Calculations: Codes dictate strict volume allowances for every incoming wire, internal clamp, switch yoke, and ground wire combination.
- NM-2 Cable Standards: Running standard 14-2 and 12-2 NM-2 cable requires accounting for wire gauge volume to prevent pinched insulation and short circuits.
Frequently Answered Questions
Common questions regarding electrical box selection, dimensions, and installation procedures help clarify best practices for both DIY homeowners and remodeling professionals. Reviewing these direct answers ensures code-compliant and secure wiring results.
What size hole do I cut for an old work box?
Standard single-gang old work plastic boxes require a precise cutout hole measuring exactly 2-1/4 inches wide by 3-3/4 inches high. Always trace the manufacturer’s physical cutout template directly onto the drywall surface before cutting to prevent making an oversized hole that compromises the mounting wings.
Key guidelines for accurate cutting include:
- Template Tracing: Use the outer plastic perimeter of your specific remodel box as a reliable cutting guide.
- Drywall Saw Control: Cut strictly along the inside edge of your pencil lines to ensure a snug, friction-fit opening.
- Double-Gang Adjustments: Wider multi-gang cutouts require larger dimensions specified by individual box manufacturers.
Does an old work box need a stud?
No, an old work box does not need a stud. Retrofit enclosures rely entirely on a stud-free installation method, using integrated flip-out clamping wings or retrofit clips that anchor tightly against the back of the finished drywall or plaster surface between framing members.
Advantages of this design include:
- Placement Freedom: Allows you to install switches and outlets anywhere along open wall spaces without locating framing studs.
- Drywall Anchoring: Uses wall board thickness as structural support rather than relying on wooden framing members.
- Retrofit Simplicity: Eliminates the need to cut away large sections of wall covering to reach structural supports.
Should an electrical box sit flush with drywall?
Yes, an electrical box must always sit completely flush with the finished drywall surface to comply with electrical safety codes. Achieving a proper flush mount prevents gaps around cover plates, avoids loose switch alignment, and ensures switches or receptacles secure correctly without strain.
Important considerations for surface alignment include:
- Code Compliance: National Electrical Code mandates that face edges of boxes in finished surfaces must not be set back more than specified tolerances.
- Cover Plate Seating: A flush mount allows wall plates to screw down tightly without bowing or cracking against protruding plastic.
- Future Finishes: Account for upcoming wall treatments like thick paint, wallpaper, or tile when setting box depth.
What’s the average cost to replace an electrical box?
The average box replacement cost typically ranges from $100 to $250 per box when hiring a licensed electrician, depending on wall accessibility and wiring complexity. DIY replacements cost less than $10 to $20 for parts alone, though wall patching and drywall repair can add minor supply expenses.
Cost variables include:
- Labor Rates: Professional electrician service calls and hourly rates for troubleshooting old wiring.
- Wall Material: Plaster walls and textured surfaces increase labor time and repair costs compared to standard drywall.
- Box Type: Standard utility boxes cost significantly less than heavy-duty fan-rated ceiling braces.

Oscar Vance | Master Plumber & Drainage Expert
Meet Oscar Vance, a licensed master plumber sharing practical solutions on residential repairs, preventive maintenance, and thoughtful home upkeep.