National Electrical Code (NEC) Underground Wiring Rules
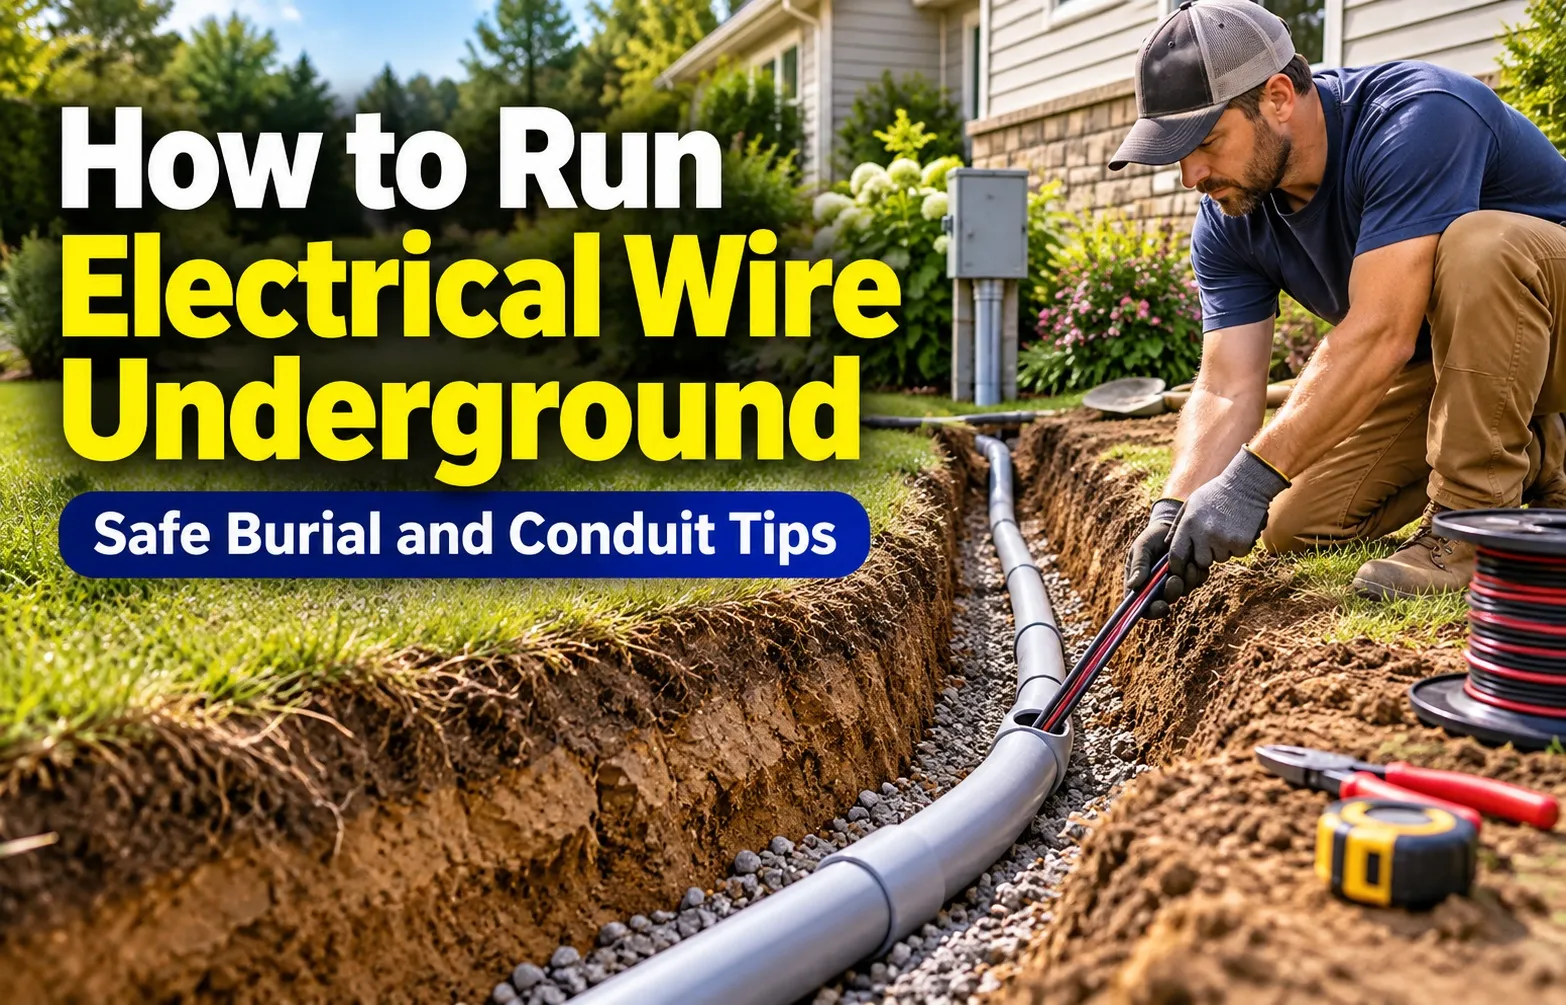 Underground electrical wiring requires strict adherence to National Electrical Code (NEC) standards to prevent fire hazards, electrical shock, and severe insulation damage. The two compliant installation methods are direct burial cable (UF-B) and individual insulated conductors (THHN/THWN) run inside rigid conduit systems.
NEC Burial Depth Requirements at a Glance
Required trench depths depend directly on the wiring method, conduit material, and circuit protection used. The following zero-scrollbar reference table outlines mandatory minimum cover measurements from finished grade to the top of the conductor or conduit under standard residential settings:
Compliance with these depth thresholds guarantees safety against lawn care equipment, digging tools, and soil settlement according to the official National Electrical Code (NEC) / NFPA 70 Standard Guide.
Direct Burial Cable (UF-B) vs. Conduit (THHN/THWN Wires)
Choosing between direct burial cable and conduit systems dictates your excavation physical workload, long-term durability, and overall project costs.
Underground Feeder (UF-B) cable features a solid vinyl jacket that completely encapsulates internal conductors, shielding them directly against water and soil exposure without extra piping.
- Pros of UF-B Cable: Lower upfront material cost and simpler installation for straight runs.
- Cons of UF-B Cable: Requires a deeper 24-inch trench and offers zero mechanical protection against future shovel strikes or rodent chewing.
- Standard Application: Short branch circuits to garden lights or single outdoor outlets.
Conduit installations utilize rigid pipes, such as Schedule 40 PVC or high-impact Schedule 80 PVC, to pull individual wet-rated THHN/THWN wires through a protected channel.
- Pros of PVC Conduit Systems: Reduced 18-inch trench burial depth, excellent physical damage protection, and simple future wire upgrades without re-trenching.
- Cons of PVC Conduit Systems: Higher initial material expenses and additional labor for gluing fittings, sweeps, and pulling wire.
- Standard Application: Heavy-duty subpanels, outbuildings, sheds, detached garages, and pool pumps.
Dial 811: Why Underground Utility Locating is Mandatory
Calling 811 or contacting your local “Call Before You Dig” service at least two to three business days before trenching is a mandatory legal requirement under state and federal law. Locating crews map hidden utility lines using standardized color codes to prevent fatal electrical shocks, explosive gas leaks, and severe service interruptions.
- Red Markings: Electric power lines, cables, conduit, and lighting cables.
- Yellow Markings: Gas, oil, steam, petroleum, or gaseous materials.
- Orange Markings: Communication, alarm, or signal lines, cables, or conduit.
- Blue Markings: Potable water lines.
- Green Markings: Sewers and drain lines.
Always maintain a tolerance zone of at least 18 to 24 inches on either side of marked utility lines. Hand-dig with a rounded shovel rather than using power trenchers when digging near marked utility line paths.
Sizing Your Wire & Conduit for Distance (Preventing Voltage Drop)
Electrical resistance naturally increases as wire length grows, creating a drop in voltage from the main breaker panel to the destination load. The National Electrical Code recommends keeping total voltage drop under 3% for branch circuits to avoid overheating motors, flickering lights, and burning out sensitive electronic components.
Calculating voltage drop requires evaluating circuit amperage, total run distance (one-way length in feet), and conductor resistance based on wire gauge (AWG). Higher current draws over long distances require stepping up to a thicker wire gauge (smaller AWG number) to maintain stable voltage delivery.
Conduit sizing must also account for official conduit fill capacity rules. According to NEC Chapter 9 requirements, when running three or more current-carrying conductors inside PVC pipe, the total wire cross-sectional area cannot exceed 40% of the interior conduit volume. Using 1-inch Schedule 40 or 80 PVC instead of 3/4-inch PVC provides significantly lower friction when pulling THHN/THWN conductors through long underground sweeps.
Distance-to-Wire Gauge Lookup Chart (50 ft to 200 ft Runs)
Select your required wire size using the zero-scrollbar reference table below. This chart calculates copper conductor sizing for standard 120V and 240V residential circuits to maintain a maximum 3% voltage drop limit:
Underground Wire Installation Guide
Executing an underground electrical installation requires precision, the right mechanical tools, and strict adherence to structural assembly techniques. Correct execution prevents cable pinching, conduit separation, and premature system failure.
Step 1: Mapping the Route & Trenching (Manual vs. Machine)
Plan a straight, unobstructed path from your power source to your destination while avoiding septic tanks, tree root systems, and marked utility lines. Choose a manual shovel for short runs under 50 feet or rent a motorized trenching machine to cut clean, uniform depths efficiently across long distances.
- Route Planning: Keep the path as short and direct as possible to minimize total wire footage and voltage drop.
- Manual Digging: Ideal for short trench lengths or tight spaces where heavy machinery cannot safely maneuver.
- Trenching Machine: Saves hours of physical labor on long runs, creating a narrow, standardized groove for your wire or pipe.
Step 2: Preparing the Trench Bed & Sand Layer
Clear the bottom of the excavated trench entirely of sharp stones, jagged roots, and construction debris that could puncture cable sheathing or crack PVC pipe over time. Lay down a clean 2 to 3-inch layer of fine sand along the base of the trench to establish a protective, stable bed.
- Debris Removal: Walk the entire length of the trench to rake out rocks or hard objects.
- Sand Cushioning: Pour and level masonry sand across the bottom to absorb soil shifting and weight loads.
- Uniform Grading: Ensure the trench floor remains flat without sudden dips or sharp humps that stress the conduit.
Step 3: Laying UF-B Cable or Glueing PVC Conduit Joints
Lay direct burial UF-B cable loosely into the trench with slight slack to accommodate soil expansion and contraction. For conduit systems, join Schedule 40 PVC sections using purple primer and solvent PVC cement, ensuring all turns utilize smooth 90-degree sweeps instead of sharp elbows.
- UF-B Cable Placement: Unspool the cable gently into the trench without pulling tight or creating sharp kinks.
- PVC Priming and Gluing: Apply purple primer to clean pipe ends and fittings, coat with PVC cement, and twist firmly for 30 seconds to lock joints.
- Sweep Configuration: Use wide-radius 90-degree sweeps at corners to make future wire pulling significantly easier.
Step 4: Pro-Tip: Pulling Wire Through Conduit Using the Shop-Vac Trick
Use a shop vacuum to rapidly suck a plastic grocery bag tied to a lightweight pull string through the glued conduit run, then apply pulling lubricant and fish your THHN/THWN conductors smoothly. This classic trade method prevents wire binding and jacket abrasion over long underground pipe spans.
- Shop-Vac Vacuum Line: Tie a plastic bag to nylon string and vacuum it from one end of the conduit to the other.
- Pulling Lubricant: Coat your bundle of THHN/THWN wires liberally with wire-pulling gel to reduce friction inside the pipe.
- Coordinated Teamwork: Have one person feed the wire smoothly into the sweep while a second person pulls steadily on the string using fish tape.
Step 5: Transitioning Above Ground with LB Fittings & Schedule 80 Conduit
Protect all vertical wire or cable runs exiting the ground by enclosing them in rigid Schedule 80 conduit up to at least 8 feet above grade to resist physical impact. Install weather-proof LB condulet fittings at building entry points to seal out moisture and secure clean 90-degree wall transitions.
- Above-Grade Protection: Swap underground Schedule 40 PVC for impact-resistant Schedule 80 PVC anywhere pipe runs vertically up exterior walls or posts.
- LB Condulet Fittings: Use gasketed LB access fittings to transition cables safely through exterior walls while maintaining weather-tight seals.
- Expansion Joints: Install PVC expansion fittings where pipes transition from underground to fixed structures to prevent cracking from seasonal temperature swings.
Backfilling Safety Warning Tape & Final Connections
Completing your underground electrical run requires structured soil backfilling, protective warning indicators, and proper breaker panel termination. Following correct backfill compaction and connection procedures ensures long-term safety, protects future excavators, and ensures your installation passes municipal open-trench inspection.
Backfilling & Placing Red Electrical Warning Tape
Backfilling must be completed in stages to protect buried cable or conduit from settling damage and provide early warning during future digging. Laying red metallic warning tape above the conduit line is a mandatory safety measure for all residential underground electrical runs.
- First Bedding Layer: Cover the installed wire or conduit with 4 to 6 inches of sifted soil or clean sand, tamping lightly by hand to eliminate void pockets without placing stress on the pipe.
- Red Metallic Warning Tape Placement: Lay continuous red electrical caution tape in the trench approximately 12 inches below the finished grade (or 6 inches above the conduit line) to alert future diggers before a shovel strikes live power.
- Final Compaction & Mound: Complete backfilling with excavated topsoil in 6-inch lifts, tamping firmly. Slightly mound the topsoil along the trench line to account for natural rain settling over time.
Weatherproof Junction Boxes & Damp-Location Splices
All outdoor wiring transitions and junction points must utilize NEMA 3R or NEMA 4X rated weatherproof junction boxes designed specifically for damp and wet locations. Direct burial cable or conduit terminations entering boxes from below require liquid-tight fittings and strain relief to keep moisture out.
- Box & Fitting Rating: Ensure all exterior junction boxes, covers, and conduit hubs carry an official damp/wet location rating with integrated rubber gaskets.
- Direct-Burial Splice Standards: Avoid unnecessary splices underground. If a underground wire splice is required, use code-approved resin-filled direct burial splice kits or heat-shrink underground splice sleeves—never standard wire nuts or electrical tape.
- Drip Loops & Drainage: Form a drip loop in flexible wire runs prior to entering exterior junction boxes so rain runoff drains away from wire entry points.
Main Panel Connections & GFCI Circuit Protection
Connecting the circuit to your main electrical breaker panel is the final step and must strictly adhere to ground-fault protection and grounding electrode system rules. Always shut off the main breaker before working inside the electrical panel.
- GFCI Breaker Protection: Install a Ground Fault Circuit Interrupter (GFCI) circuit breaker in the main panel—or a GFCI receptacle at the origin of the branch circuit—to immediately shut off power in the event of current leakage or ground faults.
- Dedicated Neutral & Ground Routing: For subpanels in detached sheds or garages, run separate neutral and ground conductors from the main panel. Neutral bars must remain unbonded (isolated) from ground bars in detached outbuildings.
- Ground Rod Electrode System: Detached buildings powered by a feeder or subpanel require a local grounding electrode system, typically consisting of two ground rods driven 8 feet into the earth and spaced at least 6 feet apart.
Critical Pitfalls & Direct Burial Myths (Addressing Reddit & Quora Gaps)
Navigating DIY electrical projects requires avoiding dangerous shortcuts frequently debated on forums. Understanding structural code violations, splicing rules, and outbuilding grounding requirements prevents costly rework and severe safety hazards.
The Romex Trap: Why Indoor NM-B Cable Fails Underground
Burying standard indoor Romex (NM-B) wire directly in the dirt or running it unsealed inside underground conduit is a severe National Electrical Code violation and fire hazard. Soil moisture rapidly dissolves the paper packing and outer nylon jacket, destroying insulation integrity and triggering dangerous short circuits.
- NM-B vs. UF-B Construction: Standard Romex features hollow spaces and paper fillers that absorb ground moisture like a sponge, whereas UF-B cable features solid, moisture-sealed thermoplastic sheathing.
- Sheath Degradation: Underground soil chemistry and constant moisture exposure break down indoor-rated PVC jackets within months, exposing bare copper conductors to wet earth.
- Short Circuit Risks: Once moisture penetrates damaged NM-B insulation, it causes ground faults, trips breakers instantly, or sparks underground electrical fires.
Can You Splice a Damaged Underground Cable? (Resin Kit Guidelines)
Splicing a damaged underground cable requires professional resin-filled direct burial splice kits rather than standard wire nuts or electrical tape. Burying unprotected electrical splices underground violates code and invites moisture intrusion, ground faults, and catastrophic electrical failures.
- Why Tape Fails: Standard electrical tape and wire nuts degrade immediately when exposed to damp soil, allowing ground water to corrode wire connections.
- Resin-Filled Splicing Kits: Code-compliant underground splices require heavy-duty mechanical connectors enclosed inside a hard plastic shell filled with two-part moisture-curing epoxy resin.
- Accessibility Best Practice: Whenever possible, eliminate underground splices entirely by pulling a brand-new continuous wire run from panel to destination, or bring the splice above ground into a NEMA 3R weatherproof junction box.
Subpanel Grounding vs. Outbuilding Feeds for Sheds & Detached Garages
Powering a detached shed or garage with a subpanel requires maintaining an isolated neutral bar separate from the subpanel grounding bar. Unlike main service panels, outbuildings need dedicated local grounding electrode rods driven into the earth to prevent dangerous ground-loop voltage differentials.
- Isolated Neutral Bar: Neutral conductors and grounding conductors must be kept completely separate inside detached outbuilding subpanels to prevent stray current from traveling along grounding paths.
- Subpanel Grounding Bar: Metal subpanel enclosures must bond directly to an independent grounding bar connected to the main panel ground wire.
- Local Ground Rods: Detached structures require a minimum of two 8-foot grounding electrodes driven into the earth and bonded to the subpanel to safely dissipate lightning strikes and fault currents.
Frequently Asked Questions
Clear, direct answers to common questions regarding underground electrical installation codes, materials, and safety requirements.
How deep should electrical wire be buried in the ground?
Electrical wire burial depth depends on the installation method. Direct burial UF-B cable typically requires a minimum 24-inch depth, while wires enclosed in Schedule 40 or Schedule 80 PVC conduit must be buried at least 18 inches deep to satisfy National Electrical Code safety regulations and prevent accidental damage.
Can Romex wire be buried underground in conduit?
No, standard indoor Romex (NM-B) wire cannot be buried underground, even inside PVC conduit. Soil moisture degrades its paper packing and outer jacket, violating the National Electrical Code and creating severe short-circuit and fire risks. Always use UF-B cable or wet-rated THHN/THWN conductors instead.
What is the best wire to bury underground without conduit?
Underground Feeder (UF-B) cable is the best and standard choice for direct burial without conduit. It features a solid, moisture-resistant thermoplastic sheathing designed to protect internal copper conductors directly from soil contact, moisture corrosion, and decay when buried at the required depth.
How far can I run 12 gauge wire underground before voltage drops?
You can run 12-gauge copper wire up to 50 feet for a standard 20-amp circuit before exceeding the recommended 3% voltage drop threshold. For longer runs between 50 and 100 feet, you must upgrade to 10-gauge wire to prevent electrical resistance, equipment overheating, and performance loss.
Can I bury my own electrical power lines without a license?
Homeowners can often trench and bury their own electrical lines on personal residential property, but most municipal jurisdictions require a proper electrical permit and a formal open-trench inspection by a building official before covering the installation to ensure full National Electrical Code compliance.

Oscar Vance | Master Plumber & Drainage Expert
Meet Oscar Vance, a licensed master plumber sharing practical solutions on residential repairs, preventive maintenance, and thoughtful home upkeep.