Can I Replace a Toilet Myself?
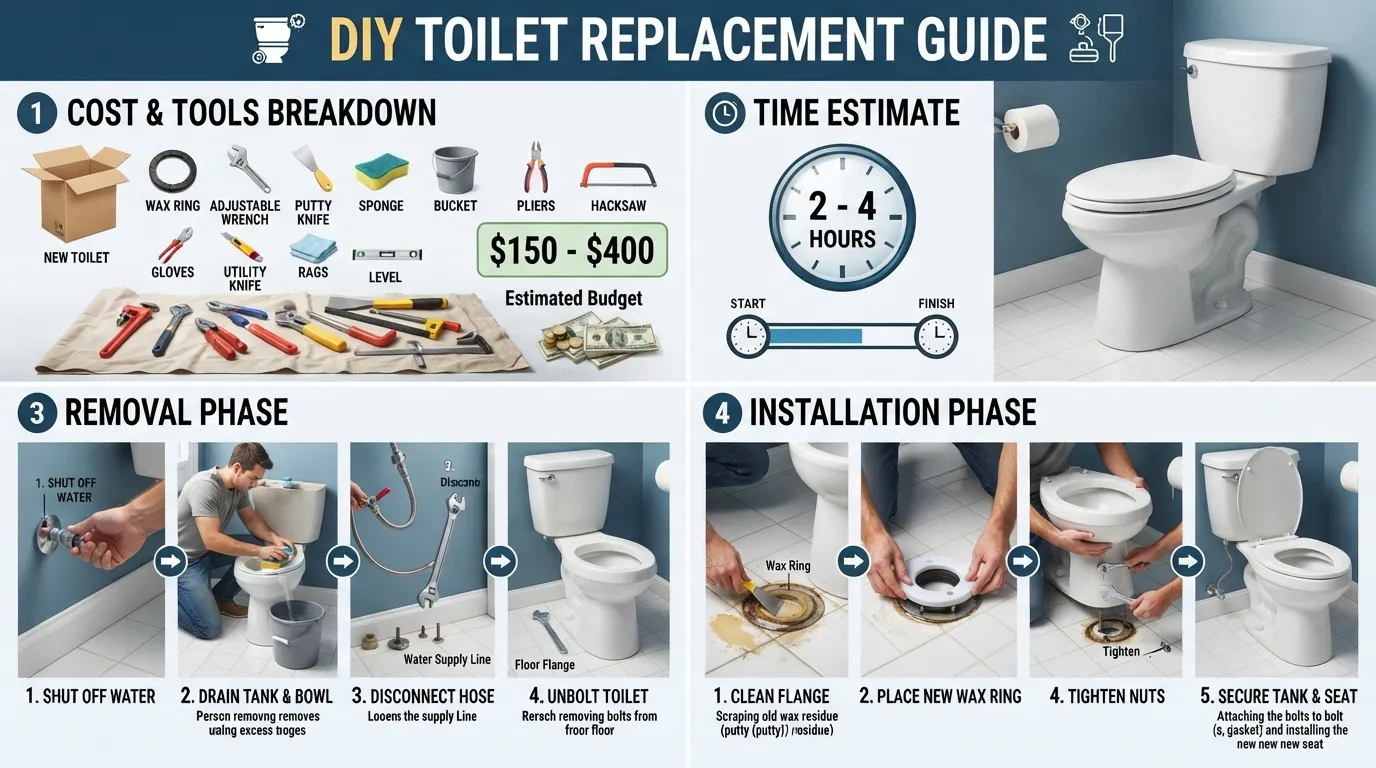
Yes, replacing a toilet yourself is a very achievable DIY project for most homeowners. The entire swap typically takes between two to four hours and requires only basic hand tools, making it one of the most accessible intermediate plumbing upgrades you can tackle.
Is It a Beginner-Friendly DIY Job?
Replacing a toilet is considered a beginner-friendly project because it does not involve cutting or soldering pipes. Most of the effort is purely mechanical—unbolting the old fixture, lifting it out, and setting a new one down onto a fresh wax ring.
- Skill Level: Beginner to intermediate; no specialized plumbing license is required in most residential areas.
- Time Investment: Plan for 2 to 4 hours of uninterrupted work, especially if you need to clean up old grout or repair a damaged floor flange.
- Core Challenge: The primary difficulty is the weight and awkward shape of the porcelain bowl, which is best managed with a helper or careful lifting technique.
What You Need Before You Start
Before unbolting your existing fixture, gather all essential equipment to avoid mid-project trips to the hardware store. Having your workspace prepared ensures a watertight seal and minimizes mess.
- Hardware & Materials: A brand-new toilet kit, a new wax ring (with or without a plastic horn), closet bolts, and a flexible supply line.
- Basic Tools: An adjustable wrench, a sponge and bucket for bailing remaining water, a putty knife, and a level.
- Safety & Cleanup Gear: Heavy-duty rubber gloves, safety glasses, and old towels to catch residual water from the tank and trap.
Is Replacing a Toilet a Big Job? Difficulty Breakdown
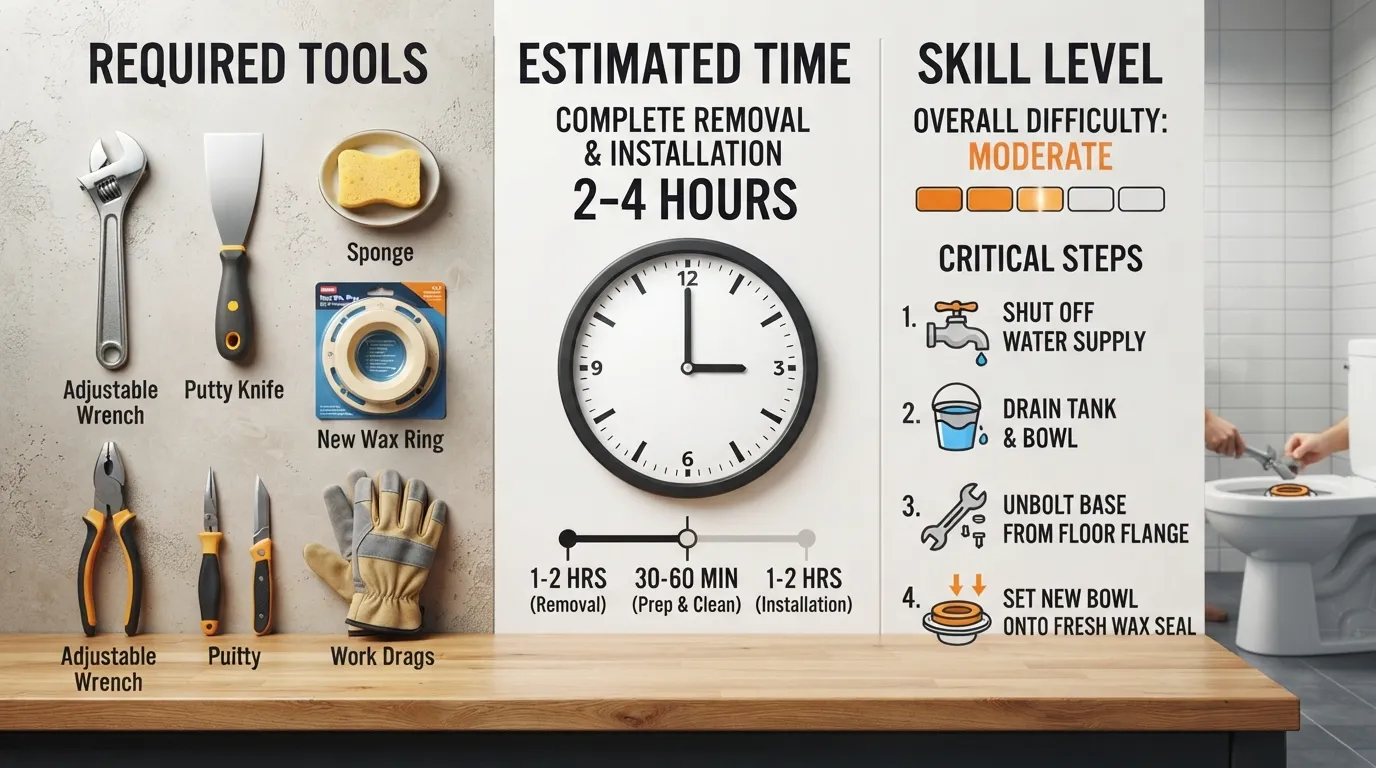
Replacing a toilet can range from a simple afternoon swap to a complex repair depending entirely on the condition of your subfloor and underlying hardware. While a standard installation is straightforward, unexpected complications like corroded bolts or water damage can quickly elevate the difficulty level.
When It’s an Easy 1-2 Hour Job
An installation is exceptionally straightforward when you are working in a modern bathroom with well-maintained plumbing fixtures. If the floor is level and the old components come apart cleanly, the process is pure assembly.
- Clean Conditions: Closet bolts unscrew easily without twisting or breaking off in the flange slots.
- Dry Subfloor: The area around the base is completely solid, dry, and free of structural rot.
- Direct Alignment: The rough-in distance matches your new toilet perfectly, allowing for an immediate drop onto the wax ring.
When It Becomes a Big Job Rusted Bolts Damaged Flange Rotten Subfloor
The project transforms into a major plumbing endeavor when age and water leaks compromise the structural integrity around the base. Addressing these underlying problems takes priority over installing the new fixture.
- Rusted Hardware: Rusted closet bolts often seize up, requiring a hacksaw or oscillating tool to cut them free.
- Damaged Flange: A cracked or rusted floor flange must be repaired with a metal reinforcement ring or replaced entirely to prevent future leaks.
- Rotten Subfloor: Long-term undetected leaks around the wax ring frequently rot wooden subfloors, requiring you to patch or replace the plywood before mounting the new toilet.
Wood Floor vs Tile Floor Installation Difference
The flooring material underneath your toilet dictates how much care you must take during removal and tightening. Each surface presents distinct installation variables.
- Tile Floors: Ceramic or stone tile provides a rigid, flat platform, but over-tightening the closet bolts can easily crack the porcelain base. You must shim the toilet carefully if the tile is uneven.
- Wood Floors: Wood subfloors are more susceptible to hidden water damage from past leaks. They also require precise shimming and sealing around the base perimeter to prevent shifting.
Tools and Materials Needed

Gathering the correct equipment before you begin ensures a seamless installation without frustrating mid-project delays. Having specialized plumbing gear on hand helps you manage everything from stubborn hardware removal to achieving a watertight, professional seal.
Essential Tools Checklist
You do not need specialized trade equipment for a standard toilet installation, but a few everyday hand tools are mandatory for safety and precision. Proper gear keeps the workspace clean and protects your bathroom finishes.
- Adjustable Wrench: Used to tighten supply lines and secure mounting nuts without rounding off the fittings.
- Sponge and Bucket: Essential for bailing out residual water from the tank and toilet trap before unbolting.
- Putty Knife & Utility Knife: Used to scrape away old wax ring residue and slice through old caulk lines cleanly.
- Rubber Gloves: Protect your hands during the removal of old, unsanitary waste components and old wax seals.
- Caulk Gun: Necessary for applying a neat, sanitary bead of silicone around the base once the fixture is secured.
Materials You’ll Need Wax Ring Bolts Caulk
Consumable materials must always be replaced brand new during a toilet swap to guarantee a leak-free connection. Reusing old wax or rusted hardware is the leading cause of premature floor damage and leaks.
- Wax Ring: Forms the crucial waterproof and gas-tight seal between the bottom of the toilet bowl and the floor flange.
- Closet Bolts (Johnny Bolts): Heavy-duty threaded brass or steel bolts that anchor the toilet base to the floor flange.
- Flexible Supply Line: A braided stainless steel water supply hose to connect the shut-off valve to the tank.
- Sanitary Silicone Caulk: Antimicrobial caulk to seal the perimeter of the toilet base to the floor for stability.
For detailed hardware size specifications and official installation tolerances, consult the Home Depot Toilet Replacement Guide.
DIY Cost vs Hiring a Plumber Cost Comparison
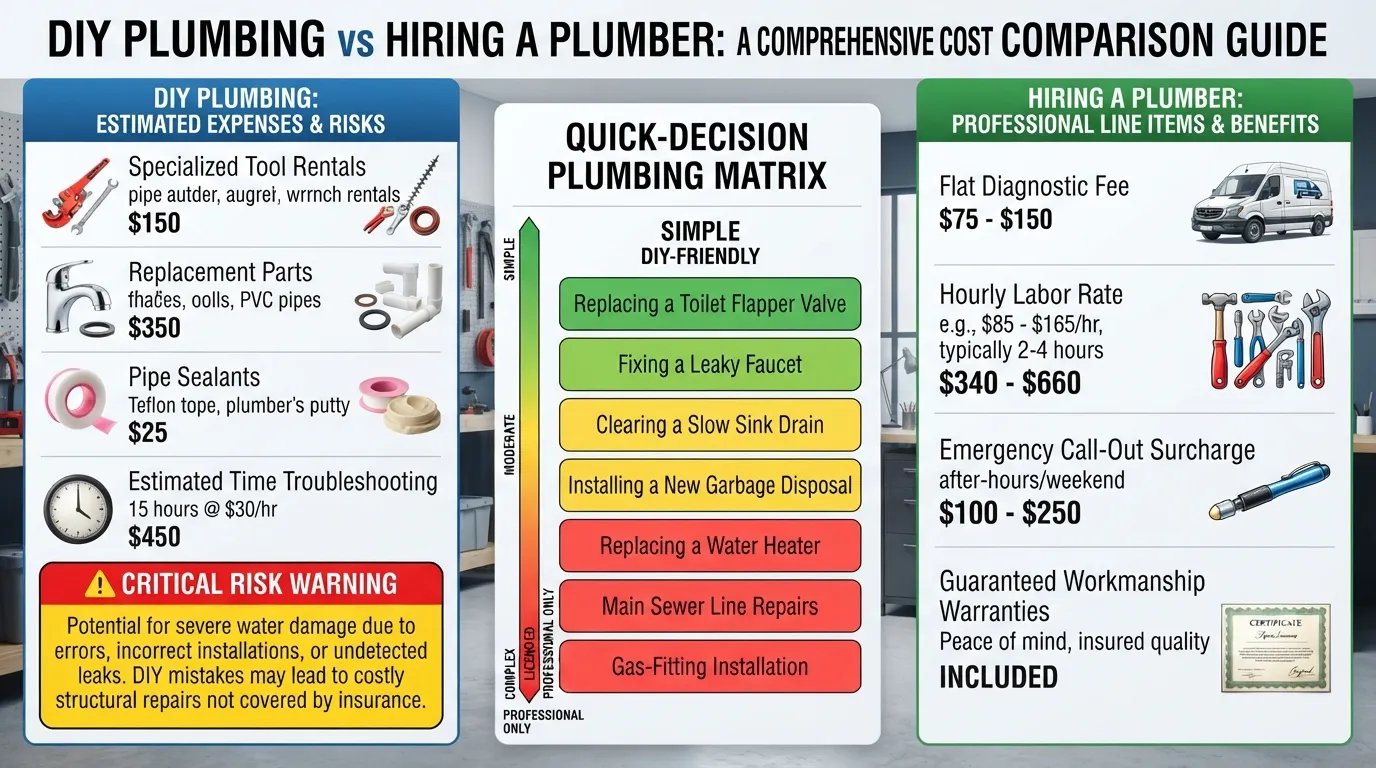
Deciding between a DIY toilet swap and hiring a professional comes down to balancing your upfront budget against the value of your time and labor. Understanding standard pricing helps you weigh potential savings against the complexity of the project.
Average Cost to Replace a Toilet Yourself
Tackling the installation yourself means you only pay for the physical hardware and consumable supplies needed for the job. Total expenses remain relatively low unless you need to purchase specialty hand tools.
- Material Expenses: A standard new toilet ranges from 150 to 400 dollars, while replacement wax rings, bolts, and supply lines add another 15 to 30 dollars.
- Tool Investment: If you already own a basic wrench set, your total out-of-pocket project cost stays strictly within the price of the fixtures and consumables.
Average Plumber Charges for Toilet Installation
Hiring a licensed professional introduces labor costs that significantly increase the total project expenditure. Plumbers typically charge hourly rates or flat service fees for fixture swaps.
- Labor Pricing: Professional installation labor typically ranges from 150 to 350 dollars depending on your local market rates and regional cost of living.
- Total Hired Cost: When combining labor fees, disposal of the old toilet, and basic materials, hiring a plumber usually totals between 300 and 700 dollars or more.
Is DIY Really Worth the Savings?
Doing it yourself saves you hundreds of dollars in direct labor fees, but you must factor in the potential risks. If an unexpected subfloor repair or flange replacement arises, a DIY project can quickly require professional intervention anyway.
- Financial Benefit: You keep 100 to 400 dollars in your pocket by avoiding contractor service fees.
- Risk Consideration: Mistakes made during a DIY installation—such as a failing wax seal—can lead to costly water damage if left unnoticed.
How Long Should It Take a Plumber to Replace a Toilet? Time Comparison
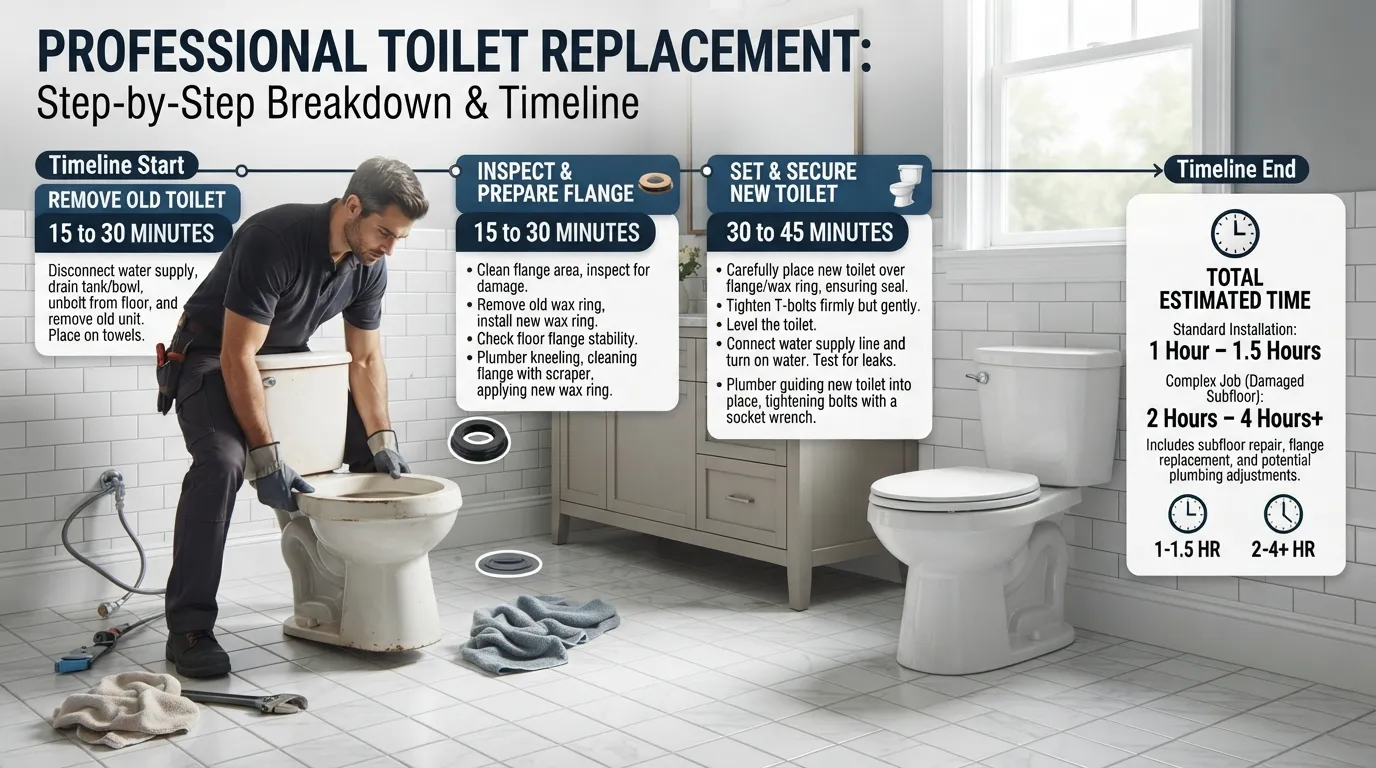
Project duration varies drastically depending on whether an experienced professional is handling the wrench or a first-time homeowner is learning as they go. Knowing the expected timeline helps you plan your day without unexpected disruptions to your home’s plumbing.
Average Time for a Professional Plumber
A licensed plumber working under normal conditions can complete a standard toilet swap in a remarkably short window. Their familiarity with common obstacles allows them to work efficiently and methodically.
- Standard Swap: A professional typically finishes the entire removal and installation process in 45 to 60 minutes.
- Complex Scenarios: If minor flange adjustments or bolt cutting are required, total professional time rarely exceeds 90 minutes.
Average Time for a Beginner DIYer
First-time homeowners should expect to dedicate significantly more time to the task due to the learning curve and caution required. Double-checking steps and handling heavy porcelain safely naturally slows down the pace.
- Total Duration: A beginner DIYer usually requires 2 to 4 hours from start to finish.
- Pacing Factor: This window includes time spent reading instructions, cleaning old wax residue, and taking careful breaks while lifting heavy components.
What Can Make the Job Take Longer
Unforeseen complications can instantly double the estimated project time for both professionals and amateurs alike. Dealing with degraded infrastructure is the single biggest factor in schedule delays.
- Stubborn Hardware: Corroded, rusted-in-place floor bolts that require manual cutting or extraction.
- Flange Repairs: Discovering a cracked or sunken plastic closet flange that demands a repair ring installation before mounting.
- Subfloor Remediation: Uncovering localized wood rot around the base that requires drying, treating, or patching before the new fixture can be safely secured.
Step by Step Guide to Replace a Toilet Yourself
Replacing your toilet is a manageable DIY project when broken down into sequential, methodical steps. Follow this complete installation workflow to ensure a secure, leak-free upgrade.
Step 1: Shut Off and Drain the Water
Turn off the water supply valve located near the base of the toilet by turning it clockwise. Flush the toilet and hold down the handle to drain as much water as possible from the tank and bowl.
- Drain Residual Water: Use a sponge and bucket to soak up whatever water remains trapped at the bottom of the tank and the bowl trap.
- Disconnect Supply Line: Place your bucket underneath the flexible hose and loosen the coupling nut to detach it from the tank inlet.
Step 2: Disconnect and Remove the Old Toilet
Remove the plastic decorative caps covering the floor bolts on either side of the base. Use an adjustable wrench to loosen and remove the nuts securing the toilet to the floor flange.
- Break the Seal: Gently rock the toilet side-to-side to break the old wax seal adhesion. Never force it violently to avoid cracking the porcelain or damaging the floor.
- Plug the Drain: Lift the toilet straight up and out of position. Immediately stuff a clean rag into the open drain hole to block foul sewer gas and prevent dropped hardware.
Step 3: Clean and Inspect the Flange
Use a putty knife to scrape away every trace of the old wax ring from the top of the plastic or metal floor flange. A pristine surface is mandatory for creating a tight new seal.
- Check for Damage: Inspect the flange slots and plastic ring for cracks, corrosion, or shifting. Install a metal repair ring if the bolt slots are compromised.
- Replace Floor Bolts: Slide brand-new closet bolts into the flange slots and secure them temporarily using plastic retaining washers so they stay upright.
Step 4: Install the New Wax Ring and Bowl
Carefully invert the new toilet bowl and press the new wax ring firmly around the waste horn on the bottom. Remove the rag from the floor drain before lowering the fixture.
- Align and Set: Lift the bowl over the floor flange, align the mounting holes directly with the upright closet bolts, and lower it straight down in one smooth motion.
- Compress the Seal: Sit down firmly on the bowl with your full weight to compress the wax ring evenly. Tighten the floor nuts alternately by hand, then snug them gently with a wrench—do not over-tighten or the porcelain will crack.
Step 5: Attach the Tank and Reconnect Water Supply
If your toilet is a two-piece model, place the rubber tank-to-bowl gasket onto the flush valve opening beneath the tank. Position the tank onto the back of the bowl and secure it with the provided hardware.
- Hook Up Water: Reattach the flexible water supply line to the tank inlet and open the main shut-off valve counterclockwise. Let the tank fill completely and test for leaks.
- Final Touches: Snap on the bolt caps, trim any excess bolt length if needed, and run a neat bead of sanitary silicone caulk around the base perimeter to lock it securely in place.
Can One Person Install a Toilet Alone? Solo Installation Tips
Yes, one person can easily install a toilet alone if they use proper lifting mechanics and take deliberate precautions. While the porcelain bowl is heavy and awkward to handle, a solo installation is entirely manageable with a little patience and preparation.
Safe Lifting Technique for One Person
Lifting a porcelain toilet bowl requires protecting your lower back and maintaining a secure grip on the fixture. Because the weight is distributed unevenly, proper body mechanics are essential to avoid injury.
- Lift with Your Legs: Squat down close to the bowl, keep your back straight, and use your leg muscles to power the lift rather than bending at the waist.
- Grip Securely: Hold the bowl firmly by the outer rim and the interior bowl opening beneath the basin. Avoid lifting by the fragile porcelain tank or flush handle.
- Clear the Path: Remove all rugs, cleaning supplies, and bathroom accessories from your walking path so you can lower the bowl onto the flange without tripping.
Tips to Avoid Cracking the Porcelain
Porcelain is exceptionally rigid but vulnerable to stress fractures if impacted or tightened unevenly against hard surfaces. Protecting your new fixture during solo placement prevents costly mistakes.
- Dry-Fit First: Lower the bowl onto the floor bolts without the wax ring first to check alignment, ensuring you can drop it straight down in one smooth motion.
- Even Bolt Tightening: When seating the wax seal, alternate tightening the left and right floor nuts a quarter-turn at a time to maintain equal pressure.
- Use Plastic Washers: Always place the plastic retainers and washers under the metal nut to create a buffer between the steel wrench and the porcelain base.
When You Should Call a Plumber Instead Red Flags
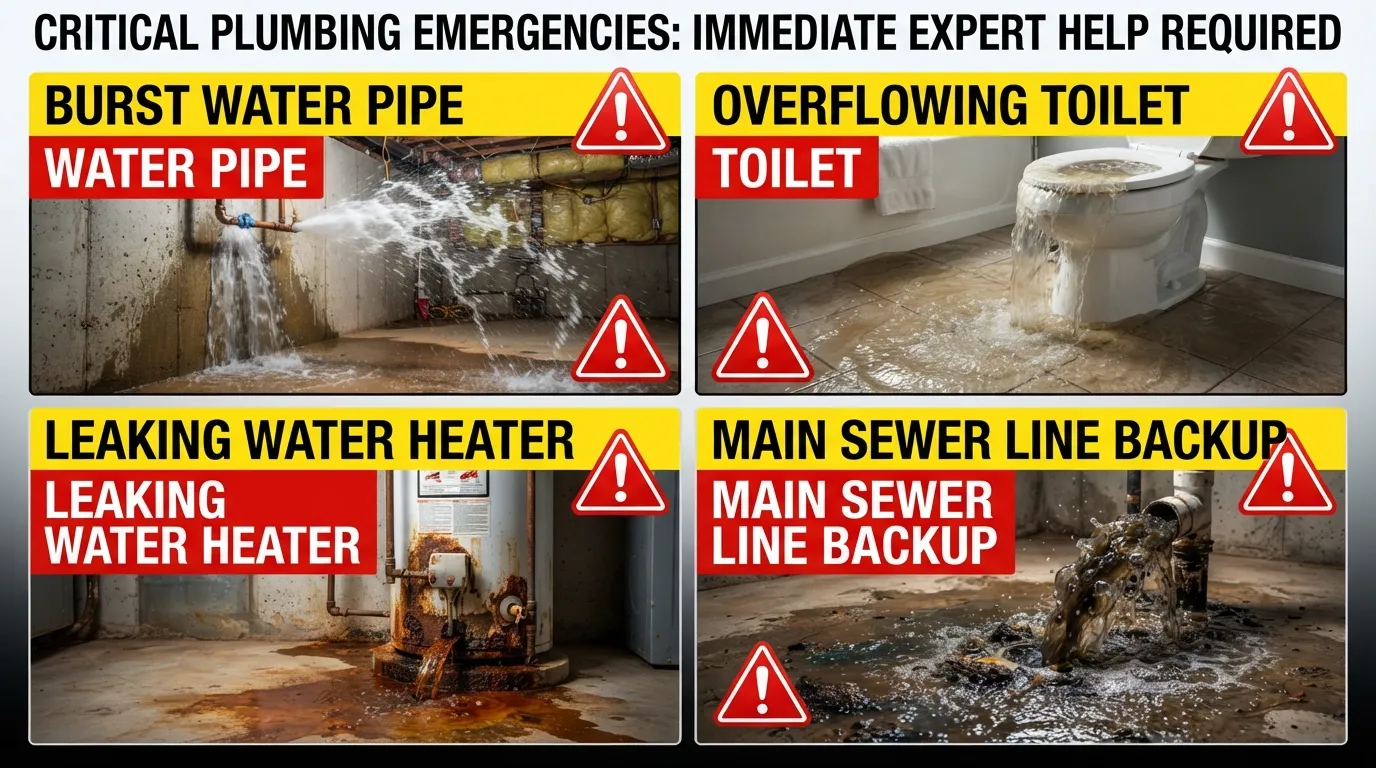
While many toilet installations are straightforward DIY projects, certain complications demand professional expertise. Recognizing critical red flags early prevents minor mistakes from escalating into expensive structural water damage or hazardous plumbing failures.
Cracked Tank or Bowl
A fractured or cracked porcelain fixture can never be safely repaired and must be replaced immediately. If you notice structural hairline fractures during unpacking or unbolting, stop installation and return the unit.
- Structural Integrity: Water pressure and weight will quickly rupture a compromised porcelain wall, leading to sudden indoor flooding.
- Warranty Protection: Attempting to patch a cracked bowl invalidates manufacturer warranties and leaves your home vulnerable to leaks.
Non-Standard Flange Height or Position
If your floor flange sits significantly below finished tile grade or high above the subfloor, a standard wax ring will fail to seal correctly. Fixing misaligned infrastructure requires specialized plumbing extensions.
- Flange Spacing: Flanges positioned too low require custom PVC spacers or double-thick wax rings to bridge the gap safely.
- Drain Misalignment: Off-center rough-ins that force the toilet to sit crookedly against the baseboard require professional pipe modification.
Persistent Sewer Gas Smell After Installation
A lingering sulfur or sewage odor after completing your swap indicates that noxious gases are escaping around the base. This is a primary health hazard that requires immediate remediation.
- Failed Seal: The wax ring likely compressed unevenly or shifted during placement, leaving a gap in the gas-tight barrier.
- Dry P-Trap: If the fixture has sat unused for days, the internal P-trap may have dried out, allowing sewer vapors to vent freely into the bathroom.
Old or Corroded Main Shut Off Valve
Older multi-turn gate valves often seize up or crack when manipulated after years of disuse. If the valve fails to close completely, you cannot shut off water to complete the swap.
- Valve Failure: Forcing a corroded valve can snap the internal stem, causing an uncontrolled water leak inside your wall cavity.
- Professional Upgrade: A plumber can safely shut off your home’s main water line and sweat or press a modern quarter-turn ball valve into place.
Frequently Asked Questions FAQ
Find quick, authoritative answers to the most common questions homeowners ask before, during, and after replacing a toilet.
Can I replace a toilet without a plumber?
Yes, most homeowners can successfully replace a standard toilet without a plumber. The job requires basic hand tools, a couple of hours of time, and careful attention to instructions—especially when lifting the heavy porcelain bowl and setting the wax ring.
Should a 20-year-old toilet be replaced?
Yes, replacing a 20-year-old toilet is highly recommended for improved water efficiency and reliability. Older models often consume 3.5 to 5 gallons per flush, whereas modern high-efficiency toilets use only 1.28 gallons or less, significantly lowering your monthly water bill.
How frequently should the wax ring in a toilet be replaced?
A wax ring only needs to be replaced when the toilet is unbolted for flooring repairs, bathroom renovations, or to fix a leak. If installed correctly with a solid subfloor, a wax ring can easily last for decades without failing.
How long after replacing a wax ring should I wait before turning water back on?
You can turn the water supply back on immediately after the toilet is fully bolted down and secured. Wax does not need drying or curing time like caulk; its seal is established the moment the toilet bowl compresses it against the floor flange.
Is it cheaper to replace the toilet myself or hire a plumber?
Replacing the toilet yourself is significantly cheaper, saving you anywhere from 150 to 350 dollars in professional labor fees. A DIY swap only requires purchasing the physical toilet kit, supply line, wax ring, and basic hardware.
Do I need to hire a plumber to replace components inside the toilet (flush valve, fill valve)?
No, replacing internal tank components like the flush valve, fill valve, or flapper is a simple, beginner-friendly DIY task. These repair kits cost under 25 dollars at any hardware store and take less than 30 minutes to install with basic household tools.

Oscar Vance | Master Plumber & Drainage Expert
Meet Oscar Vance, a licensed master plumber sharing practical solutions on residential repairs, preventive maintenance, and thoughtful home upkeep.


Pingback: What Is a Fair Price for Replacing a Toilet? 2026 Cost