Best Pipes for a Water Pressure Booster
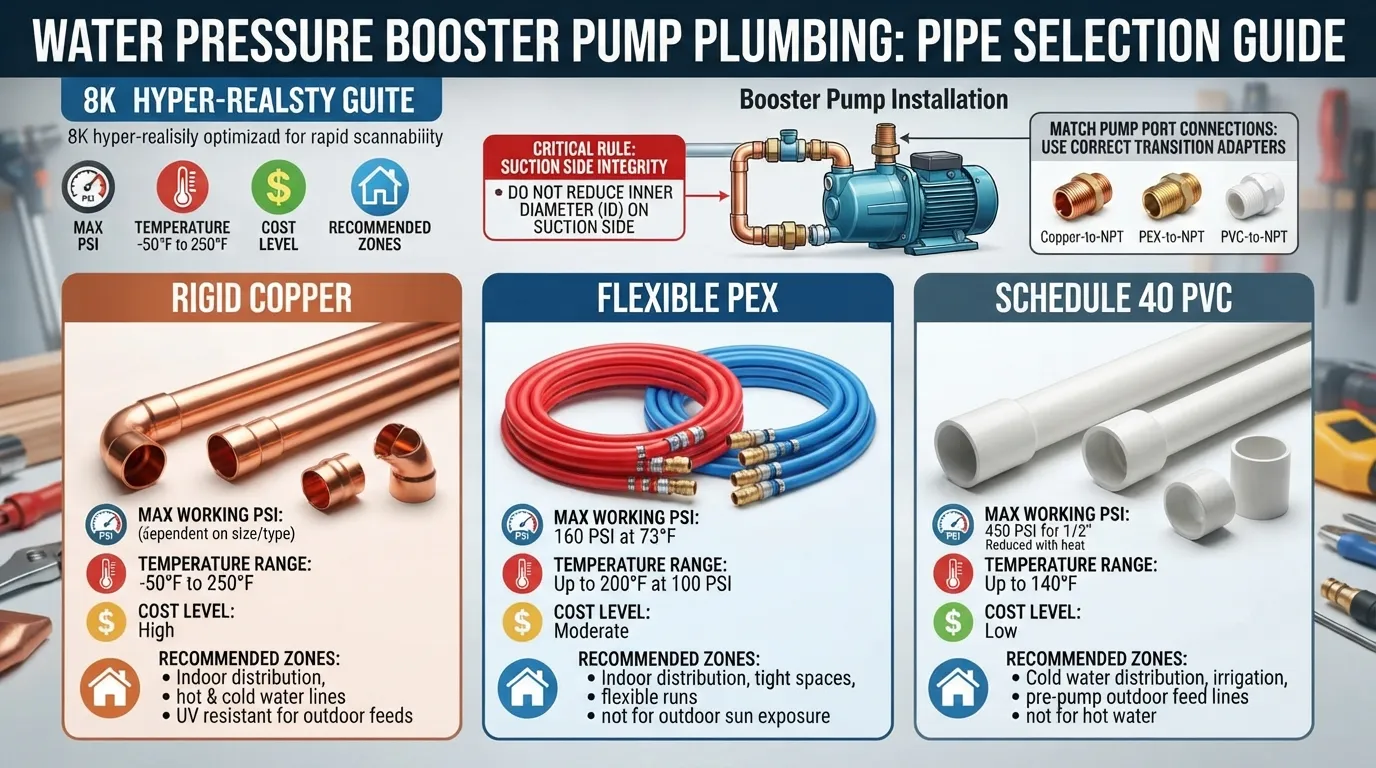
Selecting the right pipe material for a water pressure booster pump depends on durability, flexibility, and code requirements. For most residential applications, copper pipe, PEX pipe, and Schedule 40 PVC are the industry standards.
- Copper Pipe: The gold standard for durability, high-pressure tolerance, and resistance to UV degradation, making it ideal for exposed indoor or outdoor installations.
- PEX Pipe (Cross-linked Polyethylene): Highly flexible, cost-effective, and resistant to freezing, which significantly reduces the number of fittings and installation time.
- Schedule 40 PVC: Generally restricted to cold-water supply lines and outdoor suction or discharge runs before entering the main pressurized indoor plumbing grid.
When plumbing a water pressure booster pump, always match the pipe diameter to the pump’s inlet and outlet ports—typically 3/4 inch or 1 inch—to prevent flow restriction and cavitation.
Best Pipe Materials for a Water Pressure Booster System
Choosing the correct pipe material requires evaluating maximum operating pressures, temperature thresholds, installation flexibility, and overall durability. Each material handles the dynamic stress of a booster pump differently.
Copper Pipe Pros Cons & Best Use Case
Copper has been the traditional backbone of residential plumbing due to its structural strength and longevity. It handles high pressure smoothly without expanding or degrading under continuous pump vibration.
- Pros: Exceptionally high pressure and temperature resistance, complete UV stability for outdoor setups, and natural antimicrobial properties.
- Cons: High material and labor costs, rigid structure requiring soldered or pro-press fittings, and susceptibility to corrosion in acidic water.
- Best Use Case: Exposed mainline connections directly adjacent to the water pressure booster pump where rigidity and UV resistance are required.
PEX Pipe PEX-A vs PEX-B Pros Cons & Best Use Case
PEX offers modern versatility and ease of routing around tight corners. PEX-A provides maximum expansion capability and freeze resistance, while PEX-B offers higher rigidity and chlorine resistance.
- Pros: Highly flexible design minimizes joints, exceptional freeze-crack resistance, and lower overall installation cost compared to copper.
- Cons: Vulnerable to UV degradation if exposed to sunlight, requires specialized expansion or crimp fittings, and can restrict flow slightly if using insert fittings.
- Best Use Case: Long runs behind walls or through tight crawlspaces connecting the booster pump output to home distribution manifolds.
Schedule 40 PVC Pros Cons & Best Use Case Pressure-rated vs DWV clarification
Schedule 40 PVC is a rigid plastic often used in water supply lines, but it must be strictly pressure-rated. Never use thin-walled DWV (Drain, Waste, Vent) PVC for pressurized booster pump applications.
- Pros: Excellent chemical resistance, lightweight, easy solvent-weld installation, and budget-friendly for large runs.
- Cons: Low temperature threshold, brittle failure mode under water hammer shock, and prohibited by most building codes for indoor pressurized plumbing.
- Best Use Case: Cold-water outdoor suction lines or pre-pump supply feeds before water enters the indoor booster pump system.
Comparison Table Material Max PSI Temp Range Cost Foot Lifespan Flexibility
*Note: PVC pressure ratings vary drastically based on nominal pipe size; smaller diameters support higher PSI limits.
Pipe Pressure Ratings Explained How Much PSI Can Your Pipe Handle?
Understanding pipe pressure ratings is critical when installing a water pressure booster system because dynamic pumps generate sudden pressure spikes and continuous working strain. Selecting a material with inadequate PSI ratings can lead to catastrophic line failure and major property damage.
PSI Rating Table for Copper, PEX, Schedule 40 PVC & HDPE
Why Pressure Rating Matters More Than Pipe Size
Many DIY plumbers focus solely on matching the physical inner diameter of a pipe to the booster pump connection without checking the pipe schedule or pressure class. A booster pump can compound incoming municipal water pressure with heavy pump discharge pressure, easily exceeding standard working limits.
- Maximum Allowable Operating Pressure (MAOP): Always factor in thermal expansion and the potential for closed-valve deadhead pressure spikes from the pump.
- Safety Margins: Industry standards dictate that working pressure should utilize only a fraction of the total burst rating to account for water hammer shock.
What Happens If You Use the Wrong Pressure-Rated Pipe
Installing low-grade or incorrect piping like DWV PVC or mismatched thin-walled tubing on a booster system invites severe structural hazards. When pressure ratings are breached, the physical consequences can be disastrous.
- Explosive Pipe Rupture: Sudden pressure spikes or water hammer can shatter brittle pipes, releasing high-velocity streams that flood buildings within minutes.
- Joint Separation: Improperly solvent-welded or under-clamped pipes can slowly slip out of fittings under sustained cyclic pump vibration.
- Code Violations and Insurance Denials: Using unapproved materials for pressurized indoor plumbing lines often voids homeowner insurance coverage if a flood occurs.
Correct Pipe Sizing for Your Booster Pump
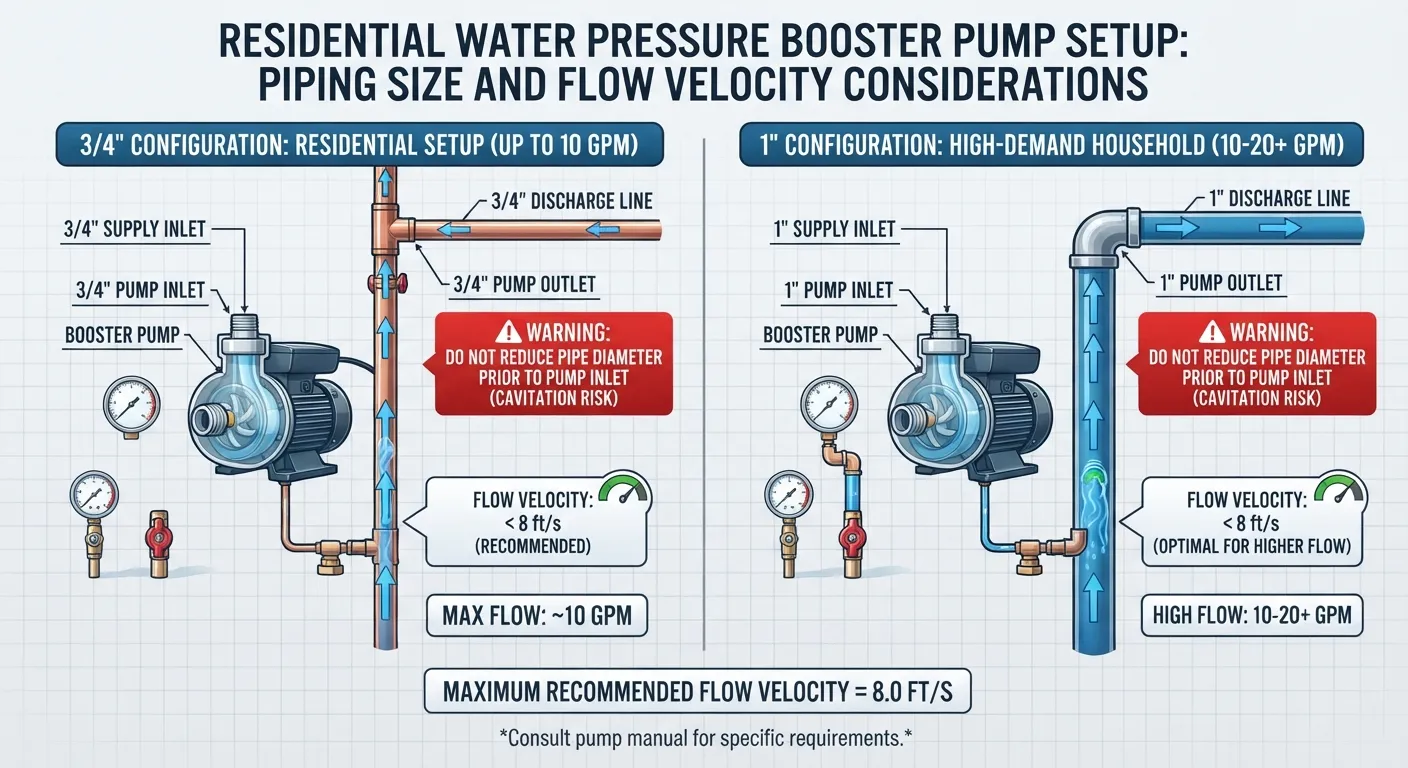
Proper pipe sizing ensures your water pressure booster system delivers optimal flow without causing excessive friction loss or pump starvation. Sizing must be calculated based on both pump specifications and household flow demands.
How to Match Pipe Diameter to Pump Inlet Outlet Size
Always match your plumbing lines directly to the booster pump’s connection ports, which are typically sized at 3/4 inch or 1 inch. Never step down the pipe diameter on the suction side, as this creates immediate flow restriction.
- Inlet Port Matching: Keep the supply feed equal to or larger than the pump intake to maintain steady water volume.
- Outlet Port Matching: Maintain the discharge port size for at least the first few feet before expanding to main house distribution lines.
Simple GPM-Based Sizing Method Practical Formula
To determine if a 3/4-inch or 1-inch pipe is required, calculate your maximum Gallons Per Minute (GPM) demand. Standard residential supply needs dictate that water velocity inside the pipe should not exceed 8 feet per second to prevent noise and pressure drop.
- Up to 10 GPM: A 3/4-inch pipe provides adequate flow capacity without excessive friction loss over standard distances.
- 10 to 20+ GPM: Upgrade to a 1-inch pipe or larger to handle high-demand multi-bathroom households efficiently without suffering pressure drop.
Will 3/4-Inch PEX Increase Water Pressure?
Switching to 3/4-inch PEX pipe alone will not increase your water pressure; only a mechanical booster pump adds pressure to the system. Pipe sizing merely determines how much water volume and flow rate can travel through the line.
- PEX Inner Diameter Reality: PEX tubing uses insert or expansion fittings that slightly reduce the inner diameter, making proper sizing even more critical.
- Flow vs. Pressure: A smaller pipe increases water velocity while sacrificing volume, whereas a properly sized pipe maintains balanced hydraulic performance across the whole system.
Why You Should Never Narrow the Pipe Before the Pump
Restricting the supply pipe diameter right before the pump inlet starves the impeller of water and causes severe operational failure. This oversight creates hydraulic consequences that can quickly destroy your equipment.
- Pump Cavitation: Low feed pressure and restricted flow cause vapor bubbles to form and violently collapse inside the pump housing, chewing up the impeller.
- Motor Burnout: Starved pumps run hotter and work harder against resistance, leading to premature motor failure and costly replacements.
Do You Have Galvanized Pipes? Here’s What You Need to Know
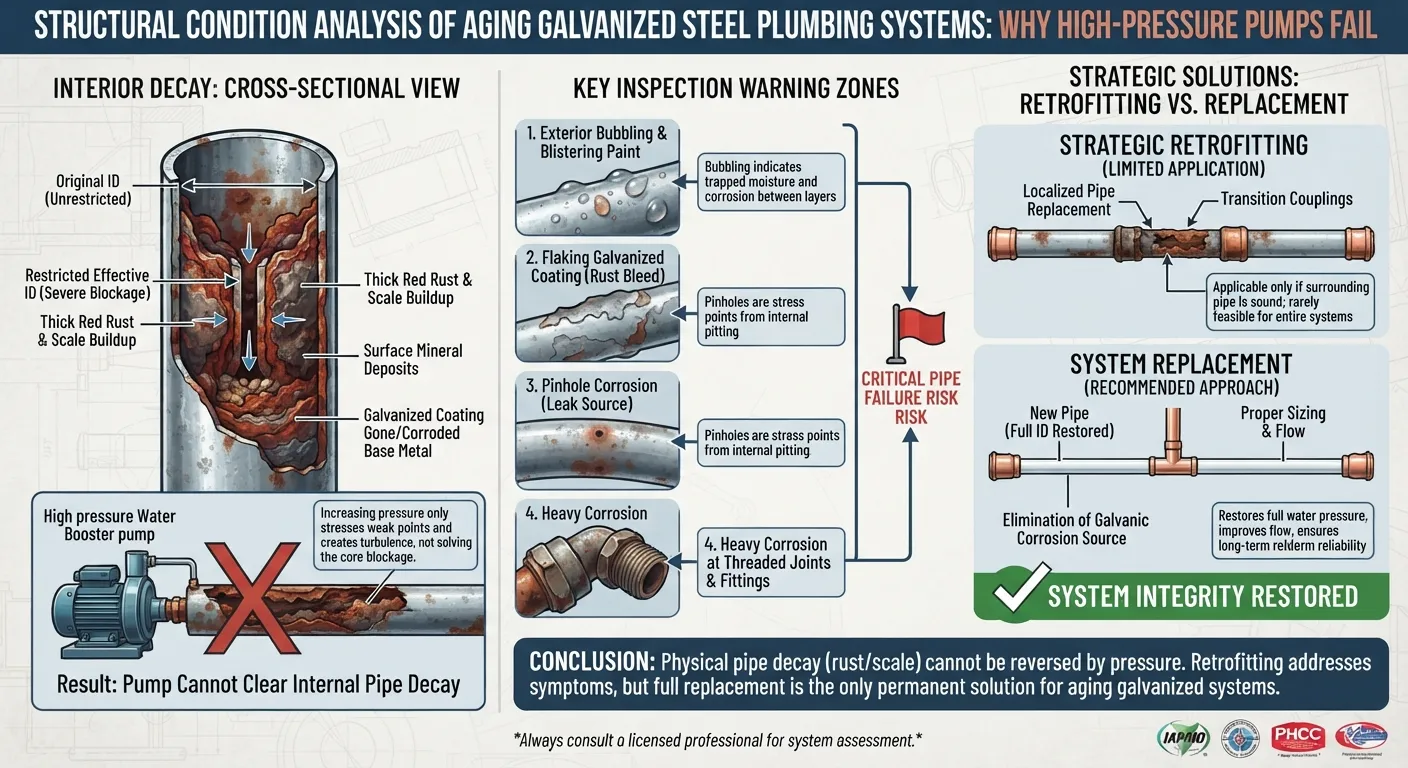
Many older homes feature aging galvanized steel plumbing that accumulates severe internal rust and mineral blockage over decades of use. Installing a water pressure booster pump into a system with heavily corroded pipes requires careful evaluation and strategic retrofitting.
Can a Booster Pump Improve Flow Through Old Galvanized Pipes?
A booster pump can temporarily force more water through narrow galvanized pipes, but it cannot reverse internal mineral buildup or structural pipe decay. While the pump will increase PSI, restricted inner diameters will still bottleneck overall household flow capacity.
- High-Pressure Stress: Boosting pressure into brittle, corroded lines dramatically increases the risk of sudden pinhole leaks or joint blowouts.
- Sustained Bottlenecks: Even with high pump output, heavily clogged galvanized lines will prevent fixtures from receiving a strong, steady volume of water.
Signs Your Galvanized Pipes Need Replacing Before Installing a Booster
Before mounting an expensive water pressure booster pump, check your existing infrastructure for critical indicators of pipe failure. Ignoring these warning signs can lead to catastrophic leaks once higher pressure is introduced.
- Drastic Flow Drop When Multiple Taps Open: If turning on a second shower causes water pressure to plummet, your lines are severely restricted by internal buildup.
- Discolored or Rusty Water: Brown or reddish water upon opening long-unused taps signals active interior corrosion and flaking pipe walls.
- Visible Exterior Rust: Flaking, bubbling, or damp spots on exposed basement galvanized pipes mean the steel has structurally compromised integrity.
Best Transition Approach for Galvanized-to-Modern Pipe Systems
When connecting a modern booster pump to an older home, you will likely need to transition from threaded steel to modern materials like copper or PEX. Using incorrect connection techniques between dissimilar metals causes accelerated galvanic corrosion.
- Dielectric Unions: Always use dielectric unions or brass fittings to physically separate copper and galvanized steel, preventing electrochemical decay at the joint.
- Strategic Section Replacement: Replace the most severely restricted runs nearest the main water supply and booster pump location first to maximize immediate flow efficiency.
Hot Water Line vs Cold Water Line Does the Pipe Material Change?
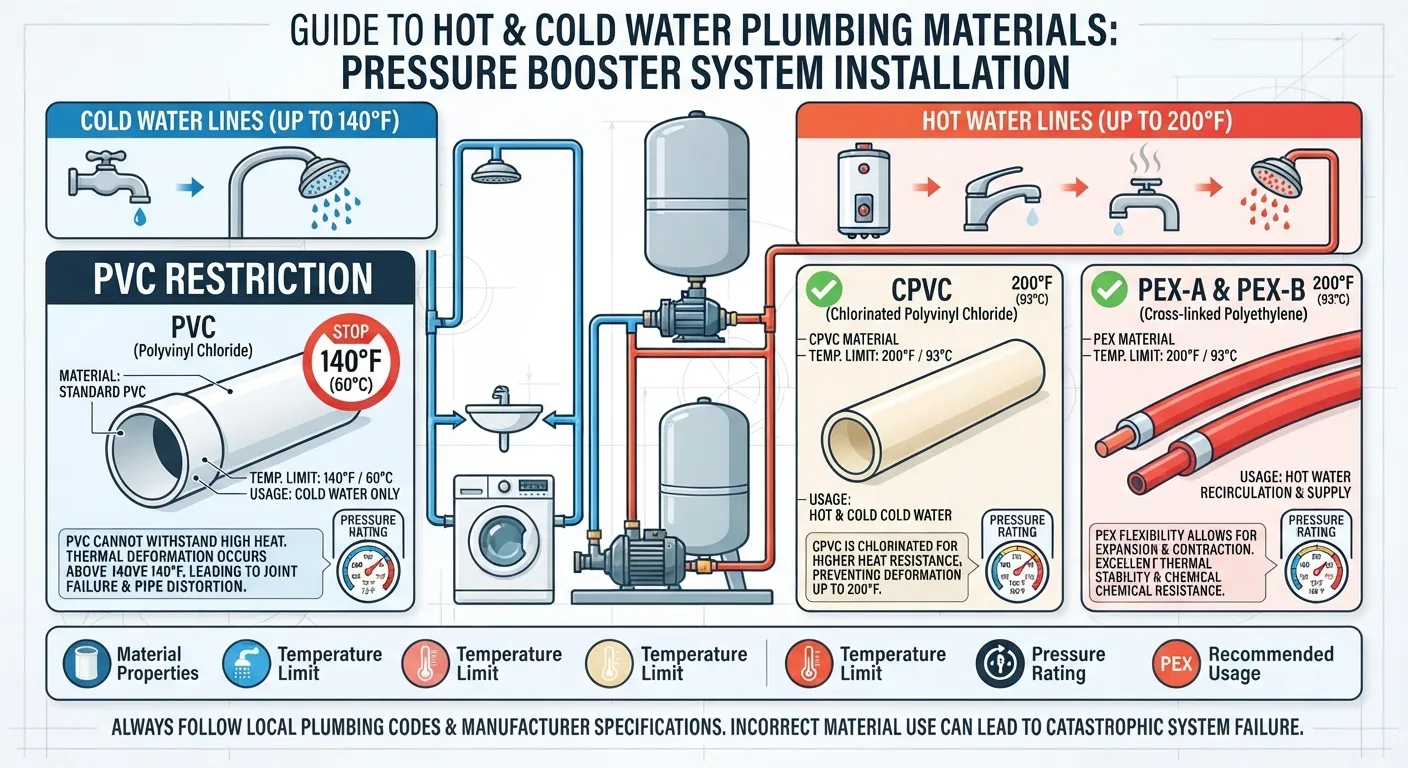
Most booster pumps are installed on the main cold water supply line before the water heater, but certain setups require boosting hot water loops or circulating lines. Temperature thresholds dictate that you must choose pipe materials capable of handling continuous thermal stress.
Why CPVC Is Required for Hot Water Booster Lines
Chlorinated Polyvinyl Chloride (CPVC) is engineered to handle high temperatures and pressures that would distort standard plastics. If your plumbing system requires rigid plastic pipe on a hot water booster application, CPVC is the correct choice.
- High Heat Tolerance: CPVC safely withstands fluid temperatures up to 200°F, making it fully compatible with domestic hot water heater outputs.
- Rigid Stability: It maintains structural rigidity under continuous thermal expansion without sagging or weakening over long horizontal runs.
Can PEX Handle Both Hot and Cold Sides?
PEX-A and PEX-B tubing are rated for both hot and cold water distribution lines, offering excellent versatility for whole-home booster integrations. Their inherent flexibility handles thermal expansion smoothly without fatiguing the joints.
- Standard Temperature Rating: Most residential PEX is rated for 160 PSI at 73°F and 100 PSI at 180°F, easily covering standard household water heater settings.
- Color-Coding Convenience: PEX is manufactured in red and blue variations, helping installers easily designate hot and downstream pressure lines during a complex pump retrofit.
Common Mistake Using Regular PVC on Hot Water Lines
One of the most dangerous plumbing errors is installing standard white PVC pipe on a hot water supply line. Standard PVC has a maximum service temperature of only 140°F.
- Thermal Deformation: Hot water exceeding 140°F causes standard PVC to soften, warp, and dramatically lose its pressure rating.
- Catastrophic Joint Failure: Solvent-welded PVC joints subjected to continuous heat cycles will loosen, leading to sudden pipe separation and major water damage.
Connecting Different Pipe Materials Transition Fittings Guide
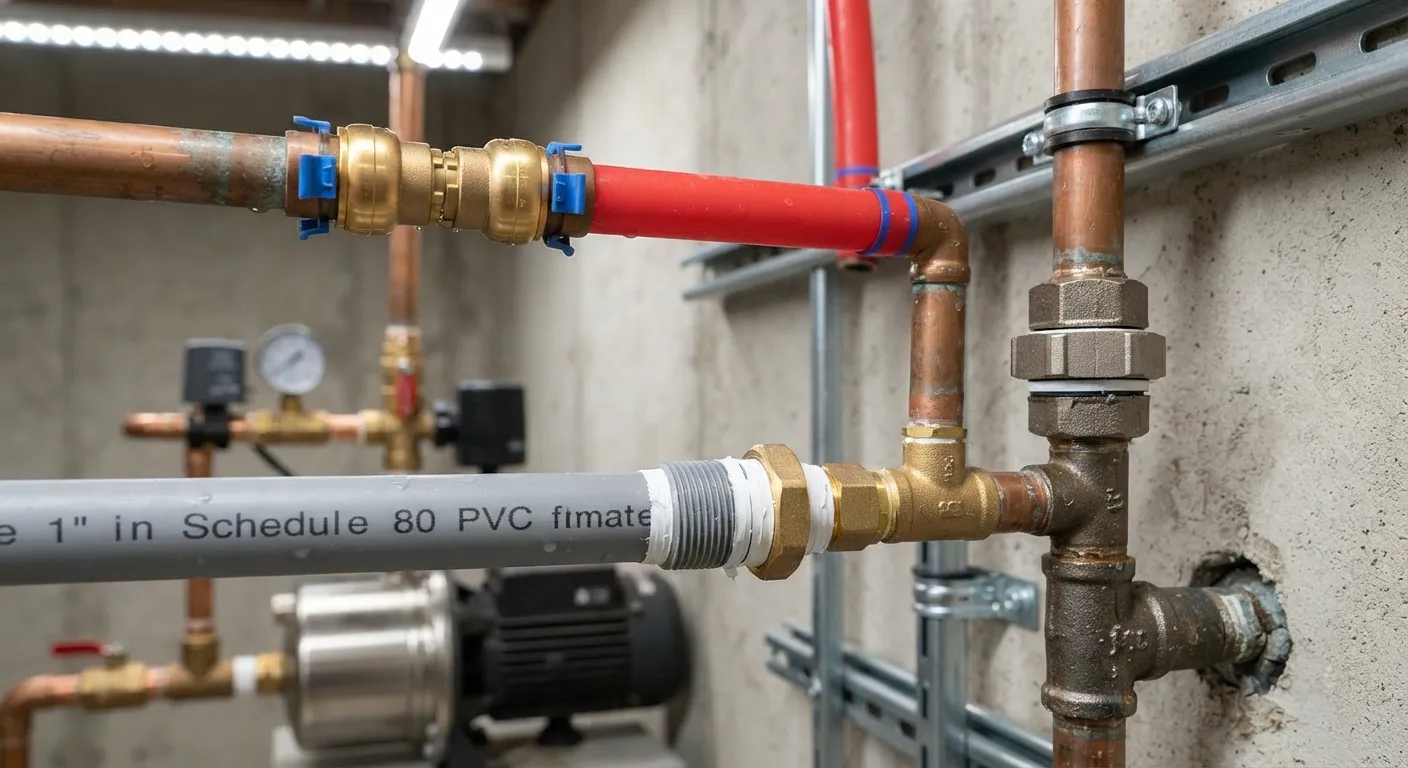
Plumbing a water pressure booster pump often requires joining dissimilar pipe materials, such as copper to PEX or plastic to metal. Using the correct transition fittings ensures a leak-free seal and prevents long-term material degradation at the joints.
Copper-to-PEX Transition Fittings
Connecting rigid copper lines to flexible PEX tubing requires specialized fittings that bridge the dimensional and structural differences between the two materials. Selecting the right connector ensures secure performance under pump pressure.
- Push-to-Connect Fittings: Brand-name push fittings (like SharkBite) offer tool-free transitions from copper to PEX, utilizing a stainless steel grab ring and O-ring seal.
- Crimp and Expansion Adapters: Brass or poly adapters use copper crimp rings or expansion rings to form a permanent, high-strength connection between PEX and threaded copper adapters.
PVC-to-Metal Adapter Fittings
When transitioning from PVC or CPVC supply lines to metal booster pump ports or copper pipes, you cannot solvent-weld plastic directly to metal. A threaded transition is required.
- Male/Female Threaded Adapters: Use a threaded plastic adapter paired with a metal counterpart, sealed with PTFE thread tape and pipe thread sealant.
- Transition Unions: Special union fittings featuring a built-in O-ring and gasket prevent overtightening stress that can crack rigid plastic threads against metal connectors.
Why Mixing Copper and Galvanized Steel Causes Galvanic Corrosion Safety Warning
Directly joining copper pipes to old galvanized steel creates an electrochemical reaction known as galvanic corrosion. When dissimilar metals touch in the presence of water, electrons flow from one metal to the other, causing rapid deterioration.
- Electrochemical Destruction: The sacrificial metal (typically the galvanized steel) rapidly corrodes, leading to restricted flow, pinhole leaks, and thread failure.
- Dielectric Protection: Always install a dielectric union or a heavy-duty brass fitting between copper and galvanized steel to physically break the electrical circuit and prevent premature joint failure.
Vibration Isolation & Flexible Connectors
Water pressure booster pumps generate continuous mechanical vibration and harmonic resonance while operating. Without proper isolation, these vibrations travel through rigid household piping, creating disruptive humming noises and fatiguing pipe joints.
Why Booster Pumps Need Vibration Isolation
The high-speed motor and impeller inside a booster pump create constant rhythmic pulses. Rigidly mounting hard copper or PVC pipes directly to the pump housing transfers these shockwaves straight into your home’s framing.
- Harmonic Wall Resonance: Vibrations travel along rigid lines, often amplifying against drywall and structural studs to create a loud humming sound throughout the house.
- Joint Fatigue: Constant micro-shaking weakens soldered, glued, or crimped pipe connections over time, eventually causing slow, recurring leaks.
Using Braided Stainless Steel Flex Hoses Correctly
Installing flexible connectors between the rigid house plumbing and the booster pump inlets and outlets dampens kinetic energy. Braided stainless steel supply lines absorb the movement before it reaches your main plumbing grid.
- Full-Port Flexibility: Choose corrugated stainless steel or reinforced rubber connectors that match your pump’s inner diameter to prevent flow restriction.
- Stress Relief: Flex hoses allow for slight thermal expansion and minor shifting without placing mechanical strain on the pump ports or pipe fittings.
Two-Wrench Method to Prevent Pipe Twisting (Practical Tip)
When tightening threaded connections between flex hoses and your booster pump, using only a single wrench can twist, warp, or crack internal seals. Always apply counter-torque to protect your equipment.
- Counter-Torque Technique: Hold the pump housing or adapter fitting steady with one wrench while turning the union nut with a second wrench.
- Leak Prevention: This method ensures tight seals without misaligning the washers or putting unnecessary rotational torque on rigid upstream pipes.
Essential Valves You Must Install Isolation & Check Valves
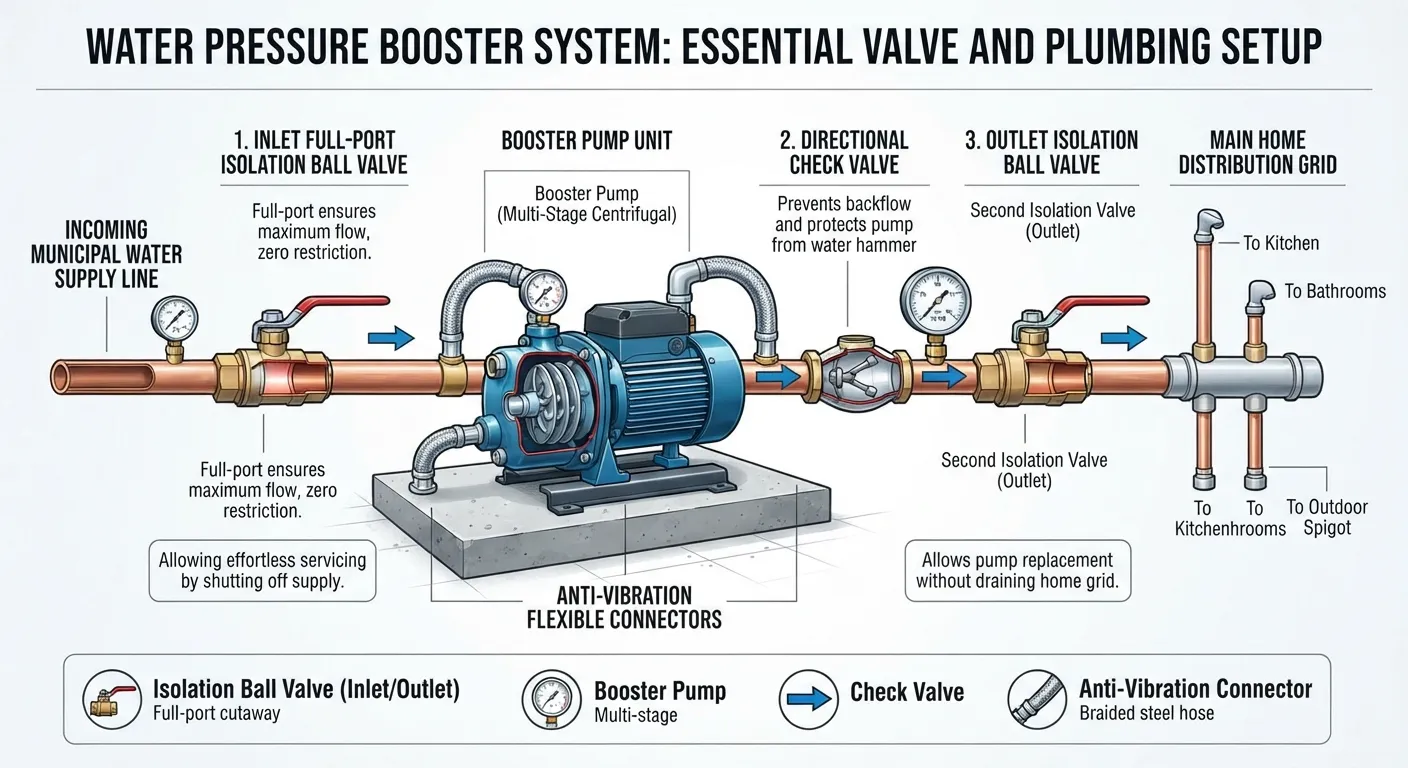
Proper valve configuration is critical for maintaining a water pressure booster system safely and efficiently. Installing the right combination of isolation and check valves prevents water contamination, protects equipment, and allows for hassle-free servicing.
Why Isolation Ball Valves Are Needed on Both Sides
Placing full-port ball valves on both the inlet (suction) and outlet (discharge) sides of your booster pump isolates the unit from the rest of the plumbing system. Without these shut-off valves, you cannot service or replace the pump without draining your entire home water supply.
- Maintenance Access: Closing both isolation valves traps water within the pump loop, allowing you to remove or repair the unit cleanly.
- Flow Control: Full-port ball valves ensure zero flow restriction when open, maintaining the full volume demanded by the pump impeller.
Check Valve Placement to Prevent Backflow
A check valve ensures water flows in only one direction, preventing high-pressure discharge water from feeding backward into the municipal supply line or damaging the pump during a shutdown. Proper positioning is outlined in industry guidelines, such as recommendations detailed by expert plumbing service protocols.
- Discharge Protection: Always install a check valve on the outlet side of the booster pump to hold system pressure and prevent backspin when the motor stops.
- Suction Safety: Certain non-self-priming centrifugal booster pumps also require a foot valve or check valve on the inlet line to maintain a primed state.
Common Valve Installation Mistakes
Incorrect valve selection or improper placement compromises booster pump efficiency and violates plumbing code standards. Avoid these common setup errors during installation:
- Using Gate Valves Instead of Ball Valves: Gate valves wear out faster and create turbulence; always use full-port ball valves for unobstructed water flow.
- Installing Check Valves Backward: Reversing the arrow direction on a check valve will completely block water delivery, starving household fixtures and straining the pump motor.
Step by Step Booster Pump Installation Overview
Installing a water pressure booster pump requires precise sequencing, proper tool preparation, and strict adherence to hydraulic safety guidelines. Following a methodical installation workflow ensures steady pressure delivery and protects your plumbing infrastructure from damage.
Tools & Materials Checklist
Gathering all necessary tools and components before starting prevents unexpected mid-project delays and ensures code-compliant connections.
- Water Pressure Booster Pump: Selected based on your specific flow (GPM) and total dynamic head requirements.
- Isolation & Check Valves: Full-port ball valves for both inlet/outlet sides and a reliable check valve to prevent backflow [00:19:35].
- Pipes and Transition Fittings: Copper, PEX, or CPVC piping matched with appropriate dielectric unions or push-fit adapters.
- Tools: Pipe cutters, adjustable wrenches, Teflon tape or thread sealant, and anti-vibration mounting pads [00:21:03].
Installation Steps
Executing each stage of the setup correctly guarantees that your booster pump operates efficiently without risking leaks, cavitation, or premature motor burnout.
- Shut Off Main Water Supply: Locate the main home water shut-off valve, turn it completely off, and drain the remaining lines before cutting any pipe.
- Determine Pump Placement: Mount the booster pump on a stable, flat surface near the main water supply line, utilizing anti-vibration pads to dampen operational noise [00:21:03].
- Install Inlet and Outlet Isolation Valves: Fit full-port ball valves on both the suction and discharge sides of the pump to allow for effortless future servicing [00:19:35].
- Connect Supply and Discharge Lines: Run pipes from the main feed to the pump inlet, ensuring the pipe diameter matches or exceeds the pump port size to avoid flow starvation.
- Incorporate Flexible Connectors: Attach braided stainless steel flex hoses on both ports to absorb mechanical shockwaves and prevent joint fatigue.
- Prime and Test the System: Fill the pump housing completely with water (if required by the manufacturer), open the isolation valves, restore power, and check all joints for leaks under operational pressure [00:21:56].
Should You Install It Yourself or Hire a Plumber?
Deciding whether to install a water pressure booster pump yourself or hire a professional depends on your plumbing experience, local building codes, and the complexity of your home infrastructure [00:01:11]. Balancing time, tools, and technical skill ensures a safe, code-compliant setup.
When DIY Installation Is Safe
If you possess intermediate plumbing skills and your home already has accessible main water lines with straight runs, a confident DIYer can successfully complete a booster pump installation using push-fit or flexible connectors [00:02:32].
- Accessible Main Line: You have an exposed, easily reachable main water supply riser in the basement or utility room [00:01:25].
- Simple Pipe Materials: Your existing plumbing consists of modern copper or PEX tubing that is straightforward to cut and adapt without specialized commercial welding gear [00:02:32].
- Basic Tool Proficiency: You are comfortable shutting off main lines, draining pipes, measuring fittings, and using wrenches correctly.
When You Should Hire a Licensed Plumber Code Compliance Angle
Certain complex setups and strict municipal regulations make hiring a licensed professional the safest and most legally sound choice [00:01:11]. Professional installation ensures compliance and protects your property against costly water damage.
- Rigid Commercial-Grade Piping: Integrating systems requiring specialized press tools [00:02:39], heavy-duty threading, or complex electrical wiring is best left to licensed tradespeople.
- Local Plumbing Code Requirements: Many municipal jurisdictions legally require permits and backflow prevention device inspections for whole-home pump retrofits.
- Aging or Mixed Infrastructure: Homes with heavily corroded galvanized steel or brittle old lines require professional assessment to prevent major pipe blowouts under higher pump pressure.
Frequently Asked Questions
Where should a water pressure booster pump be installed?
A water pressure booster pump should be installed directly on the main water supply line right after the water meter or main shut-off valve, and before any branch lines split off into the house. This ensures that the entire home benefits from increased water pressure.
- Main Feed Location: Positioning the pump on the main incoming line pressurizes both hot and cold water distribution networks evenly.
- Accessibility: Ensure the installation spot is easily reachable for maintenance, resetting digital controllers, and servicing isolation valves.
Are water pressure boosters worth it?
Water pressure boosters are well worth the investment if your household suffers from weak shower streams, slow-filling appliances, or simultaneous water use drop-offs. They instantly restore comfortable flow rates and optimize modern plumbing fixtures.
- Enhanced Performance: Eliminates frustrating trickles when running multiple faucets, laundry machines, or showers at the same time.
- Appliance Efficiency: Ensures dishwashers and washing machines receive the minimum PSI required to operate correctly and complete cycles efficiently.
What is the most common cause of low water pressure?
Low water pressure is most frequently caused by municipal supply limitations, partially closed main shut-off valves, pressure-reducing valve (PRV) failures, or severe internal pipe scaling.
- Mineral Buildup: Decades of calcium deposits or rust scaling inside galvanized and copper pipes progressively choke the inner diameter.
- Faulty PRV: A failing pressure-reducing valve can get stuck in a restricted position, unnecessarily choking incoming municipal pressure.
Can bigger pipes increase water pressure?
Increasing pipe diameter alone will not increase your water pressure; it only increases water volume and flow capacity. True pressure can only be elevated by gravitational head or a mechanical booster pump.
- Flow vs. Pressure: Wider pipes reduce friction loss over long distances, delivering more water volume at a steady rate, but they do not add PSI force.
- Balanced Hydration: Proper pipe sizing prevents pressure drops caused by bottlenecks, ensuring your system performs at its maximum potential.
What type of pipes are used for high-pressure systems?
High-pressure plumbing systems rely on heavy-duty materials capable of withstanding extreme working PSI and continuous pump vibration without structural fatigue.
- Type L or K Copper: The gold standard for high-pressure durability, offering high burst thresholds and complete rigidity.
- Schedule 80 PVC or CPVC: Thicker-walled industrial plastic options engineered to handle elevated pressure ratings compared to standard residential grades.
How can I increase water pressure without a pump?
If you want to improve water flow without installing an electronic booster pump, you can inspect and adjust existing mechanical components within your plumbing system.
- Adjust the PRV: Locate your home’s pressure-reducing valve and turn the adjustment bolt clockwise to raise municipal baseline pressure (up to safe maximum limits).
- Clear Aerator Clogs: Unscrew and clean mineral buildup from faucet aerators and showerheads to immediately restore localized water spray force.
Conclusion Choosing the Right Pipe for Long-Term Performance
Selecting the correct pipe material and implementing a professional installation strategy ensures your water pressure booster system delivers reliable, long-lasting performance. Balancing material durability, pressure ratings, and proper sizing protects your home from costly failures.
Quick Recap: Which Pipe Should You Choose?
Matching your piping choice to your specific installation environment guarantees optimal hydraulic efficiency and peace of mind under continuous pump operation.
- Copper: The ideal choice for exposed indoor runs, outdoor pump connections, and maximum rigidity under high pressure.
- PEX: The best solution for long, flexible routing behind walls and tight spaces while offering superior freeze-crack resistance.
- Schedule 40 PVC or CPVC: Reliable options for specific cold-water outdoor supply feeds or high-temp hot water lines when properly selected and pressure-rated.
By investing in the right materials, incorporating essential vibration isolation, and respecting pressure ratings, you will eliminate wimpy water flow and enjoy robust, reliable pressure throughout your entire home.

Oscar Vance | Master Plumber & Drainage Expert
Meet Oscar Vance, a licensed master plumber sharing practical solutions on residential repairs, preventive maintenance, and thoughtful home upkeep.

